THOR Rev 2.0 User manual

1
handbook

2

3

4
You have made an excellent choice!
This is not just an ordinary diving lamp,
but the result of the long and intense
collaboration of the technical divers of
the Cavebase and us.
It has been developed to withstand the
rigorous demands of exploration diving
in all situations. Our diving lamp reliably
delivers the highest performance at any
time.
We feel connected to the genius of the
pioneers of the WKPP and the test tube
design of the HID. There is no better way
to faciltate the replacement of the lamp
under water.
Our concern and aim was to further
develop and improve this design. The
time of the HID lamps is over. LEDs are
sturdier, more reliable, more energy-
efcient and thus safer.
Each component was subjected to
stresses during the tests. The test
conditions were far more extreme than
the conditions of the most difcult dives.
All used materials are of the highest
quality.
Together, they are the perfect
symbiosis of passion, reliability and
performance –
the Thor Rev 2.0!
Your dealer will gladly answer all
questions regarding your new primary
light.
Congratulations!
We are pleased to present your
new Thor Rev 2.0 primary light.
LÜDENSCHEID
1.10.2015
5
Permissible battery voltage: 9V bis 22 V
Allowable current strength: no limit
Maximum diving depth: to 220m
Permissible ambient temperature: water -5 up to 35°C (95°F)
Permissible environment: water
Technical data Warning!
Please observe the following warning notes.
The symbol …
indicates immediate danger to life
in case of non-observance.
means that close attention is
required and that non-observance
may lead to the destruction of
product.

6
As a general rule:
• When diving, stay always within your
comfort zone and dive in accordance to your
experience and skills.
• Do not dive alone.
• Do always expect that the lamp, like any
other piece of equipment, may fail. Ensure
redundancy. Always have at least two back-
up lamps. Practice the replacement of the
back-up lamp.
• Do not exceed your limits without an
experienced diving instructor.
• Ensure proper diver training. Scuba diving is
nothing you can learn quickly during a few
dives.
• Practise the handling of the lamp.
• Do not direct the light beam at the eyes of
your dive buddy or other people/animals.
There is a risk of blindness or of the
temporary loss of vision, buoyancy control
and orientation!
• Do not open the electronics compartment!
The coolant in the lamp evaporates
immediately. Above that, it is skin-irritant! The
warranty will expire!
You should always take care to comply with the
permissible technical parameters. Failure to
observe this may lead to the destruction of the
product. The product is compatible with almost
any kind of battery canister equipped with an
E/O cord. Make sure that the polarity is correct.
Usually, + is grey and – is black on the battery
canister. Always make use of a voltmeter for
verication.
Rechargeable battery canisters of the brand
Halcyon have the correct polarity ex works,
as well as the battery packs of the companies
Light for Me and Light Monkey.

7
NEVER DISASSEMBLE
THE TUBE WITHOUT GOOD
REASON!
Due to the sealing between electronic
compartment and LED, the eld exchange
of the tube is not as easy as with the old
lamps which provided sufcient space for air
compression.
Disconnect every time the lighthead from the
power source when doing maintanance works
The Head and the Tube will be very hot after
usage. Be careful !
E/O cords need extensive care. Always (!)
rinse the lamp/the battery canister thoroughly
with fresh water after the use in seawater.
Additionally, use DeoxIT® Gold G Series
protective varnish, if needed.
If not rinsed and cleaned with fresh water
immediately after the dive, E/O cords corrode
already after a few dives. This leads to loose
connections and the cable must be replaced by
a new one.
Do not kink or compress the cable. Do not carry
or pull the lamp or the battery canister with the
cable. E/O cords are sensitive. A cable break is
not a defect covered by warranty, but natural
wear and tear.
The light will dim down automatically to avoid
overheating to protect the lighthead. After the
LED has cooled down it is possible to dim up
the light again
Be careful while handling the light. The light
may break if it fells down.
Make sure that the canister and the battery is
suitable for the use with the Thor lighthead. No
guarantee or waranty will be promised or given
for damages on the battery while using the
Thor lighthead.
Choose at every time the right light power
by using the Dimmer which suits wellt o the
surroundig dive conditions.

8
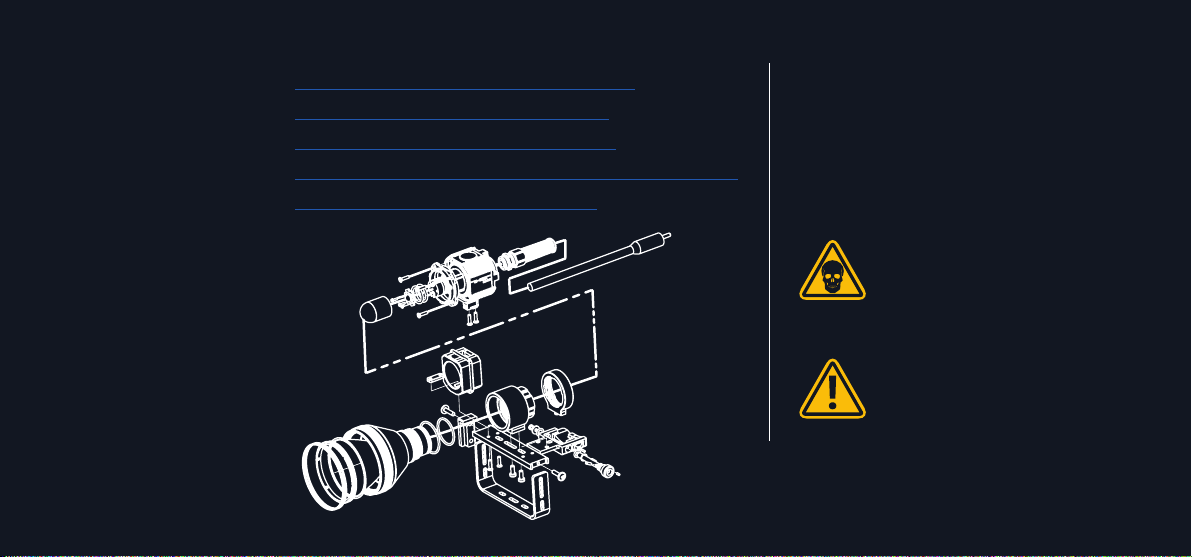
1. Lock for the attachment
of the lamp head**
2. Focus adjustment of the lamp
3. Dim button
4. Bar with option for changing the
position of the lamp head**
5. Ring for xation of the reflector
6. Reflector screen
7. Thumb loop
8. Mounting for attachment
to a SUEX scooter**
** = Optional accessory 1
2
3
4
7

9
Operation of the lamp
Switch on the lamp at the battery canister
after having connected the E/O cords. You
can only regulate the dimming level with the
lamp head. The reason therefore is to prevent
the accidental switch off of the lamp while
adjusting the dimmer. This way, the diver does
not risk being in total darkness all of a sudden.
The dimmer is regulated by pressing the
dimmer switch shortly and rmly. The lamp
has a Piezo switch. Piezo switches operate via
pressure difference. This means, long-lasting
pressure does not cause a switching operation.
The dimming levels are 100%, 75%, 50% and
25%. For individual dimming levels, please ask
your dealer.
The lamp is mounted
in assemblies.
9
Switch on the lamp at the battery canister
after having connected the E/O cords. You
can only regulate the dimming level with the
lamp head. The reason therefore is to prevent
the accidental switch off of the lamp while
adjusting the dimmer. This way, the diver does
not risk being in total darkness all of a sudden.
The dimmer is regulated by pressing the
dimmer switch shortly and rmly. The lamp
has a Piezo switch. Piezo switches operate via
pressure difference. This means, long-lasting
pressure does not cause a switching operation.
The dimming levels are 100%, 75%, 50% and
25%. For individual dimming levels, please ask
The lamp is mounted
in assemblies.
5
68
For further instructions how to use
the cookie holfer, please refer to
the instructions given in the video
on our homepage.

10
Operation of the exchange system
(optional accessory)
If the lamp is
equipped with an
exchange system,
the lamp head can be
replaced under water
as follows:
In order to unlock the lamp head, turn the
screw counter-clockwise (see arrow) up to
the stop rst.
For this purpose, the lamp has to be removed
from the wrist, because the locking pin blocks
at the back of the hand.
After this Unlock in a second action
the lamp head with a quarter turn
anticlockwise and pull it after this out
towards back. The locking works exactly
the other way round.
3
+
Table of contents


