Thulos TH-GP204 User manual

GRILL PANINI
TH-GP204
220-240V~50/60Hz 2200W
Por favor, lea cuidadosamente este manual antes de usar el dispositivo por primera
vez. Guarde el manual para futuras consultas.
For your safety and continued enjoyment of this product. Always read the instruction book carefully
before using.

ES
Estimado cliente
Agradecemos la confianza depositada en nosotros al adquirir este producto
THULOS®. Nuestro principal empeño es ofrecer artículos excelentes,
manteniendo los más estrictos controles de calidad y cumpliendo todas las
normativas vigentes de seguridad, con el objetivo de presentar un producto
perfecto y seguro para el uso doméstico.
Lea detenidamente el presente manual de instrucciones y guárdelo para
posterior consulta. En caso de entregar el aparato a terceros, entregue también
el presente manual de instrucciones.
INSTRUCCIONES IMPORTANTES DE SEGURIDAD
•LEA TODAS LAS INSTRUCCIONES
•Antes de conectar el aparato a la red, verificar que el voltaje indicado en la
placa de características coincide con el voltaje de red. Usar solo para el
hogar.
•Conectar el aparato a una base de toma de corriente provista de toma de
tierra y que soporte como mínimo 10 amperios.
•La clavija del aparato debe coincidir con la base eléctrica de la toma de
corriente. Nunca modificar la clavija. No usar adaptadores de clavija.
•Para protegerse contra el riesgo de descarga eléctrica, no sumerja el cable,
el enchufe o la unidad en agua o cualquier otro líquido.
•Desenchufe la toma de corriente cuando no esté en uso y antes de limpiarlo.
Deje enfriar antes de poner o quitar piezas y antes de limpiar el
electrodoméstico.
•Para evitar el riesgo de una descarga eléctrica, nunca intente reparar el
dispositivo usted mismo. Contacte con el Servicio Técnico Oficial para su
examen y reparación. Un reensamblaje incorrecto podría presentar un
riesgo de descarga eléctrica cuando se utiliza el panini grill.
•El uso de accesorios no recomendados por el fabricante puede provocar
incendios, descargas eléctricas o riesgo de lesiones personales.
•No lo use al aire libre o con fines comerciales.
•No permita que el cable de alimentación cuelgue del borde de la mesa o
mostrador, ni que toque superficies calientes.
•No lo coloque sobre o cerca de quemadores de gas o eléctricos calientes u
hornos calientes.
•No intente operar por medio de un temporizador externo o un sistema de
control remoto separado.

•Desenchufe la unidad cuando termine de usarla.
•Se debe tener mucho cuidado al mover el aparato.
•La temperatura de las superficies accesibles puede ser elevada cuando el
aparato está en funcionamiento. No toque las superficies calientes.
•Este aparato puede ser utilizado por personas no familiarizadas con su uso,
personas discapacitadas o niños mayores de 8 años siempre que lo hagan
bajo supervisión o hayan recibido formación sobre el uso seguro del aparato
y entiendan los peligros que comporta.
•Los niños no deben realizar operaciones de limpieza o mantenimiento del
aparato a menos que tengan la supervisión de un adulto.
•Este aparato no es un juguete. Los niños deben estar bajo vigilancia para
asegurar que no jueguen con el aparato.
•Mantener el aparato y el cable fuera del alcance de los niños menores de 8
años.
•No utilizar el aparato si ha caído, si hay señales visibles de daños, o si existe
fuga.
•No usar el aparato asociado a un programador, temporizador u otro
dispositivo que conecte el aparato automáticamente.
•Si el cable o cable flexible externo de este electrodoméstico está dañado,
deberá ser reemplazado exclusivamente por el fabricante o su servicio
técnico para evitar riesgos.
ADVERTENCIA: PARA REDUCIR EL RIESGO DE INCENDIO O DESCARGA ELÉCTRICA, SÓLO EL
PERSONAL AUTORIZADO DEBE HACER LAS REPARACIONES.
GUARDE ESTAS INSTRUCCIONES
SÓLO PARA USO DOMÉSTICO
TOMA DE TIERRA
Para reducir el riesgo de descarga eléctrica este aparato tiene un enchufe con conexión a tierra.
Si el enchufe no encaja completamente en la toma de corriente eléctrica, póngase en contacto
con un electricista cualificado. No modifique el enchufe de ninguna manera ni utilice un
adaptador.

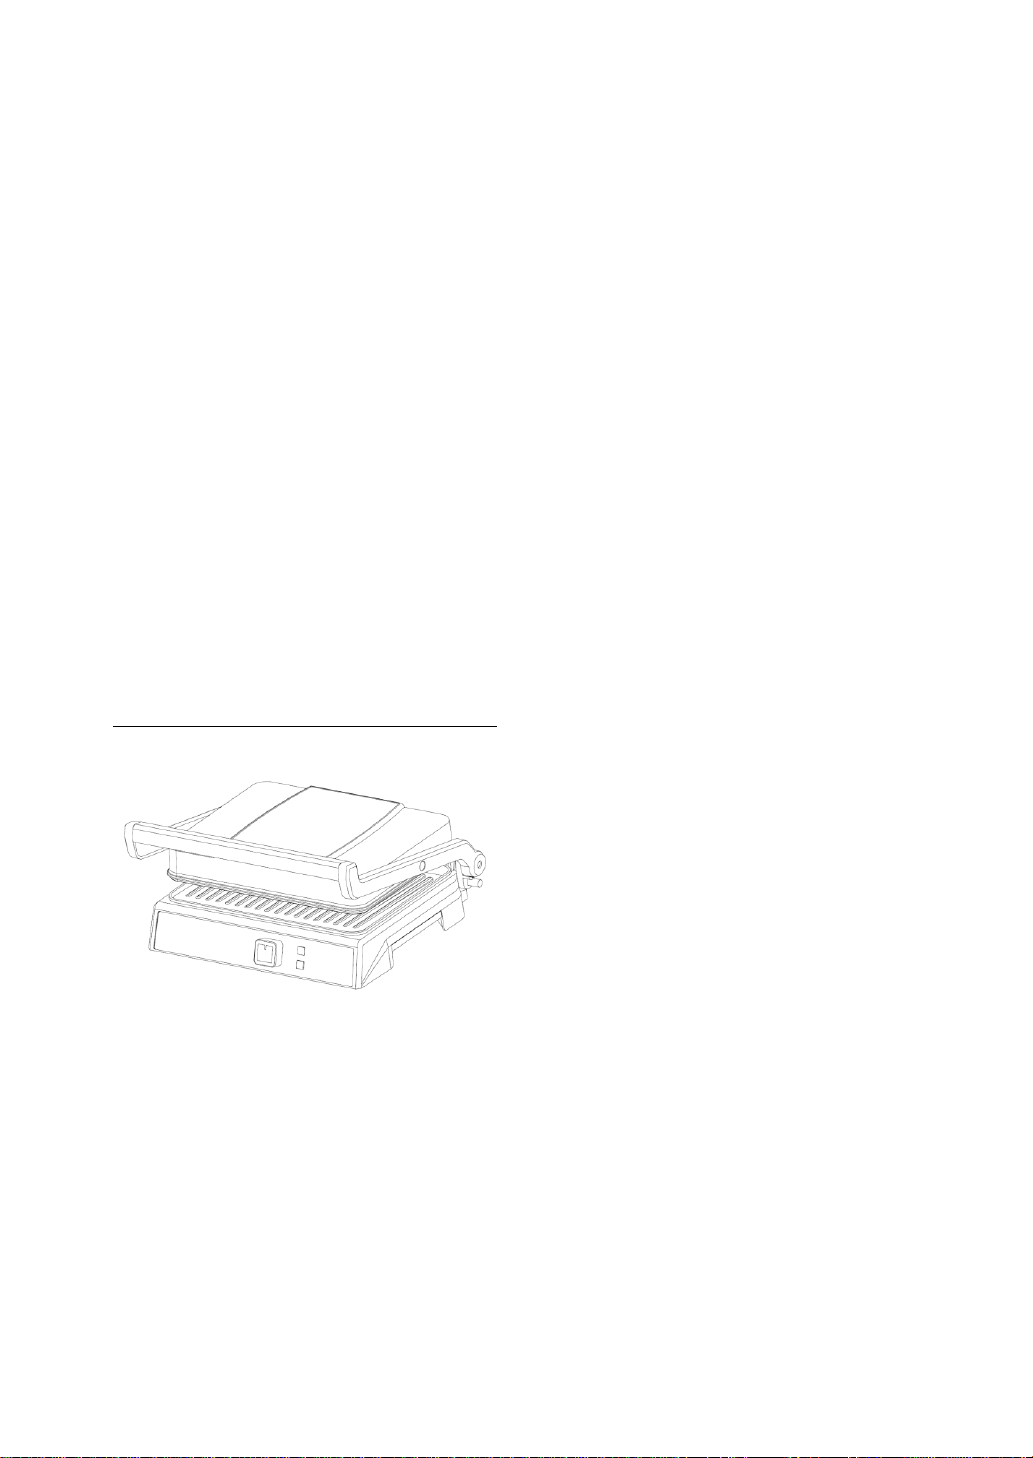
IDENTIFICACIÓN DE LAS PARTES
BEFORE FIRST USE
1. Asa
2. Placas decorativas
3. Cubierta superior
4. Placa del grill antiadherente
5. Luz de potencia
6. Luz “listo”
7. Termostato
8. Bandeja recoge grasa
9. Carcasa inferior
ANTES DEL PRIMER USO
•Lea todas las instrucciones cuidadosamente y guárdelas para referencia
futura.
•Retire todo el embalaje.
•Limpie las placas de cocción con una esponja o paño humedecido con agua
tibia.
•NO SUMERJA LA UNIDAD Y NO HAGA CORRER AGUA DIRECTAMENTE EN LAS
SUPERFICIES DE COCCIÓN.
•Seque con un paño o toalla de papel.
•Para obtener mejores resultados, cubra ligeramente las placas de cocción
con un poco de aceite de cocina o aerosol de cocina.
Aviso: cuando su grill panini se calienta por primera vez, puede emitir un ligero
humo u olor, esto es normal en muchos electrodomésticos cuando cogen
temperatura. Esto no afecta la seguridad de su electrodoméstico.
MODO DE USO
Preparando el Grill
•Asegúrese de que las placas de cocción estén correctamente instaladas.
•Cierre el Grill y enchúfelo a una toma de corriente. Se encenderá una luz
roja, indicando que el Grill ha comenzado a precalentar.
•Ajuste el control de la temperatura de la parrilla a la configuración deseada.
Al principio, pruebe un ajuste en el máximo.
•Se precalentará aproximadamente durante 3-5 minutos hasta alcanzar la
temperatura de cocción, en el momento que el Grill esté listo, se encenderá
una luz verde.
COCINANDO
Para usar como una parrilla de contacto
•Ajuste el control de la temperatura
de la parrilla a la configuración
deseada. Al principio, pruebe un
ajuste en el máximo.
•Más tarde puede ajustarlo más
bajo o más alto según su
preferencia.
•Prepare las hamburguesas, los trozos de carne sin hueso y los cortes finos
de carne u otros alimentos según las instrucciones y colóquelos en la placa
de cocción inferior.
•Cierre la placa de cocción superior, posee una bisagra flotante diseñada
para presionar uniformemente los alimentos. La placa superior debe estar
completamente bajada para lograr las marcas de la parrilla en los alimentos
seleccionados.
•Cuando los alimentos estén cocinados, utilice el asa para abrir la tapa.
Retire los alimentos con la ayuda de una espátula de plástico. No utilice
nunca pinzas de metal o un cuchillo, ya que pueden dañar la capa
antiadherente de las placas de cocción.
•Utilice el Grill como una parrilla de contacto para cocinar: Hamburguesas,

trozos de carne deshuesada, cortes finos de carne y verduras.
•Utilice el Grill como una parrilla de contacto, cuando quiera cocinar algo en
poco tiempo o cuando busque un método saludable de asar. Cuando se
cocina con este sistema, los alimentos se cocinan rápidamente porque se
asan ambos lados de la comida al mismo tiempo.
Para usar como parrilla de prensa
•Ajuste el control de la temperatura de la tostadora de la parrilla a la
configuración deseada. Al principio, intente un ajuste en el "4~6".
•Más adelante podrá ajustarlo más bajo o más alto según su preferencia.
•Prepare los sándwiches como se indica y colóquelos en la placa de cocción
inferior. Coloque siempre los sándwiches hacia la parte posterior de la placa
de cocción inferior.
•Cierre la placa de cocción superior que tiene una bisagra flotante diseñada
para presionar uniformemente el sándwich. La placa superior debe estar
completamente bajada para cocinar los sándwiches.
•Cocine de 3 a 6 minutos o hasta que estén dorados, ajustando el tiempo
para que se adapte a su gusto individual.
•Cuando el sándwich esté cocido, use el asa para abrir la tapa. Retire el
sándwich con la ayuda de una espátula de plástico. Nunca utilice pinzas de
metal o un cuchillo, ya que pueden dañar la capa antiadherente de las
placas de cocción.
•Utilice la tostadora como parrilla de prensa para asar sándwiches, panes y
quesadillas.
•La Tostadora de Parrilla fue diseñada con un mango y una bisagra únicos
que permiten que la cubierta se ajuste al grosor de la comida. Puede asar
fácilmente cualquier cosa, desde una patata en rodajas finas hasta un
grueso filete de solomillo con resultados uniformes.
•Cuando se cocina más de un alimento en la parrilla de contacto, es
importante que el grosor de los alimentos sea consistente para que la tapa
se cierre de manera uniforme en los alimentos.
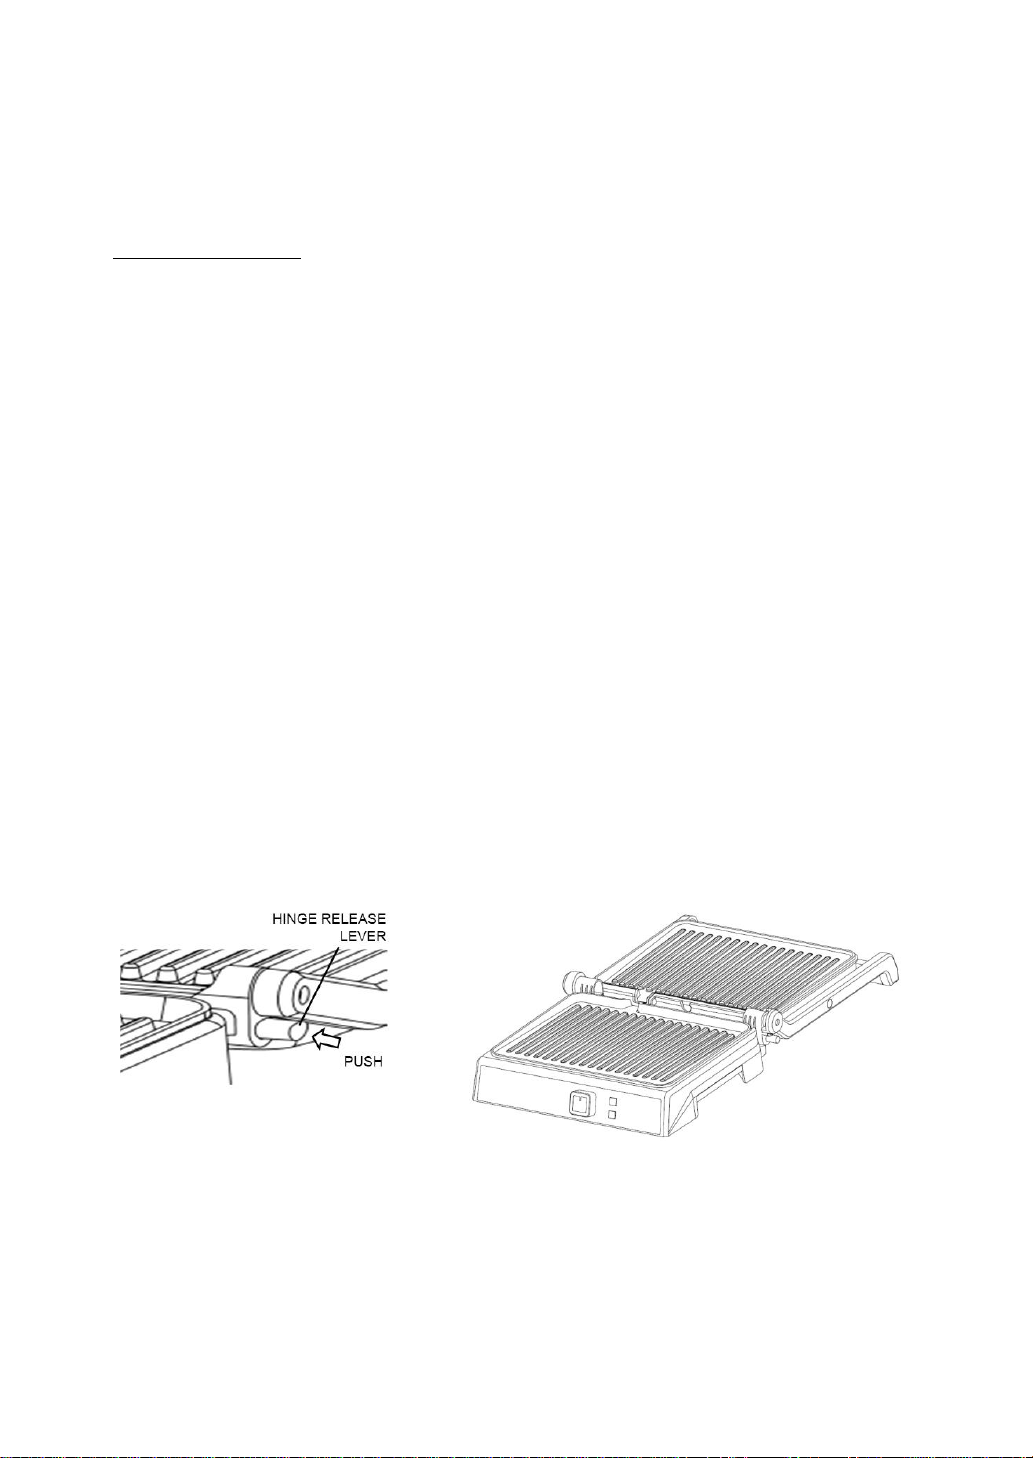
Para usar como parrilla abierta
•Coloque el grill en una superficie plana y limpia. El Grill puede colocarse en
posición plana.
•La placa superior/tapa está nivelada con la placa inferior/base. Las placas
superior e inferior se alinean para crear una gran superficie de cocción. Para
colocar el Grill en esta posición, coloque la palanca de liberación de la
bisagra en el brazo derecho.

•Con la mano izquierda en el mango, use la mano derecha para deslizar la
palanca hacia usted. Empuje la manija hacia atrás hasta que la cubierta
descanse plana sobre la mesa. La unidad permanecerá en esta posición
hasta que levante la manija y la cubierta para volver a la posición cerrada.
•Utilice el Grill como una parrilla abierta para cocinar: Hamburguesas, bistec,
aves (no recomendamos cocinar pollo con hueso, ya que no se cocina de
manera uniforme en una parrilla abierta), pescado y verduras.
•Cocinar en la parrilla abierta es el método más versátil de usar el Grill. En la
posición abierta, tiene el doble de superficie para la parrilla.
•Tiene la opción de cocinar diferentes tipos de alimentos en las placas para
evitar combinar sabores, o cocinar grandes cantidades del mismo tipo de
alimentos. La posición abierta también acomoda diferentes cortes de carne
con diferentes espesores, permitiéndole cocinar cada pieza a su gusto.
LIMPIEZA Y CUIDADOS
•Siempre desconecte el grill panini y permita que se enfríe antes de limpiarlo.
La unidad es más fácil de limpiar cuando está ligeramente caliente. No es
necesario desmontar el grill panini para limpiarlo. Nunca sumerja el grill
panini en agua ni lo coloque en el lavavajillas.
•Limpie las placas de cocina con un paño suave para eliminar los residuos de
alimentos. Para extraer los residuos de alimentos, exprima un poco de agua
tibia mezclada con detergente sobre los residuos de alimentos, luego
límpielos con una esponja no abrasiva o coloque papel de cocina húmedo
sobre la parrilla para humedecer los residuos de alimentos.
•No utilice nada abrasivo que pueda rayar o dañar el revestimiento
antiadherente.
•No use utensilios de metal para retirar sus alimentos, ya que pueden dañar
la superficie antiadherente.
•Limpie el exterior del grill panini solo con un paño húmedo. No limpie el
exterior con estropajos abrasivos o lana de acero, ya que esto dañará el

acabado. No lo sumerja en agua ni en ningún otro líquido.
•No colocar en el lavavajillas.
•Retire y vacíe la bandeja de goteo después de cada uso y lave la bandeja con
agua tibia y jabón. Evite el uso de estropajos o detergentes fuertes, ya que
pueden dañar la superficie.
•Enjuague y seque completamente con un paño limpio y suave y reemplace.
ALMACENAMIENTO
•Siempre desconecte el grill panini antes de guardarlo.
•Asegúrese siempre de que el grill panini esté frío y seco antes de guardarlo.
•El cable de alimentación se puede enrollar alrededor de la parte inferior de
la base para guardarlo.
CONDICIONES DE GARANTÍA
1. Este aparato está cubierto contra cualquier defecto de fábrica.
2. El aparato se cambiará siempre y cuando esté dentro del plazo de cambio y
se devuelva con todos sus accesorios y embalaje.
3. La garantía será válida siempre y cuando el aparato vaya acompañado de su
factura o ticket de compra donde salga reflejado el aparato, o también su
tarjeta de garantía debidamente cumplimentada y sellada.
4. El aparato estará exento de garantía (no cubierto) cuando:
4.1. El aparato tenga señales de golpes y/o caídas.
4.2. El aparato presente signos de mal uso.
4.3. El aparato presente signos de uso excesivo.
4.4. El aparato esté manipulado inadecuadamente.
4.5. No tiene documento acreditativo (tarjeta, ticket o factura
compra)
4.6. El aparato no se ha usado según las instrucciones de uso.
MEDIO AMBIENTE
Significado del cubo de basura
No deseche los aparatos eléctricos como residuos municipales sin
clasificar, use las instalaciones de recolección por separado. Póngase en
contacto con el responsable local para obtener información sobre los
sistemas de recolección disponibles.
Si los aparatos eléctricos se desechan en vertederos no controlados, las sustancias
peligrosas pueden filtrarse en el agua subterránea y entrar en la cadena alimentaria,
dañando su salud y bienestar.

EN
Dear Customer,
Thank you for purchasing this product. We kindly ask you to read the instruction
manual and keep it in a safe place for future reference. Please read all the
instructions before using this heater.
IMPORTANT SAFEGUARDS
•READ ALL INSTRUCTIONS
•Ensure that the voltage indicated on the rating label matches the mains
voltage before plugging in the appliance.
•Connect the appliance to a base with an earth socket withstanding a
minimum of 10 amperes.
•The appliance’s plug must fit into the mains socket properly. Do not alter
the plug. Do not use plug adaptors
•Use only for household.
•To protect against risk of electric shock, do not immerse the cord, plug or
cooking unit in water or any other liquid.
•Close supervision is necessary when any appliance is used by or near
children.
•Unplug from outlet when not in use and before cleaning. Allow to cool
before putting on or taking off parts, and before cleaning appliance.
•Do not operate any appliance with a damaged has malfunctioned or has
been damaged in any manner. In order to avoid the risk of an electric shock,
never try to repair the Press Grill yourself. Take it to an authorized service
station for examination and repair. An incorrect reassembly could present a
risk of electric shock when the Press Grill is used.
•The use of accessory attachments not recommended by the manufacturer
may result in fire, electrical shock, or risk of injury to persons.
•Do not use outdoors or for commercial purposes.
•Do not let power cord hang over the edge of the table or counter, or touch
hot surfaces.
•Do not place on or near a hot gas or electric burner or heated oven.
•Do not intend to operate by means of an external timer or separate
remote-control system.
•Unplug the unit when finished using.
•Extreme caution must be exercised when moving an appliance.
•This appliance can be used by people unused to its handling, disabled
people or children aged from 8 years and above if they have been given
supervision or instruction concerning use of the appliance in a safe way and
understand the hazards involved.

•Cleaning and user maintenance shall not be made by children unless they
are older than 8 and supervised.
•Keep the appliance and its cord out of reach of children less than 8 years of
age.
•This appliance is not a toy. Children should be supervised to ensure that
they do not play with the appliance.
•The temperature of the accessible surfaces may be high when the appliance
is in use.
•Do not use the appliance if it has fallen on the floor, if there are visible signs
of
•damage or if it has a leak.
•Do not use the appliance in association with a programmer, timer or other
device that automatically switches it on.
•If the connection to the mains has been damaged, it must be replaced, take
the appliance to an authorised technical support service. Do not attempt to
disassemble or repair the appliance yourself as this may be dangerous
•This appliance is not intended to be operated by means of an external timer
or separate remote-control system.
WARNING: TO REDUCE THE RISK OF FIRE OR ELECTRIC SHOCK, ONLY AUTHORIZED PERSONNEL
SHOULD DO REPAIRS.
SAVE THESE INSTRUCTIONS
FOR HOUSEHOLD USE ONLY
GROUNDED PLUG
To reduce the risk of electric shock this appliance has a grounded plug. If the plug does not fit
fully into the electrical outlet contact a qualified electrician. Do not modify the plug in any way
or use an adaptor.
PARTS IDENTIFICATION
BEFORE FIRST USE

•Read all instructions carefully and keep them for future reference.
•Remove all packaging
•Clean the Cooking Plates by wiping a sponge or cloth dampened in warm
water.
•DO NOT IMMERSE THE UNIT AND DO NOT RUN WATER DIRECTLY ONT THE
COOKING SURFACES.
•Dry with a cloth or paper towel.
•For best results, lightly coat the cooking plates with a little cooking oil or
cooking spray.
Notice: When your Grill Toaster is heated for the first time, it may emit slight smoke
or odor. This is normal with many heating appliances. This does not affect the
safety of your appliance.
HOW TO USE
Before using the appliance for the first time, peel off any promotional materials and
packaging materials, and check that the cooking plates are clean and free of dust. If
necessary, wipe over with a damp cloth. For best results, pour a teaspoon of
vegetable oil on to the non-stick plates. Spread over with an absorbent kitchen
towel and wipe off any excess oil.
PREPARING YOUR GRILL TOASTER
•Select the plates and to ensure that it is installed.
•Set the Health Grill Temperature Control to your desired setting. At first, try
a setting in the max.
•It will be preheating approximately 3-5 minutes to reach baking
temperature, the green ready lights, the Grill Toaster is ready for use.
COOKING
To Use as a Contact Grill
•Set the Grill Toaster Temperature
Control to your desired setting. At first,
try a setting in the max.
•You may later adjust it lower or higher
according to your preference.
•Prepare the burgers, boneless pieces of

meat and thin cuts of meat or other foods as directed and place it onto the
bottom cooking plate.
•Close the top cooking plate which has a floating hinge that is designed to
evenly press down on the food. The top plate must be fully lowered to
achieve Grill marks on the selected foods.
•When the foods are cooked use the handle to open the lid. Remove the
food with the help of a plastic spatula. Never use metal tongs or a knife as
these can cause damage to the non-stick coating of the cook plates.
•Use the Grill Toaster as a contact grill to cook burgers, boneless pieces of
meat and thin cuts of meat and vegetables.
•Use the Grill-Toaster as a contact grill, when you want to cook something in
a short amount of time or when you are looking for a healthy method of
grilling. When cooked on the contact grill, food will cook quickly because
you are grilling both sides of the food at the same time. The ribs on the grill
plates combined with the grease spout at the corner of the plate allow the
grease to drip from the meat and drain off the plates.
To Use as Press grill
•Set the Grill Toaster Temperature
Control to your desired setting. At first,
try a setting in the “4~6".
•You may later adjust it lower or higher
according to your preference.
•Prepare the sandwiches as directed
and place it onto the bottom cooking
plate. Always place sandwiches towards the rear of the bottom cooking
plate.
•Close the top cooking plate which has a floating hinge that is designed to
evenly press down on the sandwich. The top plate must be fully lowered to
cook sandwiches.
•Cook for about 3 to 6 minutes or until golden brown, adjusting the time to
suit your own individual taste.
•When the sandwich is cooked use the handle to open the lid. Remove the
sandwich with the help of a plastic spatula. Never use metal tongs or a knife
as these can cause damage to the non-stick coating of the cook plates.
•Use the Grill Toaster as a Press grill to grill sandwiches, breads and
quesadillas.
•The Grill Toaster was designed with a unique handle and hinge that allows
the cover to adjust to the thickness of the food. You can easily grill anything
from a thinly-sliced potato to a thick sirloin steak with even results.
•When cooking more than one food item in the contact grill, it is important
that the thickness of food items is consistent so the cover will close evenly
on the food.
To Use as Open grill
•Place Grill Toaster on a clean flat surface where you intend to cook. The Grill
Toaster can be positioned in flat position.
•Upper plate/cover is level with lower plate/base. The upper and lower
plates line up to create one large cooking surface. The Grill Toaster to this
position, locate the hinge release lever on the right arm.
•With you left hand on the handle, use your right hand to slide the lever
toward you. Push the handle back until the cover rests flat on the counter.
The unit will stay in this position until you lift the handle and cover to return
it to the closed position.
•Use the Grill Toaster as an open grill to cook burgers, steak, poultry (we do
not recommend cooking bone-in chicken, since it does not cook evenly on
an open grill), fish and vegetables.
•Cooking on the open grill is the most versatile method of using the Grill
Toaster. In the open position, you have double the surface area for grill.
•You have the option of cooking different types of foods on separates
without combining their flavors, or cooking large amounts of the same type
of food. The open position also accommodates different cuts of meat with
varying thicknesses, allowing you to cook each piece to your liking.
CLEANING AND CARE
•Always unplug the Health Grill and allow it to cool before cleaning. The unit
is easier to clean when slightly warm. There is no need to disassemble
Health Grill for cleaning. Never immerse the Health Grill in water or place in

dishwasher.
•Wipe cooking plates with a soft to remove food residue. For baked on food
residue squeeze some warm water mixed with detergent over the food
residue then clean with a non-abrasive plastic scouring pad or place wet
kitchen paper over the grill to moisten the food residue.
•Do not use anything abrasive that can scratch or damage the non-stick
coating.
•Do not use metal utensils to remove your foods, they can damage the
non-stick surface.
•Wipe the outside of the Health Grill with a damp cloth only. Do not clean
the outside with any abrasive scouring pad or steel wool, as this will damage
the finish. Do not immerse in water or any other liquid.
•Do not place in the dishwasher.
•Remove and empty the drip tray after each use and wash the tray in warm,
soapy water. Avoid the use of scouring pads or harsh detergents as they
may damage the surface.
•Rinse and dry thoroughly with a clean, soft cloth and replace.
STORAGE
•Always unplug the Health Grill before storage.
•Always make sure the Health Grill is cool and dry before storing.
•The power cord can be wrapped around the bottom of base for storing.
WARRANTY CONDITIONS
1. This appliance is covered against any factory defects.
2. The device is changed for a new one as long as it is within the change period
and is returned with all accessories and packaging in good condition.
3. The guarantee will be valid as long as the appliance is accompanied by your
invoice or purchase ticket where the exact device and model, or your
warranty card duly completed and sealed, is reflected.
4. The appliance will be exempt from warranty when:
4.1. The appliance has signs of knocks and / or falls.
4.2. The appliance shows signs of misuse.
4.3. The appliance has signs of overuse.
4.4. The appliance is improperly handled.
4.5. No supporting document. (card, ticket or invoice).
4.6. The appliance has not been used in accordance with the
instructions for use.

ENVIRONMENT
Meaning of the crossed-out wheeled dustbin:
Do not dispose of electrical appliances as unsorted municipal waste, use
separate collection facilities. Contact your local council for information
regarding the collection systems available. If electrical appliances are
disposed of in landfills or dumps, hazardous substances can leak into the
groundwater and get into the food chain, damaging your health and well-being.

Table of contents
Languages:
Other Thulos Grill manuals


Popular Grill manuals by other brands


Fisher & Paykel
Fisher & Paykel BGB48-BQAR Installation instructions and user guide

Bosch
Bosch TFB4402GB instruction manual

Bakers & Chefs
Bakers & Chefs 9905TB Assembly & operating instructions

Char-Broil
Char-Broil 463270611 Product guide

Rowlett
Rowlett RE100-PING instructions

Char-Broil
Char-Broil PLATINUM TRU-Infrared R50CC1617 Product guide