TIA Air Coffeeo 1601-AC3P User manual

MODEL 1601 SERIES COFFEE BREWER
© Copyright 2005
The Richards Corporation 25-30-27
Page TP1
September 1, 2005
COMPONENT MAINTENANCE MANUAL
WITH ILLUSTRATED PARTS LIST
AIR COFFEE
MODEL 1601 SERIES
COFFEE BREWER
P/N 500-0521
P/N 500-0619
A division of The Richards Corporation
DESIGNERS AND MANUFACTURERS OF AIRCRAFT GALLEY PRODUCTS
44931 FALCON
PLACE
lSTERLING VA 20166 USA
WWW.TIAPRODUCTS.COM l[email protected]
PHONE: (703) 471-
8600
lFAX (703) 481-5007

MODEL 1601 SERIES COFFEE BREWER
COMPONENT MAINTENANCE MANUAL
WITH ILLUSTRATED PARTS LIST
25-30-27 Page ROR1/-ROR2
September 1, 2005
RECORD OF REVISIONS
REV.
NO. PAGE
INSERTED ISSUE
DATE ISSUED
BY REV.
NO. PAGE
INSERTED ISSUE
DATE ISSUED
BY
1TP1,ROR1
LEP1
04-10-96
LOl1, LP1
1,2
101, 102
103
301, 302
303, 304
601,
602/603
604/605,
606/607
608/609,
610, 611
701, 702
703, 704
1001, 1002
1003/1004
1005, 1006
1007/1008
1009, 1010
1011, 1012
1013, 1014
1015, 1016
1017
21005,1009
1012 7-15-97
3Complete
Revision 03-01-01 TIA
4Complete
Revision 09-01-05 TIA
MODEL 1601 SERIES COFFEE BREWER
COMPONENT MAINTENANCE MANUAL
WITH ILLUSTRATED PARTS LIST
25-30-27
Page ROTR1/-ROTR2
September 1, 2005
RECORD OF TEMPORARY REVISIONS
REV.
NO. PAGE
INSERTED ISSUE
DATE INSERTED
BY REMOVAL
DATE REMOVED
BY

MODEL 1601 SERIES COFFEE BREWER
COMPONENT MAINTENANCE MANUAL
WITH ILLUSTRATED PARTS LIST
25-30-27 Page SBL1/-SBL2
September 1, 2005
SERVICE BULLETIN LIST
SERVICE BULLETIN
NUMBER REVISION
NUMBER DATE BULLETIN
INCORPORATED
SB-CB-011
A9/01/05

MODEL 1601 SERIES COFFEE BREWER
COMPONENT MAINTENANCE MANUAL
WITH ILLUSTRATED PARTS LIST
25-30-27
Page LEP1
September 1, 2005
LIST OF EFFECTIVE PAGES
SUBJECT PAGE DATE SUBJECT PAGE DATE
Title TP1 9/01/05 Inspection/Check 501 9/01/05
502 Blank
Record of Revisions ROR1 9/01/05
ROR2 Blank Repair 601 9/01/05
602 9/01/05
Record of Temporary ROTR1 9/01/05 603 9/01/05
Revisions ROTR2 Blank 604 9/01/05
605 9/01/05
Service Bulletin List SBL1 9/01/05 606 9/01/05
SBL2 Blank 607 9/01/05
608 9/01/05
List of Effective Pages LEP1 9/01/05 609 9/01/05
LEP2 9/01/05 610 9/01/05
611 9/01/05
Table of Contents TOC1 9/01/05 612 9/01/05
TOC2 Blank
Assembly 701 9/01/05
List of Illustrations LOl1 9/01/05 702 9/01/05
LOl2 Blank 703 9/01/05
704 Blank
Leading Particulars LP1 9/01/05
LP2 Blank Special Tools, Fixtures 901 9/01/05
and Equipment 902 Blank
Description and 19/01/05
Operation 29/01/05 Illustrated Parts List 1001 9/01/05
39/01/05 1002 9/01/05
49/01/05 1003 9/01/05
1004 9/01/05
Testing and Fault 101 9/01/05 1005 9/01/05
Isolation 102 9/01/05 1006 9/01/05
103 9/01/05 1007 9/01/05
104 9/01/05 1008 9/01/05
105 9/01/05 1009 9/01/05
106 Blank 1010 9/01/05
1011 9/01/05
Disassembly 301 9/01/05 1012 9/01/05
302 9/01/05 1013/1014 9/01/05
303 9/01/05 1015 9/01/05
304 9/01/05 1016 9/01/05
1017 9/01/05
Cleaning 401 9/01/05
402 Blank

MODEL 1601 SERIES COFFEE BREWER
COMPONENT MAINTENANCE MANUAL
WITH ILLUSTRATED PARTS LIST
25-30-27
Page LEP2
September 1, 2005
LIST OF EFFECTIVE PAGES –CONT.
SUBJECT PAGE DATE SUBJECT PAGE DATE
Illustrated Parts List 1018 9/01/05
1019/1020 9/01/05
1021 9/01/05
1022 9/01/05
1023 9/01/05
1024 9/01/05
1025 9/01/05
1026 9/01/05
1027 9/01/05
1028 9/01/05
1029 9/01/05
1030 9/01/05
1031 9/01/05
1032 9/01/05

MODEL 1601 SERIES COFFEE BREWER
COMPONENT MAINTENANCE MANUAL
WITH ILLUSTRATED PARTS LIST
25-30-27
Page TOC1/-TOC2
September 1, 2005
TABLE OF CONTENTS
PARAGRAPH TITLE PAGE
Description and Operation..................................................................... 1
Testing and Fault Isolation..................................................................... 101
Automatic Test Requirements ............................................................... N/A
Disassembly .......................................................................................... 301
Cleaning................................................................................................. 401
Inspection/Check................................................................................... 501
Repair.................................................................................................... 601
Assembly............................................................................................... 701
Fits and Clearances............................................................................... N/A
Special Tools, Fixtures and Equipment ................................................. 901
Illustrated Parts List............................................................................... 1001

MODEL 1601 SERIES COFFEE BREWER
COMPONENT MAINTENANCE MANUAL
WITH ILLUSTRATED PARTS LIST
25-30-27 Page LOI1/-LOl2
September 1, 2005
FIGURE NO. TITLE OF ILLUSTRATION PAGE NO.
1Component Layout, 1601 Series 3
601 Wiring Diagram, 1601-AC3P 604
602 Wiring Diagram, 1601B-AC1P 605
603 Wiring Diagram, 1601A-AC3P 606
604 Wiring Diagram, 1601A-AC3P, 1601B-AC3P 607
605 Wiring Diagram, 1601-DC28608
606 Wiring Diagram, 1601A-DC28 609
607 Wiring Diagram, 1601B-DC28, 1601B-DC28-B610
608 Plumbing Diagram, Model 1601 611
609 Plumbing Diagram, Models 1601A and 1601B 612
1001 Illustrated Parts List, (P/N 500-0521)
Model 1601 Series Coffee Brewer 1013/1014
1002 Illustrated Parts List, (P/N 500-0619)
Model 1601A and 1601B Series Coffee Brewer 1019/1020
1003 Illustrated Parts List,
Heater Assembly 1026
1004 DELETED –See Figure 1003 1028
1005 DELETED –See Figure 1001 and 1002 1029
1006 DELETED –See Figure 1001 1030
1007 Illustrated Parts List,
Carafe Assembly 1031
MODEL 1601 SERIES COFFEE BREWER
COMPONENT MAINTENANCE MANUAL
WITH ILLUSTRATED PARTS LIST
25-30-27 Page LP1/LP2
September 1, 2005
LEADING PARTICULARS
1. DIMENSIONS:
A. HEIGHT: 13.000 inches
B. WIDTH: 6.375 inches
C. DEPTH: 10.000 inches*
* Does not include pot handle. Depth including handle is 12 1/8” maximum.
2. ELECTRICAL:
MODEL INPUT
VOLTAGE
WATTAGE
1601-AC3P 115 VAC, SINGLE PHASE,
60 -400 HZ 1000 WATTS
1601A-AC3P
1601B-AC3P 115 VAC, 3 PHASE
300 -700 HZ 1000 WATTS
1601B-AC1P 115 VAC, 3 PHASE
300 -700 HZ 1000 WATTS
1601-DC28
1601A-DC28
1601B-DC28
1601B-DC28-B
28 VOLTS DC
1000 WATTS
3. WEIGHT:
A. 1601, EMPTY 11.00 Lbs.
B. 1601A, EMPTY 9.50 Lbs.
C. 1601B, EMPTY 9.50 Lbs.
4. BREW CHARACTERISTICS
A. Capacity: 48 oz. (10 cups)
B. Coffee Temperature: 170-180º F
C. Brew Temperature: 190º F
D. Brew Time: 8-10 Minutes
E. Recommended Filter Size: 2.75-Inch Base x 3 Inch Height*
*Recommended filter: BCF-100B
(V-25628, TIA P/N 124-0081)
Equivalent substitute may be use

MODEL 1601 SERIES COFFEE BREWER
COMPONENT MAINTENANCE MANUAL
WITH ILLUSTRATED PARTS LIST
25-30-27
Page 1
September 1, 2005
DESCRIPTION AND OPERATION
1. General
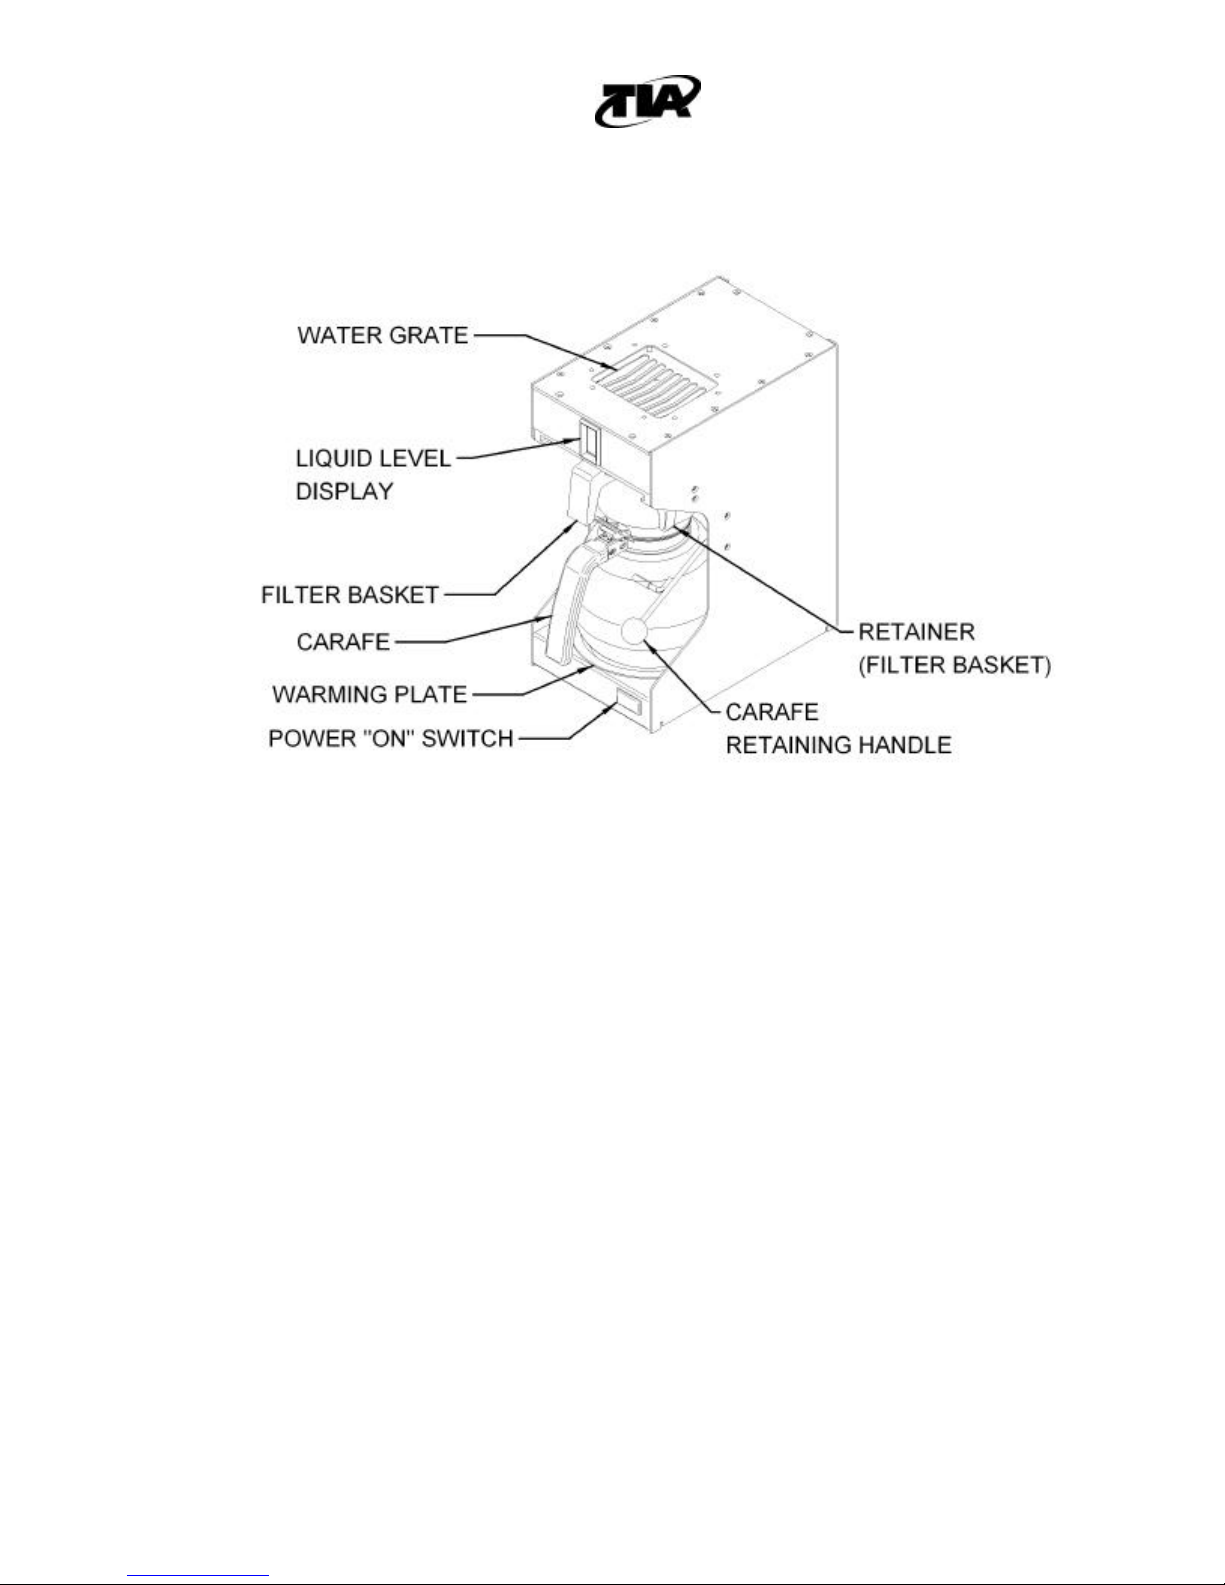
TIA Model 1601 Series Coffee Brewer, shown in Figure 1, is an aviation quality,
general purpose top fill brewer capable of making 48 oz. (10 cups) of coffee every
brew cycle. The brew tray allows for the use of a standard coffee filter and loose
coffee, or a commercial pillow pack. An integral heater assembly both brews the
coffee and provides a heated surface to keep the coffee warm.
Temperature and overheat controls are provided independently by means of single
setpoint bi-metal thermostats for each to minimize maintenance and increase
reliability.
The coffee brewer is not designed to operate in a completely enclosed compartment.
Compartment doors should be open during operation to prevent a build-up of heat
and humidity.
2. Description
A. A single POWER switch operates the unit and, when in the ON position, allows
the water to be heated to a point (controlled by the control thermostat) at which
the heated water “percolates” up the brew pipe, over the coffee in the brew tray
and into the carafe.
B. A manually resettable overheat thermostat will deactivate the heater elements if
the temperature exceeds its set point. Activation of the overheat thermostat
indicates a fault. The overheat thermostat must be manually reset before
operation of the coffee brewer can resume.
3. Operation
NOTE:The primary cause of slow brew cycles is the buildup of mineral deposits in
the heater block.
A. Turn the brew basket retainer latch downward and remove brew basket. Insert
the new filter and load fresh coffee into the brew basket. Place the brew basket
back into the coffee brewer and latch into position.

MODEL 1601 SERIES COFFEE BREWER
COMPONENT MAINTENANCE MANUAL
WITH ILLUSTRATED PARTS LIST
25-30-27
Page 2
September 1, 2005
NOTE: Unit should be off and cool before filling it with water. Adding water to a hot
coffee brewer will create a puff of steam.
B. Fill the carafe with water and pour it into the water fill port located on the top of
the coffee brewer. Watch the water level indicator to avoid overfilling the water
tank.
OPERATING HINT: To prevent carafe overflow, make certain that the amount
of water poured into the coffee brewer does not exceed the capacity of the 54
oz. carafe. DO NOT add water during the brew cycle. Remember that the
carafe must be able to hold the amount of water poured into the coffee brewer
tank. Verify that carafe is empty prior to beginning brew cycle
NOTE: Only pour fresh water into the water tank. Do not pour coffee or other
premixed liquids into the water tank. Doing so will result in damage to the
coffee brewer.
C. Switch coffee brewer ON. The indicator light will illuminate on units equipped
with indicator lights (P/N 500-0521-01, -02 and 500-0619-01, 02 ONLY). After
approximately 30 seconds water will start percolating through the brew basket
and into the carafe.
D. When brew cycle is completed and coffee has ceased flowing into the carafe,
remove brew basket from coffee brewer and discard coffee grounds.
NOTE: Coffee may continue to drip from the brew basket after the completion of the
brew cycle. The dripping is from residual liquid in the brew basket and does
not indicate a fault with the Coffee Brewer.
E. Remove carafe from coffee brewer and serve coffee. Return carafe to coffee
brewer after serving coffee and latch into position. When finished serving
Coffee, turn the coffee brewer OFF.
CAUTION: DO NOT HEAT EMPTY CARAFE.
MODEL 1601 SERIES COFFEE BREWER
COMPONENT MAINTENANCE MANUAL
WITH ILLUSTRATED PARTS LIST
25-30-27
Page 3
September 1, 2005
Figure 1. Component Layout
1601B Series Shown
4. Cold Weather Precautions
CAUTION: IF FREEZING TEMPERATURES ARE EXPECTED AND COFFEE
BREWER WILL NOT BE IN USE, COFFEE BREWER WATER SYSTEM
MUST BE DRAINED TO PREVENT ICE DAMAGE. SEE “DRAINING
COFFEE BREWER”.
A. Draining Coffee Brewer
(1) There is no manual drain on the 1601 Series Coffee Brewer. To drain the
water from the coffee brewer, switch the coffee brewer ON and operate the
coffee brewer until the water tank is empty.
(2) Turn coffee brewer OFF.

MODEL 1601 SERIES COFFEE BREWER
COMPONENT MAINTENANCE MANUAL
WITH ILLUSTRATED PARTS LIST
25-30-27
Page 4
September 1, 2005
5. Storage Instructions
A. Preparation for Storage
(1) Ensure that all liquids have been drained from the coffee brewer and
components to prevent possible damage if the unit is exposed to freezing
temperatures.
(2) Store the coffee brewer upright in a clean, dry location where the unit will not
be subject to dents or other damage.
(3) Whenever possible, the unit should be stored in the shipping or packing
container originally provided by the manufacturer.
NOTE: Inserts may be stacked in accordance with standard warehouse
practices.
(4) If inserts are to be stacked, a separator of ¼ inch plywood, or similar
protective device, is to be placed between the units to insure against damage
to the finish or component parts.
B. Short Duration Storage
NOTE: No special protection is required if the units are to be stored less than
three months.
(1) If units are stored in excess of thirty days, complete test procedures should
be performed prior to placing the unit in service.
C. Extended Duration Storage
Wrap units in water repellant material (Federal Spec. VV-P-271 or equivalent) and
enclose silica gel packages to absorb moisture and retard corrosion.

MODEL 1601 SERIES COFFEE BREWER
COMPONENT MAINTENANCE MANUAL
WITH ILLUSTRATED PARTS LIST
25-30-27 Page 101
September 1, 2005
TESTING AND FAULT ISOLATION
1. General
A. This section consists of the following subsections: Testing and
Troubleshooting.
(1) The Testing subsection is a general functional test of the coffee brewer
to determine in which area a fault may have occurred.
(2) The Troubleshooting guide describes the most common possible faults
and their remedies. It is meant to serve as a general guide and
assumes that all internal wiring and power connections are correct.
B. The 1601 series coffee brewers have single setpoint thermostats. Brew
temperature calibration is not adjustable. The thermostat does not control
the brew temperature, it controls the temperature of the heater block.
2. Testing
A. Functional Test Setup
The test bench will require the following:
(1) Power Requirements
MODEL
TEST BENCH REQUIREMENT
1601A-AC3P
1601B-AC3P
115 VAC, 3-Phase, 300 -700 Hz at 5 Amps
1601B-AC1P 115 VAC, 3-Phase, 300 -700 Hz at 10 Amps
1601-DC28
1601A-DC28
1601B-DC28
1601B-DC28-B
28 VDC at 40 Amps
1601-AC3P 115 VAC, single phase, 60 -400 Hz at 10 Amps
(2) A temperature measuring instrument capable of measuring ±3° F.

MODEL 1601 SERIES COFFEE BREWER
COMPONENT MAINTENANCE MANUAL
WITH ILLUSTRATED PARTS LIST
25-30-27 Page 102
September 1, 2005
B. Functional Test
(1) Ensure power switch is OFF and connect unit to applicable power supply.
(2) Fill carafe with water and then fill unit from top,observing water level sight
gauge in the back of the carafe cavity for Model 1601 or the LED’s on front
of the coffee brewer for Models 1601A and 1601B.
(3) Place carafe in the cavity and ensure that the brew tray is in place.
(4) Switch power switch ON and observe for the following:
MODEL
Normal Current Draw
1601-AC3P
1601A-AC3P
1601B-AC3P 2.9 Amps ± 0.5 Amps
1601B-AC1P 8.5 Amps ± 1 Amp
1601-DC28
1601A-DC28
1601B-DC28
1601B-DC28-B
35 Amps ± 3 Amps
(5) Water will now be heated and dispensed through the brew tray into the
carafe. The time to complete a brew cycle is approximately 8 -10 minutes.
NOTE: In certain circumstances, coffee brewers equipped with 300°
thermostats can experience extended brew cycles if the heater
elements cycle during the brew cycle. This is acceptable as long as
the current draw is correct and there is no calcium build-up in the
heater block.
(6) Inspect the coffee brewer for leaks, pay special attention to the brewhead,
water tank, and hose connections.
(7) Remove carafe and measure the water temperature which should be
between 170°F and 180 °F.
MODEL 1601 SERIES COFFEE BREWER
COMPONENT MAINTENANCE MANUAL
WITH ILLUSTRATED PARTS LIST
25-30-27 Page 103
September 1, 2005
NOTE: This unit has a single setpoint thermostat. Temperature calibration is
not adjustable. The thermostat does not control the brew temperature,
it controls the temperature of the heater block.
(8) After the brew cycle has completed, remove the pot from the warmer tray
and observe that the control thermostat switches the Heater Elements OFF,
by observing the current draw.(This test may take several minutes)
(9) Place the pot back on the warmer tray and verify that the control thermostat
switches the heater elements back ON, by observing for normal current
draw. (This test may take several minutes)
3. Troubleshooting Guide
These guides address the most common potential problems associated with these models.
It is not intended to solve more in-depth faults.
A. All Model 1601 Series
Fault Probable Cause Effectivity
(1) After the brew cycle
is completed and
carafe has been
sitting on the warmer
tray, unit switches off
and will not switch
back on.
(a) The overheat thermostat has
disconnected power from the
heaters. Allow unit to cool and
reset thermostat.
(b) Overheat thermostat may be
defective.
(c) The thermostat and/or its relay
have failed.
All
(2) When unit operates,
steam rises.
When the coffee brewer operates, the
normal functioning of the machine
generates some steam. If the steam
becomes “excessive”, remove the
brew basket from the coffee brewer
and observe the water flow for
consistency. A primary cause of
excessive steam is the build-up of
mineral deposits in the heater casting.
For cleaning details, refer to the
cleaning section of this manual.
All
MODEL 1601 SERIES COFFEE BREWER
COMPONENT MAINTENANCE MANUAL
WITH ILLUSTRATED PARTS LIST
25-30-27 Page 104
September 1, 2005
Fault Probable Cause Effectivity
(3) Carafe overflows
during brew cycle. Carafe can only overflow due to
overfilling water tank. Recommend
that carafe be used to fill the tank. Do
not add water to the water tank during
a brew cycle. Verify that carafe is
empty prior to beginning brew cycle.
All
(4) Brew time is longer
than expected (a) Unit has built up scale/mineral
deposits, which are constricting
flow. Clean unit in accordance
with cleaning section of this
manual.
(b) A heater element is defective.
Return to TIA for repair or
replace heater element.
(c) Water and/or unit was very cold
when starting brew. The water
took longer to heat resulting in a
longer brew time.
All
(5) ON/OFF switch is
ON but unit will not
brew.
(a) The power relay is defective.
(b) Overheat thermostat has tripped. All
(6) Power Indicator on
ON/OFF switch does
not light. Brewer
works otherwise.
Indicator lamp in switch is defective.
Replace switch. 500-0521-01
500-0521-02
500-0619-01
500-0619-02
(7) When filling reservoir
for the second or
subsequent pots of
coffee, a puff of
steam emits from the
brew head.
Heater block is still warm enough to
“percolate” coffee. After first pot of
coffee, turn power switch to OFF and
allow heater block to cool before filling
tank for next pot.
All
(8) Brewbasket
overflows Incorrect sized coffee filter being used
or too much coffee is being used. All
MODEL 1601 SERIES COFFEE BREWER
COMPONENT MAINTENANCE MANUAL
WITH ILLUSTRATED PARTS LIST
25-30-27 Page 105
September 1, 2005
Fault Probable Cause Effectivity
(9) Display LEDs are
erratic and do not
function normally.
(a) Check source of water. If
water is distilled, display
may not work correctly
because of low mineral
content of water.
(b) Malfunctioning Display
PCB Assembly. Replace
assembly with a known
good PCB assembly and
retest.
(c) Faulty cold water tank
probe. Return to TIA for
repair or repair as necessary
500-0619
(Models Only)

MODEL 1601 SERIES COFFEE BREWER
COMPONENT MAINTENANCE MANUAL
WITH ILLUSTRATED PARTS LIST
25-30-27 Page 106
September 1, 2005
THIS PAGE INTENTIONALLY LEFT BLANK.

MODEL 1601 SERIES COFFEE BREWER
COMPONENT MAINTENANCE MANUAL
WITH ILLUSTRATED PARTS LIST
25-30-27 Page 301
September 1, 2005
DISASSEMBLY
1. General
A. Since complete disassembly is impractical and undesirable, only the following items
should be removed as required: Those which have been definitely established by
Check and/or Fault Isolation procedures as being defective, those which must be
removed to gain access to remove a defective part, and those which must be
removed in order to electrically isolate a part suspected of being faulty. Check
testing and Fault Isolation procedures determine those components which are
defective and, therefore, the extent of disassembly required.
B. This section consists of the following subsections:
a. Disassembly instructions for Model 1601
b. Disassembly instructions for Models 1601A and 1601B
NOTE: Observe proper ESD handling and storage procedures for PCB assemblies
after removing top cover. ESD Discharges may damage PCB assemblies.
2. Disassembly Instructions for Model 1601
A. Top Cover and Cold Water Tray Disassembly (Figure 1001)
1. Remove top cover (10) by removing screws (35).
2. Remove gasket (30) and cold water tray (25).
3. If required, remove receptacle (15) from top cover (10) by removing screws
(20).
B. Water Tank Disassembly (Figure 1001)
1. Remove brew tube (255) from barbed adapter (45). Pull brew tubing (255)
through the tank assembly (355). Remove tank washer (365).
2. Disconnect tubes (255) from heater casting (100).
3. Note correct orientation for later installation, and remove check valve (250)
from tubing (255).
4. Remove silicon tubing (200) from fitting (205).
This manual suits for next models
9
Table of contents
Other TIA Coffee Maker manuals


