TigerTech Smart Doorbell User manual

Smart Doorbell
User Manual

Welcome to the TigerTech Family
Welcome to the TigerTech Smart Doorbell and Thank you for becoming a member of the TigerTech family.
Please take a minute to carefully review these instructions so you can enjoy your product experience.
The TigerTech Smart Doorbell is a new generation of Security & Monitoring Devices for Homes and Offices.
These can be used for ensuring the safety of your home or office and can prevent crimes before they
happen. It is small in size, aesthetically pleasing, and very reliable. It works with your Home or Office Wi-
Fi and provides you with 720P HD Video streaming of all events outside your front door on your
Smartphone. It also has a 2-way Video Calling feature, which operates when a visitor rings your Doorbell.
This allows you to see, and speak to your visitors, regardless of where you are, before you let them in your
home or office. With the TigerTech Smart Doorbell, you will enjoy complete piece of mind as you will be
able to protect your loved ones when you are at home or remotely.
The Smart Doorbell has 2 parts that need to work successfully. One is the hardware and the second is the
Mobile App. Please read the instructions and safety information in this manual before installing and
operating the hardware to ensure the safe and correct use of the device. Please also read the App
instructions to understand how to install and use the App.

In the Box
ITEMS
QTY
ITEMS
QTY
ITEMS
QTY
Doorbell Main unit
1
12V Power adapter
1
Stoppers
4
Wireless Chime
1
Power cord
1
Wire Terminals
2
Use instruction
1
Wall screws
4
Product Introduction
The TigerTech Wi-Fi Video Doorbell is used to remotely see, hear and speak to your visitors at your front
door using your Smart Phone. This product supports functions such as remote real-time video conversation,
remote snapshots, remote video recording, two-way audio, and motion alerts.
The product also comes with a wireless chime to be installed inside the home. When someone rings the
doorbell, the user's Smartphone or Tablet will ring together along with the Chime. The user’s mobile device
will receive an alert and an incoming video call. The user can then accept the video call to see the visitors
and interact with them.
1. Doorbell Main unit
6. Rear cover
11. Wireless Chime
2. Button/Speaker
7. Bell Lock / AntiTamper button
12. Chime Volume Button
3. Video Lens
8. Outlet for Power wire
13. Music Switch button
4. LED Flash for Night Vision
9. Screw installation holes
14: Power Pin
5. Microphone
10. Wire slot
15. Chime Speaker
Precautions for Safe Use
1. The Smart Doorbell works using [12V ~ 1A DC] supply. Do not connect the device directly to AC
mains while wiring the device, otherwise this may cause electric shock and permanent damage to
the device.
2. Plug in the device ONLY using the provided adapter, else it may cause damage to the device.
Warranty is void if the device is plugged in directly or using any other adapter.
3. The input power required for the supplied AC adapter is 220V - 240V ~ 50/60Hz AC. Please confirm
the electric supply fits the above requirements, else it will cause damage to the adapter and to the
Bell.
NOTE: DO NOT USE ANY OTHER ADAPTER TO CONNECT THE DEVICE AS THIS MAY CAUSE
DAMAGE TO THE DEVICE AND WILL IMMEDIATELY VOID THE WARRANTY.
4. Please make sure you have a strong Wi-Fi connection in the location where you plan to install the
device. Weak Wi-Fi connections will reduce the quality of the video streaming.
5. You will need a 64GB (or less) SD Card to install in your Doorbell if you need to store Video
Recordings or record Alarm Videos automatically.
Setup & Configuration
Pre-Requisites:
1. STRONG CABLE INTERNET CONNECTION: Please ensure that you have a good, reliable cable
internet connection for the device to work best. Portable Internet connections based on Hot spots
or a Wi-Fi Dongle will not provide best and consistent results.
2. Router Quality - Your experience will only be as good as your router. We recommend using a router
that is less than 3 years old and is manufactured by a recognized brand.
3. Router Band –The device will only connect to the 2.4 GHz band and will not connect to 5 GHz
bands.
4. Router b/g/n –Device works on 802.11b/g/n (WEP, WPA, WPA2 encryption supported). If
you have an “N-Only” router, please activate the b/g setting.
Wi-Fi Speed Test
1. Make sure that the Wi-Fi in your Home / Office is on and your Smartphone is connected to Wi-Fi.
2. Download the Speedtest App (available on IOS or Android) and install it on your Phone.
3. Please take your Smartphone to the location where you plan to install the Smart Doorbell and place
your Smartphone next to the device or device location.
4. Start the Speedtest App and Tap “Begin Test”
5. Please note the value of the “UPLOAD” speed shown at the end of the Test.
NOTE: The device works best with an Upload speed of 2.0mbps at the location where you plan to install
the device. If you are below this speed level, please either (1) move your router closer to the device, (2)
add a WiFi signal repeater or (3) increase your internet /connection speeds from your service provider

Doorbell Installation
Preparing for installation
•Before physical installation, please ensure that the device is intact. Check that all the related
accessories are available. For details, please see the Packing List.
•Check the Bell, the Chime and the power adapter housings for cracks, damage or other anomalies.
•Once you confirm that all these are in good condition, you can start the installation.
Fixing the doorbell
•The recommended installation height is 1.4 meters or 4.5 Feet from the ground. Remove the
provided wall marking sticker and paste it on the wall in the proper position. PLEASE NOTE THAT
THIS IS THE POSITION IN WHICH YOUR DOORBELL WILL BE INSTALLED.
•You will find 4 holes on the sticker, showing the location of the screws, and one hole in the Center
for the power wire to be connected inside your Home or Office.
•Drill 4 screw mounting holes in the wall (through the marker holes) and insert the stoppers into
the holes. In line with the Center hole, you will need to drill a small hole through the wall for the
power wire to go through from the Bell to the inside of your home.
•Unmount the back cover of the doorbell as shown in the picture below.
•Slide the SD Card inside the Doorbell (required if you need to record & store videos)
1. Doorbell Main unit
2. Wall screws
3. Rear cover
4. Wall marking sticker
5. Stoppers
6. Wall
7. Power adapter

•Remove the front cover of the wall marking sticker. Align the back cover of the bell with the wall
marker and stick it onto the wall sticker. Now insert the screws through the back cover and fix the
back cover to the wall.
•Guide the Doorbell power wires through the center outlet hole so that they reach inside the home
and connect the wires to the power adapter provided (DC 12V). Please take care to ensure that
this connection is done based on color (Red for POSITIVE “+”, Black for NEGATIVE “-”). Once this
is done, put on the wire connection terminals and clamp them with pliers.
•Mount the Doorbell onto the back cover and click it into place.
•Plug the power adapter which is now connected to the Doorbell, into the power socket and switch
on the power.
•The Bell Button Ring Light will light up.
•The hardware installation is completed.
.
Wireless Chime Setup
•NOTE: THE CHIME CONNECTS WITH THE BELL WIRELESSLY USING RF (RADIO FREQUENCY) AND
NEEDS TO BE IN CLOSE PROXIMITY TO THE SMART BELL (30-50 FEET)
•Plug the Wireless Chime into any wall socket inside the home. (AC 100V-240V)
•You can find 2 buttons on the music box as below.
•To sync the wireless chime with the doorbell, press and hold the ‘Music’switch button for 3 seconds
and it will ring. Then release the button.
•Immediately press the button on the Doorbell to sync the chime to the bell. If the chime rings, the
chime has been matched with the bell successfully.

IOS/Android Versions for App
The App works on iOS 8.0 or higher and on Android 4.4 or higher.
Install the App
1. Download the “WiBell” App on your Smartphone.
2. For iPhone, you can also download the app from App Store by searching for "WiBell"
3. During the installation process, if the phone prompts you “whether to trust this program OR
whether to allow access to mobile phone location” please choose “Trust” or “Allow”.
Add Doorbell to App
1. Switch on the Doorbell and wait 20-30 seconds for it to power up.
2. After 20-30 seconds, you will hear “Please use your SmartPhone to connect the device” and the
LED indicator starts to blink slowly. This is when the Doorbell generates its own Wi-Fi ‘Hot-Spot’.
3. Begin the following steps.
Step 1 - Connect your Smartphone to the Doorbell’s Wi-Fi Hotspot
i. Go to the Wi-Fi Settings on your Smartphone
ii. Connect your Phone to the Wi-Fi Network called “Smarthome-XXX” (XXX are 20
random characters.)
Step 2 - Add the Doorbell to the APP
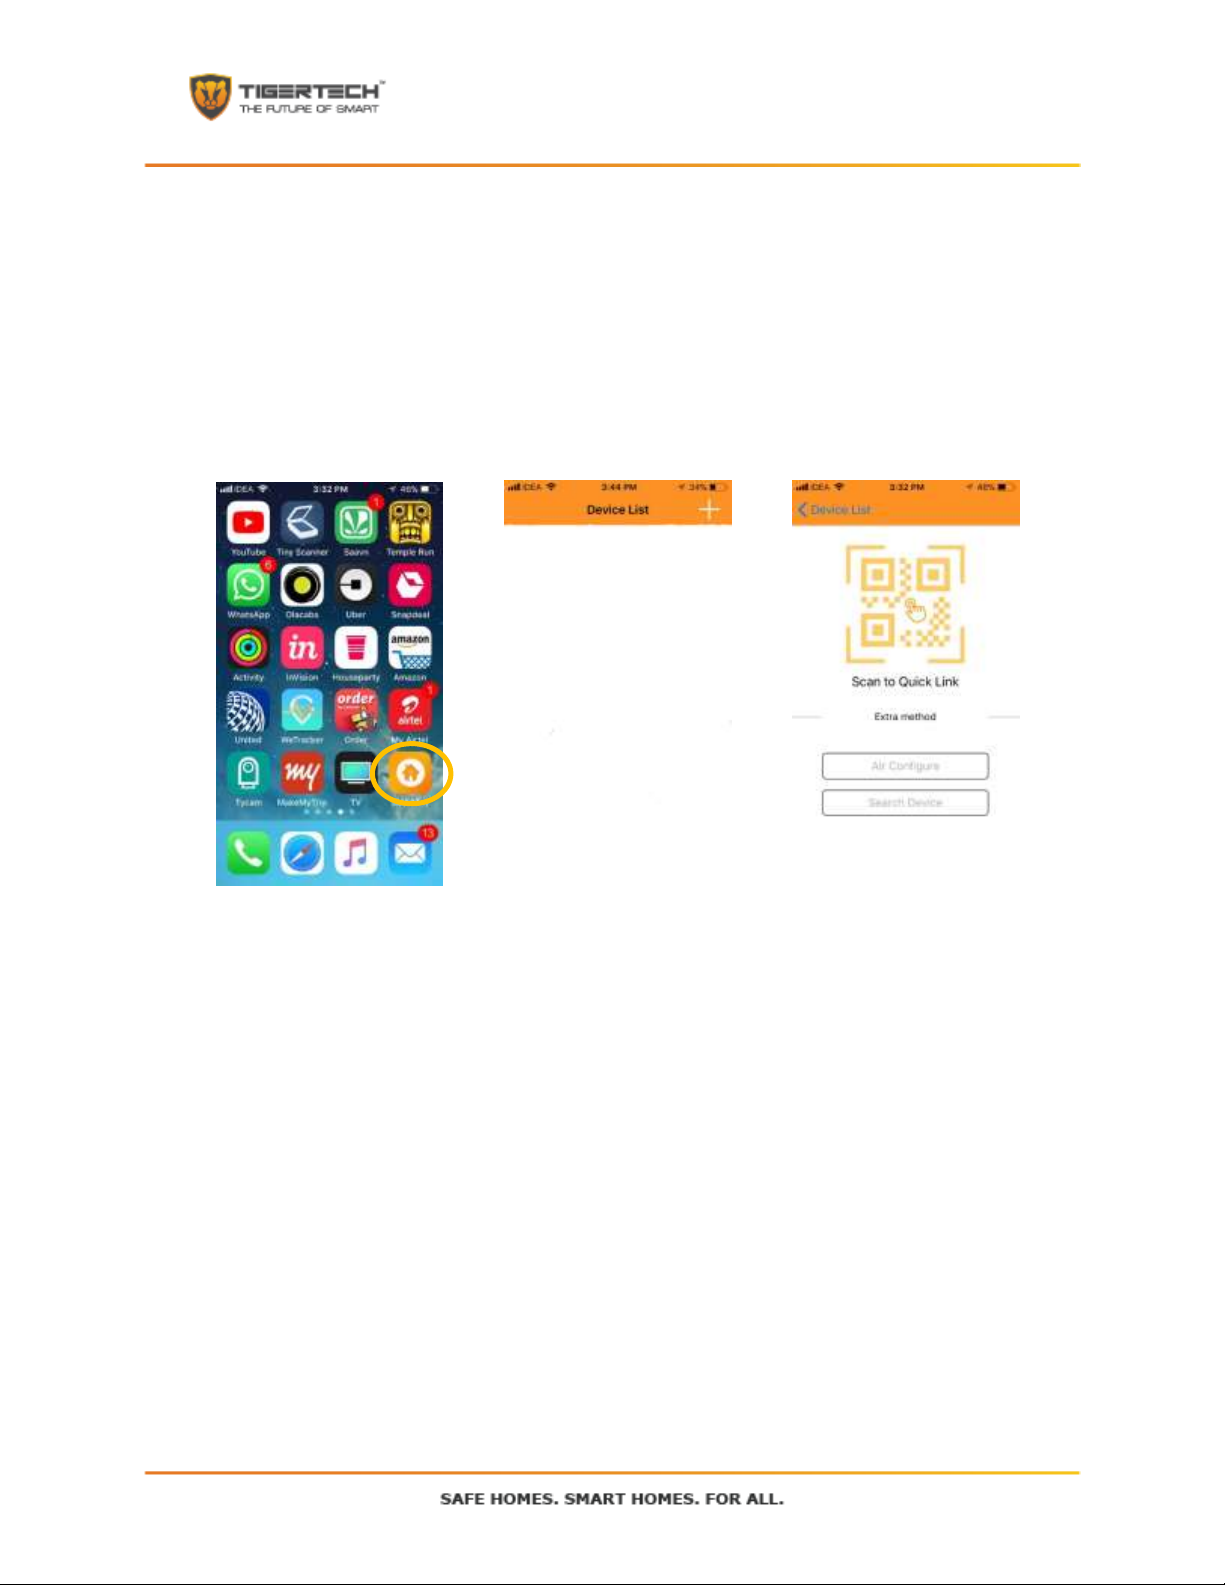
i. Open the WiBell APP
ii. Tap on the “+” icon on the top right of the screen
iii. Then Tap on “Scan QR code to quick link”
iv. Scan the QR code pasted on the Doorbell
v. The App will recognize the QR Code on the Doorbell and will display the ID Number
and ask for the Password. The default password is 999999.
vi. Enter the default password and Press “Join” on the Top Right
vii. The App will add the Doorbell to the App and a video window will appear on the
App with a “Play” button
viii. Press the “Play” button to start streaming live video from your Smart Doorbell
b. Step 2 - Add the Doorbell to the APP (Option 2)
i. In case the “QR code” does not work, just tap on “Search Device” (see above).
ii. The App will then search for the Doorbell and in a few seconds, will show the
device ID of the Doorbell it has found.
iii. Select the device ID that has been found and input the password. The default
password is “999999”.
iv. Once this is done, press “Save”.
v. The App will add the Doorbell to the App and a video window will appear on the
App with a “Play” button
vi. Press the “Play” button to start streaming live video from your Doorbell

Step 3. Connect the Doorbell to your local Wi-Fi Network:
i. Under the video window on the App screen, you will see a group of icons. Tap
the rightmost icon (Settings Icon).
ii. Choose “Advanced Setting” and then the “Wi-Fi” option.
iii. Select your Home/Office Wi-Fi network name from the list shown, enter your
Wi-Fi password and press “Save” on the top right.
iv. You will see the LED indicator blinking then stay steady if your Wi-Fi and
password are correct. You will also hear “Wi-Fi Network connecting…… Wi-Fi
Network Connection successful. Very Strong / Strong / Average Signal”. The
Wi-Fi signal strength mentioned will depend on the actual Wi-Fi signal strength
found by the Bell, and will be one of the 3 options mentioned.
v. The Video screen on the App will also show “Online”
vi. The Doorbell will now connect to your Wi-Fi Network you have specified and
is now ready to use from within the home or office as well as from outdoors.
vii. Pressing the ‘Bell’ button on your Doorbell will now send a call alert to your
mobile device.

Regular use
Answer your Doorbell: When someone rings the bell, you will receive a notification. Tap the notification to
open the App. Tap on “Answer” to start the App and show you a live video feed. You will now be able to
see and hear a live feed of the surroundings outside your door. Press the “Picture” button to take a picture.
“Video” button to record a live video of any incident. Press “Unmute” button to speak to your visitor.
Alarm Sensed: If the Doorbell motion sensor senses any activity outside your door, it will send you a
notification. Tap the notification to open the App. Tap on “Answer” to start the App and show you a live
video feed.

Other Settings
Naming the Doorbell
1. Default name given by the App for the bell is “MyBell”
2. Press “Settings” for the Doorbell you want to name. This will take you Edit Menu Screen
3. Type the name that you would like to give your Doorbell and press ‘Back’ on the top left
4. The Doorbell name will now be changed
Deleting the Doorbell from the App
If the Doorbell continuously shows “offline” you may have to delete it from the App, then Reset it and Add
it again to the App. To delete the Bell from the App, go to the Device list screen and swipe left (on IOS) or
long press the video feed window (on Android) and then confirm deletion.
Format SD Card
Please install an SD Card (upto 64GB) in your Doorbell if you need to record any videos. This will allow you
to record and store videos on demand, take pictures on demand, set the Doorbell to record continuously
or to record videos automatically when it senses an alarm.
Once you install the SD Card, you will need to Format it before it can be used. Press “Format SD Card” and
“Continue” to format the card. Once formatted, it is ready for use.
Show Stored Pictures & Videos
Show Stored videos
Show stored pictures
List of Events, Alarms, Notifications
Advanced Settings
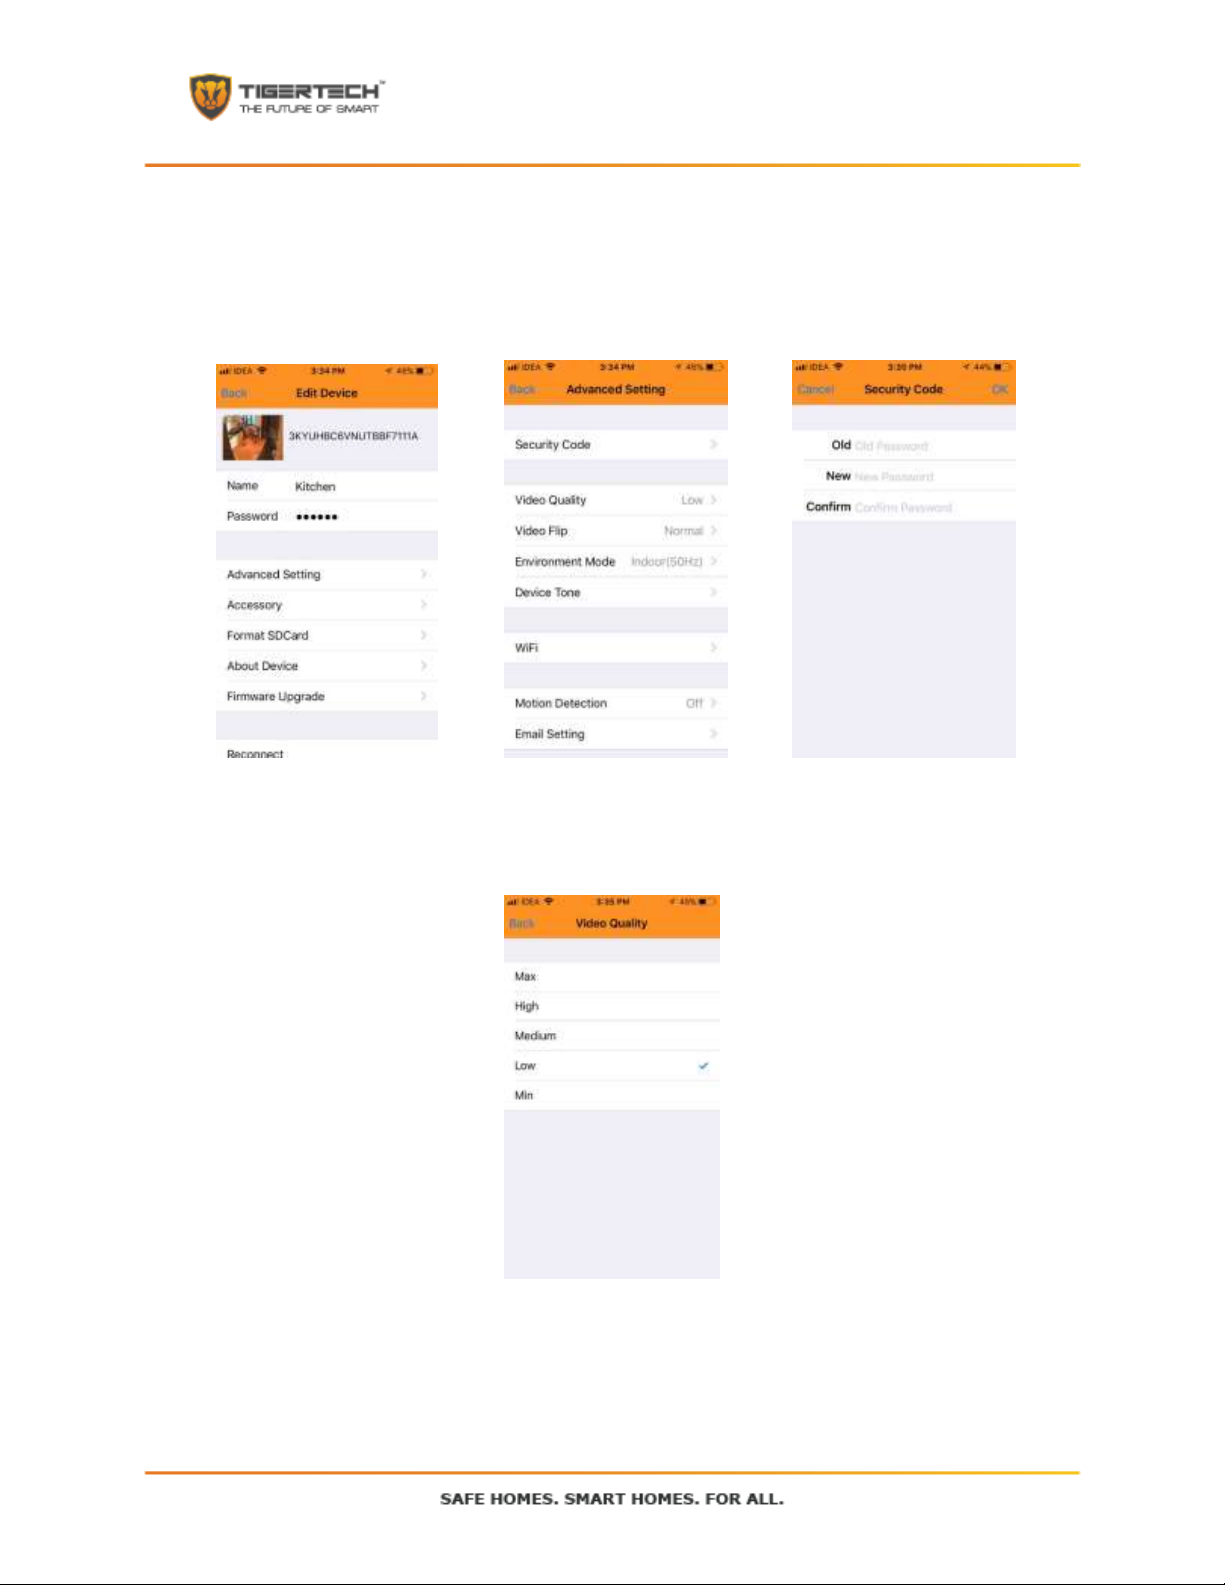
Advance Settings
1. Security Code: This allows you to change the Password for the Doorbell. Enter the old password
and then enter the new password twice, followed by OK.
2. Video Quality: Allows you to choose between SD and HD with 5 options provided
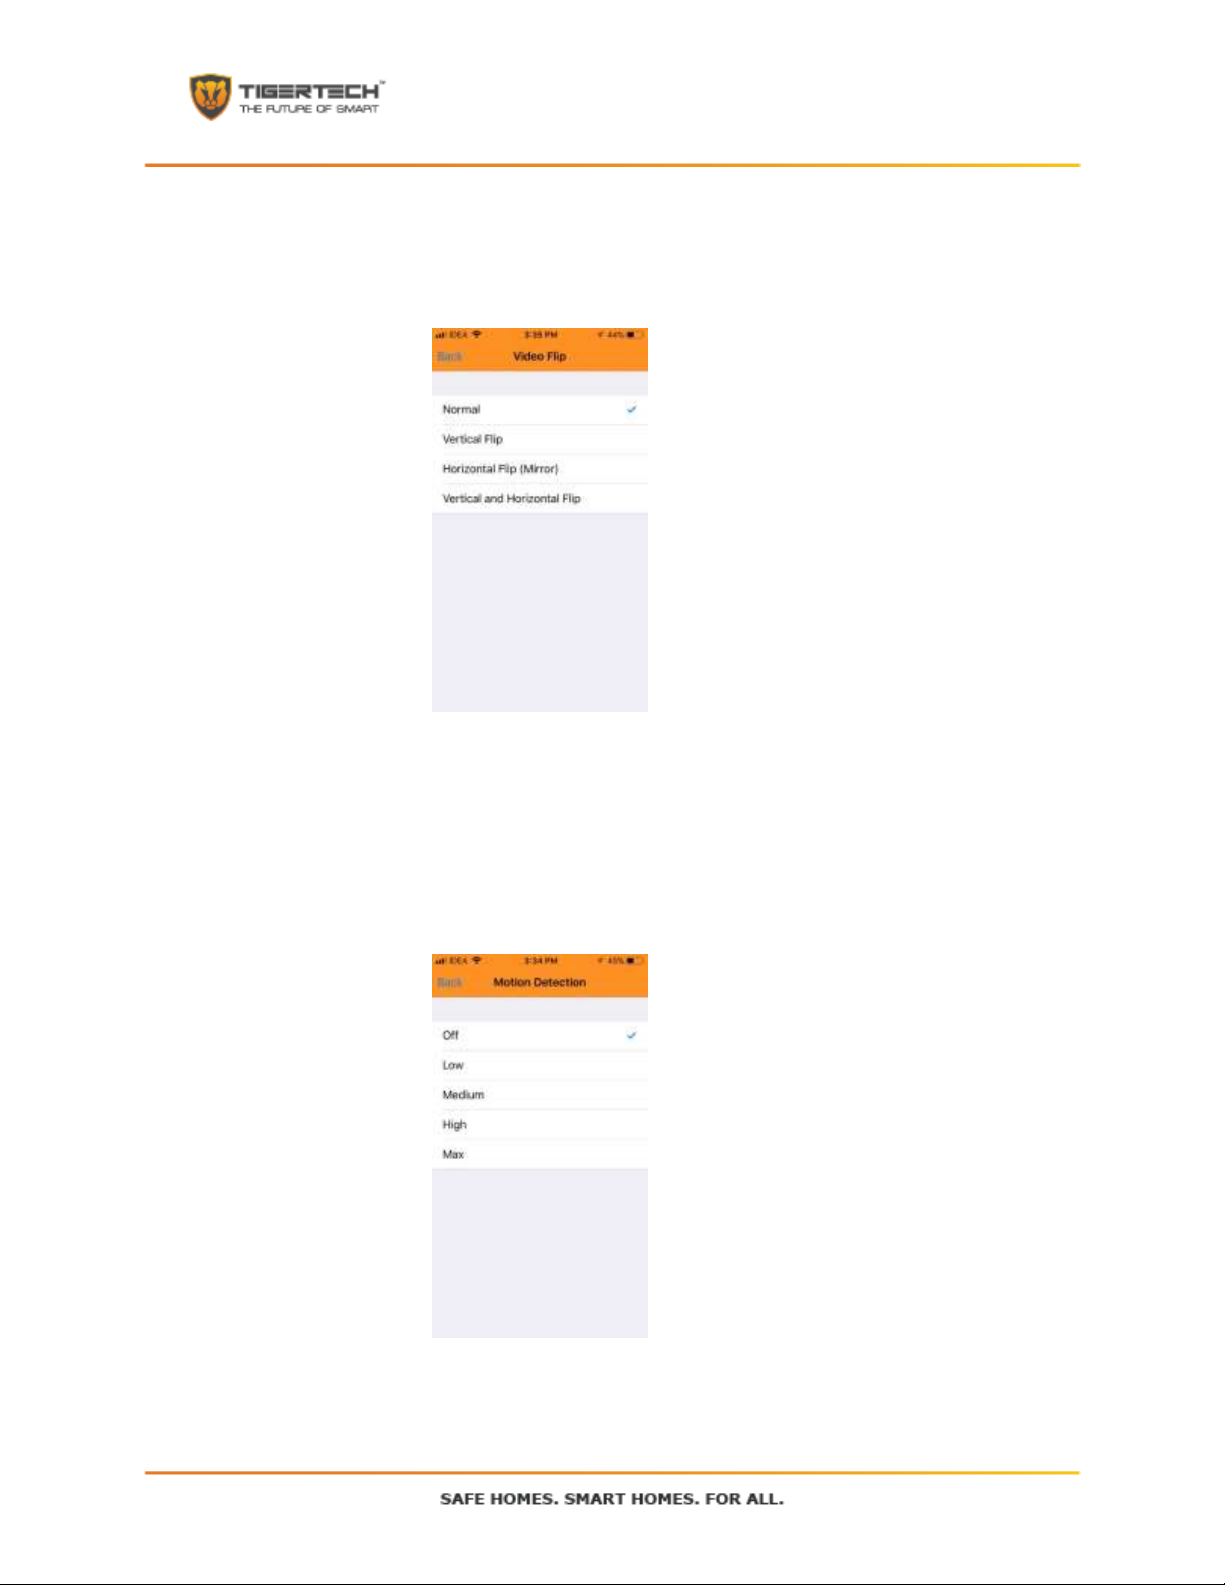
3. Video Flip: Allows you to install the Doorbell upside down and flip the video stream upside down
or mirror it.
4. Device Tone: This is to select the language. Default is English.
5. Motion Detection: The Doorbell has a video based motion sensor which can trigger an alert to your
Smartphone and also start recording automatically whenever an alarm is triggered. Use this option
to select the sensitivity of the motion sensor. Recording can only be done with an SD Card installed.
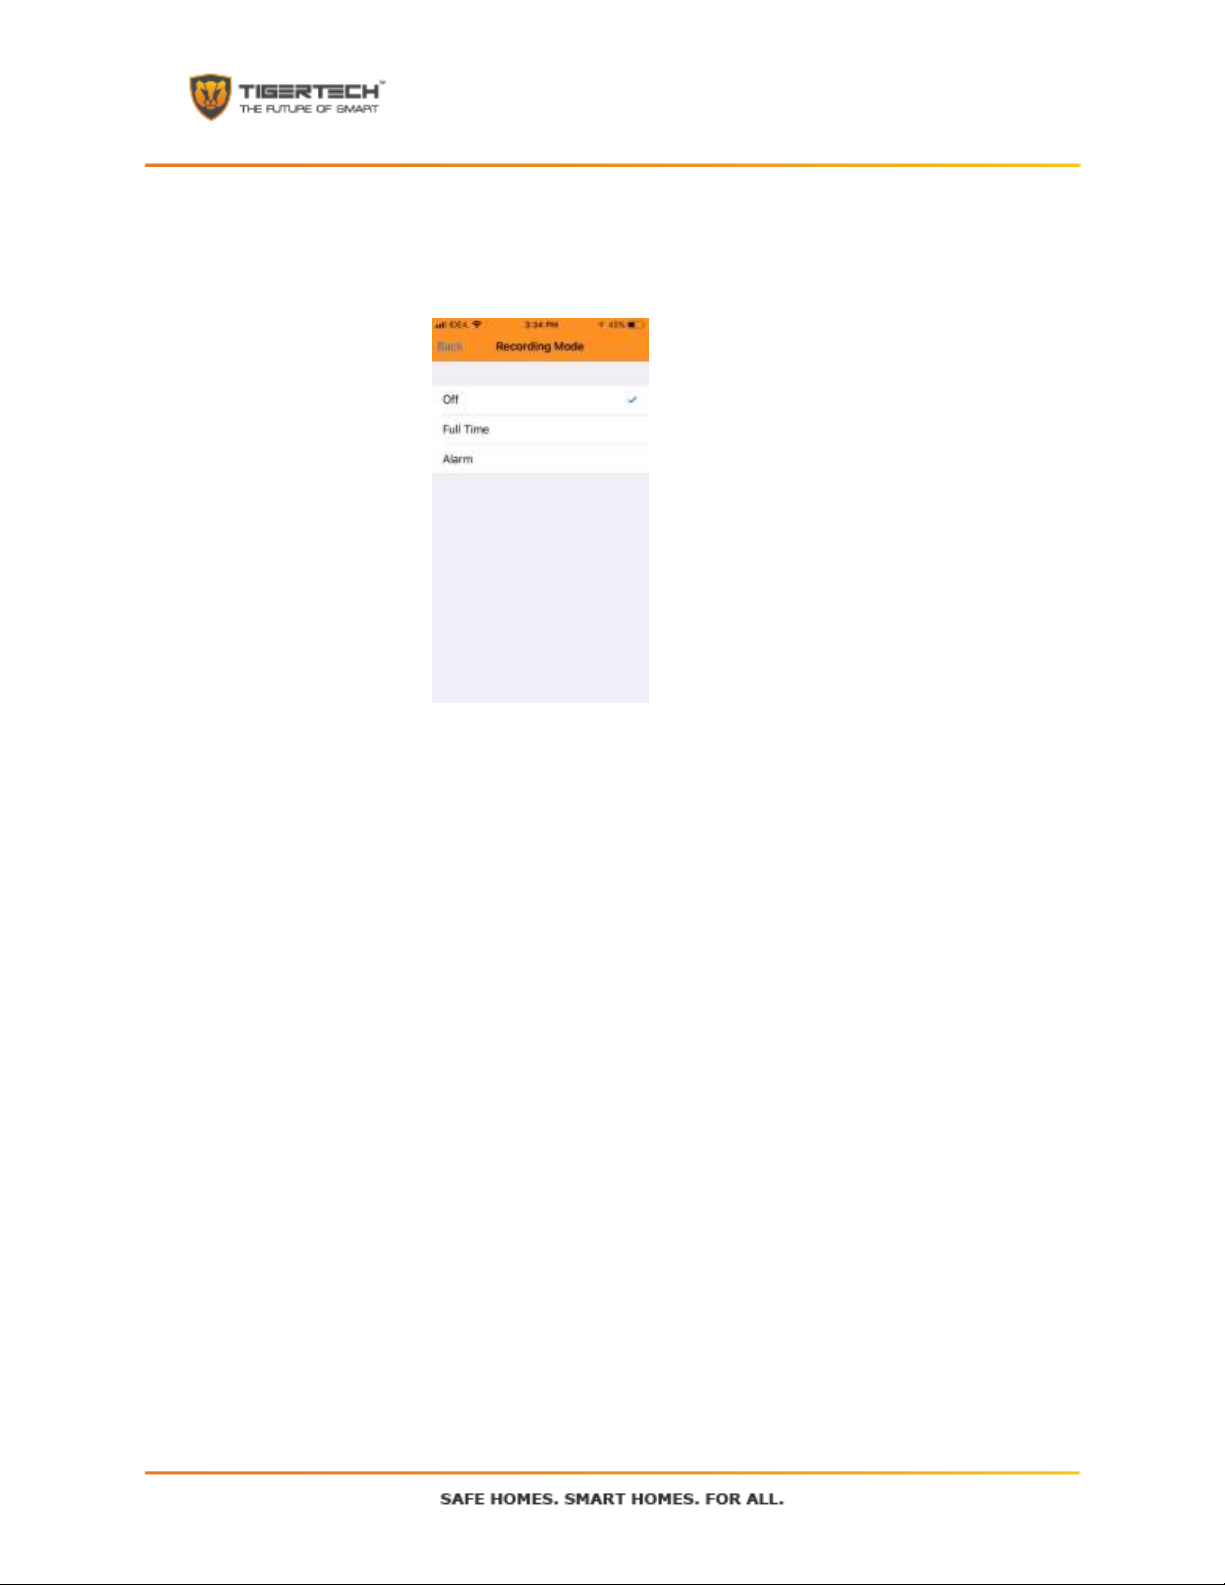
6. Recording Mode: This option allows you to record the video stream continuously or only on alarm
(when motion is sensed).
Doorbell Reset
In case you have entered an incorrect Wi-Fi password, or have moved your Doorbell to a different location
or you need setup the Doorbell again, please follow the following steps:
1. Switch off the Home / Office Wi-Fi temporarily
2. The Doorbell button should start blinking
3. Press and hold the ‘Bell’ button for 5 seconds. The LED indicator will blink fast and will say “Entering
AP mode”
4. Please go to Step 3 of “Add Doorbell to App”. (Connect the App to the Doorbell’s Wi-Fi Hotspot)
5. If you need to reset the Doorbell to factory defaults, you can press and hold the button for 10
seconds.
6. Please note that these reset functions will only work when the device is NOT connected to a local
Wi-Fi connection.

Troubleshooting:
Observation
Possible Cause
Action
Doorbell shows
“Offline”
Wi-Fi may have switched
off
Go to “Settings” and press “Reconnect”
Doorbell shows
“Offline”
Power may be off
Connect Doorbell to UPS supported AC power
Doorbell shows
“Offline”
Doorbell has
disconnected from App
Delete the doorbell from the App and add it again
Video not being
recorded
SD Card has not been
installed
Install SD Card and Format it before recording
Motion sensor not
working
May be turned off or
Sensitivity needs to be
increased
Go to Settings and check Motion Sensor sensitivity
No notifications
from Doorbell
App may have been
closed or not in
background
Restart App

General Specifications
Power Supply
DC 12V/1000mA
Power Usage
< 3W
Working Temperature
-20℃to 50℃
Working Humidity
≤100%
Size of Doorbell Unit
Diameter: 67.5mm (Circular) / Thickness: 20.5mm
Packing Size
L: 144mm x W: 86mm x H: 69mm
Gross Weight
320g
Image Maximum Resolution
1280 x 800
Technical Specifications
OS Platform
Android / iOS (iPhone, iPad) / Windows (Internet Explorer)
Image Sensor
1/4" CMOS Sensor
FOV/155°C Wide-angle lens (4 Glass)
Video Compression
H.264, M-JPEG
Streams
2 Streams with H.264/M-JPEG
Resolution
1280 (H) x 800 (v), D1, CIF, QCIF/ 1-30 / 256Kbps - 8Mbps
OSD
Supports English character, channel name, date and time super position. The
overlay position is adjustable.
Voice Intercom
Two-way Voice Intercom
Speaker: 90-96dB, Echo Cancelation
Audio Compression Algorithm
G.726, SPEEX
Networking Protocol
P2P, HTTP, RTSP, UDP, NTP, SMTP, DHCP, DDNS, PPPoE, FTP, APN, MQT
Storage
FTP/Email Remote Storage, Phone Remote Storage, TF Card Storage
Access Protocol
WEB, SDK API, ONVIF2.2, P2P
Alarm Handling
Record Upload, Alert with Motion Alarm, Email Push, Phone Push

Personal Information Security & Declarations
-Please install and use this product correctly.
-In order to guarantee the safe use of the products, please ensure that your product is not used
to spy on people without their permission.
-We adopt technology and management measures to ensure the safety of network
information. TigerTech will not responsible for any illegal use of this product. The
user bears complete and comprehensive responsibility for his or her actions.
Please note that removal of or any damage to the product shell will void the warranty.
Please use the original factory provided adapters and accessories. Please note that the device comes with
a special power adapter which is the ONLY adapter to be used for powering the device. Using any other
adapter will NOT WORK and will cause damage and warranty will be voided.
If you do not use this product correctly or connect any incompatible adapters, this will damage the product,
cause the warranty to be immediately voided, and may even endanger the safety of the user.
TigerTech Smart Living Pvt. Ltd. does not undertake any responsibility or liability whatsoever for the
customers or user’s safety at any time, in any way, shape or form.
The successful functioning of this product depends on the available Wi-Fi network. You need to ensure that
the Internet is working and that you have a good Wi-Fi network availability near the device (< 2mbps
upload speed). Please note that the device will not work when Wi-Fi is down and will not provide good
results if Wi-Fi is slow. TigerTech does not undertake any responsibility for any losses of any kind and / or
service disruption due to network failure or any other causes including force majeure causes.
Important Safety and Handling Information
To avoid injury, read all operating instructions and the following safety information before using your
device.
Warning: Failure to follow these safety instructions could result in fire, electric shock, or other injury or
damage to the device or other property.
The TigerTech device was built to withstand traditional wear and tear. Do not Disassemble, open, crush,
bend, deform, puncture, shred, microwave, incinerate, paint the device or insert foreign objects into the
device. Do not use or attempt to install your device if it has been damaged.
Water and Wet Locations. Your device is weather resistant but not waterproof. Take care not to spill
any food or liquid on the device especially before it’s installed. Try to install your device in a dry location,
protected from adverse weather conditions.
DO NOT ATTEMPT TO INSTALL YOUR DEVICE IF YOU OR THE DWELLING ONTO WHICH YOU ARE
ATTEMTPING TO INSTALL THE DEVICE, ARE WET. USE THE CIRCUIT BREAKER, OR TURN OFF THE POWER
PRIOR TO INSTALLING THE DEVICE.
Repairing or Modifying the device. Never attempt to repair or modify your device. Doing so will
automatically void your warranty.
Child Hazards. Keep the device and its accessories out of the reach of small children.

Keeping the device Within Acceptable Temperatures. The TigerTech device is designed to be
operated in regular temperatures in India (-20C to 50C). Extreme Low-or high-temperature conditions
might cause the Device to stop working properly. Please keep the device out of direct sunlight.
TigerTech Smart Living Pvt. Ltd.
1, Raj-Shree Apartments, Nilgiri Lane,
Aundh, Pune 411007
Support: +91-7720056565
Email: contact@tigertechlabs.com
Table of contents


