TIS TIS-WS-71 User manual

TIS WeaTher STaTIon
InSTaLLaTIon ManUaL
The Weather Station can measure outdoor tem-
perature, humidity, rainfall level, wind direction
and speed, brightness, and ultraviolet level, and
it can combine them all into one logic to provide
the best savings and performance for your auto-
mation project.
Automation Made Easy
Model: TIS-WS-71
ProDUCT InForMaTIon
6 58921 79909 3
BarCoDe (UPC-a)
PRODUCT SPECIFICATIONS
Temperature Measuring Range -30˚C - 60˚C
Accuracy +/- 1°C
Humidity Measuring Range 10%~99%
Accuracy
+/- 5%
Rain Volume Display
Range 0 – 9999mm
Accuracy +/- 10%
Wind Speed Range 0-50m/s (0~100mph)
Accuracy +/- 1m/s (wind speed< 5m/s)
Brightness
Range 0-400000 Lux
Accuracy +/- 15%
TIS Bus
Number of devices on 1 line Max. 64
Bus voltage 12-32 V DC
Current consumption <20 mA / 24 V DC
Mounting
Floor Mount Special column for floor mount
Connection Terminal Data / bus / 4 Pin Plug Resistive Temp Sensor
Weight
Without packaging 0.8 KG
Dimensions Width × length × height 83mm × 203mm × 154mm
Housing
Materials ABS
Casing color Gray
IP rating IP 65 outdoor

2
INSTALLATION MANUAL
MODEL: TIS-WS-71
TIS CONTROL LIMITED
RM 1502-p9 Easey CommBldg
253-261 Hennessy Rd Wanchai
Hong Kong
TEXAS INTELLIGENT SYSTEM LLC
SUITE# 610. 860 NORTH DOROTHY DR
RICHARDSON
TX 75081.USA
Copyright © 2020 TIS, All Rights Reserved
TIS Logo is a Registered Trademark of Texas Intelligent System LLC in the
United States of America. This company takes TIS Control Ltd. in other
countries. All of the Specifications are subject to change without notice.
www.tiscontrol.com
TIS WeaTher STaTIon
oVerVIeW
1
5
6
7
11
10
8
2
4
3
9
▸
1. Wind vane
▸
2. Wind speed sensor
▸
3. RS485 connector
▸
4. Battery compartment
▸
5. LED indicator: Light will display for
4s when the unit powers up. Then,
the LED will ash once every 16
seconds (the sensor transmission
update period).
▸
6. Reset button
▸
7. Thermo-hygro sensor
▸
8. UV sensor
▸
9. Light sensor
▸
10. Rain collector
▸
11. Bubble level
3
INSTALLATION MANUAL
MODEL: TIS-WS-71
TIS CONTROL LIMITED
RM 1502-p9 Easey CommBldg
253-261 Hennessy Rd Wanchai
Hong Kong
TEXAS INTELLIGENT SYSTEM LLC
SUITE# 610. 860 NORTH DOROTHY DR
RICHARDSON
TX 75081.USA
Copyright © 2020 TIS, All Rights Reserved
TIS Logo is a Registered Trademark of Texas Intelligent System LLC in the
United States of America. This company takes TIS Control Ltd. in other
countries. All of the Specifications are subject to change without notice.
www.tiscontrol.com
TIS WeaTher STaTIon
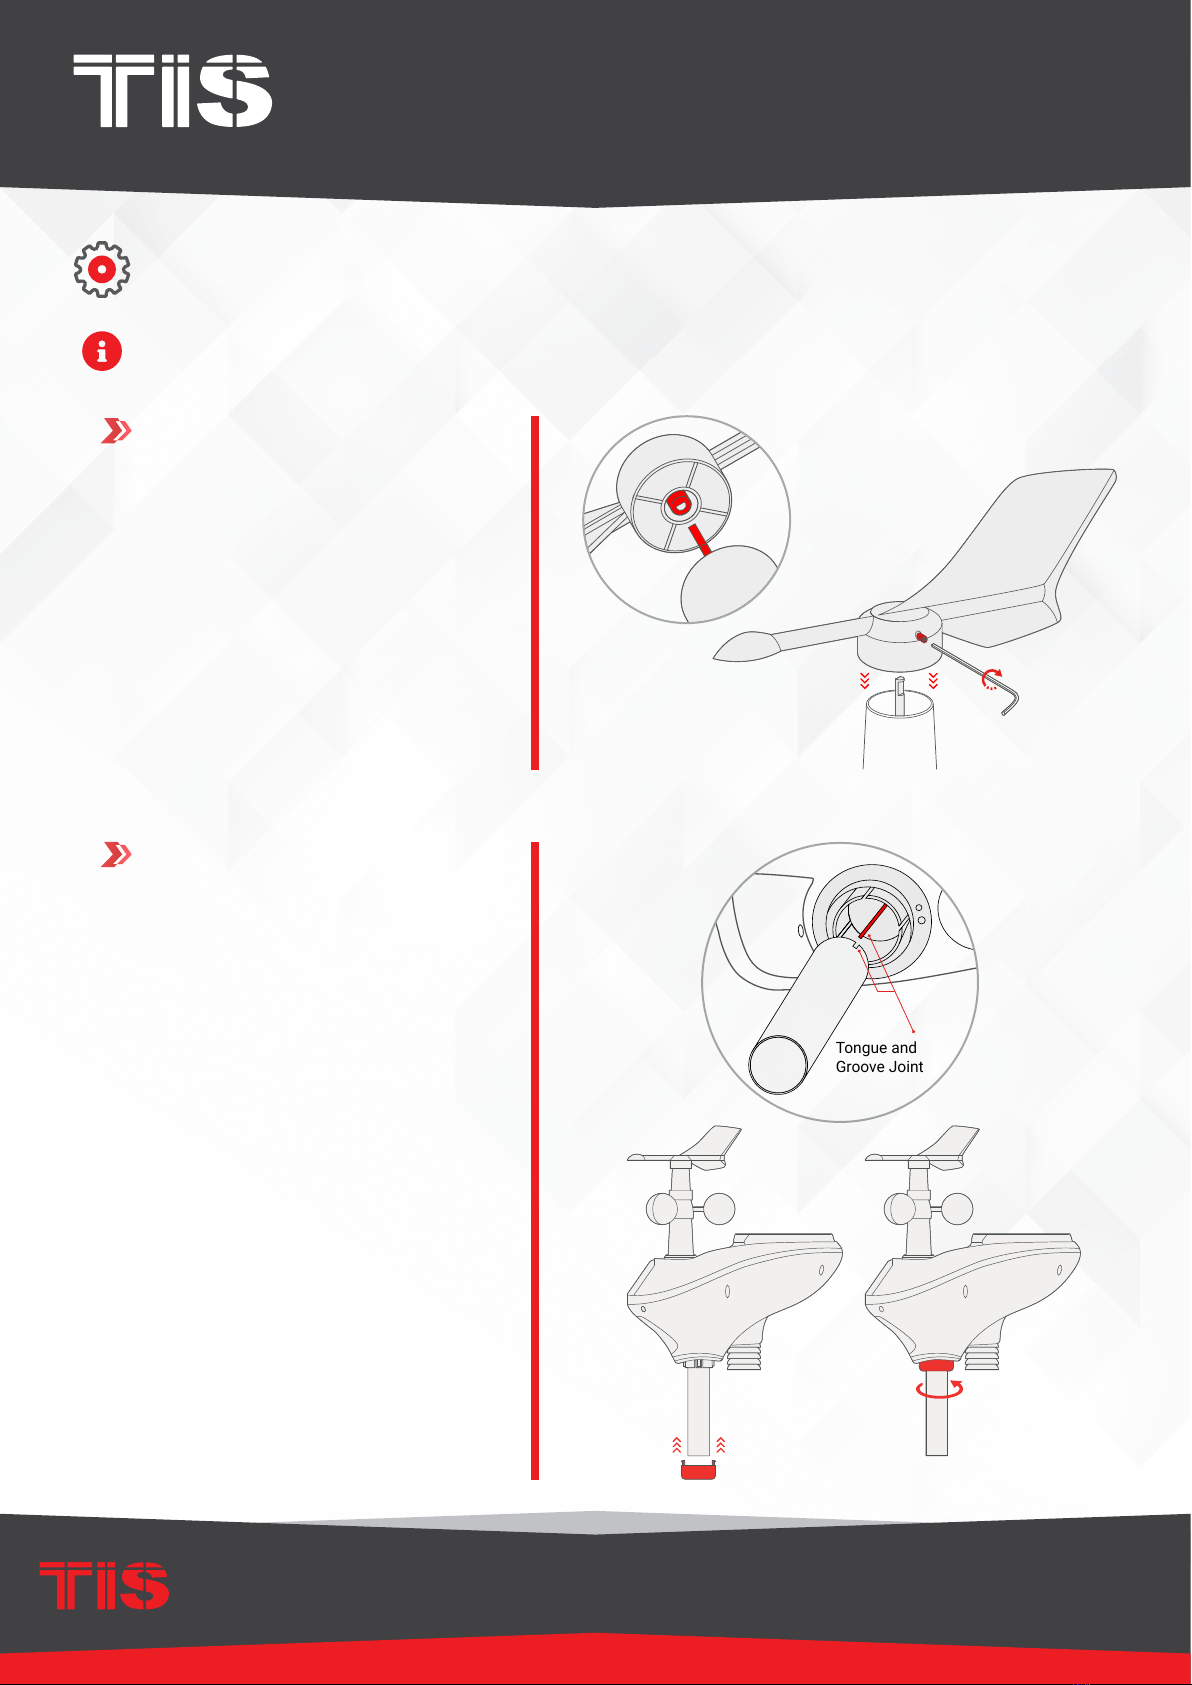
ATTACH THE WIND VANE
Push the wind vane into the shaft,
as shown in in the left gure.
Tighten the set screw with the Allen
wrench (included).
Make sure the wind vane can spin
freely.
INSTALL MOUNTING POLE
Insert the pole into the base.
Tighten the lid by rotating it into the
base, as shown in Figure.
Before placing and installing all Weather Station components in their nal destination, please
set up your work area with all parts nearby so that you can test each function.
1
2
InSTaLLaTIon STePS
Tongue and
Groove Joint

4
INSTALLATION MANUAL
MODEL: TIS-WS-71
TIS CONTROL LIMITED
RM 1502-p9 Easey CommBldg
253-261 Hennessy Rd Wanchai
Hong Kong
TEXAS INTELLIGENT SYSTEM LLC
SUITE# 610. 860 NORTH DOROTHY DR
RICHARDSON
TX 75081.USA
Copyright © 2020 TIS, All Rights Reserved
TIS Logo is a Registered Trademark of Texas Intelligent System LLC in the
United States of America. This company takes TIS Control Ltd. in other
countries. All of the Specifications are subject to change without notice.
www.tiscontrol.com
TIS WeaTher STaTIon
INSTALL THE BATTERIES
(Optional if you do not use TIS- bus
Converter power)
Locate the battery door on the thermo-
hygrometer / rain gauge transmitter, as
shown in the gure. Turn the set screw
counter clockwise to loosen the screw
to open the battery compartment. Insert
3XAA rechargeable batteries in the
battery compartment. The LED indicator
on the back of the transmitter will turn on
for 4 seconds. After that, it will regularly
ash once every 16 seconds (the sensor
transmission update period).
3
InSTaLLaTIon STePS
SIZE AA LR6
SIZE AA LR6
SIZE AA LR6
SIZE AA LR6
SIZE AA LR6
SIZE AA LR6
LED Reset Button
noTe: If the LED indicator does not turn
on or stays on permanently, make sure
the batteries are inserted correctly or the
device is reset properly.
Do not install the batteries reversely; this
can permanently damage the thermo-
hygrometer.
5
INSTALLATION MANUAL
MODEL: TIS-WS-71
TIS CONTROL LIMITED
RM 1502-p9 Easey CommBldg
253-261 Hennessy Rd Wanchai
Hong Kong
TEXAS INTELLIGENT SYSTEM LLC
SUITE# 610. 860 NORTH DOROTHY DR
RICHARDSON
TX 75081.USA
Copyright © 2020 TIS, All Rights Reserved
TIS Logo is a Registered Trademark of Texas Intelligent System LLC in the
United States of America. This company takes TIS Control Ltd. in other
countries. All of the Specifications are subject to change without notice.
www.tiscontrol.com
TIS WeaTher STaTIon
MOUNT OUTDOOR SENSOR
Fasten the mounting pole to
your mounting pole or bracket
purchased separately) with the two
U-bolts, mounting pole brackets
and nuts, as shown in here.
Tighten the mounting pole to your
mounting pole with the U-Bolt
assembly, as shown in this gure.
The four letters N, E, S and W
represent the directions North,
East, South, and West. The wind
direction sensor has to be adjust-
ed so that the directions on the
sensor match your real location. A
permanent wind direction error will
occur if the wind direction sensor
is not positioned correctly during
installation.
4
U-Bolt Nut
U-Bolt
Pole Mounting Clamp
Weather Station Pole
InSTaLLaTIon STePS
1
5
6
7
11
10
8
2
4
3
9

6
INSTALLATION MANUAL
MODEL: TIS-WS-71
TIS CONTROL LIMITED
RM 1502-p9 Easey CommBldg
253-261 Hennessy Rd Wanchai
Hong Kong
TEXAS INTELLIGENT SYSTEM LLC
SUITE# 610. 860 NORTH DOROTHY DR
RICHARDSON
TX 75081.USA
Copyright © 2020 TIS, All Rights Reserved
TIS Logo is a Registered Trademark of Texas Intelligent System LLC in the
United States of America. This company takes TIS Control Ltd. in other
countries. All of the Specifications are subject to change without notice.
www.tiscontrol.com
TIS WeaTher STaTIon
LEVEL THE SENSORS
Use the bubble level on the rain
sensor as a guide to verify that the
sensors are level.
InSTaLLaTIon STePS
1
5
6
7
11
10
8
2
4
3
9
RESET BUTTON AND
TRANSMITTER LED
In the event that the outdoor sen-
sor is not transmitting, reset the
outdoor sensor.
CONNECT TO CONVERTER
You can cut the connector wire
head and use the 4 color wires
to connect it to the TIS WS-EQ
adaptor by connecting the yellow
wire to B, the red wire to A, the
green wire to +5V, and the black
wire to GND. Then, connect the
WS-EQ TIS-BUS wires to the TIS
network.
5
6
LED Reset Button
D+
24+
WS-EQ ADAPTOR
D- GND
EQ A
GND +5V B
TIS-BUS
Cat5e
To the TIS BUS Network
To the Weather Station
▸
With the tip of a straightened
paperclip, press and hold the
RESET BUTTON for three
seconds to completely discharge
the voltage.
▸
Take out the batteries, and wait
one minute, while covering the
solar panel, to drain the voltage.
▸
Put batteries back in, and
resynchronize with console by
powering it down and back up with
the sensor about 10 feet away.
7
INSTALLATION MANUAL
MODEL: TIS-WS-71
TIS CONTROL LIMITED
RM 1502-p9 Easey CommBldg
253-261 Hennessy Rd Wanchai
Hong Kong
TEXAS INTELLIGENT SYSTEM LLC
SUITE# 610. 860 NORTH DOROTHY DR
RICHARDSON
TX 75081.USA
Copyright © 2020 TIS, All Rights Reserved
TIS Logo is a Registered Trademark of Texas Intelligent System LLC in the
United States of America. This company takes TIS Control Ltd. in other
countries. All of the Specifications are subject to change without notice.
www.tiscontrol.com
TIS WeaTher STaTIon
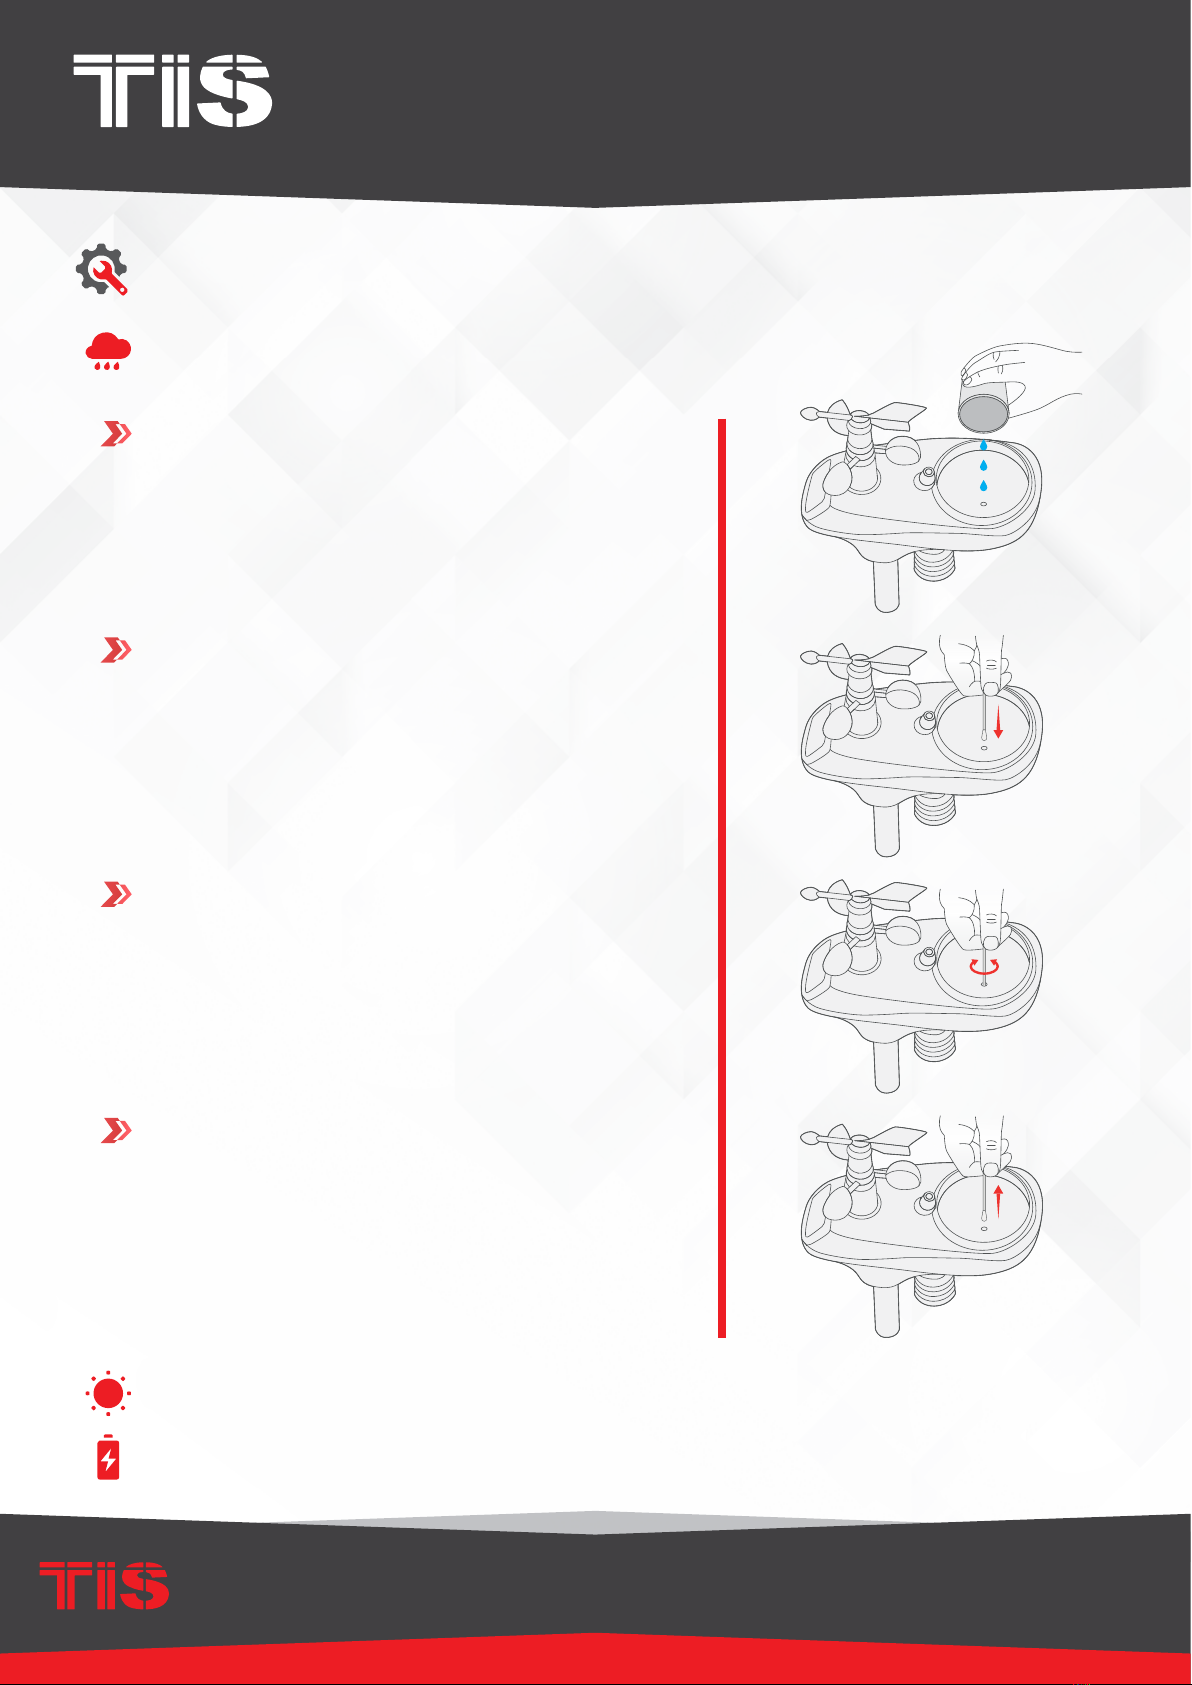
MaInTenanCe
Clean the rain gauge once every 3 months as follows:
Pour water into the rain collector to moisturize the
dirt inside the rain bucket.
Use an approximately 3-inch (80 mm) long cotton
swab, and push the cotton tip through the rain
collector hole until it reaches the self-emptying
mechanism. Then, press until the mechanism no
longer rotates.
Rotate the cotton swab, removing dirt from the
tipping mechanism and the rain collector hole.
1
2
3
Remove the cotton swab, and ush with water to
remove any remaining dirt.
4
Clean the solar radiation sensor every 3 months with water and towel.
Replace rechargeable batteries every 2 to 3 years.
Table of contents
Popular Weather Station manuals by other brands


Auriol
Auriol IAN 94604 Operation and safety notes

Ambient Weather
Ambient Weather DHR70B-STAINLESS user manual

Spectrum Technologies
Spectrum Technologies WatchDog 2900ET product manual

Omega Engineering
Omega Engineering WMS-22 user manual

Sainlogic
Sainlogic FT0366 user manual

Steinberg Systems
Steinberg Systems SBS-WS-200 user manual


