Titan Pro TP 700 User manual


SAFETY
SAFETY
SAFETY
SAFETY
OWNER
OWNER
OWNER
OWNER’
’
’
’S
S
S
SRESPONSIBILITY
RES PONSIBILITY
RESPONSIBILITY
RESPONSIBILITY
Accurateassemblyandsafeandeffectiveuseofthe
Rototilleristheowner
’
sresponsibility.
�Readandfollowallsafetyinstructions.
�Carefullyfollowallassemblyinstructions.
�Maintainthetilleraccordingtodirectionsand
ScheduleincludedinthisEarthquakeoperator
’
smanual.
�Ensurethatanyonewhousesthetilerisfamiliarwith
Allcontrolsandsafetyprecautions.
SPECIAL
SPECIAL
SPECIAL
SPECIALMESSAGES
MES SAGES
MESSAGES
MESSAGES
Yourmanualcontainsspecialmessagestobringattentionto
Potentialsafetyconcerns,machinedamageaswellashelpful
Operatingandservicinginformation.Pleasereadalltheinformation
Carefullytoavoidinjuryandmachinedamage.
NOTE:
NOTE:
NOTE:
NOTE:General
Ge neral
General
Generalinformation
in formation
information
informationis
is
i s
isgiven
gi ven
given
giventhroughout
th roughout
throughout
throughoutthe
th e
the
themanual
ma nual
manual
manualthat
th at
that
that
May
May
May
Mayhelp
he lp
help
helpthe
th e
the
theoperator
op erator
operator
operatorin
in
i n
inthe
th e
the
theoperation
op eration
operation
operationor
or
o r
orservice
se rvice
service
serviceof
of
o f
ofthe
th e
the
themachine.
ma chine.
machine.
machine.
IMPORTANT
IMPORTANT
IMPORTANT
IMPORTANTSAFETY
SA FETY
SAFETY
SAFETY
PRECAUTIONS
PRECAUTIONS
PRECAUTIONS
PRECAUTIONS
Please
Please
Please
Pleaseread
re ad
read
readthis
th is
this
thissection
se ction
section
sectioncarefully.
ca refully.
carefully.
carefully.
Operatethetilleraccordingtothesafetyinstructionsandrecommendations,
Outlinedhereandinsertedthroughoutthetext.Anyonewhousesthistiller
Mustreadtheinstructionsandbefamiliarwiththecontrols.Yourtilleris
Equippedwithasafetydevicethatenablesyoutostopthewheels
andtinesquicklyinanemergency.
Learnhowthesafetycontrolleveroperatesandhowtocontrolthetiler
atalltimes.
This
Th is
This
Thissymbol
sy mbol
symbol
symbolponts
po nts
ponts
pontsout
ou t
out
outimportant
im portant
important
importantsafety
sa fety
safety
safetyinstructions
in structions
instructions
instructionswhich
wh ich
which
whichif
if
i f
ifnot
no t
not
notfollowed
fo llowed
followed
followedcould
co uld
could
could
Endanger
Endanger
Endanger
Endangersafety.
sa fety.
safety.
safety.Read
Re ad
Read
Readand
an d
and
andfollow
fo llow
follow
followall
al l
all
allinstruction
in struction
instruction
instructionin
in
i n
inthis
th is
this
thismanual
ma nual
manual
manualbefore
be fore
before
before
attempting
attempting
attempting
attemptingto
to
to
to
O perate
Op erate
Operate
Operatethis
th is
this
thisequipment.
eq uipment.
equipment.
equipment.

2
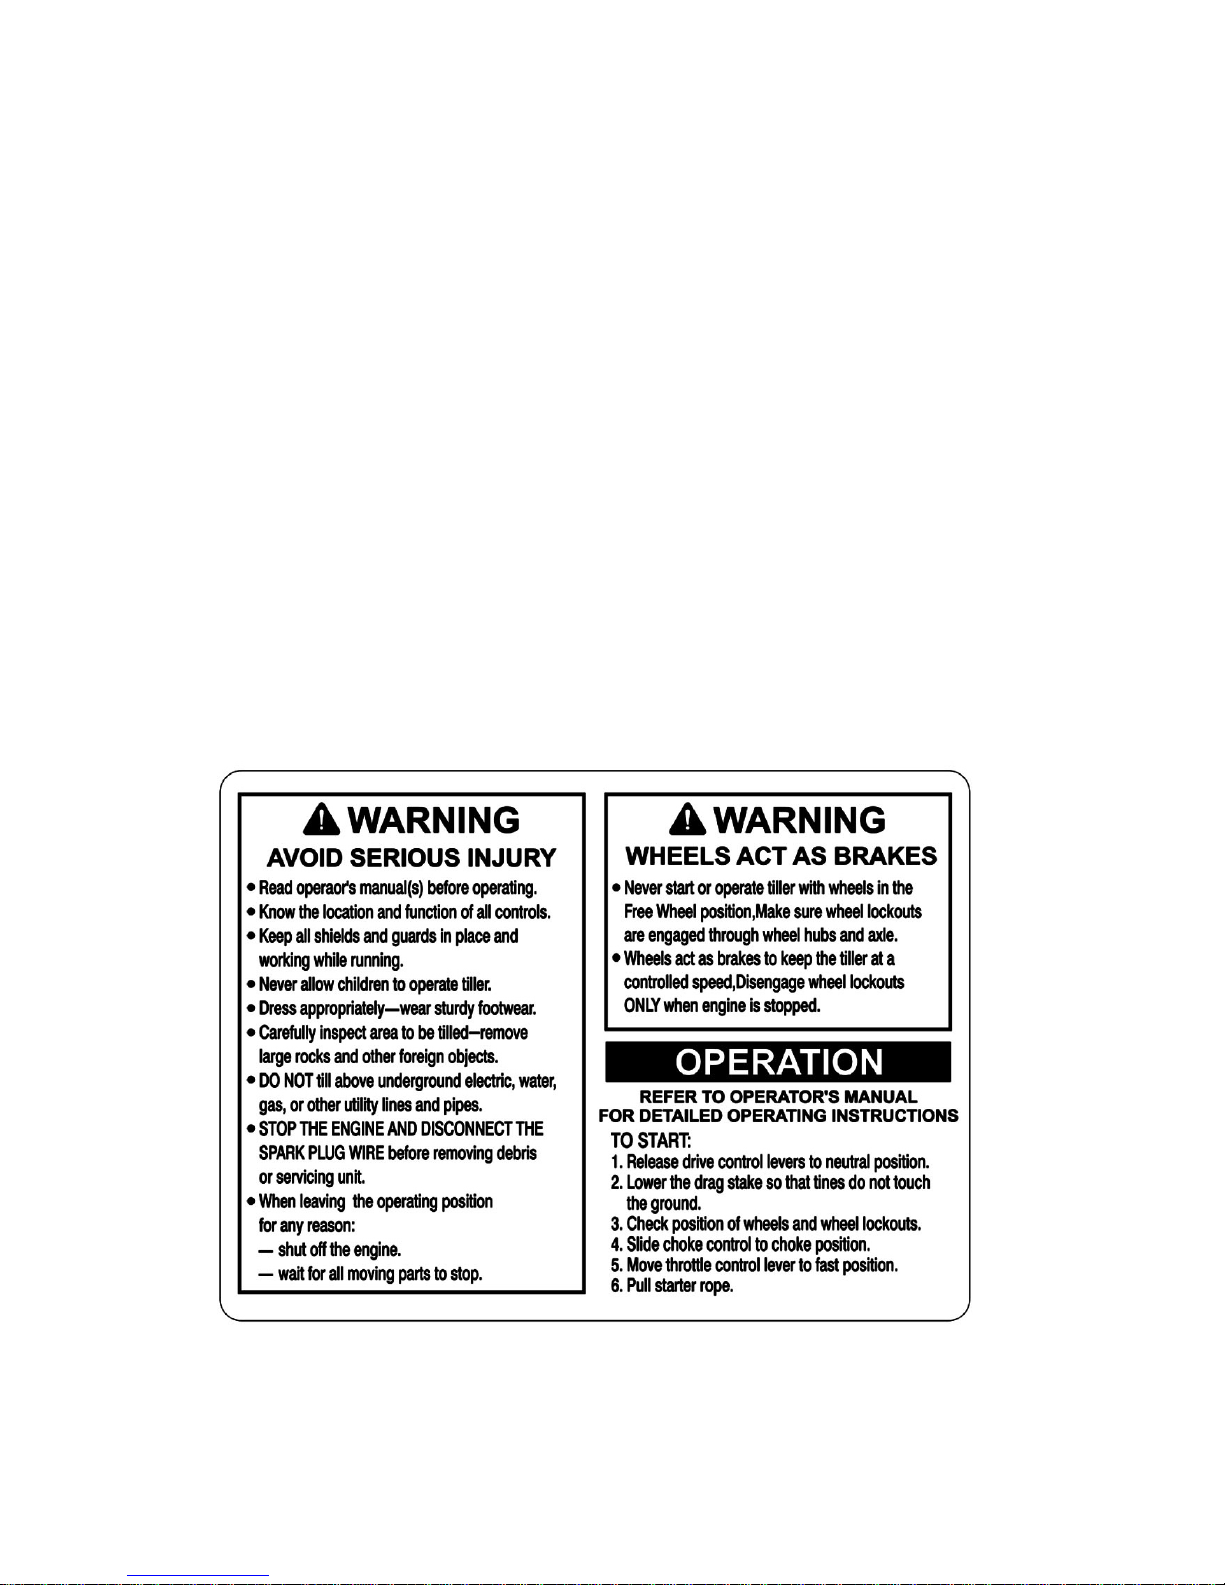
�Donotallowchildrentooperatethisrototiller.Keepsmallchildrenawayfromthearea
beingtilled.Donotallowadultstooperatethetillerwithoutproperinstruction.
PREPARATION
PREPARATION
PREPARATION
PREPARATION
�Dressappropriatelywhenoperatingthetiller.Alwayswearsturdyfootwear.Neverwear
sandals.Sneakers,oropenshoes,andneveroperatethetillerwithbarefeet.Donotwear
looseclothingthatmightgetcaughtinmovingparts.
�Carefullyinspecttheareatobetilledandremoveallforeignobjects.Donottillabove
undergroundwaterlines,electriccables,orpipes.Donotoperatethetillerinsoilwithlarge
rocksandforeignobjectswithcandamagetheequipment.
�Disengageallclutchesandleaveallcontrolleversintheneutralpositionbeforestartingthe
engine.
�Handlefuelwithcare:itishighlyflammable.
a.Useandapprovedfuelcontainer.
b.Neveraddfueltoarunningengineorhotengine.
c.Fillfueltankoutdoorswithextremecare.Neverfillfueltankindoors.
d.Replacegasolinecapsecurelyandcleanupspilledfuelbeforerestarting.
�Neverattempttomakeanyadjustmentswhiletheengineisrunning.
OPERATION
OPERATION
OPERATION
OPERATION
�Neveroperatethetillerwithoutguards,covers,andhoodsinplace.
�Neverstarttheengineoroperatethetillerwiththewheelhubsandwheelaxle.Thewheels
actasbraketokeepthetilleratacontrolledspeed.Disengagewheellockpintopermit
free-wheelingonlywhenengineisstopped.
�Keephands,feet,andclothingawayfromrotatingparts.Keepclearoftillertinesatalltimes.
�Tinesandwheelsrotatewhentillerisengagedinforwardorreverse-inforward,tinesand
wheelsrotatewhenthedrivesafetycontrollever(FORWARD
FO RW ARD
FORWARD
FORWARD),ispusheddowntowardthe
handlebar.Inreverse,wheelsandtinesrotatewhenthedrivesafetycontrollever
(REVERSE
REVERSE
REVERSE
REVERSE),ispulledbacktowardtheoperator.Releasingthereversehandletotheneutral
positionstopsthewheelsandtines.Donotoperatebothdrivesafetycontrolleversatthe
sametime.
�Beextremelycautiouswhenoperatinginreverse.
Takeextracaretoavoidslippingorfalling,
andkeephandsandfeetclearoftines.
�Useextremecautionwhenoperatingonor
crossinggraveldrives,walks,orroads.
Stayalertforhiddenhazardsortraffic.

3
�Afterstrikingaforeignobject,stoptheengine,removethewirefromthesparkplug,
thoroughlyinspectthetillerforanydamage,andrepairthedamagebeforerestartingand
operatingthetiller.
�Ifvegetationclogsthetines,raisethehandlebarstoelevatethetines,andrunthetillerin
reverse.Ifthisdoesnotcleancloggedvegetationfromthetines,STOP
STO P
STOP
STOPTHE
TH E
THE
THEENGINE
EN GINE
ENGINE
ENGINEAND
AN D
AND
AND
DISCONNECT
DISCONNECT
DISCONNECT
DISCONNECTTHE
TH E
THE
THESPARK
SP ARK
SPARK
SPARKPLUG
PLU G
PLUG
PLUGWIRE
WIR E
WIRE
WIREbeforeremovingvegetationbyhand.
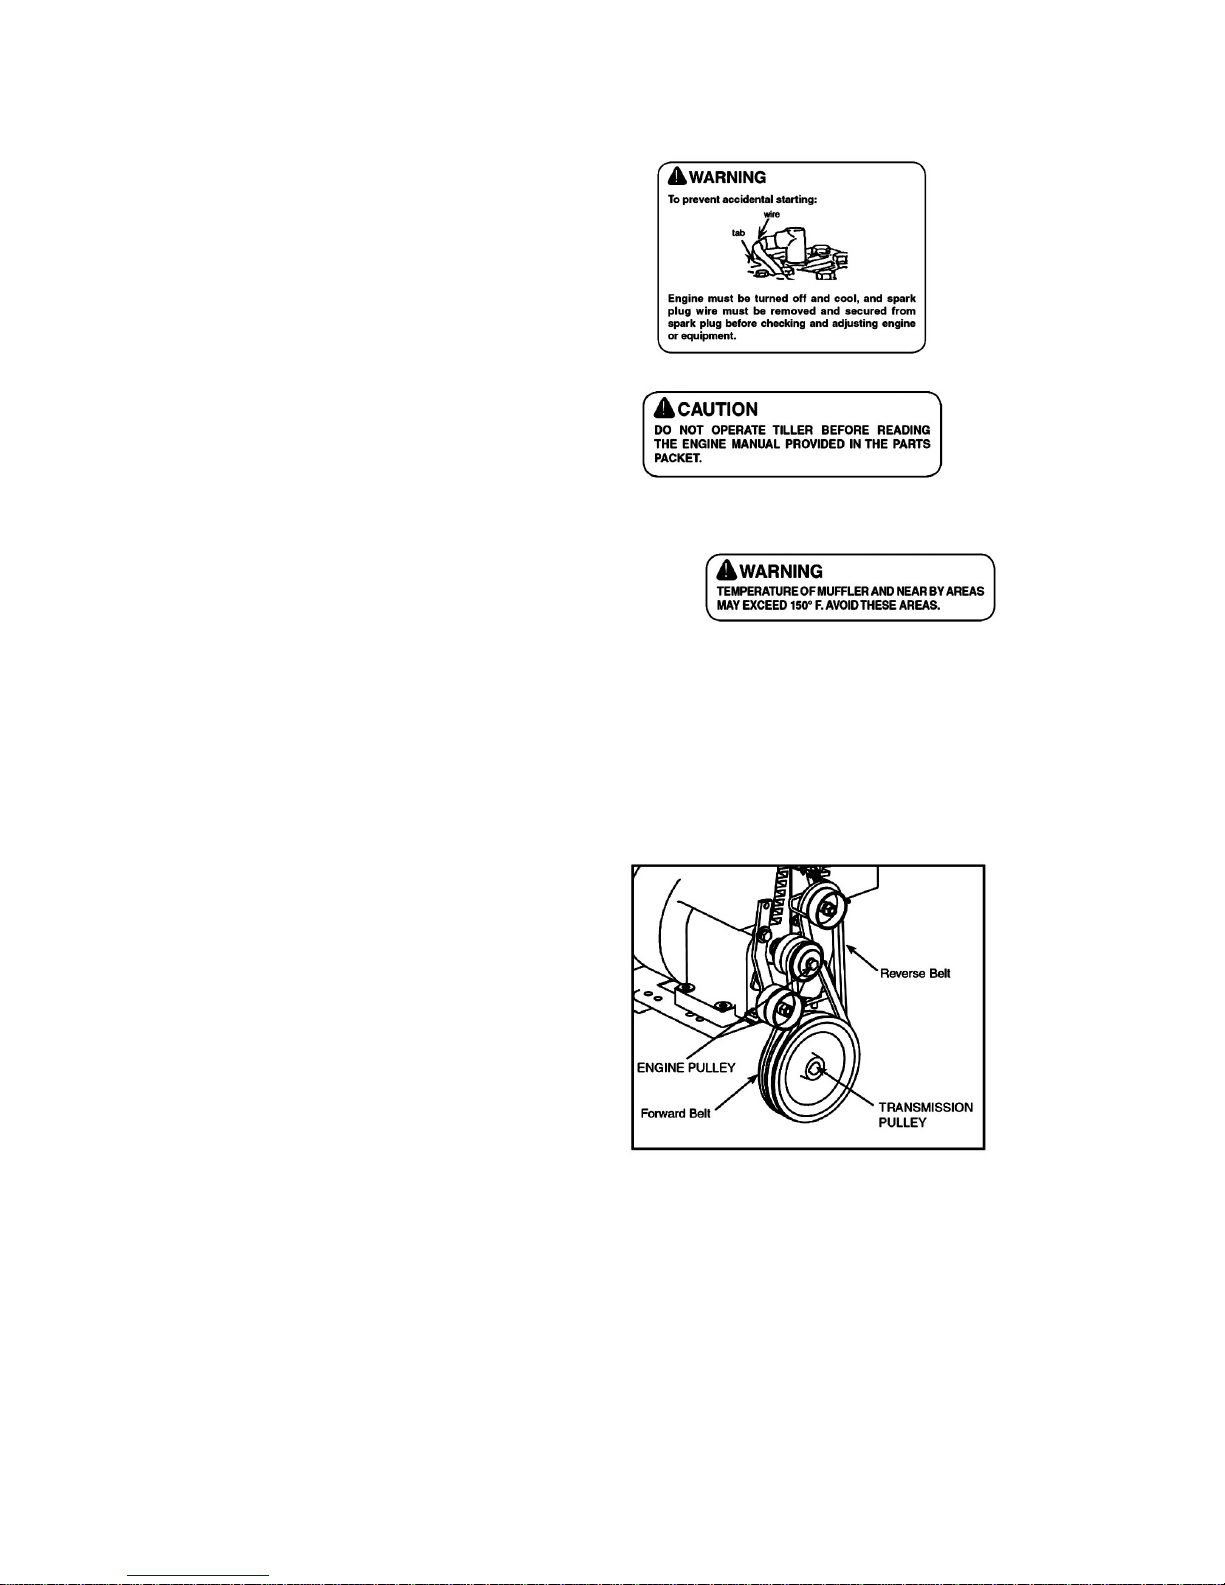
�Enginemufflerwillbehotfromoperation.Donottouchinwithbareskinoraseverebum
mayresult.
�Iftheunitshouldstarttovibrateabnormally,stoptheengineandcheckimmediatelyforthe
cause.Vibrationisgenerallyawarningoftrouble.
�Donotruntheengineindoors,exhaustfumesaredeadly.
�Donotoverloadthemachinecapacitybyattemptingtotilltoodeepattoofastarate.
�Neveroperatethemachineathightransportspeedsonslipperysurfaces.Lookbehindand
usecarewhenbacking.
�Neverallowbystandersneartheunit.
�Useonlyattachmentsandaccessoriesapprovedbythemanufacturerofthetiller.
�Neveroperatethetillerwithoutgoodvisibilityorlight.
�Becarefulwhentillinginhardground.Thetinesmaycatchinthegroundandpropelthetiller
backward.Ifthisoccurs,letgoofthehandlebarsanddonotrestrainthemachine.
�Takeallpossibleprecautionswhenleavingthemachineunattended.Disengageallcontrol
levers,stoptheengine,waitforallmovingpartstostop,andmakecertainguardsandshields
areinplace.
�Whenleavingtheoperatingpositionforanyreason:
�shutofftheengine
-waitforallmovingpartstostop
-
-
-
-MAINTENANCE
MAINTENANCE
MAINTENANCE
MAINTENANCEAND
AN D
AND
ANDSTORAGE
STO RAGE
STORAGE
STORAGE
�Keepmachine,attachments,andaccessoriesinsafeworkingcondition.
�Checkshearbolts,enginemountingbolts,andotherboltsatfrequentintervalsforproper
tightnesstobesuretheequipmentisinsafeworkingcondition.
�Topreventaccidentalstarting,alwaysdisconnectandsecurethesparkplugwirefromthe
sparkplugbeforeperformingtillermaintenance.
�Neverruntheengineindoors.Exhaustfumesaredeadly.
�Alwaysallowmufflertocoolbeforefillingfueltank.
�Neverstoreequipmentwithgasolineinthetankinsideaclosedbuildingwherefumesmay
reachanopenflameorspark.Allowtheenginetocoolbeforestoringina nybuilding.
�Alwaysrefertotheoperator
’
sguideinstructionsforimportantdetailsifthetilleristobe
storedforanextendedperiod.
4
SAFETY
SAFETY
SAFETY
SAFETYDECALS
DEC ALS
DECALS
DECALS
�
�
�
�Thisrototillerunithasbeendesignedandmanufacturedtoprovideyouwiththesafetyand
reliabilityyouwouldexpectfromanindustryleaderinoutdoorpowerequipment
manufacturing.
�
�
�
�Althoughreadingthismanualandthesafetyinstructionsitcontainswillprovideyouwith
�
�
�
�thenecessarybasicknowledgetooperatedthisequipmentsafetyandeffectively,wehave
placedseveralsafetylabelsonthetillertoremindyouofthisimportantinformationwhile
youareoperatingtheunit.
�
�
�
�Theseimportantsafetylabelsareillustratedbelow,andareshownheretohelpfamiliarize
youwiththelocationandcontentofthesafetymessagesyouwillseeasyouperform
normaltillingoperations.Pleasereviewtheselabelsnow.Ifyouhaveanyquestions
regardingtheirmeaningorhowtocomplywiththeseinstructions,rereadthecomplete
safetyinstructiontextontheprecedingpages,orcontactyourlocaldealer.
�
�
�
�Shouldanyofthesafetylabelsbecomeunreadablebecauseofbeingworn,faded,or
otherwisedamagedduringtheuseofyourtiller,pleaseusethepartnumberinformation
providedtoorderareplacementlabelfromyourlocalauthorizeddealer.
�
�
�
�Thesafetylabelsareeasilyapplied,andwillactasaconstantvisualremindertoyou,and
otherswhomayusetheequipment.Followthesafetyinstructionsnecessaryforsafe,
effectiveoperationofyourrototiller.
5
ASSEMBLY
ASSEMBLY
ASSEMBLY
ASSEMBLYINSTRCTIONS
IN STRCTIONS
INSTRCTIONS
INSTRCTIONS
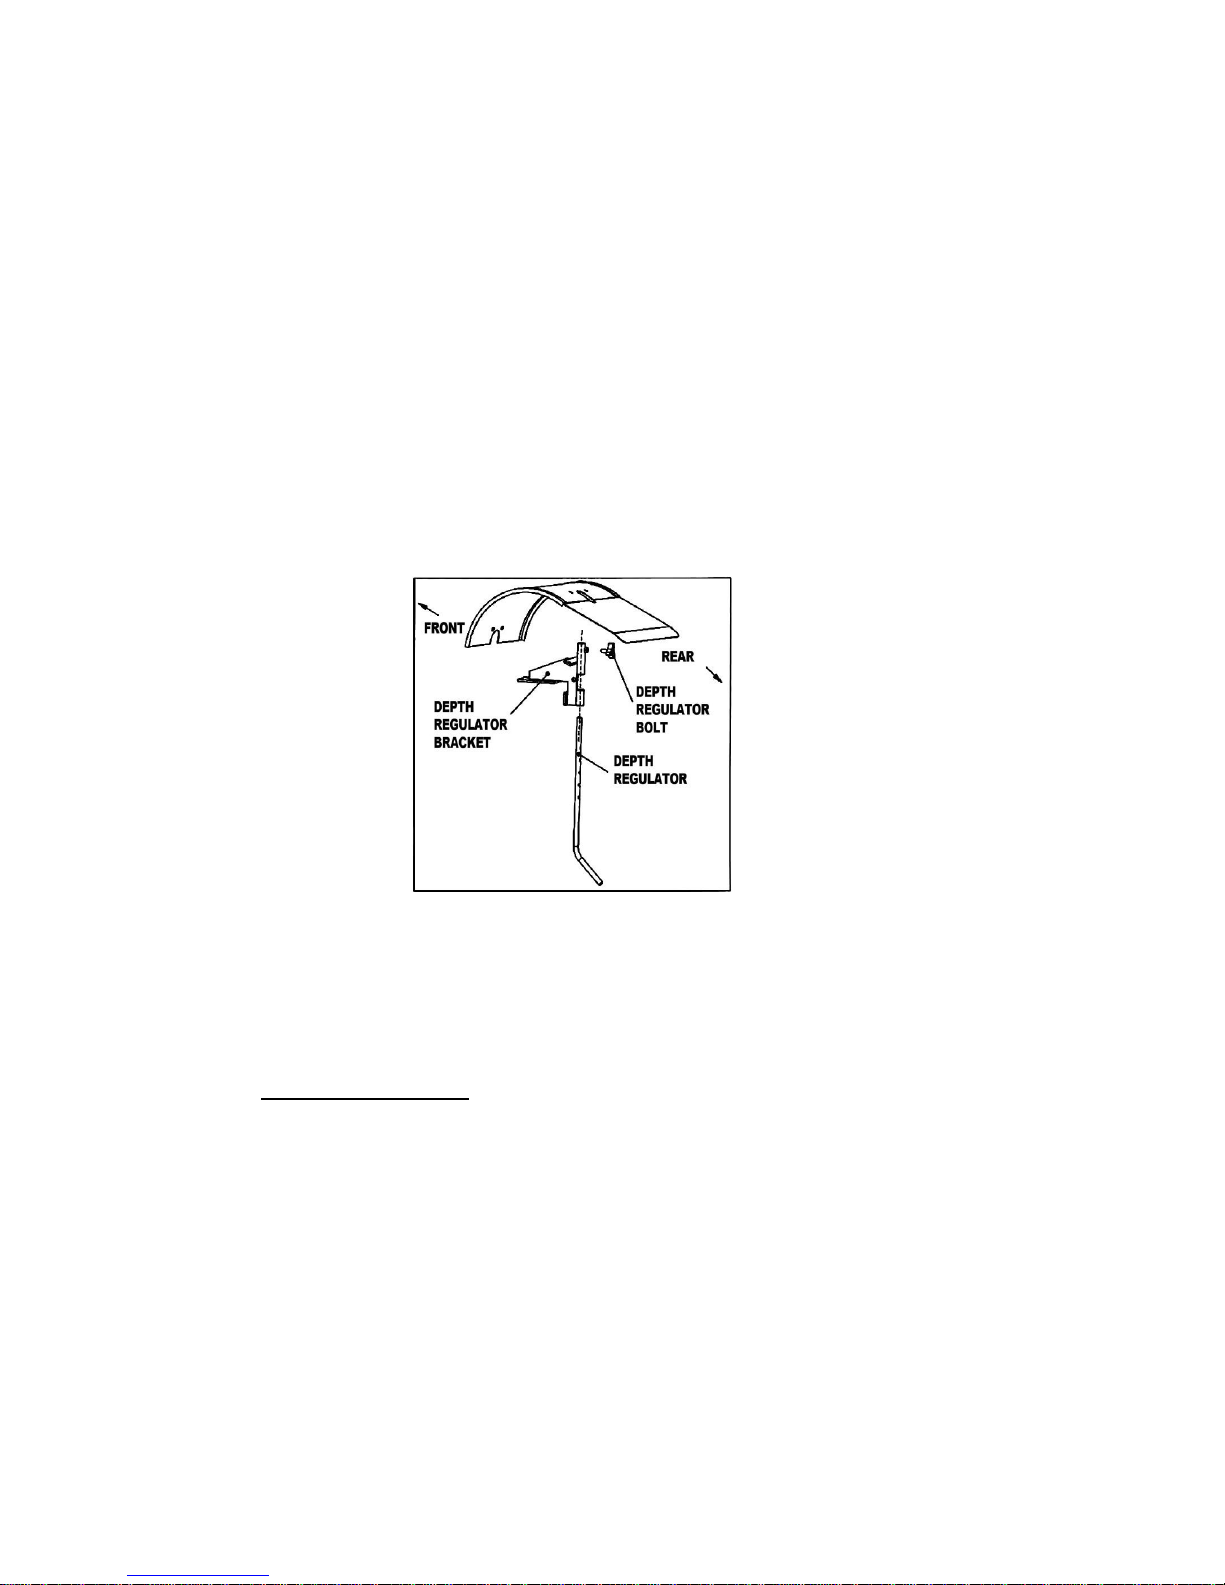
Therototillercomesfullyassembledexceptforafewparts.
Thefollowinginstructionswillhelpyouassembleand
adjustthetiller
’
sdepthregulator,cabletension,
andhandlebarheight.
You
willneedtwo9/16
’’
wrenches
tocompletetheassembly.
STEP
STEP
STEP
STEP1
1
1
1Install
In stall
Install
Installthe
th e
the
theDepth
De pth
Depth
DepthRegulator
Re gulator
Regulator
Regulator
1.
1.
1.
1.InstallthedepthregulatorintothetopofthedepthregulatorBracketwithhandlefacing
rearward.
2.
2.
2.
2.Insertdepthregulatorpinthroughdepthregulatorbracketandtopholeofdepth
regulator-tinesshouldcleartheground.

6
STEP
STEP
STEP
STEP2
2
2
2Attach
Atta ch
Attach
Attachex-arm-rest
ex -arm-rest
ex-arm-rest
ex-arm-reststems
ste ms
stems
stemsto
to
to
toth e
th e
the
theTiller
Ti ller
Tiller
Tiller
1.Theex-arm-reststemsonoutsideoftheTransmissioncoverandalignthelowerboles.
2.Insertone3/8
’’
-16x1
’’
boltforeachsideinlowerholes.
3.Start3/8
’’
-16nutsoneachbolt.
4.Insertone3/8
’’
-16x1
’’
boltforeachsideinUpperholesatdesiredhandlebarheight.
5.Tightenthenuts.

7
STEP
STEP
STEP
STEP3:Attach
3:A ttach
3:Attach
3:Attachhandle
ha ndle
handle
handlebar
ba r
bar
barto
to
to
toth e
th e
the
theTiller
Ti ller
Tiller
Tiller
1.
1.
1.
1.Insertfourfastnessboltsforeachsideineveryholes.
2.
2.
2.
2.Startfastnessnutsoneachbolt.
3.
3.
3.
3.Tightenallthenuts.
STEP
STEP
STEP
STEP4
4
4
4Fill
Fi ll
Fill
FillEngine
En gine
Engine
EngineCrankcase
Cr ankcase
Crankcase
Crankcase
IMPORTANT
IMPORTANT
IMPORTANT
IMPORTANT
Engineisshippedfromfactorywithoutoil.Engineoilmustbeaddedbeforestartingengine.
1.Addoilaccordingtoenginemanual.Donotoverfill.Useclean,highqualitydetergentoils.
Donotmixoilwithgasoline.Oillevelmustbefull.Checktheoillevelbyremovingoilfill
plug.
2.Alwayscheckoillevelbeforestartingengine.Refertoenginemanualforcapacityandtype
ofoiltouse.

8
OPERATION
OPERATION
OPERATION
OPERATION
PRE-START
PRE-START
PRE-START
PRE-STARTINSPECTION
IN SPECTION
INSPECTION
INSPECTION
1.Makesureallsafetyguardsareinplace
andallnutsandboltsaresecure.
2.Checkoillevelinenginecrankcase.Seeyour
enginemanualforprocedureandspecifcations.
3.Inspectaircleanerforcleanliness.Seeyourengine
manualforprocedure.
4.Checkthefuelsupply.Fillthefueltanknocloser
than1inchfromtopoftanktoprovidespacefor
expansion.Seeyourenginemanualforfuel
recommendations.
5.Besuresparkplugwireisattachedandspark
plugistightenedsecurely.
6.Checkpositionofwheelsandwheellockouts.
7.Checkdepthregulatorleverposition.
8.Examineundermeathandaroundengine
forsignsofoilorfuelleaks.
9.Inspectfuelhosesfortightnessandfuelseepage.
10.Lookforsignsofenginedamage.
11.Removeexcessivedebrisfrommuffler
areaandrecoilstarter.
START-UP
START-UP
START-UP
START-UP
Thecontrolsrequiredtostartandruntherototillerarelocatedontheengineandare
marked”choke”and“Throttle”.
Amoredetaileddescriptionofengineoperationandallrelatedprecautionsandprocedurescanbe
foundintheenginemanufacturer
’
smanualthataccompanieseachtiller.
COLD
COLD
COLD
COLDSTARTS
ST ARTS
STARTS
STARTS
1.Movechokelevertofullchokeposition.
2.Movethrottleleverto“start”.
3.Pullstartingropeoutslowlyonetimeandallowtoreturnnormally.
4.Pullstartingropeoutrapidly,andallowropetoreturnnormally.
5.Whenenginestarts,graduallymovechokeleverto“nochoke”positionandincreasethrottle
speed.

9
RESTATING
RESTATING
RESTATING
RESTATINGA
A
A
AWARM
WA RM
WARM
WARMENGINE
EN GINE
ENGINE
ENGINE
Restartinganenginethatisalreadywarnfrompreviousrunningdoesnormallyrequireuseofthe
choke.
1.Movethrottleleverto“start”position.
2.Pullstartingropeoutrapidlyuntilenginestarts.Allowropetoreturnnormally.Repeatuntil
enginestarts.
3.Adjustthrottlespeedto“high”forbesttilleraction.
IDLE
IDLE
IDLE
IDLESPEED
SP EED
SPEED
SPEED
Usethe“low”positiononthethrottleleverto
reducestressontheenginewhentillingis
notbeingperformed.Loweringtheengine
speedto“idle”willhelpextendthelifeof
themotor,aswellasconservefueland
reducethenoiseleveloftheequipment.
OPERATING
OPERATING
OPERATING
OPERATINGSPEED
SP EED
SPEED
SPEED
Fornormaltilling,setthethrottleleverto“fast”.
SHUTTING
SHUTTING
SHUTTING
SHUTTINGDOWN
DO WN
DOWN
DOWN
Tostoptheengineatanytime,turnengineON/OFFswitchtotheoffposition.Tostopwheelsand
tinesatanytime,releasedrivesafetycontrolleverstoneutralposition.
TILLING
TILLING
TILLING
TILLING
1Adjustthedepthregulatorlevertodesiredtillingdepth.
NOTE:
NOTE:
NOTE:
NOTE:Raise
Ra ise
Raise
Raisedepth
de pth
depth
depthregulator
re gulator
regulator
regulatorlever
le ver
lever
leverup
up
u p
upone
on e
one
onehole
ho le
hole
holeat
at
a t
ata
a
a
atime,
ti me,
time,
time,testing
te sting
testing
testingtiller
ti ller
tiller
tilleroperation
op eration
operation
operationafter
afte r
after
aftereach
ea ch
each
each
raise.
raise.
raise.
raise.Raising
Ra ising
Raising
Raisingdepth
de pth
depth
depthregulator
re gulator
regulator
regulatorlever
le ver
lever
levertoo
to o
too
toohigh
hi gh
high
highcan
ca n
can
canresult
re sult
result
resultin
in
i n
inloss
lo ss
loss
lossof
of
o f
ofcontrol
co ntrol
control
controlof
of
o f
oftiller
ti ller
tiller
tiller!
!
!
!
2
2
2
2Movethethrottlecontroltofast.
3Placethetillerinforwardbypushingdownonthedrivesafetycontrollever(FORWARD)—this
willengagethewheelsandtines.
NOTE:
You
canslowthetiller
’
sforwardadvanceatanytimebyputtingslightdownwardpressure
onthehandlebars.
You
canstopthetillerbyreleasingthedrivesafetycontrolleverstotheneutral
position.
DRIVE
DRIVE
DRIVE
DRIVESAFETY
SA FETY
SAFETY
SAFETYCONTROL
CO NTROL
CONTROL
CONTROLLEVERS
LEV ERS
LEVERS
LEVERS
FORWARD
FORW ARD
FORWARD
FORWARDLEVER
LEV ER
LEVER
LEVER

10
Engageswheelsandtinesintoforward.
Pushingdownthedrivesafetycontrol
Lever(FORWARD
FO RW ARD
FORWARD
FORWARD)towardthe
handlebarengagesthewheelsandtines.
Releasingtheleverstopsthewheelsand
tinesandbringsthetillertoacompletesstop.
REVERSE
REVERSE
REVERSE
REVERSELEVER
LE VER
LEVER
LEVER
Engageswheelsandtinesintoreverse
Pullingthedrivesafetycontrollever
(FORWARD)backtowardtheoperator
tiller.releasingtheleverstopsthewheelsand
tines.
Forwardhandle
Reverse
handle
ADJUSTMENTS
ADJUSTMENTS
ADJUSTMENTS
ADJUSTMENTS
WHEEL
WHEEL
WHEEL
WHEELLOCK
LO CK
LOCK
LOCKPINS
PI NS
PINS
PINS
Placewheelsintillingposition.
1.Removeclockpin.Alignholeinaxlewithholeinwheelhub.
2.Insertlockpinthroughholes,foldlockpintosecurepintoaxle.
3.Firmlylockwheelandaxletogetherbeforetilling.
4.Repeatforotherwheel

11
�Setthedepthregulatorleverwiththedetentpininoneofthehigherholes.This
willallowforshallowcultivationnecessarytoturnoverweeds,andbreakupand
aeratethesoil.
MAINTENANCE
MAINTENANCE
MAINTENANCE
MAINTENANCEAND
AN D
AND
ANDSTORAGE
ST ORAGE
STORAGE
STORAGE
MAINTENANCE
MAINTENANCE
MAINTENANCE
MAINTENANCE
Keepingthetillerintoprunningconditionwillprolongthetiller'slife,andhelpit
obtainoptimumperformancewheneveryouwishtostillyourgarden.
To
helpyouproperlycarefortherototiller,thefollowingpagesincludeamaintenance
schedule,routineinspectionprocedures,andsimplemaintenanceproceduresusing
basichandtools.Otherservicetasksthataremoredifficult,orrequirespecialtools,
arebesthandledbyprofessionalsandarenormallyperformedbyaqualified
mechanic.
�Goodmaintenanceisyourresponsibility,poormaintenanceisaninvitationto
trouble.
Followgoodshoppractices.
Keepserviceareacleananddry.
Bessureelectricaloutletsandtoolsareproperlygrounded.
Useadequatelightforthejobathand.
�Makesuretheengineisoffbeforeyoubeginanymaintenanceorrepairs.Thiswilleliminate
severalpotentialhazards:
Carbon
Carbon
Carbon
Carbonmonoxide
mo noxide
monoxide
monoxidepoisoning
po isoning
poisoning
poisoningfrom
fr om
from
fromengine
en gine
engine
engineexhaust.
ex haust.
exhaust.
exhaust.
Besurethereisadequateventilationwheneveryouoperatetheengine.
Neveroperatetheengineinaclosedbuilding.
Burns
Burns
Burns
Burnsfrom
fr om
from
fromhot
ho t
hot
hotparts.
pa rts.
parts.
parts.
Lettheengineandexhaustsystemcoolbeforetouching.
Injury
Injury
Injury
Injuryfrom
fr om
from
frommoving
mo ving
moving
movingparts.
pa rts.
parts.
parts.
Donotruntheengineunlessinstructedtodoso.
�Readtheinstructionsbeforeyoubegin,andmakesureyouhavethetoolsandskillsrequired.
�Toreducethepossibilityoffireorexplosion,becarefulwhenworkingaroundgasoline.Use
onlyanonflammablesolvent,notgasoline,tocleanparts.Keepcigarettes,sparksandflames
awayfromallfuel-relatedparts.
�Alwaysusepersonalprotectiondevicessuchaseye,handandhearingprotectorswhen
performinganyserviceormaintenance.
�Frequentlychecktillertines.Theyshouldbefreeofnicksandcracksandsecurelyfastenedin
place.
�Periodicallytightenallbolts,buts,screws,andcheckthatallpinsareproperlyinstalledto
makecertainunitissafetooperate.
�Whencompletingmaintenanceorservice,makesureallsafetyguardsanddevicesare

12
NOTE:
NOTE:
NOTE:
NOTE:Always
Al ways
Always
Alwayshave
ha ve
have
haveboth
bo th
both
bothwheel
wh eel
wheel
wheellock
lo ck
lock
lockpins
pi ns
pins
pinsin
in
i n
inor
or
o r
orout.
ou t.
out.
out.Do
Do
D o
Donot
no t
not
notoperate
op erate
operate
operatetiller
ti ller
tiller
tillerwith
wi th
with
withonly
on ly
only
onlyone
on e
one
onewheel
wh eel
wheel
wheel
locked.
locked.
locked.
locked.
Toplacewheelsinfree-wheelposition.
1.Removelockpin.Slidewheelinwardtowardmachine.
2.Insertpininaxleonly
3.Wheelshouldturnfreelyonaxle.
HANDLEBAR
HANDLEBAR
HANDLEBAR
HANDLEBARHEIGHT
HEI GHT
HEIGHT
HEIGHTADJUSTMENT
AD JUSTMENT
ADJUSTMENT
ADJUSTMENT
Adjusthandlebarheight.
Theidealheightofthehandlebarvarieswithoperatorheightandthedepthoftilling.Toadjust
handlebarheight:
1.Unscrewnutsandremovetopandbottomboltsoneachside.
2.Alignhandlebartodesiredholesonthelowerhandlebarmount.
3.Installboltsandnuts.Retighten
13
DEPTH
DEPTH
DEPTH
DEPTHREGULATOR
REG ULATOR
REGULATOR
REGULATORLEVER
LEV ER
LEVER
LEVER
Tillingdepthiscontrolledbytheheightof
thedepthregulatorlever.Toadjusttillingdepth:
1.Removedetentpin.
2.Raisethedepthregulatorlevertoposition
tinesatchosentillingdepth.
3.Alignholeindepthregulatorleverwithhole
indepthregulatorbracketandreplecedetentpin.
Depth
Depth
Depth
DepthRegulator
Re gulator
Regulator
RegulatorLever
Le ver
Lever
LeverDown
Do wn
Down
Down=
=
=
=Shallower
Sh allower
Shallower
Shallowertilling
ti lling
tilling
tilling.
.
.
.
Placethedetentpininthetopholeofthedepthregulatorleverforshallowesttilling.
Depth
Depth
Depth
DepthRegulator
Re gulator
Regulator
Regulatorlever
le ver
lever
leverUp
Up
U p
Up=
=
=
=Deeper
De eper
Deeper
Deepertilling.
ti lling.
tilling.
tilling.
Placethedetentpininthebottomholeofthedepthregulatorleverfordeepesttilling.
BELT
BELT
BELT
BELTTENSION
TEN SION
TENSION
TENSIONADJUSTMENT
AD JUSTMENT
ADJUSTMENT
ADJUSTMENT
Properbelttensioniscriticaltogoodperformance.After1/2hourofoperation.Allcables
mayhavetobeadjustedduetoinitialstretch.Thereafter,checktensionafterevery2hours
ofoperation.
To
To
To
To
increase
in crease
increase
increasebelt
be lt
belt
belttension
te nsion
tension
tension:
:
:
:
1.Loosenupperjamnut.Turnnutupcablein1/8''increments.
2.Tightenlowerjamnut.
3.Checkadjustment.
Thisprocedurecanberepeateduntilconduitadjustmentboltsarefullyadjusted.Ifnomore
adjustmentcanbe,beltmayhavetobereplaced.

14
TILLING
TILLING
TILLING
TILLINGTIPS
TI PS
TIPS
TIPS
Thekeytosuccessfultillingistobeginwithashallowcutonthefirstpast,andthenworkaninch
ortwodeeperoneachsuccessivepass.
�Tillingdepthwillvarywithgroundconditions.
�Whenbeginningtotillinunbrokengroundor
inextremelyhardsoil,setthedetentpininthe
highestholeofthedragstake(followinstructions
undertillingsection).Thiswillallowforshallow
tilling.Withthedragstakeinthisposition,
makeseverallightpassesovertheareatobetilled.
Tresetfordeeperdepthswithsuccessivepasses.
�Iftillerjumpsorskidsuncontrollably,lowerthedragstakebyplacingthedetentpinina
higherhole.Thiswillallowfoshallowtillingholdfirmlytothehandlebarstocontrolsudden
lurches.
�Ifweeds,tallgrasses,vines,orothermaterialsclogorjamthetines,reversethetillerto
unwindvegetation.
Immediatelyreleasethedrivecontrolleversifthetinesjamoryoustrikeaforeignobject.With
drivecontrolleversinneutralposition,pushthrottlecontroltostroppositiontostroptheengine,
disengagethesparkplugwire,whentineshavestopped,removeforeignobjectsandcheckfor
damage.

15
CULTIV ATING
CULTIV ATING
CULTIV ATING
CULTIV ATINGTIPS
TI PS
TIPS
TIPS
Ifyouplantouseyourtillerforcultivating:
�Plantrowson20
’’
--22
’’
centersforeaseofturning.Installedbeforeusingtherototiller.
�Wherereplacementpartsarenecessaryforperiodicmaintenanceandserving.Useonlynew,
originalreplacementpartsortheirequivalentsforrepairandreplacementtorestoreyour
equipmenttooriginalspecifications.
�Themanufacturerand/ordistributorwillnotberesponsibleforinjuriesordamagescausedby
useofunapprovedpartsand/oraccessories.
�Afirstaidkitshouldbekeptreadilyaccessiblewhileperformingmaintenanceonthis
equipment.
MAINTENACE
MAINTENACE
MAINTENACE
MAINTENACESCHEDULE
SC HEDULE
SCHEDULE
SCHEDULE
Yourrototillerhasbeendesignedandproducedbytheindustry
’
sleadingmanufacturerofoutdoor
powerequipmenttoprovideyouwithyearsofreliableoperation.
Keepingyourtillerintoprunningconditionwillprolongitslife,andhelpyouobtainoptimum
performance.
Pleasereadthisnormalcareschedule,andnotetherecommendedcareoperatingintervalsto
extendthelifeofyourunit.
1)Servicemorefrequentlywhenusedindustyareas.
SERVICING
SERVICING
SERVICING
SERVICINGTHE
TH E
THE
THEROTOTILLER
RO TOTILLER
ROTOTILLER
ROTOTILLER
Thefollowinginformationwillhelpyoumakethenecessarychecksandperformtheprocedures
requiredtofollowthenormalcarerecommendationsmadeforyourrototillerunit.
Ifyouprefer,yourlocalauthorizeddealercanmakethesechecksandperformtherequiredfor
you.
16
CHANGE
CHANGE
CHANGE
CHANGEFORWARD
FO RW ARD
FORWARD
FORWARD/
/
/
/REVERSE
REV ERSE
REVERSE
REVERSEBELT
BEL T
BELT
BELT
1.
1.
1.
1.Turnoffengine.Enginemustbecool.
2.
2.
2.
2.Removespeakplugwireandsecure
fromsparkplug.
3.
3.
3.
3.Removebeltguard.
�
�
�
�Removetheforwardbeltfromthe
forwardenginepulley:
-
-
-
-gentlypulltheenginerecoilropetorotate
thepulley.
-withthepulleyturning,forcetheforward
beltoutoftheV-groove.
-slidethebeltfreeoftheenginepulley.
-pulltheforwardbeltdownandoutoftheway.
-removethereversebeltfromthereverseenginepulley:
-gentlypulltheenginerecoilropetorotatethepulley.
-withthepulleyturning,forcethereversebeltoutofthe
V-groove.
-slidethebeltfreeofenginepulleysandreversebeltgudes.
-pullbeltdownandawayfromtransmissionpulley.
�Installnewreversebelt:
-threadbeltupfrombottom.
-placebeltunderreversebeltguides.
-gentlypullenginerecoilropewhileforcing
ThebeltovertheedgeoftheenginepulleyintotheV-groove.
�Installnewforwardbelt:
-placeforwardbletintransmissionpulley
Groove.

17
-gentlypulltheenginerecoilropetorotatethepulleywhileforcingtheforwardbeltinto
theV-groove.
4.Replacebeltguard.
5.Attachsparkplugwire.
ENGINE
ENGINE
ENGINE
ENGINEMAINTENANCE
MAIN TENANCE
MAINTENANCE
MAINTENANCE
Refertotheenginemanualincludedinyourpartspacketforinformationonenginemaintenance.
Yourenginemanualprovidesdetailedinformationandamaintenancescheduleforperformingthe
followingtasks:
1.Checkoillevelbeforeeachuseorafterevery8hoursofoperation.
2.Changeoilafterfirst5-8hoursofoperation.Changeoilwhileengineiswarm.Refillwithnew
Oilofrecommendedgrade. SAE 15/40
3.checksparkplugyearlyorevery100hoursofoperation.
4.Serviceaircleaner.
5.Keepengineandpartsclean.
6.Checkengineandequipmentoftenforloosenutsandbolts,keeptheseitemstightened.
CHECK
CHECK
CHECK
CHECKOR
OR
OR
ORFILL
F ILL
FI LL
FILLENGINE
ENGI NE
ENGINE
ENGINECRANKCASE
CRAN KCASE
CRANKCASE
CRANKCASE
1.Addoilaccordingtoenginemanual.Do
Do
Do
Donot
n ot
no t
notover
over
o ver
overfill
fill
f ill
fill.
.
.
.
Useaclean,highqualitydetergentoil.Do
Do
Do
Donot
not
no t
notmix
mix
mi x
mixoil
oil
oi l
oil
With
With
With
Withgasoline.
gaso line.
gasoline.
gasoline.Oillevelmustbefull.Checktheoillevel
Byremovingoilfillplugopening.
2.Alwaycheckoillevelbeforestartingengine.Refertoenginemanualforcapacityandtypeof
oiltouse.
CHECK
CHECK
CHECK
CHECKTILLER
TILLER
TI LLER
TILLERTRANSMISSION
TRAN SMISSION
TRANSMISSION
TRANSMISSION OIL
Checkthe oillevelannually.Tocheckthe oil
Level:
1.movetillertolevelground.
2.Remove oilleveldipsticklocatedbetween
Th ehandlebarmountsontheenginemount.If
The oillevelcouldn’ttouchthedipstick.
Pl easefillthe oil.
3.Replace oilleveldipstickinthefillerhole.
4. Notethatthefrontwheeltransmissionandrear
tinetransmissionareonecommonreservoirwhen

18
youaddtothefronttransmission,youmustwaitashortperiodoftimeforthe oiltofollow
re arwardandequalizeinbothfrontandrear.Thedipstickwillreadcorrectlyonlevelgroundfor
bothgearunits.
CHECK
CHECK
CHECK
CHECKTIRE
TIR E
TIRE
TIREPRESSURE
PRES SURE
PRESSURE
PRESSURE
Recommendedtirepressureis20PSI,iftiresdonothaveequalpressure,tillerwillpulltoone
side.
LUBRICATION
LUBRICATION
LUBRICATION
LUBRICATION
Properlubricationofmovingmechanicalpartsiscriticalforpropercareandmaintenance.Oilthe
movingpartsshownat10hoursintervalsusingaSAE30weightoil.
C LEAN
CLEAN
CLEAN
CLEANTINE
TIN E
TINE
TINEAXLE
AXLE
A XLE
AXLESHAFT
SHA FT
SHAFT
SHAFT
1.turnoffengine,enginemustbecool.
2.Removesparkplugwireandsecurefromsparkplug.
3.3.tipthetillerforward.blockthetillerinpositionsothatitrestsontheenginemountandthe
tinesareexposed.
4.Removeallvegetation,string,wire,andothermaterialthatmayhaveaccumulatedontheaxle
betweentheinsidesetoftinesandthesealonthetransmissionhousing.
5.Tipthetillerbacktoalevelpositon.
6.Replacesparkplugwire.
STORAGE
STORAGE
STORAGE
STORAGE
PREPARE
PREPARE
PREPARE
PREPAREFOR
FOR
F OR
FORSTROAGE
STR OAGE
STROAGE
STROAGE
Followthestepsbelowtoprepareyourtillerforstorage.
1.protectwheelsandaxlesfromrust:
2.-Removelockpinandslidewheeloffhub.
-coattheaxleslightlywithaxlegrease.
-slidewheelbackonhubandinsertlockpin.
-Drainfuelsystemcompletelyfollowingenginemanufacturer
’
sinstructionsoraddfuel
stabilizertopreventfuelfromgummingupduringextendedstorageperiod.
3.Whileengineisstillwarm,draintheoilfromtheengine.Refillwithfreshoilofthe
recommendedgrade.
4.Cleanexternalsurface,engineandcoolingfan.
5.Removingsparkplug,pouroneounceofSAE30oilintosparkplughole.
6.Plugholeandpullstartercordslowlytodistributeoilevenlyincylinderheadarea.
7.Reinstallsparkplug.
8.Transportunittosuitablestoragelocation.Ifyouhavechosentouseafuelstabilizer

19
Andhavenotdrainedthefuelsystem,followallsafetyinstructionsstorageprecautionsinthis
manualtopreventthepossibilityoffirefromtheignitionofgasolinefumes.Remember,gasoline
fumescantraveltodistantsourcesofignitionandignite,causingriskofexplosionandfire.
Ifthereisanypossibilityofunauthorizeduseortampering,removethesparkplugandstoreitin
asafeplacebeforestoringtherototillerunit.Besuretoplugthesparkplugholetopreventforeign
materialfromentering.
TROUBLESHOOTING
TROUBLESHOOTING
TROUBLESHOOTING
TROUBLESHOOTINGAND
AN D
AND
ANDREPAIR
REP AIR
REPAIR
REPAIR
TROUBLESHOOTING
TROUBLESHOOTING
TROUBLESHOOTING
TROUBLESHOOTINGGUIDE
GU IDE
GUIDE
GUIDE
Whilenormalcareandroutinemaintenancewillextendthelifeofyourrototiller,prolongedor
constantusemayeventuallyrequirethatservicebeperformedtoallowittocontinueoperating
properly\.
Thetroubleshootingguidebelowliststhemostcommonproblems,causesandremedies.
PROBLEM
PROBLEM
PROBLEM
PROBLEMREMEDY
RE MEDY
REMEDY
REMEDY/
/
/
/ACTION
AC TION
ACTION
ACTION
Enginewillnotstart
�Addgastogastank.
�Connectsparkplugwiretosparkplug
�Throttlemustbepositionedatchokeforacold
start
Enginerunsrough,foodsduringoperation�Cleanorreplaceaircleaner
Engineishardtostart
�Drainoldfuelandreplacewithfresh.Usegas
stabilizeratendofseason
�Makesuresparkplugwireissecurelyattachedto
sparkplug
�Drivesafetycontrolleversmustbereleasedto
neutralpositiontostartthe
engine
Enginemissesorlackspower
�Raisethetinesforshallowtillingbyloweringthe
depthregulatorlever
�Removeandcleanfueltank
�Cleanorreplaceaircleaner
�Impropercarburetoradjustment,taketo
authorizedengineservicecenter
�Replacesparkplugandadjustgap
�Drainandrefillgastankandcarburetor
Enginewillnotstopwhenthrottlecontrolispositioned
atstop
Seeenginemanualtocheckandadjustthrottlelinage
Tillermovesforwardduringstarting(machine
jumpsorlurchesforward)
�Lockwheelsintillingposition
�Raisethetinesforshallowertillingbylowering
thedepthregulatorlever
Tillerisdifficulttocontrolwhentilling(machine
jumpsorlurchesforward)
�Lockwheelsintillingpositon
�Raisethetinesforshallowertillingbylowering
Depthregulatorlever
Table of contents
Other Titan Pro Tiller manuals


Popular Tiller manuals by other brands

Echo
Echo ProThatch 99944200563 Operator's manual

EarthQuake
EarthQuake CRT series Operator's manual

SNOWJOE
SNOWJOE SUNJOE TJ599E-RM Operator's manual

EarthQuake
EarthQuake 3300V Operating instructions & parts explosions

Brinly
Brinly SA-400BH owner's manual

MTD
MTD World Tiller - Series 240 Operator's manual


