Titan MG Series User manual

Handheld videoscope
MG series

01
In order to avoid harm to you and others and affect the service life of this
equipment, please read and observe the following "safety precautions” before use.
The safety precautions are divided into "warning" and "danger" for explanation.
Incorrect operation may cause damage to the equipment
Do not stretch or twist the insertion tube of the device with great strength,
otherwise it may cause damage to the tube.
Do not severely hit the probe of this equipment, otherwise it may cause the lens
assembly to break.
Do not use or store this device at temperatures above 60°C or below -20°C.
Please store this equipment in a dry, non-magnetic, acid-free, and dust-free
environment.
Wrong operation may cause personal injury
Keep the device out of the reach of children.
Do not look directly into the end of the insertion tube. The bright light may damage your
eyesight.
Keep the device away from acid or alkaline solutions, oil or gasoline, and do not use it in
an atmosphere containing volatile/flammable vapors.
Do not use an unsuitable power adapter to charge the device.
This device uses a rechargeable lithium battery to supply power. It is forbidden to
approach fire sources.
Safety Recommendations

01
Packing List
Carry case Monitor Probe unit
Micro SD card HDMI Cable Cleaning cloth &Cotton swab
User’s manual Card reader Charger
Parts function

02
Monitor
① Menu
② Playback
③ Freeze
④ Power OFF/ON
⑤Upward
⑥ OK
⑦ Video
⑧ Dimmer
⑨ Downward
menu OK
⑩ Lock Button
Side view
⑪USB Port
⑫HDMI Jack
⑬Micro SD Card Slot
⑭Reset
⑮12V DC In

03
Probe unit
⑯Connector
⑰Control Stick
⑱Hook
⑲Working Channel
⑳Insertion Tube
㉑Image Brightness
㉒Snap
BRT
Connecting monitor and probe unit
Put the connecting parts close facing , align the lock
button and the hole on the probe side , press lock
button ,plug in with a clack ,release the lock button ,
the two parts will be combined securely .
To separate the monitor and probe , press the lock
button , pull down the probe unit and which will be
taken apart .
After connecting the monitor, please check the monitor
Alignment
rotatable along with horizontal and vertical axis respectively.
Quick Setup

System Setting
Hook and lock function
The hook is not only for ease to hang up, it
is also a lock lever allow you to fix control
stick at certain position .
Turn the hook downwards , increased friction to
curb movement of control stick . turn it upwards
to release control stick .
Charging
If you find the low level of power, please plug the charger in
12V DC jack at side of monitor to charge, status indicator
turns red and flashes, the red will change to green when the
battery is fully charged.
Ready for use
Please insert the Micro SD card into the card slot on,
press power button for 3 seconds, the device enters
preview mode, real time image appears in screen, for the
fist time use, please set the time and date, language ,etc
.
The monitor could not be turned off normally when it is not being combined with
the probe unit.
Switch on device and enter preview mode, press menu to access menu interface, use
to select system setting.
Light frequency
50Hz
Power Save OFF
Text Set
Date & Time
Language
OK Enter MENU Back
04
NOTE

05
MENU Back
Enter
OK
YY/MM/DD
00:00
2020 / 01 /01
Light Frequency To select light frequency 50Hz or 60Hz.
Power Save OFF Disable this function.
5min Automatically power off when there is no operation for 5minites .
10M Automatically power off when there is no operation for 10minites.
30M Automatically power off when there is no operation for 30minites.
Text Set: This function is only available when the date stamp is activated.
How to use: Use the to move the cursor right, to move up and down,
press OK that the selected character will appear on top of tablet, you can
input total maximum 18 characters one time, once the input is completed,
move the cursor to ,press OK to confirm and the input text will present
on image like as a stamp.
1
2
3
4
5
6
7
8
9
0
a
b
c
d
e
f
g
h
i
j
k
l
m
n
o
p
q
r
s t
u
v
w
x
y
z
Case key.
To delete the last character.
Date & Time
Select the Date & Time, press the OK key button to start the setting, with to change
the number, and move to next item.
NOTE

06
Image Setting
Language
Enter the language setting , with to select the language wanted, and press
the OK key to confirm.
Format
This operation will clear all the contents on the Micro SD memory card and cannot be
restored. Please operate with caution!
Reset All
Operate this item to restore the device to the factory settings.
Switch on device and enter preview mode, press menu to access menu interface, use
to select image setting.
Movie Size
1080P
Quality
Seamless OFF
Date Stamp OFF
Audio OFF
OK Enter MENU Back
Movie Size
Two types of image resolution optional 1920X1080 pixels and 1280X720 pixels.
Quality
Allow to choose 3 types of picture quality, be noted the function is noneffective on
current device.
Seamless The video file consists of consecutive clips with the same duration.
The duration of clip as below:
OFF The video consists of one single clip.
10 M 10minutes.
20M 20 minutes.
30M 30minutes.
Date Stamp
Off Date stamp disable
Date Date shows on image like as stamp
Date &Time Both Date and time shows like as stamp

07
Image viewing and recording
Audio
The item allows record sound and video simultaneously, you can choose turn on or off
this function.
Mirror& Flip
OFF Mirror image disable
Mirror Mirror image, vertical symmetry
Flip Mirror image, horizontal symmetry
Mirror&Flip Mirror image, both horizontal and vertical symmetry
Zoom and freeze
In preview mode, press to zoom in or out , x1, ×1.5, ×1.75, ×2, ×2.5, ×3, ×4,
×5, ×6, ×7, ×8 times optional.
Press freeze the current image, press once more to release.
Dimmer
With to adjust the light intensity on probe end ,from 1-5 level optional
Image brightness
With BRT key to adjust the image brightness, generally , to see dark objective,
The higher value can get better picture , or vice versa. in most case the value
should be +1.3 or +1.7 .the selectable value number from -2.0 to +2 as follows:
-2.0, -1.7, -1.3, -1.0, -0.7, -0.3, 0, +0.3, +0.7, +1.0, +1.3, +1.7, +2.0
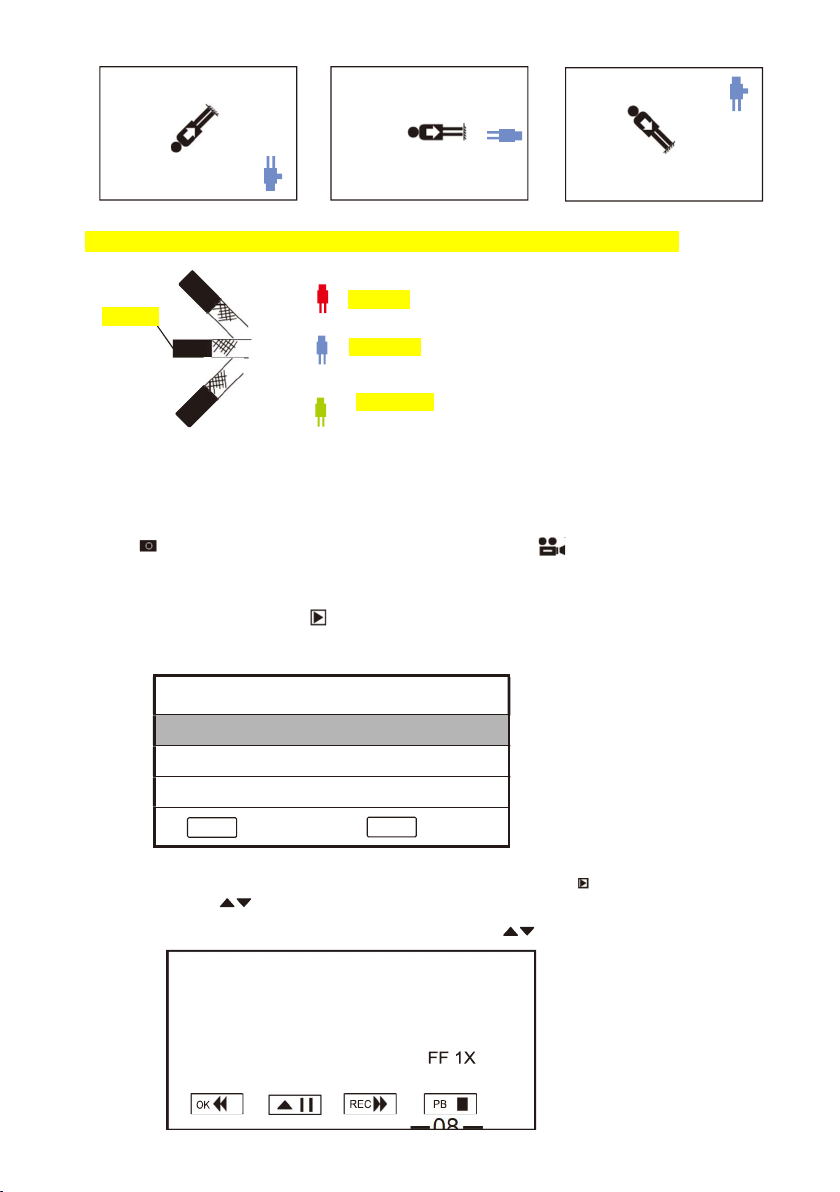
Gravity direction indicator
A gravity sensor is built in camera, an icon appears on the screen is to indicate the gravity
direction on the image, the total 8 different positions of icon and relevant gravity direction are
showed as below :

08
00:01:57/00:03:40
The color indicates camera angle related to horizon. (Needing to clarify this part)
Camera
Uptrend
Horizontal
Downtrend
Take picture and video recording
Power on the device, enters preview mode, real time image appears on screen, press
behind the probe unit to take snap shot,or press to take video.
Image viewing
In the preview state, press to enter the image files, the pictures and videos are
stored in JPG and VIDEO folder respectively.
JPG
VIDEO
OK
Enter
PB
Back
Select JPG, Press OK and you will see the last picture, press return to previous
interface, with to find previous or next picture.
Select VIDEO, Press OK to find video column, with to select the file to play.

09
Storage & Maintenance
Press OK to back-forward,repeatedly press OK to get 2x,4x,6x
speed. Press to pause or continue to play .
Press to fast -forward , repeatly press to get 2x, 4x,6x,8x speed.
Press to go back previous interface .
Protect&Delete
In the image viewing mode , select a picture or video file , press MENU to enter the item
of Protect and Delete .
Protect is to prevent the files from
being deleted carelessly . You can
choose protect :
Single The current one
Protect All All the files
Unprotect All Remove protect from all files
Delete
Single Delete the current one
All Delete all files
1.
Cleaning components
Cleaning insertion tube
Wipe thoroughly with a piece of gauze or other material moistened with neutral detergent,
next clean by gauze moistened with clear water , and then wipe the insertion tube dry off
all moisture.
Clear the insertion tube immediately after withdrawing the insertion tube. Leave the
very dirty insertion tube for long periods can cause it to be corroded.
Cleaning distal end
Grasping the rigid portion of camera end, use a clean soft piece of gauze or cotton swabs to
wipe off dirty and water. Best results may be obtained using commercially available absolute
ethanol. Fig08
NOTE
PB
Single
Protect All
Unprotect All
OK
Enter
MENU
Back
Single
All
OK
Enter
MENU
Back

10
Q & A
Cleaning unit body
Wipe with soft cloth dampened with clean water, and wipe with clear and dry cloth.
2.
Storage precautions
Store the instrument under normal room temperature and humidity.
Straighten angulation section while lay into carrying case.
Store the equipment at a clear, dry and stable place.
Q:What should I do if the device cannot be turned on?
A: Connect the power adapter to the charging port of the display for charging.
Q: What should I do if there is no picture or light on the screen?
Q: What should I do if the image is too dark or too bright?
A: The BRT button at behind of control unit to adjust the brightness value.
Q: What should I do if the light of the probe is too dim?
A: Press the dimmer to get right light intensity .
Q: What should I do if I can not take photos or record videos?
A: The Micro SD card is missing, incorrectly inserted, full or malfunctioning, try to format
or replace it with a new one.
Q: What should I do if the screen is stuck, garbled, or white screen?
A: When all the function keys freeze or fail, insert the insulated needle into the reset
hole on the side of the monitor, and restart the device to see if the problem can
be solved.

11
LCD Panel
5’’ TFT LCD
Support MicroSD Card , HDMI output
Power source Lithium battery 2600mAh 7.4V
AC adapter: Input 100-240VAC Output 12VDC 2A
Effective pixels 2,000,000
Depth of view 10-100mm
Field of view 90degree
Photo size JPG 1920x1080
Video size MOV 1920X1080
Weight 1.0Kg
Operating Environment
Operating
Temperatures
Distal end and insertion tube :0-60° C
Other parts excepted of above :0-40°C
Operating
Humidity
15-90% RH
Water proof Ip67 Insertion tube only
System parameters
This manual suits for next models
5
Table of contents