TK Products AKER MR160 User manual

AKER VOICE AMPLIFIER
Model MR160 12Watts
English Owner’s Manual
Thank you for purchase an Aker Voice Amplifier from TK Products, LLC. You have purchased the highest
quality and most innovative voice amplifier in the world. We hope that this amplifier will protect your voice
and throat from soreness and fatigue while allowing you to be heard by large groups of people. You will find
that the Aker Voice Amplifiers are easy to use and very effective. This owner’s manual will hopefully
address all of your questions. We welcome your suggestions for improvement.
Features:
→Long usage time between charges 12-16 hrs
→Long Battery Life
→Loud clear sound and easy to use
→FM Radio with automatic tuning
→MicroSD Card socket and USB drive socket for
playing MP3 music and recording speaking.
→LCD screen for control and information.
→Case is made of high impact strength ABS
plastic.
→Microphone input.
Package Contents:
→MR160 Voice amplifier with built in
rechargeable lithium batteries.
→Wired microphone with headset
→Male to Male 3.5mm audio patch cable
(for MP3 players)
→Battery charging power adapter cable
(110v to 240v)
→Adjustable waist belt. Removable Belt
Clip.
→Convenient storage bag
Charging the Battery
The voice amplifier comes fully charged and ready to use. When the amplifier is on and if the LED is
dim RED, blinks, or can’t be seen then it is time to charge the amplifier.
To
Charge:
1. Shut off the voice amplifier.
2. Insert the plug of the power adapter into the charge socket on the amplifier.
3. Plug the power adapter to a power source. Voltage can range from 110v to 240v.
4. When charging the LED will FLASH between RED and GREEN.
5. The LED will show a solid GREEN when completely charged. Charging will take 4-
6 hours depending on voltage.
1. Note: To extend battery life, it is best to only charge after the battery completely runs out
of power. The battery should last 2-4 years before it needs to be replaced. Please contact
TK Products, LLC for replacement batteries and replacement procedures.
Using the Voice Amplifier
1. Attach the voice amplifier to your waist using either the belt clip or the waist band.
2. It is recommended that you wear the microphone headset as shown in the diagram.
3. For best performance adjust the microphone tip so that the two holes inside the sponge aim at
your mouth and the tip is 1 to 1.5 inches (2-3cm) from your mouth. An easy way to tell the
correct position is to make sure the white line on the microphone tip is facing your mouth.
The microphone is directional so placement is very import for controlling feedback.
4. Insert the plug of the microphone into the port labeled “microphone” on the voice amplifier.
5. Turn the volume dial to turn on the voice amplifier and to adjust the volume. The LED RED
light will turn on when the voice amplifier is on.
6. Adjust the volume level to the desired loudness. You can reduce feedback or screeching by
reducing the volume or moving the speaker further from the microphone.
Note: For the best sound performance and clarity, please use the microphone that has been
provided with this voice amplifier.
The LCD Menu.
Note: The LCD menus will appear in Chinese. An English translation is provided in this manual but there no
way to change the language on the amplifier. Aker is working on an English version.
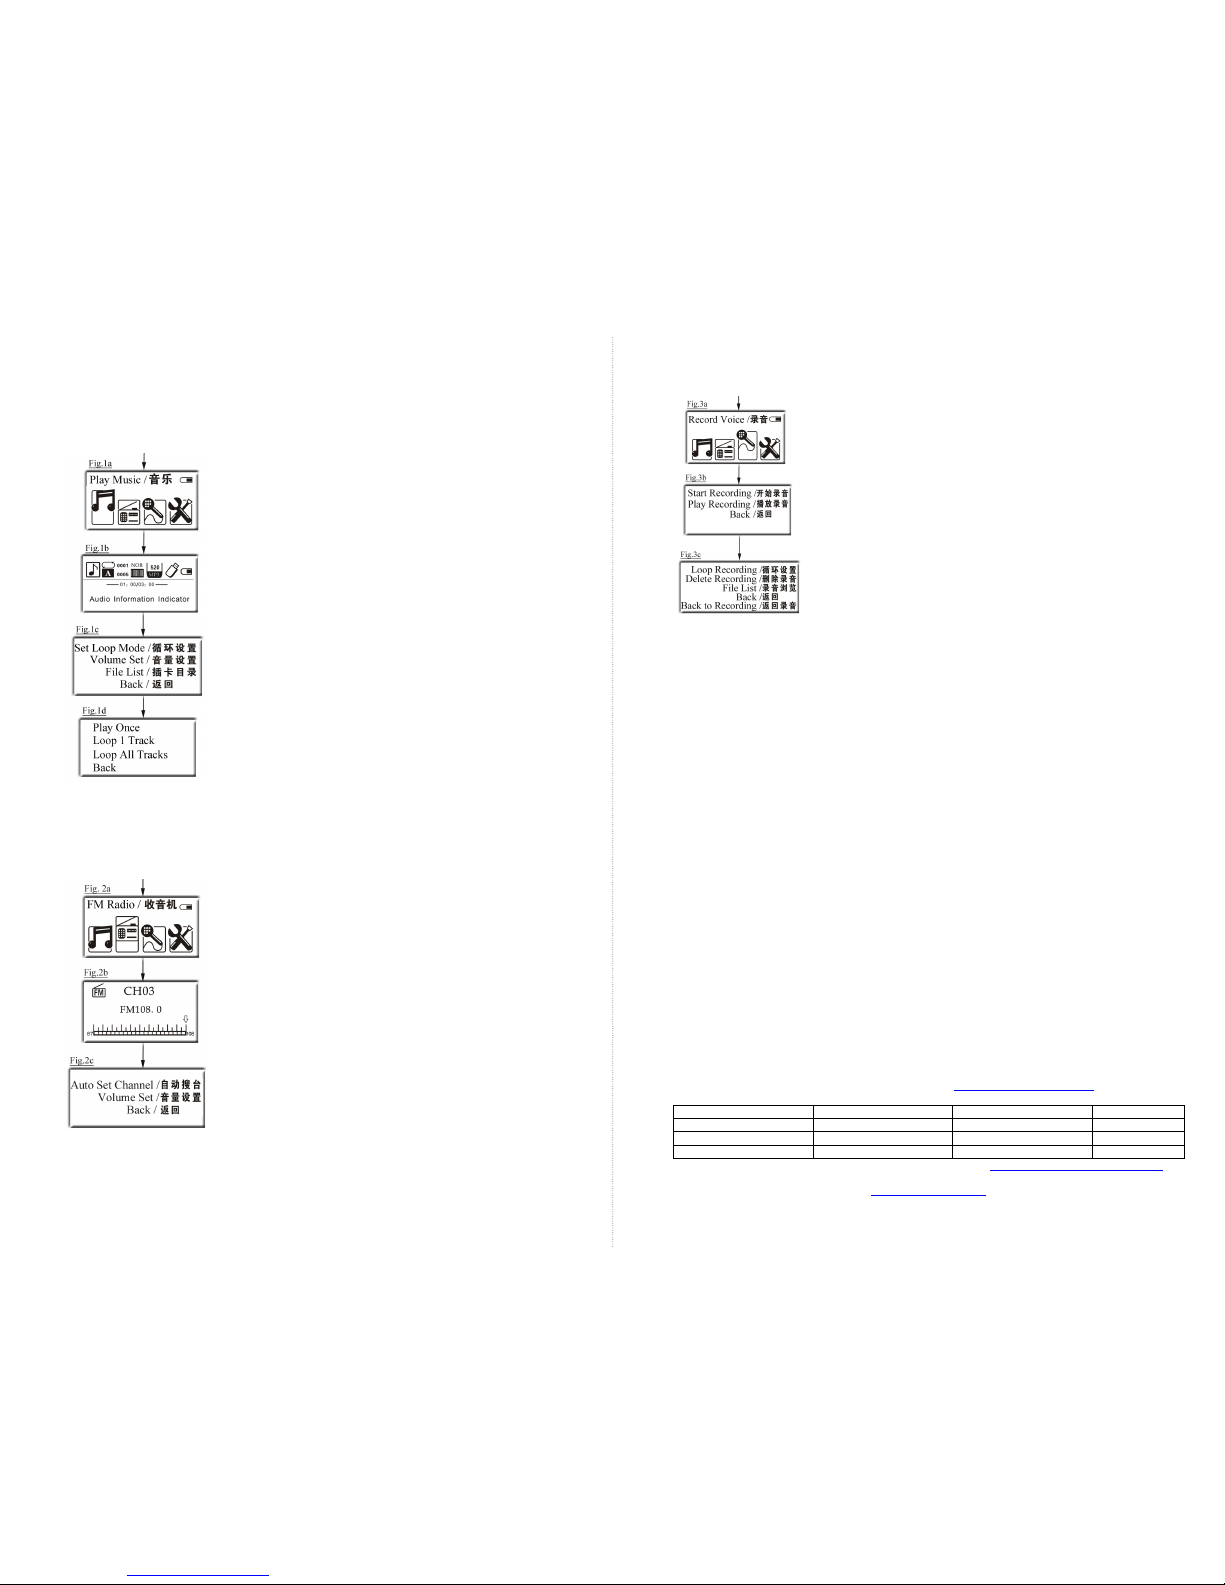
Using a USB Drive or MicroSD Card or to play MP3 Music:
1. Insert a SD card or USB drive into one of the ports on the
amplifier. Note, the Amplifier will only play MP3 formatted files.
The files must not be in a folder and there must only be mp3 files
on the card/drive or it will not play the files.
2. Turn on the voice amplifier and then press and hold the MENU
button until you see the screen in Figure 1a. Adjust the
NEXT/PREV buttons until the music icon is selected.
3. Press the PLAY/PAUSE button. Music will begin to play. Use the
NEXT or PREVIOUS button to cycle through the MP3 files.
Once the music begins to play the audio information screen will
show (Figure 1b).
To Loop Music
1. Select the MENU button. The screen in Figure 1c will appear.
The first line is the “Set Loop Mode”. Adjust the NEXT/PREV
buttons and then press the PLAY/PAUSE button when on the first
line.
2. The screen in Figure 1d will appear. Use the NEXT/PREV
buttons and then press the PLAY/PAUSE button on the loop
method desired.
View File List
1. Select the MENU button. The screen in Figure 1c will appear. The
third line is the “File List”. Adjust the NEXT/PREV buttons and
then press the PLAY/PAUSE button when on the third line.
2. The File List will appear. Adjust the NEXT/PREV buttons and
then press the PLAY/PAUSE button when on the desired file.
Using the FM Radio:
1. Plug in the included Audio cable into the Microphone Port. The
cable will act as antenna.
2. Turn on the voice amplifier and then press and hold the MENU
button until you see the screen in Figure 2a. Adjust the
NEXT/PREV buttons until the music icon is selected.
3. Press the PLAY/PAUSE button. The FM radio will begin to play
and the FM screen will show (Figure 2b). Use the NEXT or
PREVIOUS button to cycle through FM stations. A short press
large changes in frequency. Hold the NEXT/PREV for small
changes in frequency. show (Figure 1b).
To Program FM Channels
1. To auto program the channels press the MENU button briefly. The
screen shown in Figure 2c will appear. The first line is the “Auto
Set Channel”. Adjust the NEXT/PREV buttons and then press the
PLAY/PAUSE button when on the first line.
2. The Amplifier will then cycle through and find local stations then
program them. Once the cycle stops you may use the Forward and
Back button to change programmed channels.
To Record Speaking
1. Insert a SD card or USB drive into one of the ports on the
amplifier. There must be a card or drive present to accept the
recording.
2. Turn on the voice amplifier and then press and hold the MENU
button until you see the screen in Figure 3a. Adjust the
NEXT/PREV buttons until the music icon is selected.
3. Press the PLAY/PAUSE button and the screen in Figure 3b will
appear. The first line is the “Start Recording” mode. Adjust the
NEXT/PREV buttons and then press the PLAY/PAUSE button
when on the first line.
4. A recording screen will then appear (not shown) which will
show the time recording. Use the PLAY/PAUSE button to
pause and restart the recording.
To Play the Recording.
1. Hit the MENU button. The screen in Figure 3b will appear. The second line is the “Play
Recording” mode. Adjust the NEXT/PREV buttons and then press the PLAY/PAUSE button
when on the second line.
2. A play screen will then appear (not shown) and the recording will start playing. Use the
PLAY/PAUSE button to start and stop the playback.
3. Use the NEXT/PREV buttons to cycle through other recorded files.
To Loop, Delete, or access File List
While in the Play Recording screen, hit the MENU button. The screen in Figure 3c will appear.
Adjust the NEXT/PREV buttons and then press the PLAY/PAUSE button when on the desired
feature.
•First Line = Loop Current Recording.
•Second Line = Delete Current Recording.
•Third Line = Access File List and select desired file.
•Fifth Line = Back to play recording screen.
•Sixth Line = Back to Recording screen.
FAQ:
Question: Why does the voice amplifier produce feedback or screeching and how do I reduce it?
Answer: You can reduce feedback or screeching by reducing the volume or moving the speake
further from the microphone. Make sure the white line on the microphone tip is facing your mouth.
Question: How long does the battery take to charge?
Answer: the typical battery charge time is 4-6 hours.
Question: My voice amplifier will not work or produce sound?
Answer: Check that your microphone is plugged into the correct port, your battery is charged, and
the voice amplifier is turned on to an audible volume. If you continue to have problems please
contact TK Products, LLC for help.
For Further information please visit www.TKProductsLLC.net.
Output Power:
RMS 12watts
Weight:
0.72 lbs
Frequency Response:
100hz±13db1khz±1db
Voltage:
7.5 v
Speaker Sensitivity:
53 dBV/A +- 3 dB
Current Consumption:
150 mA
Dimensions:
4.13” x 3.35” x 1.34”
Battery charge life:
12-16 hours
TK Products, LLC - Cleburne, Texas -Rev062012
www.TKProductsLLC.net
Popular Amplifier manuals by other brands


Televes
Televes Avant User instructions

Infineon Technologies
Infineon Technologies IRAUDAMP15 Reference design

Kramer
Kramer TP-310A user manual

Musical Paradise
Musical Paradise MP-301 MK2 Quick setup guide

Cary Audio Design
Cary Audio Design CAD 300SEI LX-20 operating manual

McIntosh
McIntosh MC 2155 owner's manual