Tojock EVP-101 User manual


tojock@126.com
Contents
1.SAFETY INSTRUCTIONS................................................................................................. 1
2.Notice....................................................................................................................................2
3.Instruction........................................................................................................................... 4
4.Package Contents............................................................................................................. 4
5.Unit Diagram....................................................................................................................... 5
5.1 FRONT PANEL........................................................................................................ 4
5.2 REAR PANEL...........................................................................................................5
6.Remote Control..................................................................................................................6
6.1 Remote Control Definition...................................................................................... 7
6.2 Installation of Batteries............................................................................................8
7.Connections........................................................................................................................9
7.1 Connect to TV via standard Audio/ Video cable (included)....................................... 9
7.2 Connect to an amplifier via coaxial digital audio output......................................8
7.3 Connect TV and Projector Via HDMI Cable (included)....................................10
8.Basic Player Operation........................................................................................11
8.1 Before you begin .....................................................................................11
8.2 PLAY ......................................................................................................................11
8.3 Play Video ...................................................................................................12
8.4 Play a blue-ray video disc ............................................................................13
8.5 Play Music ................................................................................................14
8.6 Play a photo slideshow.... ............................................................................15
9.Additional Features Explained.................................................................................... 16
10.General Settingss...............................................................................................17
11.Support formats.................................................................................................21
12.Main unit specifications.....................................................................................21
13.Troubleshooting.................................................................................................22
14.More Q & A..........................................................................................................24
15.Warranty..............................................................................................................25

tojock@126.com
1
1. Safety and Maintenance
Here are some basic safety precautions that you should carefully follow when
you use your new Tojock DVD Player. Read all instructions carefully! Tojock is not
responsible for damage or injuries caused by improper use of the appliance.
This symbol indicates “dangerous voltage” inside the product that
presents a risk of electric shock or personal injury.
This symbol indicates important instructions accompanying the product.
WARNING: To reduce the risk of fire or electric shock, do not expose this product
to rain or moisture. The appliance shall not be exposed to dripping or splashing
and no objects filled with liquids, such as vases, shall be placed on the
appliance.
Security Instructions
Read all of the instructions before using this DVD player and keep this manual in
a safe place for future reference.
1) READ ALL INSTRUCTIONS.
2) Remove any packaging material before using this appliance.
3) Moisture - Do not expose this apparatus water or moisture. To prevent fire or
shock hazard, do not place objects filled with liquids, such as vases, on the discs
player. If liquid enters the unit, unplug the device immediately. Be sure to install
the player in an area where access to the AC power cord is available so that the
unit may be unplugged from the wall socket immediately in the event of trouble or
if the liquid is spilled onto the unit.
4) NOTE: If the player is brought directly from a cold to a warm location, or is
placed in a very damp room, moisture may condense on the lenses inside the
player and the player may not operate properly. In this case, remove the disc and
leave the player turned on for about half an hour until the moisture evaporates.
5) Heat - The Discs player should be situated away from heat sources such as
radiators, heat registers, stoves, or other products (including amplifiers) that

tojock@126.com
2
produce heat.
6) Proper ventilation - Do not install this player in a confined space, such as a
bookshelf or similar unit unless proper ventilation is provided. Slots and openings
in the Discs player casing are provided for ventilation to ensure reliable operation
of the product and to protect it from overheating. These openings must not be
blocked or covered. The openings should never be blocked by placing the
product on a bed, sofa, rug, or other similar surfaces as ventilation will be
inhibited, and overheating will occur.
7) Overloading - Do not overload wall outlets, extension cords, or integral
convenience receptacles, as this can result in a risk of fire or electric shock.
8) Cleaning - Unplug this product from the wall outlet before cleaning. If dusting
or cleaning is required, be sure to clean the outer portion of the casing only. Do
not attempt to clean the inside or to disassemble the casing. Do not use liquid
cleaners or aerosol cleaners. Use a damp cloth for cleaning and be sure to allow
the unit to dry completely before plugging the unit to a power source.
9) To protect against electric shock do not immerse cord, plugs, or appliance in
water or any other liquid.
10) Close supervision is necessary when your appliance is being used by or near
children.
11) Keep the appliance and its cord out of reach of children aged less than 8
years.
12) If the supplied power cord is damaged, it must be replaced by the
manufacturer, its service agent, or similarly qualified persons in order to avoid a
hazard.
13) Do not operate any appliance with a damaged cord or plug or after the
appliance malfunctions, or is dropped or damaged in any manner. Return
appliance to the nearest authorized service facility for examination, repair, or
electrical or mechanical adjustment.
14) Any use of this product which is not recommended by the manufacturer may
cause injury to persons or damage to the appliance.
15) Place appliance on a flat surface or table. Do not hang its power cord over
the edge of the table or counter. Ensure that the power cord does not touch the
hot surface of the appliance.

tojock@126.com
3
16) If the unit requires servicing, refer servicing to qualified service personnel. If
the unit is still under warranty, contact Tojock or our service center. See the terms
and conditions specified under the warranty included with this product.
17) Do not use the appliance for other than intended use.
18) Do not use outdoors.
FOR HOUSEHOLD USE ONLY SAVE THESE INSTRUCTIONS
2. Notice
2.1 Trademark Notice
DVD Video is a trademark of DVD Format / Logo Licensing Corporation.
Blu-ray Disc and Blu-ray Disc logo are trademarks of the Blu-ray Disc
Association.
Manufactured under license from Dolby Laboratories. Dolby, Dolby Audio, and
the double-D symbol are trademarks of Dolby Laboratories.
For DTS patents, see http://patents.dts.com. Manufactured under license from
DTS Licensing Limited. DTS, the Symbol, & DTS and the Symbol together are
registered trademarks, and DTS 2.0+Digital Out is a trademark of DTS, Inc. ©
DTS, Inc. All Rights Reserved.
The terms HDMI, HDMI High-Definition Multimedia Interface, and the HDMI Logo
are trademarks or registered trademarks of HDMI Licensing Administrator, Inc.
Java and all other Java trademarks and logo are registered trademarks of Sun
Microsystems, Inc.
2.2 Cinavia Notice
This product uses Cinavia technology to limit the use of unauthorized copies of
some commercially-produced film and videos and their soundtracks. When a
prohibited use of an unauthorized copy is detected, a message will be displayed
and playback or copying will be interrupted.
If playback or copying is interrupted and one of the messages shown below is
displayed, the content is an unauthorized copy protected by Cinavia technology.

tojock@126.com
4
Message Cinavia Message Code
[Message(s) 1] 1
[Message(s) 2] 2
[Message(s) 3] 3
[Message(s) 4] 4
More information about Cinavia technology is provided at the Cinavia Online
Consumer Information Center at http://www.cinavia.com. To request additional
information about Cinavia by mail, send a postcard with your mailing address to:
Cinavia Consumer information Center, P.O. Box 86851, San Diego, CA, 92138,
USA.
2.3 IPR Message
Copyright 2004-2013 Verance Corporation. CinaviaTM is a Verance Corporation
trademark. Protected by U.S. Patent 7,369,677 and worldwide patents issued
and pending under license from Verance Corporation. All right reserved.
3. Instruction
Congratulations on your purchase of the Tojock Home DVD player. The Home
DVD player from Tojock is a great way to enjoy your discs without the clutter of a
full-size player.
Its compact design provides easy access to all your favorite media, and the fast
search backward/forwards will guarantee that you never miss a minute.
Watch from a distance via use the remote control, or use the zoom-in feature to
get a closer look. The Tojock Home DVD player is a great way to ensure quality
entertainment within minutes.
Before using your player, it is recommended that you familiarize yourself with the
features, functions, and operating procedures described in this manual. Due to
tojock@126.com
5
slight modifications in production, the instructions, features, and descriptions
found in this manual might be slightly different from your product. Design and
specification subject to change without notice.
4. Package Contents
Please verify your package for the following items. Besides that, the package
contents may differ due to the products upgraded. All product contents are
subjected to the actual product receives.
5. Unit Diagram
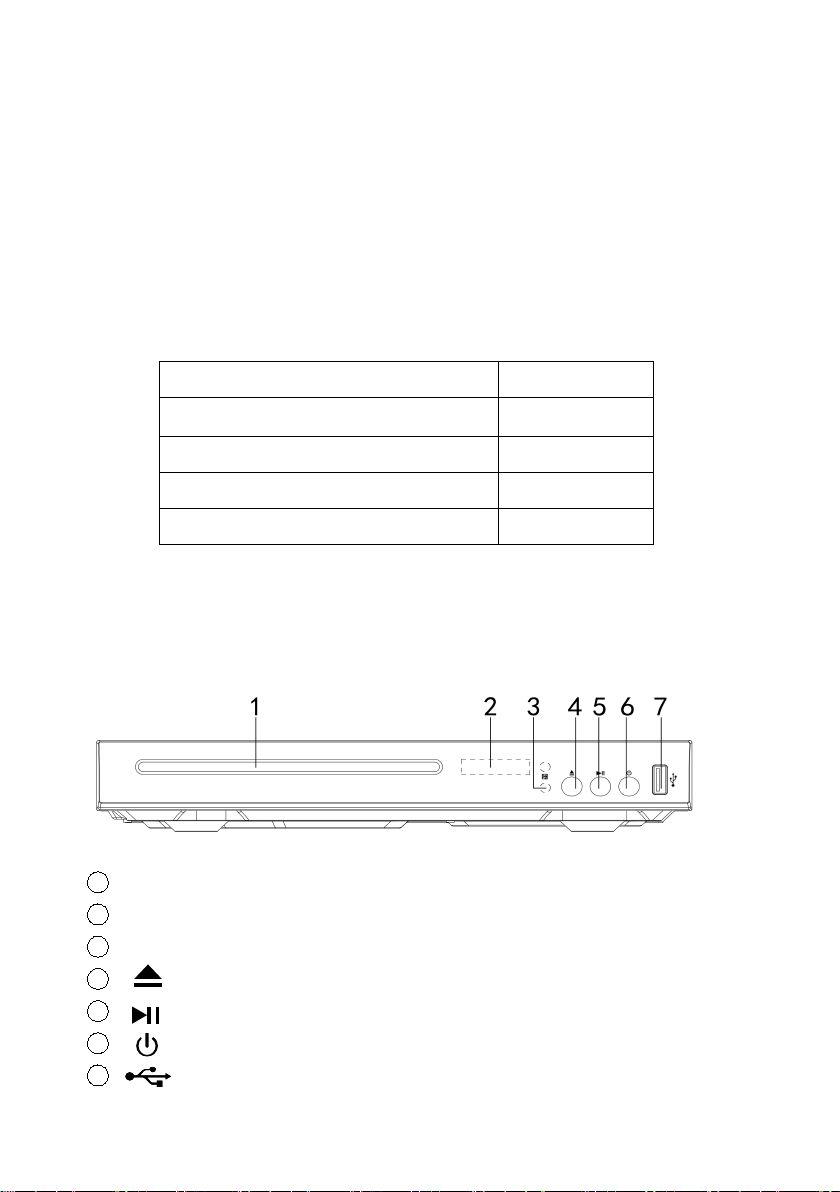
5.1 FRONT PANEL
1Disc Compartment
2Display panel
3Power indicator light
4Open or close the disc compartment
5Start (resume) / pause play
6on / Turn off
7USB
DVD Player
1pcs
Remote Control (without battery)
1pcs
HDMI Cable
1pcs
AV Cable
1pcs
User Manual
1pcs

tojock@126.com
6
USB port: only support 2.0 USB flash drive (Max 128G) and USB HDD (Max
8TB).
When you use the USB HDD to play videos, you'd better plug a charger on the
USB HDD to power the USB HDD, or your DVD player will not be able to
recognize USB HDD.
5.2 REAR PANEL
1. HDMI Output Jack
2. Coaxial Digital Output Jack
3. Audio Right Output Jack
4. Video Output Jack
5. Audio Left Output Jack
6. Remote Control
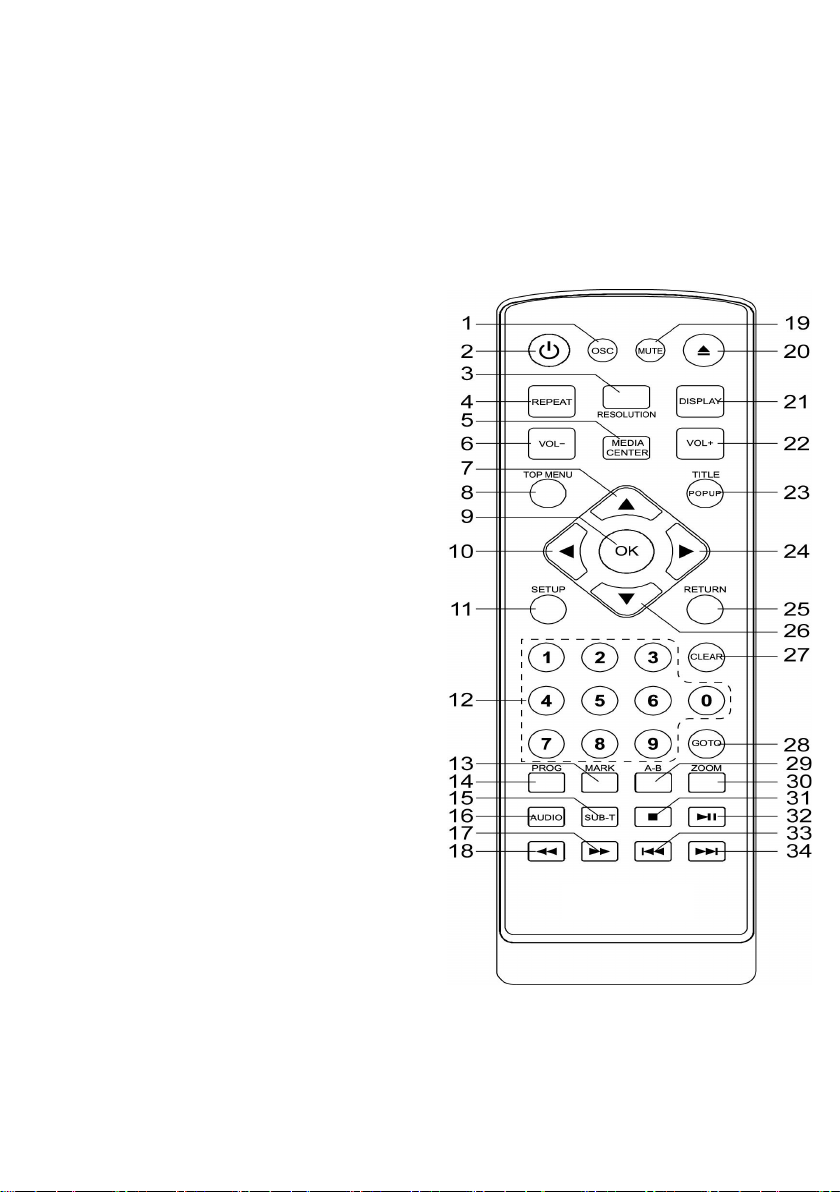
6.1 Remote Control Definition
(1) OSC: To access OnScreen Control Menu
(2) Power: Turn on/off the player or restore the player to standby mode.
Front Panel Display
Description
LOAD
BDMV
SETUP
Loading a disc.
Blu-ray disc is recognized.
Setup menu is displayed
tojock@126.com
7
(3) RESOLUTION: Press to change the resolution mode of the player.
(4) REPEAT: The specific repeat mode is different
according to the disc type.
DVD: RepeatCH>RepeatTT>RepeatAll>Repeat Off.
CD/VCD: Repeat track>Repeat all> Repeat Off.
Playlist: Repeat file>Repeat playlist>Repeat Off.
(5) MEDIA CENTER: To turn on/off
Media center.
(6) VOL-: Decreases volume.
(7) UP: Navigates through the Menus
(8) TOP MENU: To open the Top menu of
BD/DVD video disc
(9) OK: Confirms an entry or selection
(10) LEFT: Navigates through the Menus
(11) SETUP: Access the SETUP menu
(12) NUMBERS: For direct channel
access
(13) MARK: To bookmark at any point
during playback
(14) PROG: Edit the program and play
(15) SUBTITLE: Select a subtitle
language on a disc
(16) AUDIO: Select an audio language
(17) FAST FORWARD: Search forward
(18) FAST REVERSE: Search backward
(19) MUTE: Press to mute or un-mute
the volume
(20) Open or close the disc compartment
(21) DISPLAY: show the current status of the disc information
(22) VOL+: Increases volume
(23) TITLE: To open the Title menu of a disc

tojock@126.com
8
POPUP: Shows and hides the popup menu
(24) RIGHT: Navigates through the Menus
(25) RETURN: Return to a previous display menu
(26) DOWN: Navigates through the Menus
(27) CLEAR: To clear an entry
(28) GOTO: Jump to a user-specified time during playback
(29) A-B: Press A-B can repeat playback of a user-defined section
(30) ZOOM: zoom in or zoom out
(31) STOP: Stop play
(32) PLAY/ PAUSE: Start (resume) / pause play
(33) PREV: Skip to the previous title, chapter, or track
(34) NEXT: Skip to the next title, chapter, or track
6.2 Installation of Batteries
1. Press and lift the back cover up to open the battery compartment of the remote
control.
2. Insert two AAA size batteries. Make sure that the polarities of the batteries ( + )
and ( - ) match those of the battery compartment.
3. Close the battery compartment cover.
NOTE:
Remove the batteries If
you don’t use the
remote control very
often.
Do not mix old and new
batteries.
Do not mix alkaline,
standard (carbon-zinc)
or rechargeable (ni-cad, ni-me, etc.) batteries. Batteries can contain corrosive
tojock@126.com
9
substances, so they should be disposed of properly.
CAUTION
Due to a risk of explosion. Keep batteries away from heat, direct sunshine, or fire.
Never discard batteries in a fire.
7. Connections
When connecting this unit to other components, be sure that all devices are
turned off. Audio/Video cables are connected according to different color
identification and should be fitted firmly into the appropriate jacks.
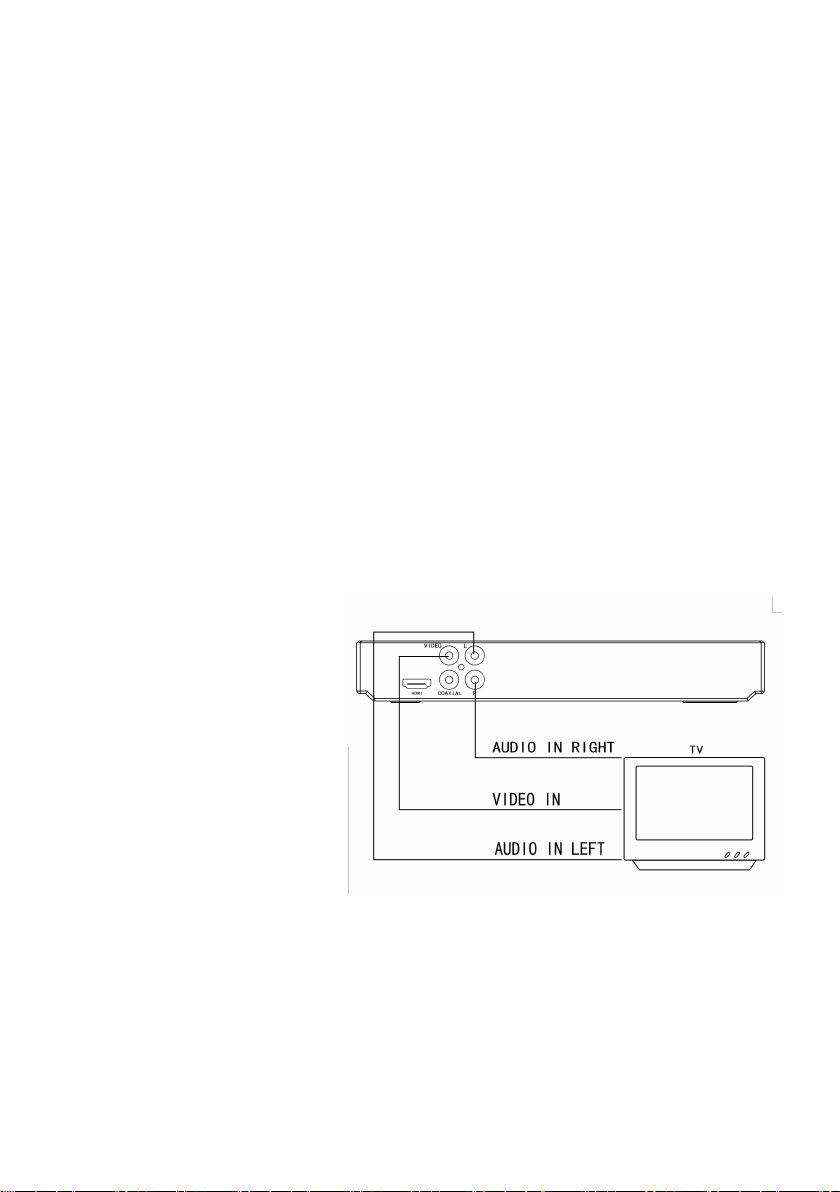
7.1 Connect to TV via standard Audio/ Video cable ( included)
A. Connect the supplied RCA Audio/Video cable using the red(right) and
white(left) cables to the Audio jacks on the rear of the DVD player and to the
Audio Inputs on your TV.
B. Connect the video cable
(yellow) to the Video jack
on the rear of the player
to the Video Input on your
TV.
C. Set your TV to its
appropriate Video input
7.2 Connect to an amplifier via coaxial digital audio output
A. Connect the supplied RCA Audio/Video cable using the red and white cables
to the Audio jacks on the rear of the player and to the Audio Inputs on your

tojock@126.com
10
TV.
B. Connect the video cable (yellow) to the Video jack on the rear of the player
to the Video Input on your TV.
C. Connect a digital coaxial
cable (not included) to the
coaxial cable jack on the
rear of the player and to the
coaxial digital audio input on
your digital receiver or
amplifier.
Tips
This way of connection type provides standard image quality only.
7.3 Connect TV and Projector Via HDMI Cable (included)
A. Connect an HDMI cable to the HDMI jack located on the rear of the discs
player.
B. Connect an HDMI cable to the HDMI Input jack on your television.
User Tips
You can optimize the video
output by pressing the
“Resolution” button
repeatedly to select the best
resolution the TV can
support;
To play the digital video
images of a disc or video via an HDMI connection, it is necessary that both this
product and the display device (or an AV receiver/ amplifier) support a copyright

tojock@126.com
11
protection system called HDCP (high-bandwidth digital content protection
system);
HDMI connection provides the best image quality.
8. Basic Player Operation
8.1 Before you begin
Press to turn on your disc player first.
Select the appropriate video input settings to correspond to the input used when
connecting to the discs player.
Refer to the “Connections” section of this manual;
If you have connected the player to an audio system (stereo or amplifier) turn on
your audio system and select the appropriate audio input settings to correspond
to the input used when connecting to the Discs player.
Note: As TV and audio systems vary, please refer to your TV or Audio system
user’s manual.
8.2 PLAY
Press the POWER button on the player or press the Power/Standby button
on the remote control.
Press to open the disc compartment on the remote control or button on
the player.
Hold the edge of the disc and insert a disc with the label facing up
Press the to close the disc compartment and start disc play
To stop playing a disc, press
Usually, the DVD player will start to play a disc automatically once the discs were
been put in. You can use the directional buttons and the ENTER button on the
tojock@126.com
12
remote control to navigate the disc’s menu screen. If the discs do not
automatically begin playing, press the PLAY button on the player or remote
control.
Note: The auto-load sequence of each Audio discs, CD, VCD disc may vary
according to formats or the way the disc was authored.
Some discs will auto-play a series of previews, copyright notices, or
advertisements before loading the Menu screen. Certain buttons on the remote
control, such as the MENU, TITLE, F.RWD, F.FWD, PREV, NEXT, and GOTO
buttons, may be automatically disabled until the auto-load sequence is
completed.
8.3 Play Video PL
AY VIDEO
Control Video Play
1. Play a title
2. Use the remote to control the play back
Note:
For BD disc with Java application, the resume function is not available.
Display Menu
BD-video Disc
TOP MENU: Stops the video playing and returns to the disc menu. This feature is
disc-dependent
POPUP: will access the BD-video disc menu without interrupting disc play.
DVD-video disc
Button
Action
Start or resume play / Pause play
return to start, if you want to play videos again, press
Skip to a previous/next title or chapter.
Search fast-backward or fast-forward.
Press repeatedly to change the search speed.

tojock@126.com
13
TOP MENU will display the root menu of a disc
DISPLAY will display disc information and guide you through the available
functions on the disc
Change Video Play
8.4 Play a blue-ray video disc
Blu-ray video discs have a larger capacity and support features such as
high-definition video, multichannel surround sound, Interactive menus, and so
on.
1. Insert a BD-video disc.
Button
Action
Audio
Selects an audio language
SUBTITLE
Selects a subtitle language on a disc
REPEAT
Select or turn off repeat mode
Repeat options may vary from the disc type
DISPLAY
Display the current status or disc information
ZOOM
Zoom in/out of the video image
BOOK
MARK
Bookmark the selected point during playback
A-B
When a disc is playing, pressing this button once will save a
"start point" for repeating playback, Pressing this button
again will save an "endpoint" for repeated playback.
playback will repeat from the start point to the endpoint.
The marked section for repeat play should be in one
track/title
PROGRAM
Edit the program and play
GOTO
Jump to a user specified time during playback
OSC
Access options relating to the current activity or selection,
and control the video playback
tojock@126.com
14
2. Playback will automatically start, or select a play option in the menu and press
OK.
3. During playback, you can press
TOP MENU to display additional
information, features, or content
store on the disc.
4. During playback, you can press
POP UP to display the disc menu
without interrupting disc play.
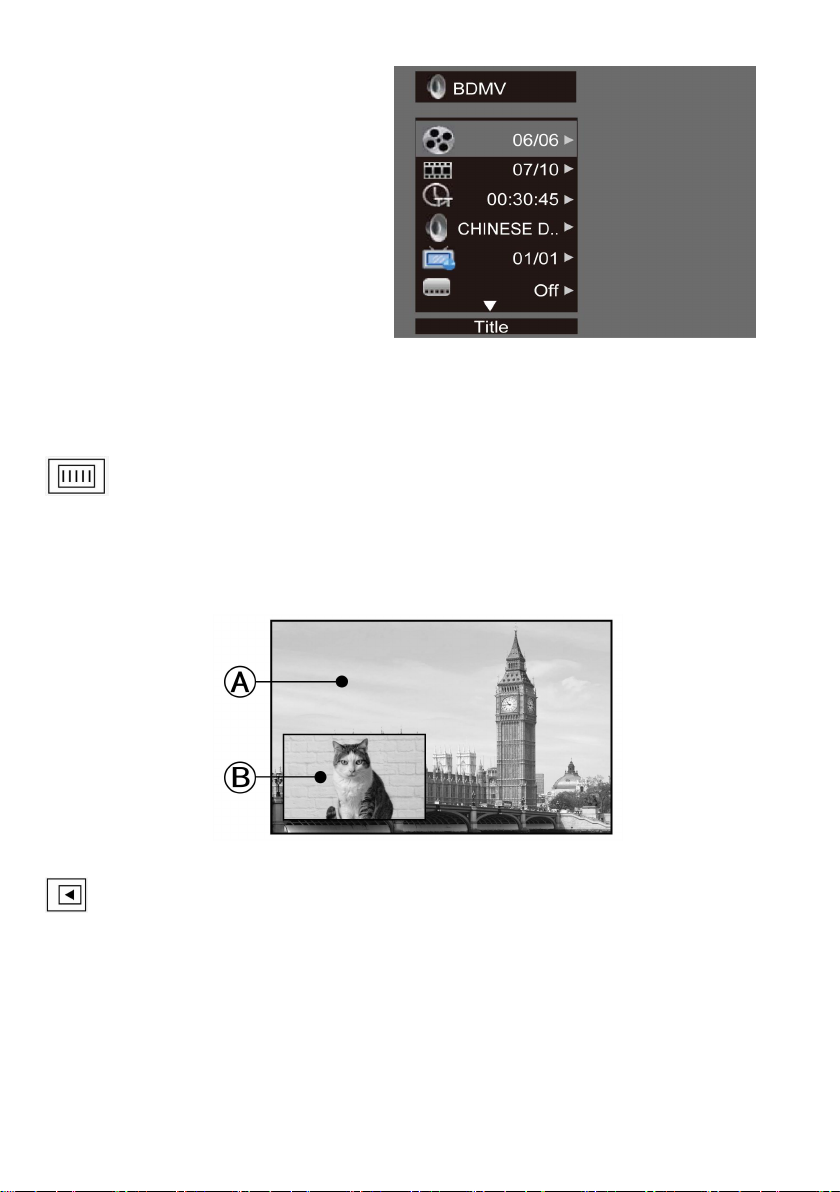
5. During playback, press the [OSC]
button on the RMC - the ON-SCREEN MENU will be displayed. (As shown in the
picture below)
second video【BD-V】:Displays the state of the second Video. Use
direction key【►】to open the second video selection box, then press【 ▲ 】
/【 ▼ 】to select the full-screen video and the second video window (picture in
picture).
(A) Primary video
(B) Second
second Audio【BD-V】:Displays the state of the second Audio. Use the
direction key【►】to open the selection box, then press【 ▲ 】/【 ▼ 】to switch
on/off the audio output.
8.5 Play Music
Controlling music playback

tojock@126.com
15
Use the remote control to control the playback for the audio files.
8.6 Play a photo slideshow
You can play JPEG on the player as a slideshow.
1. Insert a disc or USB device that contains JPEG files
2. Select a Photo folder, then press OK to open.
To select a Photo, use the Navigation buttons.
To enlarge the selected Photo and start the slideshow, press OK.
Note:
It may require more time to display the disc content on your TV if there is a
large number of songs/ photos compiled onto one disc.
This product can only display digital camera Pictures in the JPEG-EXIF
format, typically used by almost all digital cameras. It cannot display Motion
JPEG, or Pictures in formats other than JPEG, or sound clips associated
with Pictures.
Folders/files that exceed the supported limit of this product cannot be
displayed or played.
Button
Action
Start or resume play / Pause play.
Stop Play
Skip to a previous or next title or chapter
Search fast-backward or fast-forward. Press repeatedly to
change the search speed.
Select an item to play
REPEAT
Select or turn off repeat mode

tojock@126.com
16
Controlling Photo slideshow
1. Begin a Photo slideshow.
2. Use the remote control to control the play as follows:
Button
Action
◄ ►
Rotate a photo
▲ ▼
Flip a photo
■
Stop play
Set slideshow interval and animation
1. During slideshow playback, press OSC. The options menu will be displayed.
2. Navigate the options with the Navigation button.
3. Select an option in the menu, then press OK.
4. Press OK.
Playing music during a Photo slideshow
Create a musical slideshow to play both CD music files and JPEG Photo files
simultaneously.
Note:
Create a musical slideshow, you must store the CD and JPEG files on the same
disc as the photos.
1. Select your CD music to play and start play-back.
2. Press Media Center to return to the main menu.
3. Navigate to enter a photo folder, then press OK to start slideshow play.
Slideshow begins and continues till the end of the photo folder.
Audio continues to play until the end of the disc.
To stop the slideshow play, press ■.
To stop the music play, press ■again.
9. Additional Features Explained
9.1 Use USB Memory Sticks / Thumb Drives
Turn off the DVD player.

tojock@126.com
17
Insert the USB Memory Stick to the USB Port on the front of the DVD player.
Turn on the DVD player. Press and hold the DVD/USB button on the remote
control.
The Folder/Files list will appear on the screen.
Use the arrow buttons to select and highlight the desired folder or file.
Press the ENTER button to confirm and begin playback.
Notes
1. The DVD player can support USB 2.0 Stick up to 128GB. Don’t support USB
3.0 stick.
2. The DVD Player support video files of H.264/VC1/MPEG-1/MPEG-2/MPEG-4
WMV, and resolution up to 1920*1080.
10. General Settings
10.1 Basic operation for the menu
BASIC OPERATION FOR THE MENU
1. Press STOP twice during playback
2. Press SETUP, the SETUP MENU display on the screen.
3. Select a main menu by LEFT/RIGHT.
4. Select the menu you want by UP/DOWN buttons and press RIGHT to enter.
You can press UP to return to the main menu.
5. Select the option by UP/DOWN and press RIGHT.
You can press LEFT to return to the previous menu.
6. Select by UP/DOWN buttons and press OK to confirm.
You can press LEFT to return to the previous menu.
7. To return to the main menu from any submenu, press RETURN.
8. To exit the menu, press SETUP.
10.2 General Player Settings
GENERAL PLAYER SETTINGS
SYSTEM
1. Screen Saver: Turns the screen saver on/off. The screen saver will display in 3

tojock@126.com
18
mins if there is no operation when the unit is turned on.
2. Disc Auto Playback: Turns the disc auto playback function on/off.
3. Disc Auto Upgrade: Turns the Disc Auto Upgrade function on/off.
4. Load Default: Return the player to its default settings.
5. Upgrade: select this when you want to upgrade your player software to the
latest version.
6. BUDA: Define memory for BD-J.
* Notice : BUDA Setup has two-submenu of "External" & "On board". If you
choose "External", you must connect USB first.
LANGUAGE
1. OSD: Selects the OSD language.
2. Menu: Selects the menu language of the disc.
3. Audio: Selects the audio language for the program.
4. Subtitle: Selects the subtitle language for the program.
Note:
You have to select the audio and subtitle language according to the requirements
on the disc.
PLAYBACK
1. Closed Caption: Turn on/off the CC function.
2. Angle Mark: Turn on/off the Angle mark function.
3. PIP Mark: Turn on/off the PIP mark function
4. Secondary Audio Mark: Turn on/off Secondary Audio mark function.
5. Last Memory: Turn on/off the last memory function
6. PBC: Turn the PBC function on/off.
7. Audio Watermark Level 3: Function reserved.
SECURITY
1. Change Password: Changes the password for parental control menu.
2. Parental Control: to set the parental control.
Other manuals for EVP-101
1
Table of contents
Other Tojock DVD Player manuals


