Tokio Smartphone 2.0 User manual

Tokio Smartphone 2.0
1
1 What’s Included
The following components are included with your purchased product:
Tokio Smartphone
Power Adapter
USB Cable
User Manual
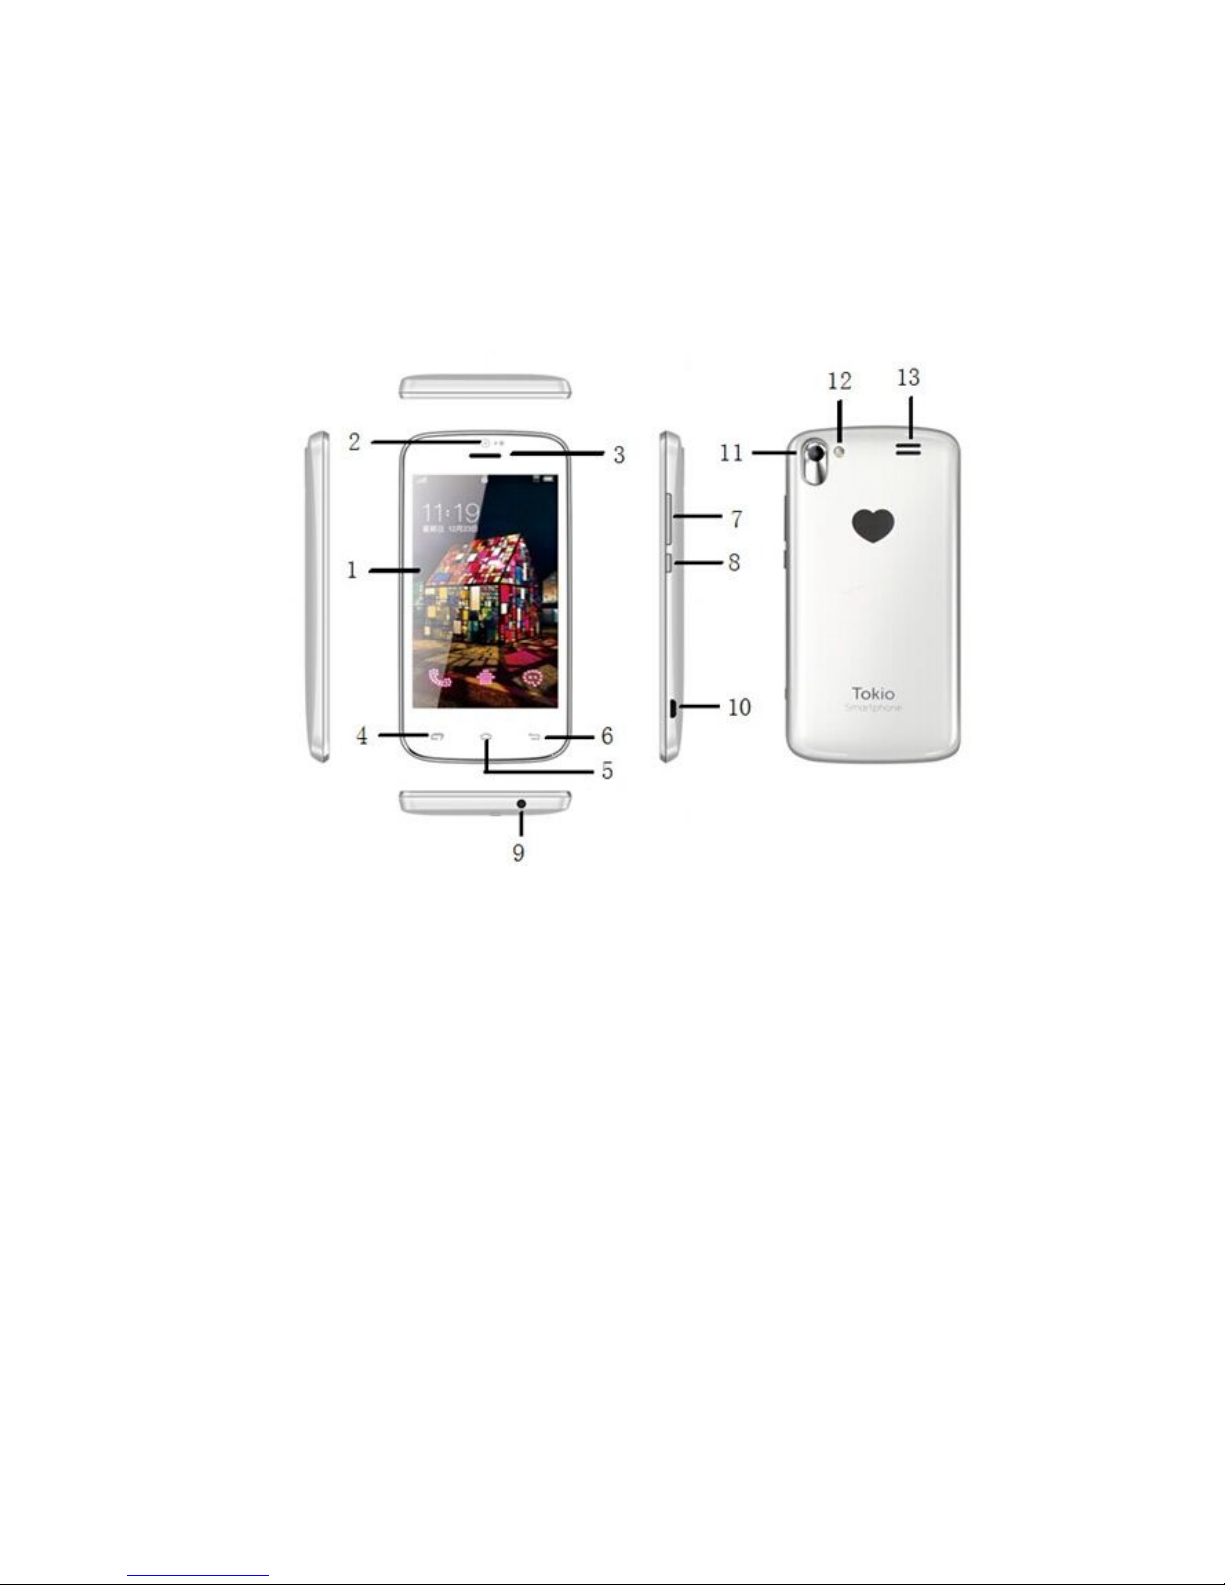
2 Appearance and buttons
1. Touch screen
2. Front camera
0.3 mega pixels front camera
3. Earpiece
4. Menu
5. Home screen
6. Back to previous step
7. Volume +, Volume-
8. Power switch
9. 3.5mm headset jack
10. Micro USB port
You can use it to connect to PC for data transmission, charging or
connection with external USB devices.
11. Back camera
2.0 mega pixels back camera
12. Flashlight
13. Speaker
2
3 Getting Started
Before operating your Tokio Smartphone for the first time, please read this
manual carefully and follow the instructions as described below.
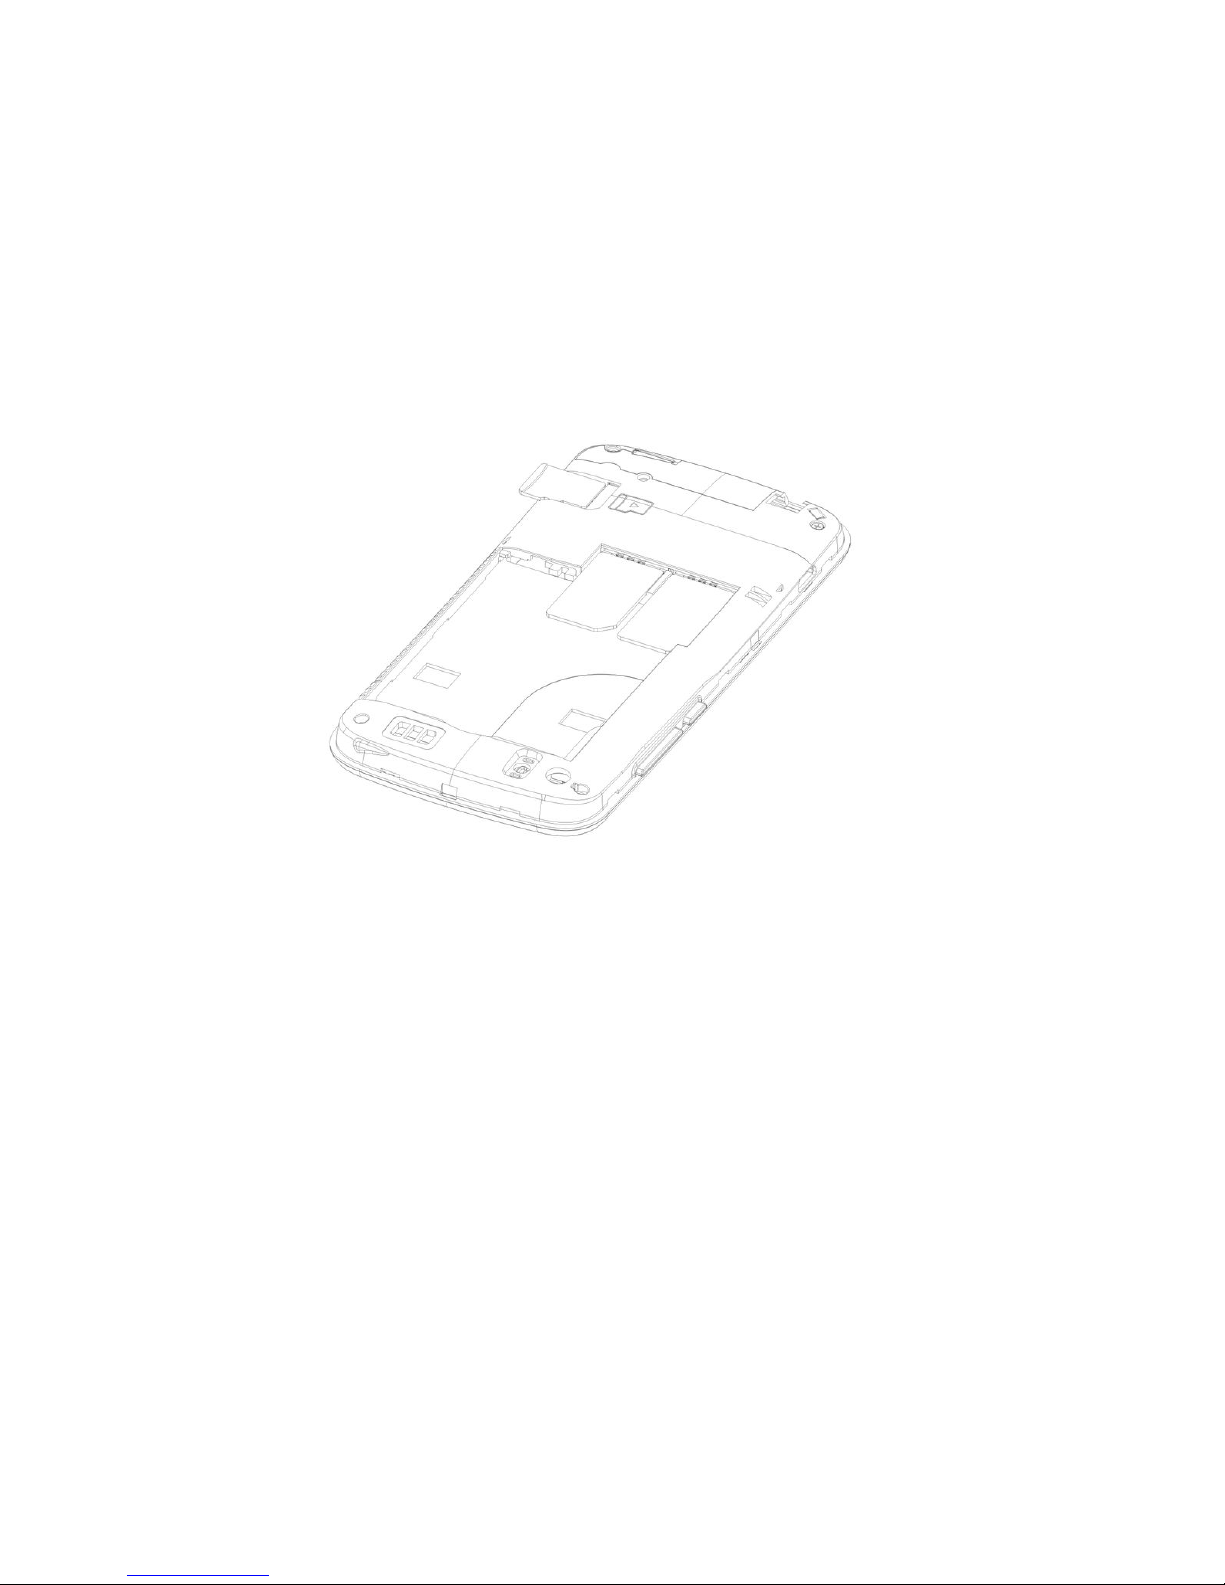
4 Installing the SIM card/Micro SD card
Please install the SIM card/Micro SD card according to below procedures:
With the phone turned off, hold your phone securely with the front
facing down, lift up the back cover from the notch with your thumb or
finger.
Install the SIM cards/Micro SD card according the correction
directions, see below:
Install the battery according to correct direction.
Align and secure the cover and press it down to close the back
cover.
Note: the phone supports 2 GSM SIM cards and 2 GSM SIM cards are at
standby mode after installation. It supports maximum 32GB micro SD
card.
5 Battery charging
The smartphone is equipped with a built-in rechargeable Lithium battery. It is
suggested to fully charge the battery before use.
We strongly recommend to use the power adapter provided in the packaging,
using other adapter may damage the Phone and void the warranty.
Charging Process:
Connect one end of the USB cable with power adapter, and then connect
the other end of USB cable with your smartphone.
Plug the power adapter into the nearest electrical outlet.
Users can still use the Smartphone while it is being charged.

3
6 Turn ON/OFF Phone
1. Turn On: after the battery has been fully charged, press & hold the power
switch for around 3 seconds to turn on the phone. Screen lock will be showed
after starting up.
2. Turn Off: When the phone is ON, press & hold the power switch for around 3
seconds and the system will popup out “power off” option, tap on the option to
turn off the phone
3. Sleep mode: when the phone is ON, briefly press the POWER button to turn off
the display temporarily and switch your phone to Sleep mode. Your phone also
automatically goes into Sleep mode when you leave the phone idle after a certain
period of time. To wake up the phone from Sleep mode, just briefly press the
POWER button again to wake it up.
4. Unlock screen: screen lock will be appeared after you start up your phone or the
phone wakes up from sleep mode, to unlock the screen, Press and hold lock key
to drag it to unlocking icon to unlock it to enter the main interface:
Remarks:
When battery power has been used up, the phone will shut down itself
automatically.
If you illegally turn off the device, restart will scan and restore the memory,
it may take longer time to enter into system.

4
7 Touch Operations
Tap: quick tap on an icon on the screen to enter that application.
Swipe or slide: slide your finger across the screen to go to next screen
interface or page
Press and hold: press and hold an icon to open the available options.
Press, hold and drag: Press and hold your finger on an app with some
pressure before you start to drag. While dragging, do not release your finger
until you have reached the target position.
Pinch: for some applications, like Photos or the web browser, you can “pinch”
the screen using fingers to zoom in or zoom out.
8 Notification icons
These are the icons that may appear on the notifications area of the status bar:
Opening the Notifications panel
When a new notification icon displays in the status bar, press and hold the
status bar, then slide your finger downward to open the Notifications panel.
If you have several notifications, you can scroll down the screen to view more
notifications.

5
On the notifications panel, there are below shortcut settings easily for you to
setup:
1. Owner: to setup the owner info of your phone.
2. Airplane mode: tap on it to turn on/off the Airplane mode.
3. Battery status: tap on it to see the battery consumption status.
4. Wi-fi: tap on it to turn on/off the wi-fi connection.
5. Bluetooth: tap on it to turn on/off the Bluetooth connection.
6. GPS: to determine location through Wi-Fi
7. Data connection: to turn on/off Mobile data connection.
8. Data Usage: tap on it to see the data usage details.
9. Audio Profiles: to select the phone modes: General, Silent, Meeting, Outdoor.
10. Brightness: tap on it to adjust the brightness of the screen.
11. Timeout: tap on it to setup different phone idle time before screen goes to
sleep mode.
12. Auto rotation: tap on it to turn on/off “Auto rotation of screen”.
9 Personalize Your Phone
Language
Go to “Settings”, and find “Language & input, then select your desired
language, default your desired input method and Android keyboard.
Set Date and Time
Go to “Settings”, and find “Date & time”, then tap on it to enter and select
the correct time zone and setup your desired date and time.
Display settings
Go to “Settings”, and find “Display” menu, then tap on it to enter, you can
setup your desired screen Brightness, Wallpaper, Auto-rotate screen,
Screen lock style, Animation, Screen timeout, font size etc.

6
Change ringtone
Go to “Settings”, and find “Audio profiles” setting, then tap on it to enter
and then select the right phone mode(General), then enter to default the
Volumes, Phone ringtone, Message ringtone, Notification ringtone.
Setup screen lock
Go to settings, and find “Security”, then tap on it to enter and setup your
screen lock(Slide, Pattern, PIN or password).
10 Connection with PC
The phone has a micro USB connector which allows it to communicate with a
computer. After connecting the phone with PC through the cable provided, then
below USB connection screen interface will pop up, tap “Turn on USB storage”
to connect to PC.
Then tap ‘‘OK’’ to confirm the message to connect your phone with PC. Then go
to ‘‘Settings’’→‘‘Development Options’’, then tick on ‘‘USB debugging’’, then
your phone will be connected to PC, and an additional external drive can be
found on your PC.

7
11 Phone Desktop Screen
1. After starting up, you will enter into below main desktop screen:
2. On the main desktop screen, you can manage the app icons: press on the
icon and hold it for 3 seconds, then you can drag it anywhere on the main
desktop screen.
3. Delete icons: press the icon and hold it for 3 seconds, and drag the icon onto
the “ ” icon, then you can delete that icon from desktop.
4. Touch on the blank area on the main desktop screen(not on icons) and
hold for around 3 seconds, the dialog box “Choose wallpaper from” will pop
out as shown below, tap on the sources(Gallery, Live Wallpapers, Video
Wallpaper, Wallpapers) to select and change the wallpaper, see the below
screenshot.

8
5. On the main desktop screen, you can touch the icon to see all the
APPS, tap on any App icon and hold it for around 3 seconds, you can drag
that App icon onto main screen interface.
12 Phone Calls
1. Making Calls
A. Go to app list and find phone call icon , tap on it to enter, then find
the dial panel to input the phone number which you are going to call,
tap to delete the wrong number inputted, after inputting the right
phone number, tap on icon to initiate the call, system will remind
you to choose SIM 1 or SIM 2 to make the call.
B. If you want to make a call to the one whom you just called or who just
called you, you can tap on the call log icon view the call history,
find the phone number and tap on icon to start the call.
C. You can also make a call from the Contacts directory, just tap on the
Contacts icon to enter into Contacts directory and find the your
contact to start the call right away.
D. You can also tap on to hide the dial pad and tap on to add the
contact into contacts directory.
9
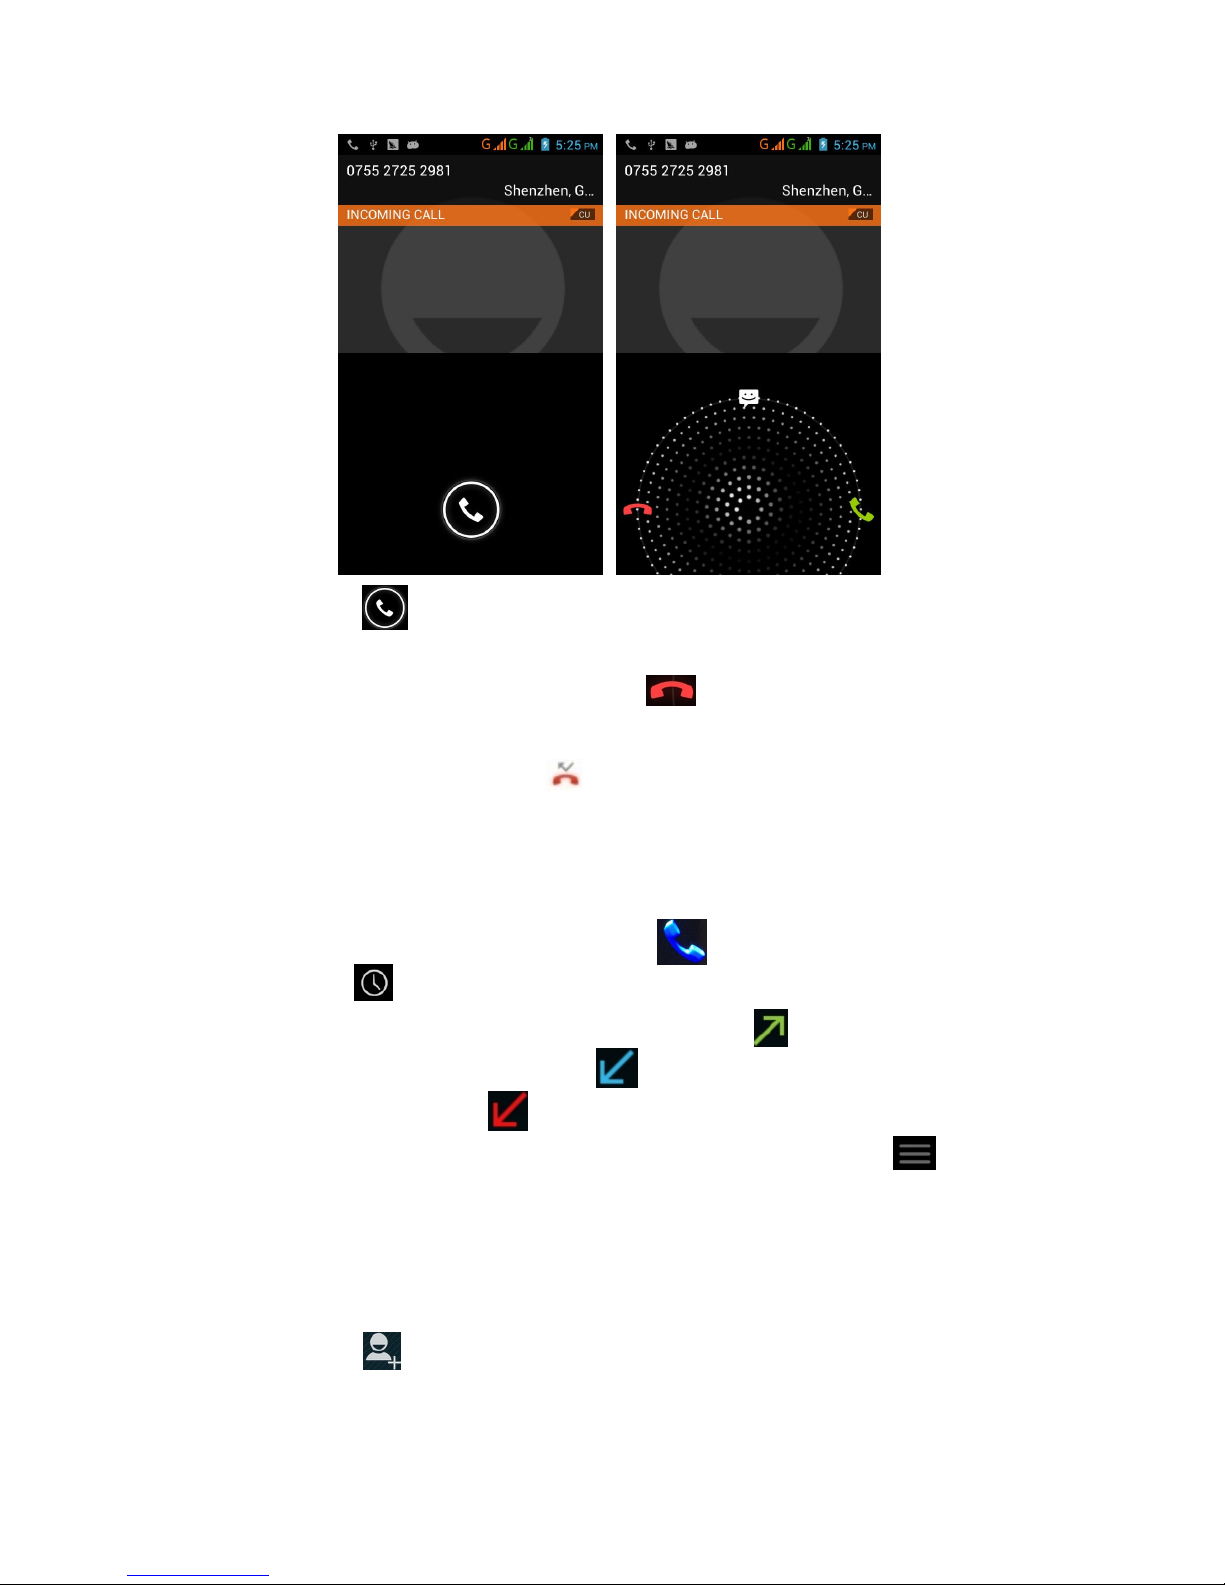
2. Receive Calls
When a call comes in, you will see below screen interface:
Slide call icon rightward to answer the call.
3. Refuse Calls
Slide lock icon leftward onto the icon to refuse the call.
4. Missed Calls
If you missed a call, the icon will be displayed on the status bar, press
and hold on the status bar then drag it down to see the missed call. Tap on
the missed call to call back.
5. Call Log
Go to app list and find phone call icon , tap on it to enter, then find the
Call Log icon , tap on it to see all the call history.
Tap on “All” to view all the call history, tap on to see the phone
numbers you have called, tap on to see the phone numbers which
have called you, tap on to see the missed calls.
If you want to delete all the call history, tap on Menu icon , system will
prompt option to delete call history, tap on it and confirm the selection to
delete all call history.
6. Create Contacts
When you initiate a call, after you input the phone number, you can
tap on “ ” to add the current phone contact into your contact lists.
When you view the call log, tap on specific phone number, then tap
on icon “Add to Contacts” to add that contact into your Contacts
directory.
You can also add contacts by running the Contacts application, go to
10
app lists and find the Contacts app icon , tap on it to enter, then
tap on icon to create new contact by following the steps.
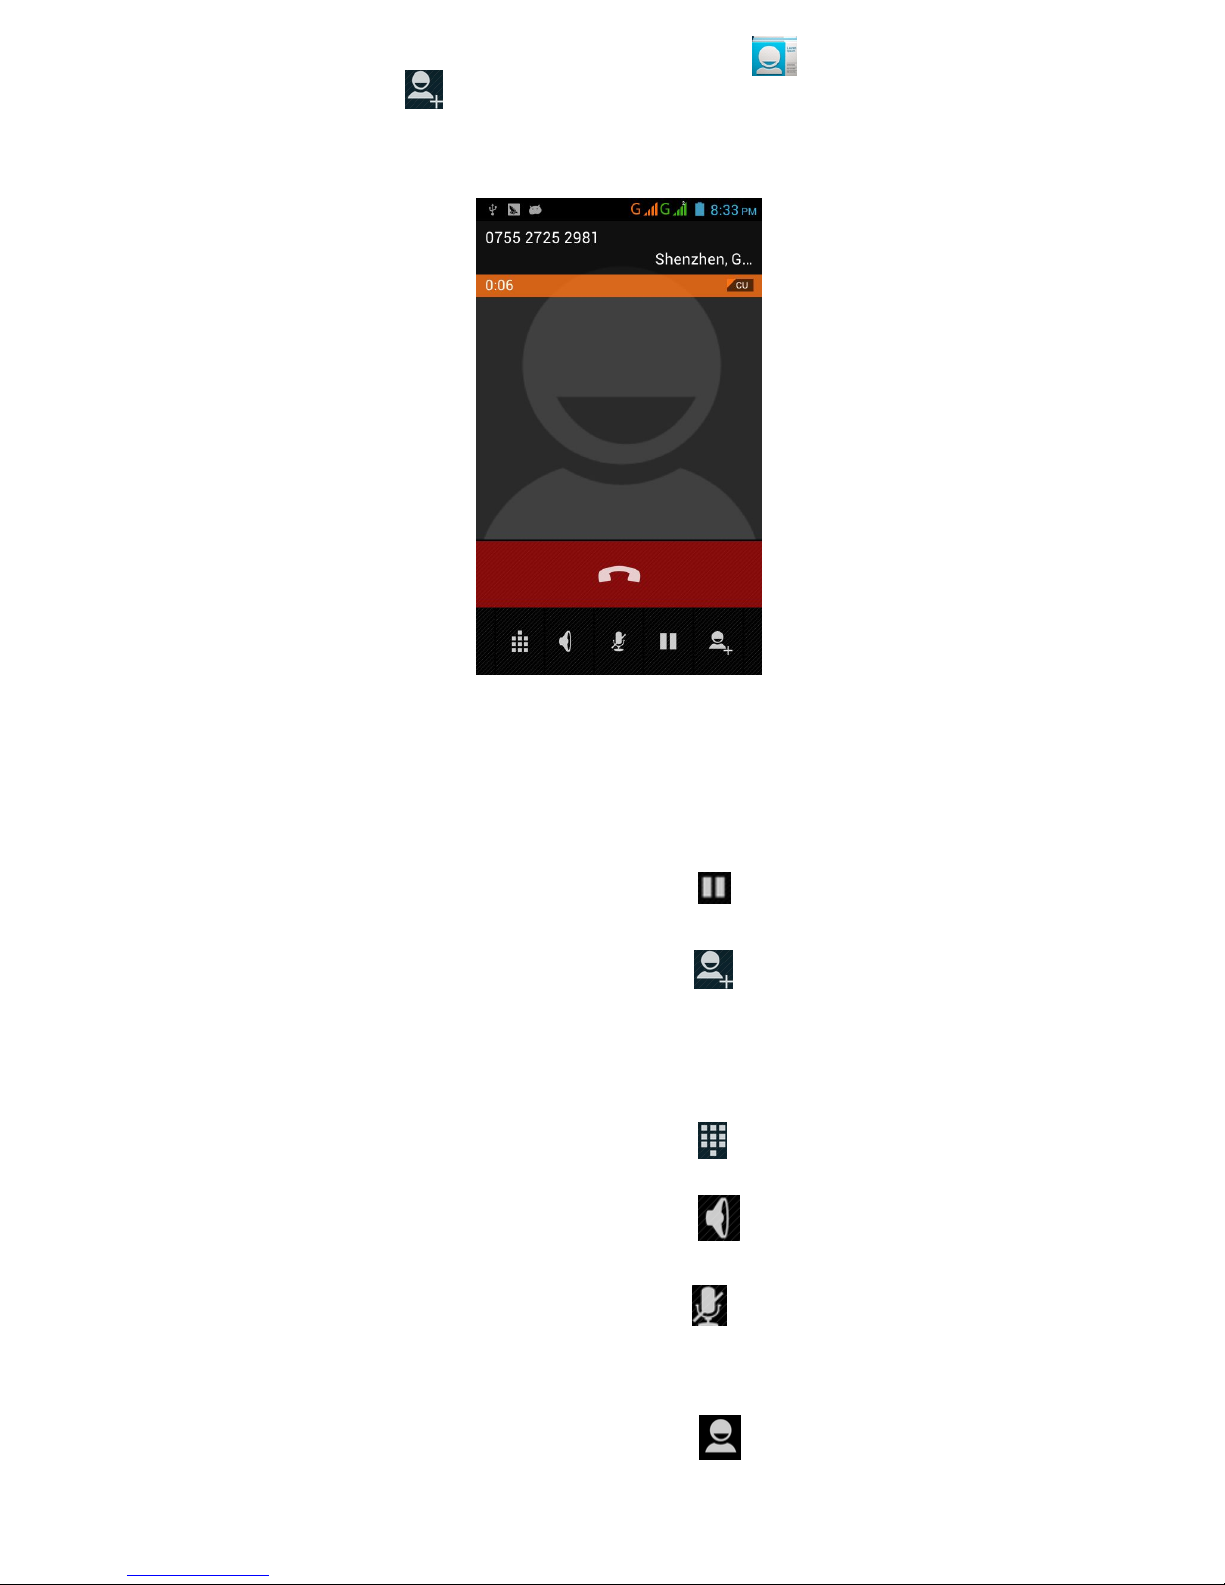
7. Options during the call
There are many options during your call, see below:
1) Adjust Volume
During the call, you can adjust the volume by pressing volume+ or
volume-.
2) Switch Call
During the call, you can tap on icon to switch the call.
3) Add Call
During the call, you can tap on icon to add another call, input the
second call number and make second call at the same time.
Note: this function needs SIM card to have multiparty call feature.
4) Dial Pad
During the call, you can tap on icon to run the dial pad.
5) Loudspeaker
During the call, you can tap on icon to open the loudspeaker.
6) Mute
During the call, you can tap on icon to mute the MIC, this way, the
callee will not hear your voice.
7) Contacts
During the call, you can tap on icon to view your contact lists.
8) Record The Call

11
During the incoming call, you can tap on menu icon to record the
call.
13 Messaging
1. Check message
1) Tap on “Messaging” icon to enter.
2) Then all messages will be displayed automatically, tap on specific
message to see the contents.
2. Send SMS message
1) Tap on “Messaging” icon to enter.
2) Tap on icon “Compose new message” to compose new message.
3) Input the phone number which you want to send the message to, or
select the contacts from your phone Contacts by tapping on
4) Input the text message and send.
3. Send MMS message
When creating message,it was defaulted as SMS,it will be changed to
MMS automatically when you add an attachment.
Note: you can send messaging to multiple contacts at the same time.
14 SIM management
On the Desktop screen, tap , and then you can see all the apps, tap the
Settings icon , and then select "SIM Management", then you can start up
below settings:
1) SIM INFORMATION
The SIM information will be displayed here, and you can activate or
deactivate the SIM by sliding the ON/OFF bar.
2) DEFAUL SIM
Since this is a smartphone supports dual-SIM, you can default one SIM as
the defaulted SIM for Data connection.
You can also turn off the “Data connection” here for both SIM’s.
3) GENERAL SETTINGS
You can turn on/off Roaming for each SIM, and select the roaming
reminder type(Once, Always or Never)

12
15 Wi-Fi settings
On the main desktop screen, tap , tap the Settings icon , and then select
"Wi-Fi", then turn on Wi-Fi by sliding the Wi-Fi bar, the phone will automatically
scan display all available Wi-Fi networks:
Connecting to a Wi-Fi network: tap on your Wi-Fi network and start to
connect. If the Wi-Fi network does not need a password, tap "connect" to start
the connection. If the Wi-Fi network needs a password, then input the password
and tap “connect” to start the connection. If the Wi-Fi network has been
successfully connected before, that information will be stored, connection will
be done automatically. Once your phone connects to Wi-Fi successfully, the
Wi-Fi icon will appear on the status bar.
If your Wi-Fi network has been hidden, you need to tap on “ ” to manually
setup your Wi-Fi network.
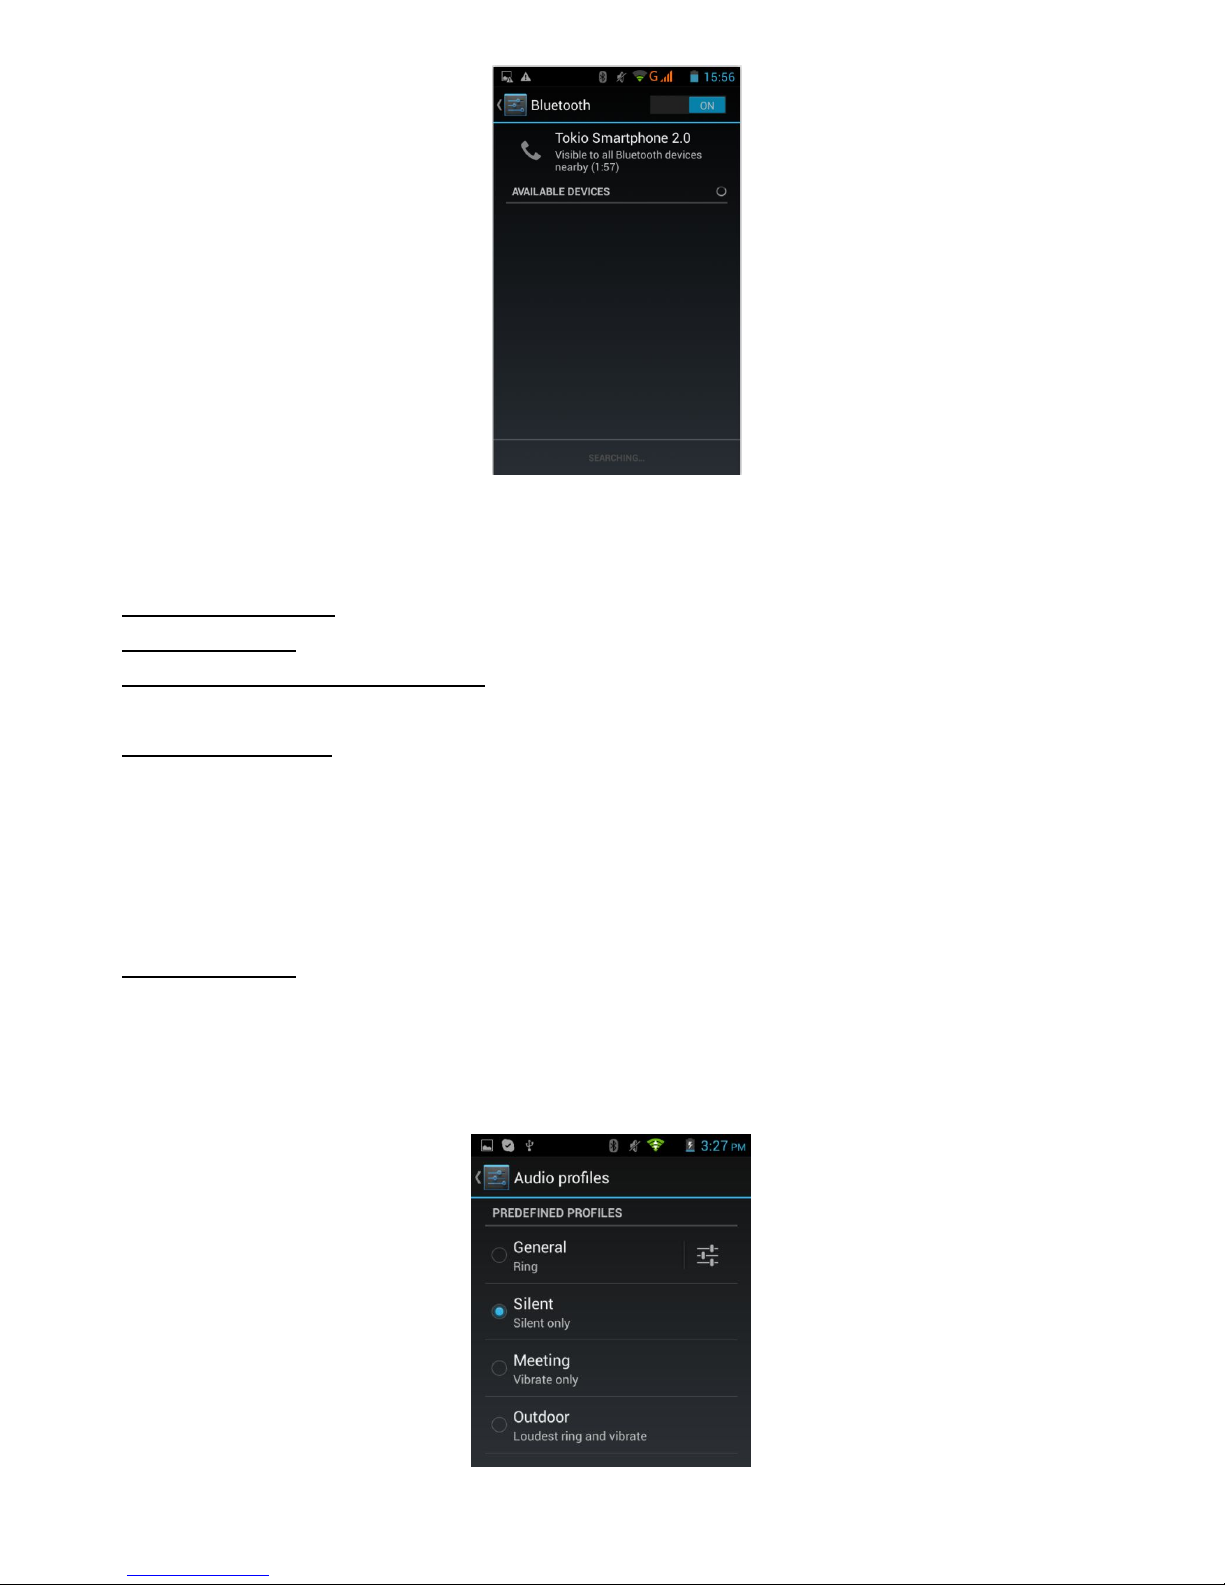
16 Bluetooth
Go to Settings , then select the “Bluetooth”, turn on the Bluetooth by sliding
the Bluetooth bar, the phone will automatically scan all available Bluetooth
devices and list them immediately or you can tap on “SEARCH FOR DEVICES”
to scan the Bluetooth devices manually.
Tap on your desired bluetooth device to pair it right away.
Your phone name will be showed on screen, tap on it to make your phone
visible to other nearby Bluetooth devices, tap on it again to make your phone
invisible to other nearby Bluetooth devices.
13
17 More Settings
In the Settings menu, touch on "More" menu to access more settings for the
phone:
Aeroplane mode: select to turn on/off the Airplaine mode.
VPN Settings: to set up & manage Virtual Private Networks.
Tethering & portable hotspot: to share your phone’s mobile data connection via
USB or as portable Wi-Fi hotspot.
Mobile networks: settings on our mobile network:
Data connection: to see the data used in current period.
Access Point Names: to set up the APN for each SIM
Network operators: to set up network operators for each SIM.
Mobile data service prefer: Mobile data service preferred is used to
improve the data transmission efficiency at the cost of lwer call
receiving rate.
USB internet: sharing windows PC internet via USB cable
18 Audio Profiles
In the Settings menu, touch on "Audio profiles" menu to customize the phone’s
sound settings based on your requirements.

14
First, please select the correct phone mode before your specific settings.
Vibrate: Select to vibrate the phone for incoming calls.
Volume: Select to adjust the volume of the incoming call, alarm,
notification and media etc.
Phone ringtone: to select the desired ringtone for your incoming calls.
Message ringtone: to default the desired ringtone for your message.
Notification ringtone: to default the desired notification ringtone for
your phone.
Audible touch tones: select to make your dial pad with touch tones.
Touch sounds: select to play sound when making screen selection.
Screen lock sound: select to make your screen lock/unlock with sound.
Vibrate on touch: vibrate when pressing soft keys and on certain UI.
Vibration intensity: setup your touch feedback vibration intensity.
19 Display Setting
15
Lock Screen nofificatons: select it to choose screen lock style.
Workspace transition effect: tap on it to setup the workspace transition
effect.
Brightness: click the settings bar , slide to adjust the brightness
of the screen, and then click "OK" to confirm or "Cancel" to exit.
Wallpaper: tap on it to setup the wall paper, you can import the
wallpaper from Gallery, Live Wallpapers, or the existing built-in
Wallpapers gallery.
Auto-rotate screen: select it to allow the screen automatically rotate
according tot the position of phone.
Font size: select it to adjust the screen font size.
Sleep: tap on it to setup the time of inactivity for screen to enter into
sleep mode.
Horizontal calibration: tap on it to calibrate horizontally using
acceleroeter.
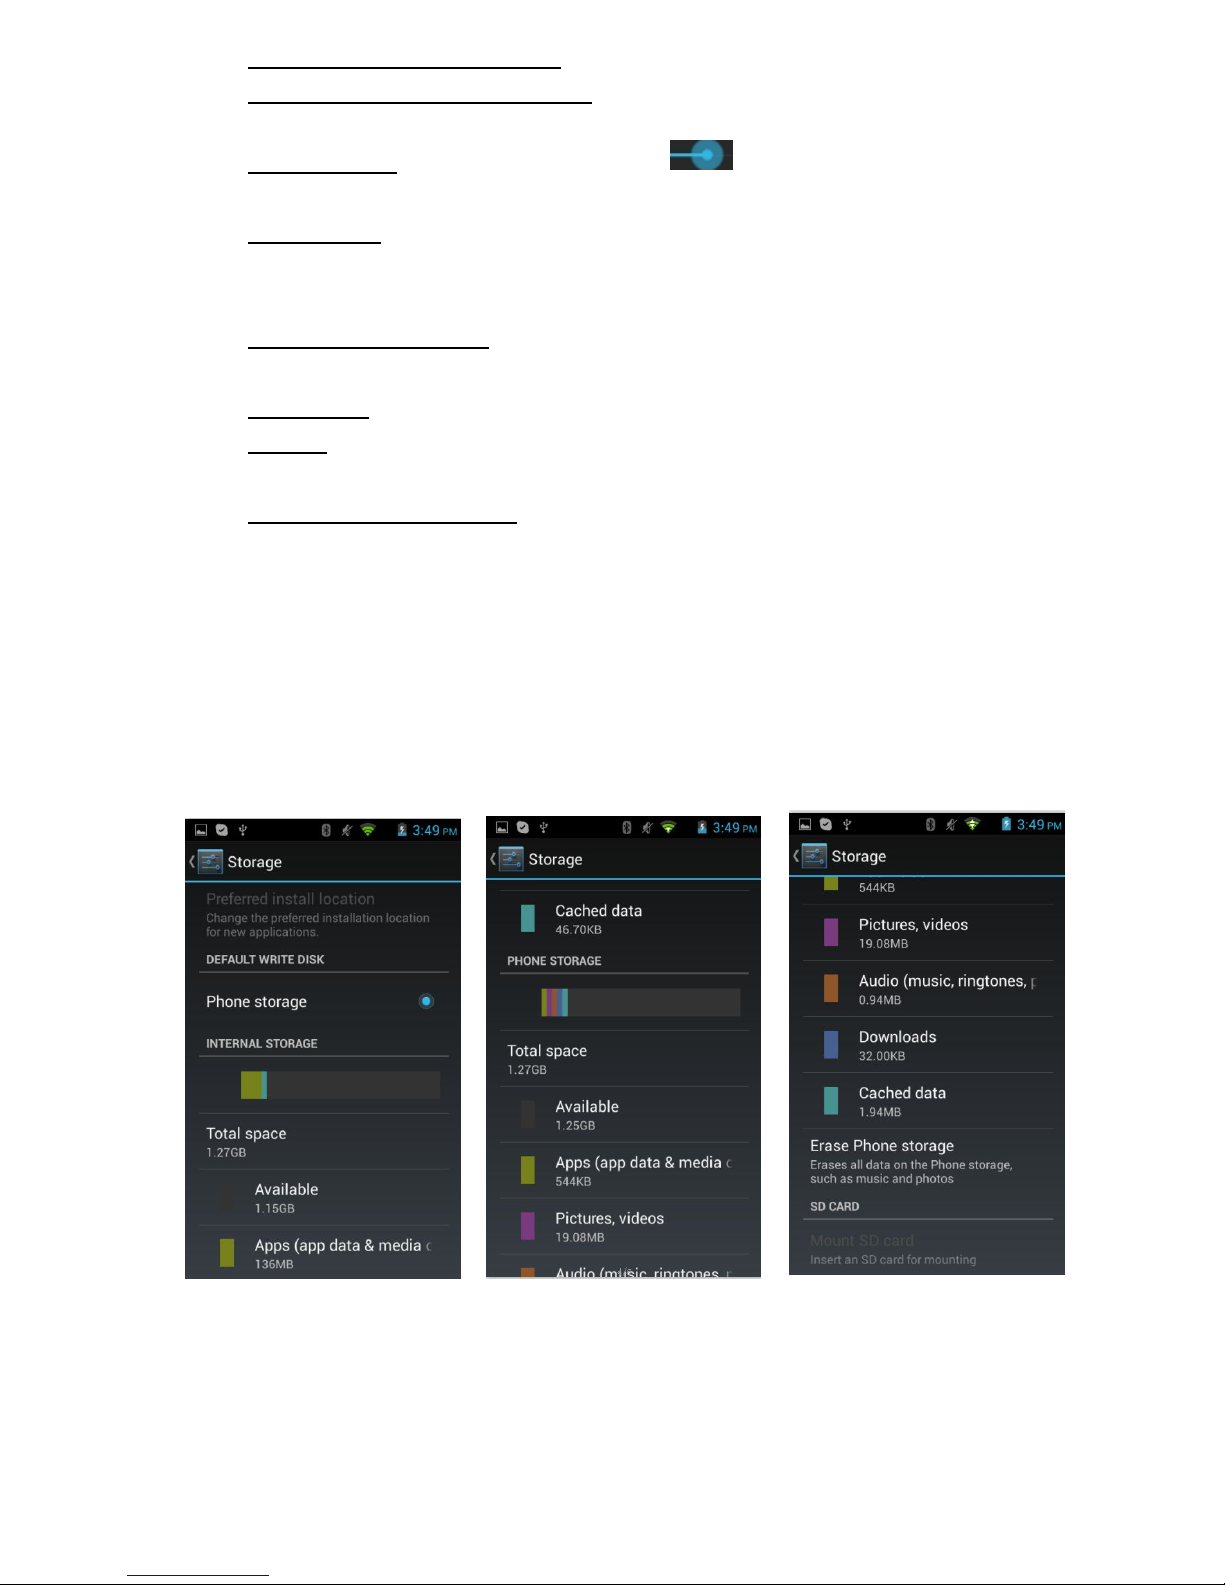
20 Storage
You can select the memory source to install the applications, you can also
check the storage details of external SD card, internal phone storage and phone
storage. You can also erase all data on the phone storage, such as music and
photos, and you can also unmount the SD card safely here.
【Remarks】:
If you want to safely remove the Micro SD card, please tap on the option
“Unmount SD Card”, and confirm the selection, after this, you can safely
remove SD card.

16
21 Applications
In the Settings menu, touch on "Apps" menu to customize the phone’s
application settings based on your requirements.
Manage applications: tap on the directories(Downloaded, SD card,
Running or All) and select the application which you want to uninstall,
you will enter into the following interface, tap on Uninstall, then you
can remove that application from your phone.

17
22 Add account
You can add account by tapping “Add account”. You can add corporate, Email
or Google account.
23 Security
Tap on the "Security" to set up:
Screen lock: You can completely disable the screen lock, but it is recommended
to use protection, such as pattern password.

18
Select "Pattern" and then click "Continue" .
Perform the unlock pattern by connecting at least 4 points, and then click
continue, to save a pattern.
PIN: The PIN code will be a screen lock:
Enter 4 digits, and then tap OK to lock the screen. When the device is switched
on or off, you will be prompted for a code to unlock the screen.
Password: Enter the password that will be used to lock the screen.
19
When you turn on your Phone or unlock the screen, you will be prompted for a
password.
SIM Card Lock: tap on “Set up SIM card lock”, you will need to tick the option of
“Lock SIM card”, then you will be required to input PIN number to lock the SIM
card. Once you lock the SIM card, you need PIN to use the phone.
Make passwords visible: tick this option to make your passwords visible when
you input the passwords.
Device administrators: to add and remove device administors. If you do not
have administrators, tap menu ico to add the administor.
Install from SD card: tap on it to install the certificates fromm SD card.
Set password: to set or change the credential storage password.
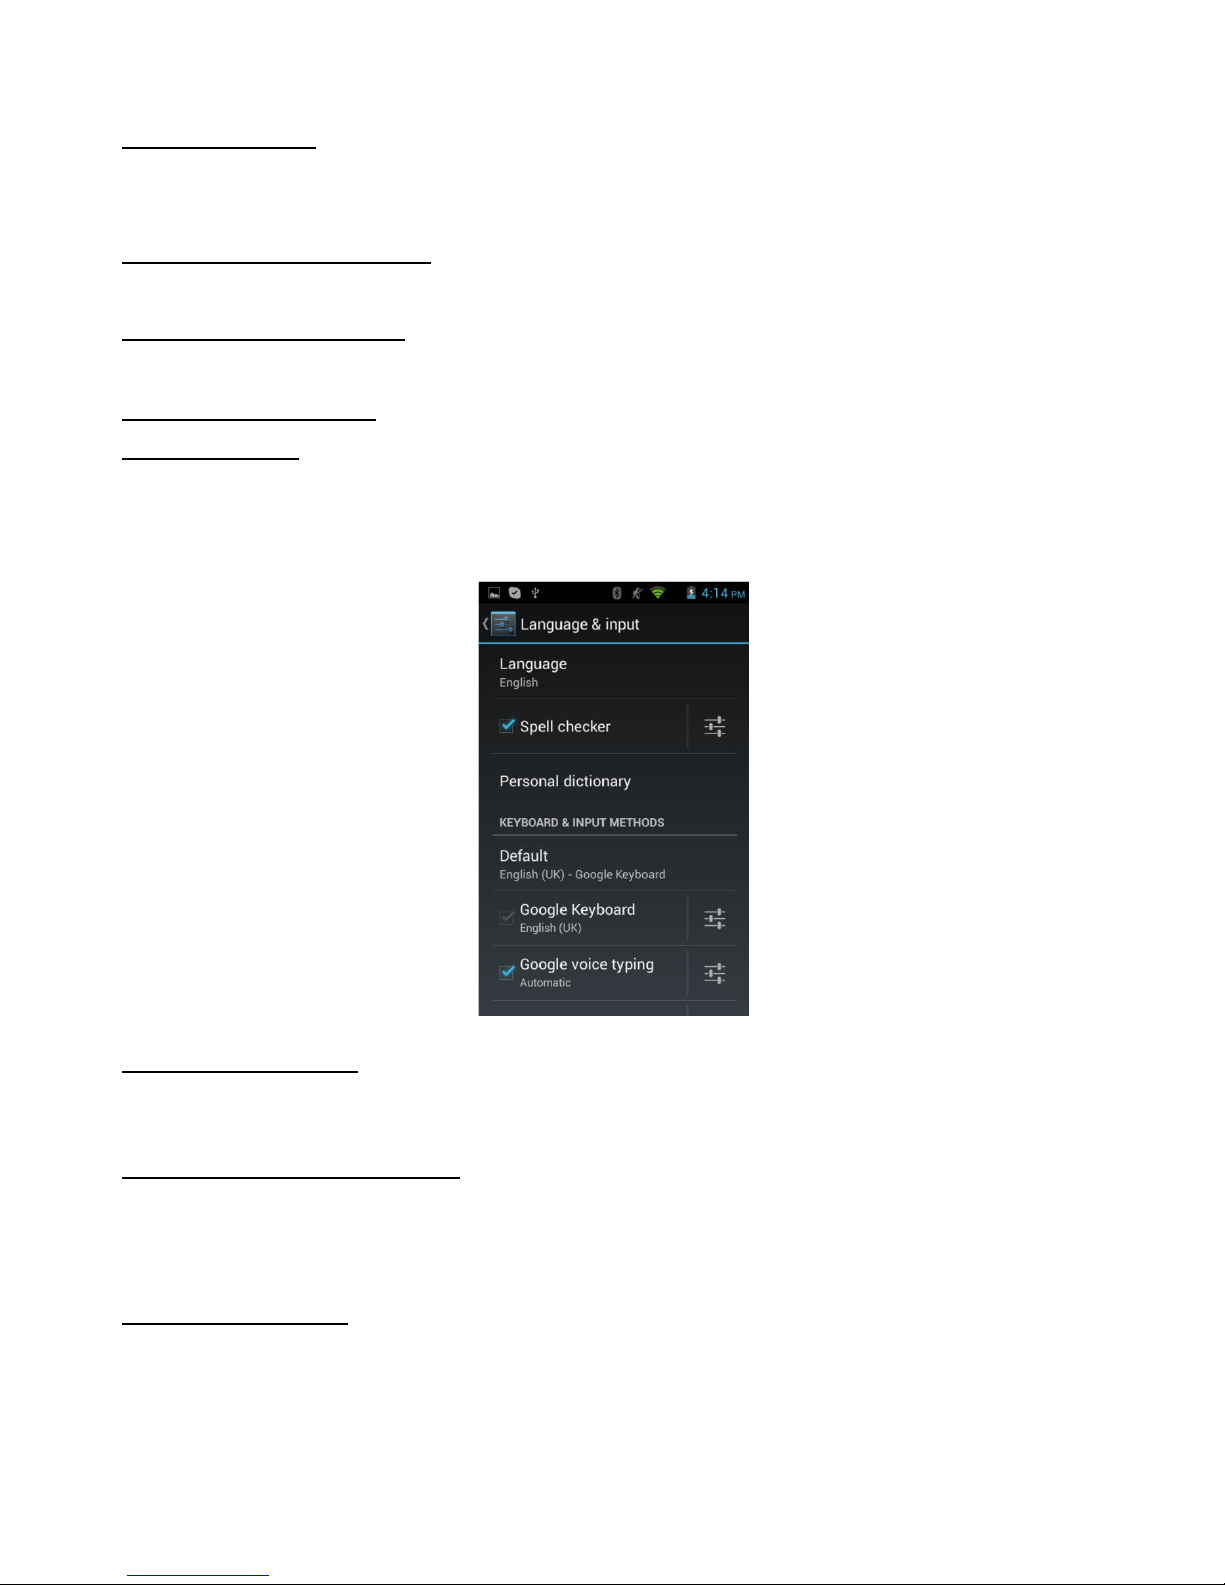
24 Language, keyboard, voice
Touch the "Language & input" to access to the following settings:
Language settings:
In addition to the English language, the phone supports different languages .
You can scroll the languages list to select your desired language.
Keyboard & input methods:
You can perform different settings on the Android Keyboard and input methods.
25 Backup & reset
Factory data reset
Allows you to erase all personal data from the phone.
Table of contents


