Tolis Group ArGest TGL1800 User manual

ArGest® Library
User's Guide TGL1800, TGL2240,
TGL4480
FOR ANY QUESTIONS PLEASE CONTACT TOLIS GROUP SUPPORT www.tolisgroup.com/support

TOLIS Group Library User Guide. Printed in U.S.A.
COPYRIGHT STATEMENT
TOLIS Group, Inc., et al
Copyright © 2001–2018 TOLIS Group, Inc. All rights reserved.
Your right to copy this manual is limited by copyright law. Making copies or adaptations without prior
written authorization from TOLIS Group, Inc. is prohibited by law and constitutes a punishable violation
NOTICE OF TRADEMARKS AND SERVICE MARKS
BRU, the TOLIS Group “three-man” Logo, and the BRU “circle b” Logo are trademarks or registered
trademarks of TOLIS Group, Inc.
“Backup You Can Trust” and “BRU...Because it's the RESTORE that matters” are service marks of
TOLIS Group, Inc.
The absence of a product, service name or logo from this list does not constitute a waiver of TOLIS
Group's trademark or other intellectual property rights concerning that product, name or logo.
Throughout this book trademarks are used. TOLIS Group, Inc. states that we are using any and all
trademarked names in an editorial fashion and to the benefit of the trademark owner with no intention of
infringement of the trademark. For TOLIS Group legal information, please contact
NOTICE OF LIABILITY
The information in this manual is distributed “as is” and without warranty. While every precaution has
been taken in the preparation of this book, TOLIS Group, Inc. nor its resellers and representatives shall
have any liability to any person or entity with respect to any loss or damage caused or alleged to be
caused directly or indirectly by the information and instructions contained in this manual or by the
computer software and hardware described within.
TOLIS Group, Inc. may revise this publication from time to time without notice.
UPDATE INFORMATION
TOLIS Group, Inc. will always work to ensure that the data contained in this manual is kept up to date.
As such, please visit our website at http://www.tolisgroup.com to retrieve the latest version of this
manual.
PRINTING HISTORY
September 2018
2

IMPORTANT
The shipping lock must be removed for the robotics to work properly. A robot move error is displayed if
the shipping lock is not removed. Retain the shipping lock for moving the library or shipping the library.
Not using the shipping lock for library movement may damage the library and will result in a voiding of
the warranty.
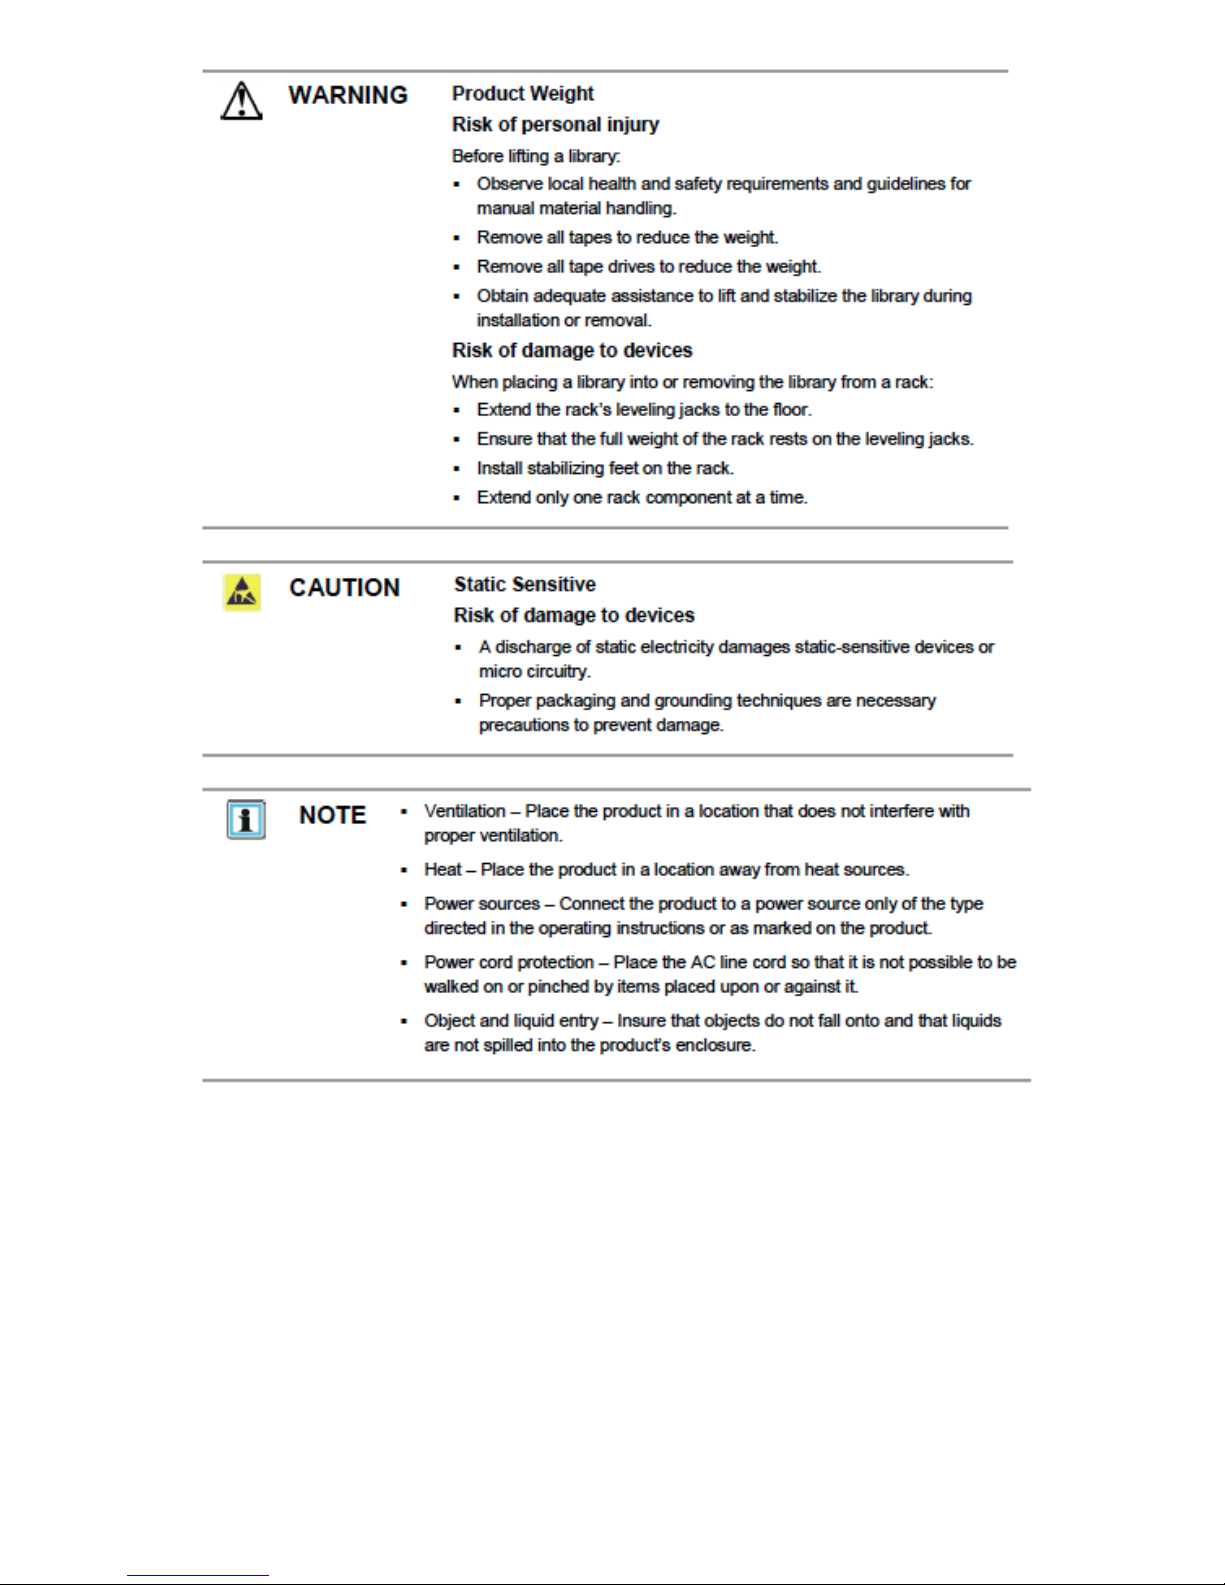
HEAVY LIFT WARNING!
When moving the Library, to reduce the risk of personal injury or damage to the device:
•Observe local health and safety requirements and guidelines for manual material handling.
•Remove all tapes to reduce the overall weight of the device and prevent cartridges from falling into
the robotic path and damaging the Library.
•Obtain adequate assistance to lift and stabilize the device during the installation or removal.
RACK INSTALLATION WARNING
When placing the Library into a rack, to reduce the risk of personal injury or damage to equipment:
•Extend the rack leveling jacks to the floor.
•Ensure that the full weight of the rack rests on the leveling jacks.
•Install stabilizing feet on the rack.
•Extend only one rack component at a time. Racks may become unstable if more than one
component is extended.
KEEP YOUR BOXES!
In the event that the library needs to be returned for warranty repair, the unit must be returned in the
original packaging. Units that cannot be returned in the original packaging for any reason must have
prior authorization from TOLIS Group or the RMA will be refused.
OBTAINING TECHNICAL SUPPORT
Technical support for the library is provided directly from TOLIS Group, Inc. See Appendix C for TOLIS
Group Technical Support contact information.!
3

!
4
5

Table of Contents
1 - Panel Overviews and Location Requirements 8...............................
Optional: Tabletop Conversion Cover or Desktop Feet 14........................................
2 - Unpacking the Library 15....................................................................
Identify Product Components 15...............................................................................
Removing and Storing the Shipping Lock 15............................................................
3 - Installation 16.......................................................................................
Rack Mount Installation 16........................................................................................
Determine Your Rack Type 16.............................................................................
Securing the Rails to the Rack 16.......................................................................
Installing the Library 16.......................................................................................
Desktop/Tabletop Installation 16..........................................................................
4 - Connecting the Library 17...................................................................
Determine the Connection Type 17...........................................................................
Planning Configuration: SAS 17...............................................................................
Planning Configuration: Fibre-Channel 17................................................................
Direct Connection 17...........................................................................................
SAN Connection 18.............................................................................................
Planning the Configuration: Parallel SCSI 18...........................................................
Changing the SCSI ID 18....................................................................................
Preparing the Host (Backup Server) 19....................................................................
Connecting the Library: SAS 19................................................................................
Connecting the Library: Fibre-Channel 19................................................................
Connecting a Second Tape Drive 20...................................................................
Connecting the Library: Parallel SCSI 20.................................................................
Connecting a Second Tape Drive 20...................................................................
5 - Using the Operator Control Panel (OCP) 21......................................
Control Keys 21........................................................................................................
LED Indicators 21.....................................................................................................
Powering on the Library 21.......................................................................................
Configuring the Network 22......................................................................................
To configure an IPv4 address 22.........................................................................
To enable IPv6 and configure IPv6 addressing options OCP 23.........................
Setting the Date and Time 23...................................................................................
Setting the Administrator Password 23.....................................................................
Loading Cartridges/Tapes 24....................................................................................
Unlocking the Mailslot (Unlock Mailslot) 25..............................................................
6

6 - Using the Remote Management Interface (RMI) 26..........................
Logging In 26............................................................................................................
Status Icons 26.........................................................................................................
7 - Advanced Options & Additional Information 27...............................
Configuring Logical Libraries (Partitioning) 27..........................................................
Bar Code Reporting Format 27.................................................................................
Setting the Library Behavior 28.................................................................................
Powering a Drive On or Off 29..................................................................................
Magazine Release 30...............................................................................................
Labeling Tape Cartridges 30.....................................................................................
LTO Formatted Bar Codes 30..............................................................................
Updating the Firmware 31.........................................................................................
Appendix A: Limited Hardware Warranty 32..........................................
Global Limited Warranty and Technical Support 32..................................................
Hardware Limited Warranty 32.................................................................................
General terms 32.................................................................................................
Exclusions 34......................................................................................................
Exclusive Remedy 34..........................................................................................
Limitation of liability 34..............................................................................................
Customer Responsibilities 35...................................................................................
Types of Hardware Warranty Service 36..................................................................
Parts-only warranty service 36..................................................................................
Advanced unit replacement warranty service 36......................................................
Appendix B: OCP Menu Structure 37......................................................
Appendix C: TOLIS Group Technical Support 38...................................
Appendix D: Ordering Media 39...............................................................
Recommended Media 39..........................................................................................
Purchase from TOLIS Group 39...............................................................................
7

1 - Panel Overviews and Location Requirements
8

9
10

11

12
13

Optional: Tabletop Conversion Cover or Desktop Feet
The Library should ONLY be installed into a rack with the enclosed rails, or
installed into the optional tabletop conversion cover (TGL2240Library only), or
with use of the specialized desktop feet (TGL1800 and TGL2240 only) and set on
a flat surface. The TGL4480 is only designed to be used in a rack there are no
desktop conversion options available.
VERY IMPORTANT: Please contact TOLIS Group Support for instructions on
using the Desktop Feet or to inquire about the tabletop conversion kit. Using
the library on a desk or shelf without the proper support of the feet or tabletop
conversion kit may damage the library and void the warranty.
14

2 - Unpacking the Library
Remove the packaging, accessories, and Library from the box one layer at a
time. Place the Library on a level work surface. Carefully remove the foam
padding and then the bag from the Library. Save the packaging materials to
move or ship the Library in the future.
Identify Product Components
Confirm that you received the following
product components as per your order:
1. SAS, FC, or parallel SCSI cable(s)
matching your LTO drive(s) type
2. Power cord
3. Power cord extension cable (select
units only)
4. Two rack rails (ships in separate
box)
5. Two packets of rack hardware
6. Product documentation is located
online at tolisgroup.com
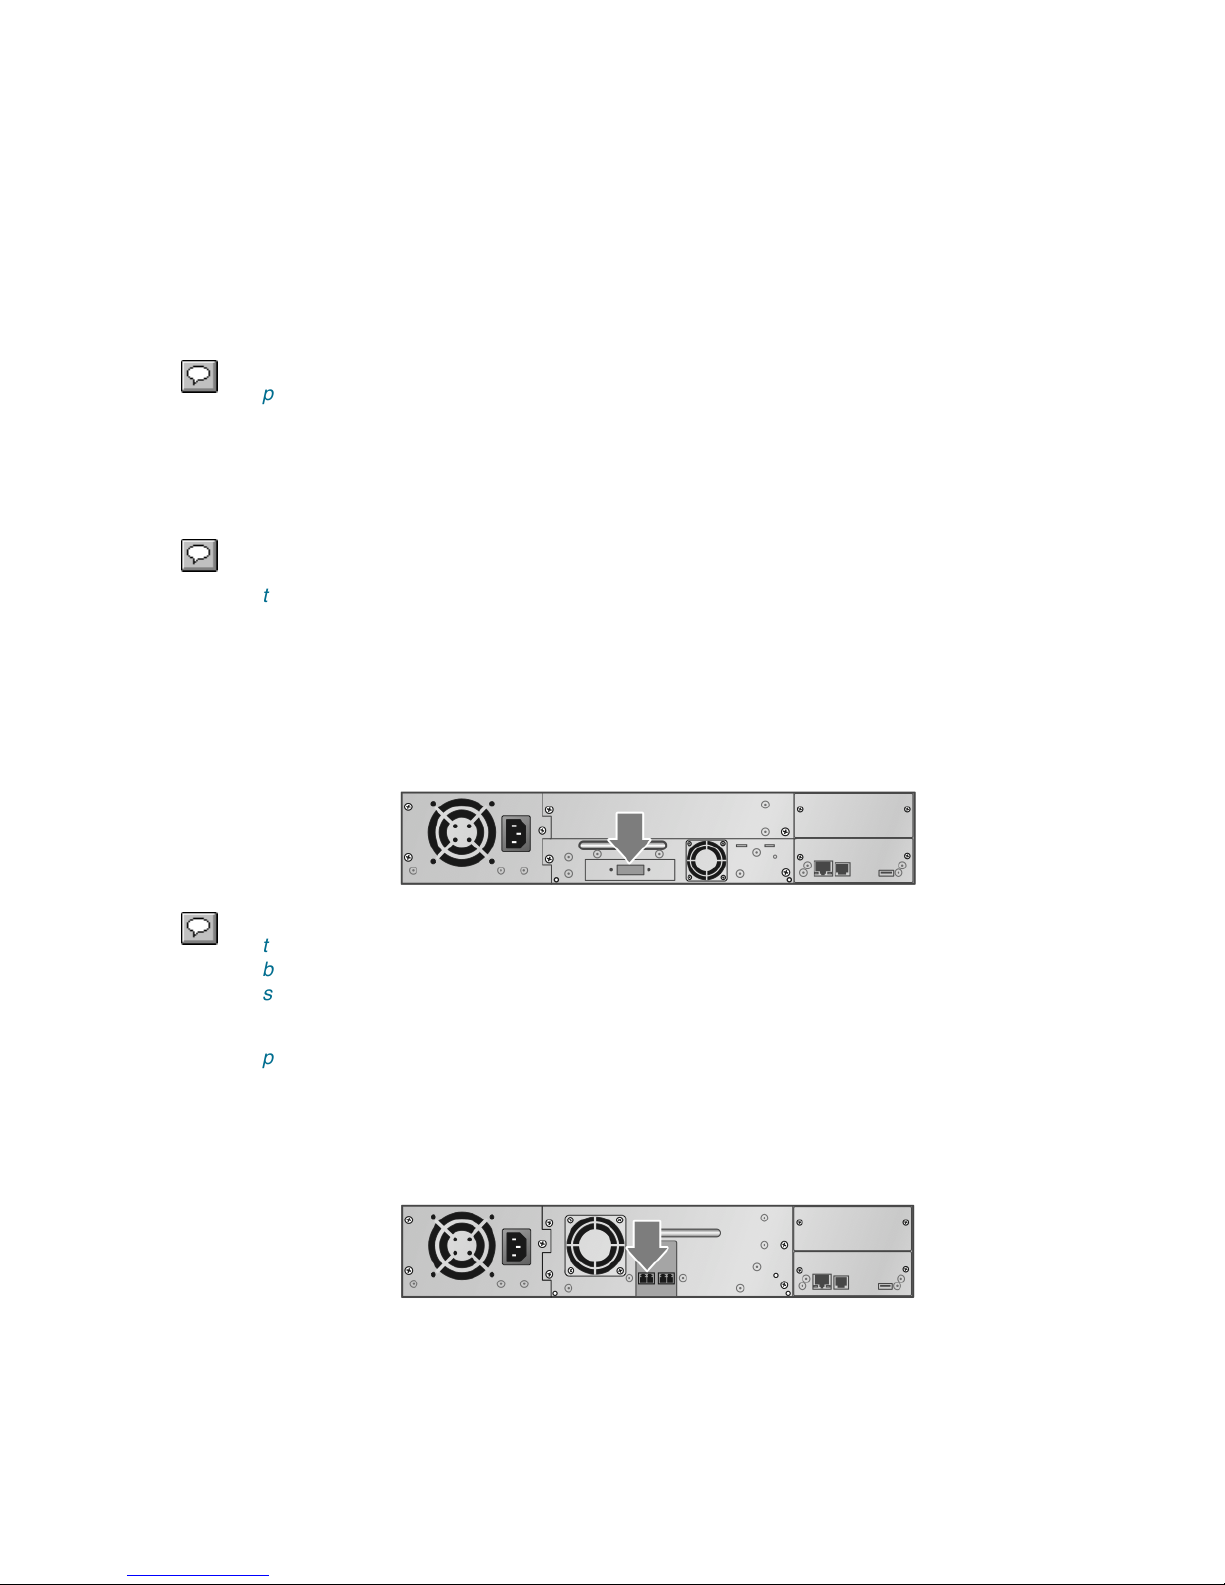
Removing and Storing the Shipping Lock
The shipping lock protects the robotic transport mechanism from moving
during shipment and must be removed and stored before powering on the
Library.
Locate the adhesive tape holding the storage lock at the top of the Library.
Remove the adhesive tape, then remove the storage lock and store it as shown.
IMPORTANT:
The shipping lock must be removed for the robotics to work properly. A robot move error is displayed if
the shipping lock is not removed. Always insert the shipping lock when moving or shipping the library to
protect the internal robotics during movement. Failure to use the shipping lock when moving the library
may damage the library and void the warranty.!
15

3 - Installation
The is to be installed into a rack with a minimal rack depth of 26-inches (66.04 cm) if the Tabletop
Conversion Cover or desktop feet are not being used. DO NOT use the ArGest library on a flat surface
without the Desktop Conversion Kit or desktop feet as the stress on the outside edges of the library will
cause robotic failures and void the warranty.
Rack Mount Installation
Determine Your Rack Type
You will need a #2 and #3 Phillips screwdriver, the
two rack rails, and the packet of eight (8) M6 screws
appropriate for your rack type.
•The System/E rack has .71mm round holes in the
rack column. Chose the bag labeled HP Rack
System/E.
•The 5000 and 10000 racks have 9.5mm square holes in the rack column. Choose the bag labeled
HP Rack 5000, 10000.
Securing the Rails to the Rack
Using the screws for your rack type and a #3
Phillips screwdriver, secure the front of one rail to
the rack. Extend the rail and secure the back of the
rail to the rack. Secure the other rail to the rack in
the same manner.
The front of the rails are straight and the back is
angled as shown above.
Installing the Library
The library is installed by sliding the library onto the rails. Secure the library to the rack by using a #2
Phillips screwdriver to mounting the built-in screws in the front bezel to the rack. Tighten the captive
screws on each side of the library.
Desktop/Tabletop Installation
Place the cover on the work surface behind the
Library. Slide the Library into the cover until the
front panel of the Library is aligned with the cover.
Tighten the two captive screws on the front bezel to
secure the Library in the cover.
16
4 - Connecting the Library
The library is available in three different connectivity methods: SAS (default), parallel SCSI, and Fibre-
Channel. Use the instructions below based on your library model.
The library is capable of using a maximum of one drive for the TGL1800, 2 drives for the Library, and 4
drives for the TGL4480. If more than one drives have been purchased with the library the connectivity
of the two drives must be the same (i.e. SAS, FC, or parallel SCSI). It is not possible to mix the
connectivity methods of different drives (i.e. Using a parallel SCSI drive in the bottom drive bay and a
SAS drive in the top drive bay).
NOTE: When using the library with multiple tape drives, the bottom drive is always the
primary (first) drive. The top drive is the secondary (second) tape drive.
Determine the Connection Type
See Chapter 1 to determine which type of drive connection the library is using. Once determined, use
the steps below for the appropriate connection type.
NOTE: With the release of the Ultrium 5 (LTO-5) tape technology, LTO-5 is not
manufactured in the parallel SCSI interconnect type, only SAS and FC. The Ultrium 4
technology is the last release of LTO to support parallel SCSI interconnectivity.
Planning Configuration: SAS
The server that the library is connecting to must have a SAS HBA with an external connector. TOLIS
Group hardware bundles come with an HBA that must first be installed into the system the library will be
connecting to. If this has not been done, please stop here and install the HBA into the system that the
library will be directly connected to.
NOTE: Most Serial Attached SCSI (SAS) RAID controllers do not support connection to
tape devices. If you did not obtain your SAS HBA with your TOLIS Group hardware
bundle, please make sure that the SAS HBA that the library will be connected to
supports tape libraries on the operating system that is being used.
Connecting the library to a SAS RAID controller that does not support tape libraries may
prevent the system from being able to boot when the library is connected.
Planning Configuration: Fibre-Channel
The Fibre-Channel (FC) tape drive has two FC ports. Only one port may be used at a time, but both
ports can be connected for path failover.
Direct Connection
You will need a 8Gb+ FC HBA. A 12Gb HBA is recommended for optimum performance, but is not
required.
17

For Mac OS X systems that use the Apple Fibre-Channel Utility, direct connection of the library requires
the port the library is plugged into to be set on a 1Gb Arbitrated loop to ensure proper communication to
a tape library.
SAN Connection
All FC switches between the host and the library must be of the appropriate type. A 2Gb switch in the
path may result in performance digression when backing up highly compressible data to a 4Gb tape
drive.
All switches between the host and the library must be zoned appropriately so that the backup server
and the library are the only devices in a single zone. Placing the library into a zone with other servers
will cause intermittent connectivity problems and reduced performance. Connecting the tape library
directly to the backup system does not require zoning of the FC switch.
Planning the Configuration: Parallel SCSI
If you are unfamiliar with configuring parallel SCSI devices, please contact TOLIS Group support.
Follow these general guidelines when planning the SCSI configuration:
•The LTO-3 and LTO-4 TGS-series tape drives are Ultra320 parallel SCSI devices. Only put one
LTO-3 or LTO-4 tape drive on an Ultra320 bus. Putting multiple LTO-3 or LTO-4 tape devices on a
single Ultra320 bus will result in degraded performance. Do not connect a tape drive to an SE SCSI
bus because it will seriously degrade performance.
•The LTO-2 tape drive is an Ultra160 parallel SCSI device. Up to two LTO-2 tape drives can share an
Ultra320 bus or each tape drive can be on its own Ultra160 bus.
•Avoid putting the library on the same SCSI bus as a disk drive or SE device as it can result in
degraded performance of the tape library and drive as well as any attached disk drives.
•The default SCSI ID of the bottom half-height or single full-height drive is 4. The default SCSI ID of
the top half-height tape drive (if installed) is 5.
NOTE: With the release of the Ultrium 5 (LTO-5) tape technology, LTO-5 is not
manufactured in the parallel SCSI format. The Ultrium 4 technology is the last release
of LTO to support the parallel SCSI format.
Changing the SCSI ID
On a parallel SCSI library, if you need to change the SCSI ID for one or both of the tape drives, do so
before connecting the library to the host computer.
1. Attach the power cord to the Library.
2. Remove the shipping lock if you have not already done so.
3. Power on the library by pressing the power button on on the front panel.
4. Once the library has become ready, on the front panel, press ENTER.
5. Press NEXT until the display shows Configuration. Press ENTER.
6. Press NEXT until the display shows Change Drive 1 or Change Drive 2. Press ENTER to
select the drive that needs a new SCSI ID.
18

7. Press NEXT until the display shows the desired new SCSI ID. Press ENTER to set the new SCSI
ID of the selected drive.
8. Change the SCSI ID of the other tape drive if necessary.
NOTE: The SCSI ID can also be changed from the RMI (Configure -> Drive) screen
once the RMI is configured.
Preparing the Host (Backup Server)
If you have not already done so, install the BRU backup software that was provided with your hardware
bundle onto the system that will be managing the library tape library.
You’ll also need to install the HBA into the same machine that the BRU software is being installed onto.
If an HBA that was not provided by TOLIS Group (purchased with the tape library), make sure that the
SAS, FC or SCSI HBA being used supports tape devices on the operating system in which the HBA is
being used. Also verify that the HBA being used supports multiple LUNs. For parallel SCSI devices,
verify that multiple LUN support is enabled for the HBA and operating system.
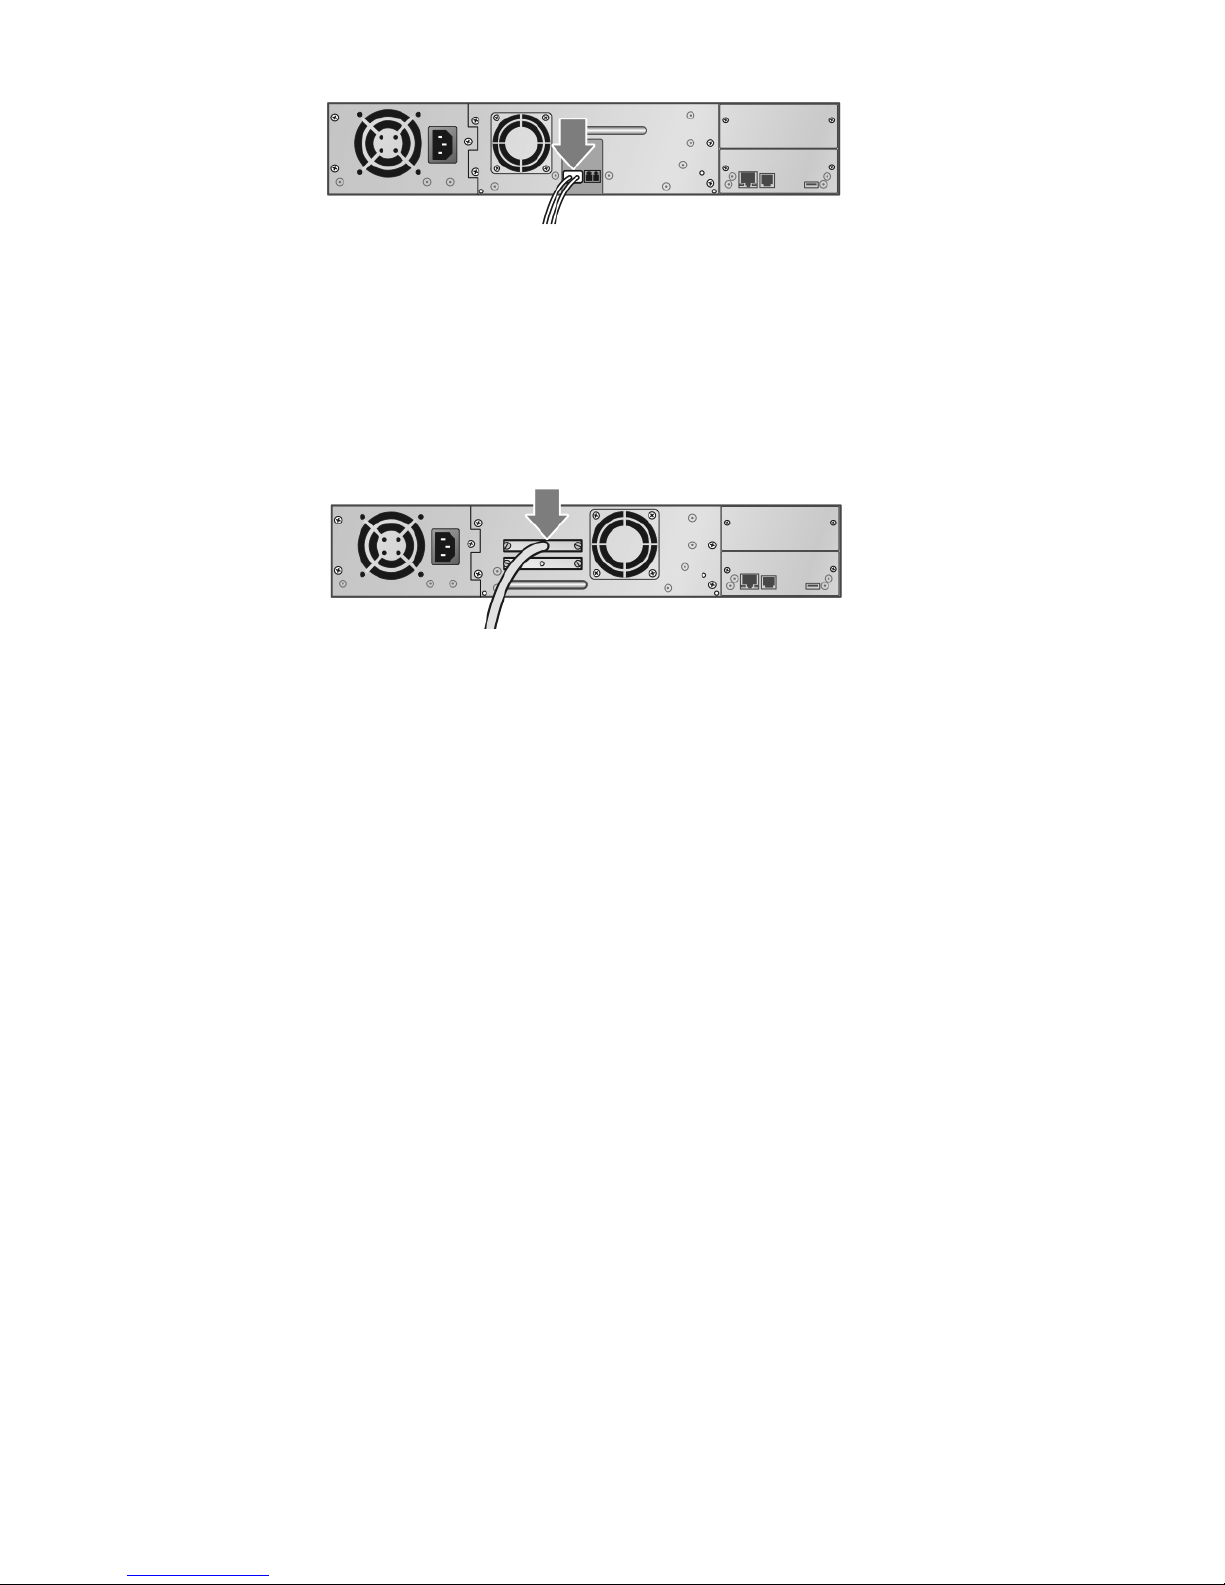
Connecting the Library: SAS
The SAS cable that is provided with the Library tape
library is a 4-meter one-to-four (1-4) fanout cable. The
connections are all SFF-8088 mini-SAS connections.
This cable can be used to connect up to four tape drives
to a single SAS HBA port. Any of the four tape drives can
be used for any tape drive.
TOLIS Group also permits the cable to be used to
connect third-party SAS devices such as RAID arrays or
other non-TOLIS Group tape hardware. However, these
additional devices may need to be removed for
troubleshooting purposes when contacting TOLIS Group Technical Support concerning the Library tape
library.
SAS signal rate require clean connections with a minimum number of connections between the HBA
and the library. Do not use adapters or converters between the HBA and the tape library. TOLIS Group
recommends a maximum SAS cable length of six (6) meters.
Attach the HBA end of the cable (the end with a single connection) to the SAS HBA installed into the
BRU backup system. Attach a connector on the opposite end (one of the four) to each installed/
attached tape drive.
The unused ends are single channel and not suitable for use with some disk arrays. Use the other
ends to connect other tape devices or leave the ends capped and secure the loose connections to the
rack to minimize stress on the connectors inserted into the tape drive(s).
Connecting the Library: Fibre-Channel
Remove the FC port dust cap from Port A. Attach the end of the FC cable to Port A on the tape drive.
Attach the other end of the FC cable to a switch or HBA.
19
Make sure that if you are connecting the Library to a FC switch that you have read the Planning the
Fibre-Channel Configuration at the beginning of this chapter.
Connecting a Second Tape Drive
Connect the second FC tape drive in the same manner as the first drive.
Connecting the Library: Parallel SCSI
Attach one end of the parallel SCSI cable to the top parallel SCSI port on the tape drive. Attach the
other end of the SCSI cable to the host bus adapter (HBA) or to the previous parallel SCSI device on
the SCSI bus chain.
If the tape drive is the last device on the SCSI chain or is the only device on the SCSI bus, then a
parallel SCSI terminator (included in hardware bundle) is required to be added to the bottom port of the
parallel SCSI port on the drive.
Always make sure that the last device on a parallel SCSI chain is properly terminated.
Connecting a Second Tape Drive
If the Library has two parallel SCSI drives, attach one of a parallel SCSI cable to the HBA on the
system. Attach the other end to the bottom port on the bottom tape drive.
Using another parallel SCSI cable, attach one end to the top port of the bottom tape drive. Attach the
other end of the parallel SCSI cable to the bottom port of the top tape drive.
If the tape library is the only device or the last device on the parallel SCSI chain, use the provided
parallel SCSI terminator to terminate the chain by attaching the terminator to the top parallel SCSI port
of the top tape drive.
20
This manual suits for next models
2
Table of contents
Other Tolis Group Storage manuals

Popular Storage manuals by other brands


Western Digital
Western Digital My Book Office Edition user manual

Synology
Synology DiskStation DS214se Quick installation guide

LDI
LDI SAFCO 3098 Assembly instructions

Alpha ESS
Alpha ESS Storion-SMILE5 Installation, operation & maintenance manual

Sun Microsystems
Sun Microsystems StorEdge 3900 Series Site preparation guide

HIK VISION
HIK VISION 81 Series Quick operation guide