Tomasi MicroCork User manual

Gebrauchsanleitung
DE
Instruction Manual
EN


Bitte lesen Sie diese Gebrauchsanweisung vor Gebrauch
sorgfältig durch.
DE
Please read these instructions carefully before use.
EN
1
DE
EN
a
b
c f
e
gd
❶
❸
❷Warnings
The MicroCork is water
resistant, but not waterproof!
Never immerse in liquid!
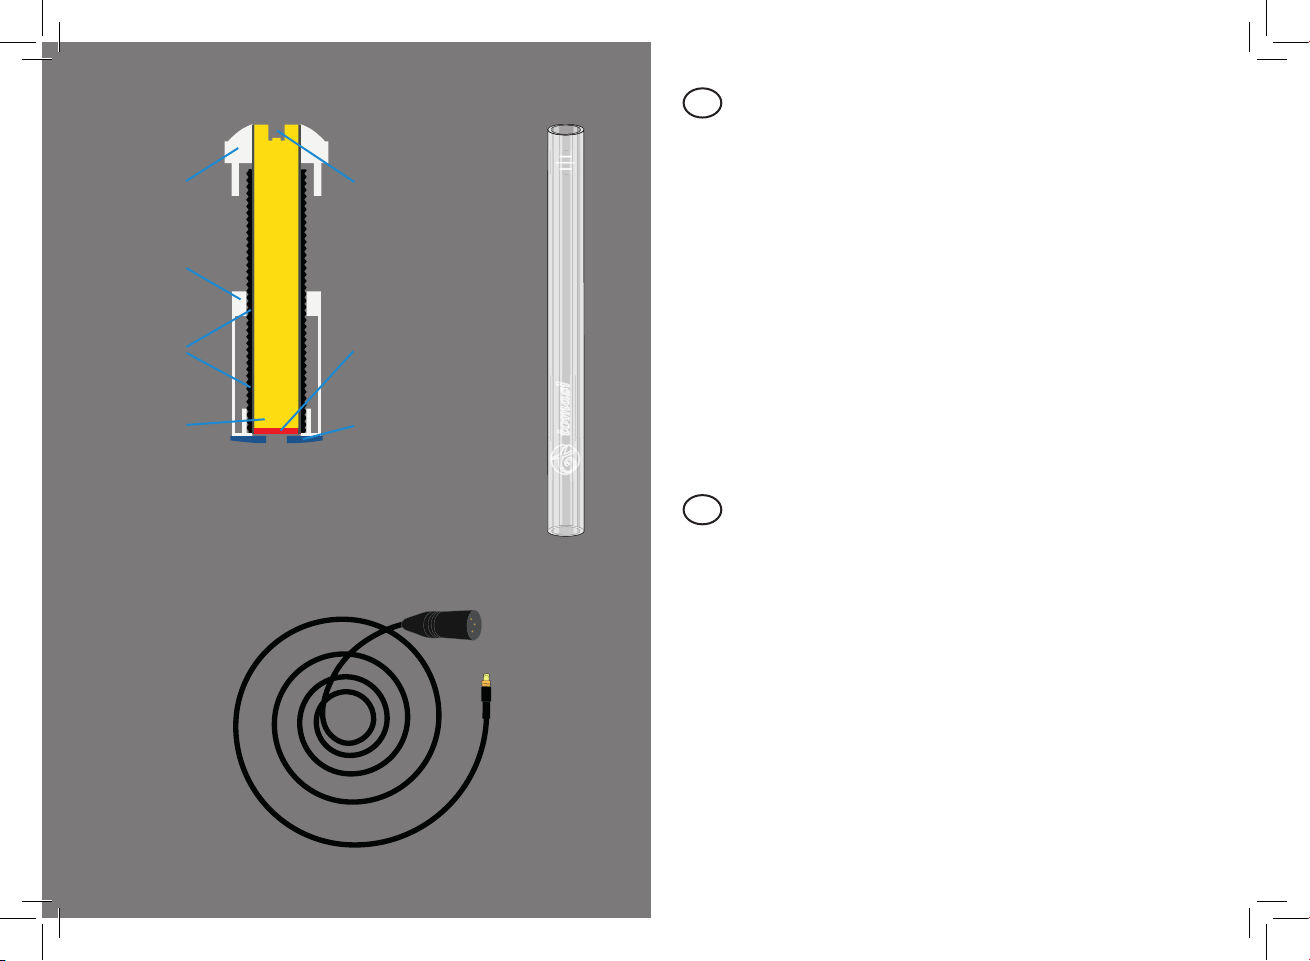
Package Contents
❶MicroCork pickup
a. Crown
b. Casing
c. Threaded sleeve
d. Pickup
e. Plug
f. Membrane
g. Cork plate
❷Acrylic rod
❸Cable
Warnhinweise
Der MicroCork ist wasserre-
sistent, aber nicht wasser-
fest! Niemals in Flüssigkeit
tauchen!
Lieferumfang
❶MicroCork Tonabnehmer
a. Krone
b. Gehäuse
c. Gewindehülse
d. Tonabnehmer
e. Stecker
f. Membran
g. Korkplatte
❷Acryl-Stab
❸Kabel
2
DE
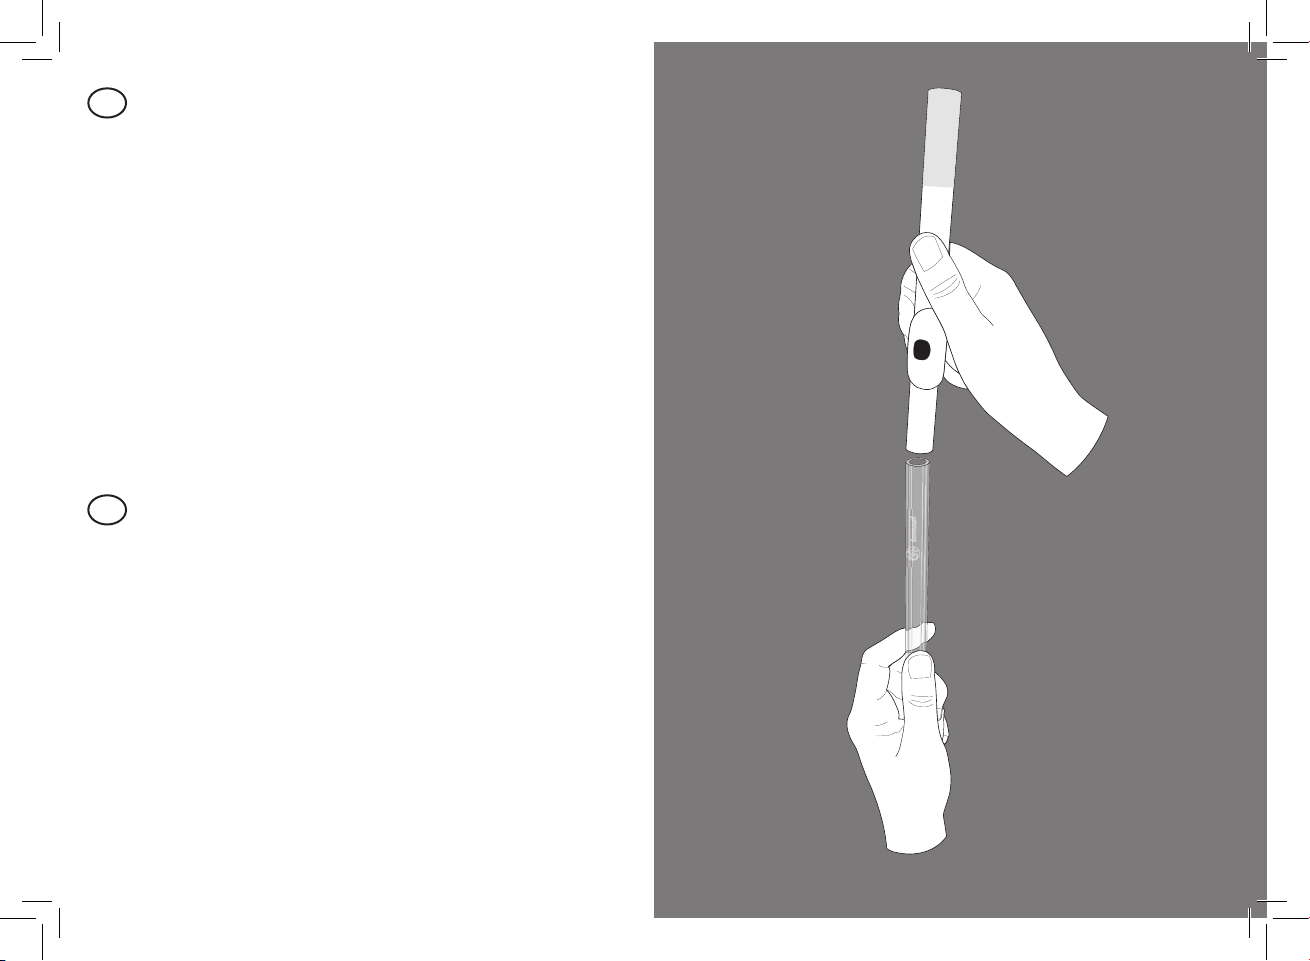
Schritt 1
Kopfstück-Krone abschrauben.
Dann das Kopfstück „auf den Kopf” stellen (mit der Seite
der Krone nach unten) und den beiliegenden Acrylstab
(Seite 1, Abb. 2) einführen.
EN
Step 1
Unscrew the head-joint crown.
Then place the head-joint „upside down” (with the crown
side facing down) and insert the enclosed acrylic rod
(page 1, g. 2).

DE
EN
3
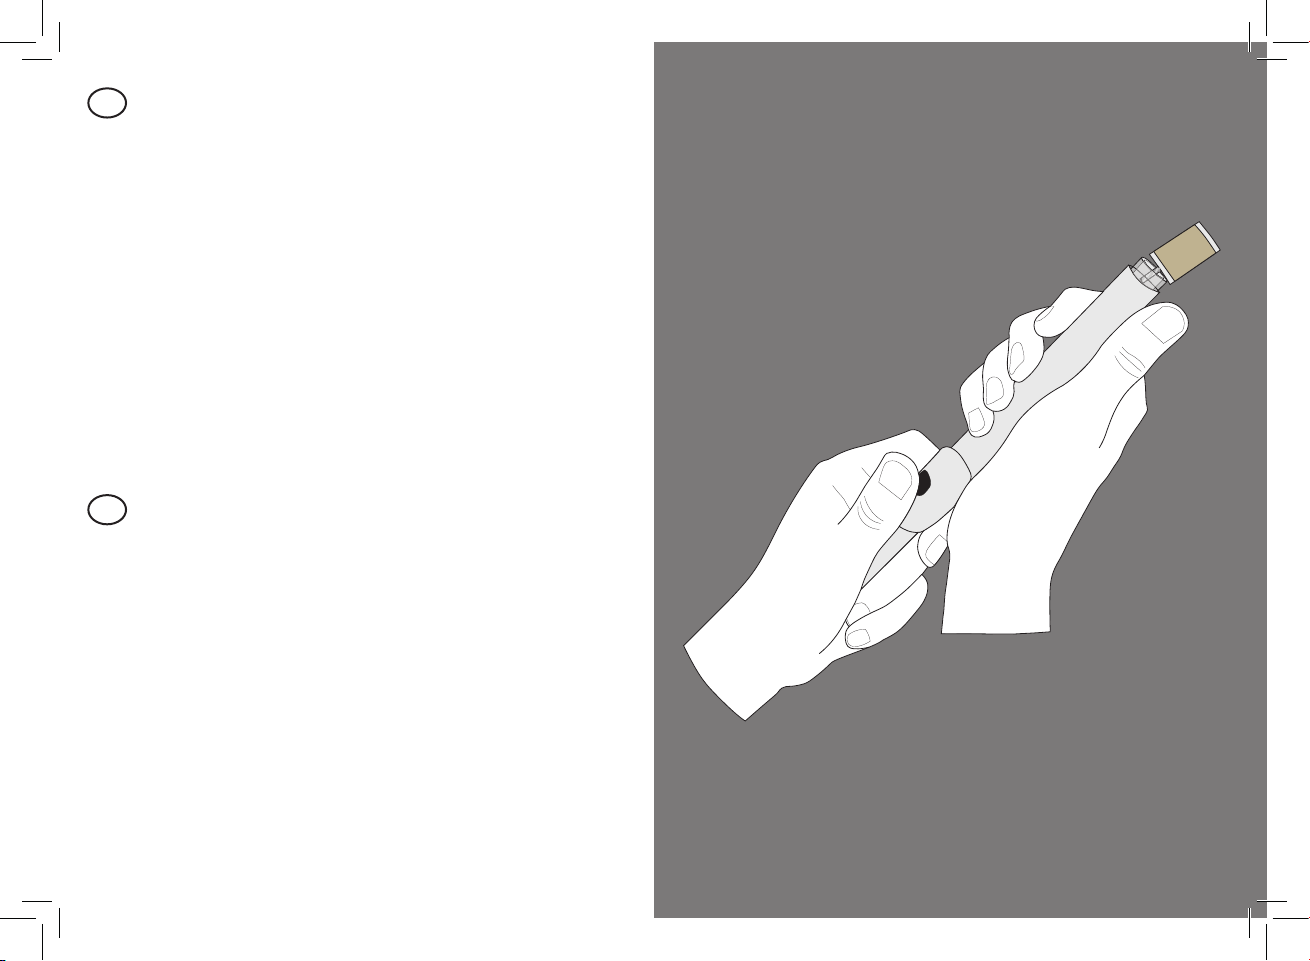
Step 2
Place the head-joint with the inserted acrylic rod on a
steady surface (table top) and rmly press the head-joint
straight down.
Schritt 2
Stellen Sie das Kopfstück mit dem eingeführten Acryl-Stab
auf eine stabile Fläche (Tischplatte) und drücken das Kopf-
stück kräftig gerade nach unten.
4
DE
EN
Step 3
Press the acrylic rod fully into the head-joint tube until the
cork slides out.
Schritt 3
Drücken Sie den Acryl-Stab ganz in das Kopfstück-Rohr bis
der Kork heraus gleitet.

5
DE
EN
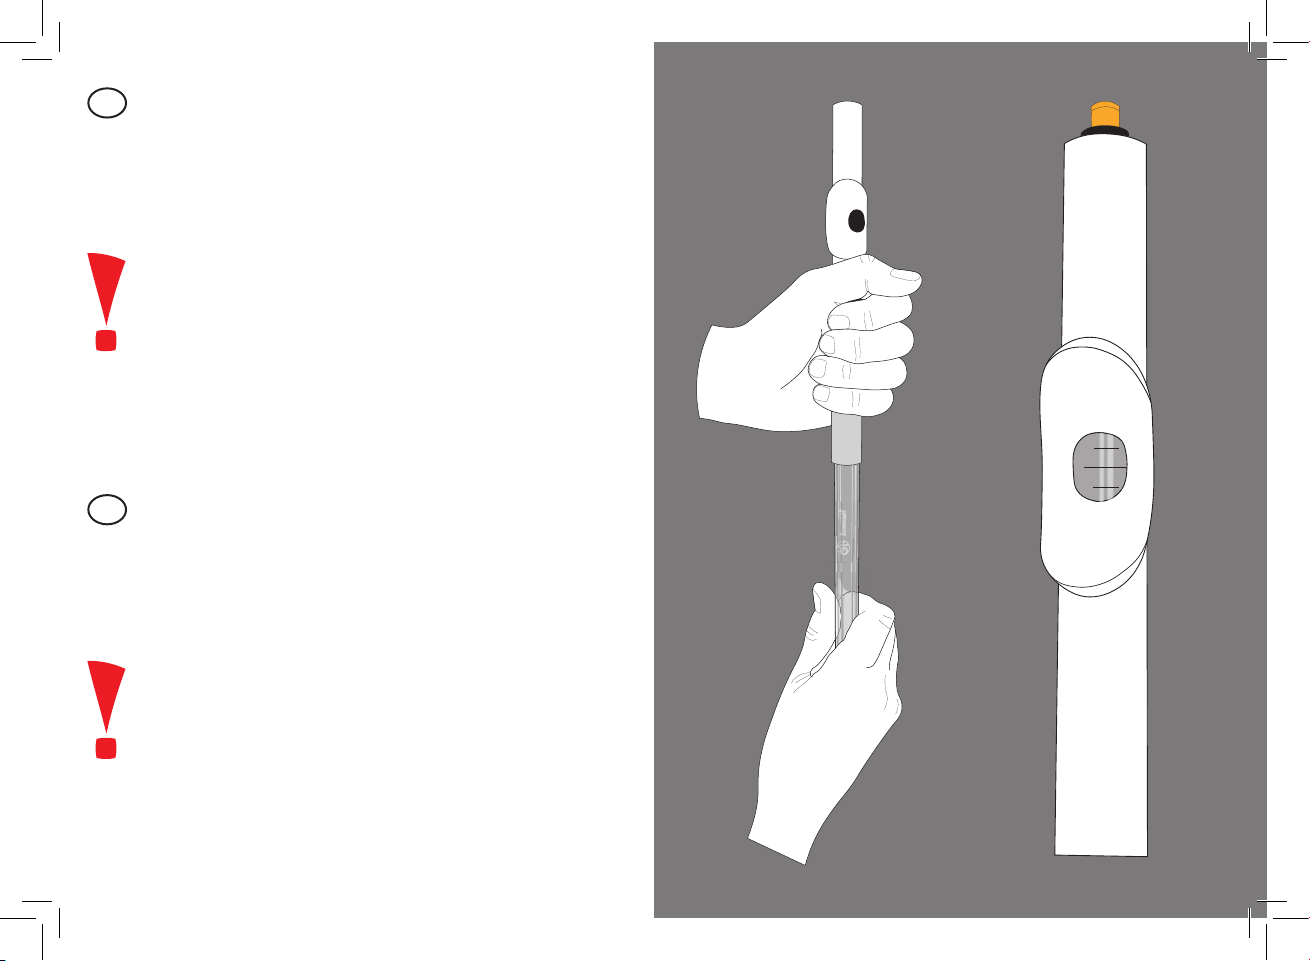
Step 4
Slide the MicroCork pickup (page 1, g. 1) from the bottom
(the side further away from the lip-plate) into the head-
joint as illustrated.
Schritt 4
Schieben Sie den MicroCork Tonabnehmer (Seite 1, Abb. 1)
von der Unterseite (der von der Mundplatte weiter entfern-
ten Seite) wie abgebildet in das Kopfstück.
6
DE
EN
Schritt 5
Schieben Sie den MicroCork Tonabnehmer mithilfe des
Acryl-Stabs so weit in das Rohr, bis sich die drei Markierun-
gen am Stab genau in der Mitte des Mundlochs be nden.
Es ist sehr wichtig, dass Sie diesen Schritt richtig
ausführen. Eine falsche Platzierung des MicroCork im
Kopfstück kann zu Stimmungsproblemen und inkor-
rekter Intonation bei der Flöte führen.
Bei Problemen wenden Sie sich bitte an eine Fach-
werkstatt.
Step 5
Slide the MicroCork pickup into the tube using the acrylic
rod, until the three markers on the rod are exactly in the
middle of the mouth hole.
It is very important that you perform this step prop-
erly. False placement of the MicroCork in the head-
joint can lead to tuning problems and incorrect
intonation in the fl ute.
If problems occur, please contact a specialist work-
shop.

7
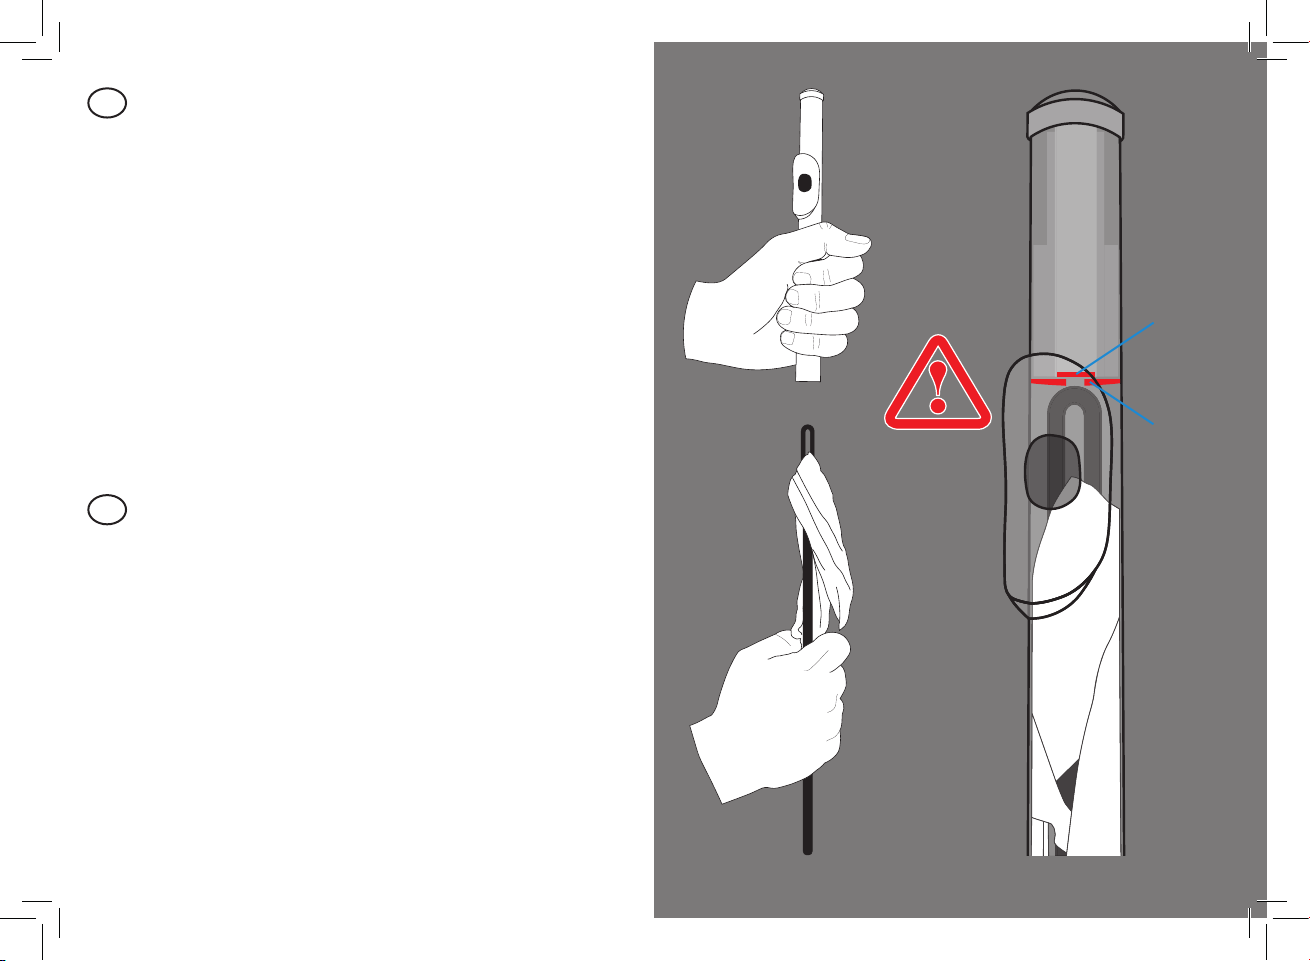
DE
EN
❶
❷
Step 6
❶Screw the enclosed headjoint-crown
(page 1, g. 1a) on the MicroCork.
❷Connect the enclosed cable (page 1, g. 3).
Schritt 6
❶Schrauben Sie die beiliegende Kopfstück-
Krone (Seite 1, Abb. 1a) auf den MicroCork.
❷Stecken Sie das beiliegende Kabel an (Seite 1, Abb. 3).
8
DE
EN
b
a
Important Notice!
Be careful not to apply pressure to the cork plate (b) when
cleaning the head-joint with the cleaning rod and cloth.
The membrane (a) of the pickup could be damaged!
Wichtiger Hinweis!
Achten Sie darauf, beim Reinigen des Kopfstücks mit Putz-
stab und –tuch keinen Druck auf die Korkplatte (b) auszu-
üben. Die Membran (a) des Tonabnehmers könnte sonst
beschädigt werden!

9
9
EN
Anwendungsbeispiel
Flöte mit MicroCork (a). Anschluss entweder direkt an den
Phantomspeise-Anschluß (b) eines
Mischpults (c) oder via
Interface (d) an einen
Computer (e) mit Sound-Mixer Software oder ein
Tablet (f) mit Sound-Mixer App.
Lautsprecher (g)
Wichtig: Bei Verwendung eines Mischpults oder eines In-
terface muss der Tomasi MicroCork via Phantomspeisung
angeschlossen werden. Externe Phantomspeiseadapter
sind günstig erhältlich, falls das Gerät keine Phantomspei-
sung hat.
DE
Example of use
Flute with MicroCork (a) connect to the
Phantom Power Connection (b) of a
Mixer (c) or via
Interface (d) to a
Computer (e) with music-mixing software or a
Tablet (f) with music-mixing app.
Loudspeaker (g)
Important: When using a mixer or interface, the Tomasi
MicroCork must be connected via Phantom Powering. An
external phantom power adapter is available at low cost, if
the device does not provide phantom powering.

10
PHANTOM
ON
g
f
ed
c
b
a

Guarantee Conditions for the MICROCORK
Pickup
Thank you for your trust! We wish you much pleasure and
fun with the Tomasi MicroCork.
We grant a 24-month guarantee against material and
processing errors for the Tomasi MicroCork. The warranty
period begins with the date of purchase.
Terms of warranty:
In the case of warranty claims, please contact your spe-
cialist dealer. The completely lled out warranty card and
the original invoice are required for the registration of war-
ranty claims. Warranty can only be granted if no changes
have been made to the MicroCork.
The guarantee claim according to the European Consumer
Protection Law (Directive 1999/44/EC) shall remain unaf-
fected by these warranty provisions.
Damage caused by
a. improper handling,
b. mechanical or electrical damage caused by misuse,
c. camber or pressure on the membrane,
d. repairs, carried out by the customer or other unau-
thorized persons,
e. improper packaging or handling during transporta-
tion,
are excluded from the warranty.
Subject to technical modifications!
Garantiebestimmungen für den MICROCORK
Tonabnehmer
Vielen Dank für Ihr Vertrauen! Wir wünschen Ihnen viel
Freude und Spaß mit dem Tomasi MicroCork.
Wir gewähren eine 24monatige Garantie gegen Material-
und Verarbeitungsfehler für den Tomasi MicroCork. Die
Garantiezeit beginnt mit dem Kaufdatum.
Garantiebedingungen:
Im Falle von Garantieansprüchen wenden Sie sich bitte
an Ihren Fachhändler. Für die Anmeldung von Garan-
tieansprüchen ist die vollständig ausgefüllte Garantiekarte
sowie die Originalrechnung erforderlich. Garantie kann nur
gewährt werden, wenn keine Änderungen am MicroCork
vorgenommen wurden.
Der Gewährleistungsanspruch gemäß Europäischem
Verbraucherschutzrecht (Richtlinie 1999/44/EG) bleibt von
diesen Garantiebestimmungen unberührt.
Schäden, verursacht durch
a. unsachgemäße Handhabung,
b. mechanische oder elektrische Beschädi-
gung durch missbräuchliche Anwendung,
c. Sturz oder Druck auf die Membran,
d. Reparaturen, die vom Kunden selbst oder anderen
nicht autorisierten Personen durchgeführt wurden,
e. unsachgemäße Verpackung oder Hand-
habung während des Transportes,
sind von der Garantie ausgenommen.
Technische Änderungen vorbehalten!

Warranty Card for Tomasi MicroCork / Garantiekarte für Tomasi MicroCork
Date of Purchase / Kaufdatum
Customers’ Signature /Unterschrift des Kunden
Problem description / Problembeschreibung:
Assembly by / Einbau durch (please check / bitte ankreuzen):
Yes / Ja No / Nein
Specialist Dealer or Workshop
Fachhändler oder -werkstatt
Brand and model of head joint / Marke und Modell Kopfstück: Customers’ name & address
Kundenname & -adresse:
Dealers’ address / Händleradresse:
Stamp / Stempel
Please ll all elds of this form. / Bitte füllen Sie alle Felder des Formulars aus.

Distribution / Vertrieb
Musik Lenz & Co KG
Hoffmannsthalstraße 38
5700 Zell am See / Austria
Tel.: +43 - 6542 - 736210
Fax: +43 - 6542 - 73621-79
E-Mail: of ce@musik-lenz.at
Web: www.musik-lenz.at
Produktion
Werner Tomasi Ges.m.b.H.
Neulinggasse 20
1030 Wien / Austria
Tel.: +43 - 1 - 712 35 66
Fax: +43 - 1 - 712 35 66-10
E-Mail: info@fl ute.at
Web: www.fl ute.at
Table of contents
Popular Musical Instrument manuals by other brands


Keith McMillen Instruments
Keith McMillen Instruments BopPad user manual

Medeli
Medeli DP263 User manaul

Electro-Voice
Electro-Voice Digital Organ Cabinet FX 70 owner's manual

Solo Music Gear
Solo Music Gear PRK-1 Assembly manual

Yamaha
Yamaha Clavinova CLP-650 owner's manual

Musser
Musser M-55 PRO-VIBE user guide