Tonic T557 User manual

- 1 -
Warning
To prevent fire or shock
hazard, do not expose the
unit to rain or moisture.
To avoid electrical shock, do
not open the
cabinet.
Refer servicing to qualified
service personnel only.
The AC cord must only be
changed at qualified service
facility.
zThis appliance is classified as a
CLASS 1 LASER product.
zThe CLASS 1 LASER PRODUCT
MARKING is located on the rear panel.
zThis product contains a low power
laser device. To ensure continued
safety, do not remove any cover or
attempt to gain access to the inside
of the product. Refer all servicing to
qualified personnel only.
This product incorporates copyright pro-
tection technology that is protected by
method claims of certain U.S. patents and
other intellectual property rights owned by
Macrovision Corporation and other rights
owners. Use of this copyright protection
technology must be authorized by
Macrovision Corporation, and is intended for
home and other limited viewing uses only
unless otherwise authorized by
Macrovision Corporation. Reverse engi-
neering or disassembly is
prohibited.
Caution
Refer servicing to qualified service
personnel only.
The following marking is printed on the
rear panel.
This symbol is intended to
alert the user of the presence
of uninsulated “dangerous
voltage”withintheproducten-
closure that may be of suffi-
cient magnitude to constitute
a risk of electric shock to per-
sons.
This symbol is intended to
alert the user to the pres-
ence of important operating
and maintenance (servic-
ing) instructions in the
literature accompanying the
applicance.
memorex 569_EngP01-15_rev.p65 11/26/2005, 10:36 AM1

- 2 -
IMPORTANT SAFETY INSTRUCTIONS
Before using the unit, be sure to read all operating instructions carefully. Please note that
these are general precautions and may not pertain to your unit. For example, this unit may
not have the capability to be connected to an outdoor antenna.
1. READINSTRUCTIONS
All the safety and operating instructions should be read before the product is operated.
2. RETAIN INSTRUCTIONS
The safety and operating instruction should be retained for future reference.
3. HEEDWARNINGS
All warning on the product and in the operating instructions should be adhered to.
4. FOLLOW INSTRUCTIONS
All operating and use instructions should be followed.
5. CLEANING
Unplug this product from the wall outlet before cleaning. Do not liquid cleaners or aerosol
cleaners. Use a damp cloth for cleaning.
6. ATTACHMENTS
Do not use attachments not recommended by the product’s manufacturer as they may
cause hazards.
7. WATERANDMOISTURE
Do not use this product near water- for example, near a bathtub, washbowl, kitchen sink,
or laundry tub, in a wet basement, or near a swimming pool.
8. ACCESSORIES
Do not place this product on an unstable cart, stand, tripod, bracket, or
table. The product may fall, causing serious injury and serious damage
to the product. Use only with a cart, stand, tripod, bracket, or table rec-
ommended by the manufacturer or sold with the product. Any mounting
of the product should follow the manufacturer’s instructions, and should
use a mounting accessory recommended by the manufacturer.
An appliance and cart combination should be moved with care. Quick
stops, excessive force, and uneven surface may cause the appliance
and cart combination to overturn.
9. VENTILATION
Slots and openings in the cabinet and in the back or bottom are provided for ventilation
and to ensure reliable operation of the product and to protect it from overheating. These
openings must not be blocked or covered. The openings should never be blocked by
placing the product on a bed, sofa, rug, or other similar surface. This product should
never be placed near or over a radiator or heat source. This product should not be placed
in a built-in installation such as a bookcase or rack unless proper ventilation is provided
or the manufacturer’s instructions have been adhered to.
10. POWER SOURCES
This product should be operated only from the type of power source indicated on the
marking label. If you are not sure of the type of power supply to your home, consult your
appliance dealer or local power company. For products intended to operate from battery
power, or other sources, refer to the operating instruction.
memorex 569_EngP01-15_rev.p65 11/26/2005, 10:36 AM2

- 3 -
11. GROUNDINGORPOLARIZATION
This product is equipped with a alternating-current line plug (a plug having one blade wider
than the other).
This plug will fit into the power outlet only one way. This is a safety feature. If you are unable
to insert the plug fully into the outlet, try reversing the plug. If the plug should still fail to fit,
contact your electrican to replace your obsolete outlet.
Do not defect the safety purpose of the polarized plug.
12. POWER-CORD PROTECTION
Power-supply cords should be routed so that they are not likely to be walked on or pinched
by items placed upon or against them, paying particular attention to cords at plugs, conve-
nience receptacles, and the point where they exit from the appliance.
13. LIGHTNING
To protect your product from a lightning storm, or when it is left unattended and unused for
long periods of time, unplug it from the wall outlet and disconnect the antenna or cable
system. This will prevent damage to the product due to lightning and power-line surges.
14. POWERLINES
An outside antenna system should not be located in the vicinity of overhead power lines or
other electric light or power circuits, or where it can fall into such powerlines or circuits.
When installing an outside antenna system, extreme care should be taken to keep from
touching such power lines or circuits as contact with them might be fatal.
15. OVERLOADING
Do not overload wall outlets and extension cords as this can result in a risk of fire or
electric shock.
16. OBJECTANDLIQUID ENTRY
Never push objects of any kind into this product through openings as they may touch
dangerous voltage points or short out parts that could result in fire or electric shock. Never
spill or spray any type of liquid on the product.
17. OUTDOORANTENNAGROUNDING
If an outside antenna is connected to the product, be sure the antenna system is grounded
so as to provide some protection against voltage surges and built-up static charges. Sec-
tion 810 of the National Electric Code, ANSI/ NFPA 70, provides information with respect to
proper grounding of the mast and supporting structure, grounding of the lead-in wire to an
antenna discharge product, size of grounding conductors, location of antenna discharge
product, connection to grounding electrodes, and requirements for grounding electrode.
18. SERVICING
Do not attempt to service this product yourself as opening or removing covers may
expose you to dangerous voltage or other hazards. Refer all servicing to qualified service
personnel.
19. REPLACEMENTPARTS
When replacement parts are required, be sure the service technician uses replacement
parts specified by the manufacturer or those that have the same characteristics as the
original part. Unauthorized substitution may result in fire, electric shock or other hazards.
memorex 569_EngP01-15_rev.p65 11/26/2005, 10:36 AM3

- 4 -
20. SAFETYCHECK
Upon completion of any service or repairs to this product, ask the service technician to
perform safety checks to determine that the product is in proper operating condition.
21. WALLOR CEILINGMOUNTING
The product should be mounted to a wall or ceiling only as recommended by the manufac-
turer.
22. DAMAGEREQUIRINGSERVICE
Unplug the product from the wall outlet and refer servicing to qualified service personnel
under the following conditions:
a. When the power-supply cord or plug is damaged.
b. If liquid has been spilled, or objects have fallen into the product.
c. If the product has been exposed to rain or water.
d. If the product does not operate normally by following the operating instructions. Adjust
only those controls that are covered by the operating instructions, as an adjustment of
other controls may result on damage and will often require extensive work by a qualified
technician to restore the product to its normal operation.
e. If the product has been dropped or the cabinet has been damaged.
f. When the product exhibits a distinct change in performance - this indicates a need for
service.
23. HEAT
The product should be situated away from heat sources such as radiators, heat registers ,
stoves, or other products (including amplifiers) that produce heat.
24. NOTETOCATVSYSTEM INSTALLER
This reminder is provided to call the CATV system installer’s attention to Article 820-40 of
NEC that provides guidelines for proper grounding and, in particular, specifies that the
cable ground shall be connected to the grounding system of the building, as close to the
point of cable entry as practical.
IMPORTANT SAFETY INSTRUCTIONS (CONTINUED)
memorex 569_EngP01-15_rev.p65 11/26/2005, 10:36 AM4

- 5 -
FCCNOTICE:
This equipment has been tested and found to comply with the limits for a Class B digital device,
pursuant to part 15 of the FCC Rules. These limits are designed to provide reasonable protec-
tion against harmful interference in a residential installation. This equipment generates, uses,
and can radiate radio frequency energy and, if not installed and used in accordance with the
instructions, may cause harmful interference to radio communications.
However, there is no guarantee that interference will not occur in a particular installation. If this
equipment does cause harmful interference to radio or television reception, which can be
determined by turning the equipment off and on, the user is encouraged to try to correct the
interference by one or more of the following measures:
Reorient or relocate the receiving antenna.
Increase the separation between the equipment and receiver.
Connect the equipment into an outlet on a circuit different from that to which the receiver is
connected.
Consult the dealer or an experienced radio/TV technician for help.
FCCCaution:
To assure continued compliance, follow the attached installation instructions and use only
shielded cables when
connecting to other devices. Also, any changes or modifications not expressly approved by the
party responsible for
compliance could void the user’s authority to operate the equipment.
memorex 569_EngP01-15_rev.p65 11/26/2005, 10:36 AM5

- 6 -
READ CAREFULLY BEFORE USING
Cautions in use of VCR dvd compo are described below. Please read carefully before using a DVD-
Video player.
Installation place and handling
•When you place this unit near other devices, they may affect poorly together.
•When you place this unit and TV in the upper and lower sides, it may cause flickering of
pictures or failure (tape is not ejected).
•When you place this player near strong magnetic materials, it may affect image or voice poorly or
damage recording.
•Do not spill volatile liquids like insect spray over the player. Do not leave rubber or plastic products in
contact with the player for a long time. They will cause deterioration or paint peel-off.
Not in use
•When the unit is not in use, be sure to remove the disc or tape and turn off the power.
•If you do not use the unit for a long period, remove batteries in REMOTE to prevent leakage.
•In case you don’t use the unit for a long time, the unit may not function properly in the future. Turn on
and use the player occasionally.
Moving
•Repack the unit as it was originally packed at the factory. Alliteratively, pack this product with towel
not to be damaged.
•Eject any videotape 8 Disc.
Cleaning
•Dust off dirt in cabinet or control panel part smoothly with a soft cloth.
•For heavy dirt, soak the cloth in a weak detergent solution, wring it well and wipe. Use a dry cloth to
wipe it out.
•Follow instructions in using chemical cleaners.
•Do not use any type of solvent such as gasoline or benzene, as they may cause deterioration or
paint peel-off.
Checking
•Video is a high precision device. To obtain a clear screen, we recommend regular inspection and
maintenance every 1,000 hours of use by technical engineers.
•For checking, contact your dealer or your nearest service center.
Checking and Replacement of Antenna
•Antenna is subject to change in its direction or damage by wind and rain. For clean screen, contact
and consult your nearest service center about checking and replacement.
memorex 569_EngP01-15_rev.p65 11/26/2005, 10:36 AM6
- 7 -
In recording important screen
•Be sure to record the screen and check whether recording is performed properly. We beg you to
understand compensation of recording is not performed by badness of used tape or video.
Copyright
•Do not use your recordings without permission of a copyrighter except personal usage.
Tape and Disc Handling
•Do not use any tape and disc below. Damage of video head or cut/coiling of tape may cause failure.
- Tape with mold
- Tape or disc stained with juice or attachments
- Tape having breakage connection
- Disassembled tape
- Disc with severe scratch
•Moisture condensation may occur in tape. Moisture condensation damages the tape. Please use the
tape after the moisture condensation is disappeared.
•After use, store tape vertically in a case to prevent loose.
•Do not store the following places.
- High temperature and humidity
- Subject generation of mold
- Much dirt or dust
- Near strong magnetic materials such as speaker
memorex 569_EngP01-15_rev.p65 11/26/2005, 10:36 AM7
- 8 -
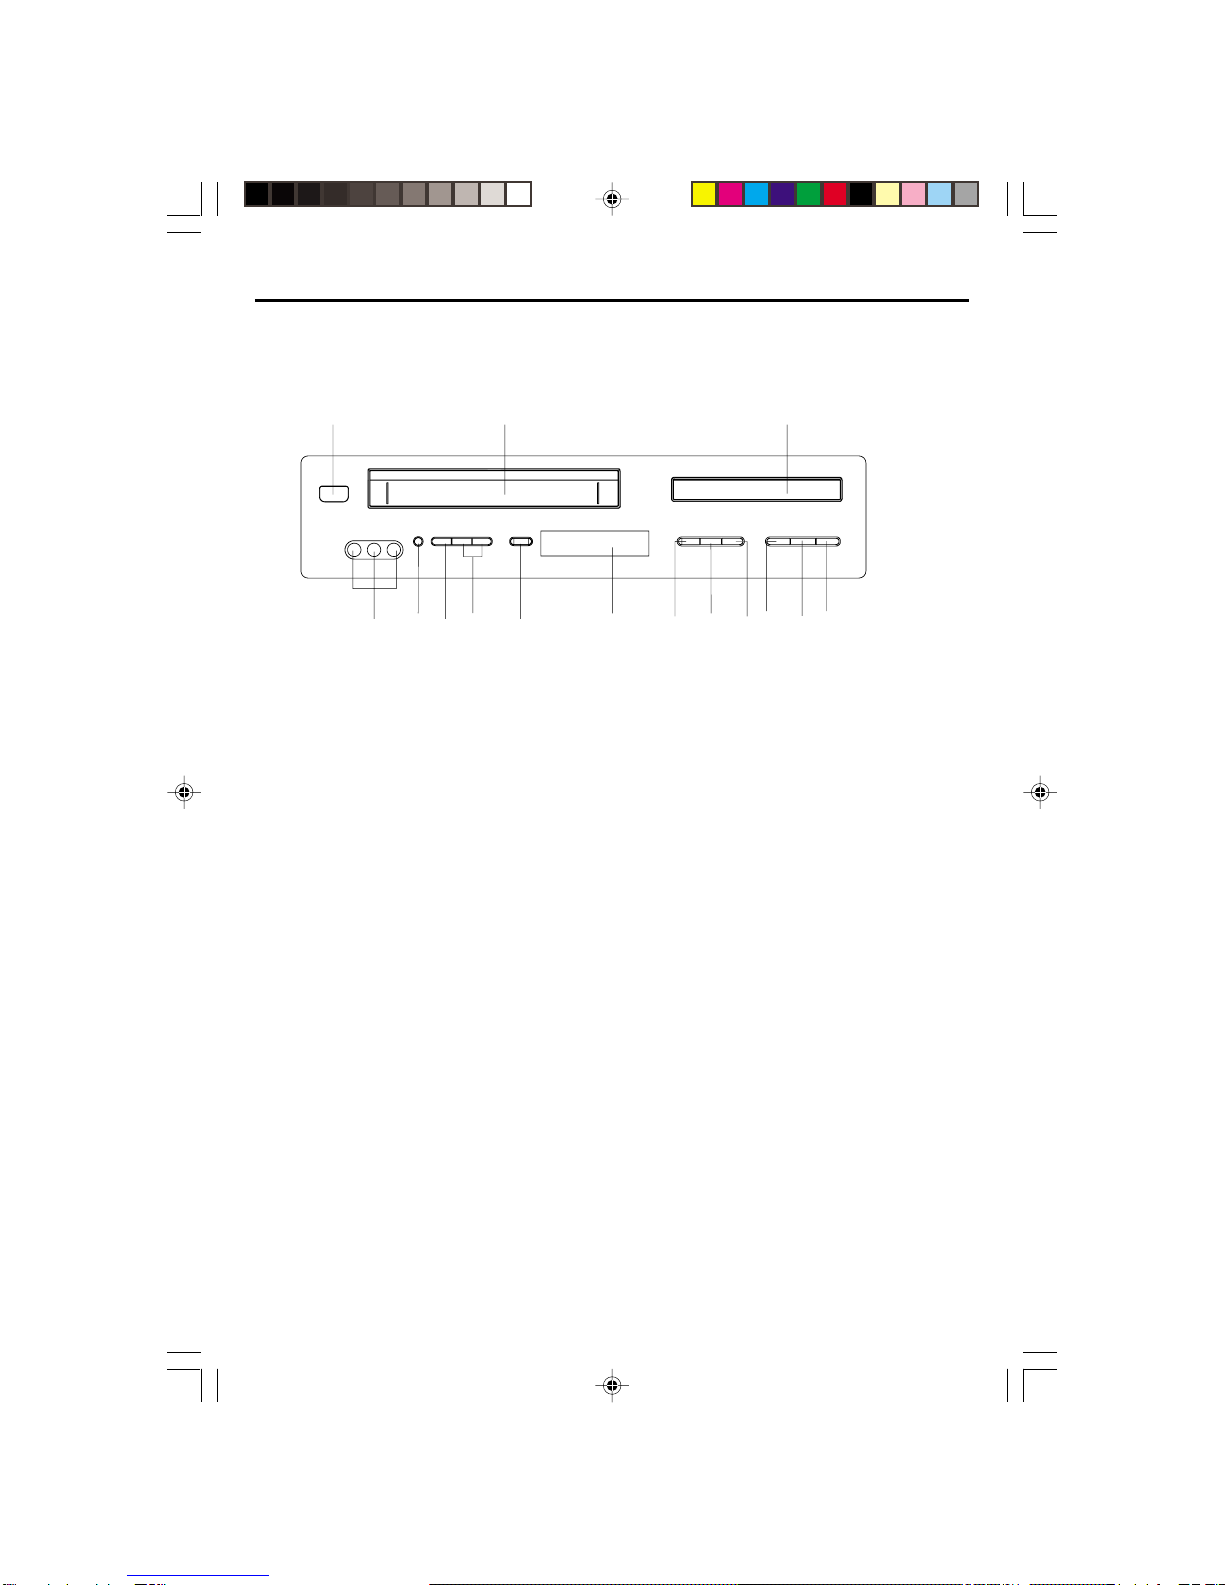
LOCATION OF CONTROLS AND INDICATORS
Main Unit (Front View)
1. POWER (STANDBY/ON) Button 9. VCR/DVD Button
2. Place to insert videotape 10. Display window
3. Disc Tray 11. RECORD Button
4. Disc Skip Up/Tape Fast Forward Button 12. CHANNEL Up/Down Button
5. PLAY/PAUSE Button 13. TV/VCR Button
6. Disc Skip Down/Tape REWIND Button 14. EJECT Button (VCR)
7. STOPButton 15. AV 2 Input Jack
8.Open/Close Button
123
4
5
6
7
8
9
10
11
12
13
14
15
memorex 569_EngP01-15_rev.p65 11/26/2005, 10:36 AM8
- 9 -
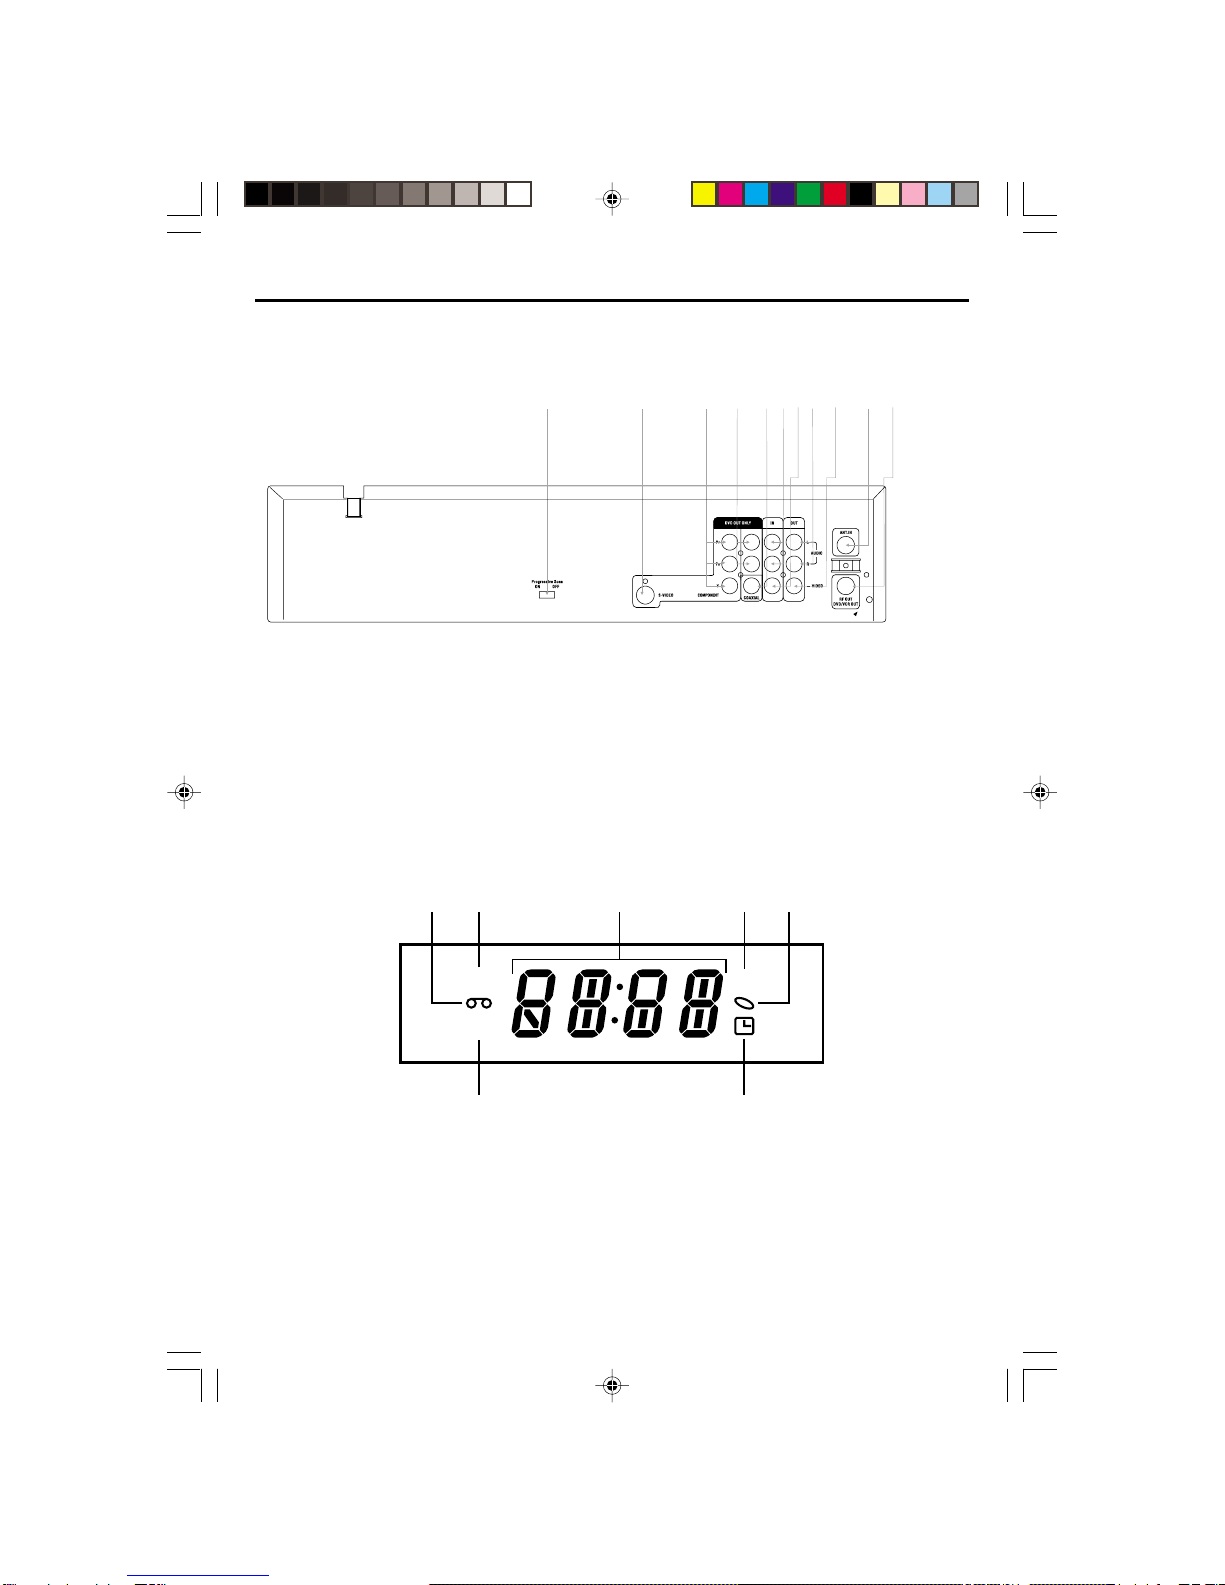
LOCATION OF JACKS AND TERMINALS
Main Unit (Rear View)
1. Progressive Scan Switch(DVD ONLY) 7. Composite Video out (Recording Input)
2. S-Video Jack(DVD ONLY) 8. Audio L&R Jacks (Output)
3. Comporent Video Jacks(Y,Pb,Pr) 9. Composite Video Out (Output)
4. DVD only Audio L & R Jacks(DVD ONLY) 10. Antenna Input
5. Coaxial digital out(DVD ONLY) 11. Antenna In
6. AV 1 Input Jack 12. RF Out
Operation Display Window
1. VCR in operation 5. DVD in operation
2. VCR Tape operation 6. Timer indicator
3. Status Bar 7. RECindicator
4. DVD Disc operation
VCR
DVD
REC
12 345
6
7
12
34568
910 11 12
memorex 569_EngP01-15_rev.p65 11/26/2005, 10:36 AM9

- 10 -
Remote Control Unit
1. TVG Button
2. POWER Button
3. TITLE Button
4. SUBTITLE Button
5. ZOOM Button
6. STEP Button
7. REC Button (VCR)
8. PLAY/PAUSE Button
9. VCR Button (DVD)
10.NAVIGATIONARROWS (///)
11. SETUPButton
12.NEXT Button (DVD)
(Move into a next chapter or track)
13. PREVIOUSButton(DVD)
(Move into a previous chapter or track)
14. NUMBER Button (DVD, VCR)
15.RECORD SPEEDButton (VCR)
16.AV1/AV2 Button
17.ANGLE Button
18.REPEATButton
19.REREATA-B Button
20.DISPLAY Button
21.TV/VCR Button (DVD, VCR)
22.Clear Button
23.100 Button
24. PROGRAM Button (VCR)
25. FORWARDSEARCH Button
26.REVERSE SEARCHButton
27.DVD MENU Button
28.OK Button
29.DVD select Button
30.STOP Button
31.SLOW/F Button
32.AUDIO Button
33.PBC Button (DVD)
34.RETURN Button (DVD)
35.OPEN/CLOSE Button (DVD),
EJECTButton(VCR)
36. SEARCHButton
CONTROL REFERENCE GUIDE
1
2
3
4
5
6
7
8
9
10
11
12
14
15
16
18 19
20
21
22
24
25
27
28
29
30
31
32
33
34
35
36
13
17
26
23
memorex 569_EngP01-15_rev.p65 11/26/2005, 10:36 AM10

- 11 -
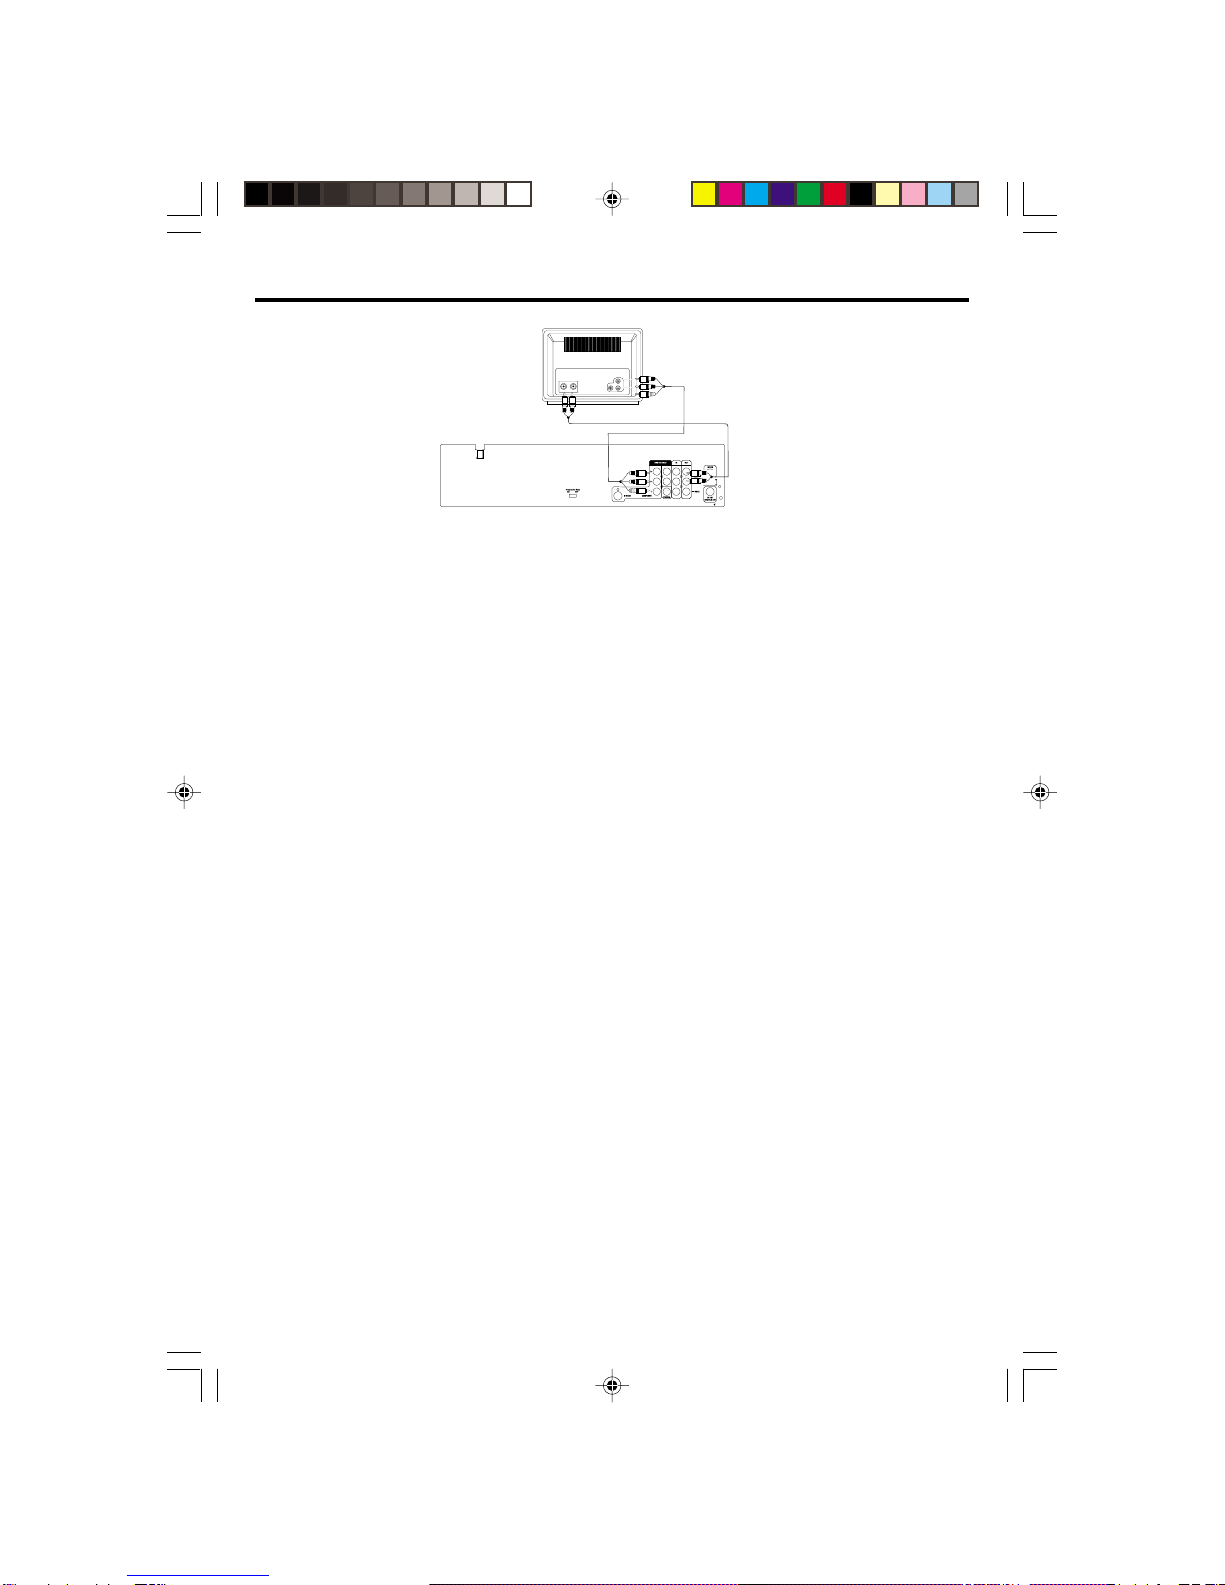
Useaudiocable (Red/White),Videocable (Yellow) to connectthe VCR-DVD
ComboandyourTV.
Connect VCR-DVD Combo to TV set by S-Video Socket.
Socket.
Connect the S-Video Cable to connect VCR-DVD Combo and your TV.
Connect VCR-DVD Combo to TV set by Audio / AV cables (Output)
AUDIO
IN
L
TV
R
Video
CompositeVideo
Cable
Audio
L&R
Cables
AUDIO
IN
L
TV
R
S.Video
Audio
L&R
Cables
S-Video
Cable
memorex 569_EngP01-15_rev.p65 11/26/2005, 10:36 AM11
- 12 -
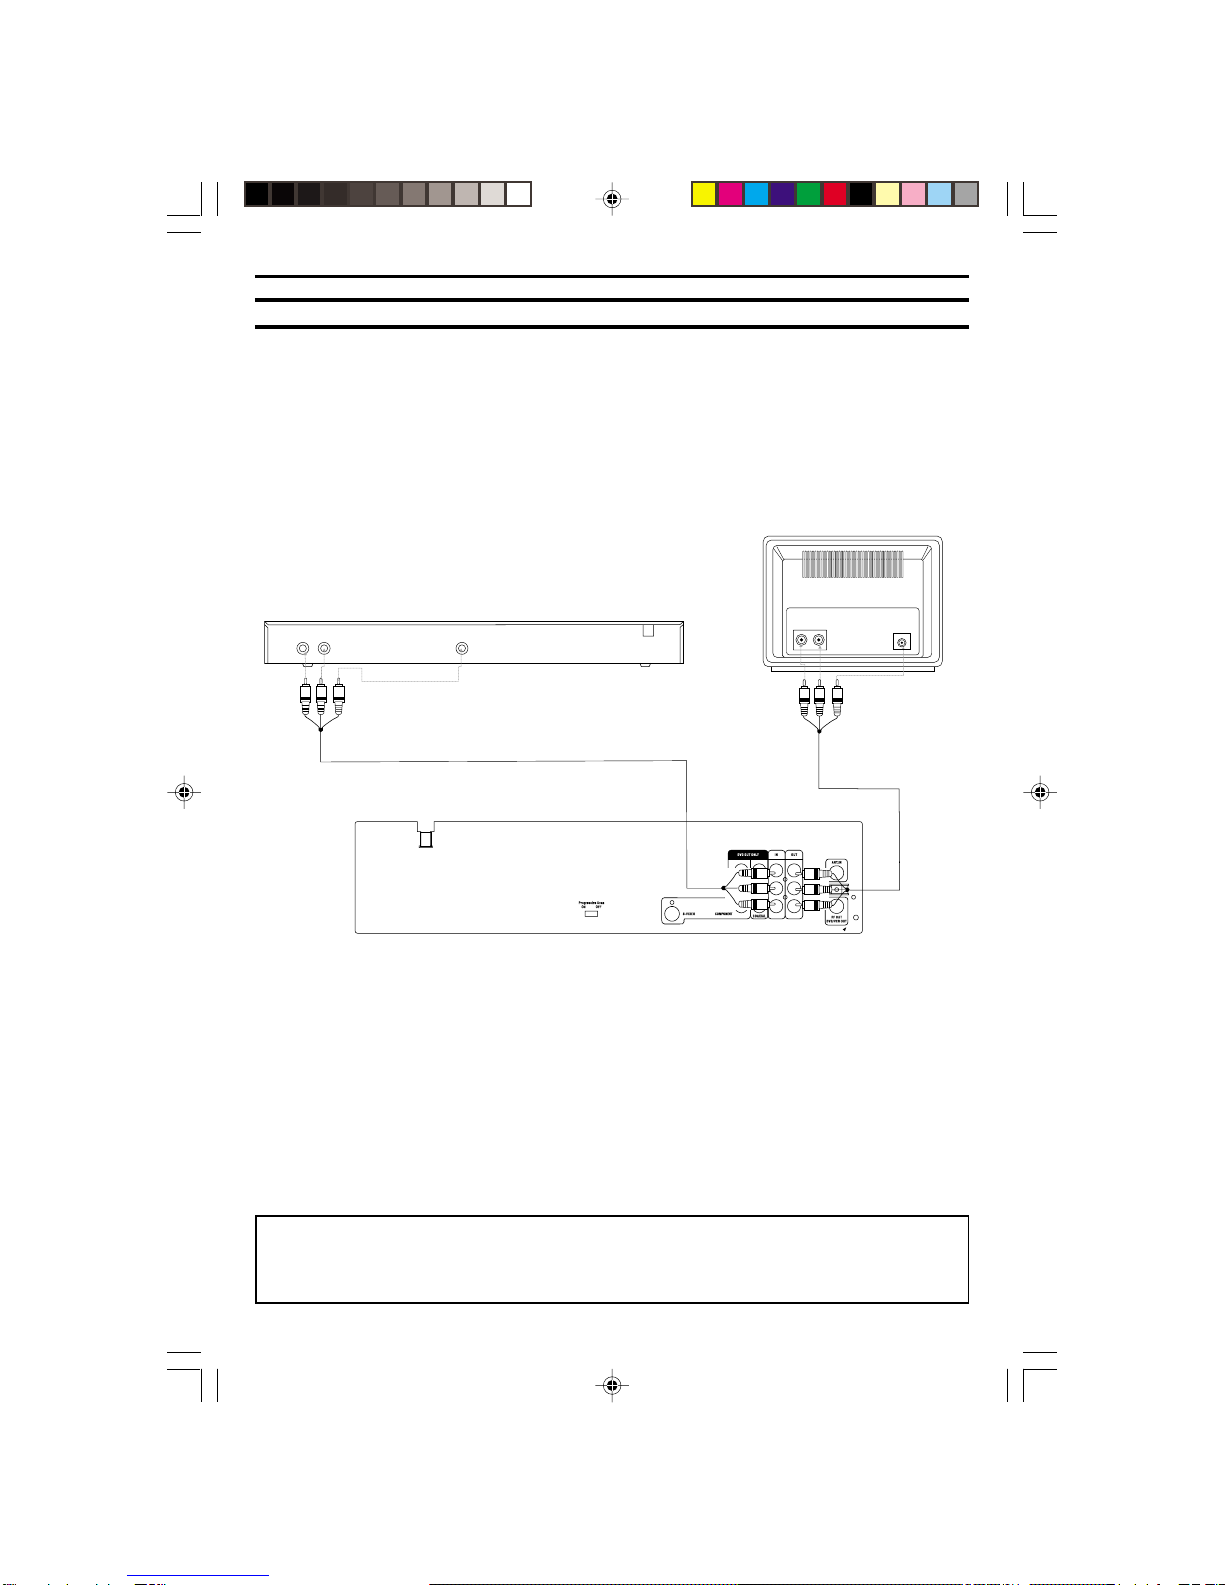
CONNECT VCR-DVD COMBO TO TV SET BY Y,Pb,Pr,Jacks
NOTES FOR CONNECTING TOA TV:
• TV must have Y, PB and PR input jacks.
• Set the VIDEO OUT Option (on the GENERAL Menu Page) to YUV if using the component Video Out jacks.
• When connecting the DVD ,refer to the owner’s manual of the TV, as well as this manual.
• When connecting the DVD to the TV, make sure the power is off and both units are unplugged before
making any
connections.
• Component Y,Pb,Pr,Jacks can only be used for DVD Playback, not for VCR playback.
• If using a TV with a blue screen option, turn the option off on the TV for best results.
PROGRESSIVE (Y, PB, PR) VIDEO OUT:
Use these jacks to connect to a TV with progressive video input jacks, set the progressive scan switch
to ‘ON’. Progressive scan is a video scanning system that displays all lines in a frame in one pass, as
opposed to the traditional system, interlaced scan. This connection provides optimum quality. To ensure
maximum picture quality, use three video-grade cables for
connections. Note that it is essential to match the color-coded connectors with a compatible TV.
Notes: When “Component Video Out” is set to “Progressive Select”, there is no video output from the
“Video Out(Composite)” and “S-Video” jacks.
525 LINE DIGITAL PROGRESSIVE-SCAN COMPONENT VIDEO OUTPUT.
Compared to standard interlaced video, progressive scan effectively doubles the amount of video infor-
mation fed to your TV or monitor. The result is a stable, flicker-free image. (Check your TV/monitor for
compatibility with this feature).
For the very highest picture quality, try watching a movie on DVD-Video on a progressive-scan
compatible TV.
NOTES:
• If you connect a TV that is not compatible with a progressive scan signal and set the PROGRESSIVE
SCAN switch to ‘ON’, you will not be able to see any picture at all.
• CONSUMERSSHOULD NOTETHATNOTALLHIGH DEFINITIONTELEVISION SETSARE FULLYCOM
PATIBLE WITHTHIS PRODUCTANDMAYCAUSEARTIFACTSTOBEDISPLAYED INTHE PICTURE.IN
CASEOF525PROGRESSIVESCANPICTUREPROBLEMS,ITISRECOMMENDEDTHATTHEUSERSET
THEPROGRESSIVESCANSWITCHTO‘OFF’.
• If you want to switch the Progressive Scan function “ON” and if you see the “ Progressive Scan switch
On” Blue Dialogue box appears on the TV screen telling you to “Restart player,then you should turn OFF”
the player power by pressing the Standby On/Off button of the Remote control or the power button on the
player’s front panel and put the progressive scan
switch to the “ON” position afterwards.Next time whenever you turn on the player and TV, the progres-
sive scan function will automatically turn “ON” to produce better picture quality.
• To turn off the progressive scan function switch off the player power the same way as above and
switch the progressive scan switch “OFF”.The progressive scan function will turn off whenever you
turn on the player and TV.
TV
AUDIO
IN
RL
P
b
Y
P
r
memorex 569_EngP01-15_rev.p65 11/26/2005, 10:36 AM12

- 13 -
Connect the Coaxial Digital out to the Amplifier if the amplifier has
the corresponding digital input terminals.
Connect the Coaxial digital out terminal to the amplifier if the amplifier has the corre-
spondingdigitalinput terminals.
Audio cable
(not supplied)
Surround right
speaker
Surround left
speaker
Center
speaker
Front right
speaker
Sub-woofer
speaker
Front left
speaker
Video cable
S-Video cable
(not supplied)
Coaxial cable
(not supplied)
To video input
To digital audio input
AV amplifier with
a Dolby Digital decoder
memorex 569_EngP01-15_rev.p65 11/26/2005, 10:36 AM13
- 14 -
Connect VCR-DVD Combo to Aux Equipment from AV Jacks(Input)
IfyourAux EquipmenthasAVoutput jacks, connectthe audioL&R
RCA cables and Video Cable to the input jacks of VCR-DVD Combo and
outputtheAux signalsto theTVset asillustrated above diagram.
LR Video
AUX
TV
AUDIO
IN
RL
Video
AV input cable
AV output cable
memorex 569_EngP01-15_rev.p65 11/26/2005, 10:36 AM14
- 15 -
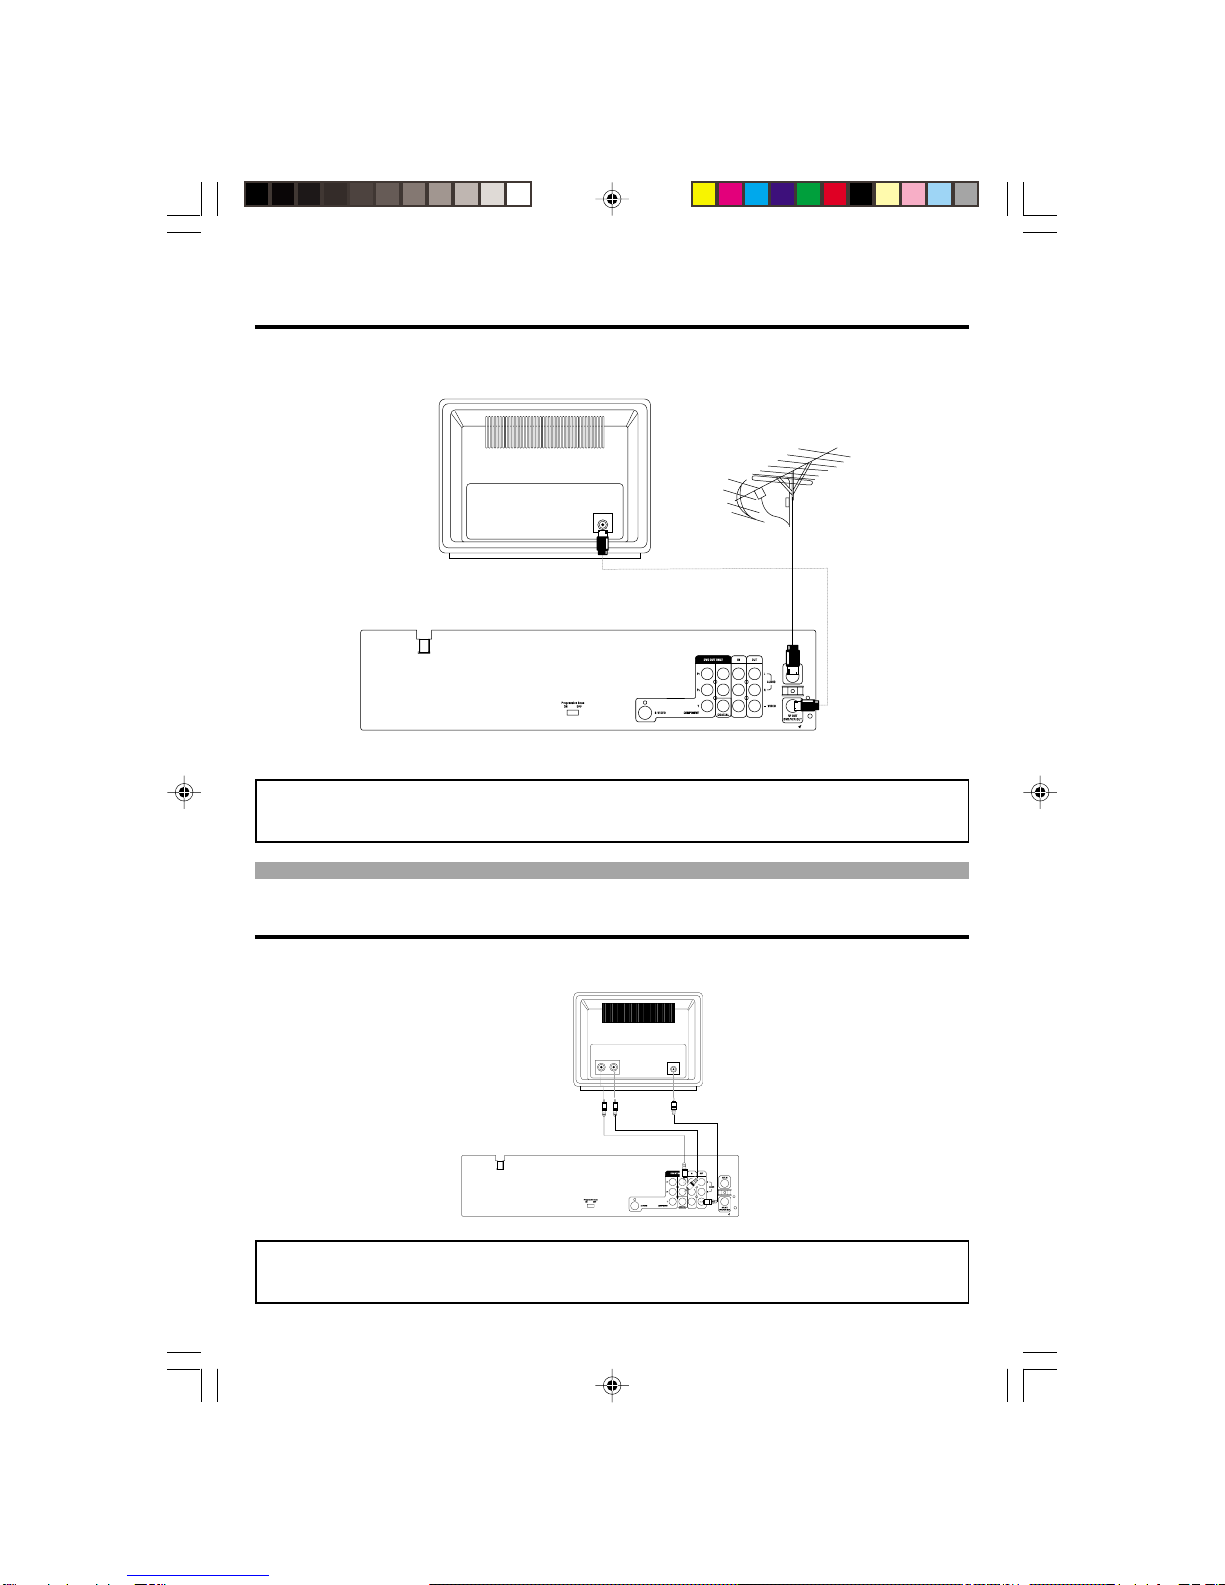
Connect the TV Antenna and RF Out to TV set if you do not have
AV Jacks.
If your TV set is old style and do not haveAV Jacks, use the above connections to
record and display your desired TV program on your old TV set.
Connect your VCR-DVD Combo to TV set-by DVD out only AV
cables.
Connect your VCR-DVD to your TV set by using the DVD onlyAudio L&R Jacks and
the composite video output jack when playing your desired DVD disc.
TV
Autenna In
Aerial
AUDIO
IN
L
TV
R
Video
memorex 569_EngP01-15_rev.p65 11/26/2005, 10:36 AM15

- 16 -
VCR PLAYBACK
1. Press the [ / POWER] button to power on.
2. Press the VCR button of remote control or the SELECT button of the front panel to enter VCR
mode.
3. Insert the desired videotape.
4. Press the INPUT button of the remote control to select PROGRAM 1 of the VCR mode.
5. Press the PLAY button to play the videotape.
6. To stop the playback, press the STOP button.
7. To pause the playback, press the PLAY/PAUSE button.
8. To playback fast foward or to rewind it, press F.F or F.R buttons.
9. Press the OPEN/CLOSE button of the remote control or the EJECT button of the front panel to
remove the videotape.
To Copy from DVD to Videotape
1. Insert the desired DVD disc. When it is a DVD disc with copy protect function, you can’t copy it.
2. Insert a recordable tape.
3. Connect the AV (Video and Audio L&R) Jacks with the RCA cords according to colors to the TV
display.
4. Press the DVD button of the remote control to select DVD mode and play the disc.
5. Go to the desired DVD chapter of the disc and press the RECORD button of the remote control or of
the front panel to start recording desired DVD chapter.
•DVD plays and VCR starts recording.
6. To exit copy, press ths STOP button.
7. Press the VCR button to select the VCR mode.
8. Press the F.R (Rewind) button of the remote control to go back to the beginning of the recording
track. Press the STOP button and press the PLAY button to play the recording portion.
To Select External Input
Press the INPUT button of the remote control to select between broadcasting mode, AV1, AV2 and AVF.
memorex 569_EngP16-30_rev.p65 11/17/2005, 9:30 AM16

- 17 -
To Record from External Input
1. Insert a recordable tape.
2. Press the AV1/AV2 button of the remote control repeatedly to select desired external input.
3. Press the RECORD button to start recording.
4. Press the STOP button to exit the recording.
To Record from Antenna Input
1. Insert a recordable tape.
2. Press the INPUT button of the remote control repeatedly to switch to broadcasting mode.
3. Use the /or Number buttons to select your desired TV station.
4. If you cannot receive a TV station, follow the procedures of “Setting the Channel Set” page in
this manual to automatically scanning all TV stations receivable.
5. After setting your desired TV station, press the RECORD button to start recording.
6. Press the STOP button to exit the recording.
ONE TOUCH TIMER RECORDING(OTR)
When your urgent business happens suddenly in watching TV or you want to record the current TV
program for the desired time, follow the procedures below.
1. First, follow the steps 1 to 4 in "Recording With VCR".
2. Press [REC] button as much as you want.
•See the "Recording Times Table" below.
Button Press Times......Operational Status
Once -------------------------------------------------- continuous recording until you press STOP button
Twice ------------------------------------------------- recording for thirty minutes from current time
3(times) -----------------------------------------------recording for one hour
5 ------------------------------------------------------- recording for two hours
7 ------------------------------------------------------- recording for three hours
9 ------------------------------------------------------- recording for four hours
11 ------------------------------------------------------recording for five hours
13 ----------------------------------------------------- recording for six hours
15 ----------------------------------------------------- recording for seven hours
17 ----------------------------------------------------- recording for eight hours
18 ----------------------------------------------------- recording to the status of Once Press
3. To stop Recording mode, press [STOP] button more than 8 seconds.
To Enjoy Another TV Program During Recording
You may enjoy another TV program during recording, Press the TV/VCR button on the remote or front
panel, “TV” will appear on the display. Now you may enjoy another TV program with your TV. Press
the TV/VCR button again to return to VCR mode, “VCR” will appear on the display.
memorex 569_EngP16-30_rev.p65 11/17/2005, 9:30 AM17
- 18 -
ABOUT VCR
VIDEOHEAD CLEANING
The video heads enable the VCR to read video information pictures from the tape during playback. In
the unlikely event that the heads become clogged with dirt video playback will be impossible. This can
easily be determined during playback of a known good tape, there is good sound, but the picture is
extremely snowy.
If this is the case, have the video cassette recorder checked by qualified service personnel.
NOTES
During normal operation of the VCR, the video and audio heads can accumulate dirt over a period of
time, especially when using an old or poor quality tape.
When the heads are dirty, the picture can get snowy and the tracking control will have little or no
effect. If this condition occurs, head cleaning cartridges may take care of the problem and restore
normal picture.
We recommend that head cleaning cartridges be used sparingly since they are very abrasive and can
damage the video heads during prolonged use.
If the problem is not resolved with the head cleaning cartridge then the unit needs to be checked by a
qualified service personnel.
ERASUREPROTECTION
Video cassettes are equipped with a safety tab to prevent accidental erasure. When the tab is removed,
recording can not be performed.
TO PREVENT ACCIDENTAL ERASURE TO RECORD AGAIN
- After recording, break off the safety tab - Cover the hold with cellophane tape.
with a screwdriver if you don't want to
record over the tape.
WHAT IS DEW CONDENSATION SYMPTOM?
If a VCR is moved from a cool place to a warm and damp place or a place facing a direct cool wind
from air-conditioner .... and others, temperature varies sharply, which makes dew on head drums of
VCR.
IF DEW CONDENSATION OCCURS,
1. First, turn it on for one or two hours before using it.
2. Do not use it because it may develop troubles of a VCR
or videotape.
memorex 569_EngP16-30_rev.p65 11/17/2005, 9:30 AM18

- 19 -
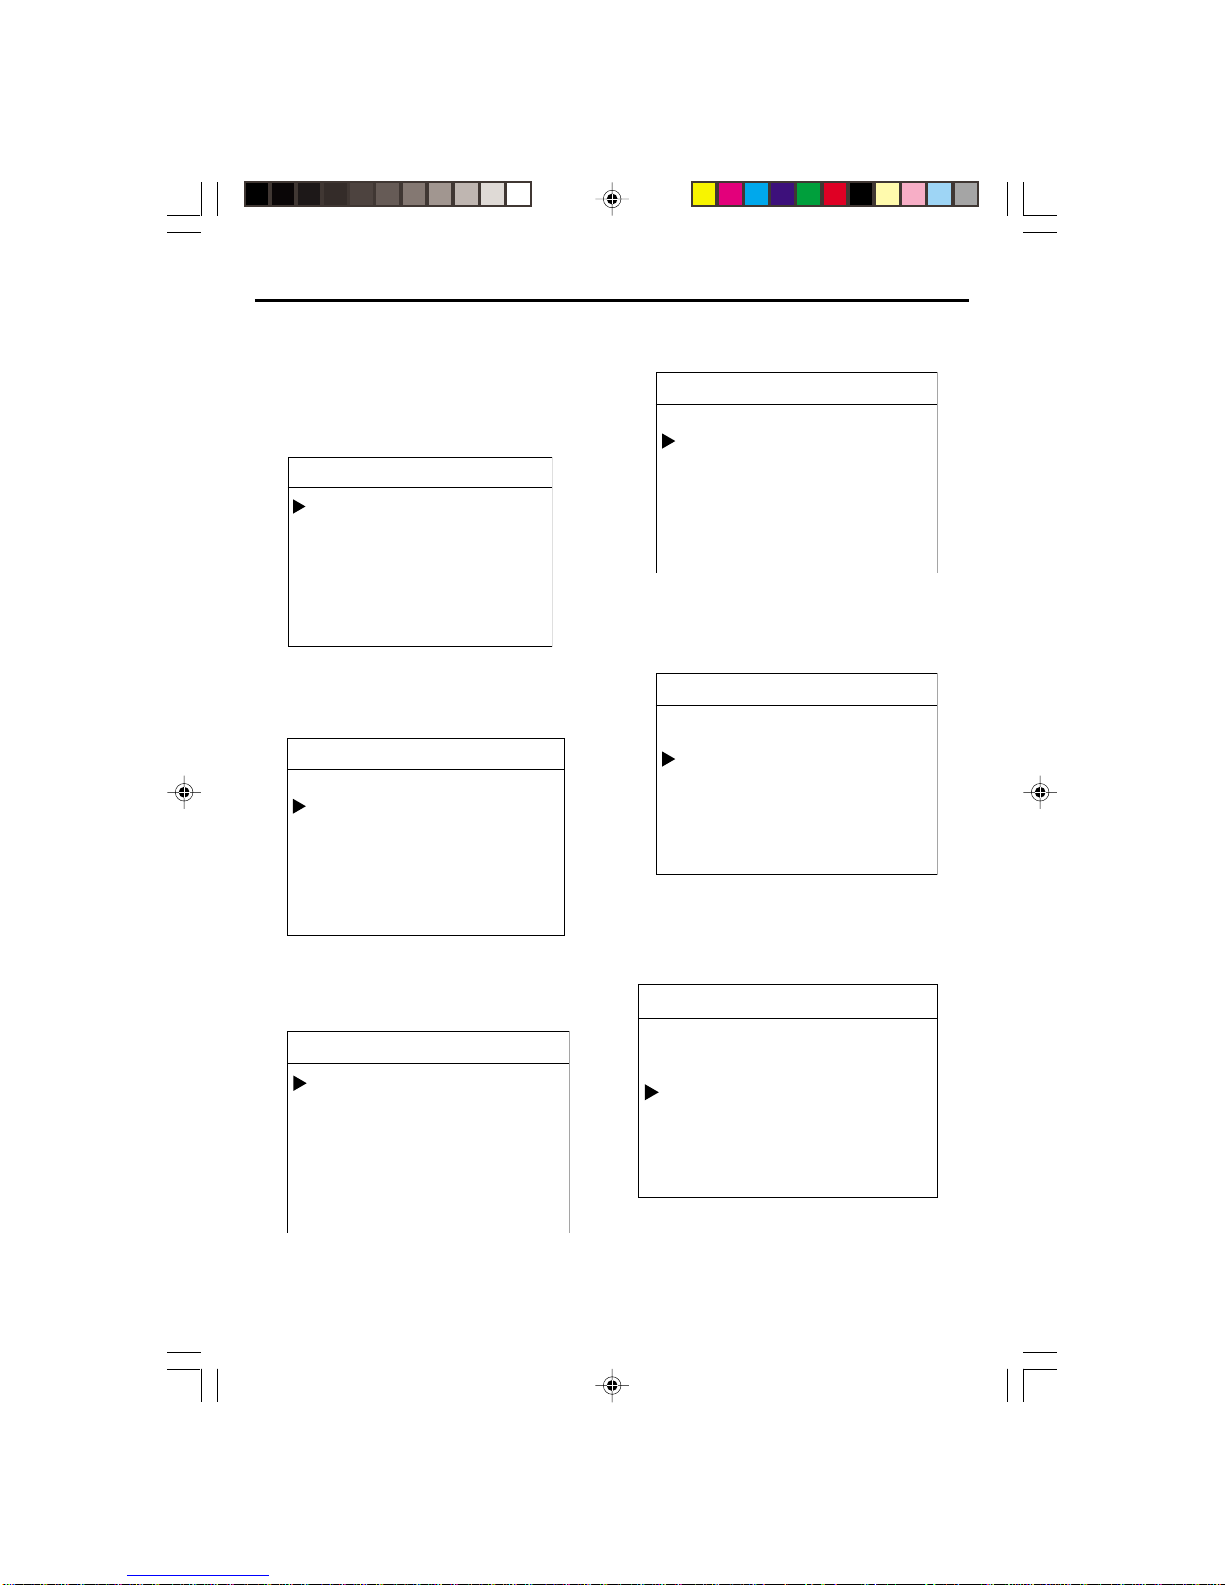
CLOCK SET
•Press [VCR] button on remote control to change into VCR mode and follow the procedure below.
1. Press [SETUP] button on the remote control.
The initial menu is displayed.
2. Press [ENTER] button, then the CLOCK SET is displayed.
3. Set the current date and time with [,] Navigation buttons
or Number 0-9 button.
For TIME SET, follow the order of Hour/Minute; for DATE SET,
follow the order of Month/Day/Year in CLOCK SET SCREEN.
Use (,)Navigation Buttons to Select AM or PM.
4. If CLOCK SET is completed, press [SETUP] button.
SETUP
Clock Set
Program Set
Channel Set
Language Select
Search
Option
Select:Ok Quit:Setup
Clock Set
Date
--/--/20--
(mm/d d y y
Quit : Setup
/)
Time
- -:- -
Clock Set
Date
--/--/20--
(mm/d d y y
Quit : Setup
/)
Time
--:--
Clock Set
Date
1 1 / 0 2 /2005
(/
Quit:Setup
mmdd/y y)
Time
02:50PM
memorex 569_EngP16-30_rev.p65 11/17/2005, 9:30 AM19
- 20 -
Use The Program Set Feature
The Program set feature allows you to preset
the DVD-VCR to record a programme to be broad-
cast. Up to 8 programmes can be preset. Before
presetting a recording, check that the date and
time are correct.
1. Press [SETUP] button on the remote control.
The initial menu is displayed.
2. Press [] Navigation button to select the
“Record timer” and press [OK] button, then
the Record timer is displayed.
3. Press “Channel”, Enter the Channel connection
method and the channel source number
4. Select “Start Date”. Enter the number of
recording date of the programme channel.
5. Select “Rec” Cycle. Press the navigation
()button to select your record cycle. one
time DDailyDWeekdaysDWeekly.
6. Select “Start time”. Enter the number of
recording Start time of the programme channel.
SETUP
Clock Set
Program Set
Channel Set
Language Select
Search
Option
Select : Ok Quit:Setup
SETUP
Clock Set
Program Set
Channel Set
Language Select
Search
Option
Select : Ok Quit : Setup
PROGRAM1
Channel
Start Date
REC Cycle
Start Time
End Time
Tape Speed
Page : PROG+/- Quit : Setup
Antenna - -
--/--
One time
--:-- AM
--:--AM
SP
PROGRAM1
Channel
Start Date
REC Cycle
Start Time
End Time
Tape Speed
Page : PROG+/- Quit : Setup
Antenna - -
--/--
One time
--:-- AM
--:--AM
SP
PROGRAM1
Channel
Start Date
REC Cycle
Start Time
End Time
Tape Speed
Page : PROG+/- Quit : Setup
Antenna - -
--/--
One time
--:-- AM
--:--AM
SP
PROGRAM1
Channel
Start Date
REC Cycle
Start Time
End Time
Tape Speed
Page : PROG+/- Quit : Setup
Antenna - -
--/--
One time
--:-- AM
--:--AM
SP
memorex 569_EngP16-30_rev.p65 11/17/2005, 9:30 AM20
This manual suits for next models
1
Table of contents


