TONOR K6 User manual

MADE IN CHINA
TONOR KARAOKE SPEAKER MANUAL
K6

CATALOGUE
English
Deutsch
Español
02~12
12~23
24~34
35~45
46~56
Français
Italiano
01

DEAR CUSTOMER
In order to achieve the best performance of your product, please
read this instruction manual carefully before using, and keep it for
future reference.
CAUTION
RISK OF ELECTRIC SHOCK DO NOT OPEN
Caution: To reduce the risk of electric shock do not open this device,
there are no serviceable parts for customers. Please refer any
maintenance or repair to qualified personnel.
This sign means the existence of dangerous voltage inside the
unit, which states a risk of electric shock.
This sign means that there are important instructions of
operation and handling in the manual that comes with this device.
NOTE
This unit may be submitted for changes in specifications,
characteristics and/or operation without prior notice to user, in
order to continue improving and developing its technology.
Important Notice
Before Use this Speaker
1. Read these instructions.
2. Keep these instructions.
3. Heed all warnings.
4. Follow all warnings.
5. Do not use this apparatus near water.
6. Clean only with dry cloth.
7. Do not block any ventilation openings. Install in accordance with
the manufacturer's instructions.
8. Do not install near any heat sources such as radiators, heat
registers, stoves, or other apparatus (including amplifiers) that
produce heat.
English
02

03
9. Only use attachments/accessories specified by the manufacturer.
10. Use only with the cart, stand, tripod, bracket, or table specified
by the manufacturer or sold with the apparatus. When a cart is
used, use caution when moving the cart/apparatus combination to
avoid injury from tip-over.
11. Unplug this apparatus during lightning storms or when unused
for long periods of time.
12. Refer all servicing to qualified service personnel. Servicing is
required when the apparatus has been damaged in any way. Such
as power-supply cord or plug is damaged, liquid has been spilled or
objects have fallen into the apparatus, the apparatus has been
exposed to rain or moisture, does not operate normally, or has been
dropped.
13. Battery usage CAUTION-TO prevent battery leakage which may
result in bodily injury, property damage, or damage to the remote
control.
- Install all batteries correctly, + and - as marked on the remote
control.
- Do not mix batteries(old and new or carbon and alkaline, etc.).
- Remove batteries when the remote control is not used for a long
time.
- Batteries(battery pack or batteries excessive heat such as
sunshine, fire, or the like).
14. Apparatus shall not be exposed to dripping or splashing.
15. Do not place any sources of danger on the apparatus(e.g. liquid
filled objects, lighted candles).
16. Where the MAINS plug or an appliance coupler is used as the
disconnect device, the disconnect device shall remain readily
operable.
Warning
- Never remove the casing of this apparatus.
- Never lubricate any part of this apparatus.
- Never place this apparatus on other electrical equipment.
- Never look into the laser beam inside this apparatus.
- Make sure that you always have easy access tothe power cord, or
adaptor to disconnect the apparatus from the power.

04
Caution
Use of controls or adjustment or performance of procedures other
than herein may result in hazardous radiation exposure or other
unsafe operation.
Hearing safety
- Listen at a moderate volume.
- Using headphones at a high volume can impair your Hearing.
- Sound can be deceiving. Over time your hearing 'comfort level'
adapts to higher volumes of sound, so after prolonged listening.
What sounds 'normal' can actually be loud and harmful to your
hearing. To guard against this, set your volume to a safe level before
your hearing adapts and leave it there.
To establish a safe volume level:
- Set your volume control at a low setting.
- Slowly increase the sound until you can hear it comfortably and
clearly without distortion.
Listen for reasonable periods of time:
- Prolonged exposure to sound,even at normal 'safe' levels, can also
cause hearing loss.
- Be sure to us your equipment reasonably and take appropriate
breaks.
Be sure to observe the following guidelines when using your
headphones.
- Listen at reasonable volumes for reasonable periods of time.
- Be careful not to adjust the volume as your hearing adapts.
- Do not turn up the volume so high that you can't hear what's
around you.
- You should use caution or temporarily discontinue use in
potentially hazardous situations. Do not use headphones while
operating a motorized vehicle, cycling, skateboarding, etc., it may
create a traffic hazard and is illegal in many areas.
Notice
Any changes or modifications made to this device that are not
expressly approved by Consumer Lifestyle may void the user's
authority to operate the equipment.

Your Party Speaker
Introduction
With this unit, you can enjoy audio from Bluetooth and other
extermal device.
What's in the box
Check and identify the contents of your package:
1* Speaker
1* Remote control
1* User manual
1* Aux In/FM Antenna Cable
1* Adapter
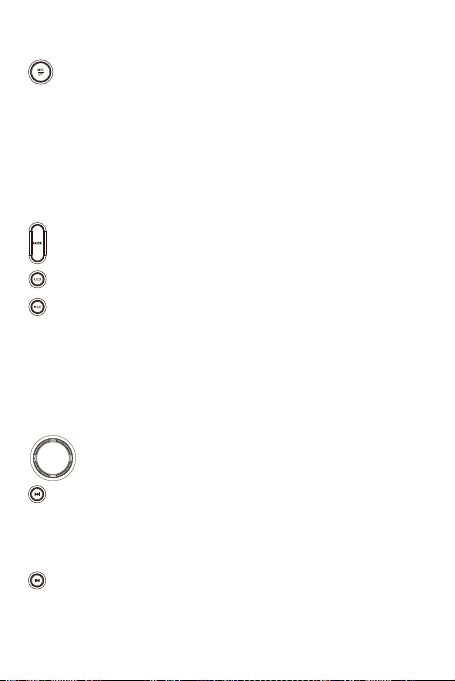
Overview of the Top control panel
1. MIC/GT button
2. Mode Switching button
3. LED button
4. Record button
5. Volume control knob
6. Next button
7. Previous button
8. Play/Pause/TWS button
9. Tone button
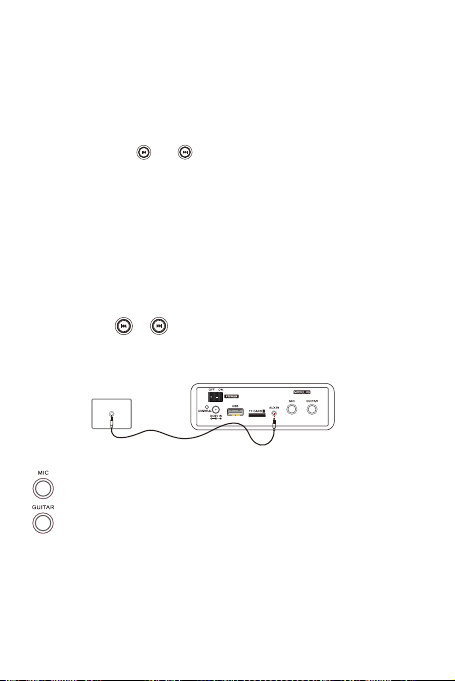
Overview of the Rear panel
1. Charging light
2. Power ON/OFF button
3. DC Input jack
4. USB jack
5. TF Card jack
6. AUX jack
7. Microphone jack
8. Guitar jack
Get started
Caution
Use of controls or adjustments or performance of procedures other
than herein may result in hazardous radiation exposure or other
unsafe operation.
123456789
1 2
3
4 5
6
7 8
05

Always follow the instructions in this chapter in sequence.
Connect power
Caution
- Risk of product damage! Ensure that the power supply voltage
corresponds to the voltage printed on back or the underside of the
unit.
- Risk of electric shock! When you unplug the AC power cord, always
pull the plug from the socket. Never pull the cord.
- Before you connect the AC power cord, make sure that you have
completed all other connections.
Connect the adapter cable to the wall socket:
Prepare the remote control
To insert the remote control batteries:
1. Open the battery compartment.
2. Insert 2xAAA batteries with correct polarity (+/-) as indicated. The
2xAAA battery not include in our products, please purchase from
Authorized Seller.
3. Close the battery compartment.
Please Note:
- If you are not going to use the remote for a long time,remove the
batteries.
- Do not use old and new or different type of batteries in
combination.
- Batteries contain chemical substances, so they should be disposed
of properly.
1
06
2
3

07
Turn ON/OFF the speaker
1. The speaker can work with DC power by build in battery (DC
mode).
2. DC mode, the speaker will be powered by the built in recharge-
able battery.
Use the power adaptor to power on the speaker and set the power
switch on rear panel to ON position.
Caution:
If you do not use this unit for a while, please switch the "POWER"
button to "OFF" status, and disconnect the AC power cable of this
unit.
Charging the internal Battery
The speaker comes with a built-in rechargeable battery,follow the
below steps to charge it:
1. Connect the adapter cable and plug to the wall socket on the rear
panel.
2. There is a BATTERY indicator light on the rear panel will light up
as RED color, the battery is being charge.
When the BATTERY indicator RED color light of, the battery is fully
charged, then unplug the adapter cable to stop charging.
Internal Battery Level indicator
1. There is a battery level indicator on the display, total are three
level of the battery, it will decrease the level when the battery is
running.
2. When you see there is only 1 level of the battery indicator, please
charge the internal battery on time to keep the battery life.
3. When the speaker sound becomes abnormal, please charge the
internal battery on time to keep the battery life.
Note: please fully charge the product when it is not going to be used
for a long time and charge once a month to keep longer battery life.
Basic key play operations
Function
1. Press this MIC/GT button to oepn the volume control of
microphone, then turn the volume knob to adjust the sound
volume,the display will show n 0 to n 16.
2. Press this MIC/GT button to open the echo level control of
microphone, then turn the volume knob to adjust the level, the
display will show EC 0 to EC 16.
3. Press this MIC/GT button to open the Guitar volume control, then
turn the volume know to adjust the sound volume,the display will
show G 0 to G 16.
Press this MODE button for function mode switching between
Bluetooth/FM/AUX.
Press this LED button to switch the light effect.
1. Press this button can record FM/Microphone/AUX to USB when
playing music.
2. Press one time to open the recording and the music of
FM/Microphone/AUX will store automatically into USB. Press long
time to play the recording.
3. Press again to stop the recording and you can play the recorded
music from the USB.
Note: USB music can not record to USB.
Turn this volume knob to adjust the all sound level,
music/microphone/guitar.
1. Press this next button for next track when playing music.
2. Long press this next button for fast forward.
3. Press this next button at FM mode, the radio will read the saved
radio station and select the next one in ascending order.
1. Press this previous button for previous track when playing music.
2. Long press for fast backward.
3. Press this previous button FM mode, the radio will read the saved
08

radio station and select the previous one in descending order.
1. Each press of the PLAY/PAUSE/TWS BUTTON cause the
operation the change from PLAY to PAUSE or from PAUSE back
to PLAY.
2. Long press PLAY/PAUSE/TWS button for TWS function.
3. When in FM mode, press this button to search and save stations
automatically.
1. Press this TONE button to adjust the treble level, the display will
show t-10 to t+10.
2. Press this TONE button two times continuously to adjust the bass
level, the display will show b-10 to b+10.
1. Red light is displayed while charging.
2. Full charge is shown in blue light OFF ON.
Set the power switch to ON or OFF position on the rear panel
to turn on or turn off the speaker
Or use remote control ON/OFF button.
Adapter Charging port
Insert the USB driver to USB socket to play music.
Insert the TF card to TFcard socket to play music.
Insert the AUX cable to external device.
Insert wired Mirophone to the MIC jack.
Connect guitar with standard 1/4" cable.
09
Connect with Bluetooth
1. Press the MODE button on the Top Control panel or on the
remote control to switch to the BLUETOOTH CONNECT mode,
(BLUE)will be displayed on the screen.
2. Open the Bluetooth on the external device (must have Bluetooth
function), and the name "TONOR K6" will show on the device. Please
try to connect it.
3. Once connected, you can hear a small sound from the speaker.
4. You can use the or key on the Top Control panel to
control the tracks of the extermal device.
Note: This speaker do not need the password.
Connect with AUX Line in
1. Press the MODE button on the Top Control panel or on the
remotecontrol to switch to the AUX mode, AUX will be displayed on
the screen.
2. Connect this speaker to AUX inserting jack and the external
device Earphone jack by provided AUX cable.
3. Once connected, turn on your external device music.
4. You can use or button on the Top control panel to control
the tracks of the external device.
Caution: Please turn off the unit before connect AUX cable in order
to avoiding unexpected noise.
Connect with Wired Microphone/Guitar
Insert 6.35mm wired microphone to play with microphone.
Insert 6.35mm wired guitar to play with guitar.
When playing with the wired microphone/guitar, please press this
knob to adjust the sound volume level of microphone/guitar.
1. Press this MIC/GT, you can open the volume control of
microphone/guitar, the display will have corresponding function on
the screen, then turn the volume knob to adjust the sound volume
10

11
level of microphone/guitar.
2. Press this MIC/GT, you can open the echo volume control of
microphone, the display will have corresponding function on the
screen, then turn the volume knob to adjust the echo sound volume
level of microphone.
Important Notes
- While using the microphone, avoid being put the microphone
opposite the bass of Speaker, as they may have Whistler Noisy.
- To get the best singing performance, keep the micro phone within
5-15cm of the mouth and at a 45 degree angle.
- When using the microphone, always pay attention to the battery.
- If the battery is low, the indicator light will come on and the
performance will progressively become poor.
Caution: Please do not put the microphone directly face to the
speaker, it may damage the speaker.
Product information Specifications
Amplifier
Output power 30W
Input Sensitivity ≥500mV
FM
FM range 87.5-108MHZ
Frequency Response 75Hz-20KHz
Speaker
Bass Speaker 6.5 Inch
General information
DC Power DC 9V IN
Battery Li-ion 7.4V4000mAh
Troubleshooting
Warning
- Never remove the casing of this speaker.
If you encounter problems when using this speaker, check the
following points before requesting service.

Deutsch
12
No power
- Ensure that the Adapter plug of the speaker is connected properly.
- Ensure that there is power at the DC outlet.
No sound or poor sound
- Adjust the volume.
- Disconnect the headphones.
- Check that the speakers are connected correctly.
- Check if the stripped speaker wires are clamped.
No response from the speaker
- Disconnect and reconnect the Adapter plug, then turn on the
speaker again.
Remote control does not work
- Before you press any function button, first select the correct source
with the remote control instead of the main unit.
- Reduce the distance between the remote control and the unit.
- Insert the battery with its polarities (+/-signs) alignedas indicated.
- Replace the battery.
- Aim the remote control directly at the sensor on the front of the
speaker.
SEHRGEEHRTERKUNDE
UmdieoptimaleLeistungIhresProduktszuerzielen,lesenSiebitte
dieseBedienungsanleitungvorderVerwendungsorgfältigdurchund
bewahrenSiesiezumspäterenNachschlagenauf.
VORSICHT
STROMSCHLAGGEFAHR,NICHTÖFFNEN
Vorsicht:ÖffnenSiediesesGerätnicht,umdasRisikoeines
elektrischenSchlageszuverringern.EsgibtkeineTeile,dievom
Kundengewartetwerdenkönnen.BitteüberlassenSieWartungs-
oderReparaturarbeiteneinemqualifiziertenFachmann.

DiesesZeichenbedeutet,dassimInnerendesGerätsgefährliche
Spannungenbestehen,dieeinenelektrischenSchlagzurFolge
habenkönnen.
DiesesZeichenbedeutet,dassindermitdemGerätgelieferten
BedienungsanleitungwichtigeHinweisezurBedienungund
Handhabungenthaltensind.
HINWEIS
AndiesemGerätkönnenohnevorherigeAnkündigungÄnderungen
dertechnischenDaten,derEigenschaftenund/oderderFunktions-
weisevorgenommenwerden,umseineTechnologieweiterzu
verbessernundzuentwickeln.
WichtigerHinweis
VorderVerwendungdiesesLautsprechers
1.LesenSiedieseAnleitung.
2.BewahrenSiedieseAnweisungenauf.
3.BeachtenSiealleWarnhinweise.
4.FolgenSieallenWarnhinweisen.
5.VerwendenSiedasGerätnichtinderNähevonWasser.
6.NurmiteinemtrockenenTuchreinigen.
7.BlockierenSiekeineLüftungsöffnungen.InstallierenSiedasGerät
inÜbereinstimmungmitdenAnweisungendesHerstellers.
8.StellenSiedasGerätnichtinderNähevonWärmequellenwie
Heizkörpern,Heizregistern,ÖfenoderanderenGeräten
(einschließlichVerstärkern)auf,dieWärmeerzeugen.
9.VerwendenSienurdievomHerstellerangegebenenZubehörteile.
10.VerwendenSiedasGerätnurmitdemvomHersteller
angegebenenodermitdemGerätverkauftenWagen,Ständer,
Stativ,HalteroderTisch.BeiVerwendungeinesWagenssolltenSie
beimBewegenderWagen/Geräte-Kombinationvorsichtigsein,um
VerletzungendurchUmkippenzuvermeiden.
11.ZiehenSiedenNetzsteckerbeiGewitteroderwennSiedasGerät
fürlängereZeitnichtbenutzen.
12.ÜberlassenSiealleWartungsarbeitenqualifiziertemServiceper-
sonal.EinServiceisterforderlich,wenndasGerätinirgendeiner
13

Weisebeschädigtwurde.ZumBeispiel,wenndasNetzkabeloderder
Steckerbeschädigtist,wennFlüssigkeitoderGegenständeindas
Gerätgelangtsind,wenndasGerätRegenoderFeuchtigkeit
ausgesetztwar,wenndasGerätnichtnormalfunktioniertoder
heruntergefallenist.
13.BatterienutzungVORSICHT.UmeinAuslaufenderBatterienzu
verhindern,daszuKörperverletzungen,SachschädenoderSchäden
anderFernbedienungführenkann,
-LegenSiealleBatterienrichtigein,+und-wieaufderFernbedi-
enungangegeben.
-MischenSiekeineBatterien(alteundneueoderKarbonbatterien
undAlkalibatterien,usw.)
-EntfernenSiedieBatterien,wenndieFernbedienunglängereZeit
nichtbenutztwird.
-Batterien(AkkupackoderBatterienübermäßigeHitzewie
Sonnenschein,FeueroderÄhnlichem).
14.DasGerätdarfkeinenWassertropfenoder-spritzernausgesetzt
werden.
15.StellenSiekeineGefahrenquellenaufdasGerät(z.B.mit
FlüssigkeitgefüllteGegenstände,brennendeKerzen).
16.WennderNetzsteckerodereineGerätekupplungalsTrennvor-
richtungverwendetwird,mussdieTrennvorrichtungleichtbedienbar
bleiben.
Warnung
-EntfernenSieniemalsdasGehäusedesGeräts.
-VerwendenSieniemalsSchmiermittelfürTeilediesesGeräts.
-StellenSiediesesGerätniemalsaufandereelektrischeGeräte.
-SchauenSieniemalsindenLaserstrahlimInnerendesGeräts.
-AchtenSiedarauf,dassSieimmerleichtenZugangzumNetzkabel
oderzumAdapterhaben,umdasGerätvomStromnetzzutrennen.
Achtung
DieVerwendungvonBedienelementen,Einstellungenoderdie
DurchführungvonVerfahren,dienichtindiesemHandbuch
beschriebensind,kannzueinergefährlichenStrahlenbelastungoder
einemanderenunsicherenBetriebführen.
Gehörschutz
-MitmittlererLautstärkehören.
-DieVerwendungvonKopfhörernmithoherLautstärkekannIhr
Gehörbeeinträchtigen.
14

15
-Soundkanntrügerischsein.MitderZeitundnachlängeremHören
passtsichIhrGehöranhöhereLautstärkenan.Was„normal“klingt,
kanninWirklichkeitlautundschädlichfürIhrGehörsein.Umdem
vorzubeugen,solltenSiedieLautstärkeaufeinensicherenWert
einstellen,bevorsichIhrGehöraneinehöhereLautstärkegewöhnt
hat.
SostellenSieeinesichereLautstärkeein:
-StellenSiedieLautstärkeaufeinenniedrigenWertein.
-ErhöhenSielangsamdieLautstärke,bisSiesieangenehmund
deutlichohneVerzerrungenhörenkönnen.
HörenSiefüreinenangemessenenZeitraumzu:
-EinelängereGeräuschbelastung,selbstbeinormaler„sicherer“
Lautstärke,kannebenfallszuGehörschädenführen.
-AchtenSiedarauf,dassSieIhreAusstattungvernünftignutzenund
ausreichendePauseneinlegen.
BeachtenSiebeiderVerwendungIhrerKopfhörerdiefolgenden
Richtlinien.
-GenießenSiedieMusikinangemessenerLautstärkeundüber
einenangemessenenZeitraumhinweg.
-VerändernSiedieLautstärkenicht,währendsichIhrGehör
anpasst.
-StellenSiedieLautstärkenichtsohochein,dassSienichtmehr
hörenkönnen,wasumSieherumgeschehen.
-InpotenziellgefährlichenSituationensolltenSieVorsichtwalten
lassenoderdieVerwendungvorübergehendunterbrechen.Benutzen
SiekeineKopfhörer,währendSieeinKraftfahrzeugführen,Fahrrad
fahren,Skateboardfahrenusw.,dadieseineGefahrfürdenVerkehr
darstellenkannundvielerortsillegalist.
Hinweis
Any changes or modifications made to this device that are not
expressly approved by Consumer Lifestyle may void the user's
authority to operate the equipment.

16
IhrParty-Lautsprecher
Einführung
MitdiesemGerätkönnenSieAudioüberBluetoothundandere
externeGerätegenießen.
Lieferumfang
ÜberprüfenundidentifizierenSiedenLieferumfang:
1*Lautsprecher
1*Fernbedienung
1*Benutzerhandbuch
1*Aux-Eingang/FM-Antennenkabel
1*Adapter
ÜbersichtfürdasobereBedienfeld
1.MIC/GT
2.Modusumschaltung
3.LED
4.Aufnahme
5.Lautstärke
6.„Weiter“
7.„Vorherige“
8.Abspielen/Pause/TWS
9.Ton
ÜbersichtfürdieRückseite
1.Ladelicht
2.ON/OFF-Taste
3.DC-Eingangsbuchse
4.USB-Buchse
5.TF-Karten-Buchse
6.AUX-Buchse
7.Mikrofonbuchse
8.Gitarrenbuchse
ErsteSchritte
Achtung
DieVerwendungvonBedienelementen,Einstellungenoderdie
DurchführungvonVerfahren,dienichtindiesemHandbuch
beschriebensind,kannzueinergefährlichenStrahlenbelastungoder
einemanderenunsicherenBetriebführen.
1 2 3 4 5 6 7 8 9
1 2
3
4 5
6
7 8

17
BefolgenSiestetsdieAnweisungenindiesemKapitelderReihe
nach.
Stromanschließen
Achtung
- GefahrvonProduktschäden!VergewissernSiesich,dassdie
NetzspannungmitderaufderRückseiteoderUnterseitedesGeräts
angegebenenSpannungübereinstimmt.
- Stromschlaggefahr!WennSiedenNetzsteckerentfernen,müssen
SieimmerdenSteckerausderSteckdoseentfernen.ZiehenSie
niemalsamKabel.
- BevorSiedasNetzkabelanschließen,solltenSiesichvergewissern,
dassSiealleanderenVerbindungendurchgeführthaben.
SchließenSiedasAdapterkabelandieWandsteckdosean:
VorbereitungderFernbedienung
SolegenSiedieBatterienderFernbedienungein:
1.ÖffnenSiedasBatteriefach.
2.LegenSie2AAA-BatterienmitderrichtigenPolarität(+/-)wie
angegebenein.Die2AAA-BatteriensindnichtimLieferumfang
enthalten,bittekaufenSiediesebeieinemautorisiertenHändler.
3.SchließenSiedasBatteriefach.
Hinweis:
- WennSiedieFernbedienungübereinenlängerenZeitraumnicht
benutzen,nehmenSiedieBatterienheraus.
- VerwendenSienichtalteundneueBatterienoderverschiedene
Batterietypenzusammen.
- BatterienenthaltenchemischeSubstanzenundsolltendaher
ordnungsgemäßentsorgtwerden.
1
2
3

18
Einschalten/AusschaltendesLautsprechers
1.DerLautsprecherkannüberdeneingebautenAkkumit
Gleichstrombetriebenwerden(DC-Modus).
2.ImDC-ModuswirdderLautsprecherüberdeneingebautenAkku
mitStromversorgt.
VerwendenSiedasNetzteil,umdenLautsprechereinzuschalten,und
stellenSiedenNetzschalteraufderRückseiteindiePositionON.
Achtung:
WennSiedasGeräteineZeitlangnichtbenutzen,schaltenSiebitte
die„POWER“-Tasteauf„OFF“undziehenSiedasNetzkabeldes
Gerätsab.
AufladendesinternenAkkus
DerLautsprecherverfügtübereineneingebautenwiederaufladbar-
enAkku.GehenSiewiefolgtvor,umihnzuladen:
1.VerbindenSiedasAdapterkabelmitderSteckdoseaufder
Rückseite.
2.AufderRückseitebefindetsicheineBATTERIE-Anzeige,dieROT
aufleuchtet,wennderAkkugeladenwird.
WenndasroteBATTERIE-Anzeigelichtausist,istderAkku
vollständigaufgeladen.ZiehenSiedanndasAdapterkabelab,um
denLadevorgangzubeenden.
InterneBatteriestandsanzeige
1.EsgibteineBatteriestandsanzeigeaufdemDisplay,insgesamt
gibtesdreiPunkte.DerBatteriestandnimmtab,wenndieBatterie
aufgebrauchtist.
2.WenndieBatteriestandsanzeigenurnoch1Punktanzeigt,laden
SiebitterechtzeitigdieinterneBatterieauf,umdieLebensdauerder
Batteriezuverlängern.
3.WennderKlangdesLautsprechersabnormalwird,ladenSiebitte
rechtzeitigdeninternenAkkuauf,umdieLebensdauerdesAkkuszu
verlängern.
Hinweis:BitteladenSiedasProduktvollständigauf,wennes
längereZeitnichtbenutztwird.LadenSieeseinmalimMonatauf,
umdieLebensdauerderBatteriezuverlängern.

19
GrundlegendeFunktionenderTasten
Funktio
1.DrückenSiedieMIC/GT-Taste,umdieLautstärkeregelungdes
Mikrofonszuöffnen.DrehenSiedanndenLautstärkeregler,umdie
Lautstärkeeinzustellen.AufdemDisplayerscheintn0bisn16.
2.DrückenSiedieMIC/GT-Taste,umdenEcho-Pegelreglerdes
Mikrofonszuöffnen.DrehenSiedanndenLautstärkeregler,umden
Pegeleinzustellen.AufdemDisplayerscheintEC0bisEC 16.
3.DrückenSiedieMIC/GT-Taste,umdieLautstärkeregelungfürdie
Gitarrezuöffnen.DrehenSiedanndenLautstärkeregler,umdie
Lautstärkeeinzustellen.AufdemDisplayerscheintG0bisG16.
DrückenSiedieMODE-Taste,umdenFunktionsmoduszwischen
Bluetooth/FM/AUXumzuschalten.
DrückenSiedieLED-Taste,umdenLichteffektzuwechseln.
1.DrückenSiedieTaste,umwährendderMusikwiedergabe
FM/Mikrofon/AUXaufUSBaufzunehmen.
2.DrückenSieeinmal,umdieAufnahmezuöffnen.DieMusikvon
FM/Mikrofon/AUXwirdautomatischaufUSBgespeichert. Lange
drücken, um die Aufnahme abzuspielen.
3.DrückenSieerneut,umdieAufnahmezustoppen.Siekönnendie
aufgenommeneMusikvomUSBabspielen.
Hinweis:USB-MusikkannnichtaufUSBaufgenommenwerden.
DrehenSiedenLautstärkeregler,umdieLautstärkefür
Musik/Mikrofon/Gitarreeinzustellen.
1. DrückenSiebeiderMusikwiedergabedieTaste„Weiter“fürden
nächstenTitel.
2. HaltenSiedieTaste„Weiter“,umschnellvorzuspulen.
3. WennSiedie„Weiter“-TasteimFM-Modusdrücken,suchtdas
RadiodengespeichertenRadiosenderundwähltdennächstenin
aufsteigenderReihenfolge.
1.DrückenSiebeiderMusikwiedergabedie„Vorherige“-Taste,um
Table of contents
Languages:


