Top RC CESSNA 400 User manual
Radio Control Model Airplane
CESSNA 400CESSNA 400CESSNA 400
Operation manual
1.Please read this manual carefully and follow the instruction of the manual before
you use this products;
2.Our airplane is not a toy,which is only suitable for the experienced manipulator or
under the guidance of the experienced pilot.
3. Not recommended for the children under 14 years old.
4.Please adjust this plane according to the instruction and make sure that the finger
and other parts of your body out of the rotating parts of the plane, or it may cause
damage to the plane or injury to your body.
5.Do not fly in the thunderstorm,strong wind or bad weather.
6.Never fly the plane where there are power lines overhead, automobiles,near
aerodorme,railway or highway.
7.Never fly our plane where are crowds of people.Give yourslef plenty of room
flying,as the plane can fly at a high speed.Remember that you are responsible for
others safety.
8.Do not attempt to catch the plane when you are flying it.
9.The user should bear full responsibility of proper operation and usage with regards
to this model.We, Top RC together with any distributor of us will not be responsible
for any liability or loss due to improper operation.
CONTENTS
Statment:
Brief introduction
Main specifications
Ma in co nf ig ura ti on
Products constitution
Assemble processes
Adjustment s
Saf tey precautions
Charging method and cautions
Caution and Notice for Li-po battery
Caution and notice for ESC
Spa re par ts
....................................................................................1
........................................................................................1
...................................................................................1
.......................................................................................1
...................................................................................2
teps.........................................................................................4
..................................................................................5
...............................................................................6
.....................................................6
...............................................................................7
............................................................................................8
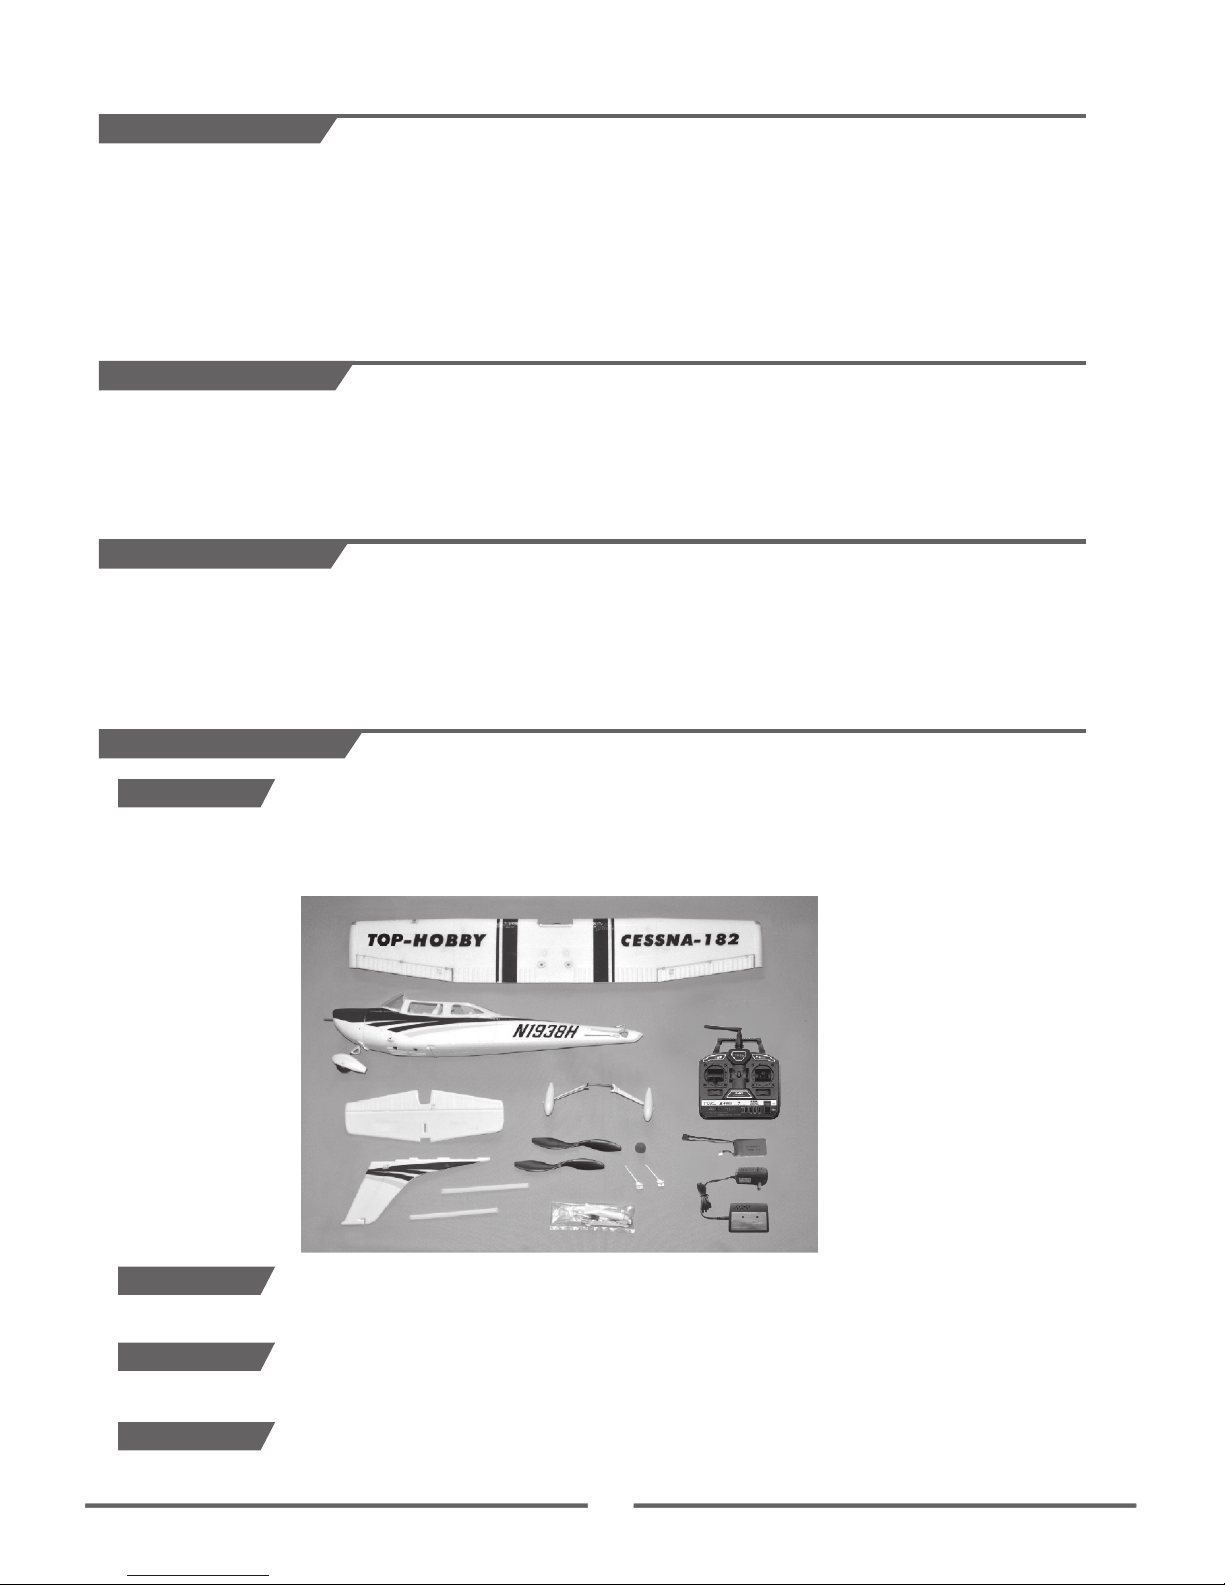
1
fuselage,main wings, horizontal wings, vertical wings, front landing gear, main landing gear,propellor,
stay bar,Cowling set, battery, , radio,charger,antenna, accessary bag
RTF version
Brief introduction
★Wingspan 980mm
★Length 800mm
★Weight 680g
★Thrust ≥6 8 0 g
★Flying time ≥6 min
1
Mian specifications
Mian configuration
Kits without radio
Kits without radio,charger and battery
Without any electronic parts
★Radio system 4ch 2.4Gzh E-401 radio
★Motor DST-1200
★Battery 1300
★ESC 20A
★Servo 9gX4
mAh 11.1V 15C
Product constitution
ARF version
PNP version
KIT version
Thank you for purchasing the “ ” remote control model airplanes from Top RC, and we hope this plane will bring
endless joy to you after you choose it.
With the EPO foam materials, it is very light and strong;
Used the perfect structure design, easy to assemble and maintain,and crash resistance.
Used the perfect power system, it has the strong power and can fly long time;
It can finish the inverted flight,inside loops, outside loops, axial rolls ,and other aerobatic performance.
High scale, and beautiful appearance.
CESSNA
★
★
★
★
★

2
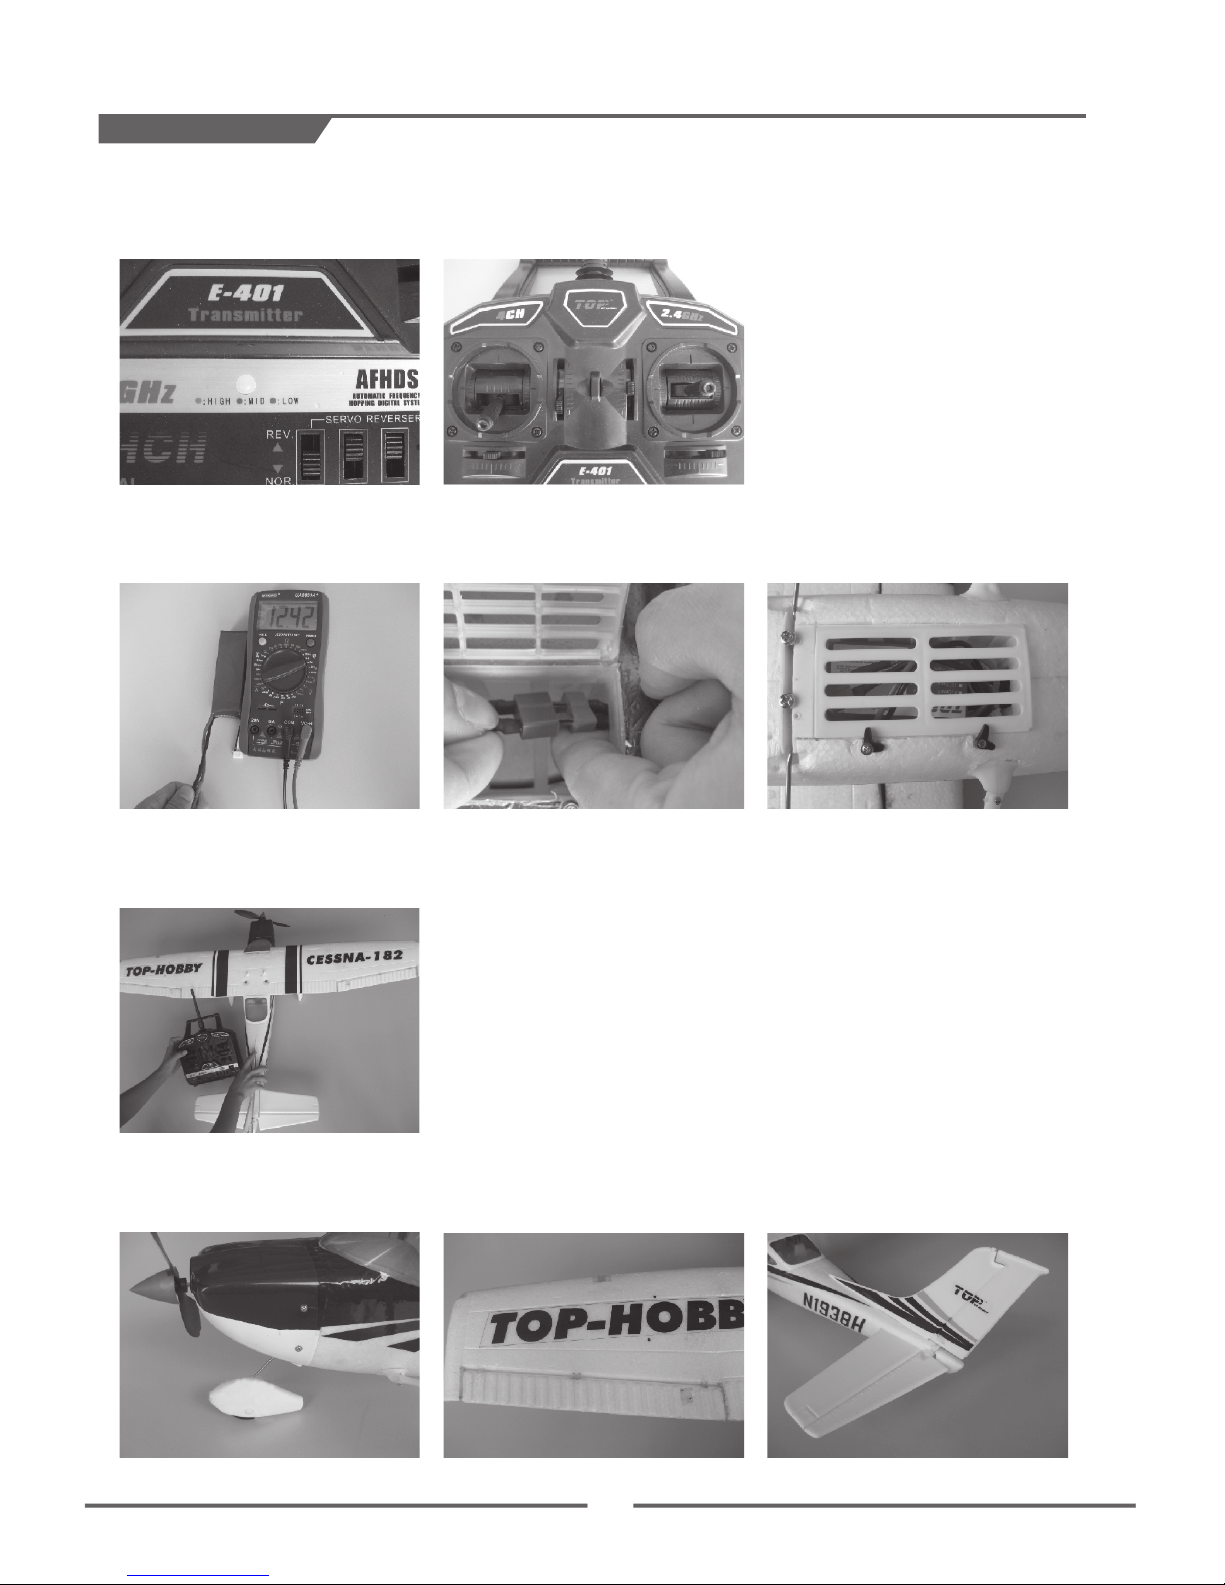
1.Install the main landing gear
Take of the fuselage& main landing gear&stopper& foam glue from the box.Assemble the main landing gear into
the slot of the fuselage,and add the glue to the wooden stopper, then insert it into the slot.At last, lock the main
landing gear.
2. Install the tail wings
Take of the horizontal wings & vertical wings& foam glue from the box. Add the foam glue to the horizontal wings
and fuselage,then insert the horizontal wings to the slot of the tail parts and connect to the fuselage.Use the same
method to connect the vertical wing to the fuselage.
3. Install the main wings
Take of the main wings &stay bar&antenna&screws from the box.Connect the navigation light and aileron wire (Make
sure the positive and negative cannot be connected reversed.).Insert the main wings into the slot of the fuselage,
and use the PM5*35MM screw to lock it,then lock the stay bar by the PA1.7X10mm screws.At last, please use the
foam glue to connect the antenna to the slot of the main wings.
Assemble processes
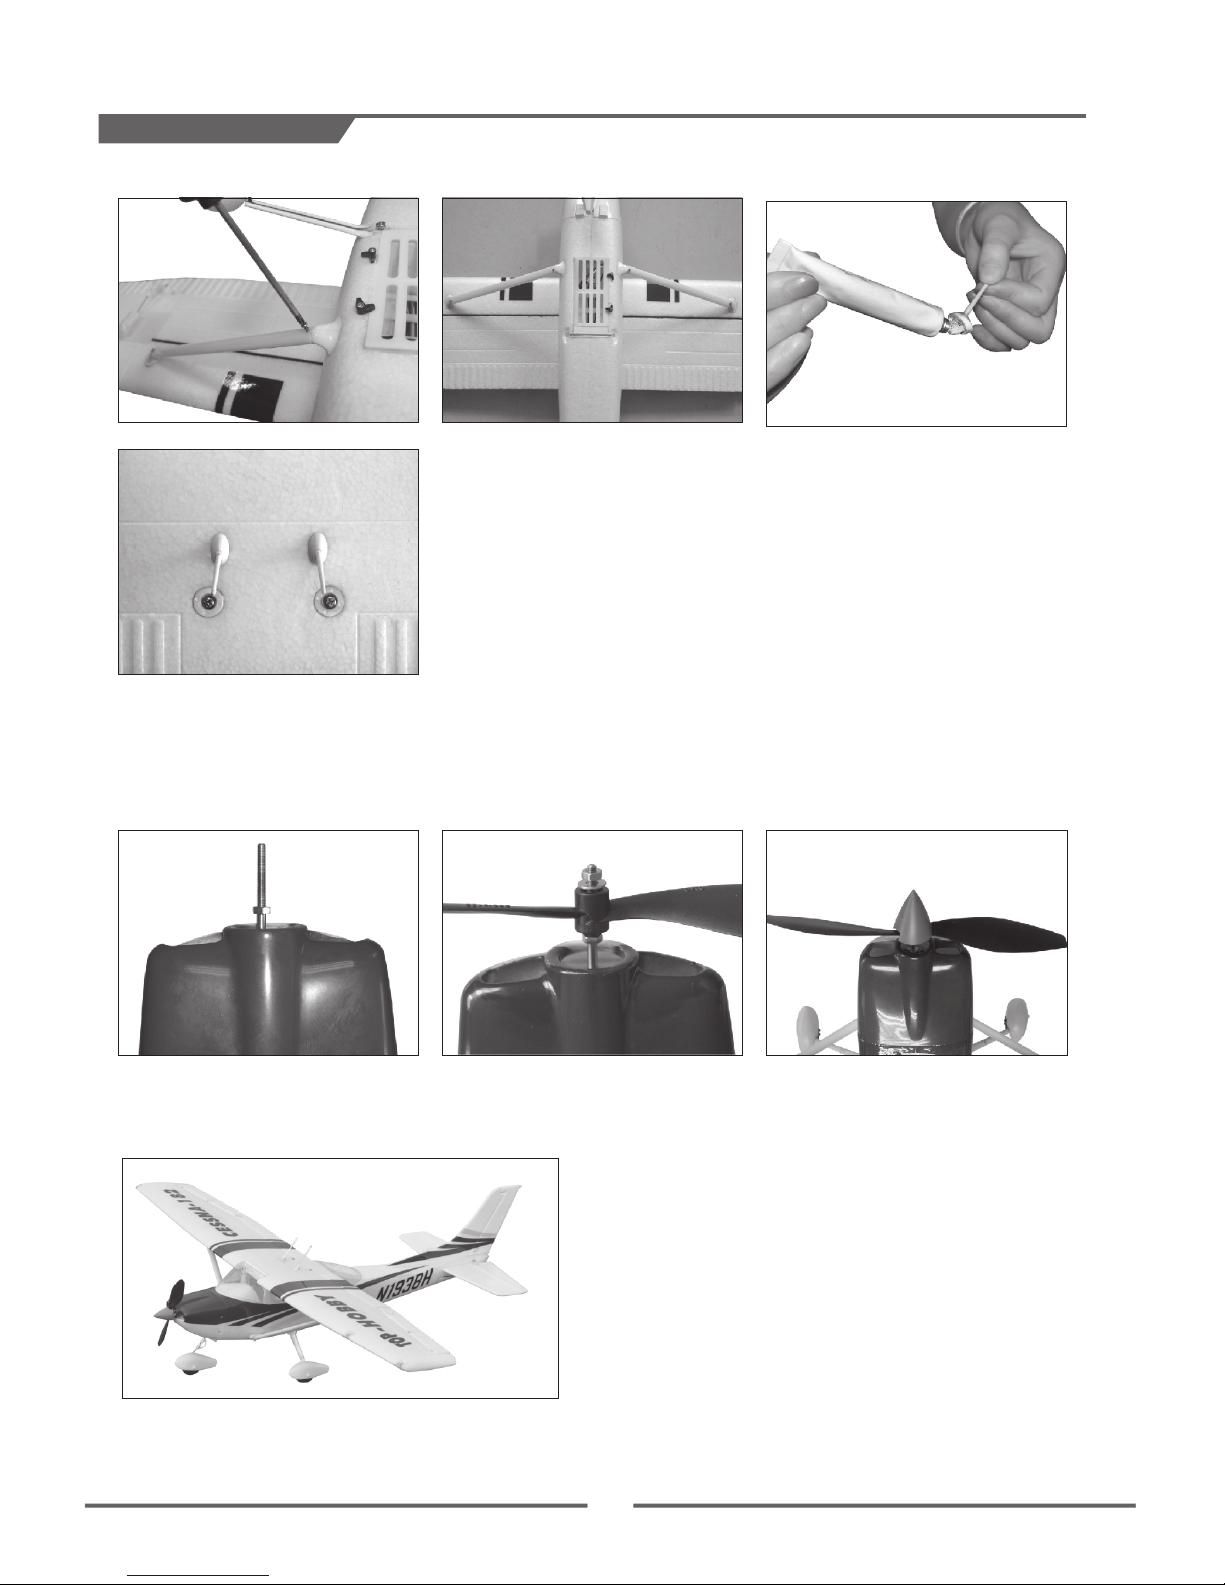
3
5.Finished the assembly of the Cessna.
4. Install the propellor
Take of the cowling& propellor&nut&spanner from the box, please lock the propellor by the following pictures.
Assemble processes
4
Adjustment steps
4.Please check the control surface and front wheel can work or not.Do not make it reverse, and make
sure that the control surface &free wheel and the joystick are in the same direction.
1.Turn on the transmitter , and please make sure that there is enough power for the transmitter.
Push the joystick for throttle and throttle trim switch to the lowest position,and other trim switch
should be in the neutral position.
2.Please make sure that the battery is full power ,and connect to the ESC plug , then install the battery
into the battery case.
3.Please catch the back part of the fuselage and push the throttle slowly to make sure that the motor
can work normally.
5
45-48mm
Adjustment steps
1.If you have the simulator, we suggest that you can practise your skill by the simulator before you fly
this model,which will bring some help for you.
2.Please climb the plane above the 50 meters with half throttle to fly it when you fly it for your first time,
then you will be familiar with the performance of this plane.
3.You should learn how to control this model blandly, it will reduce the possibility of crash and prolong
the usage life of the plane.
4.The turn radius should not be too little,or it will stall and it will increase the possibility of crash.
5.When taking off or landing the plane, you should against the wind.
6.Do not fly the model over your head or behind you, you should fly the model in front of you.
Saftey precautions
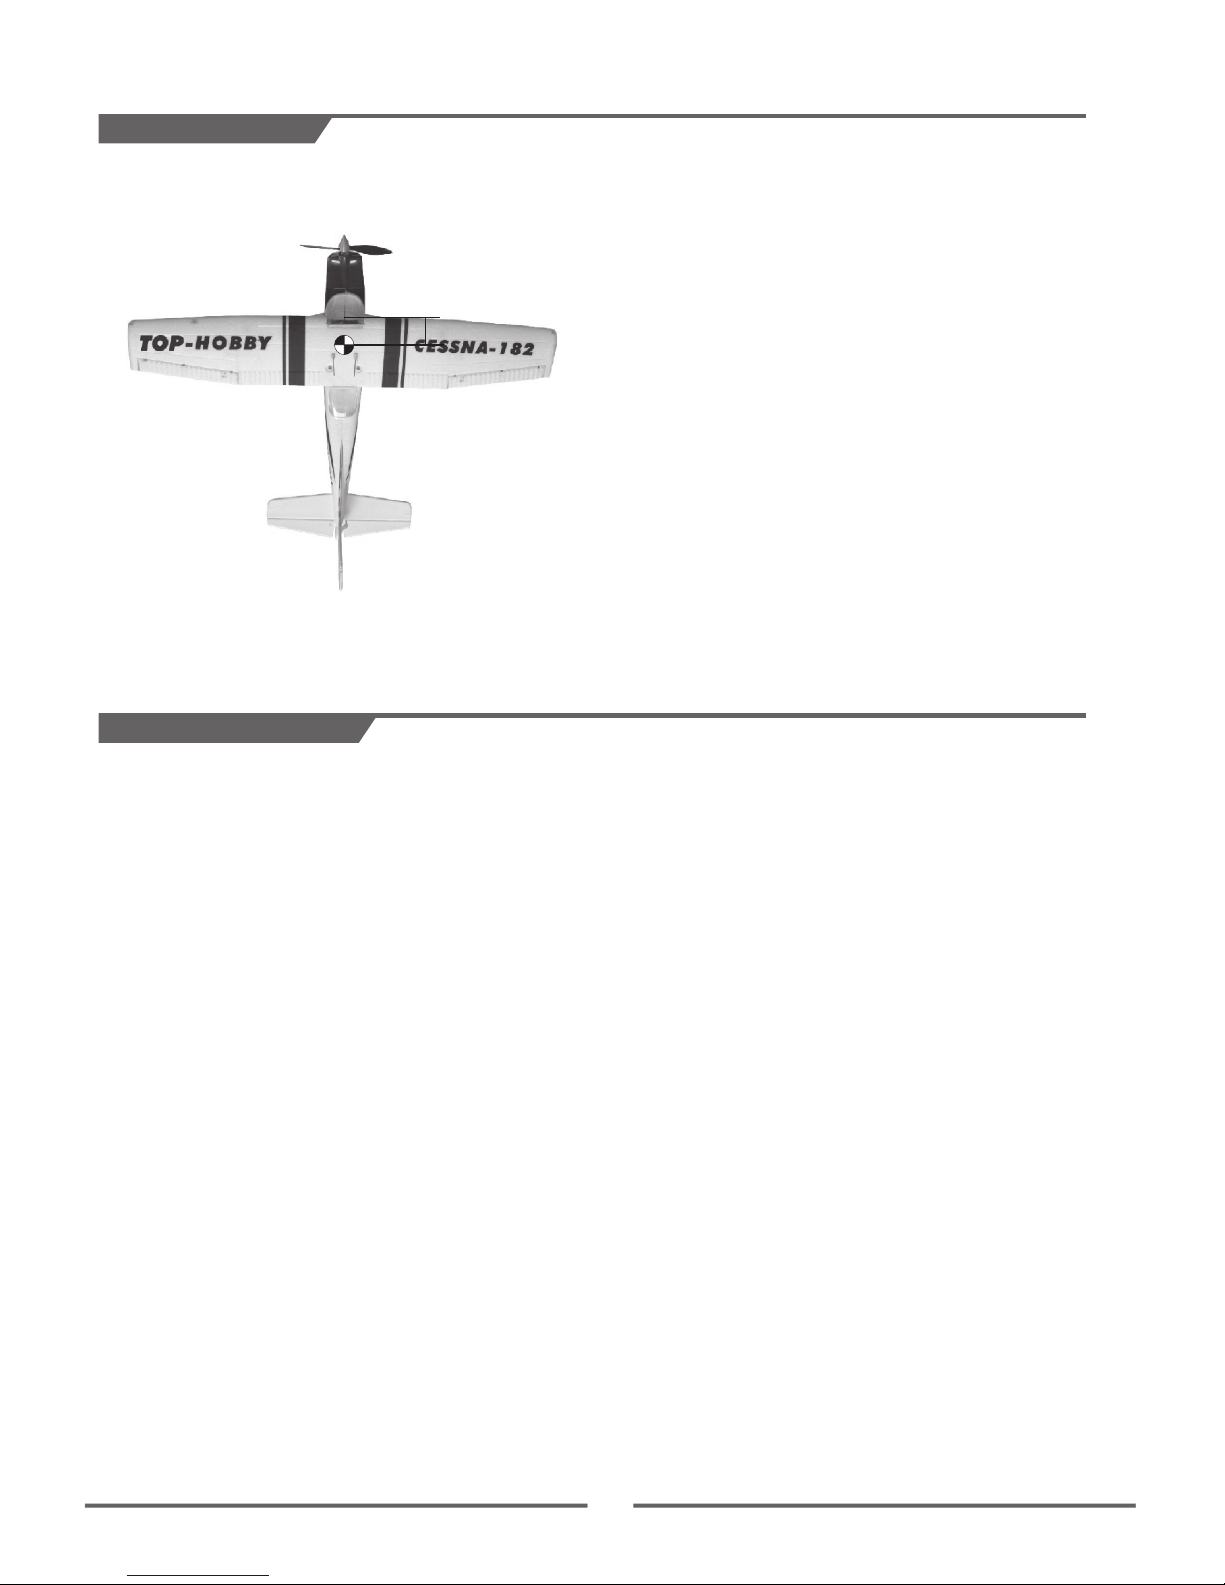
5.Check the center of gravity and make sure that the CG of the plane should be within the range as indicated
by the arrows.
6.Finished the adjustment for .CESSNA
6
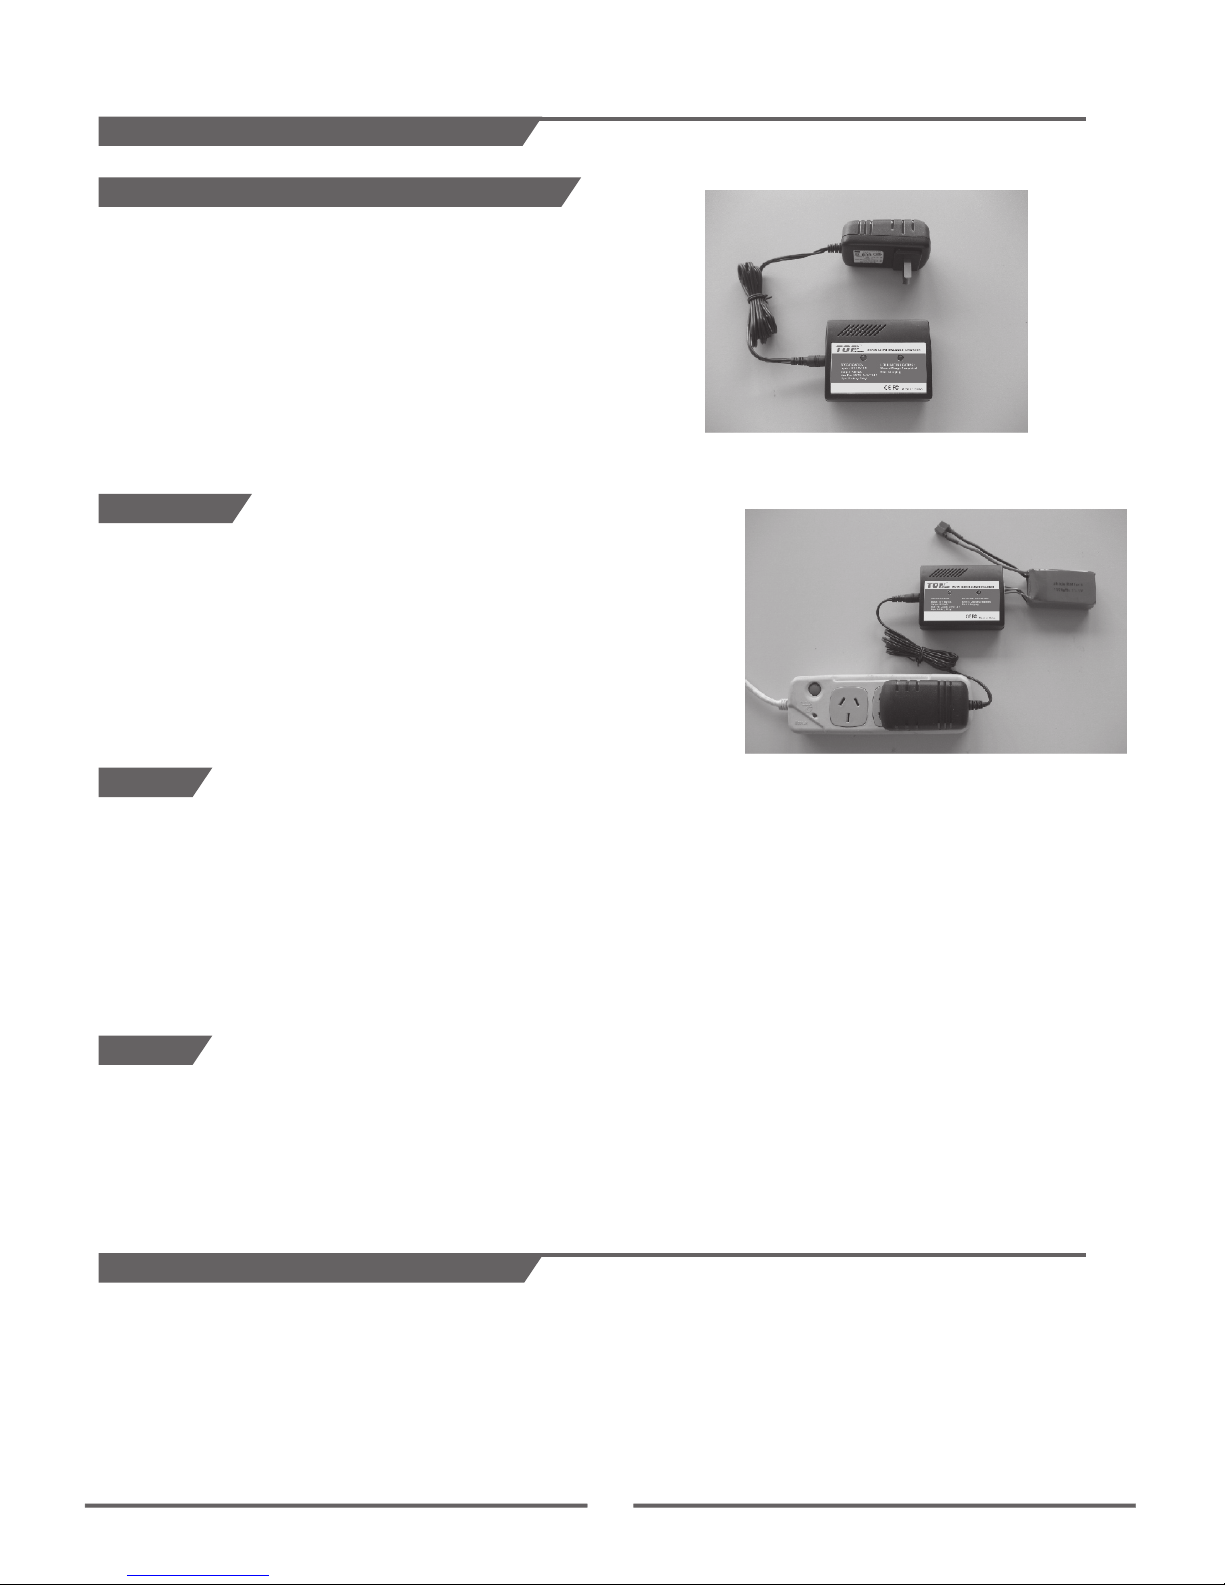
Operating
Then plug cigarette into its socket in car (Adapter should be
connected if charge at home: connect the adapter to home power
socket, then plug the adapter' DC end to charger). The LED will turn
green indicating it is ready for charging.
2.Connect the battery to charger per its interface mark. The LED becomes
red, which means charging is on the way.
3.When LED flashing, the charger will enter the stage of drip current
charging. The LED turns green when fully charged , and the battery
will be used at any time.
1.
Notice
1. While charging is in process, please do not make it near flammable materials.
2.Expect Li poly battery, this charger is not allowed for other kinds of battery.
3. While charging, please keep it out of the reach of Children.
4. When this charger is in use, please do not go away and leave it unwatched, if any abnormality occurs
(such as the power indicator is off, the temperature of the battery rise rapidly, etc. ) stop charging immediately.
5. Please do not use power with output voltage higher than 15V.
6. Please do not disassemble the charger or its accessories.
7. When the battery is not cool down, please do not urge to charge it.
Notice
1.Be fully charged under no more than 1 A voltage by using the specified charger.
2.Be discharged under 10C voltage but avoiding discharge time too long to harm the battery.
3.Repeat the first and second step one or two times.
4.When the Li-poly battery was stored more than 3 months, it needs to be recharged to maintain its voltage,
and ensure its life time.
Specifications:
Input voltage: DC 10V~15V
Output voltage:2S-3S Li-Po battery
Charging current: 1.0A
Indicator state:
Green: Charge complete & no battery
Red: Charging
The batteries are inspected separately. When the voltage
reaches 4.20V, the charging process stops.
Charging method and cautions
Li-Po battery(balance changer) specifications
Safety Instruction of Li-Po/Ni-MH battery
1. Do not disassemble or reconstruct the battery.
2. Do not short-circuit the battery.
3. Do not use or leave the battery nearby the fire, stove or heated place (more than 80℃).
4. Do not immerse the battery in water or sea water, do not get it wet.
5. Do not charge the battery under the blazing sunlight.

6. Do not drive a nail into the battery, strike it by hammer or tread it.
7. Do not impact or toss the battery.
8. Do not use the battery with conspicuous damage or deformation.
9. Do not charge a warm battery. Allow it to cool completely before attempting to charge.
10. Do not reverse charge or over discharge the battery.
11. Do not connect the battery to the ordinary charger socket or car cigarette jack.
12. Do not use the battery for unspecified equipment.
13. Do not touch the leaking battery directly, please wash your skin or clothes with
water if they are bedewed by liquid leaking from the battery.
14. Do not mix the Li-Poly battery with other un-chargeable battery in using.
15. Do not continue charging the battery over the prescribed time.
16. Do not put the battery into the microwave oven or high-pressure container.
17. Do not use the abnormal battery.
18. Do not use or keep the battery under the sunlight.
19. Do not use the battery nearby the place where generates static electricity (over 64V).
20. Do not charge the battery when the environmental temperature is under 0℃ or over 45℃.
21. If you find the battery leaking, smelling or abnormal, stop using it and return it to the seller.
22. When the battery is charging, please do not make it near the flammable materials!
23. Keep the battery away from the children.
24. Use the specified charger and observe charging requirement (under 1A).
25. When using by minors, parents should show them to the correct instruction.
1. The function of this ESC was in the best condition after factory setting; please do not change it by yourself.
2. Before connecting the battery, please make sure the throttle and trim were in the lowest position. If the
throttle and trim were not in the lowest position by mistake after connecting the battery, you can cut off the
battery; move the throttle and push to the lowest position, then connect the battery.
3. The ESC of the airplane was in a good cooling position after factory assembly; please do not move its position.
4. The ESC should be connected to the brushless motor correctly, otherwise the motor will be reversed turning,
and the model airplane can not fly correctly.
Notification for ESC
7

No:top00401
Fuselage(blue)
No:top00402
Main wings(blue)
No:top00403
Canopy )(blue)
No: op404t
DST-1200 brushless motor
No:top00404
Tail wings(blue)
No:top00406
spinner
No:top00405
Landing gear
8
No:top00407
Propellor
No:top00408
screws set
No:top00409
foam glue
No:top202
20A Brushless ESC
No:top505
11.1V,1300mah lipo battery
No:top00411
connector wire
No:top00410
LED lights
No:top00412
Fuselage(red)
No:top00413
Main wings(red)
No:top00414
Canopy(red)
No:top00415
Tail wings(red)
Spare parts

Radio Control Model Airplane
CESSNA 400CESSNA 400CESSNA 400
Made in china
www. toprchobby.com
Tel: 0086-(0)755-27559991
Fax: 0086-(0)755-27559990
Shenzhen Top RC Hobby Co.,Ltd
Table of contents
Other Top RC Toy manuals


Popular Toy manuals by other brands


Horizon Hobby
Horizon Hobby UMX Carbon Cub SS instruction manual

HOMCOM
HOMCOM 370-174 Assembly instruction

LGB
LGB Capricorn manual

Carrera
Carrera Evolution 25189 Le Mans Contest Assembly and operating instructions

IMAGINARIUM
IMAGINARIUM Techno Gears Marble Mania Extreme 2.0 instruction manual

Eduard
Eduard B-25G interior quick start guide


