TopDry Contempo Mini User manual
TopDry
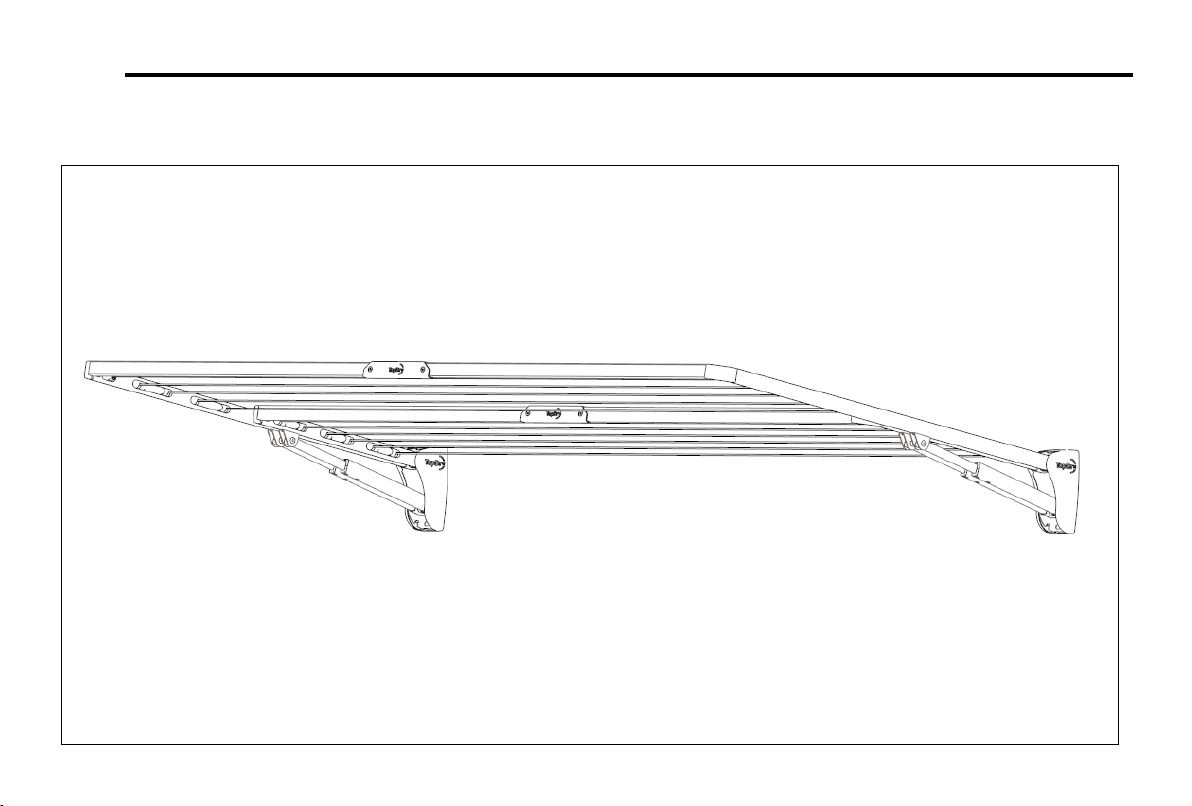
Product Manual Contempo Folding Clothesline Range (Mini, Slim, Long, Double, Single)
IMPORTANT –READ THESE INSTRUCTIONS BEFORE USING YOUR CLOTHESLINE


2
Safety Tips
Only use your clothesline to hang and dry washing.
Remember the clothesline is not a children’s toy
Don’t use your clothesline if it is damaged
Note the following for future reference
Product Name
Date of purchase:
Place of purchase:
Introduction
3
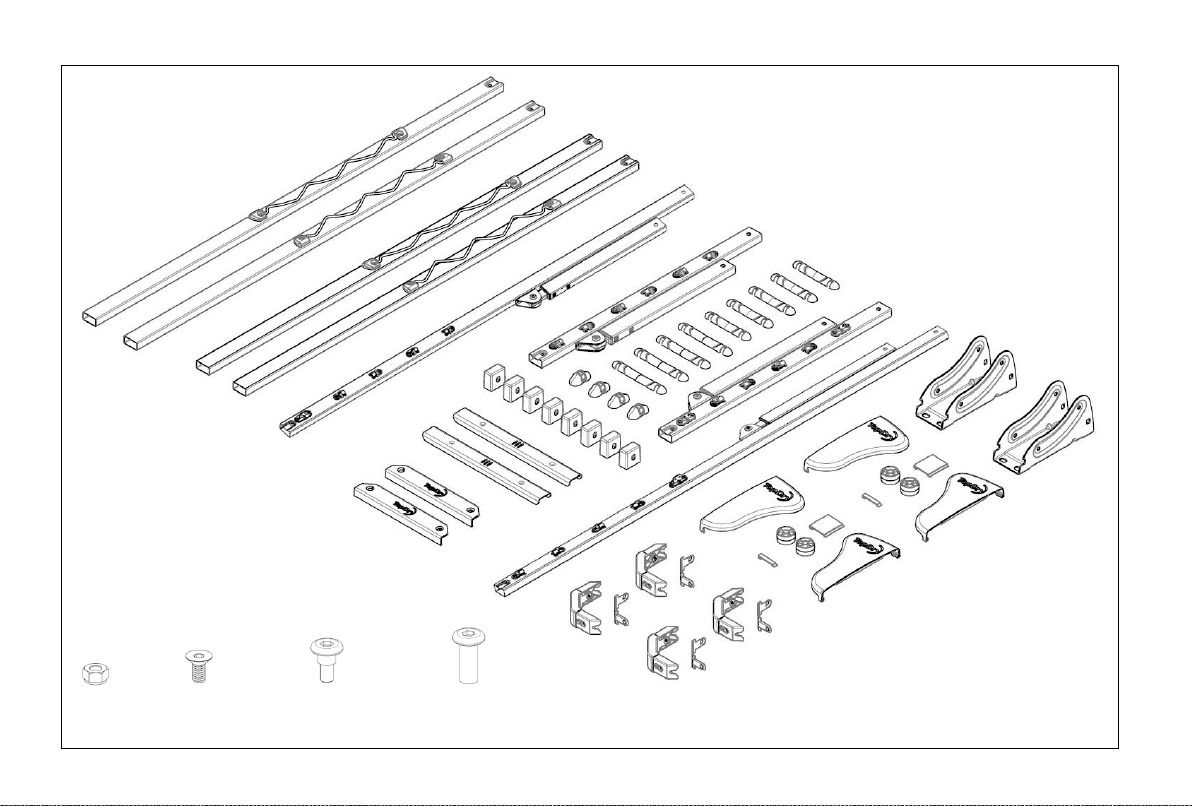
Package Contents of the Top Dry Contempo Double Folding 11 line
1
3
5
6
23
22
20
21
19
7
8
17
9
13
14
12
10
11
16
15
27
26
24
25
18
2
4

4
Package Contents of the Top Dry Contempo Double Folding 11 line
Item
Description
Qty
Item
Description
Qty
1
Front Bar Outer Left Hand
1
16
Corner Inner Cover
4
2
Front Bar Outer Right Hand
1
17
Line Hook Cover - Long
4
3
Front Bar Inner Left Hand
1
18
Line Hook Cover - Short
5
4
Front Bar Inner Right Hand
1
19
Tensioner Cover
4
5
Arm Outer Left Hand
1
20
Arm End Cap
4
6
Arm Outer Right Hand
1
21
Strut End Cap
4
7
Arm Inner Left Hand
1
22
Front Bar Joiner
2
8
Arm Inner Right Hand
1
23
Front Bar Handle
2
9
Wall Bracket
2
24
Chicago Bolt - Male
4
10
Wall Bracket Cover Left Hand
2
25
Chicago Bolt - Female
4
11
Wall Bracket Cover Right Hand
2
26
M6 x 16mm Countersunk Socket Screw
12
12
Wall Bracket Cover Insert Upper
2
27
M6 Nut
8
13
Wall Bracket Cover Insert Lower
2
28
Line
2
14
Arm Spacer
8
29
5mm Hex Key
2
15
Corner
4
30
4mm Hex Key
1
5
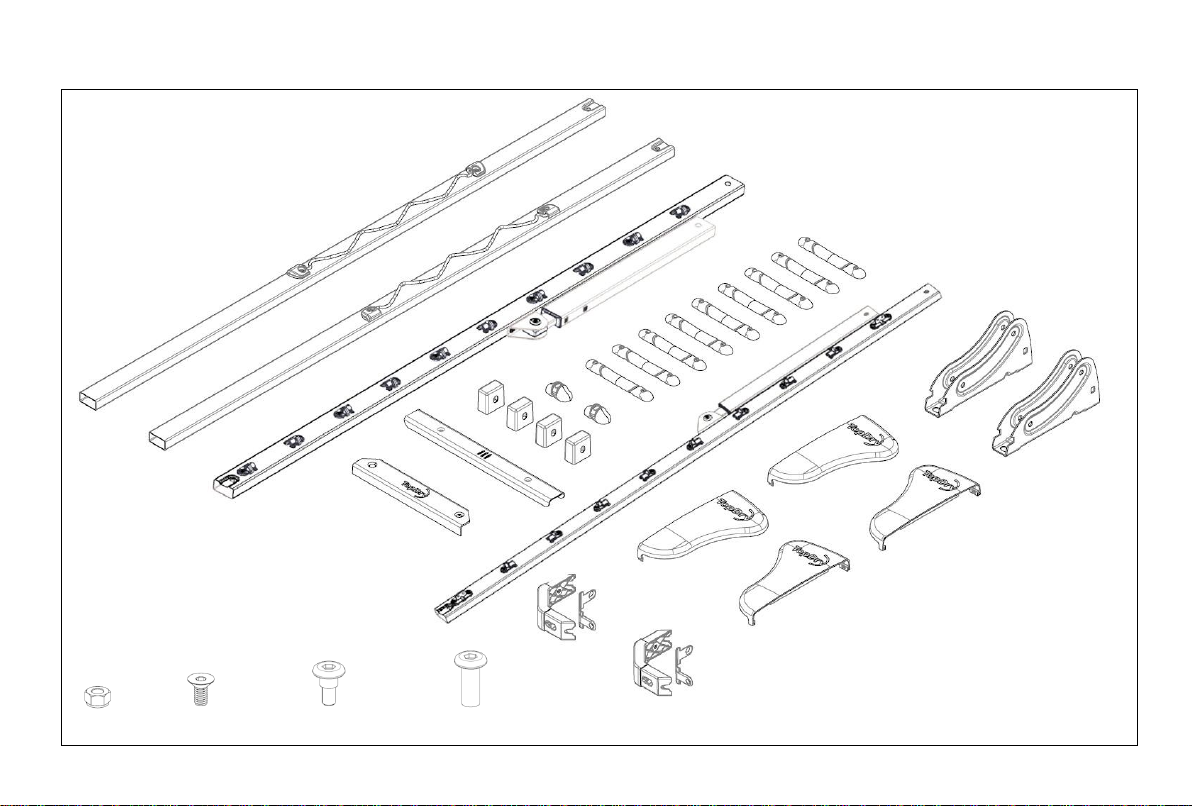
Package Contents of the Top Dry Contempo Single Folding 10 line
1
3
4
5
6
7
9
7
8
19
18
16
17
15
14
12
11
10
13
2

6
Package Contents of the Top Dry Contempo Single Folding 10 line
Item
Description
Qty
Item
Description
Qty
1
Front Bar Left Hand
1
12
Arm End Cap
2
2
Front Bar Right Hand
1
13
Strut End Cap
2
3
Arm Left Hand
1
14
Front Bar Joiner
1
4
Arm Right Hand
1
15
Front Bar Handle
1
5
Wall Bracket
2
16
Chicago Bolt - Male
4
6
Wall Bracket Cover Left Hand
2
17
Chicago Bolt - Female
4
7
Wall Bracket Cover Right Hand
2
18
M6 x 16mm Countersunk Socket Screw
6
8
Corner
2
19
M6 Nut
4
9
Corner Inner Cover
2
20
Line
1
10
Line Hook Cover
9
21
5mm Hex Key
2
11
Tensioner Cover
2
22
4mm Hex Key
1
7
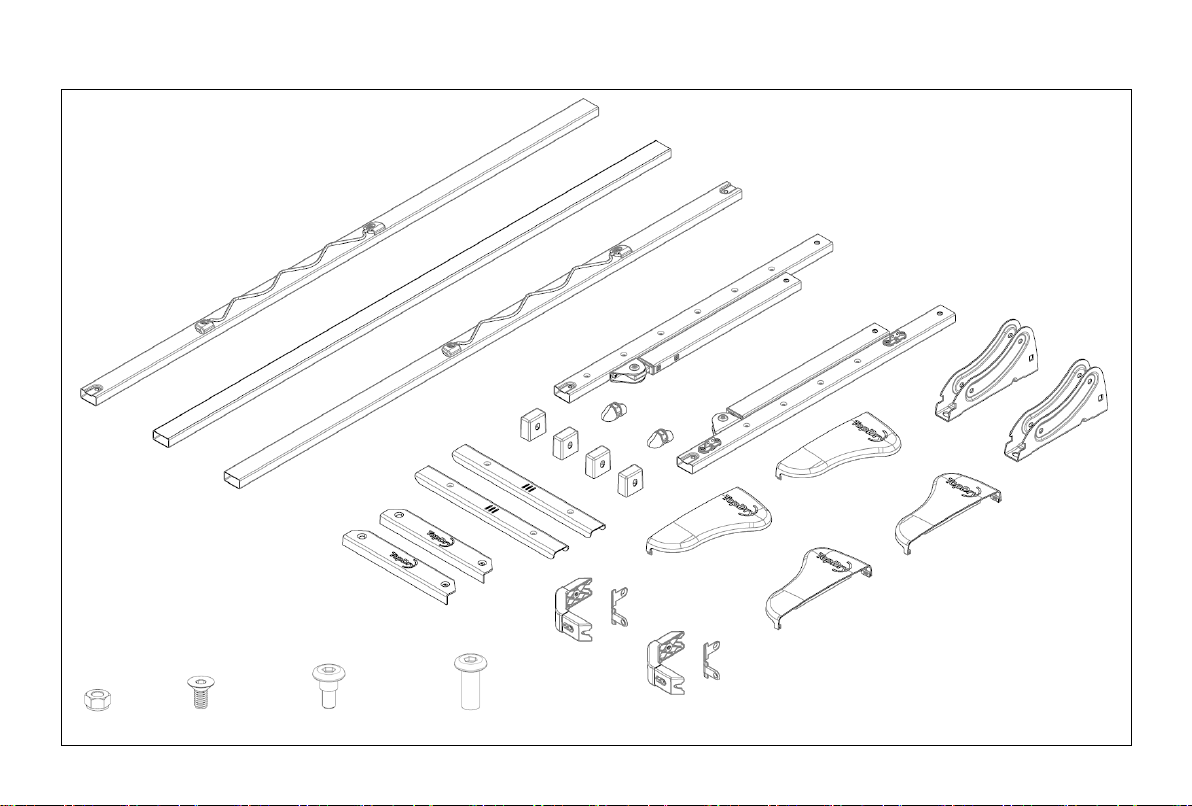
Package Contents of the Top Dry Contempo Long Folding 6 line
3
2
1
15
14
12
4
5
11
13
7
8
6
10
9
17
16
18
19

8
Package Contents of the Top Dry Contempo Long Folding 6 line
Item
Description
Qty
Item
Description
Qty
1
Front Bar End Left Hand
1
12
Arm End Cap
2
2
Front Bar End Right Hand
1
13
Strut End Cap
2
3
Front Bar Centre
1
14
Front Bar Joiner
2
4
Arm Left Hand
1
15
Front Bar Handle
2
5
Arm Right Hand
1
16
Chicago Bolt - Male
4
6
Wall Bracket
2
17
Chicago Bolt - Female
4
7
Wall Bracket Cover Left Hand
2
18
M6 x 16mm Countersunk Socket Screw
8
8
Wall Bracket Cover Right Hand
2
19
M6 Nut
4
9
Corner
2
20
Line
1
10
Corner Inner Cover
2
21
5mm Hex Key
2
11
Tensioner Cover
2
22
4mm Hex Key
1

9
Package Contents of the Top Dry Contempo Slim Folding 6 line
2
1
14
13
11
12
10
3
4
5
7
6
9
8
16
15
17
18

10
Package Contents of the Top Dry Contempo Slim Folding 6 line
Item
Description
Qty
Item
Description
Qty
1
Front Bar Left Hand
1
12
Strut End Cap
2
2
Front Bar Right Hand
1
13
Front Bar Joiner
1
3
Arm Left Hand
1
14
Front Bar Handle
1
4
Arm Right Hand
1
15
Chicago Bolt - Male
4
5
Wall Bracket
2
16
Chicago Bolt - Female
4
6
Wall Bracket Cover Left Hand
2
17
M6 x 16mm Countersunk Socket Screw
6
7
Wall Bracket Cover Right Hand
2
18
M6 Nut
4
8
Corner
2
19
Line
1
9
Corner Inner Cover
2
20
5mm Hex Key
2
10
Tensioner Cover
2
21
4mm Hex Key
1
11
Arm End Cap
2
11
Package Contents of the Top Dry Contempo Mini Folding 6 line
1
7
8
10
11
5
6
9
2
3
4
12
14
13
16
15
17

12
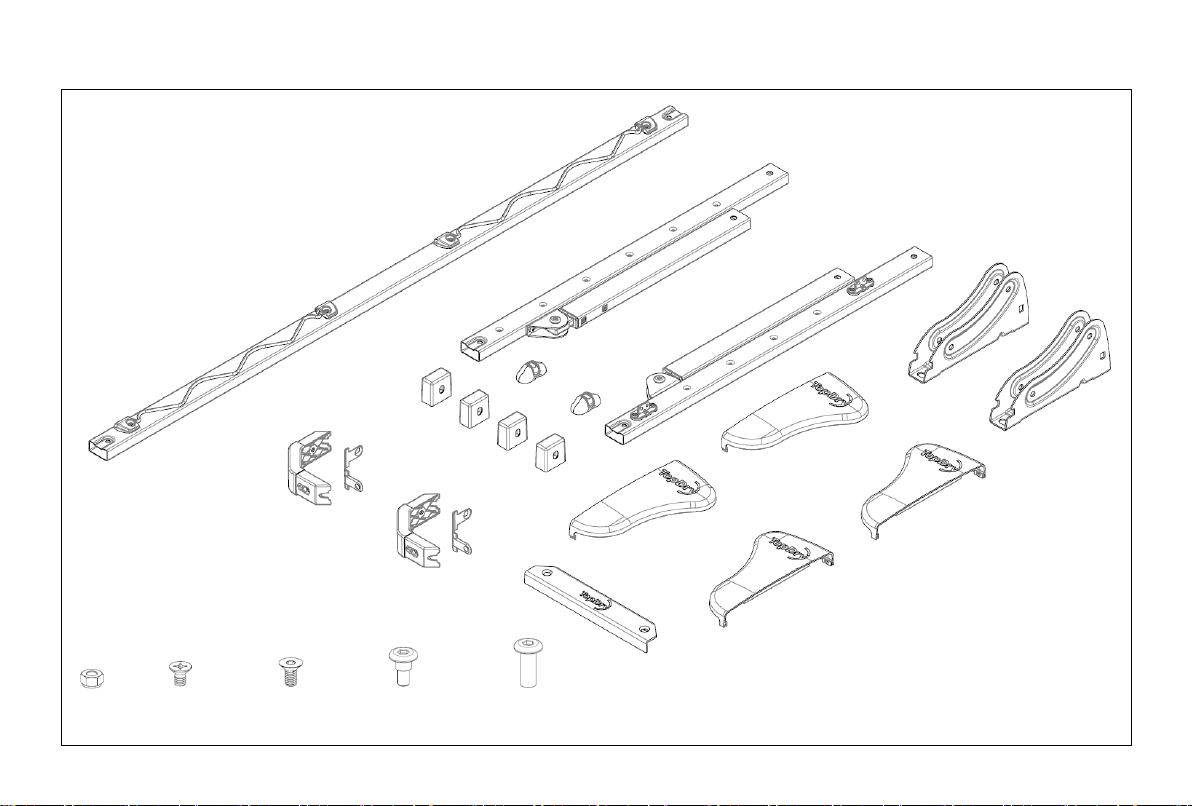
Package Contents of the Top Dry Contempo Mini Folding 6 line
Item
Description
Qty
Item
Description
Qty
1
Front Bar
1
11
Strut End Cap
2
2
Arm Left Hand
1
12
Front Bar Handle
1
3
Arm Right Hand
1
13
Chicago Bolt - Male
4
4
Wall Bracket
2
14
Chicago Bolt - Female
4
5
Wall Bracket Cover Left Hand
2
15
M6 x 10mm Countersunk Cross Head Screw
2
6
Wall Bracket Cover Right Hand
2
16
M6 x 16mm Countersunk Socket Screw
4
7
Corner
2
17
M6 Nut
4
8
Corner Inner Cover
2
18
Line
1
9
Tensioner Cover
2
19
5mm Hex Key
2
10
Arm End Cap
2
20
4mm Hex Key
1

13
1. Choose the Installation Location
Attach the Wall Brackets to the wall positioned so that the top of the bracket is 50mm below the user’s height.
Leave clearance around the clothesline. We recommend 300mm on either side and 500mm above. For Double and Single Clotheslines
ensure that the top of the wall brackets are at least 1.3m above the ground so that there is space for the arms to fold down for storage.
Note: Double, Single and Slim clotheslines can be installed on a Post Kit that is available separately.
Users head height
50mm

14
2. Mount the Wall Brackets
To securely attach the wall brackets to a brick wall ensure that you only drill into brick. Do not drill into the gaps-between bricks. Make sure
the wall is of a solid construction.
Measure out the dimensions and use the wall brackets as a guide to check that your hole positions are correct before drilling. Use fasteners
suitable for the wall.
Note: Only use the outer holes for the Double Wall Bracket. Do not use the inner holes.

15
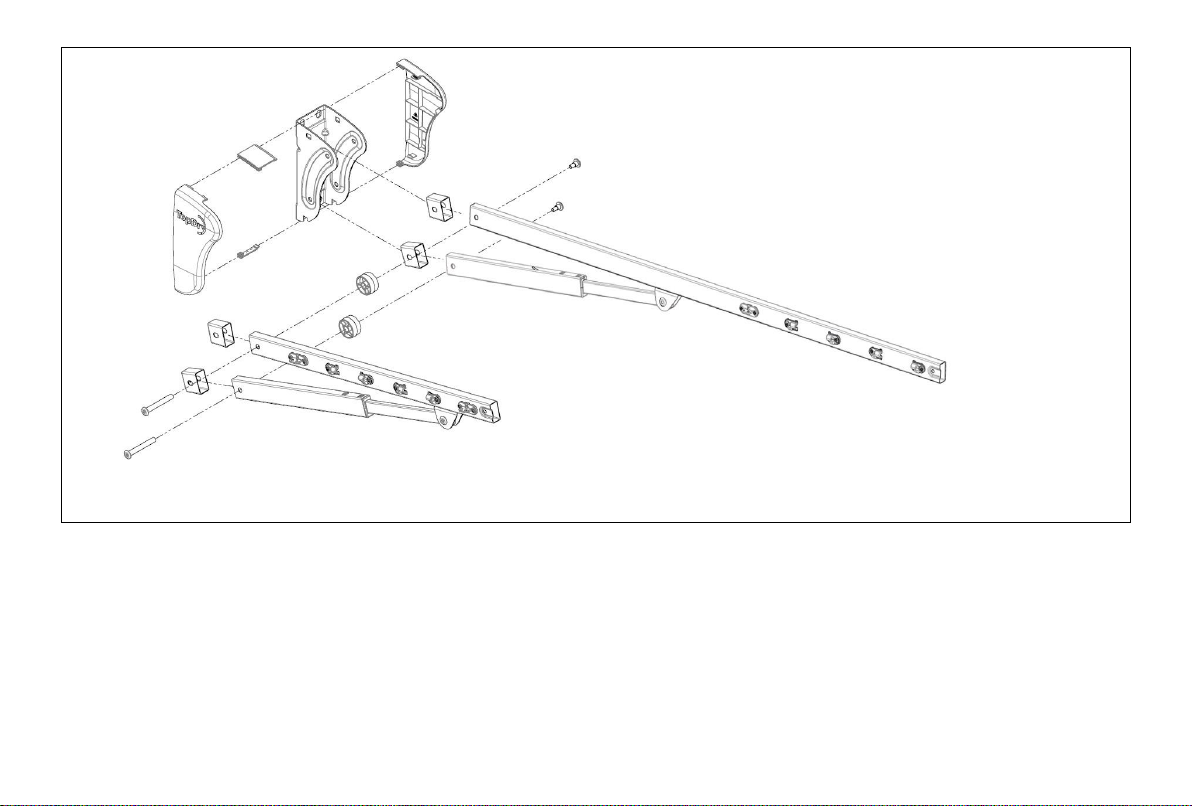
3. Install the Arms
1. Fit the End Caps over the Arms and Struts
2. Align the holes in the arms with the upper holes in the bracket
3. Push through the long bolt, positioning the two round spaces between outer and inner arms.
4. Secure with the short bolt.
5. Repeat for the strut in the lower holes of the bracket
6. Clip on one cover
7. Clip on the upper and lower cover inserts
8. Clip on the final outer cover.
9. Repeat for the other side
Note: The instructions and images are for the TOPDRY Double folding frame. The TOPDRY Single, Slim, Mini and Long Folding Frames do not
have the inner arms, round spacers or cover inserts.

16
Left hand side
17
Right hand side
18
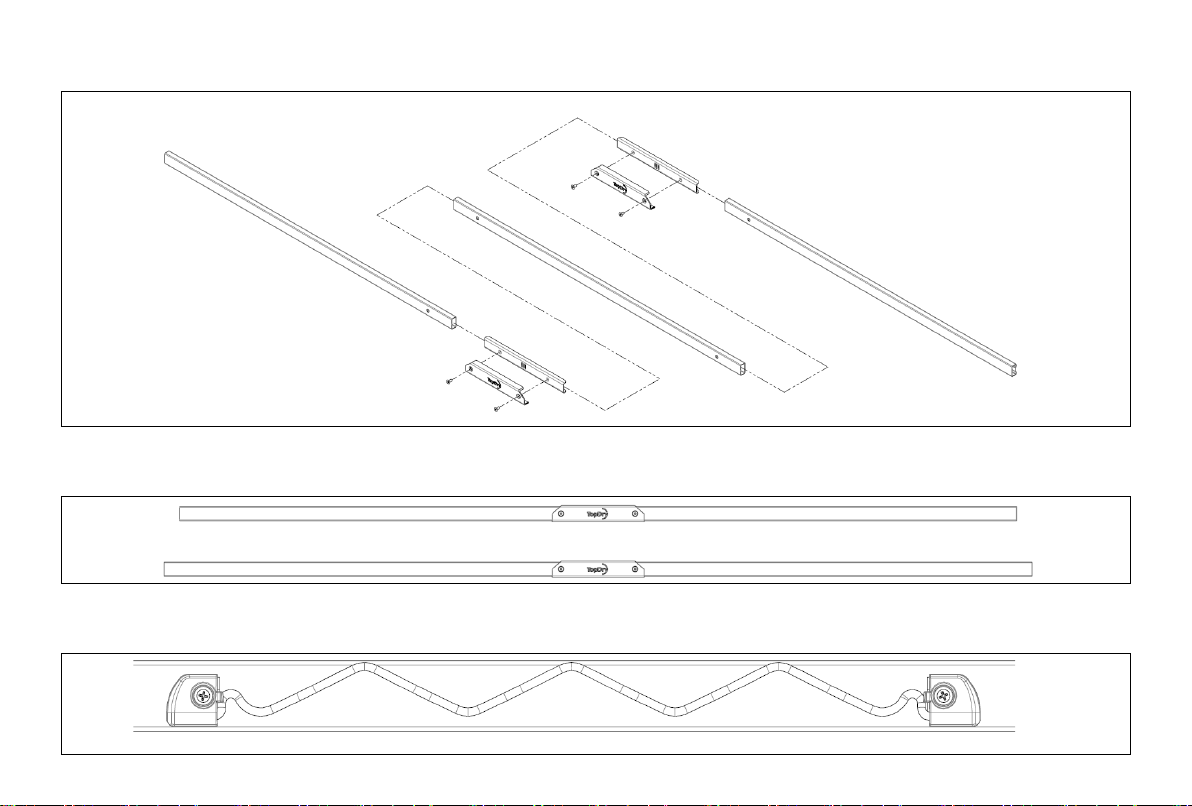
Front Bar Configurations
The TOPDRY Long Folding frame has Front Bar made with two End Bars and one Centre Bar assembled with joiners and handles as shown.
The TOPDRY Double Folding frame has two Front Bars, an inner and an outer. The Inner Bar is made from two shorter pieces and one
Joiner, the Outer Bar from two longer pieces and one Joiner.
The TOPDRY Folding frame clotheslines have coat hanger racks on the inside faces of the Front Bars. To enable the racks to operate
correctly orient the bars as shown.
UP ˄

19
4. Assemble the Front Bar
1. Using a rubber mallet/hammer tap the Joiner into one of the Front Bar pieces. Continue tapping until the centre slot in the Joiner
aligns with the end of the Front Bar and check that the hole in the Front Bar lines up with the screw thread in the Joiner. If you’ve
tapped it too far use a flat bladed screwdriver to carefully lever the Joiner out of the Front Bar. Take care to not damage the painted
finish.
2. Assemble the Handle to the Bar and Joiner with one screw. This will keep the Joiner in position while you insert the other Bar.
3. Use the rubber mallet/hammer to gently tap the second Front Bar piece into position. Stop when it is flush with the first Bar.
4. Insert the second screw and tighten.
Note: TOPDRY Long Folding Frame - repeat this process for the second joiner.
TOPDRY Mini Folding Frame - a joiner is not needed. Use the screws supplied to assemble the Handle to the Front Bar.
Step 1
Step 2
This manual suits for next models
4
Table of contents
Other TopDry Dryer manuals

Popular Dryer manuals by other brands

Alliance Laundry Systems
Alliance Laundry Systems 120 Installation & operation manual

Frigidaire
Frigidaire Affinity FAQG7001L B Specifications

GE
GE Profile DPGT650GH Dimensions and installation information

Electrolux
Electrolux TW L4 E user manual

Whirlpool
Whirlpool 7MWED1800EM Use and care guide

Pkm
Pkm WT6-15C instruction manual


GE
GE DCCH480EK Dimensions and installation information

Whirlpool
Whirlpool WED5900SB parts list

Bosch
Bosch WTWH75S9SN Installation and operating instructions

Hotpoint
Hotpoint FETC 70C Instruction booklet

Whirlpool
Whirlpool CGM2941TQ installation instructions

Alliance Laundry Systems
Alliance Laundry Systems DRY684C Installation & operation