Toro ProCore User manual

FormNo.3397-398RevA
ProCore®Processor
ModelNo.09749—SerialNo.315000001andUp
Registeratwww.Toro.com.
OriginalInstructions(EN)*3397-398*A

ThisproductcomplieswithallrelevantEuropeandirectives.
Fordetails,pleaseseetheDeclarationofIncorporation(DOI)
atthebackofthispublication.
ThissparkignitionsystemcomplieswithCanadianICES-002.
Introduction
Thismachineisintendedtobeusedbyprofessional,hired
operatorsincommercialapplications.Theprimaryfunction
ofthemachineistosweep,process,anddisperseaeration
coresinoneoperation.
Readthisinformationcarefullytolearnhowtooperateand
maintainyourproductproperlyandtoavoidinjuryand
productdamage.Youareresponsibleforoperatingthe
productproperlyandsafely.
YoumaycontactTorodirectlyatwww.Toro.comforproduct
andaccessoryinformation,helpndinganAuthorizedToro
Dealer,ortoregisteryourproduct.
Wheneveryouneedservice,genuineToroparts,oradditional
information,contactanAuthorizedServiceDealerorToro
CustomerServiceandhavethemodelandserialnumbersof
yourproductready.Figure1identiesthelocationofthe
modelandserialnumbersontheproduct.Writethenumbers
inthespaceprovided.
Figure1
1.Modelandserialnumberlocation
ModelNo.
SerialNo.
Thismanualidentiespotentialhazardsandhassafety
messagesidentiedbythesafety-alertsymbol(Figure2),
whichsignalsahazardthatmaycauseseriousinjuryordeath
ifyoudonotfollowtherecommendedprecautions.
Figure2
1.Safety-alertsymbol
Thismanualuses2wordstohighlightinformation.
Importantcallsattentiontospecialmechanicalinformation
andNoteemphasizesgeneralinformationworthyofspecial
attention.
©2015—TheToro®Company
8111LyndaleAvenueSouth
Bloomington,MN554202
Contactusatwww.Toro.com.
PrintedintheUSA
AllRightsReserved

Contents
Safety...........................................................................4
Training.................................................................4
SafeHandlingofFuels.............................................4
WhileOperating......................................................4
Maintenance...........................................................5
Hauling..................................................................5
SafetyandInstructionalDecals.................................6
Setup...........................................................................10
1Removing,Activating,andChargingthe
Battery..............................................................11
2InstallingtheBattery............................................12
3MountingtheJackStand.......................................12
4PositioningtheStoragePins..................................14
5MountingtheCoreProcessorforOne-Pass
Operation..........................................................14
6DisconnectingtheCoreProcessorfromtheTow
Vehicle..............................................................16
7MountingtheCoreProcessortotheWorkman
Vehicle..............................................................16
8DisconnectingtheCoreProcessorfromthe
WorkmanVehicle...............................................18
9AdjustingtheBrushHeight..................................18
10LevelingtheCoreProcessor.................................19
ProductOverview.........................................................20
Controls...............................................................20
Specications........................................................21
SpecialInstructionsforWorkmanandotherutility
towvehicles(tractors)..........................................21
Attachments/Accessories........................................21
Operation....................................................................22
AddingFuel...........................................................22
CheckingtheEngine-OilLevel.................................23
HydraulicFluid......................................................23
AdjustingtheBrushHeight.....................................23
LevelingtheCoreProcessor.....................................24
AdjustingtheBrushHeightintheField.....................26
AdjustingtheRollerScraper.....................................26
CheckingtheTirePressure......................................26
CheckingtheTorqueoftheWheelNuts.....................26
StartingtheMachine...............................................27
StoppingtheMachine.............................................27
OperatingtheCoreProcessor..................................27
OnePassOperation................................................27
TowHitchOperation..............................................27
OperatingTips.......................................................27
WhileOperating....................................................28
Transporting..........................................................28
SoilMoisture.........................................................28
SoilMoistureChart.................................................29
InspectingandCleaningtheBrush/Chopper
Housing............................................................29
InspectingandCleaningtheMachineafter
Operation..........................................................29
InspectingtheChopperTips....................................30
OperatingtheMachineatHighAltitude.....................31
Maintenance.................................................................32
RecommendedMaintenanceSchedule(s)......................32
DailyMaintenanceChecklist....................................33
PremaintenanceProcedures........................................33
Lubrication...............................................................34
GreasingtheBearingsandBushings..........................34
EngineMaintenance..................................................35
ServicingtheAirCleaner.........................................35
ServicingtheEngineOil..........................................36
ServicingtheSparkPlugs.........................................38
FuelSystemMaintenance...........................................39
ReplacingtheFuelFilter..........................................39
ServicingtheFuelTank...........................................39
ElectricalSystemMaintenance....................................40
ServicingtheBattery...............................................40
CoolingSystemMaintenance......................................41
CleaningtheEngineScreenandtheOil
Cooler...............................................................41
CleaningtheEngine................................................41
BeltMaintenance......................................................41
AdjustingtheBelts.................................................41
HydraulicSystemMaintenance....................................44
CheckingtheHydraulicLinesandHoses....................44
Storage........................................................................45
3

Safety
Improperuseormaintenancebytheoperatororowner
canresultininjury.Toreducethepotentialforinjury,
complywiththesesafetyinstructionsandthoseinthe
tractionunit
Operator's Man ual
.Alwayspayattentionto
thesafetyalertsymbol,whichmeans
Caution
,
W ar ning
,
or
Danger
—personalsafetyinstruction.Failureto
complywiththeinstructionmayresultinpersonalinjury
ordeath.
Toensureoptimumperformanceandcontinuedsafety
certicationofthemachine,useonlygenuineToro
replacementpartsandaccessories.Replacementpartsand
accessoriesmadebyothermanufacturerscouldbedangerous,
andsuchusecouldvoidtheproductwarranty.
Training
•ReadtheOperator’sManualandothertrainingmaterial
carefully.Befamiliarwiththecontrols,safetysigns,and
properuseofequipment.
•Neverallowchildrenorpeopleunfamiliarwiththese
instructionstouseorservicethemachine.Local
regulationsmayrestricttheageoftheoperator.
•Knowhowtostoptheenginequickly.
•Keepallshields,safetydevices,anddecalsinplace.Ifa
shield,safetydevice,ordecalbecomesdamaged,illegible,
orismalfunctioning,repairorreplaceitbeforeoperation
iscommenced.Also,tightenloosenutsandboltsto
ensurethatthemachineisinsafeoperatingcondition.
•Whileoperatingthemachine,alwayswearsubstantial,
slip-resistantfootwear,longtrousers,hardhat,safety
glasses,andearprotection.Longhair,looseclothing,or
jewelrymaygettangledinmovingparts.Donotoperate
theequipmentwhenbarefootorwearingopensandals.
•Wearsafetyglasses,safetyshoes,longpants,andahelmet.
Itisrequiredbysomelocalordinancesandinsurance
regulations.
•Donotalterthisequipmentinanymannerwhichmay
causehazardousconditions.
SafeHandlingofFuels
•Toavoidpersonalinjuryorpropertydamage,useextreme
carewhenhandlinggasoline.Gasolineisextremely
ammableandthevaporsareexplosive.
•Extinguishallcigarettes,cigars,pipes,andothersources
ofignition.
•Onlyuseanapprovedfuelcontainer.
•Neverremovefuelcaporaddfuelwiththeengine
running.
•Allowenginetocoolbeforerefueling.
•Neverrefuelthemachineindoors.
•Neverstorethemachineorfuelcontainerwherethereis
anopename,spark,orpilotlightsuchasonawater
heateroronotherappliances.
•Neverllcontainersinsideavehicleoronatruckor
trailerbedwithaplasticliner.Alwaysplacecontainerson
thegroundawayfromyourvehiclebeforelling.
•Removeequipmentfromthetruckortrailerandrefuelit
ontheground.Ifthisisnotpossible,thenrefuelsuch
equipmentwithaportablecontainer,ratherthanfroma
fuel-dispensernozzle.
•Keepthenozzleincontactwiththerimofthefueltank
orcontaineropeningatalltimesuntilfuelingiscomplete.
Donotuseanozzlelockopendevice.
•Iffuelisspilledonclothing,changeclothingimmediately.
•Neveroverllfueltank.Replacethefuelcapandtighten
securely.
WhileOperating
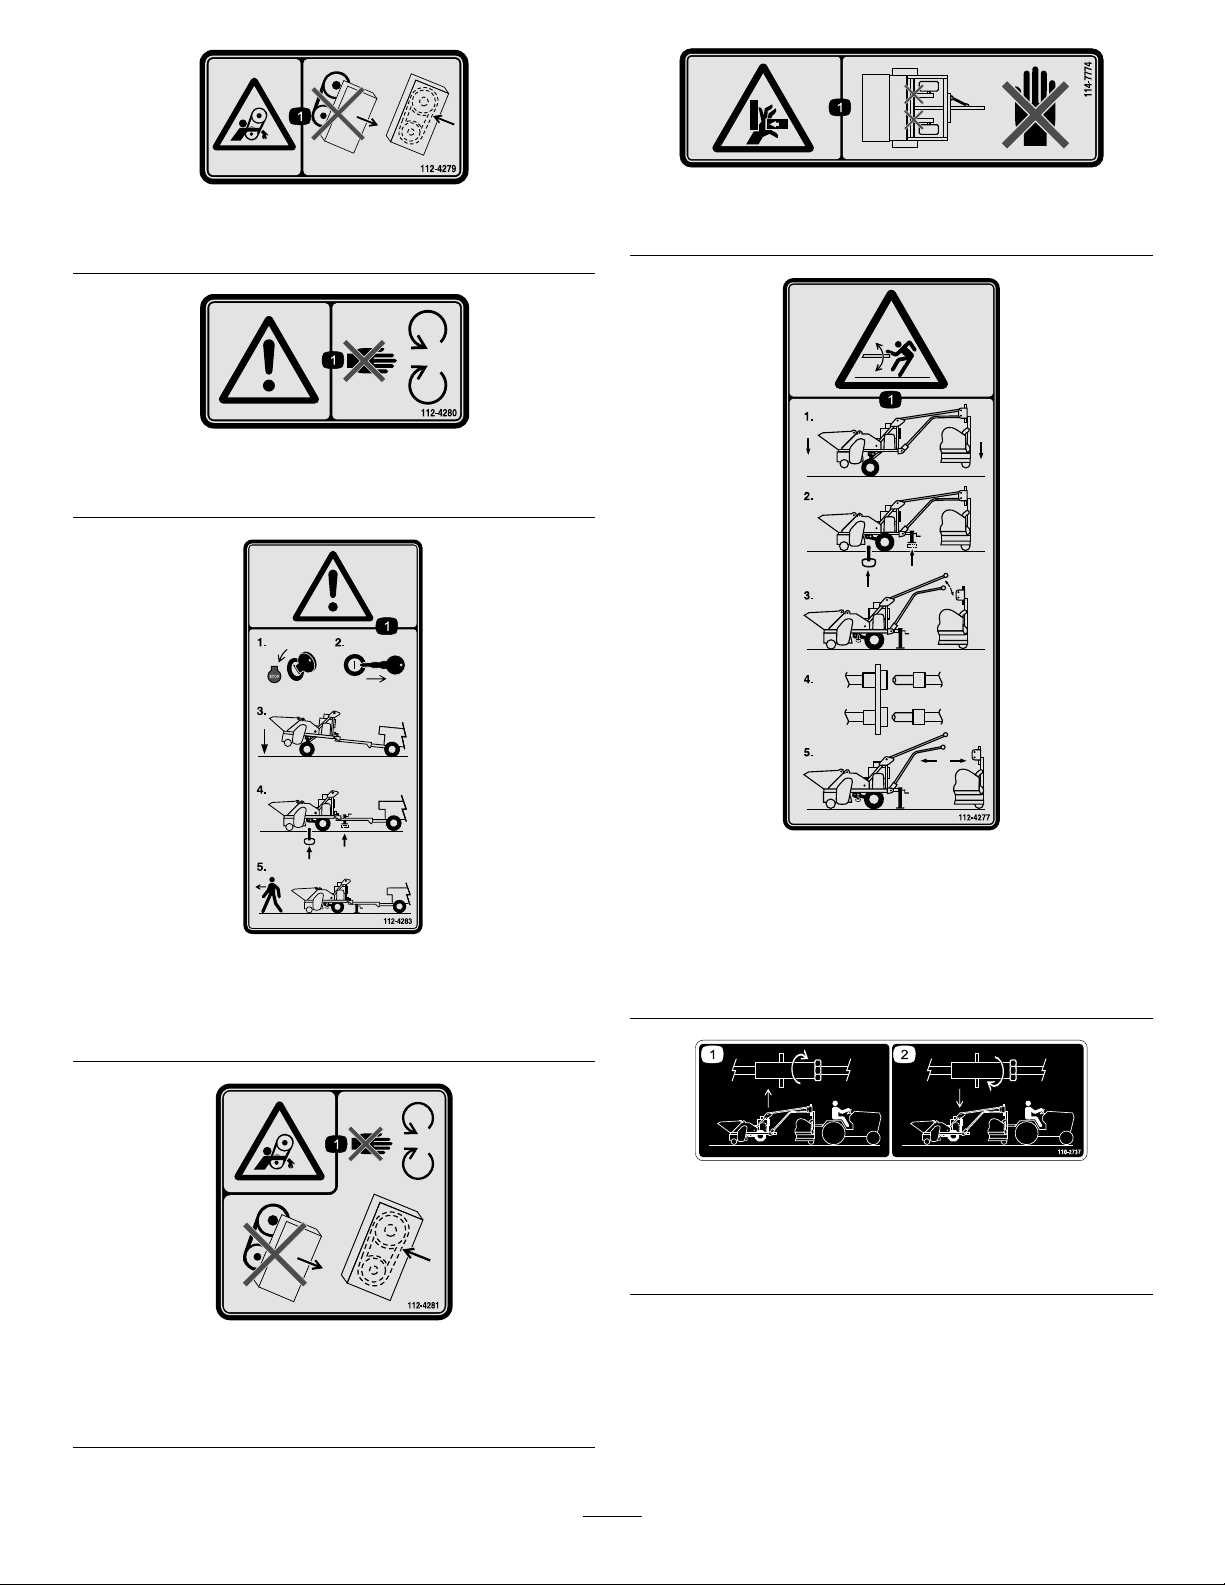
•Rotatingpartscancauseseriouspersonalinjury.Keep
hands,feet,hair,andclothingawayfromallmovingparts
topreventinjury.Neveroperatethemachinewithcovers,
shrouds,orguardsremoved.
•Neveroperatethemachinewhileundertheinuenceof
drugsoralcohol.
•Stopthecoreprocessorwhenapersonorpetcomesinto
operatingarea.Carelessoperation,combinedwithterrain
angles,ricochets,ormissingordamagedguards,canlead
tothrownobjectinjuries.Donotresumeoperationuntil
areaiscleared.
•Nevercarrypassengers.
•Ifthetowvehicleenginestallsorthemachineloses
headwayandcannotmakeittothetopofaslope,donot
turnmachinearound.Alwaysbackslowlystraightdown
theslope
•Topreventlossofcontrol,dothefollowing:
–Operateonlyindaylightorwhenthereisgood
articiallight.
–Driveslowly.
–Watchforholesintheterrainorotherhazards.
–Usecarewhenbackingmachine.
–Donotdriveclosetoasandtrap,ditch,creek,drop
off,orotherhazards.
–Reducespeedwhenmakingsharpturns.Avoid
suddenstopsandstarts.
–Avoidturningthecoreprocessoronahillsideor
embankment.
–Donotgofromreversetoforwardnorforwardto
reversewithoutcomingtoacompletestoprst.
–Whennearorcrossingroads,alwaysyieldthe
right-of-way.
•Donotoperatethismachineunlessyouareskilledinand
trainedonhowtodriveonhillsides.Failuretousecaution
4

onslopesorhillsmaycauselossofcontrol,possibly
resultinginpersonalinjuryordeath.
•Donotruntheengineinaconnedareawithout
adequateventilation.Exhaustfumesarehazardousand
couldpossiblybedeadly.
•Lightningcancausesevereinjuryordeath.Iflightning
isseenorthunderisheardinthearea,donotoperate
themachine;seekshelter.
•WhenusingaWorkmanasatowvehicle,itis
recommendedtoput227kg(500lb)ofweightintothe
vehiclebedwhenoperatingonanyslopes.
Maintenance
•Parkmachineonlevelground.Neverallowuntrained
personneltoservicethemachine.
•Usejackstandstosupportcomponentswhenrequired.
Performingmaintenanceonamachinenotproperly
supportedmaycausethemachinetofallandcouldcause
injury.
•Carefullyreleasepressurefromcomponentswithstored
energy.
•Disconnectbatteryorremovespark-plugwiresbefore
makinganyrepairs.Disconnectthenegativeterminal
rstandthepositivelast.Reconnectpositiverstand
negativelast.
•Removethekeyfromtheignitionswitchtoprevent
accidentalstartingoftheenginewhenservicing,adjusting,
orstoringthemachine.
•Toreduceapotentialrehazard,keeptheenginefreeof
excessivegrease,grass,leaves,andaccumulationsofdirt.
Neverwashawarmengineoranyelectricalpartswith
water.
•Besurethatthemachineisinsafeoperatingconditionby
keepingnuts,bolts,andscrewstight.Checkthechopper
shaftbearingmountingboltsandnutsfrequentlytobe
surethattheyaretightenedtospecication.
•Iftheenginemustberunningtoperformamaintenance
adjustment,keephands,feet,clothing,andotherpartsof
thebodyawayfromthechopperandothermovingparts.
•Donotoverspeedtheenginebychangingthegovernor
settings.Tobesureofsafetyandaccuracy,haveyour
ToroDistributorcheckthemaximumenginespeedwitha
tachometer.
•Theenginemustbeshutoffbeforecheckingtheoilor
addingoiltothecrankcase.
•Keephandsandfeetawayfrommovingparts.Ifpossible,
donotmakeadjustmentswiththeenginerunning.
•Chargebatteriesinanopenwellventilatedarea,away
fromsparkandames.Unplugchargerbeforeconnecting
ordisconnectingfrombattery.Wearprotectiveclothing
anduseinsulatedtools.
•Keepallpartsingoodworkingconditionandallhardware
tightened.Replaceallwornordamageddecals.
•UseonlyToroapprovedattachments.Warrantymaybe
voidedifusedwithunapprovedattachments.
•Hydraulicuidescapingunderpressurecanpenetrate
skinanddoseriousdamage.Keepbodyandhandsaway
frompinholeleaksornozzlesthatejecthighpressure
hydraulicuid.Usecardboardorpapertondhydraulic
leaks.Fluidaccidentallyinjectedintotheskinmustbe
surgicallyremovedwithinafewhoursbyadoctorfamiliar
withthisformofinjuryorgangrenemayresult.
•Performonlythosemaintenanceinstructionsdescribedin
thismanual.Ifmajorrepairsareeverneededorassistance
desired,contactyourToroDistributor.
•Makesurethatallhydrauliclineconnectorsaretight,and
allhydraulichosesandlinesareingoodconditionbefore
applyingpressuretothesystem.
•Toensurethattheoptimumperformanceisbeingmet
andforcontinuedsafetycerticationofthemachine,use
onlygenuineTororeplacementpartsandaccessories.
Replacementpartsandaccessoriesmadebyother
manufacturerscouldbedangerous,andsuchusecould
voidtheproductwarranty.
Hauling
•Usecarewhenloadingorunloadingthemachineintoa
trailerortruck.
•Usefullwidthrampsforloadingmachineintotraileror
truck.
•Tiethemachinedownsecurelyusingstraps,chains,cable,
orropes.Bothfrontandrearstrapsshouldbedirected
downandoutwardfromthemachine.
5

SafetyandInstructionalDecals
Safetydecalsandinstructionsareeasilyvisibletotheoperatorandarelocatednearanyareaofpotential
danger.Replaceanydecalthatisdamagedorlost.
105-4586
1.Entanglementhazard,belt—stayawayfrommovingparts.
Donotoperatethemachinewiththeshieldsorguards
removed;keeptheshieldsandguardsinplace.
112-4272
1.Warning;thrownobjecthazard,bystanders—keep
bystandersawayfromthemachine.
112-4274
1.Warning;thrownobjecthazard,bystanders—keep
bystandersawayfromthemachine.
2.Cuttinghazard,handandfoot—waitformovingpartsto
stop.
110-2701
1.Warning—storedenergyhazard.
2.Todisconnectthemachinelinkedtoanaerator,lower
processorandaeratortotheground,engagethestorage
pininthefrontholeandsupportthemachinewitha
jackstand,disconnectthemechanicallinkagefromthe
aerator,disconnectthehydrauliclines,beforedrivingaway.
3.Todisconnectthemachinelinkedtoatowvehicle,lower
processortotheground,retractthetongue,engagethe
storagepininthefrontholeandsupportthemachinewitha
jackstand,disconnectthemechanicallinkagefromthetow
vehicle,disconnectthehydrauliclines,beforedrivingaway.
112-4275
1.Entanglementhazard,shaft—stayawayfrommovingparts.
6

112-4279
1.Entanglementhazard,belt—keepallguardsinplace.
112-4280
1.Warning—stayawayfrommovingparts.
112-4283
1.Warning—stoptheengine,removethekey,lowerthe
machine,engagethestoragepininthefrontholeanduse
thejackstandbeforeleavingthemachine.
112-4281
1.Entanglementhazard,belt—stayawayfrommovingparts;
donotoperatewithguardsremoved;keepallguardsin
place.
114-7774
1.Crushinghazard,hand—pinchpoint;keephandsaway.
112-4277
1.Storedenergyhazard—todisconnectthemachinelinked
toanaerator,lowerprocessorandaeratortotheground,
engagethestoragepininthefrontholeandsupportthe
machinewithajackstand,disconnectthemechanical
linkagefromtheaerator,disconnectthehydrauliclines,
beforedrivingaway.
110-2737
OnOnePassHitch,Model09753
1.Rotationdirectiontoraise
themachine.
2.Rotationdirectiontolower
themachine.
7

112-4276
1.Warning—readtheOperator'sManual.
2.Warning—donotoperatethismachineunlessyouaretrained.
3.Falling,crushinghazard,bystanders—noridersonmachine.
4.Warning—stayawayfrommovingparts;donotoperatewithguardsremoved,keepallguardsinplace.
5.Warning—keephandsandfeetoutofthesweeperbrush.
6.Warning—keepbystandersawayfromthemachine.
7.Warning—donotexceed24km/h(12mph)whentransportingthemachine.
114-7775
1.Warning—slidingandlossofcontrolhazard.
2.Acoreprocessorlinkedtoanaeratorandbeingtowedhasagrossvehicleweightof907kg(2000lb)andanegativetongue
weightoflessthan45kg(100lb),readthetractorOperator'sManualtochoosethecorrectweightkit.
3.Acoreprocessorlinkedtoanaeratorinoperationhasagrossvehicleweightof907kg(2000lb)andapositivetongueweightof
lessthan226kg(500lb),readthetractorOperator'sManualtochoosethecorrectweightkit.
4.Donotexceed8km/h(5mph)onslopeswhentowingthecoreprocessorlinkedtoanaerator.
5.Acoreprocessorlinkedtoatowvehiclehasagrossvehicleweightof907kg(2000lb)andapositivetongueweightofless
than45kg(100lb),readtheOperator'sManualtochoosethecorrectweightkit.
6.Acoreprocessorlinkedtoatowvehiclehasapositivetongueweightoflessthan182kg(400lb),readthetowvehicleOperator's
Manualtochoosethecorrectweightkit.
7.Donotexceed8km/h(5mph)onslopeswhentowingthecoreprocessorlinkedtodirectlytoavehicle.
8

112-4293
1.Storedenergyhazard—lowerprocessortotheground,releasetensionbymovingthetowvehicleclosertothemachine,engage
thestoragepininthefrontholeandsupportthemachinewithajackstand,disconnectthemechanicallinkagefromtheworkman,
disconnectthehydrauliclines,beforedrivingaway.
115-2999
OnT owHitch,Model09750
1.Crushinghazard,hand—pinchpoint;keephandsaway.
112-4270
1.Checkthebrushhousingevery4hours;readtheOperator's
Manual;raisebrushcoverandcleanthebrushhousing.
112-4292
OnT owHitch,Model09750
1.Warning—readtheOperator'sManual.
2.Movethepinoutofthearmtounlockthetowhitch;move
thepinintothearmtolockthetowhitch;lockthetowhitch
whenevertransportingthemachine.
112-4285
OnT owHitch,Model09750
1.Turnthecrankclockwisetoraisethemachine.
2.Turnthecrankcounterclockwisetolowerthemachine.
9

Setup
LooseParts
Usethechartbelowtoverifythatallpartshavebeenshipped.
ProcedureDescriptionQty.Use
1Electrolyte(notsupplied)A/RChargethebattery.
2Petroleumjelly(notsupplied)A/RInstallthebattery.
Jackstand1
3Jack-standtube1Mountthejackstand.
4Storagepin2Positionthestoragepins.
Hitchpin(includedwiththeone-pass
hitch)1
Lynchpin(includedwiththeone-pass
hitch)1
Hitchpin(includedwiththeone-pass
hitch)2
Lynchpin(includedwiththeone-pass
hitch)2
5
Cabletie5
Mountthecoreprocessortothetow
vehicle.
6Nopartsrequired–Disconnectthecoreprocessorfromthe
towvehicle.
Hitchpin(includedwiththetowhitch)1
Lynchpin(includedwiththetowhitch)1
7Cabletie12
Mountthecoreprocessortothevehicle.
8Nopartsrequired–Disconnectthecoreprocessorfromthe
vehicle.
9Nopartsrequired–Adjustthebrushheight.
10Nopartsrequired–Levelthecoreprocessor.
MediaandAdditionalParts
DescriptionQty.Use
BeltT ensionerT ool1Usetotensionbelts
AllenWrenchandT orqueGauge1Usetoadjustbearings
Operator'sManual1Readpriortooperatingthemachine
EngineOperator'sManual1Useforreferencetoengineoperation
PartsCatalog1Useforreferencetopartnumbers
CerticateofConformity1CEcompliance
OperatorTrainingMaterial1Viewpriortooperatingthemachine
10

Important:RefertoSpecialInstructionsforWorkman
andotherutilitytowvehicles(tractors)(page21)for
specialoperatinginstructionsfortheWorkmanand
otherutilitytowvehicles(tractors).
1
Removing,Activating,and
ChargingtheBattery
Partsneededforthisprocedure:
A/RElectrolyte(notsupplied)
Procedure
1.Ifthebatteryisnotlledwithelectrolyteoractivated,
bulkelectrolytewith1.260specicgravitymustbe
purchasedfromabatterysupplierandaddedtothe
battery.
DANGER
Batteryelectrolytecontainssulfuricacid
whichisadeadlypoisonandcausessevere
burns.
•Donotdrinkelectrolyteandavoidcontact
withskin,eyesorclothing.Wearsafety
glassestoshieldyoureyesandrubber
glovestoprotectyourhands.
•Fillthebatterywherecleanwaterisalways
availableforushingtheskin.
2.Removethestrapsecuringthebatterycovertothe
batterybox(Figure3).
Figure3
1.Batterybox3.Strap
2.Batterycover
3.Removethecoverandliftthebatteryoutofthebattery
box.
4.Cleanthetopofthebatteryandremovetheventcaps
(Figure4).
Figure4
5.Carefullylleachcellwithelectrolyteuntiltheplates
arecoveredwithabout6mm(1/4inch)ofuid(Figure
5).
11

Figure5
1.Electrolyte
Important:Donotoverllthebatteryasthis
allowselectrolytestooverowontootherparts
ofthemachineandcauseseverecorrosionand
deterioration.
6.Replacetheventcaps.
7.Connecta3to4Abatterychargertothebatteryposts
(Figure6).Chargethebatteryatarateof3to4Afor4
to8hours.
Figure6
WARNING
Chargingthebatteryproducesgassesthatcan
explode.
Neversmokenearthebatteryandkeepsparks
andamesawayfrombattery.
8.Whenthebatteryischarged,disconnectthecharger
fromtheelectricaloutletandthebatteryposts.Allow
thebatterytositfor5to10minutesbeforeproceeding
tothenextstep.
2
InstallingtheBattery
Partsneededforthisprocedure:
A/RPetroleumjelly(notsupplied)
Procedure
1.Slidethebatteryintothebatteryboxwiththeterminals
facingrearward.
WARNING
Batteryterminalsormetaltoolscouldshort
againstmetalprocessorcomponentscausing
sparks.Sparkscancausethebatterygassesto
explode,resultinginpersonalinjury.
•Whenremovingorinstallingthebattery,
donotallowthebatteryterminalstotouch
anymetalpartsofthetractor.
•Donotallowmetaltoolstoshortbetween
tryterminalsandmetalpartsofthetractor.
2.Attachthenegative(black)cabletothenegative(-)
terminalofthebattery.
WARNING
Incorrectbatterycableroutingcoulddamage
theprocessorandcablescausingsparks.
Sparkscancausethebatterygassesto
explode,resultinginpersonalinjury.
•Alwaysdisconnectthenegative(black)
batterycablebeforedisconnectingthe
positive(red)cable.
•Alwaysconnectthepositive(red)battery
cablebeforeconnectingthenegative
(black)cable.
3.Attachthepositive(red)cabletothepositive(+)
terminal.
4.Coattheterminalsandmountingfastenerswith
petroleumjellytopreventcorrosion.
5.Installthebatterycoverandsecurewiththestrap.
12

3
MountingtheJackStand
Partsneededforthisprocedure:
1Jackstand
1Jack-standtube
Procedure
One-PassHitch
1.Removetheboltandnutsecuringthetowbartothe
frontofthecoreprocessor(Figure7).
2.Removethetowbar.
Figure7
1.Towbar3.Nut
2.Bolt
3.Insertthejack-standtubeintothetowbarmounting
hole(Figure8).
Figure8
1.Towbarmountinghole4.Jackstand
2.Bolt5.Nut
3.Jack-standtube
4.Rotatethetubeuntiltheholeslineupwiththeholesin
thecoreprocessor.
5.Usingtheboltandnutpreviouslyremoved,securethe
tubetothecoreprocessor(Figure8).
6.Slidethejackstandontothejacktube,alignthe
mountingholes,andsecurewiththelynchpin(Figure
8andFigure9).
Figure9
13

WorkmanTowHitch
1.Onthesideofthetowhitch,slidethejackontothe
jacktube(Figure10).
Figure10
1.Jackstand2.Jack-standtube
2.Rotatethejackstandtoaligntheholesandsecurewith
thelynchpin(Figure10).
4
PositioningtheStoragePins
Partsneededforthisprocedure:
2Storagepin
Procedure
Thestoragepins(Figure11)aretobeinsertedintothefront
orrearholesofthecoreprocessor.
FrontHolePosition
Whenthestoragepinsareinsertedintothefrontholes,the
coreprocessorcansafelybedisconnectedandremovedfrom
thetowvehicle(Figure11).
RearHolePosition
Afterthecoreprocessorisconnectedtothetowvehicle,
insertthestoragepinsintotherearholes(Figure11).
Important:Thecoreprocessorcanonlybeoperated
whenthepinsareintherearposition
Figure11
1.Storagepin3.Rearhole(coreprocessor
connectedtotowvehicle)
2.Fronthole(coreprocessor
disconnectedfromtow
vehicle)
5
MountingtheCoreProcessor
forOne-PassOperation
Partsneededforthisprocedure:
1Hitchpin(includedwiththeone-passhitch)
1Lynchpin(includedwiththeone-passhitch)
2Hitchpin(includedwiththeone-passhitch)
2Lynchpin(includedwiththeone-passhitch)
5Cabletie
Procedure
Note:ThecoreprocessormustbeequippedwiththeOne
PassHitchKit(Model09753)beforeitcanbemountedto
theaerator.
1.Makesurethattheprocessorbrushissetforcorrect
heightofcut.
2.Usingatiedownorrope,securethetow-armhitch
platetotheframehitchpivotwhileraisingthetow-arm
forinstallation(Figure12).
14

Figure12
1.Tiedownorrope3.Framehitchpivot
2.Tow-arm-hitchplate
3.Backthetractor/aeratorintopositioninfrontofthe
coreprocessor.
4.Removethetiedownorropeandlowerthe
tow-arm-hitchplateintotheaeratorhitchpivot(Figure
13).
Figure13
1.Tow-arm-hitchplate2.Aeratorhitchpivot
5.Aligntheholeinthetowarmhitchplatewiththelower
holesintheaeratorhitchpivot(Figure14).
6.Securethetow-arm-hitchplatetotheaeratorhitch
pivotwithahitchpinandlynchpin.
7.Lowertheaeratortotheground
8.Securethepitchcontrollinktothetopholesinthe
aeratorhitchpivotandtheframehitchpivotwithhitch
pinsandlynchpins(Figure14).
•Connectthecontrollinktothefrontholesinthe
framehitchpivotwhenoperatingProCore864and
880aerators.
•Connectthecontrollinktotherearholesinthe
framehitchpivotwhenoperatingaProCore660
aerator.
Figure14
1.Pitch-controllink3.Rearmountingholes
(ProCoreAerator)
2.Frontmountingholes
(ProCore880and864
Aerators)
9.Routethehydraulichosestothetractorandconnectto
thequickcouplers.
10.Makesurethatthehydraulichosesareproperly
connectedtotheprocessorandthetractor.
11.Routethecontrolharnesstothetractoroperators
position.
12.Securethehydraulichosesandthewireharnesstothe
tow-armswithcableties.
Important:Whenturningthetractortotheright
orleft,makesurethatthehydraulichosesor
controlharnessdonotbecomedisconnectedor
damaged.
13.Operatethecoreprocessorandcheckthehydraulic
uidlevelinthetowvehicle.Replenishasrequired.
14.Removethestoragepinsfromthefrontholeposition
andinsertthemintotherearholepositionduring
operation(Figure15).
15

Figure15
1.Storagepin3.Rearhole(coreprocessor
connectedtotowvehicle)
2.Fronthole(coreprocessor
disconnectedfromtow
vehicle)
Important:Whenchangingtowvehiclesortractors,
makesurethatthehydraulicuidsarecompatiblewith
thecoreprocessors.Iftheuidsarenotcompatible,
removeanyuidremaininginthecoreprocessor.
6
DisconnectingtheCore
ProcessorfromtheTow
Vehicle
NoPartsRequired
Procedure
1.Removethestoragepinsfromtherearholeposition
(Figure16).
2.Slowlylowertheprocessoruntilitcomestorestonthe
rearrollerandtires.
3.Installthestoragepinsintothefrontholeposition
(Figure16).
4.Afterthestoragepinsareinstalled,turnoffthetow
vehicle.
Figure16
1.Storagepin3.Rearhole(coreprocessor
connectedtotowvehicle)
2.Fronthole(coreprocessor
disconnectedfromtow
vehicle)
5.Lowerthejacktothegroundtostabilizethemachine
(Figure17).
Figure17
1.Jack
6.Movethehydraulic-liftleverbackandforthtoremove
pressurefromhydrauliclines.
7.Disconnectthehydraulichosesfromthetractor.
8.Removetheremotecontrolfromthevehicle.
9.Windthehosesandcableontotheharnessmountfor
storage.
10.Removethelynchpinandhitchpinssecuringthepitch
controllink.
Note:Youmayneedtoslightlyraisetheaeratorto
removethehitchpins.
11.Removethepitchcontrollink.
12.Removethelynchpinandhitchpinssecuringthe
tow-armstotheaerator.
Note:Youmayneedtoslightlyraisetheaeratorto
removethehitchpins.
16

7
MountingtheCoreProcessor
totheWorkmanVehicle
Partsneededforthisprocedure:
1Hitchpin(includedwiththetowhitch)
1Lynchpin(includedwiththetowhitch)
12Cabletie
Procedure
Note:ThecoreprocessormustbeequippedwiththeTow
HitchKit(Model09750)beforeitcanbemountedtothe
vehicle.
1.Backthevehicleintopositioninfrontofthecore
processor.Makesurethattheprocessorbrushisset
forthecorrectheightofcut.
2.Adjusttheprocessorhitchtonguetothesamelevelas
thevehiclehitch(Figure18).
Note:Thecoreprocessorframeshouldbelevelwith
thegroundwhenitisontherearroller.
3.Connecttheprocessorhitchtothevehiclehitchwitha
hitchpinandlynchpin(Figure18).
Figure18
1.Processorhitch3.Lynchpin
2.Towvehiclehitch4.Hitchpin
4.Raisethejackandsecureitinthestorageposition
(Figure19).
Figure19
1.Jack
5.Connectthehydraulichosestothevehiclequick
couplers.Makesurethatthehydraulichosesare
properlyconnectedtotheprocessorandthevehicle.
6.Routethecontrolharnessoverthebedofthevehicle
totheoperatorsposition.
Important:Makesurethatthehosesandcontrol
harnessarenotkinkedandthattheybendfreely
duringoperation.
7.Removethestoragepinsfromthefrontholeposition
andinsertintotherearholepositionduringoperation
(Figure20).
Figure20
1.Storagepin3.Rearhole(coreprocessor
connectedtotowvehicle)
2.Fronthole(coreprocessor
disconnectedfromtow
vehicle)
8.Toextendthetowhitch,proceedasfollows:
A.Makesurethatthelatch-handlepinisinthe
unlocked(rear)position(Figure21).
17

Figure21
1.Latchhandle3.Lockedposition
2.Latch-handlepininthe
unlockedposition
B.Liftuponthelatchhandle(Figure22).
C.Slowlydrivethevehicleforwarduntilthehitch
assemblylocksintoplace(Figure22).
Note:Lockthehitchassemblyintheextended
positionbymovingthelatchhandlepintothe
forward(locked)position(Figure21).
Figure22
1.Latchhandle2.Hitchassembly
9.Operatethecoreprocessorandcheckthehydraulic
uidlevelinthevehicle.Replenishasrequired.
8
DisconnectingtheCore
ProcessorfromtheWorkman
Vehicle
NoPartsRequired
Procedure
1.Removethestoragepinsfromtherearholeposition
(Figure23).
2.Slowlylowertheprocessoruntilitcomestorestonthe
rearrollerandtires.
3.Installthestoragepinsinthefrontholeposition
(Figure23).
4.Afterthestoragepinsareinstalled,turnthetractorto
theOFFposition.
Figure23
1.Storagepin3.Rearhole(coreprocessor
connectedtotowvehicle)
2.Fronthole(coreprocessor
disconnectedfromtow
vehicle)
5.Disconnectthehydraulichoses.
6.Removetheremotecontrolfromthevehicle.
7.Windthehosesandcableontotheharnessmountfor
storage.
8.Toretractthetowhitch,liftuponthelatchhandle
andslowlybackupthevehicleuntilthehitchassembly
locksintoplace(Figure22).
9.Lowerthejacktothegroundtostabilizethemachine
Figure24).
Figure24
1.Jack
Important:Makesurethatthetongueassembly
isretractedbeforedisconnectingtheprocessor
hitchtonguefromthevehiclehitch.
10.Removethelynchpinandhitchpinsecuringthe
processorhitchtonguetothevehiclehitch.
18

ProductOverview
Controls
Brush/Chopper
Note:Therearenocontrolstoturnthebrush/chopperON
orOFF.Thebrush/chopperengageswhenyouincreasethe
enginespeed;itdecreaseswhenyoumovethethrottletolow
idleoryoustoptheengine.
Lift/OffsetControls
Thelift/offsetfunctionsrunoffthetowvehiclehydraulic
system.RefertothetowvehicleOperator’sManualfor
hydraulicsystemcontrolinformation.
Note:Thelift/offsetcontrolonlyfunctionswhenthecore
processorengineswitchisintheONposition.
Lift/offsetswitch
Thelift/offsetswitch(Figure25)allowstowvehiclehydraulic
systemtooperateintheliftoroffsetmode.
EngineStopSwitch
Presstheswitchtostoptheengine(Figure25).
Figure25
1.Lift/offsetswitch2.Enginestopswitch
Important:Ifyouneedtostopquickly,lifttheaerator
andthenstopthetractor.Ifyoustopthetractorbefore
youlifttheaerator,theturfwillbedamaged.
ChokeControl
Tostartacoldengine,pullchoke-controllever(Figure26)
outtotheONposition.
IgnitionSwitch
Theignitionswitch(Figure26)whichisusedtostartand
stoptheengine,has3positions:OFF,RUNandSTART.Turn
thekeytotheSTARTpositiontoengagethestartermotor.
Releasethekeywhentheenginestarts.Thekeymoves
automaticallytotheONposition.Toshutengineoff,move
throttlecontroltotheSLOWpositionandwaitfortheengine
todecelerateandthenturnthekeytotheOFFposition.
ThrottleControl
Thethrottle(Figure26)isusedtooperateengineatvarious
speeds.Toincreasetheenginespeed,movethethrottlelever
totheFASTposition.Todecreasetheenginespeed,movethe
throttlelevertotheSLOWposition.Alwaysruntheengine
atfullthrottle.
Figure26
1.Throttlecontrol3.Ignitionswitch
2.Chokecontrol
HourMeter
Thehourmeter(Figure27)indicatesthetotalhoursof
machineoperation.
Figure27
1.Hourmeter
20
Other manuals for ProCore
2
This manual suits for next models
2
Table of contents
Other Toro Lawn Mower manuals

Toro
Toro 74096 Manual

Toro
Toro Greenmaster Flex 1820 User manual

Toro
Toro Titan 136-1654 User manual

Toro
Toro 2700 User manual

Toro
Toro 74765 User manual

Toro
Toro 20050 User manual

Toro
Toro LT2240 User manual

Toro
Toro Super Recycler 20092C User manual

Toro
Toro 74105 User manual

Toro
Toro HDX SD 2000 Series User manual