Torrent AP265 User manual

SHOWER PUMP
INSTALLATION AND OPERATING INSTRUCTIONS
Before installation, read these installation and operating instructions. Installation and
operation must comply with local regulations and accepted codes of good practice.
INSTALLER PLEASE LEAVE THESE INSTRUCTIONS WITH CUSTOMER
General
Your Shower Pump has been carefully designed, manufactured and tested in England.
The important instructions MUST be followed, otherwise the pump may be damaged and
your warranty invalidated.
Please dispose of any packaging supplied with this pump in an environmentally
friendly and legal manner.
Important Instructions
•Do not connect the pump directly to the water mains supply.
A shower pump installation requires a cold water storage tank and a hot water cylinder.
The pump cannot be used with combination boilers.
•Full bore isolation valves must be fitted in the inlet and outlet pipe work to the
pump.
•When unpacking and installing the pump, ensure that no foreign particles (such as
solder, dust, etc) are allowed to enter the pump. These will cause the flow switch to
malfunction and damage the pump impeller.
•The pump supply head must comply with the minimum and maximum shown in
the technical data sheet. See figure 1, page 6 for installation diagram.
The pump cannot operate if the level of the water in the cold water storage tank is
below the level of the pump.
•Do not fit non-return valves in the inlet line to the pump. The pump must be able to
vent back to the supply tank.
•The strainers supplied with the pump must be used on inlet connections.
•The pump requires dedicated hot and cold water supplies.
•The hot water supply to the pump inlet should be connected from the first outlet from the
hot water cylinder expansion pipe. Use of a Surrey Flange is recommended for optimum
pump performance.
•No solder flux.
Do not allow any solder flux to come into contact with any of the plastic parts of the
pump or hoses. If this happens, clean immediately with strong detergent, rinse and
inspect surfaces for corrosion.
•Do not let the pump run dry.
Purge with water thoroughly for 5 minutes on cold water and 5 minutes on hot water
before running pump. Then check that each connection is water tight and not leaking.
•Complete all pipe work before making electrical connections. Do not let any water
into the electrical terminal box.
•After completing installation, the whole system must be thoroughly tested – operating
both hot and cold at full flow.
Maximum hot water temperature must not exceed 60°C (140°F) in accordance with
BS6700 2006.
Finally check that each connection is watertight and not leaking.

2
Positioning the Pump
Select a position for installing the pump which affords easy access for subsequent
servicing and maintenance.
This shower pump is fitted with long life mechanical seals which, in some very rare
circumstances, can leak. Although this is very unlikely, position the pump to minimise any
possible water damage.
The supply head must comply with the minimum and maximum shown in the technical
data. Pipe work to and from the pump must be unrestrictive with provision to prevent air
locks.
Keep the pump as close as possible to the source of hot and cold water.
For optimum performance, ensure
•a good water flow to the pump
•sufficient head
•unrestrictive pipework.
•provision to prevent air locks.
Recommended location for the pump, if space allows, is on the floor of the airing cupboard.
The area around the pump must be well ventilated – the pump must not be covered
otherwise the motor will overheat.
The pump must be placed in a frost free location.
If the pump is installed above the outlet level of the hot cylinder then an anti gravity loop at
least 250mm deep must be fitted to prevent air locks – see Figure 2, page 7.
The pump must be mounted horizontally with outlets vertically upwards to ensure correct
operation of the flow switches.
To reduce noise, we recommend the pump be mounted on a small concrete paving slab
approximately 225 x 225mm and 40-50mm thick.
Connect the pump and shower system as shown in Figure 1, page 6.
To achieve a flow of 0.5 l/min, to turn the flow switches on, there must be a minimum
height between the cold water storage tank and the highest point of the outlet pipework of
approximately 250mm – see Figure 1, page 6.
The pump must be installed in accordance with the Water Supply (Water Fittings)
Regulations 1999.
For installation within a bathroom locate the pump in accordance with the IEE Wiring
Regulations seventeenth edition (BS7671:2008) Part 6 Section 601 for a shower pump
with an IPX2 enclosure. The pump must be positioned at least 0.6 metres horizontally or 3
metres vertically away from any bath, shower tray or basin.
The pump may be fitted under a bath providing this space is only accessible through the
use of a tool. If in doubt consult the Wiring Regulations. Installation under a bath can result
in higher pump noise. The pump requires dedicated hot and cold water supplies.
Negative Head
If the water level in the cold water storage tank is below the level of the shower outlet, this
is called a negative head system. To enable the shower pump to operate, either a negative
head or universal pump or a special negative head kit will be required. The special
negative head kit consists of a pneumatic push button and air switch (pre-wired and
mounted in a terminal box) complete with 7.5 metres (25 feet) of plastic tubing. When the
pump is fitted with a special negative head kit, the shower is operated by turning on the
mixer valve and starting the pump by pushing the switch once. The pump will then run as
normal and will automatically switch off when the shower is turned off.
The service helpline will be able to advise a local stockist of negative head kits.
Negative head kits are not available for Brass pumps.

3
Hot Water Supply to the Pump
DO NOT USE ANY JOINTING COMPOUNDS OR TAPE
We recommend that 28mm pipe work is used to feed the cylinder from the header tank for
optimum performance.
The use of a Surrey Flange (see Figure 1, page 6), or equivalent, is recommended for
optimum pump performance.
It is not recommended that the hot water supply is taken directly from the top of the hot
water cylinder, as entrapped air may cause problems.
22mm pipework is recommended to ensure an adequate flow to the pump. Where high
flows are expected, 28mm is recommended. Refer to the technical data sheet for minimum
pipe size.
It does not matter which end of the pump is connected to the hot water supply. Ensure that
the hot water supply is connected to the inlet port on the pump.
Cold Water Supply to the Pump
DO NOT CONNECT DIRECTLY TO WATER MAINS
DO NOT USE ANY JOINTING COMPOUNDS OR TAPE
The cold water supply to the pump must be connected directly from the cold water storage
tank, see Figure 1, page 6. 22mm pipework is recommended to ensure an adequate flow
to the pump. Refer to the technical data sheet for minimum pipe size.
The tank connector should be positioned at least 25mm (1”) lower than the cold water
supply to the hot water cylinder to prevent the supply of hot water only.
It does not matter which end of the pump is connected to the cold water supply. Ensure
that the cold water supply is connected to the inlet port on the pump.
Connecting the Pump
DO NOT USE ANY JOINTING COMPOUNDS OR TAPE
For ease of installation, future servicing and cleaning of filters, full bore isolating gate
valves must be fitted to the inlet and outlet pipe work to the pump. (See Figure 1, page 6).
Isolating valves greatly assist draining down, strainer cleaning and refilling, which will result
in much lower service costs.
The flexible hoses supplied with the pump must be used for connecting this pump to the
pipe work. Use of these hoses will ensure strain and vibration-free watertight connections.
The maximum bend angle must not exceed 45º.
Failure to use the hoses, filters and washers (where required) supplied with the
pump will invalidate the warranty.
After initial installation, run the pump for a few minutes, switch off, drain down and clean
the inlet strainers.
Line up pipework and fit hoses to the pump before connecting to pipes. Position pipework
accurately so that the pump is not subject to mechanical strain.
Plastic nuts should be finger tight plus ¼ turn. Ensure correct alignment to avoid cross
threading. The nuts should be retightened after hot water has been pumped for the first
time.

4
Electrical Connections
WARNING
•The pump must be earthed.
•The pump must be connected to an external mains switch with a contact separation
gap of at least 3mm in each pole.
•The pump must be connected to a 230V, 50Hz supply with a switched spur fused at
5A (10A on model BP130D).
•Metal pipes must be earthed by the use of earthing clamps to BS 951 and 4mm
earthing wire. Where the earth continuity has been broken by flexible pipes the pump
discharge and suction pipe work should be connected with earthing clamps to BS 951
and 4mm earthing wire.
CAUTION
•Complete all pipework before making electrical connections.
•Do not allow any water to enter into the electric terminal box.
If in doubt - consult a qualified electrician.
Connect using the following colour code:
•BROWN to terminal L (Live).
•YELLOW/GREEN to terminal E (Earth). Ensure that the earth lead is at least as long
as the other two leads.
•BLUE to terminal N (Neutral).
Insert the lead fully into the terminal connector and tighten the screw firmly. Ensure that the
connection is secure. Be sure to tighten the cable restraint.
Ensure compliance with the IEE Wiring Regulations (BS 7671).
In the interests of safety it is recommended that a residual current device (RCD) be
installed in the supply circuit.
WARNING
Do not operate pump without the terminal cover in place.
The pump switch should be left on at all times for normal operation of the system.

5
Before Using the Pump
WARNING
•Do not let the pump run dry.
•Purge water thoroughly through the system before switching on the electricity
supply to the pump.
•Do not switch on the electricity supply.
1. Turn on the water supply. Allow the system to fill.
2. Immediately inspect for any leaks.
3. With pump not running, allow maximum water flow, e.g. remove handset from shower
hose, letting the shower hose hang into the shower tray or bath. Operate maximum
hot and cold flow for at least 5 minutes each, to flush out all debris and ensure air is
thoroughly purged from the system. For fixed head showers remove the shower rose
and connect a length of hose, hanging into the shower tray or bath.
4. Switch on the electricity supply to the pump. Again operate the pump in both full hot
and cold modes for about 5 minutes each.
5. With the pump operating, carefully inspect again for any leaks from all connections on
both hot and cold feed pipes to the pump and to the system.
After hot water has been run for several minutes, check all hot water connections and
make sure that there are no leaks.
6. The first few times the pump is used, the insulating varnish used on the pump motor
may give off an odour. This is perfectly normal and will diminish with use.
7. In hard water areas scale build up can cause the pump parts to stick if the pump is not
used for long periods.
8. It is recommended that the pump is run for 5 minutes or more, at least once every four
weeks in order to prevent the pump seizing.
Servicing
The flexible pump hoses, dependent on water temperature and mechanical stress, can
deteriorate with age. We recommend that all flexible hoses and connections are inspected
at least every 6 months. Replace as necessary to prevent leaks. Only hoses designed to
be used with this product should be used. The service helpline will be able to advise of
a local stockist of hoses.
If the flow from the shower drops below its normal performance, it may be necessary to
clean the pump strainers. Blocked strainers are common on initial installation of pumps, or
in new buildings where the use of jointing compounds, tapes, flux and other debris can be
flushed through the system.
In this event, close the service valves, remove and clean the strainers.
Check that if the shower has a hose, it is not twisted or kinked and restricting the water
flow.
Purge any air in the system. With the pump not running allow maximum flow by removing
the shower handset and allowing the hose to hang into the shower tray or bath. Operate
maximum hot and cold flow for at least 5 minutes each. For fixed head showers remove
the shower rose and connect a length of hose, hanging into the shower tray or bath.
A common cause of poor shower performance is a clogged shower head/handset, so
regular cleaning and descaling is important - this applies particularly to hard water areas.

6
Figure 1. Recommended installation of positive head pumps

7
Installation notes – Positive Head Pumps
•A Surrey flange or equivalent should be used, depending on the cylinder type and
installation.
•The hot water supply to the shower pump must be via a dedicated supply.
•Do not fit non-return valves on the inlet pipework to the pump. The pump must be able
to vent back to the cold water storage tank and hot water cylinder.
•Avoid positioning outlets in the cold water storage tank directly below the inlet from the
water mains in order to avoid air being drawn into the pump or hot water cylinder.
•22mm pipework should be used to and from the pump.
•The expansion pipe from the hot water cylinder should always rise in order to avoid
trapped air.
•The outlet pipework from the pump to the shower valve should rise, where possible, to
avoid trapped air.
Pipework from the pump to the shower valve should go up and over, rather than under
floor.
Avoid blanked off pipes (dead legs) which can trap air and cause problems.
•Avoid kinks in the flexible hoses as this will restrict the flow of water to and from the
pump.
•All pipework should be secured down to minimise noise and vibration.
•After commissioning the pump ensure that all hose connections are tight to avoid air
being drawn into the system.
Figure 2. Installation – pump above hot water cylinder outlet
It is recommended that the pump is positioned at the base of the hot water cylinder.
If the pump is positioned above the outlet of the hot water cylinder, the pipework to
the pump must have an anti-gravity or downward loop. This will help prevent airlocks.
The supply head from the water level in the cold water storage tank to the pump suction
port must be within the minimum and maximum values specified in the Technical data.

8
Fault Finding
Before starting work on the pump, make sure that the electricity supply has been switched off
and that it cannot be accidentally switched on.
One of the most common causes of pump problems is air in the system. To purge air from the
system, with the pump not running allow maximum flow by removing the shower handset and
allowing the hose to hang into the shower tray or bath. Operate maximum hot and cold flow for
at least 5 minutes each. For fixed head showers remove the shower rose and connect a length
of hose, hanging into the shower tray or bath.
Fault Possible Cause and Remedy
Check that the electricity supply to the pump is switched on.
Check the fuses and any replace blown fuses. If the new ones blow too, the
electric installation should be checked.
The pump motor has built-in thermal protection to switch off the motor and
prevent overheating, which resets automatically within 1 to 2 hours.
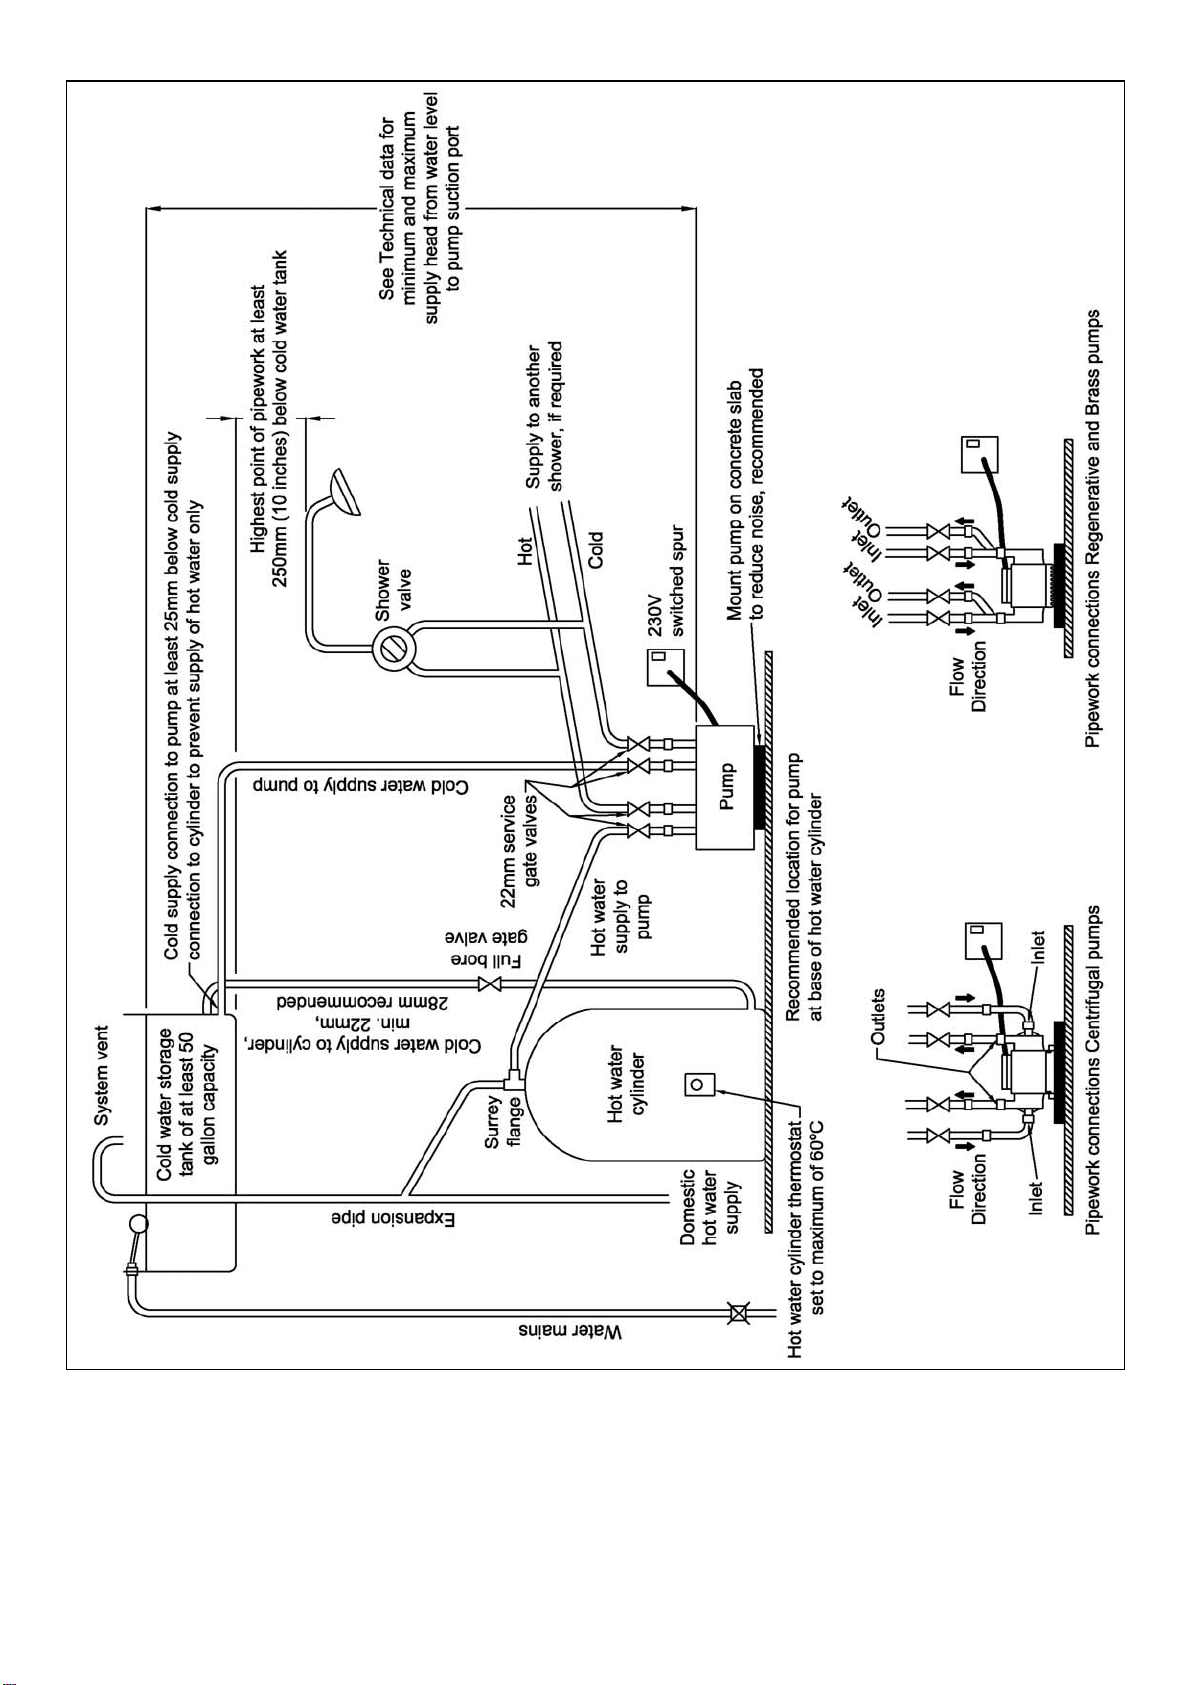
Check that any isolating valves on pump inlets and outlets are fully open.
Check that the pump strainers are not blocked. Close the service isolating
valves, clean the strainers and re-open the service isolating valves.
Ensure that the pump is installed with vertical discharge ports (flow switches).
The pump fails
to start.
Ensure that the water flow with the pump switch off is at least 0.5 l/min.
Check that the pump strainers are not blocked. Close the service isolating
valves, clean the strainers and re-open the service isolating valves.
The flow from
the shower
drops. Purge any air in the system. With the pump not running allow maximum flow
by removing the shower handset and allowing the hose to hang into the
shower tray or bath. Operate maximum hot and cold flow for at least 2 minutes
each.
Ensure there are no leaks in the system and that all taps and outlets are off.
Purge any air in the system. With the pump not running allow maximum flow
by removing the shower handset and allowing the hose to hang into the
shower tray or bath. Operate maximum hot and cold flow for at least 5 minutes
each. For fixed head showers remove the shower rose and connect a length
of hose, hanging into the shower tray or bath.
Flow switch or reed switch faulty or incorrectly set. Contact the helpline for
adjustment or replacement details.
The pump
runs
continuously.
Ensure that the float in the outlet port is not stuck in the up (on) position.
Ensure that there is no debris in pump housing or outlet port.
The pump
pulses. Ensure that taps or other outlets are not causing water hammer, which can
cause the pump to start momentarily. A low pressure non-return valve can be
fitted on the outlet pipework from the pump. Contact your installer.
Ensure that air can not enter the pump, most commonly from the hot-water
cylinder. Fit a Surrey or Essex flange and ensure that there are no high points
in the pipework layout where air can collect.
Ensure that the hot-water temperature at the pump is not above 60ºC (140ºF).
Unstable
water
temperature /
noisy pump. Ensure that there is no debris caught in the pump impeller casing.
Noisy pump. Noise caused by vibration through the pump mounting surface can be reduced
by mounting the pump on a concrete slab.
Hose
connection
leaking.
For screw connection hoses, ensure that the hose washers and strainer
washers are fitted and that the plastic nuts on the hoses are tight.
For push fit connection hoses, ensure that the hose connection is fully inserted
to a minimum depth of 33mm.
ML10053 03
/
12
Table of contents
Popular Water Pump manuals by other brands

Intex
Intex krystal clear 602 owner's manual

Senci
Senci SCWT-100 operation instruction

Oase
Oase Aquamax Dry 6000 operating instructions

Gardner Denver
Gardner Denver GD-250 Operating and service manual

Ampco Pumps Company
Ampco Pumps Company ZP1+ Series Maintenance manual addendum

Orion
Orion 12626 user manual

ITC
ITC DOSTEC AC manual

Flofab
Flofab 2FFSEV512 Installation, operation & maintenance manual

Ebsray
Ebsray RC SERIES Installation, operation & maintenance instructions

GORMAN-RUPP PUMPS
GORMAN-RUPP PUMPS T2C60SC-B Installation, operation and maintenance manual

GORMAN-RUPP
GORMAN-RUPP SM SERIES Installation, operation and maintenance

Barnes
Barnes 2020HC Installation and operation manual