TouchStar TouchPC Hawk II User manual

Hawk II User Guide Rev3 23-03-12 Copyright © 2012 TouchStar Technologies Ltd pg. 1
TouchPC Hawk II
USER GUIDE

Hawk II User Guide Rev3 23-03-12 Copyright © 2012 TouchStar Technologies Ltd pg. 2
TOUCHPC HAWK II 1
1) NOTES,NOTICES AND CAUTIONS 4
ABBREVIATIONS AND ACRONYMS 4
GOOD PRACTICE 5
WHEN USING YOUR DEVICE 6
WHERE TO FIND INFORMATION ABOUT YOUR HAWK II 8
2) ABOUT YOUR HAWK II 9
FRONT,SIDE AND BACK VIEWS 9
USING THE BATTERY 13
REMOVING AND FITTING THE EXPANSION DOOR 17
CONNECTING AUXILIARY EQUIPMENT 18
USING AN OPTIONAL EXPANSION CABLE OR HUB 18
FITTING THE HAWK II INTO THE CRADLE 19
HAWK II QUICK RELEASE CRADLE CONNECTIONS 20
USING A HAWK II HUB 21
USING EXTERNAL ANTENNAS 24
ATTACHING GPS &HSPA ANTENNAS 24
USING MOUNTS AND BRACKETS 25
USING THE DEBUG PORT 26
USING SD /SDIO, SIM &MICRO SD CARDS 27
INSERTING A SD /SDIO CARD INTO THE FULL SD CARD SLOT 27
REMOVING A SD /SDIO CARD FROM THE SLOT 27
INSERTING THE SIM &MICRO SD CARDS 28
PERFORMING A RESET 30
HAWK II HOW TO CLEAR IPSM 31
SCREEN PROTECTORS 35
ORDERING AND FITTING A SCREEN PROTECTOR 35
3) USING MICROSOFT®WINDOWS CE.NET 5.0 36
SCREEN CALIBRATION 36
CONTROL PANEL 38
4) USING MICROSOFT®ACTIVESYNC®41

Hawk II User Guide Rev3 23-03-12 Copyright © 2012 TouchStar Technologies Ltd pg. 3
ABOUT ACTIVESYNC 41
SERIAL PORT CONNECTION 41
ETHERNET CONNECTION 43
ESTABLISHING AN ACTIVESYNC PARTNERSHIP USING TSSYNC 44
5) APPENDIX 45
SPECIFICATIONS 46
APPLICATION SUPPORT PACKAGE 48
STORAGE TEMPERATURE 49
SHOCK 49
ENVIRONMENTAL 49
REGULATORY NOTICES 49
CE NOTICE (EUROPEAN UNION)51
CONTACTING TOUCHSTAR TECHNOLOGIES 51
GLOSSARY 52

Hawk II User Guide Rev3 23-03-12 Copyright © 2012 TouchStar Technologies Ltd pg. 4
1) Notes, Notices and Cautions
NOTE: A NOTE indicates important information that helps you make
better use of your Hawk II.
NOTICE: A NOTICE indicates either potential damage to the
hardware or loss of data and tells you how to avoid the problem.
CAUTION: A CAUTION indicates a potential for property damage,
personal injury or death.
Abbreviations and Acronyms
For a complete list of abbreviations and acronyms, see the ‗Glossary‘ at
the rear of this document.
Information in this document is subject to change without notice. ©
TouchStar Technologies Ltd. All Rights Reserved.
Reproduction in any manner whatsoever without the written permission of
TouchStar Technologies Ltd is strictly forbidden.
Trademarks used in this text: Intel is a registered trademark and XScale is a
trademark of Intel Corporation. Microsoft, CE.Net and ActiveSync are
registered trademarks of Microsoft Corporation. Bluetooth is a registered
trademark owned by Bluetooth SIG, Inc.
Other trademarks and trade names may be used in this document to refer
to either the entities claiming the marks and names of their products.
TouchStar Technologies disclaims any proprietary interests in trademarks
and trade names other than its own.

Hawk II User Guide Rev3 23-03-12 Copyright © 2012 TouchStar Technologies Ltd pg. 5
Good Practice
CAUTION: Safety Instructions –To ensure your own personal safety
and to help protect your Hawk II from potential damage, please
use the following safety guidelines.
SAFETY: General
Do not attempt to service your Hawk II unless you are a TouchStar
approved trained technician.
When using an extension cable with your AC adapter ensure that the
total ampere rating of the products plugged in to the extension power
cable does not exceed the ampere rating of the extension cable.
Under no circumstances insert any objects into the openings of the
Hawk II, other than the specified cards. Doing so can cause damage to
your device and / or electric shock to you.
Keep the Hawk II away from extreme heat sources such as radiators
and fires.
Use the AC adapter in a well-ventilated area. Do not cover it with any
items as this may result the adapter to run warmer than it should.
Use care when handling the adapter during or immediately after
operation as it may become hot.
Use care when handling CF Cards and SD Cards as they can become
warm during normal operation.
Clean your Hawk II only with a clean damp cloth.
Do not leave a fixed image displayed on your Hawk II screen for long
periods of time. Screen ‗burn‘ may occur when fixed patterns are
displayed on screen for a long time - the default timeouts will normally
prevent this.
SAFETY: Power
Only use TouchStar AC adapters with this Hawk II.
Do not connect the device to a mains electrical socket until you have
checked the AC adapter voltage rating to ensure that the required
voltage and frequency matches.
To remove the Hawk II from all power sources, put it into suspend,
disconnect the AC adapter from the electrical outlet, remove the
battery and turn the backup battery off using the appropriate DIP
switch.

Hawk II User Guide Rev3 23-03-12 Copyright © 2012 TouchStar Technologies Ltd pg. 6
Ensure your AC adapter‘s power cable is not located where it can be
tripped over or stepped on.
SAFETY: Battery
Use only Hawk II batteries with this device.
Take care when carrying or storing a battery as any metal object that
touches across the contacts could result in excessive current flow. This
could cause extremely high temperatures and may result in damage to
the battery pack or cause fire or burns.
Do not disassemble the battery. Handle a damaged or leaking battery
with extreme care.
All batteries shall be controlled in accordance with the ―Handling
Precautions and Prohibitions for Varta Microbattery GmbH Lilon Polymer
Pouch Batteries and General Supply Notices‖.
When Using Your Device
The following guidelines will help prevent damage to your device in a
normal working environment.
SAFETY: Ergonomic Computing Habits
Prolonged touch screen use may result in a repetitive strain injury.
Eyestrain can be caused if any display or monitor is viewed for
extended periods of time.
SAFETY: Using the Hawk II
Care for your Hawk II by keeping it away from excessive temperatures
and bright sunlight.
Condensation can form on or within the device if the Hawk II is moved
quickly from one extreme temperature to another. Allow the moisture to
evaporate before using your Hawk II.
When disconnecting any cable, only pull on the connector –not the
cable. When pulling keep it evenly aligned to avoid damaging any
pins. Before you connect a cable make sure both connectors are
correctly oriented and aligned.
SAFETY: Battery Disposal
For battery replacement please refer to the section in this document on

Hawk II User Guide Rev3 23-03-12 Copyright © 2012 TouchStar Technologies Ltd pg. 7
batteries. Do not dispose of your Hawk II battery. All batteries shall be
returned to Touchstar Technologies Ltd. If in doubt please contact a
Touchstar for assistance.

Hawk II User Guide Rev3 23-03-12 Copyright © 2012 TouchStar Technologies Ltd pg. 8
Where to Find Information about your Hawk II
What are you looking for?
Find it here:
How do I setup my device and
information on auxiliary
equipment?
Hawk II User Guide
Information on using my Hawk II
Hawk II User Guide
Connecting to other devices
using hard wired and wireless
options
Hawk II User Guide
Hawk II updates and detailed
technical information
Please contact your Hawk II
representative for more
information
Up to date information on your
Hawk II
www.touchstar.co.uk
Hawk II Product Number and
individual Serial Number
Software Updates
Label located in the battery
recess.
Contact your local Hawk II
Representative for links and
passwords

Hawk II User Guide Rev3 23-03-12 Copyright © 2012 TouchStar Technologies Ltd pg. 9
2) About Your Hawk II
Front, Side and Back Views
CAUTION: Before performing any of the procedures in this section,
read and follow the safety instructions in Section 1
Front View
TOUCHSCREEN –Use the TouchScreen to enter information onto your Hawk
II. To prolong the life of your TouchScreen a disposable screen protector is
fitted. Only use the recommended tools / methods to activate the
TouchScreen. Such as a finger or stylus.
LABEL RECESS AREA - A label recess area is provided to apply branding of
the product. A TouchStar label is fitted as standard.
Rugged polycarbonate
touch screen
7” TFT 800 x 480
pixel resolution
Label Recess Area

Hawk II User Guide Rev3 23-03-12 Copyright © 2012 TouchStar Technologies Ltd pg. 10
Side View (With Access Door Removed)
Item #
Description
1
USB Type A
2
Serial Debug –For Development purposes only.
3
USB Mini Type A /Mini Type A –USB Communication Port.
4
SD / SDIO Secure Digital Card Slot –For memory expansion and SDIO expansion
5
J-Tag
6
Debug –Press to enter debug mode.
7
Hard/Soft Reset Button - Reset Hawk II without removing battery
1
2
3
4
5
7
6

Hawk II User Guide Rev3 23-03-12 Copyright © 2012 TouchStar Technologies Ltd pg. 11
Rear View (With Expansion Door and Battery Removed)
Item #
Description
1
SIM Card Slot - HSPA Mobile Broadband / Voice calls
2
Micro SD Card Slot
3
Battery Contact Pad –Provides Electrical connection for Lithium Ion battery
4
Imager - For capture of 1D & 2D Barcodes
5
3 Megapixel Colour Camera - For high quality images
6
High Power white LED Flash and video - Provides illumination in poor lighting
conditions
7
Fixing for straps (2 per side)
8
Securing port for seating in Quick Release Cradle
9
Speaker –To provide high quality audio
1
2
3
7
5
6
4
8
9
Hawk II User Guide Rev3 23-03-12 Copyright © 2012 TouchStar Technologies Ltd pg. 12
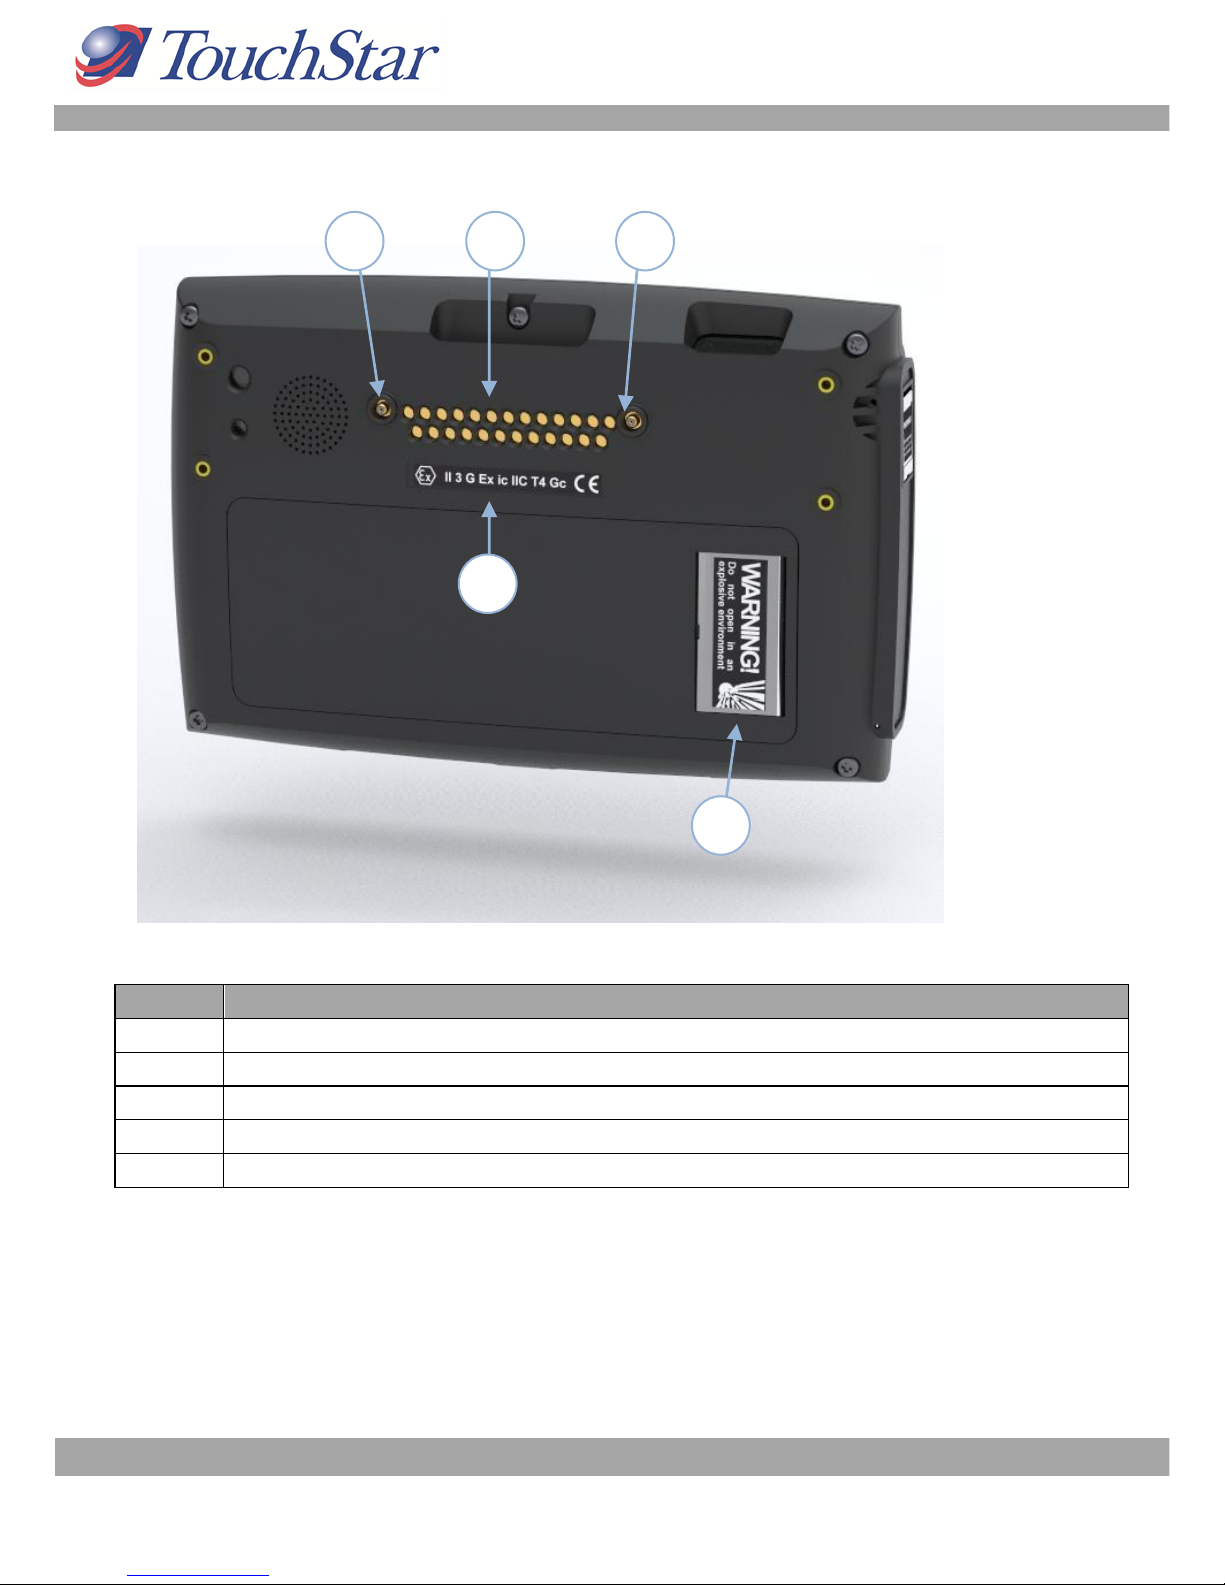
Rear View (with battery fitted)
Item #
Description
1
Mobile Broadband - HSPA external Antenna Communication Port via Cradle
2
Cradle Interface - Permits connection via Quick Release cradle
3
GPS - SIRF IV external Antenna Communication Port via Cradle
4
ATEX Label –Identifies the ATEX Category that Unit is approved to
5
Battery Warning Label
1
3
2
4
5

Hawk II User Guide Rev3 23-03-12 Copyright © 2012 TouchStar Technologies Ltd pg. 13
Using the Battery
If you are using your Hawk II for the first time you must install and charge
the battery. Once the battery is charged the Battery Status Utility will
display its status.
NOTICE: Do not use your Hawk II until the battery has been
charged for at least 4 hours. When charging, in the taskbar a
lightening symbol will appear.
Installing and Removing the Battery
To install the battery:
1) If a SIM card is required, make sure it is fitted
2) Align the tongue on the top edge of the battery with the
corresponding slot in the battery bay.
3) Pivot the battery down until the battery is fully inserted. Push battery
clip down to lock.
NOTE: As soon as the battery is inserted the Hawk II will power up.
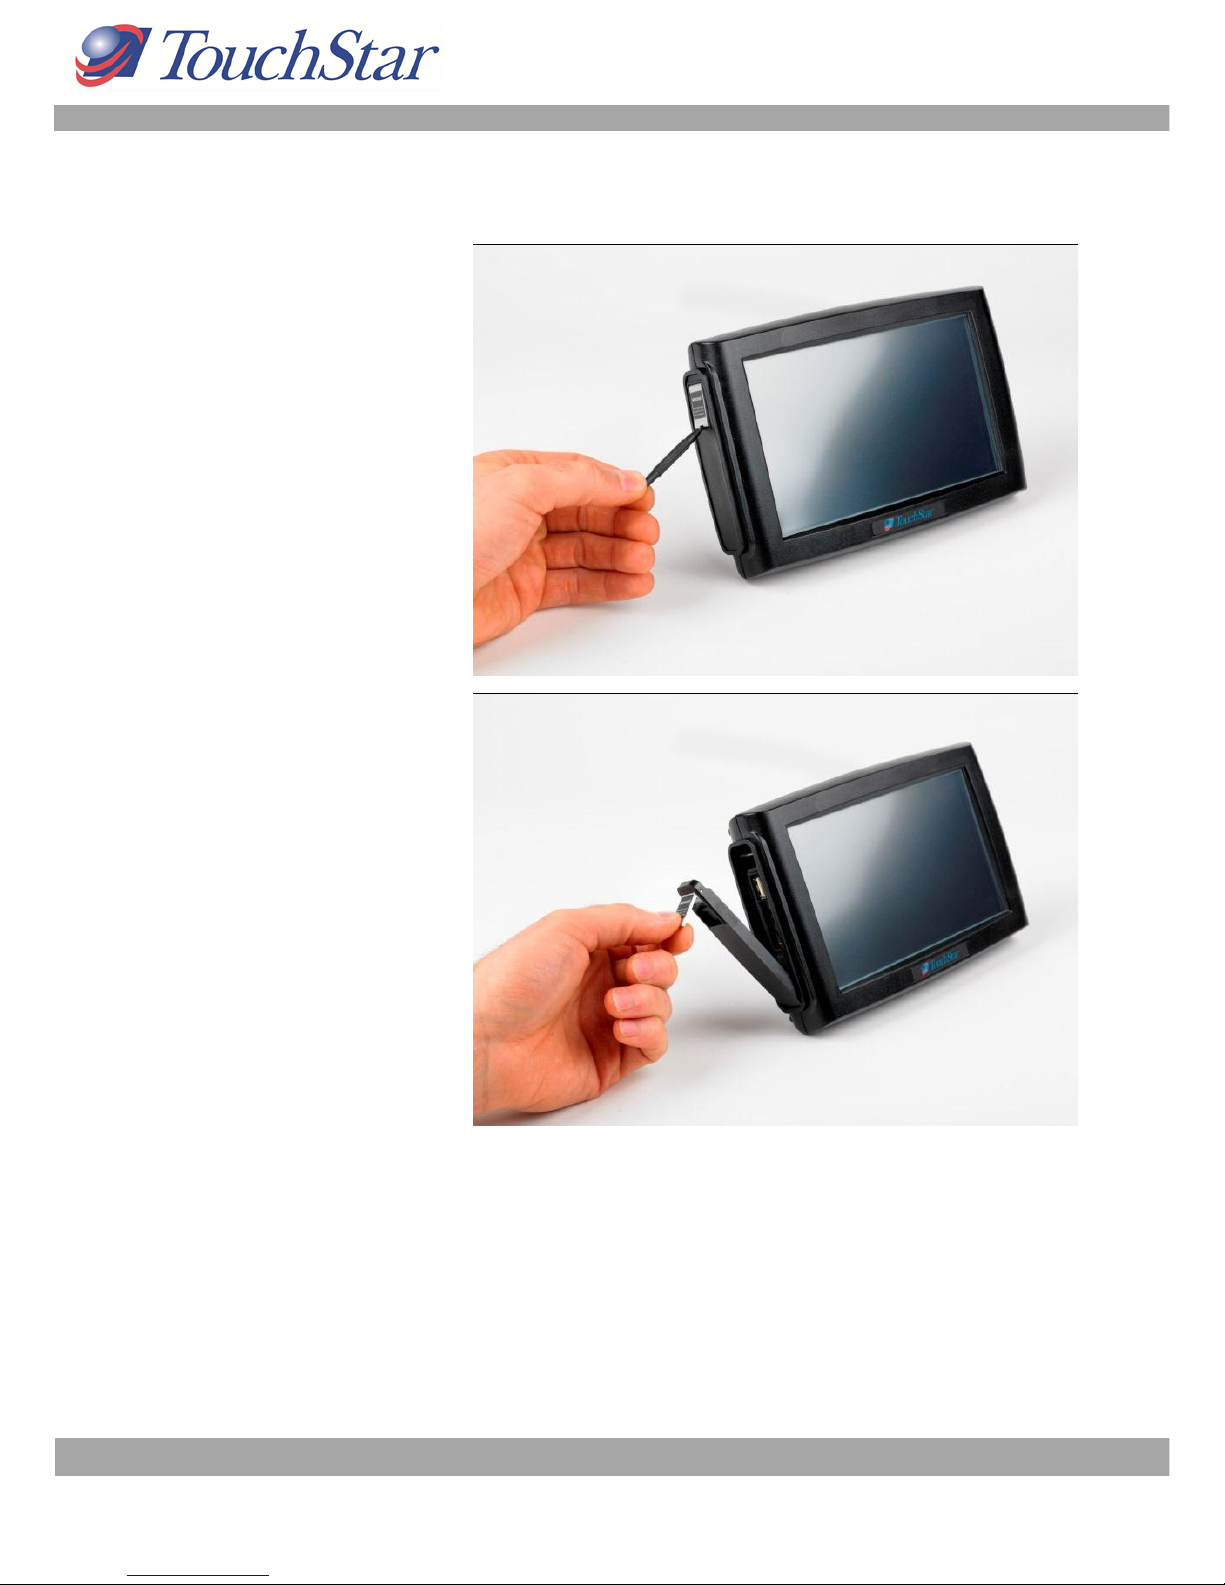
To Remove the Battery:
1) Insert tool in slot to
lift locking tab.
Hawk II User Guide Rev3 23-03-12 Copyright © 2012 TouchStar Technologies Ltd pg. 14
2) The battery will ‗sit
up‘ slightly allowing you to
lift it up and out.
NOTE: The Hawk II part number and unique serial number are
located underneath the battery. You will need the serial number of
the device should you need to contact TouchStar Technologies.

Hawk II User Guide Rev3 23-03-12 Copyright © 2012 TouchStar Technologies Ltd pg. 15
Charging the Battery
Use one of the following options to charge the main battery
To charge the battery when it is fitted in the Hawk II firstly connects
an AC adapter to the Cradle and plug into a mains electrical
socket. Fit the Hawk II to the Cradle.
Remove the battery from the Hawk II and fit into the battery
charger (available separately).
If the main battery is low, it will switch off to maintain the cell‘s
performance –the battery should be fully charged as soon as it is drained.
To recover from a critically low battery:
1) See above
2) Replace with a fully charged battery (removing the critically low
battery will not affect any settings if the backup cell is turned on –
see DIP Switch Settings)
The main battery will last for approximately 4.5 hours during normal working
conditions. Around 2.5 hours if the backlight is continuously on.
Backup Battery Information
Your Hawk II is fitted with an internal backup battery which in the event of
power loss from the main battery will store your device settings together
with any application software stored in RAM.
The backup battery will not power the unit. If the main battery runs flat or is
removed you will not be able to turn the Hawk II on until it is replaced.
During the charging of the main battery the backup battery is also
charged.
A fully charged Backup Battery will store your Hawk II‘s vital settings for
approximately 30 days.

Hawk II User Guide Rev3 23-03-12 Copyright © 2012 TouchStar Technologies Ltd pg. 16
Looking After Your Hawk II Batteries
All batteries shall be controlled in accordance with the ―Handling
Precautions and Prohibitions for Varta Microbattery GmbH Lilon
Polymer Pouch Batteries and General Supply Notices‖.
The cells in your Hawk II battery are Lithium Ion which makes them ideal for
sitting on permanent charge (for example in a Cradle). However, if you
plan on putting your device in storage for any period of time you must
periodically charge and discharge the batteries (also known as cycling).
Storing Batteries
Ensure your Hawk II battery is stored between -20°c and +50°c. Storing it
outside this range will result in diminished battery life.
Your Hawk II battery must be cycled once every 30 days whilst in storage.
Battery Disposal
All batteries shall be returned to TouchStar Technologies Ltd for disposal.
Hawk II User Guide Rev3 23-03-12 Copyright © 2012 TouchStar Technologies Ltd pg. 17
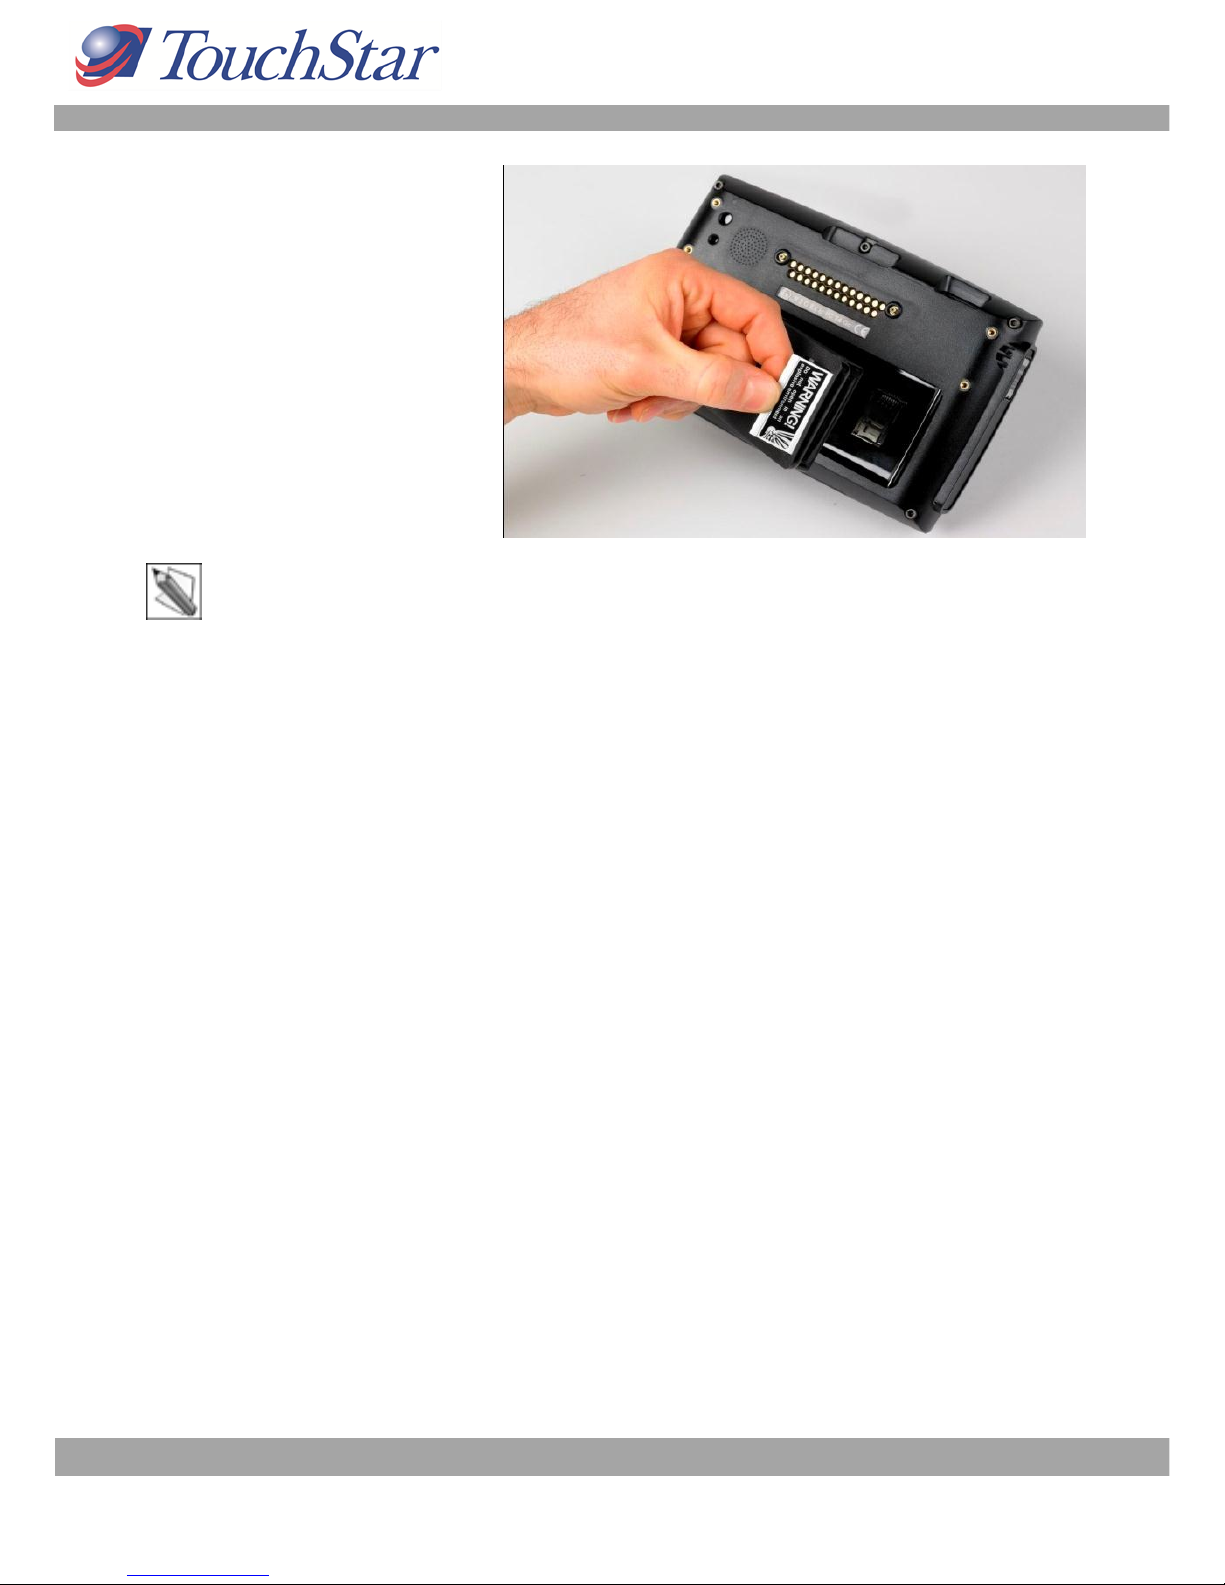
Removing and Fitting the Expansion Door
1. To remove the
expansion door carefully
place a suitable tool in
the slot under the
aluminium securing
latch and carefully lever
the locking latch
upwards to release the
door.
2. To fit the
expansion door locate
the 2 tongues on the
base of door into the
mating slots in the Hawk
II. Secure the door in
place by pushing the
securing latch flush to
the door face.

Hawk II User Guide Rev3 23-03-12 Copyright © 2012 TouchStar Technologies Ltd pg. 18
Connecting Auxiliary Equipment
Your Hawk II has several accessories that can improve the functionality of
the device and enhance its usability.
Using the Cradle
The Hawk II Cradle is a docking station. Its primary function is to provide
the Hawk II with a semi / permanent fixing, external power, external GPS &
HSPA antenna connections and full communication to other devices.
Using an Optional Expansion Cable or Hub
The Hawk II has Ethernet, Serial, USB, Audio In, Audio Out brought out to
the Cradle from the rear of the device. By connecting the correct cable or
Hub to the cradle you can communicate with a large selection of devices.
Available Cables -
A 25 Pin D-SUB Cable may be plugged into the Cradle

Hawk II User Guide Rev3 23-03-12 Copyright © 2012 TouchStar Technologies Ltd pg. 19
Fitting the Hawk II into the Cradle
1) Present the Hawk II to
the cradle. Seat the 2
rectangular slots in the side
of the Hawk II (Adjacent to
the TouchStar label) onto
the corresponding seating
keys on the Cradle. See
picture for further info.
2) Push the Hawk II into the cradle until
seated in place under the top catch.
The cradle will then hold the unit until
the handle is closed.
3) Now close the handle, locking
the Hawk II in place.

Hawk II User Guide Rev3 23-03-12 Copyright © 2012 TouchStar Technologies Ltd pg. 20
Removing Hawk II from the Cradle
1) When removing the Hawk II
from the cradle, lift the handle
until it locks in the open position.
The Hawk II is still held in position
by the cradle, so the user can
easily remove the unit.
Hawk II Quick Release Cradle connections
Table of contents
Popular Desktop manuals by other brands


MiTAC
MiTAC TYAN GC79-B8252 Service engineer's manual

MSI
MSI Wind Top AE220 user manual

Commodore
Commodore Plus 4 Service manual

Digital Equipment
Digital Equipment VAXstation 4000/60 Condensed Service Information

Lenovo
Lenovo 30141DU - IdeaCentre Q100 Mini PC Safety and Warranty Guide

HP
HP Pavilion t124 Specifications


