Toyo Toyo-View 45C User manual


TOYO-YIElv
INSTRUCTION
MANUAL
fllBLr-#EE=
ffi
TOYO-YIEIV45CWfl,
6Ht\.LIJ.EHL<
. d)E
le
F
= . c:r-45C hJ-=
AFHt\
t lf^t
\
ElaE..6filZ6
Dd-):'dU\td"
zan *- tag+'loF€.lz6.xry.r t'-#-trof#ffia)6D L.,
#ffiE^0)AF'1I#B!8effi..
>>7 )l/..
=> I\2 FCFEE.,
El?
FffiO{Fffi
tzffifz63atr.ffilj4+,{trr\Pdd.. iEHOVT\ ),
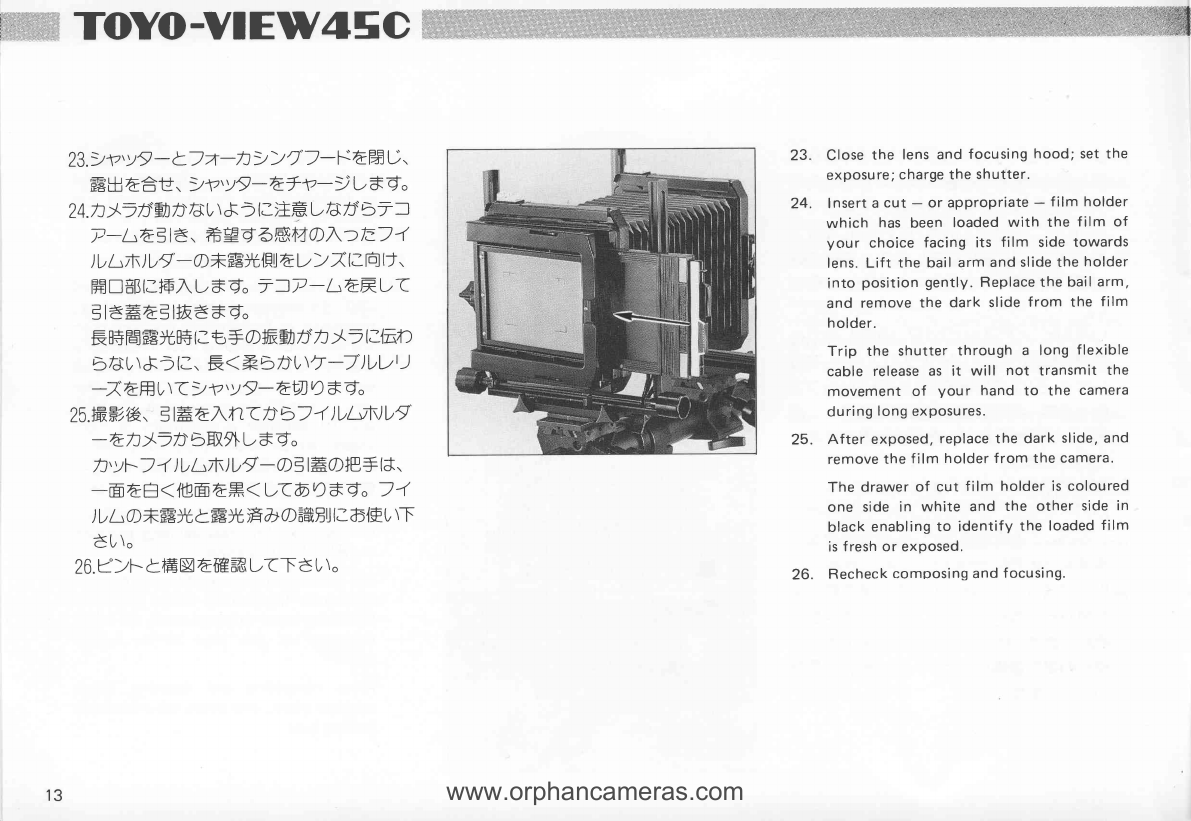
aE{$Effi
OJfrffiE&
4> 77 Llv6t E++F.t. *fi
I'V\nn
a=HaaUEd6tuF alE
r
\( <n6 z x t f=
Dt d"
EAg!
Am
V\fr
L& <Of+FOE
B!t'itrt
\frA.IE.ffiU
\
Ere
( E
DE. .Oil&t\6-HBj=AffiHf{
rA Ulzol}EffiTdt \Ad&
.6F,Fr
\+Uttf^td.
1:
: :llir
l::l.: :
:: ,l r:
lntroduction
Congratulation
- on becomingthe ownerof aToyo-View 45C camera.
Your Toyo-View 45C has beencarefully designed
and craftedusing
our time proven technology and experiencein large
format camera
production for rugged
use on locationor in the studio. The camera
will open up an exciting
newworld to you,
a
world inwhich
you can
explore
new
dimensions
in photography.
The following pages
will review
basic
operationand will explainthe
purpose
and the useof manyfeatures
built-into
the camera.To use
your camera
most efficiently we recommendthat the instructions
are
caref
ully read.
lg*;,Jlddli","..: .-.e;;.. ...- . ,--- .rit\i*-..--
www.orphancameras.com
: ::::
::";'"::1.
:::
."
=:/x
o€!fiiEoffi#.................. ......9
Contents
Nomenclatures . . .
Basic
Operation .
Assembly
Mounting
thelens
Changingthebellowsand
camera
back
Bringing
the camera
to the neutral(zero)
position
Photographing
Universal
Back
Camera
Movements
Riseandshift
controlthe image
positioning
for
improved
composition
A. To control imagevertically,usef
ront and rear
standards
rise
B. To control imagelaterally,usefront and rear
standardsshift
Tilt and swing
of rear
standardcompensate
or
3
5
5
7
8
9
11
14
15
.. 15
F
F
F
. .15
. . 16
.17
.17
. 18
.
19
. 19
.20
.21
.27
.29
emphasize
perspective
anddistortionof subject
C. To control vertically,use
rearstandardtilt
D. To control horizontally,
userearstandard
swing
Tilt andswingof front standard
control the focus
and
depth of f
ieldregardlessthe aperture
effect
E. To controlvertically,usefront standard
tilt
F. To controlhorizontally,
usefront
standardswing
Accessories
to Increase
Camera
Performance
ChoosingView CameraLenses
Specifications .
..-*,-;- -.- ,.r:sdri,:, - "idli);i;;:;;.
*, - . .'jd:, r.;;-.-*-.::-aJ,:r;,.tir .*$fgds&i&*s '

ffi TOYO-YIEIV4 C
J=>l:J=771/-LE,nilV-LL
Focusinq
Frame
Release
Arm-Top
J->}J-771/-L
Focusino
Frame
J->}J.7)l/-L'E,MP-L.T
FocusingFrame
Release
Arm-Bot
tom
t-)tlUC>JO,y2Ul\-
Intermediate
LockinqLever
7=V-/)
BailArm
>) F!,y+>J/7
Shrft
LockinqKnobs
T> Srrv,yT
EndCap
T)>-)U
M
onora
il
aB[azffr Components Wtr.)>-/)
BellowsFrame-Front
7i )U;7J-)l)
Trlt
Reference
Scales
.4xtr,y+>J/7
Rise
Locking
Knobs
7</rF!'yJF>'J )7
TrltLockrngKnobs
-47:>FU-/0./7
Rising
Knobs
74>Ja,y+>J>l\-
Swing Locking
Levers
a42.7t-h>>J)7
Microfocusing
Knobs
?
42a7 7
-n >>Ja,y+> J> I
\-
Microfocus
Locking
Levers
FED)t-n>>Ja,v+>J /7
Fastfocus
Lockrng
Knobs
www.orphancameras.com
7.1(+tt
SprrrtLevels
(Domestrc
Version
Only)
7-Sil{$tJffin4H.
Lens
HoodPositiontnq
Sockets
.477J-)l)
Rrse
Reference
Scales
I/>7 -l'{ffi7ffi.
Lensboard
Slrde
Locks
l/>lfr-F
Lensboard
>7|7J-)l)
Shrft
Reference
Scales
T> F:rf
V,yj
End
Cap
D'yJF>Jfi\g>
Locking
B
utton
7.1(#tt
Sprrit
Levels
t)fi)Ue>J2t),y2fig>
Revolving
Release
Button
qBtr
Bellows
7< /rFE,yJF>J
/7
Trlt
Lockrng
Knobs
Trrpod
BlockLocking
Knob
qffi6
Tn
pod Mountrng
B
lock
>) Ftr,y+>J./7
Shrft
Locking
Knobs
74>'/7'r-)U
SwingReference
Scales
4
W TOYO-YTEIY4EC
EA0lrd{Ft\E
.N>L-OfiHU(
6HU
\t(JU
t
/-z/-zl,\EF
=' tr':r-45O
lJ''
7+tr-/ UAIR#i -Z lZ. =EBelZDtJT
A:(Uttd. F5+lZDffi
' lfHU(DCAt
F
lZt. d-|o..
lSSrEOlZ€{FfUCd"
1.772-)ri-ZA 0n t'=A{A., T/ l/
- )r..
*l+64)+H
,(EIH r(Td u
t.
2.T
/, - )UDfrfr
AT> F-
* P'Y7
AE'Y
+> t'rtg >8., ft,A'*=
lzYI)c+F,
rd
D
b+ p,v7A+ffilz5
16.'HI9f
r* d"
3.Htt+.
L{++A$XD)
7
-n >>t"
AE'Y
+> t"
/ ) alfr,hT. mixffi
cftfrtra+ha
t:(TdU\.
BasicOperation
ASSEMBLY
You
r Toyo-View 45C is carefu
lly packaged
as
three
componentsin preformed
styroforms.lt
can be setup or disassembled
quickly for ease
in storing
or carryingin relatively
smallspaces.
1. Removecarefully
the componentof front
and
rearstandardsassembled
with bellows,
cameraback
andlensboard;
monorail
with
removableend
caps;and tripod mounting
block
from the
package.
Remove one of the end caps from the
monorail. Depress the locking button
using a sharp pointed matter and slide
the
end cap off the rail.
The monorail is finished in matte black so
that to avoid glaring.
Loosen the fastfocus locking knobs on the
front and rear standards, and remove the
cardboard shipping tube from the stand-
ards.
2.
3.
www.orphancameras.com

4.T
/ U-)DAffi+tZlF Utd. T/
),-L-e+
- L{u#a+ -)E
AAtl ( d?
(
Tdut.
5.lhlr+lzt
/>-)rE+fi^L, T> S+p,y
7Er(Tdur.
6.*ffi6D'y +>t" / ) d3flb.. -/) DElFtl
|lx5s. tzt(gffia&T / >- )r+R
IZEE. fiE-IZtrE'*d"
7.Ett+,lbt+O$X D) 7 -n>>t' CD'y
+>t"/)Elffih(Tdur"
B.
=flfi,!\>79 > S
za*
d Zn t'- dreHZ il'l$
1/
44
) 7 At
J\+) AEED{ffi=TU
\
t d.
n /. AEdfiHAnd Dr.r*{UF
E
(J
. 9}+
aTE] C6td.
@)DCBU \5H Atrffi.3lZlJ.
X4cgzE t
E=fltril\>
79> SD/ly\=Cd. F= . 7Z
=flfiil..
F= .)T4 |Zt>Strrr^-
9-79> F-A6EErtd.
4.
5.
Slide the monorail th
rough the f
ront
standard gently. Make certain that the
ribbed guide on the monorail fits the key-
way on the f
ront standard.
Slide the rear standard on the monorail
and replacethe monorail end cap.
Loosen the locking knob of the tripod
mounting block; place and center the
block on the monorail so that the knob
locates on the lefthand side; secure the
locki
ng knob.
Tighten the fastfocus locking knobs on the
f
ront and rear standards.
Place you r Toyo-V iew on a sturdy tripod
or stand, and securefirmly. There are
two
tripod mounting sockets: one for 1
14" and
one for 3lB" threads.
To result a blurrless clear negative, large
and stable tripod or stand is required.
Toyo-Pro tripods, Toyo Weight Stands and
Toyo E
levator Stand are recommended.
lf required, loosen the locking knob on
the tripod mounting block and level the
camera laterally.
6.
7.
B.

: TOYO-YIEIY =C T-llllf
at/>RAW{S|J
l/> TldEt-
<l/> 7^- Flzil'l$
(
Jn (drd
D&E fu
" - OEHBJ
=ARThI]6dHTdf?
( U
\
66IEAF=' V-CZ 77->=)E.C
il'lslJ(Tdu t
(Hxil).
HE
>>7^- Fo
t'. A>>Z'il'\- SD-#ffiCE
6V 97 9-
*F€6Dtd. 21HA.HTdU\.
>>7A
EO'Eld
26F
dEZ lzU(T dU
t.
9.
..LTO>>f, tr\
- F+FTilFE91'5
H^ Zt
-r
sdtltd"
@
r>f,fi-t{ oEflitffitd.'
HEF-+T>>
z'af+5..
Edrd
t\
s- lzEHL,(T du
\"
10.l/> )tzf\
-S A
qU
tr) ll -LO ElZ
t?(.
tT O
>>RA-F }F
z
].TRARUT
J,Y?
,td.
F= .
C
t-Ar>7^-FlJEtr.trt@
D5..€AfrF]|z€il{Stf6..DC6 *
doffiDP)v,y g-+R{E
l.-
trdt \{UE
a
E'fuCTdUI.
MOUNTINGTHE LENS
To mount a lens
on the lensboard,takethe lens
and lensboardto a competent
camera
mechanic
for proper mounting. Besides
flat lensboard,
recessed
lensboardf
or wide angle lens and
various adaptors to allow the use of other
cameras'boards commonly are also
available.
Pleaserefer the paragraphes
"Accessories
to
f
ncrease
Camera
Performance"
on page
21
, and
"Choosing
View Camera
Lenses"
on page
27.
9. To remove the lensboard,
push the top
lensboard
slide lock up, and the bottom
lensboard
slide
lock
down.
Note: Always
hold
thelenswith one
hand
while engaging
or unfastening
the
slide
locksto
prevent
it from falling.
10. To mount the lensboard,
place
the board
on the groove
of bellows
frame
and
return
theslide
locks
to their locked
positions.
As the lensboard is square, it can be
mountedany of four positions
so
that the
diaphragmand shutter speedcontrolsare
easily
accessible
regardlessof camera
posi-
tion.
www.orphancameras.com
OqU
trt h
>1.l\,yiOEEfr,
y.znac^+ftEU>f,'fi-sEttlz. tT
C+qz?tRTl:Uttd"
nt'. I\,y2{d
! Nlra> J 2 t
),y
2 ^g
> D4-L(ZX
5{UEIZil,IU
IJ
TT d U
I
"
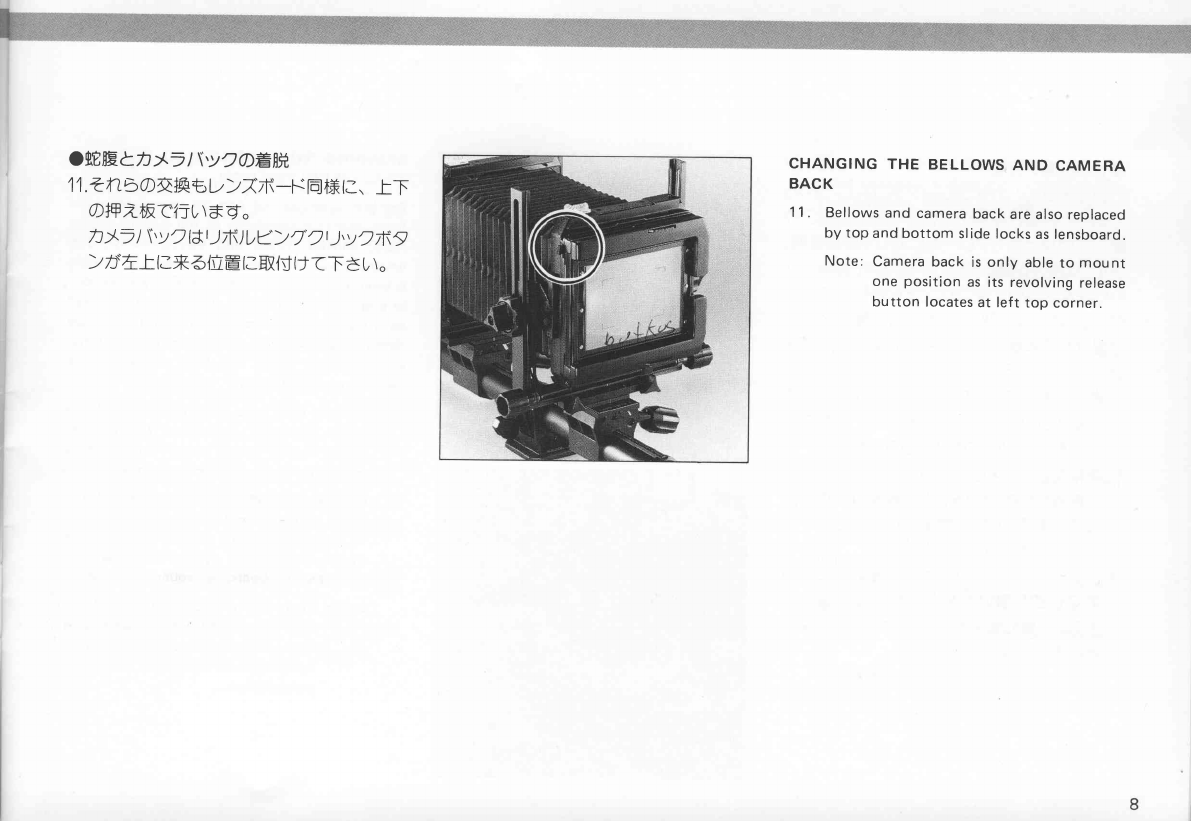
CHANGING THE BELLOWS AND CAMERA
BACK
11
. Bellows and camera back are
also
replaced
by top and bottom slide
locks
aslensboard.
Note: Camera back is only able to mount
one position as its revolving release
button locates
at left top corner.

M ToYO-YIEW4g,C
Otz!frEoffi-ad'
:_ont tlJ., n
t . L-) >L>l-(77t
-))
c Htt+,
L6++.€ES
lzrytDutd. tzD{il
EL lJ
ffit+
t ET/ tr
1,lZlS U(EtrE [q..
7j'(+Eto.
€lzEfr
c. . 4z'pe6 0>7
FDfSgl
rrdt\ltflqCd. 74/rF.. Z4>
t".,
>)Fll lJ?|)'v2DbD, F5+lz€tr
{uED+tJo
&d" t7J - )rq-l#ffir(Td
U\o
1
z.ffi!+E6
A. 47ta'
v
+> t"
/ ) A3fl
bT
- 17f)F tr-/' / )Atr r, ktLa)l-,
-LA-ffiTIJ(EOZ'v2 rtd.
13.Htt+EEA7<
)rF
tr'v
+> t"
) ) E3flh
(EtrE Ftl>pzaH r.. Xt nla^Eo
n
'Y2
Ld-d
" tzD{UElJ2
|
)'Y2t-7i -
/t,C+UDtd"
@
74)rl2 t
-)'v
2 lJ..
tz
tr{UEAlEZffilA
t a35'
O{UE
lZEbDt d-"
? A/tluEt,ffi
76.. +H{U
E-.trRfft'Et
l:) <)D
LNrg -
D}FAC'EtE/u"
BRINGING THE CAMERA TO THE NEU.
TRAL (ZERO)
POSITION
By the provision of camera
movements,
the
front and rear standards
of the camera
can be
rised, shifted, tilted and swung freely. The
neutral
position
isthe point wherethe camera
is
level;
thef
ront and
rear
standards
are
vertical-
ly and horizontally
right
angle
to the monorail
with no front and back
rise
or lateral
shift.
The
detents
for the tilts, swings
and lateral
shifts,
and reference
scales
will help you bring the
camera
to neutraleasily.
12. Unlock both rise locking knobs of the
front standard,
and bring the bellows
frame to the lowest position by turning
the
rising
knobs.
Relockthe
knobs.
13. Unlock both tilt locking knobs of the
f
ront standard,
and set
the bellows
frame
to the vertical
zero position.
Relock
the
knobs.
The vertical
tilt position
is
at zero
when
thedetent
isengaged.
Note: There
are
two additional
detents
at
35" tilt down and uP besides
at
zero. BeYond
the detents,
flo film
holders
can
be
inserted
at horizontal
com
position.
www.orphancameras.com
1
4.ffi++A74>t"a,
y+> f' U
I\- A
3UD..
74 >t"APaAH T(E U
Z,
y2, t d.
€D{UElJ2 t
-),
y2 t7J-l[, C+U
Dtq "
@
74 >t"2 |
),
y2 lJ
690"-nlzb
Dt d"
15.Htt+
CT'vA>7;D'y
+>?'/)Alfr0,,
>)*.E+*Otz n{UE
(ZEO
!,y 2 t-,
t
do
tzD{UE
lJ2
t
),y2 t 7J 17T+UD
d9o
16.'&++cHtEdl
2-1\O+RlEAftu
\.,
6/7
Cp
aaHrrq.
17.tu'tAt+O
-HBz-l'(Ett
€{F
Zld',
nr,.?l
C7N+AEA(ZXD
6Z.DCA-d"
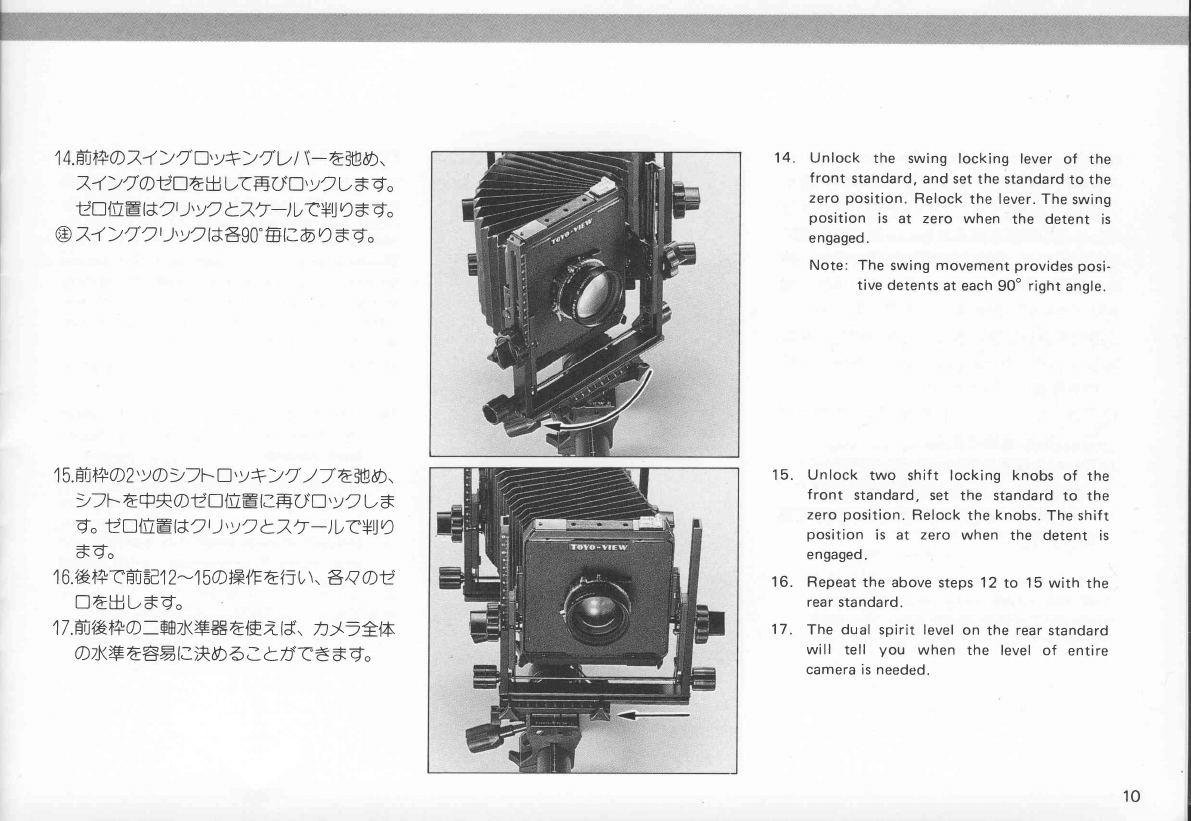
14. Unlock the swing locking lever of the
front standard, and set the standard to the
zero position. Relock the lever.The swing
position is at zero when the detent is
engaged.
Note: The swing movement provides posi-
tive detents at each 90' right angle.
Unlock two shift locking knobs of the
front standard,
set the standard
to the
zero
position.
Relock
theknobs.
The
shift
position is at zero when the detent is
engaged.
Repeat
the above
steps12 to 15 with the
rear
standard.
The dual spirit levelon the rear
standard
will tell you when the level of entire
camera
is
needed.
15.
16.
17.
10
:TOYO-YTEW4=C
ClRTt
-fq8!
oDE L,t\{UECd"-rud=fliltTn }-
AU=
DD*ft.- u6 lzba. lR{E
AEAZ
d 3TzhCd. f rf;gffi
F^ll>l€,ffit \5ffi
IJ,
a'h<lzD (2..
Ht{+AcE
6l-zlJHt^H
1,
.
1B.C>FAU0)ED..
>P'Y9
-A?#U
\(ffi
2a7#ffi(zt
(Tduto
1
9.2
t -n >>f' ) - SFrT
Fftrr
9 >t+q
L$
(..7-sa?#Etq.
7-F Ailfldffild. Pf
DE
t t90"
74>
t"
dU (=
/ >- )1,,L+|i) ..
Z
AfuETT
-S A++tIJ'
6 - TLqU
O
trES$
D}F
IJ
( il
9lt1tq-.
PHOTOG
RAPH
ING
Generally
it is
recommended
to place
thetripod
mounting
block at the centerof monorail
for
better balancingand supportingthe camera
on
the tripod and easier
handling.However,
to use
a wide angle
lens
it is recommended
to setthe
camera
as front as possible
and to place
the
tripod mou
nting block at the back of rear
standardin order to avoid vignetting
and fog-
ging
the
negative
by monorail.
18. Open the shutter
blades
and aperturedia-
phragms
for f
ocusing.
19. lf foldablefocusing
hood
is
provided,
open
the hood by pushing the hood release
latchupwards.
To remove the hood, swing the closed
hood to a 90o position parallelto
monorail,
and push the hood up to dis-
engage
the lower pivot then lean
backand
push down it to disengagespringloaded
upper
pivot.
11
www.orphancameras.com
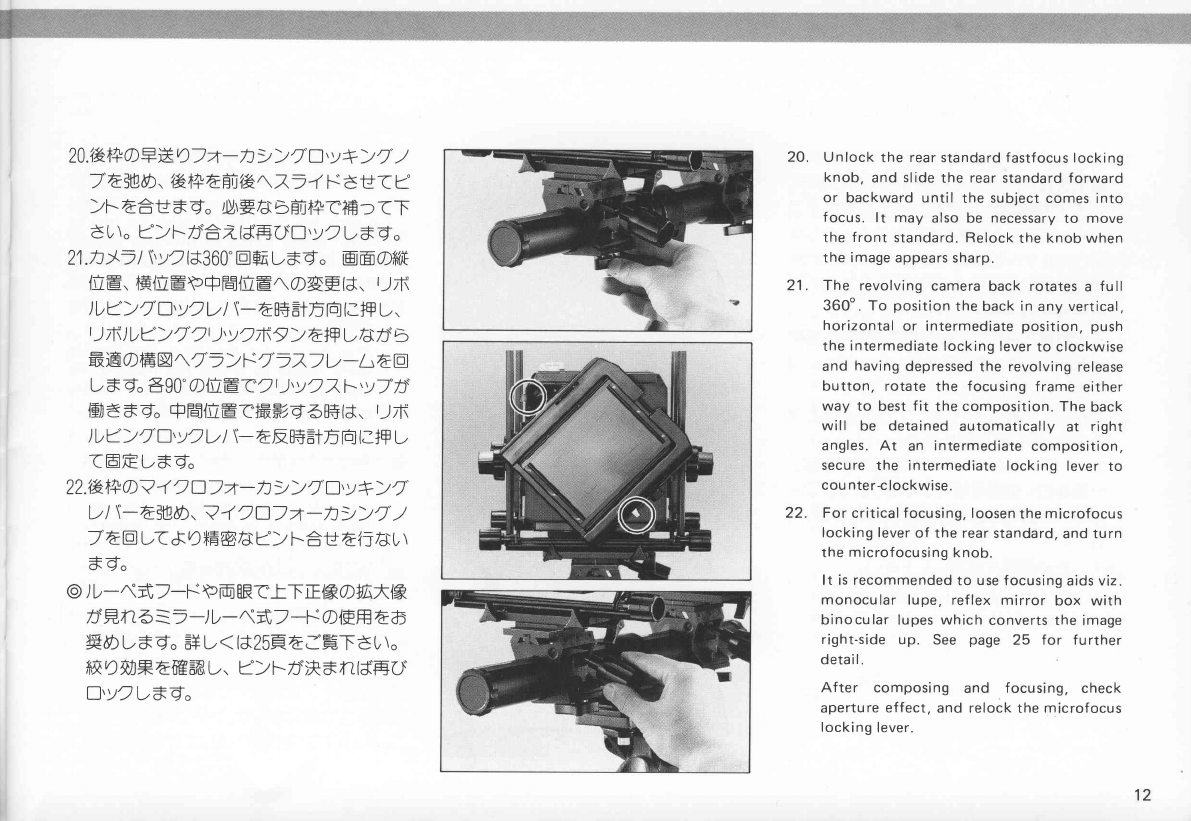
20.Lh|f+O
FiX
0) 4
- n>>t"
Z,
y
+> t"
-/
7 dlflb.. "(ht+affi&rz- 4 s dtl( r
>FAAtt t q. MEza*
bHt{+C?H
: (T
dU
t. a>FDAZld'EOn,y2, * q.
21.n
t'i I\,y2l*360'trSA
r*d" @Hof;ift
{U8..
+F{UEtrQ
F=I{fiE^OAFlJ, U
f\
)D?>t"Z,y2>
I\-AB+ilEH
lZ+Fr.
|
)^ )
ra> t"2t
),
y
2fig >A+qU
r.r*
Db
|.-
t d-"590"
O{UET2
|
),y22 F,y)"D
{Fi]A
)ra> t"
Z,y2
U
I\-AFB+a:tfr
HlzlF,
(trtrt-td.
2z.tkt+C?
42O) 4
- n>
) J.
Z,y
*> t"
>I\-A3flo.,
?-f2a) 7-n>>t" /
)Atr r( &D#ESza*a>
F6tlAftl. d7\
69"
@
),-^ rt7-s pm
ERctTE
l*.cTttxl*.
D
nn6_=r -/ r-^ fi)-s o{Fffi
a6
EE
rtd. # r< (J25FA.HTdL
r.
lrf.D{lR
Affi
#,
l-. Z>F D)R
* n ldEO
Z'y?t-td.
21.
20.
22.
Unlock the rear
standardfastfocus
locking
knob, and slide the rear standard forward
or backward until the subject comes into
focus. lt may also be necessary to move
the front standard. Relock the knob when
the image
appears
sharp.
The revolving camera back rotates a full
360". To position the back in any vertical,
horizontal or intermediate position, push
the intermediate locking lever
to clockwise
and having depressed the revolving release
button, rotate the focusing frame either
way to best fit the composition. The back
will be detained automatically at right
angles. At an intermediate composition,
secure the intermediate locking lever to
cou
nterclockwise.
For critical
focusing, loosen
the microfocus
locking lever
of the rear
standard,
and turn
the microfocusing knob.
It is
recommended to usefocusing aidsviz.
monocular lupe, reflex mirror box with
binocular lupes which converts the image
right-side up. See page 25 f
or f
u
rther
detail.
After composing and focusing, check
aperture effect, and relock the microfocus
locking lever.
12
ffiTOYO-YIEIY4s,C
23)P'v9 - L)z-h>>t")-SAPz: ti'
ffiH
AAtl.. )P'Y9-EtP-t L,t d"
24.n
l.DflJDr.r=U
\&.lZ)+H rrdDbTr
j)-LA=l E, #Eq 4ffit,4
a^=/=7 4
),
L^ )r9 - a*ffix{Fla>> 7ll rq
lJ.
ft:
trEBlzlF
t-
t d" 7=P - LARUT
Et6HAEl+&Atd..
F Bt
F=1
ffi)fB+
l;-t-+ affi F,
Dn /= ZEn
br.r=U
\S. lZ.F< *aDl'tj -) )Ulrt)
-Z EffiU\(
>P,v9-Eb)Dtd.
Z5.trffi7=itlk,
E
|= E^ftTD b ) 4 )rL/fl\'g
-ant'.DbHIflrtd"
h,vl) 4 )
U
L^ )Dg
- C3|#O+F-,
+ I
J..
-H A=<,fUHa'E^<
r( 6Dtd" ) 4
), /JO*ffiX, LffiN)frb Ca&EU
lz
6{Ft \T
dU
t.
26.C>F.t€g tre=F^r(Td U
t"
23.
24.
25.
26.
Close the lens and focusing hood; set the
exposure; charge the shutter.
Insert
a cut - or appropriate - film holder
which has been loaded with the film of
your choice facing its film side towards
lens. Lift the bail arm and slidethe holder
into position gently. Replace
the bail arm,
and remove the dark slide from the film
holder.
Trip the shutter through a long flexible
cable release
as it will not transmit the
movement of you r hand to the camera
during long exposures.
After exposed, replace the dark slide,and
remove the film holder from the camera.
The drawer of cut f
ilm holder is colou
red
one side in white and the other side in
black enabling to identify the loaded f
ilm
is
fresh or exposed.
Recheck composing and focusing.
13
www.orphancameras.com

:1-l \-+J)Ul\,y2
F= .E'_t_-45C
Cn
/- I
\,y2
{J
360'@D
t d" ) 4),
L )r9-+fi^cft:lgBtJ^S
<Fn:3.
F= ' E-)D)4)rLNr9-67/
45.,
69/45pfr..4 S^/19
-B€AEA)
c6 6Nr9 -€ trt*+F^' ({FZ 5t+F
tz
h]Z..t"-> S2. 7) >- L'DF5+
llHltf
t1dd. -Cffiffi,El--
l\-U-l1rl\'y2 L0,
LuTl,\
t d. il9fttlJ'. t"-) a,Y2Wtf,,fJ
b
L )
rg-€ ffiU
fi!
r.r*
<{F
7d-d"
1.C> FptEgaau.' _LTat".> ;t"-
7) >- LEErtP
- LA+FZ
r.r=
D bXtD
C
f; fa\+Fd-.. P
- Lft:uffiC),y
28BD[H
b6=(U \
6?>Dbtft? ..
2"2> S
t".
7)l/-LDHItltl*d"
2.) 4 )'L^)1,,9
-CHI,lJtf
lJ.,
tTc ) 4
)
D
L^) l/9
-+q
ZffiA
AFU
\7.4 lidu .
trEl'T(|adLl.
3.t".> t{
t"- 7) >- Lail{$(f lJ. HItf
,+JrlFeEAfi:(TdU t" ) 4 )rl:h)l)
I -++ZtfiDt^{FU
tz
bt?td'. HI{S|J
tJcE
tt1tu" tf{FU^Z.4 Ndtl(Tdur. HI
lltJth, EErtP
- LA),y 78BDIT AC
> ZfBb6: ( U
\3DfrEDD
(T d U
t"
Universal
Back
In addition to the features
of a f
ull 360" revolv-
ing
and
direct insertionof thick film holdersviz.
Toyo Roll F
ilm Ho
lders 67 145
, 69145 and
various Polaroid holders as the back opens its
slot wide enough, the focusing frame of the
camera back of Toyo-View 45C can be removed
easily. This provision is named the Universal
Back. lf removed the focusing frame, other f
ilm
holders
with Graf
lok type provision can be used
regardless
the th
ickness.
1. Upon composing and focusing, having de-
pressed the knurled edges of the top and
bottom focusing frame release
arms to dis-
engage the hooked portions of the arms
from the corresponding pins, shift the focus-
ing frame towards direction arrow, and
remove the f
ocusingf
rame.
2. To mount a film holder,
place
the holder
on
position and shift the top and bottom slide
locks i
nward
.
3. To reattach the focusing frame, reverse
the
removing procedure. Replace the slidelocks
outward, make su
re proper engaging the
hooks and pins.
14

ffiTOYO-YIEW4=C
n>L=L-)1 )F
?t-/t /-+-,L-) t-> FDtzllUEA*-ClJgtrO n>\. t-
AnD*Etu. F=' tr'r-45OlJ,
4x54>UAx@HlZI0Z.
5F lz-xfi
LV|RnO
HU
EAElzaq ?f; AO
L-) t'> F
A
1+
=T
u\td. znblJ-( 7., i7 F.,74)2"., 7<irF.0+ld't?.,
Htt+Q/>
7)a'&++()4),L).€ {Z{ffi
: ( U
t
t d. {FU
tDlJffi+
cd. na& Ed.lez(Tdur"
a. <7t >7 F
lt.. &DRu
t15g
Olzblzl*d+EHr5tf
t d.
A.EA.LT
lZEhDdlZlt. Et' Lk++O-
<7(AffiU
\
t d.
OOSFIJ.'
nr'- Effib)r.r={UE{ZE(Jrd
U
\
E
D
(2.'
tEgDTE
lzE'5:(U\td" @CSHld..
ffi++O.<f,
!,y+>2"
./)A
\flbT. 4
7=> F
tr
-/' / ) Etr' ..
2"
i> t-t"
- TAnt.J.h-
bffi
Eq6 ffiElzl#-AffiWJd
tf t q.ffi
MD)R
t n IJ'
D,
y
2 t-
* d-"
UEH^{3f, du5 lZld. lkt+c. 4 7affiu
\(Td u
r.
Camera
Movements
When your Toyo-View isin the neutral
position,
it functionsin the same
manneras
anordinary rigidcamera.In addition to a 4x5 inch large
format,
Toyo-View 45C provides
all directional movementson its front standard
(lens)
and rear
standard
(film) which realizenewcreationof photography.
Thesemovements
are
calledrise,shifts,swings,andtilts. Usingcamera
movements
iseasyto learn.
Just
rememberfollowing basic
rules.
RISE
AND SHIFTSCONTROL THE IMAGE POSITIONINGFOR IMPROVEDCOMPOSITION
A. TO CONTROL IMAGE VERTICALLY, USE FRONT AND REAR STANDARDS RISE
Photo (1) composesimagetoo low asthe cameracannot be
setat right posrtron.
Photo (2) controlled
the composition
by risingfront standardto desiredimprovedcomposition.Unlock both riselockingknobs;
turn rise
control
knobs
to desiredcompositionon the glass;
relock
the lockingknobs.
To control imageopposedirection,userearstandardrise.
15
www.orphancameras.com

8.1*AE6lZEhDdlzt*. Hl
.tht+o>2 Faffiu
\
td.
@CSHC(d.'
+R=l
CEHIZT.Eza*
YI)h-9=(
U
\
* d"
@c=HlJn t'. aa\+ESJ
du. IAt+At\, x tdHt{+
aa
^i7 Fr, ffiEd-5{UE
\l*tR, * d. }R,18
lJ?,yC>)l-
!'y +>t" -/) AiAb(+ A+TWJD
t . C>;n -ZI(Z+E
gD)*
* t?IJ'EO'D,y
2t.,
* d.
B. TO CONTROL IMAGE LATERALLY. USE FRONT AND REAR
STANDARDS SHIFT
Photo (3): An objection places
in front of subject.
Photo (4)
: Replace camera position to left; control the image to
desired composition by shifting rear standard to left or front
standard to right. Unlock two shift locking knobs; shift the standard
manually; relock the locking knobs upon composing
through focus-
ing
glass.
16

ffiTOYO.YTEIY4E,C
alk++o7
<
)tF
t 7< >) l&, ?Fs{aoEiEffi
\eff
a+frE.t-l=
D3f;EHdu-d"
?fis{AH
L) 4)rAHDV{J
za*
bEtr# lz
S
6l*,C#ldf; ti*
Etu
" fitff'O+R=l
Ct7eld. +HEdt15HAEld'/l{A'r.r*
D
t
Etu
" 3Q-68
du6 lZ
ld+{it9i..l.,
t d.
C.EtrEHOIJ)F
!-/Ll*.. th++A7
<
)lrFctrt\td"
@c5Fld. ?Hs{A
AnLtJ ( U
\
6/-zblz74)D
L,ffi.?Hs{A
D+{rcrcr=
<. ?fi
S{AoEtr#RDtlIil
I'TU
\
t d.
@CSH|J.
trAffiE
d
6lzhlzlb++t6Di I )rF
n'v
+>
t"
-/) AiUbT) 4)1,'LffiAF.E|ZI'.,?ff5{ L+|id tl ( U
\
-Tr.r*EF-En6-lZ
lJ.,
Zl(Et3tl'f|Jffi
Td U
t. C>F
d 9 " Lttll
6uC l=bU>7(Htt+)874 )r;t TU\-d. +HEDcAn
ld'EO!,v2
rtd"
TILT AND SWING OF REAR STANDARD COMPENSATE OR
EMPHASIZE PERSPECTIVE AND DISTORTION OF SUBJECT
lf the subject plane and film plane are parallel, the subject won't be
distorted which causing
by perspective.
For a three dimensional subject,
choose one plane to be compensated. To emphasize the perspective,
unparallelthe planes.
C. TO CONTROL VERTICALLY, USE REAR STANDARD TILT
Photo (5): Due to unparallel the film and subject planes,
the vertical
linesconverged.
Photo (6): Unlock two tilt locking knobs at rear standard;tilt the
bellows frame to parallel (in this case
- vertical)
the film plane with
subject; relock the knobs upon completion the adjustment. Usedual
spirit level to check perpendicular accurately. Tilting the lens may
be needed to refocus.
17
www.orphancameras.com
D.zKYfrHA)) F
D-/ rl*. tht+O7<
>
?'cfi EL
t
t d.
OCSF(J..
?fiS{
D) 4),L,H.+{rCra*U
tEDlz, z.l'<VE
HIZITflfiI,,TU\Td"
@O
5F lJ.'
tlltr
A+frEf'
6tr2
blz'&t+A
74 >
t"
Z'
v*> t"
l/l\-AiEbT74 )l/Lffi874 >t" l', ?fiS{
L+|idtl(
U
\
* d" +HEDCE
t?(d'EO
Z'v2 l,
t d" DrPza*
bl/>7(ffi
t+)
€H>2" I,TZ> FA6tl t d.
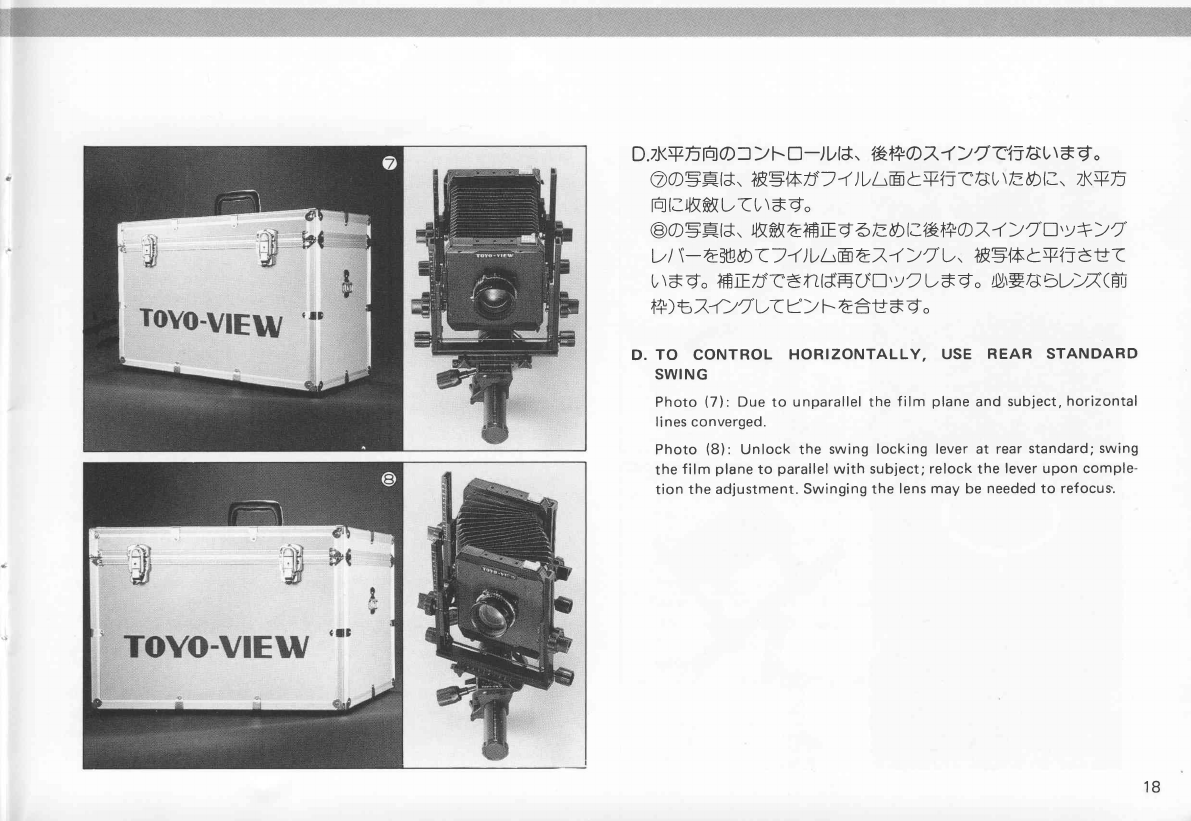
D. TO CONTROL HORIZONTALLY. USE REAR STANDARD
SWING
Photo (7l. Dueto unparallelthe film plane
and
subject,
horizontal
lines
converged.
Photo (B): Unlock the swinglockinglever
at rear
standard;swing
the
film plane
to parallel
with subject;relockthe leveruponcomple-
tion theadjustment.
Swingingthe lens
may be
needed
to refocus.
18
This manual suits for next models
1
Table of contents
Other Toyo Film Camera manuals


