tracktion F-em User manual

F-em!
Frequency Modulation Synthesizer
USER GUIDE!
TRACKTION COMPANY | www.tracktion.com

F-em User Guide
Credits
Programming: Wolfram Franke
Additional Programming: David Rowland
User Interface Design: Sasha Radojevic
Sound Design and Sample Content: Alessandro Cardinale, Ed Ten Eyck,
Jay de Miceli, Klaus-Peter Rausch (KPR), Stranjah, Vasil Ivanov (The
Editor), Yuli Yolo
Manual: Wolfram Franke, Holger Steinbrink
Version: 0.3.1
2

F-em User Guide
Table of Contents
Credits 2
Table of Contents 3
1. Introduction 4
Some Basics 5
2. Installation & Authorisation 6
2.1 Windows PC 6
2.2 macOS 6
2.3 Linux Ubuntu 6
2.4 Authorisation 7
3.Basic Operations 8
3.1 Loading Instruments on the Browser Page 8
3.2 Saving Instruments 9
3.3 The Macro Parameters in the Browser Page 9
3.4 Control Elements 9
4. The User Interface 11
4.1 Header Section 12
4.2 Keyboard Section 13
4.3 Master Section 14
4.4 Arpeggiator Master Section 14
4.5 Working with Layers 15
5. The Main Edit Section 16
5.1 Basic Sound Editing Operations 16
5.2 The FM Matrix 17
5.3 Noise Generator 19
5.4 Operator 1 to 8 20
5.5 Sample Oscillator 1 and 2 21
5.6 Common Modulation Sources 23
5.7 Filter 1 and 2 31
5.8 EQ - Equalizer and Amp 33
5.9 Arpeggiator 35
5.10 Effects 1 to 4 38
5.11 The Mod Matrix 44
5.12 The Layer Page 45
5.13 The Macros Tab 48
6.Modulation Assignment 49
6.1 About Modulations 49
6.2 Modulation Sources 51
7. Appendix 57
7.1 Modifiers and their Operations 57
8. Product Support 61
3

F-em User Guide
1. Introduction
Thank you for purchasing our F-em Frequency Modulation Synthesizer.
We hope you enjoy it as much as we do, have a lot of fun with it and
make great music with it.
F-em is a premium quality instrument that combines an advanced FM
synthesis engine with a stunning array of programming options.
The Main Edit section lets you dive much deeper into the FM synthesis
engine and offer lots of parameters to control nearly everything.
The deep sound creation possibilities include four sound layers with
eight operators each, that offer typical analog waveforms and separate
pitch and level LFOs as well as pitch and level envelopes. There are two
additional sample oscillators and a white and pink noise generator.
Followed by two serial multimode filters and a four-band equalizer with
shelf and bell curves.
Each layer can be mixed into four effect busses, each featuring a sum
overdrive, a compressor, a modulation effect like!chorus, flanger, phaser
or sum filter, and a space effect like delay or clocked delay, or natural,
plate or non-linear!reverb.
Freely assignable modulations with an easy-to-understand user
interface offer maximum flexibility easily surpassing even!expensive
hardware synthesizers. F-em offers 2 Flow LFOs, modulation modifiers
and a wide range of sources.
4

F-em User Guide
Some Basics
What is an Instrument?
An instrument is a sound program of up to four layers including all
sound data, effect settings and global instrument parameters.
What is a Layer?
An instrument can contain up to four sound layers that can be edited
separately. Basic options and parameters (e.g. Arpeggiator, Effects) are
used by all layers. Each layer offers a full range FM engine.
What is FM?
Frequency Modulation (FM) is a synthesis method that uses the
frequency of a waveform to modulate the frequency of another. In FM
synthesis, these waveform generators mostly called ’operators’ that are
comparable to oscillators.
Operators are arranged in different relationships to one another; these
arrangements are known as algorithms. Depending on the algorithm,
one or more operators is usually routed directly to the audio output.
Some FM synthesizers offer predefined algorithms, F-em uses a
completely free programmable FM matrix.
The primary operator is known as the carrier, and the other operators
are known as modulators. When a modulator does not have a direct link
to the audio output it is being used to alter the sound of the carrier.
More than one modulator can be linked to a carrier, which allows the
introduction of even more complex harmonics into the output of the
carrier. The waveshapes can become very complex.
Also, a feedback loop can be set up. This a way for an operator to
modulate itself, or to provide additional modulation for an entire stack
of operators.
In F-em, each operator offers synchronisation, a Pitch LFO and a Level
LFO as well as a Pitch envelope (with Level Scaling) and a Level
envelope. Besides this, 2 sample oscillators and 2 filters are available for
FM purposes.
The FM Matrix
5

F-em User Guide
2. Installation & Authorisation
The installation including all sample and sound data requires
approximately 2 GB space on your hard drive.
F-em can be installed and unlocked on up to 4 different computers with
a single license.
2.1 Windows PC
1. Double click “f-em 1.0.0.exe” to launch the installer for F-em. In this
example, 1.0.0 refers to the current version number of the file, which
most likely differs from this example.
2. Follow the on-screen instructions.
Installation locations on Windows:
VST 64-bit: C:\Program Files\Steinberg\VstPlugins\!
AAX 64-bit: C:\Program Files\Common Files\Avid\Audio\Plug-Ins\
2.2 macOS
1. Double click “F-em 1.0.0.pkg” file to launch the installer for F-em. In
this example, 1.0.0 refers to the current version number of the file,
which most likely differs from this example.
2. Follow the on-screen instructions.
Installation location Mac:
AU: /Library/Audio/Plug-Ins/Components/!
VST: /Library/Audio/Plug-Ins/VST/!
AAX: /Library/Application Support/Avid/Audio/Plug-Ins/
2.3 Linux Ubuntu
1. Copy the F-em 1.0.0. so file into your VST plugins directory. Common
locations are shown below.
2. Ensure your host is set to scan the location.
3. Perform a plugin scan in your host.
Common Linux VST directories:
/usr/lib/vst /!
usr/local/lib/vst
~/.vst
✎Please observe the system requirements of your host application!
F-em runs only in 64 bit host applications.
✎Please observe the system requirements of your host application!
F-em runs only in 64 bit host applications.
6

F-em User Guide
Please follow these instructions to install the F-em content
1. Create a F-em directory at "~/Tracktion/F-em/" (may already exist)
2. Copy the "Instruments" content to „~/Tracktion/F-em/Instruments“
3. Copy the "Samples" content to „~/Tracktion/F-em/Samples"
4. Restart your host and any open instances of F-em
You should end up with two folders:
"~/Tracktion/F-em/Instruments" containing „.f-em instrument" files
"~/Tracktion/F-em/Samples" containing ".acktionsamples" files
To authorize the plugin on Linux, you must use the offline authorization
method.
2.4 Authorisation
F-em uses a software based copy protection and can only run with an
activated license.
After installation, please load F-em as instrument within your DAW. The
plug-in is currently locked and running in demo mode (a noise occurs
periodically).
Click on the Unlock button in the headline of the plug-in window to
open the authorisation window.
Please enter your email address and password from Tracktion
Marketplace and click on “Register” to unlock F-em. You need an active
internet connection for this procedure.
You can alternatively click on the “Offline Unlock” button, if you
computer has no internet connection. Please follow the onscreen-
instructions.
After a successful authorisation, you can use F-em without limitations.
7

F-em User Guide
3. Basic Operations
3.1 Loading Instruments on the Browser Page
Click on the folder button in the head section to open the
Browser section. Here you can quickly locate e.g. categories
or styles of Instruments by selecting one or more tag.
Standard selection is cumulative unless the
“Command” (macOS) or “Ctrl” (Windows) key is used in
conjunction with selection – this will select individual tags.
Use the Search field in the right area to perform a text search of the
Instrument library. With the left and right arrows you can switch
through the patches.
To select sound packs or a desired author, click on the corresponding
name in the left window section. Same is valid for Category, Style or
Character search. You can also combine search attributes. To set back
a search, click on the corresponding Xin the upper right are of an
attribute column. The actual search results are always displayed in the
right sound result area.
You can tag your favourite sounds by clicking on the star symbol right
besides the sound name in the right area. Favourite sounds will be
shown with a yellow star symbol. Click on „Show only favourites“ to
show your „best only" sounds
To load a selected Instrument in the instrument result list, simply double
click on its name.
Another way to search and load a sound is to click on the sound name
field in the Header section. Here, you can also perform a name search.
8

F-em User Guide
3.2 Saving Instruments
To save an Instrument, click on the Save button in the
Header section. User Instruments are added to the
Instrument library. The file ending contains „.fminst“.
A newly saved preset is appended to the end of the file
browse list. When launching F-em, the files are scanned
starting with your user's instruments folder, followed by the public
instruments folder (the one with the factory instruments). This results in
the order that your creations come first followed by the ones from the
factory sound bank.
3.3 The Macro Parameters in the Browser Page
The Macro parameters can be found on two location: At the bottom of
the Browser page you will find additional parameters regarding the
overall Level envelopes and Effect levels. These macro parameters have
influence on the Level envelopes and Effect levels of all Layers.
Why are these parameters located on the Loading page? Because If you
load a sound and want to change some important settings directly, you
do not have to navigate to the corresponding sound edit pages.
Keep in mind, that the Macro parameters produce an offset to the
original settings. For example, if all Level envelopes are have an Attack
of 0, a negative setting of the Macro Attack dial won’t produce any
result.
Another Macro parameter location can be found in the Macros tab. Read
more on page 48.
3.4 Control Elements
Dials
To set a value, click on the dial, hold down the mouse button
and move the mouse up and down. A double click resets the
parameter value to its default.
Buttons
A simple click on a button activates or deactivates its
function. Buttons light up when they have been used.
Selection Field Button
A simple click on a selection field calls up the
corresponding display page. Selection field
buttons light up, when clicked.
9

F-em User Guide
Pop-up Menus
Click on the corresponding slot or button to open a pop up
menu where you can choose the desired option/parameter.
Value Selection Fields
Click in a Value Selection Fields and move the
mouse up or down to easily change the
parameter value. Double click in a Value
Selection Field to set the parameter value to its default value.
Fader
Click on the corresponding fader and hold it.
Move your mouse to the left or the right to
change the value. Some faders need to move
vertically to change values.
Graphical Elements
Click on the corresponding graphic and
move the mouse vertical or horizontal to
change settings. This is valid for the
envelopes as well as the equalizer curves.
Wheels
To change the value, click on the wheel and drag it up
or down. The Pitch wheel snaps automatically back into
its center position as soon as you release the mouse
button.
The Virtual Keyboard
F-em provides a virtual keyboard with 128 keys. Click on a key to play
the corresponding note. The vertical position of the initial click of the
key determines the velocity.
10

F-em User Guide
4. The User Interface
F-em is divided into different sections which are described in detail
within the next chapters.
The Header section (1) offers basic instrument functions.
The Main Edit (2) section includes lot of controls to edit a Sound Layer
in detail.
The Layer section (3) lets you select and control the 4 Sound Layers.
On the left side, you find certain sub sections (4) for controlling FM
Operators, Filters, the Arpeggiator, Effects etc.
In this section (5) you find: An EQ page includes a four-band equalizer,
the Arp page offers a powerful arpeggiator, the Effects page offers four
effects for each layer. The Mod page contains an extensive modulation
matrix and the Layer page contains various options and parameters for
each of the four layers.
The Master and Arpeggiator Master section (6) offers global
parameters.
The Modulation Sources section (7) offers the Macro page, 2 Flow
LFOs, lots of additional mod sources as well as modifier sources.
The Virtual Keyboard (8) provides a virtual full-range keyboard with 128
keys
11

F-em User Guide
4.1 Header Section
The Header section offers global and basic settings.
• Click on the f.´em logo to open a pop-up window with additional
information about the plug-in version number as well as the
development team. Here, you can also check for updates.
• Click on the Folder button to open the Browser section. Read more
in the chapter “3.1 Loading Instruments on the Browser Page” on
page 8 of this manual.
• Click on the Program Interface button to open the Main Edit page.
Read more in the chapter “5. The Main Edit Section” on page 16
• The Instrument name field displays the name of the actual
Instrument. Click on the name to open the sound list.
• Click on an Arrow button to switch to the previous/next sound.
• The Instrument information field opens a pop-up window where you
can enter several information regarding the actual sound. These
information will be saved with the sound.
•Name: Here you can enter a name for
the actual instrument.
•Category: Here you can enter an
instrument category, e.g. Lead.
•Author: Here you can enter the name of
the sound designer.
•Style: Here you can enter a sound or
music style of the actual instrument.
•Character: Here you can enter a sound
character of the actual instrument.
•Description: here you can enter a further
description regarding the instrument.
• The Save button lets you save the actual
Instrument. You can also change the name of
the Instrument during the storing process.
• The Master Volume dial allows you to adjust
overall volume of F-em. The meter left besides
the Volume dial displays the outgoing audio
signal.
• Click on the Global button (gear symbol) to
open a pop-up window with additional
parameters (see picture on the right). Click the
Global button again to close the Global menu.
•Author: Here you can enter the name of
the sound designer.
•Zoom - click on the corresponding zoom
button to change the size of the plug-in
user interface. The regular size is 100%.
You can also drag the handle in the
lower right GUI corner to change the size
of the user interface to your needs.
12

F-em User Guide
•MPE activates/deactivates the global MPE mode (MIDI
Polyphonic Expression) for all Layers. Read more about the
MPE functionality of F-em on page 46.
•Multiple Cores - when running multiple instances of F-em,
turning off the multi core processing can improve CPU
performance on certain systems – typically older computers.
Which setting works better, depends on your computer
hardware, your operating system and finally your host
application. Therefore, we recommend to try out both settings
in different work situations.
•Control Behaviour - when using a mouse to adjust the rotary
controls, the input movement can be selected to be linear or
circular. If set to “Circular”, you change a value of a rotary
control by clicking on it and moving your mouse in a circular
motion around the control. You don‘t need to stay inside the
control bounds, though, you have a wide range to fine-tune the
value. If set to “Linear”, rotary controls behave like value
display controls. Moving the mouse up or right increases a
value, moving it left or down decreases it.
•Open GL - Activates/deactivates the Open GL graphic engine.
If deactivated, the graphic performance is reduced. We
recommend to switch Open GL off only, if you experience
incompatibilities or odd behaviour.
•Locations - Click on the corresponding button (e.g. User
Sounds) to open the folder where the sounds or samples are
placed. If you want to move the preset/sample content, you
need to show F-em the new data path. This can be done within
the Locations window.
•Install Content Pack - If you have downloaded a content pack
outside of the Tracktion Download Manager, click this button
to locate and install the pack.
•Check For Updates - Click on this button to open the
Tracktion Marketplace. If an update for F-em is available, it will
be shown here. Keep in mind that you need an active internet
connection to check for updates.
•Question Mark button - click on this button to open this PDF manual.
•Panic button: Click on the exclamation mark button to send and
execute an “All Notes Off” command to terminate stuck notes. Panic
immediately sets all envelopes to their release phases. Panic also
stops the arpeggiator playing when running in Latch mode.
4.2 Keyboard Section
F-em provides a virtual keyboard with 128 keys and two wheels. Click
on a key to play the corresponding note. The vertical position of the
initial click of the key determines the velocity. The orange arrows to the
left and right side of the keyboard can be used to move the keyboard
range, that goes from C-2 to G8.
13
F-em User Guide
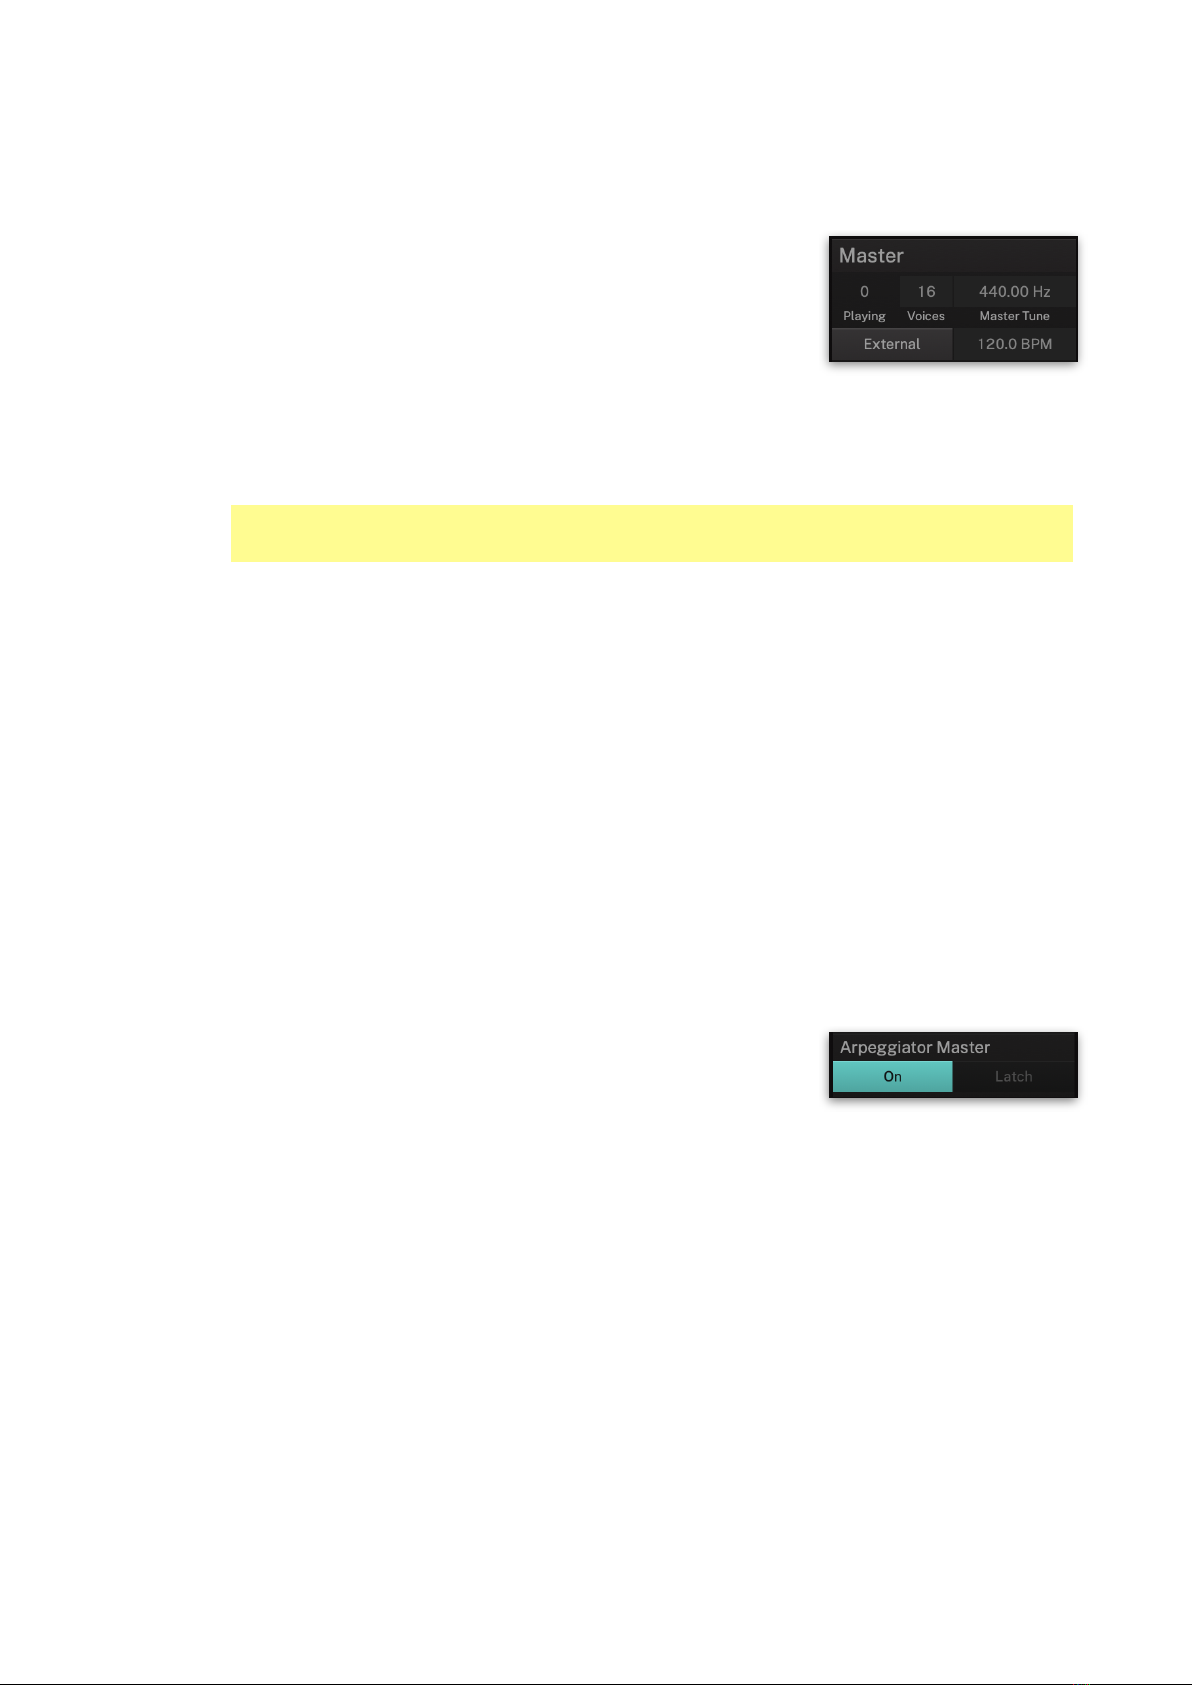
4.3 Master Section
Here, you can make global settings for playback.
•Playing: Shows the number of the current
played voices. Keep in mind, that every of the
4 Layers plays its own voice, so the total
number of played voices is 4 when all four
Layers are active and you play a single note
(and Unison is set to 1).
•Voices: Determines the maximum number of
voices that F-em produces (up to 256 voices, default is 40).
Decreasing the number of voices improves efficiency and therefore
reduces load on CPU. If voice count is set too low, then “voice
stealing” can occur with the possibility of audible artifacts.
•Master Tune: 440.00 Hz is widely used as concert pitch in the United
Kingdom and the United States. In continental Europe, the frequency
of the note A commonly varies between 440 Hz and 444 Hz. In the
period instrument movement, a consensus has arisen around a
modern baroque pitch of 415 Hz (Abof A 440), baroque for some
special church music (Chorton pitch) at 466 Hz (A# of A 440), and
classical pitch at 430 Hz.
•External: When enabled, the arpeggiator(s) and all clock-based
parameters (LFOs, Envelopes, Clocked Delays etc.) are synchronized
to the tempo of your host application. If disabled, you can specify a
desired tempo in BPM (see Tempo option below).
•Tempo: Adjusts the tempo when External is disabled. This can be
useful if you prefer a rhythmic pattern to be half or double time. By
double click on Tempo, it will be set to default 120 BPM.
4.4 Arpeggiator Master Section
The arpeggiator is used to sequence rhythmic
patches. Each of the 4 layers can have its own
arpeggiator settings, but this section controls the
global arpeggiator settings for all layer
arpeggiators simultaneously.
•On: Toggles the operation state for all arpeggiators to on or off.
•Latch: Enables the arpeggiators to remember the last set of keys
played on the keyboard. When enabled, the arpeggiator sequences
will continue to play even after the keys have been released. Once all
keys are released, the next chord to be played will clear the latch
memory and only the newly played chord will be arpeggiated. To
stop the arpeggiators with Latch enabled, press the “On” button.
14
✎Please keep in mind that the chosen number of unison voices will
respectively add more CPU usage.

F-em User Guide
4.5 Working with Layers
F-em offers 4 Layers. Each Layer offers a full range FM synthesis
engine, an equalizer, an arpeggiator, an effect section and
comprehensive modulation options as LFOs, sources and modifiers.
Finally, the audio signal of the 4 Layers is mixed together.
•Layer button: Click on the corresponding Layer button to select the
desired Layer for editing. The parameter page switches immediately
and shows the settings for the current Layer.
•Mute/Solo: Click on the Mute button (M) to mute the desired Layer.
Click on the Solo button (S) to solo the desired Layer. This mutes all
other Layers. Click the Solo/Mute button again to deactivate the
solo/mute function.
•Layer Volume slider: Controls the output level of the corresponding
Layer.
•Layer Panner dial: Controls the panning of the corresponding Layer.
•Copy/Paste/Init buttons: Click on the first button
(with two overlay rectangles) to copy the settings of
the corresponding Layer into the clipboard. Click on
the second button (with the clipboard symbol) to
paste the settings of the Layer in the clipboard to the corresponding
Layer. Double click on the third paper bin symbol to to initialize the
corresponding Layer to its basic settings.
•CPU Usage Display: The CPU usage display right beside the 4 Layers
is used to monitor how much of your computer’s CPU is being used
by the instrument. If you play too much F-em voices, the global
performance of your system and the audio may suffer.
15

F-em User Guide
5. The Main Edit Section
The Main Edit section includes dedicated subpages to edit each Sound
layer in detail.
5.1 Basic Sound Editing Operations
For deeper sound editing, it is useful to know, how F-em is structured
and how to select subpages.
Here is a short overview, how to edit a sound:
• Create a default Layer: We recommend to start with a single default
Layer. Select Layer 1 and initialize it. Click on the Solo button, so that
you hear only this layer.
• Build up an FM interconnection: First of all,
you need to set up a FM basic structure.
This must be done in the FM Matrix. Click
on the FM Matrix selection field to open the
FM Matrix page.
• Here, you find a basic structure of your sound.
By default, Operator 8 (O8) is routed to the
amplifier (A). When you press a key on your
MIDI master keyboard, you should hear a raw
sine tone. In our case, O8 is called a carrier.
• To edit the sound parameters of Operator 8,
simply click on the O8 selection field. Here, you
can make edits regarding the frequency, the
waveform and the corresponding modulation sources for Operator 8,
as Pitch LFO, Level LFO, Pitch Envelope, Level Scaling and Level
Envelope.
• Click on the selection fields of the other operators (O1 to O7) to open
the corresponding operator edit pages.
• In the same way, you can open a Noise generator (N), two Sample
Oscillators (S1 and S2) as well as two filters (F1 and F2). Keep in mind,
that every module can be deactivated by clicking the On/Off button.
• You can also select a dedicated EQ for each layer, an arpeggiator
(Arp), 4 Effects, a modulation matrix (Mod) and a page with basic
Layer parameters.#
16
✎Hint: Some sound parameters may display a little right-pointing
triangle symbol. If it is highlighted, this indicates, that this
parameter is modulated by on or more modulation sources. Upon
clicking such a highlighted Modulation indicator, it opens a popup
menu showing the modulation sources and amounts. Clicking one
of these entries activates the respective Modulation Assignment
View. Read more about modulations in the corresponding
chapter on page 49.
✎Every operator/oscillator edit page, as well as the effects, the
modulation matrix and the arpeggiator will be described in detail
on the next pages. !
So let’s start with the FM Matrix!

F-em User Guide
5.2 The FM Matrix
To open the FM Matrix page, click on the FM
Matrix selection button.
The FM Matrix page with a simple FM connection
Here, you setup you FM connections. As you might know, each operator
can be work as a carrier (you hear the corresponding operator audio
signal) or as a modulator (you might not hear the audio signal, but it
works as modulation source for other operators (or the filters).
By default, Operator 8 (O8) is set up as a carrier (see picture above).
This is represented by the thin white connection lines from O8 to A
(which stands for Amplifier). By clicking and moving the mouse over
the intersection, you can edit the volume. You can also use the slider in
the left section on the O8 selection field. You can switch off operators
by clicking pin the corresponding button (e.g. O1). The white connection
line is greyed out. Click again on the button again, to activate the
operator.
In our example (see picture above), we have set up O1 as a carrier for
Operator 8. This can be done by clicking on the intersection of O1 and
O8 in the matrix. Keep in mind that you need to click and move the
mouse up or down to adjust the modulation amount. In our example,
the amount is -17.2 which means, that operator 1 modulations operator
8. Here, Operator 1 can’t be heard because there is no connection to the
amplifier (A),
Changing the ratio and frequency of Operator
8 will change the modulation of Operator 1
and so also the sound result. This can be done
by using the two value selections on the selection field for O1.
Depending on the values, the sound can change dramatically.
You can also introduce a feedback for a desired operator. Click on the
corresponding feedback selection field in the FB column and move the
mouse up or down. In our example, we introduced a small amount of
feedback for Operator 1.
You can also sync two operators. In our example, we have set up sync
for Operator 8 which will be synchronized to Operator O1. Click on the
17

F-em User Guide
corresponding Sync selection field in the SNC column and move the
mouse up or down.
Each operator can be controlled by velocity. To do so, click on the
corresponding velocity selection field in the VEL column and move the
mouse up or down. In our example, we introduced maximum velocity
amount for Operator 1 and 8.
In the right section of the
FM matrix page you will
find miniature graphics,
that represents the current
settings of the operators. The first two waveforms show the Pitch and
Level LFO for each operator. The next graphic shows the Pitch
envelope and the last one the Level envelope. To navigate directly to
the corresponding edit page, click on the desired graphic.
Each operator can be placed in the stereo panorama. This is done in the
P(anning) row under the A(mplifier) row at the bottom of the FM Matrix
page. Click on the corresponding selection field and move the mouse
up or down.
Below the miniature graphics you find a simple oscilloscope which
displays a graphical representation of the current audio signal.
18

F-em User Guide
5.3 Noise Generator
On this page, you find the noise generator
controls. To open this page, click on the N
selection field in the left section. Each Layer
features its own noise generator.
•Noise Activation:
Click on this
button, to
activate/
deactivate the
Noise generator.
•Noise Selection:
Click on this pop-
up menu to select
the noise type.
You can choose
between White
noise (which contains all frequencies with equal intensity) and
Pink noise (where each octave interval carries an equal amount
of noise energy).
•Noise Filter: Click on the pop-up menu to select the desired
noise filter type. A description of the available filter types can
be found in chapter „5.7 Filter 1 and 2“.
•Cutoff: Controls the cutoff (on low pass or high pass types) or
center (on band pass or band stop types) frequency of the
filter. If Comb is selected, the frequencies near the cutoff
frequency are emphasized. If Redux is selected, the outgoing
sample rate of the signal is reduced. The Cutoff value is shown
in Hz ion the left section and also as graphical representation.
•Resonance: Controls the resonance of the filter if set to any of
the 12 dB or 24 dB filter types. On 6 dB filter types, this control
does nothing. On band stop types, it narrows the stop band,
which is almost inaudible. If Redux is selected, the outgoing bit
rate of the signal is reduced.
•Burst Rate (the upper parameter in the left section of the Noise
generator): Burst noise consists of sudden step-like transitions
between two or more current levels. The lower the value, the
more popping or crackling sound is produced.
!
19
✎Pitch LFO, Level LFO, Pitch Envelope, Level Scaling and Level
Envelope are described in separate sections in chapter 5.6,
because they are identical for all Operators/Sample Oscillators/
Noise generator.

F-em User Guide
5.4 Operator 1 to 8
On these pages, you find the Operator
controls. To open an Operator page, click
on the corresponding selection field O1 to
O8 in the left section. Each Layer features
its own set of 8 operators. Because every Operator features the same
parameters, it will be described at once.
The Copy/Paste buttons lets you copy all settings from this operator
and paste it to any other, regardless of its Layer.
•Operator On/Off:
Click on this
button, to
activate/
deactivate the
corresponding
Operator.
•Waveform: Click
on this button to
open a pop-up
menu. Here, you
can select the
desired operator waveform (Sine, TX2 - 8, Triangle, Square,
Saw). The TX waveforms are based on a classic FM synthesizer
from the 1980s.
•Invert: By clicking this button, the polarity of the selected
waveform is inverted. When the button lights up, the phase of
the waveform has been inverted.
•Ratio: The Frequency Ratio selection causes the frequency of
the operator to follow the keyboard. In other words, higher
notes produce higher frequencies. 1.00 is the fundamental
pitch, so the values 0.25 and 0.50 are considered sub-
harmonic. As with the notes on a piano, doubling the coarse
tuning value raises the frequency by an octave, and lowering
the value by half produces a frequency that is an octave lower.
For example, a value of 2.00 is an octave higher than a value of
1.00, and a value of 0.50 is an octave lower than a value of 1.00.
•Freq Offset: This option is comparable to the pitch parameter
of an oscillator. Based on the fundamental pitch, the operator
can be tuned in Hertz to positive and negative values.
•Sync: Synchronizes the current operator to the selected one
(O1 to =8). Synchronization means, that the operator is reset
with each full wave cycle of the selected master operator. It
produces a rich sync-sound. Any operator can be synced to
any other operator besides itself. Recursive sync is prevented,
the second sync connection is disabled in this case.
•Start Phase: Controls the phase with which the Operator
begins its cycle when a note is played. Typically, you set
Startphase to “Free” if you want to simulate a typical analog
synthesizer waveform or if you want to have some life in the
sound. When you set up more than one Operators to play the
same waveform and roughly the same pitch, you should also
set Startphase to “Free” to prevent flanging upon note start, an
effect that plagues most sample-based synthesizers even
today. You should set Startphase to the maximum magnitude
20
Table of contents


