Tradewinds GADABOUT M300 User manual

Owner’s Manual
Model #’s
M300
M400
M500
Read & Save This
Instruction Manual!
P/N 71112
REV 11/03
Evaporative Cooling
Evaporative cooling uses the principle of evaporation to lower the air temperature. Hot, dry air is passed through wetted
filters and is converted to refreshingly cooled air. Gadabout Coolers make the best use of the evaporative process by
controlling the flow of water, spreading the water evenly over the filters, and delivering a steady stream of cooled air.
Gadabout evaporative coolers are 80% less costly to operate than refrigerated air conditioners.
SAFETY GUIDE LINES & CAUTIONS
When Operating When Servicing
Make sure that the circuit the cooler is plugged into is equipped with a
(slow blow) breaker large enough to support the full amperage of the
cooler.
Always Unplug the cooler before attempting service of any kind.
To reduce the risk of fire or electrical shock, DO NOT use this fan
with any Solid-state speed control device.
If the motor shuts off because of thermal overload, check into the
problem immediately. If allowed to continue, permanent damage will
occur.
This cooler is equipped with an automatic thermally protected motor. If it
shuts off on its own for any reason, it can restart without warning.
Keep cord away from high traffic areas where it may come in contact
with a sharp object or be run over by heavy equipment.
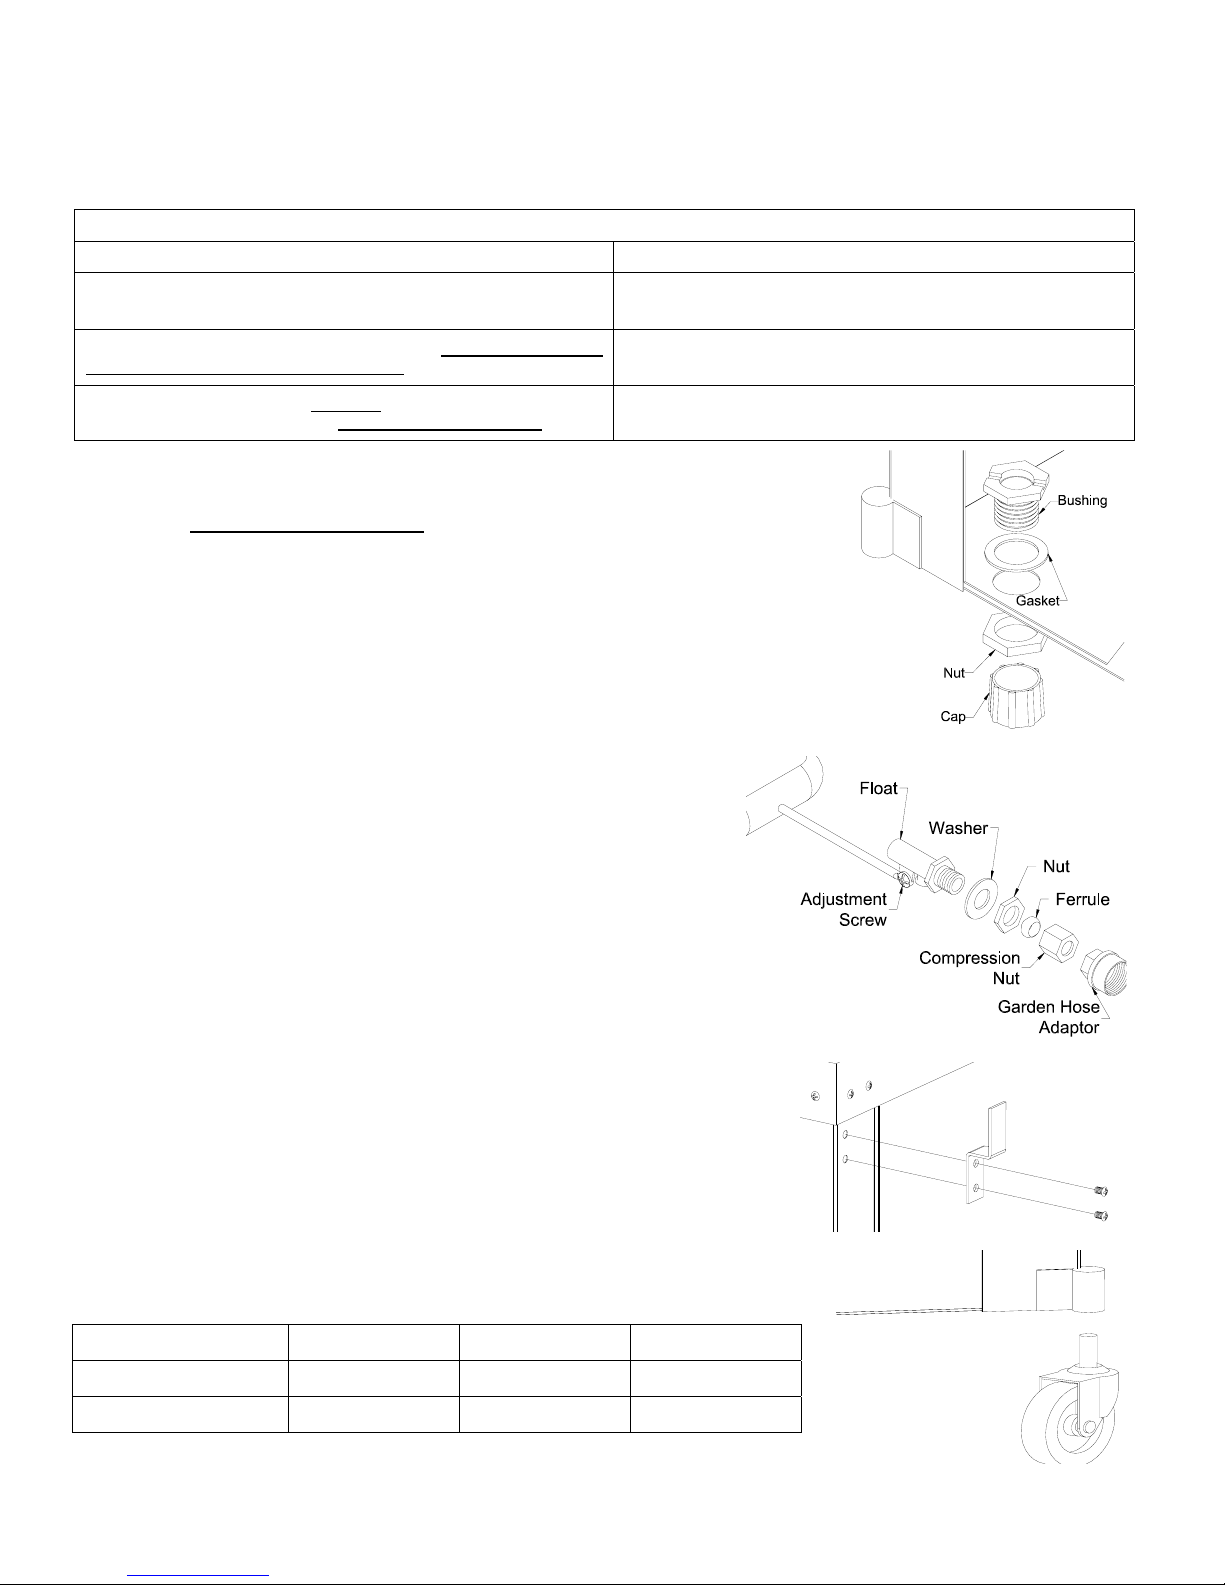
INSTALL DRAIN
1. Slide the Gasket over the Bushing and push through the hole in the cooler pan from
the inside. DO NOT OVERTIGHTEN.
2. Screw the Cap onto the Bushing and HAND TIGHTEN.
3. If leakage occurs after Reservoir is full, retighten the Drain Cap until leaking stops.
A small amount of silicone caulk may be used if necessary.
INSTALL FLOAT
1. Place threaded portion of Float through hole in side of cabinet.
2. Place Washer onto float.
3. Thread Nut onto float, and tighten to secure.
4. Thread Garden Hose Adapter onto float.
5. To adjust float level, loosen Adjustment Screw. Adjust level so float shuts off
completely when water level reaches fill line. Retighten screw.
Note: The compression nut and ferrule are not required when installing
the garden hose adapter.
Note: You may fill the cooler by removing one of the louvers and filling
the Reservoir directly from a garden hose.
Note: If the front panel interferes with the operation of the float, rotate the
float bulb slightly to allow proper operation.
INSTALL CORD WRAP BRACKETS
The Cord Wrap Brackets attach to the left front corner of the cabinet as
shown. Use the ¼-20 screws and nuts provided.
INSTALL CASTERS
The Casters slip into the outrigger brackets at the bottom corners of the
cabinet as shown.
OPERATION
1. Place the unit on a level surface near an open door or window.
2. If used inside a building, you should partially open doors and/or windows to
ensure adequate exhaust.
3. The cooler may be run on PUMP ONLY, for 2 to 3 minutes before fan
operation, to ensure proper wetting of the pads.
4. HIGH and LOW COOL settings operate both the fan and the pump.
5. HIGH and LOW VENT settings operate only the fan.
Caution: Do not operate the pump with low or no water in the reservoir.
Model M300 M400 M500
Power consumption 626 watts/hr 551 watts/hr 662 watts/hr
*Cost 4.4 cents/hr 4.0 cents/hr 6.4 cents/hr
*Based on 7 cents per KWH
2

MAINTENANCE
3/4"
NOTE: This fan motor is thermally protected with an automatic reset and will
automatically stop if overloaded. After the motor cools, it will restart automatically. If
this occurs, check into the problem before permanent damage occurs.
Periodically inspect your cooler for leaks, proper belt tension and alignment, blocked
water lines and excessive residue build-up on the pads.
To adjust belt tension, loosen the 4 Adjustment Bolts (2 each side) on the Motor
Mount. Adjust belt tension so that 3 pounds of pressure (lightly push with one
finger) will cause the belt to deflect ¾”, as shown. Retighten the Adjustment Bolts.
•
•
•
•
•
Note: The M300 is a direct drive unit. There is no belt.
Use SAE 20W or SAE 30W non-detergent oil to lube the bearings. Place 2 to 3
drops in the bearing oil cups at the beginning of the season and no more than
once a season during cooling season. If the motor has oil holes (usually plugged
with yellow caps that read “OIL” at either end of the motor) oil the motor also,
following the same procedure as for bearings.
NOTE:
Excessive oil in the bearings may leak out and be drawn into the air stream.
Excessive oil in the motor may leak onto the motor windings and damage the
motor.
The M300 has no blower bearings, but the motor may be oiled by putting 2 or 3
drops into the small, V shaped protrusion on the side of the motor.
• To replace pads
1. Remove pad frames from cooler.
2. Unhook pad holders and remove.
3. Remove and discard old pads.
4. Clean mineral deposits from the pad frames. If the paint is chipped or rust spots
occur, sand the spots and paint with a rust resistant exterior paint.
5. Place new filters in pad frames and tuck in to prevent hot air from bypassing.
6. Replace pad holders and hook into place.
7. Replace pad frames in cooler.
NOTE: The M300 has only one pad frame. Two evaporative pads are mounted
inside of the cabinet. They are accessible from the pad frame.
• Cleaning cooler
1. Remove the Drain Cap and let the water drain from the reservoir.
2. Rinse dirt and debris from the pan and clean any mineral deposits that may have
collected in the reservoir or on any interior surface of the cooler.
3. Clean water trays and ensure that water slots are not clogged.
4. If the paint is chipped or rust spots occur, sand the spots and paint with a rust resistant exterior paint.
NOTE: Do not get water on the Fan Motor. This will cause damage.
• Storing cooler
WIRING DIAGRAM
WHITE
GREEN
BLUE
GREEN
BLACK
RED
GREEN
WHITE
BLACK
PUMP
RECEPTACLE
MOTOR/
1. Drain water and clean cooler and dry thoroughly.
2. Clean or replace evaporative pads. (Remove pads from pad
frames and rinse thoroughly. Allow pads to dry before
replacing.)
3. Cover cooler with good quality canvas cover if storing outside
(DO NOT use plastic). This will protect the finish.
Always unplug cooler:
• Before attempting service of any kind
• When not in use
• When moving
• When filling, if float not used WHITE
MOTOR
RECEPTACLE
3

TROUBLE SHOOTING
PROBLEM POSSIBLE CAUSE REMEDY
Cooler fails to start or does not
deliver air
No electrical power to unit
•
•
Fuse blown or breaker tripped
GFCI tripped
Motor overheated
Motor locked-up
Check fuses or breakers and GFCI
Check voltage and belt tension,
replace motor if needed
Replace motor
Motor cycles on and off Low voltage Check voltage, plug into different
outlet if needed
Excessive humidity Insufficient exhaust Open doors or windows
Inadequate air delivery Insufficient exhaust
Pads plugged
Clean or replace pads
Inadequate cooling
Insufficient exhaust
Pads not wet
•
•
•
•
•
•
•
•
Pads plugged
Water distributor clogged
Pump malfunction
Water trays clogged
Open doors or windows
Check water distributor system
Clean or replace pads
Clean water distributor
Clean or replace pump
Clean water trays
Musty or unpleasant odor Stale water in cooler
Pads mildewed or plugged
Drain and clean pan
Clean or replace pads
Noisy Fan rubbing housing
Loose parts
Realign blower wheel (unplug unit)
Tighten loose parts
Cooler pan overflowing Float improperly adjusted Adjust float
LIMITED WARRANTY
This warranty is extended to the original purchaser only. It does not cover damages incurred during shipping or
through accident, neglect, or abuse by the owner. Tradewinds does not authorize any person or representative to
assume any other or different liability in connection with this cooler.
TERMS AND CONDITIONS OF WARRANTY
The CABINET is guaranteed against leakage due to rusting out for Five Years. All other original parts provided by
Tradewinds are warranted against defects in material or factory workmanship for Two Years.
EXCLUSIONS FROM THE WARRANTY
Tradewinds is not responsible for incidental or consequential damage resulting from any malfunction.
Tradewinds is not responsible for any damage occurring from the use of water softeners, chemicals, descale material,
or if a higher horsepower motor than what Tradewinds recommends is used in the unit.
Tradewinds is not responsible for the cost of service calls to diagnose cause of trouble, or labor charge to repair and/or
replace parts.
HOW TO OBTAIN SERVICE UNDER THIS WARRANTY
Contact the Dealer where you purchased the evaporative cooler. If for any reason you are not satisfied with the
response from the Dealer, contact Customer Service Department: Tradewinds 5800 Murray Street, Little Rock,
Arkansas 72209. 1-501-562-1094. www.tradewindscooler.com.
When contacting Customer Service, please have the following information available.
Purchase Date: ___________________
Model Number: ___________________
Serial Number: ___________________
4

M400 & M500 REPLACEMENT PARTS
Item M400
Part No. M500
Part No. Description Item M400
Part No.
M500
Part No. Description
1 71014 71014 Power cord 20 30318 30322 Blower wheel
2 71033 71033 Cord wrap bracket 21 30241 30238-02 Shaft
3 70973 71027 Water hose 22 524330 524331 Set collar
4 71130 71130 Grill assembly 23 501244 501241 Fiber washer
5 71012 71030 Pump 24 583000 60PB Bearing
6 71129 71129 Knob 25 70925 70924 Bearing support
7 70982 70982 Switch bracket 26 583009 583091 Blower pulley
8 524299 524299 Switch 27 582093 582030 Belt
9 595121T 595121T Pump receptacle 28 71025 70955 Blower brace
10 595098T 595098T Motor receptacle 29 325FP 325FP Motor pulley
11 70965 71000 Cabinet 30 50310 30491 Motor
12 70967 70968 Water distributor 31 524162 524162 Motor clamps
14 70959 70958 Top 32 515160 70154 Motor support
15 71019 71019 Caster 33 595129 595129 Motor cord
16 524198 524198 Float 34 504254 504256 Pad retainer
17 71021 71021 Garden hose adapter 35 71103 71104 Pad
18 70980 70980 Drain assembly 36 70957 70956 Pad frame
19 70972 71026 Blower housing 37 504267 504269 Water tray
5

M300 REPLACEMENT PARTS
Item M300
Part No. Description Item M300
Part No. Description
1 71014 Power cord 16 70425 Inlet ring
2 71033 Cord wrap bracket 17 70423 Motor
3 70973 Water hose 18 70424 Blower wheel
4 71012 Pump 19 70367 Blower housing
5 71130 Grill assembly 20 71019 Caster
6 71129 Knob 21 524198 Float
7 70982 Switch bracket 22 71021 Garden hose adapter
8 524299 Switch 23 71052 Pad (side)
9 524342 Switch box 24 504266 Tray (side)
10 595121T Pump receptacle 25 70415 Pad retainer (side)
11 71006 Cabinet 26 70980 Drain assembly
12 71100 Water distributor 27 504255 Pad retainer (back)
13 70987 Top 28 71053 Pad (back)
14 70431 Motor mount 29 70375 Pad frame
15 589040 Rubber bushing 30 504268 Water tray (back)
6
This manual suits for next models
2
Table of contents
Other Tradewinds Air Cleaner manuals


