Trieste TRD-WQP8-9239H S/S User manual
A
B
C
12
A
B
C
D
12
日期
签字
底图总号
旧底图总号
描校
描图
借(通)用件登记
日期
日期
标准化
处数
工艺
审核
设计
标记 更改文件号
审定
批准
校对
签名
张
第
张
共
广东美的集团股份有限公司
数量
阶段标记
量重
比例 D
美的洗涤电器制造有限公司
REV.
1
11
00
英文用户手册
新西兰
TRD-WQP8-9239HS/S
(9239H)
TRIESTE
6710004578
技术要求:
所有内容的印刷颜色均为
规格为:
如供应商的排版需要加空白页,请加在后面
1. PANTONE Black C
2. A4
3.
80G双胶
TRD-WQP8-9239H S/S
Witheachwashcycle.
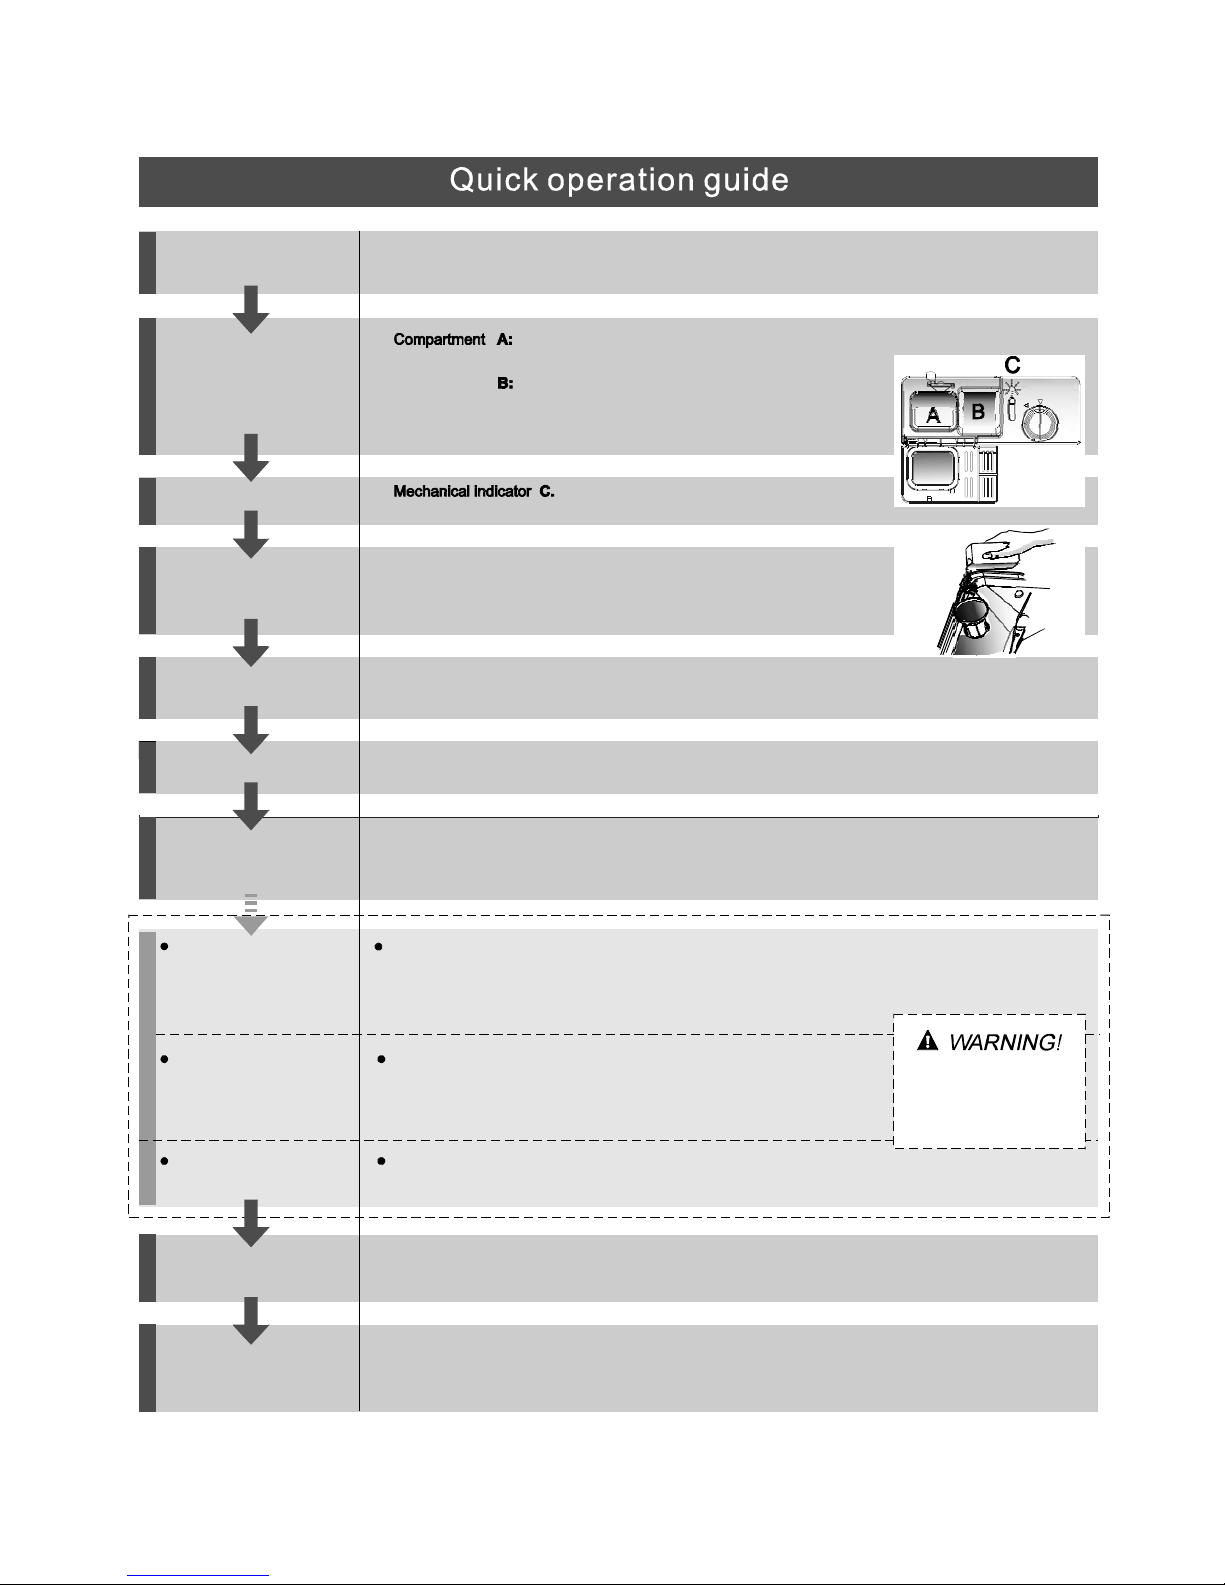
Compartment
For programmes with pre-wash only.
(Follow the user instructions!)
Electric indicator on control panel (if provided).
Check the rinse aid level
(On models with water softener system only.)
Electric indicator on control panel (if provided).
If there is no salt warning light in the control panel
(for some models), you can estimate when to fill the salt into
the softener by the number of cycles the dishwasher has run.
Check the regeneration
salt level
Load the baskets
Select a programme
Close the door, turnon the water tap and press the Start/Pause button. The machine will start working
after about 10 seconds.
Running the dishwasher
Switch off the appliance
Turn off the water tap,
unload the baskets
Fill the detergent dispenser
Warning: wait a few minutes (about 15 minutes) before unloading the dishwasher to avoid handling
the dishes and utensils while they are still hot and more susceptible to break.
They will alsodry better.Unload the appliance, startingfrom the lower basket.
Changing theprogramme
Add forgotten dishes in the
dishwasher.
Scrape off any large amount of leftover food. Soften remnants of burnt food in pans,
then load the baskets. Refer to the dishwasher loading instructions.
Press the Programme button until the selected programme lights up.
( See the section entitled Operationg instruction )“”
When the working cycle has finished, the buzzer of the
dishwasher will sound 8 times, then stop.
Turn off the appliance usingthe ON/OFF button.
If the appliance is switched
off during a wash cycle.
Open the door carefully.
Hotsteam may escape
when thedoorisopened!
If the appliance is switched off during a wash cycle, when switched
on again, please re-select the washing cycle and operate the dishwasher
according to the original Power-on state ).
Switch on the appliance Press the On/Off button to switch on the appliance, Open the door.
1.Open the door a little to stop the dishwasher.
2.After the spray arms stop working, you can open the door completely.
3.Add the forgotten dishes.
4.Close the door, the dishwasher will start running again after 10 seconds.
For detailed operating method read the corresponding content onthe instruction manual.
1.A running cycle can only be modified ifit has been running for a short time. Otherwise the detergent
may have already been released and the water already drained. If this is the case, the detergent
dispenser must be refilled.
2. Press the Start/Reset button for more than 3 seconds to cancel the running programme.
3. Select a new programme.
4. Restart the dishwasher.
To review the section ontroubleshooting Tips
willhelp youto solve some common problems
by yourself .
Dear Customer,
Please carefully read this manual beforeusing the
dishwasher, it will help you to use and maintain the
dishwasher properly.
Pass it onto any subsequentowner of the appliance.
This manual contains sections on safety Instructions,
OperatingInstructions,InstallationInstructionsand
Troubleshooting Tips, etc.
The manufacturer, following a policy of constant
developmentandupdating of the product, may
make modificationswithout giving prior notice.
Dishwasher Features.................................... ...2
A Water Softener..................... ....................3、..
Attention before orafter loading the Dishwasher
Baskets..........................................................8
FilteringSystem.............................................13
Caring forthe Dishwasher..................... .........14.
B Loading the Saltinto the Softener.................4、
C Fill theRinseAid Dispenser.........................4、
D Function ofDetergent .................................5
、
Loadingthe upper ...............................9Basket
LoadingtheLower ...............................9Basket
Cutlery Basket........................................... ...10
Wash CycleTable...........................................11
Turning on theAppliance................................12
Change the Programme.............. ................12....
At the Ene of the Wash Cycle...........................12
PositioningtheAppliance................... ..........15..
Water Connection.................................. .......16.
About Power Connection........................ .......15.
Start of dishwasher................................ ......17..
Beforecallingfor service........................... .....18.
Errorcodes.................................... ..............19.
Technical information.............................. .....20..
Control Panel...................................................2
Keep it to refer to it at a laterdate.
If you can not solvethe problems by yourself ,
please ask forthe help of professional technicians.
This appliance must be grounded. In the event of a
malfunction or breakdown, grounding will reduce
the risk of anelectric shock by providinga path of
least resistance of electric current. This appliance
is equipped with a cord having an equipment-
grounding conductor and a grounding plug.
The plug must be plugged into an appropriate outlet
that is installed and grounded in accordance with
all local codes and ordinances.
Improper connection of the equipment-grounding
conductor can result in the risk of an electric shock.
Check with a qualified electrician or service
representative if you are in doubt whether the
appliance is properly grounded. Do not modify the
plug provided with the appliance; If it does not fit
the outlet. Have a proper outlet installed by a
qualified electrician.
Keep children away from detergent and rinse aid, keep
child away from the open door of the dishwasher,
there could still be some detergent left inside.
ren
Do not abuse, sit on, or stand on the door or dish
rack of the dishwasher.
Do not touch the heating element during or
immediately after use.
(This instruction is only applicable to machines
with a visual heating element.)
Do not wash plastic items unless they are marked
dishwasher safe or the equivalent. For plastic items
not so marked, check the manufacturer's
recommendations.
Useonly detergent and rinse additives
designed for an automatic dishwasher.
Never use soap, laundrydetergent, or hand
washing detergent in your dishwasher. Keep
these products out of the reach of children.
During installation,the powersupply mustnot
beexcessively ordangerouslybentorflattened.
Do not tamper with controls.
Do not operate your dishwasher unless all
enclosure panels are properly in place. Open
the door very carefully if the dishwasher is
operating, there is a risk of water squirting out.
Do not place any heavy objects the
door when it is open. The appliance could tip
forward.
on or stand on
When loading items to be washed:
1)Locatesharp itemsso that theyare not likely
todamagethedoorseal;
2 Warning: Knives and otherutensils with
sharp points must be loaded in the basket
with their pointsdown orplacedin a
horizontalposition.
)
When using your dishwasher, youshould
prevent plastic items from comingintocontact
withtheheating element.(This instruction is only
applicable to machines with a visual heating
element.)
Ifthesupply cord isdamaged, it must be replaced
by themanufacturer or itsserviceagent or a
similarly qualified person in order to avoid a
hazard.
Please dispose of packing materials properly.
Use the dishwasher only for its intended function.
Remove the door to the washing compartment when
removing an old dishwasher from service or discarding it.
Dishwasher detergents are stronglyalkaline, they
can be extremely dangerous if swallowed.Avoid
contact with skin and eyesand keep children away
from the dishwasher when the door is open.
Check that the detergent comparment isempty
after completionof the wash cycle.
The applianceis to be connected to the water
mains using new hosesets and that oldhose-sets
should not be reused.
The maximumnumber of place settingsto be
washed is 8.
The maximumpermissible inlet water pressureis
1Mpa.
The minimumpermissibleinlet water pressureis
0.04Mpa.
Children should be supervised to ensure that they do
not play with the appliance.
This appliance is not intended for use by persons
(including children with reduced physical, sensory or
mental capabilities, or lack of experience and
knowledge ,unless they have been given supervision
or instruction concerning use of the appliance by a
person responsible for their safety.
)
When using your dishwasher, follow the precautions listed below:
The door should not be left open,
since this could increase the risk of tripping.

beforeusing it forthe firsttime.
To getthe best performance fromyourdishwasher, read all operating instructions
42
Program indicator lights and button: To select
one of the threeand show the washing program.
3
Start andPause button:To start the selected
washing program or reset the washing program
when the machine is working.
Rinse aid warning lights: To show when the
rinseaid dispenser need to be refilled
Powerindicatorlight and switch:Toturnon/off
and show the power supply.
P
10 11
Back View
Front view
Main Filter
Detergent Dispenser
Cup Shelf
Cutlery Basket
Coarse Filter
Rinse Aid Dispenser
Inlet pipe connector
Drain pipe connector
Lower Basket
Spray Arms
Upper Basket
1
5
6
7
8
9
10
11
3
2
4
1
2
3
4
5
6
7
8
9

Before using yourdishwasher for the first time:
The water softener must be set manually, usingthe water hardness dial.
The water softeneris designed to remove minerals and salts from thewater,which wouldhave
a detrimentalor adverse effect on the operation of the appliance. The higher the
content of these minerals and salts, the harder your water is. The softener should be
adjusted accordingtothe hardness ofthe waterin yourarea. Your localWaterAuthority
can advise you onthehardnessofthewaterinyourarea.
Adjusting Salt Consumption
The dishwasher isdesigned toallow for adjustment in the amount of salt consumed based on the hardness of
the waterused.This isintended tooptimise andcustomise the levelo f salt consumption.
1. Unscrewthe cap fromthe salt container.
2. There is a ring on the container with an arrow on it (see figure
ontheside),ifnecessary, rotate thering intheanticlockwise
direction from the "-" Setting toward the"+"sign, basedon the
hardness ofthe water being used.
It is recommendedthat adjustments shouldbe made in
accordance withthe following scheme:
WATER SOFTENER
Thehardness ofthe watervaries from place to place.If hard water is used inthedishwasher,deposits will
form on the dishesand utensils.
The applianceis equipped with a special softener that uses a salt container specifically designed to eliminate
lime and minerals from the water.
Contact your local water board for information on the hardness of your water supply.
dH mmol/l
0~140~8 0~1.4 /0/
14~398~22 1.4~3.9 - 20 50
39~8022~45 3.9~8 Mid 40 25
+60 16
fH
0~10
10~28
28~56
Clarke
WATER HARDNESS
SelectorPosition Salt consumption
(gram/cycle) Auto nomy
(cycles/1kgs)
Please follow the steps below foradjustment in salt consumption.
""/
"-"
"+"
"Mid"
Settingtowardthe"+"sign
Settingtowardthe"-"sign
Settingtowardbetween
the "-" sign and "+" sign
No salt need added
45~60 80~107 56~75 8~11
If your model does not have any water softener, you mayskip this section.
A. Set the watersoftener
B. Pour 1 2 litre ofwaterinsidethesaltcontainer andthen fill withdishwasher salt
/
C. Filltherinseaiddispenser
D. Fill in detergent
°Clark: British degree
°fH: French degree
°DH: German degree
dH=1.25Clarke=1.78fH=0.178mmol/l
°°°
1
normal fora small amount of water to come out of the salt container.Itis
1. The salt container must only be refilled when the salt warning light in the control panel comes on.
Depending on how well thesalt dissolves, the salt warning light may still be on even though the
salt container is filled.
If there is no salt warning light in the control panel (forsome Models),you can estimate when to fill
the salt into the softenerby the cycles that the dishwasher has run.
2. If thereare spills ofthe salt,a soakor a rapid program should be runto remove the excessivesalt.
Always use the salt intendedforusewith dishwasher.
The salt containerislocated beneath the lower basket and shouldbefilledasexplained
inthe following:
Attention!
Only use salt specifically designedfor the use indishwashers! Every other type of
salt not specificallydesigned for theuse in adishwasher, especiallytable salt, will
damage thewater softener. In case of damages caused by the use of unsuitable
salt the manufacturerdoes notgive any warranty nor is liable for any damages caused.
Only fill withsalt justbefore starting one of thecomplete washingprograms.
This will prevent any grains of salt or salty water, which may have been spilled,
remaining on the bottom of the machinefor any period of time, which may cause
corrosion.
The rinse aid isreleasedduring the final rinseto prevent water from forming droplets onyour dishes, which can
leave spots andstreaks. Italso improvesdryingby allowing water toroll offthe dishes. Your dishwasheris
designed touse liquidrinseaids.The rinseaiddispenser islocated inside thedoor next to the detergentdispenser.
To fill the dispenser, open the cap and pour the rinse aid into the dispenser until the level indicator turns completely
black. The volume ofthe rinseaidcontainer is about 110ml.
RinseAid Dispenser
Function of RinseAid
Rinse aid is automatically added during the last rinse, ensuring thorough rinsing, and spotandstreakfree drying.
Attention!
Only usebranded rinse aid for dishwasher. Never fillthe rinse aid dispenser withanyothersubstances
(e.g. Dishwasher cleaning agent, liquid detergent). This would damage the appliance.
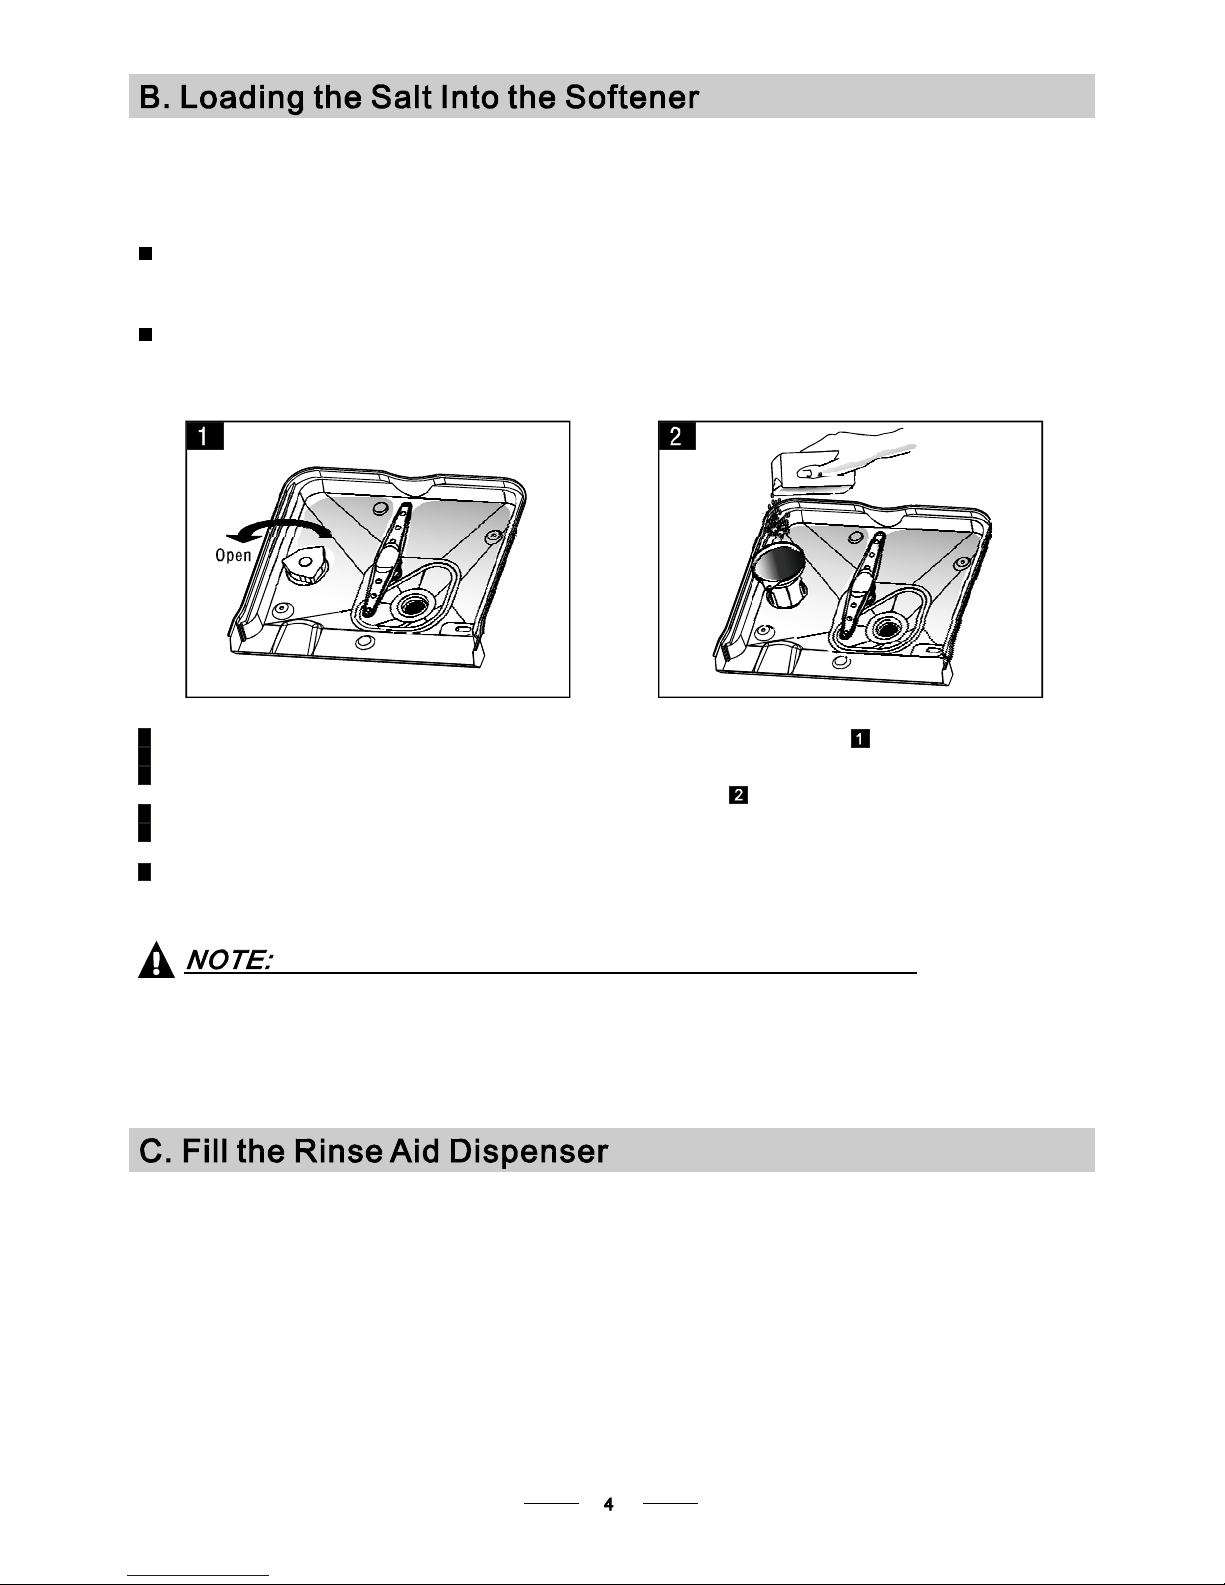
ARemove the lower basket and then unscrew andremovethe cap from the saltcontainer.
BBefore thefirst wash,fill 1lt. of water inthe salt container of your machine.
CPlace theend of thefunnel (supplied) into the hole and introduce about 1kg of salt.
DAfter filling the container, screw the cap tightly back clockwise.
EUsually, the salt warning light will stop being illuminated within 2-6 days afterthesaltcontainer hasbeen filled with
salt.
FImmediately after filling the salt into the salt container, a washing program should be started
program Otherwise the filter system, pump or other important parts of the machine may be damaged
bysalty water.This isoutof warranty.
(Wesuggest to use the
soak orrapid ).

To open the dispenser, turn the cap to the "open" (left) arrow and lift it out.
Pourthe rinse aid into the dispenser, being careful not tooverfill.
Replace the cap by inserting italigned with "open" arrow and turning it totheclosed (right) arrow.
Adjusting RinseAid Dispenser
The rinse aid dispenser has six or four settings. Always start with the dispenser
set on"4". If spots and poor drying are a problem, increase the amount of rinse
aid dispensedby removing the dispenser lidand rotating the dial to "5". If the
dishes still are not drying properly or are show spots,adjust the dial to the next
higher lever until your dishes are spot-free. The recommended setting is "4".
(Factory value is "4".)
Increasethe doseif there are drops of wateror limespots onthe dishes after washing.
Reduce it ifthere are sticky whitish stains on your dishes ora bluish film on glassware or
knife blades.
1
2
3
As the rinse aid diminishes, the size of the black dot
ontherinse aidlevel indicator changes, as illustratedbelow.
Full
3/4full
1/2full
1/4 full- Should refillto eliminate spotting
Empty
When to Refill the Rinse Aid Dispenser
Ifthereis no rinse-aid warning light in thecontrolpanel,you can estimate the amount from the colour
of the optical level indicator C located next to thecap. Whenthe rinse-aidcontainer is full, the whole
indicator will be dark .As the rinse-aid diminishes, thesize of the dark dot decreases. You should never let
the rinse aid level fall 1 / 4 full.
duringthe nextwash.
Don'tforget to replace the cap before you closedishwasherdoor.
Clean up any rinse aid spilled while during filling with an absorbent cloth to avoid excessive foaming
Detergents with its chemical ingredients arenecessary toremove dirt,crush dirt andtransport it outof the dishwasher.
Mostofthe commercial qualitydetergents are suitableforthis purpose.
Detergents
There are 3 sorts of detergents
1.Withphosphate and withchlorine
2.With phosphate and without chlorine
3.Withoutphosphate and without chlorine
""

Amount ofDetergentto Use
Proper Use of Detergent
Use only detergentspecificallymade for the usein dishwashers.Keep your detergent fresh and dry.
Don't putpowdereddetergentinto the dispenseruntil you'reready towash dishes.
Dishwasher detergent iscorrosive! Take care to keepit out of reach of children.
Based ontheir chemicalcomposition, detergentscanbe split in two basic types:
The use of normal washingprograms in combination with concentrated detergents
reduces pollution and is good for your dishes; these wash programsare specifically matched
to the dirt-dissolving properties of the enzymes of the concentrated detergent. For this reason
normal wash programsin which concentrated detergentsareused canachievethe same
results that canotherwise onlybe achieved using intensive programs.
“”
“”
“”
Detergenttabletsofdifferent brandsdissolve at different speeds. For thisreasonsome
detergenttablets cannot dissolve and develop theirfull cleaning power during short
programs. Therefore please use long programs when usingdetergent tablets, to
ensure the complete removal of detergent residuals.
The dispensermust berefilled before the start of each washcycle following the instructions
provided in the wash cycle table . Your dishwasher uses less detergent and rinseaid than
Conventional dishwasher.Generally, onlyone tablespoon of detergent is neededfor
anormal washload. Moreheavily soileditems needmoredetergent.Alwaysaddthe
detergentjustbefore starting the dishwasher, otherwiseit couldget damp and will not
dissolve properly.
Concentrated Detergent
DetergentTablets
DetergentDispenser
Always add the detergent just before starting eachwash cycle.
Only use branded detergent aidfor dishwasher.
If the lid isclosed: press release button.The lid will spring open.
conventional, alkaline detergentswith caustic components
low alkaline concentrated detergents with natural enzymes
Normally new pulverised detergent is without phosphate.Thus the water softenerfunction of
phosphate is not given. In this case we recommend to fill salt in the salt container even when
the hardness of water is only 6 dH. If detergents without phosphate are used in the case of hard water
often white spots appear on dishes and glasses. In this case please add more detergent to reach
better results. Detergents without chlorine do only bleach a little. Strong and coloured spots will not
be removed completely. Inthiscase please choose a program with a higher temperature.
°
Detergent tablet
Detergent powder

Fill the detergent dispenser with detergent.
The marking indicates the dosing levels , as
illustrated on the right:
Theplace of main wash cycledetergent placed ,
MIN means approximately20g of detergent.“”
Theplace of pre-wash cycle detergent placed ,
approximately 5gof detergent
Please observe themanufacturers dosing and storage
Recommendationsas statedonthedetergent packaging.
Closethe lid and press untilitlocks in place.
If the dishes are heavily soiled, place an additional
detergent dosein the pre-wash detergent chamber.This detergent will take effect during the pre-washphase.
A
B
Fill in Detergent
You findinformation about the amount of detergent for thesingle programme onthe last page.
Pleaseaware, thataccording tothe levelsoiling and the specific hardnessof waterdifferencesarepossible.
Pleaseobservethemanufacturer's recommendationson the detergentpackaging.

Cutlery with wooden,horn china or
mother-of-pearl handles
Plasticitems that arenotheat resistant
Older cutlerywith glued parts that arenot
temperatureresistant
Bonded cutlery itemsor dishes
Pewter or cooper items
Crystal glass
Steel items subject to rusting
Wooden platters
Items madefromsyntheticfibres
Some types of glasses canbecome
dull aftera large number of washes
Silver and aluminum parts have a
tendencyto discolourduringwashing
Glazed patterns may fade ifmachine
washed frequently
Are not suitable Are oflimited suitability
Dishesand items of cutlery mustnot lie insideoneanother, or cover each other.
To avoiddamage to glasses,theymust not touch.
Load large items which are mostdifficult to cleaninto the lower basket.
The upper basket is designed toholdmoredelicate and lighter dishware such as glasses, coffee
andteacups
Long bladed knives stored in an uprightposition are a potential hazard!
Long and/orsharp itemsof cutlery such as carving knivesmust be positioned
horizontallyin the upperbasket.
Please do not overload yourdishwasher. This is important forgoodresults and for
reasonable consumption of energy.
Load hollow items suchas cups,glasses, pans etc. With the opening facing downwards so that
water cannot collect in the container or a deepbase.
Usea mild detergentthatis describedas 'kind todishes'.If necessary, seek further
information from thedetergentmanufacturers.
Forparticular items, select aprogramwithas lowa temperatureaspossible.
To prevent damage, takeglass and cutlery out of the dishwasher as soon as possible
after the program has ended.
Consider buyingutensilswhich are identifiedas dishwasher-proof.
(For best performance of the dishwasher, follow these loading guidelines.
Features and appearance ofbaskets and cutlerybasketsmay vary from your model.)
Scrape off any largeamounts ofleftover food. Soften remnants of burnt food in pans.
It is not necessary to rinse the dishes under running water.
Place objects inthe dishwasher in following way:
1.Items such ascups, glasses, pots/pans, etc. are faced downwards.
2.Curved items, or ones with recesses, should be loaded aslant so that water can run off.
3.All utensils are stacked securely and can not tip over.
4.All utensils are placed in the way that the spray armscan rotatefreely during washing.
Very small items should not be washed in the dishwasher as they could easily fall out of the basket.
To prevent water drippingfrom the upper basket into the lower basket, we recommend thatyou
empty the lower basket first and then the upper basket.


Cutlery should be placed in the cutlery basket with the handles at the bottom. If the rack has side baskets,the
spoons should be loaded separately into the appropriate slots,especially long utensils shouldbe placedin the
horizontal position at the front ofthe upperbasket as shownin the picture.
Folding Spikes of Lower Basket
For better stacking of pots and pans,
the spikes can be folded down as
show in the picture right.
Do not let any item extend through the bottom.
Always loadsharp utensils with thesharp point down!
Adjusting the Upper Basket
The height of the upper basketcanbe adjustedin order to create more space forlarge utensils
both for the upper/lower basket. The height of theupper basket can be adjusted by placing the
wheels on different height of the rails. Long items, serving cutlery, salad servers andknives
should be placed on the shelfso that they do not obstruct the rotationofthe sprayarms.
The shelf can be folded back or be removed when not required for use.
Forpersonal safety anda topqualitycleaning,placethesilverwareinthe basket
making sure that:
Theydonotnesttogether.
Silverware is placed with the handles-down.
But place knivesand other potentially dangerous utensils are placed handles-up.
Teaspoons
4
Soup spoons
2
Forks
1
Knives
5
3
Dessert spoons

It is dangerous to open the door when washing, because the hot water may scald you.
When the working cycle has finished, the buzzer of the dishwasher will soundfor 8 seconds, then stop. Turn off
the appliance using the ON/OFF button, shut off the water supply and open the door of the dishwasher.
Wait for afew minutes before unloading thedishwashertoavoidhandling the dishes and utensils while they
are still hot andmore susceptible to breakage. Theywill alsodry better.
Switch Off the Dishwasher
1.Switch off the dishwasher by pressing the ON/OFF button.
2.Turnoffthewatertap!
Open thedoor carefully.
Hot dishes are sensitive to knocks. The dishes should thereforebeallowed to cool down around 15 minutes
before removingfrom the appliance.
Open thedishwasher's door, leave it ajar and wait a few minutes beforeremoving the dishes. In this way they
will be cooler andthe drying will be improved.
Unloadingthedishwasher
It is normal that the dishwasher is wet inside.
Empty thelower basket first and thenthe upperone. This will avoid water dripping fromthe upper Basket onto
the dishes in the lower one.
the machine will working after 10 seconds.continue
Ifyou openthe door , the machine will pause. When you close the door ,during a wash cycle
Premise:
Acycle that is underway can only be modified if it has only been running for a short
time. Otherwise, thedetergent mayhave alreadybeen released, and the appliancemay
have already drained the wash water. If this is the case, the detergent dispenser must
be refilled (seethe section entitled " Loading theDetergent " ).
When youpressthe start/reset button more than 3 seconds, you can cancel the running
programme andselectother programmes(see the sectionentitled "Starting awash cycle.. . " ).
1
2
Aforgotten dish can be added at any time before the detergent cup opens.
Load the forgotten dishes.
Close the door, the dishwasher will start running again
after 10 seconds.
After the spray arms stop working,you can open the door
completely.
2
Open the door a little to stop the washing.
13
4
The filter preventslarger remnantsof food or other objects from getting insidethepum.
Theresidues may blockthefilter, inthis casethey must be removed.
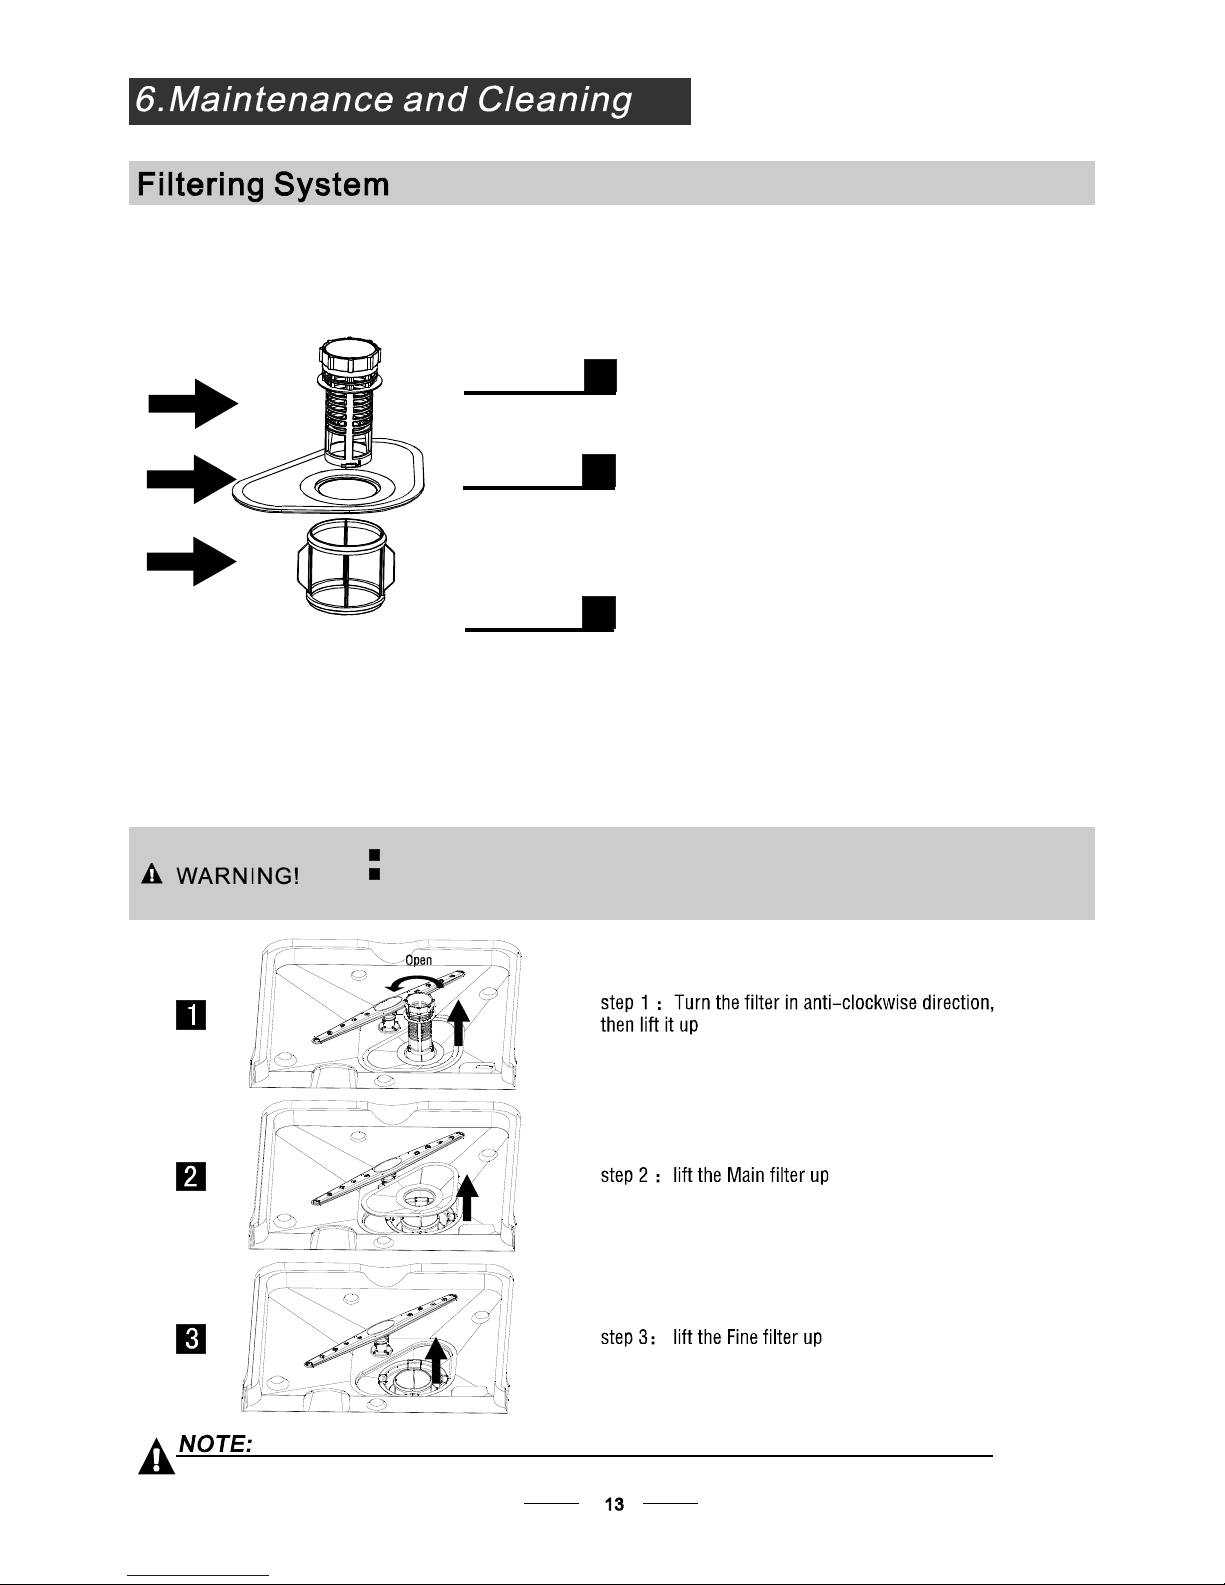
The filter system consists of a coarse filter,a flat (Mainfilter)
And a microfilter(Fine filter).
Food and soil particles trapped inthisfilter arepulverizedby a
special jet on the lower spray arm and washed down todrain.
Larger items, such as pieces of bones or glass, that could block
thedrainaretrappedin the coarse filter. To remove theitems
caught by the filter, gently squeeze the tap on thetop of this
filterandliftout.
Thisfilter holds soiland food residuesin the sumpareaand
preventsitfrom being redepositon the dishes during wash cycle.
Main filter
1
Coarse filter
2
Fine filter
3
2
3
1
Filter assembly
Thefilter efficiently
For best performance and results, the filter must be cleaned regularly. thisreason, it is a goodidea to
remove thelarger food particlestrapped in the filter aftereach wash cycleby rinsing the semicircular filter and
cup under running water. To remove thefilter device, pull thecup handle in the upwarddirection.
removes food particles from the wash water,allowing it to be recycledduring the cycle.
For
The dishwasher must never be used without the filters.
Improper replacementof the filter may reduce the performancelevel of the appliance
and damage dishesandutensils.
When following this procedure from step1 to step 3, the filter system will be removed;
when following it from Step 3 to Step 1, the filter system will be installed.

The control panel can be cleaned by using a lightly dampenedcloth.
Aftercleaning, make sure to dry it thoroughly.
For the exterior, use agood appliance polish wax.
Never usesharp objects, scouring pads orharsh cleaners on any part of the dishwasher.
ProtectAgainst Freezing
1.Cutoffthe electrical power to the dishwasher.
2.Turn off the water supply and disconnect the water inlet pipe from the water valve.
3.Drain thewater from the inlet pipeandwatervalve. (Use apan tocatch thewater)
4.Reconnect the water inlet pipe to the water valve.
5.Remove the filter at the bottomof the tub and use a spongeto soak up water in the sump.
please take frost protection measures onthe dishwasher in winter.Every fter washingcycles,
please operate as follows time a
:
- Inspect the filters for blocking after everytime the dishwasher has beenused.
- By unscrewing the coarse filter, you can remove the filter system.Removeanyfoodremnants and
cleanthefilters underrunningwater.
Remarks:
Cleaning the Filter
CleaningThe Door
To clean the coarsefilter and the fine filter, use acleaning brush. Reassemble thefilter parts as shown in the figures
on thelast page and reinsert the entire assembly in the dishwasher, positioning it in itsseat and pressing downwards.
The entirefilter assembly shouldbe cleanedonce a week.
Whencleaning the filters, don't knock on them. Otherwise, the filters could be
contorted andtheperformance ofthe dishwashercouldbedecreased.
To clean theedge around the door,you shoulduseonly a soft warm, damp cloth.
To avoid penetrationof water into the door lock and electrical components,do not
use a spray cleaner of any kind.
Never use a spray cleaner toclean the door panel as it may damage the door lock
and electricalcomponents.
Abrasive agents or some paper towels should not be used because of therisk of
scratching or leaving spots on the stainless steel surface.
Cleaning the SprayArms
Ifyour dishwashercannot work because of
the ice, please contact professional service persons.
To remove the upper spray arm, screw off the nut clockwise then remove
the arm.

Itis recommend thatyourun a washcycle withthe
dishwasher empty andthen remove the plugfrom the
socket, turn off the water supply and leave the door of
the appliance slightly open. This will help thedoor
sealstolastlongerandpreventodoursfromforming
withintheappliance.
If the appliance must be moved, tryto keep it in the
verticalposition. Ifabsolutelynecessary, itcanbe
positioned on its back.
Oneofthefactorsthatcauseodourstoforminthe
dishwasher is food thatremains trappedin the seals.
Periodic cleaning with adamp sponge will preventthis
from occurring.
Ensure the voltage and frequency of the power being correspondsto
those on the rating plate. Only insert the plug into an electricalsocketwhich isearthed
properly. If the electrical socket to which the appliance must be connected is not
appropriate fortheplug, replace the socket, ratherthan using aadaptors orthelikeas
they couldcause overheating andburns.
Pleaselook at therating label to know the ratingvoltage and connectthe dishwasher to the appropriate power supply.
Use the required fuse 10 amp,timedelay fuse or circuitbreakerrecommended and provide separate circuit serving
only this appliance.
This appliance must be earthed. In the event of a malfunction or breakdown, earthing will reduce the risk of
electric shock by providing a path of least resistance for the electric current. This appliance is equipped with a
cord having an equipment-earthing conductor and an earthing plug. The plug must be plugged into an
appropriate outlet that is installed and earthed in accordance with all local standards and requirements.
Position the appliance in the desired location. The back should rest against thewall behind it, and the sides,
along the adjacent cabinets or walls.The dishwasher is equippedwith water supply and drain hoses that can
be positioned either tothe right or the leftsides to facilitateproper installation.
Once the applianceis positioned for levelling, the height of the dishwasher
may be altered via adjustmentof the screwing level ofthe feet. In any case,
theappliance should notbeinclined more than 2 .
For personal safety:
DO NOT USEAN EXTENSION CORD OR AN ADAPTER PLUG WITH THIS APPLIANCE.
DO NOT, UNDERANY CIRCUMSTANCES, CUT OR REMOVE THE EARTHING
CONNECTION FROM THE POWER CORD.
After every wash, turn off the water supply to the
appliance and leave the doorslightlyopen sothat
moisture and odours arenot trapped inside.
Before cleaning or performing maintenance, always
remove the plug from the socket.
Tocleantheexteriorandrubberparts ofthedishwasher,
donot use solventsor abrasive cleaningproducts.
Only use a cloth with warm soapy water.
To remove spots or stains from the surface of the
interior, usea clothdampened withwater ana little
vinegar, ora cleaning product madespecifically for
dishwashers.
After EveryWash
Remove the Plug
No Solvents orAbrasive Cleaning Moving theAppliance
Seals
When not inUse for aLongTime

for personal safety:
DO NOT USE AN EXTENSION CORD OR AN ADAPTER PLUG WITH THIS APPLIANCE.
DO NOT, UNDERANY CIRCUMSTANCES, CUT OR REMOVE THE
FROM THE POWER CORD. EARTHING
CONNECTION
Connectthe cold water supply hose toa threaded 3/4(inch)connector andmake sure
that it is fastened tightly in place.
If the water pipes are new or have not been used for an extended period of time, let the
water run to make sure that the water is clear. This precaution is needed to avoid the
risk of the waterinlet to be blocked anddamage theappliance.
Thewater supplyto the appliancecanalso be connected to the household hot water
line (such as, central system, heatingsystem),as longas it does not exceed a
temperature of 60 C. In this case,thewash cycle time will be shortenedby about15
minutesandthe wash efficiency slightly reduced.
Theconnection must be made to the hot waterlinefollowing the same procedures as
described inthe section for theconnection to the coldwater line.
Improper connection of the equipment earthing conductor can result in the risk of an
electric shock.
Check with a qualified electrician or service representative if you are in doubt whether the
appliance is properly earthed.
Do not modify the plug provided with the appliance. If the plug does not fit properly to the
outlet, please have a qualified electrician to install a proper outlet.
In order to avoidthat there ismore waterstaying in the inlet hose, please close
the hydrant after using.(Not applicable to appliances without aqua-stop.)
PLEASE HANG UPTHE DRAIN HOSE EITHER WAY OFA, B, C
φ40mm
AB
C
Counter
Front
Drain pipe
Drain hosehook
Close the drain hose hook to the counter
NOTE
Thetopofthehose
must be at a height
between
40 and 100cm.
The free end o f the
hose mus t not be
immersed in water.
Insert the drainhose into adrain pipe with a minimum diameter of 4cm, orlet it run into thesink, makingsure to
avoidbendingor crimping it. Use the special plasticsupport thatcomes withthe appliance. The top ofthehose
must be at a heightbetween 40 and 100cm.The free end of the hose must notbe immersed in water toavoid the
back flow of it.
Table of contents
Other Trieste Dishwasher manuals


