trig TMA44 User manual

TMA44 Audio Panel
Operating Manual
01848-00-AA
10 Nov 2017
Trig Avionics Limited
Heriot Watt Research Park
Riccarton, Edinburgh
EH14 4AP
Scotland, UK
© Copyright 2017
EN / DE / FR


EN
1
Front Panel
Power On and Fail-Safe Operation
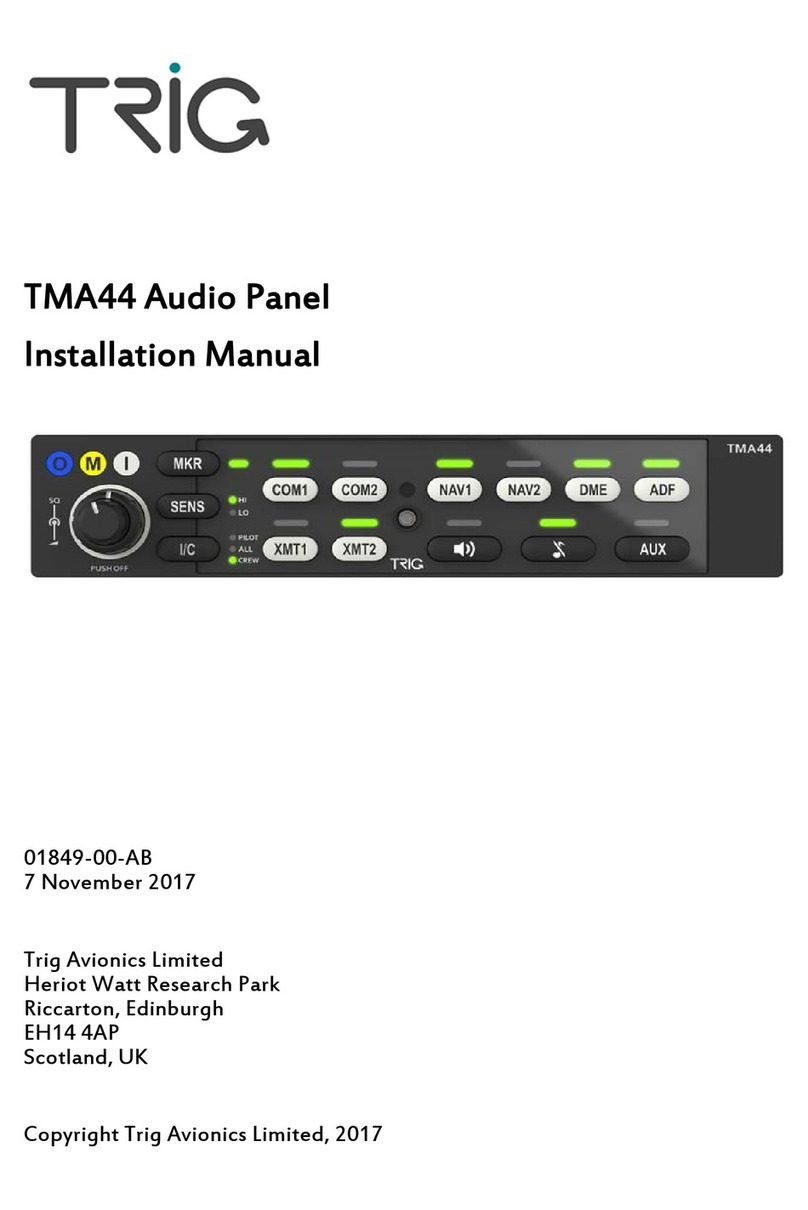
The audio panel is turned on and off by pressing the volume control knob
(smaller, inner knob on left side of unit).
When the system is turned off or if power is removed the audio panel will be
placed in the fail-safe mode. In the off or fail-safe mode, the pilot is
connected directly to Com 1 and to unswitched input 1, allowing transmit,
receive and alert capability regardless of audio panel condition.
Transmitter Selection
To select a radio for transmission, press either the XMT1 or the XMT2 button;
the green indicator lamp above the button will light up, indicating which radio
you will transmit on. The corresponding COM1 or COM2 indicator will also
light up; you always hear the audio from the transceiver that is selected for
transmit.
Both pilots can transmit on the selected radio, but only the person who presses
their Push-To-Talk switch will be heard over the aircraft radio.
Receiver Selection
To listen to both radios press the COM1 or COM2 button as required to enable
the second radio. Both radios will remain selected until one is manually
deselected.
Navigation Audio Selection
The MKR, NAV1, NAV2, DME, ADF and AUX buttons select the switched
navigation receivers. Press once to turn on the corresponding source, press
again to turn it off.

EN
2
A green lamp above the button will light indicating which audio source is
selected.
Cockpit Speaker
This button will place all selected audio on the cockpit speaker when active.
Note: In Split mode (see below), only unswitched inputs will play
through the speaker.
To help reduce power consumption and internal heat build-up in the avionics
stack, switch off the speaker when not in use.
Swap Mode
The optional Swap button, usually mounted on the control yoke, switches
between the Com transmitters without having to reach for the audio panel.
Pressing the Swap button has exactly the same effect as switching between
XMT1 and XMT2 on the audio panel.
Split Mode
Pressing both XMT1 and XMT2 buttons at the same time puts the TMA44 into
Split mode; all four COM and XMT indicators will light up. This connects the
pilot to Com 1 and the co-pilot to Com 2, and they can use their respective
radios independently. The passengers will not hear the radios or crew intercom
in Split mode.
Press either XMT button to exit Split mode.
It is not possible to place the pilot on Com 2 and the co-pilot on Com 1.
In Split mode only the pilot will hear the selected navigation audio.
An example of this feature is when the pilot may want to talk to Air Traffic
Control, while the co-pilot may be speaking to ground handling agents.
Note: Due to the nature of VHF communications signals, and the size
constraints in general aviation aircraft, it is probable that there will
be some transmission bleedover in Split Mode, particularly on
adjacent frequencies. Split Mode may not be suitable in all aircraft
conditions.
Intercom Volume
Turning the volume control knob (the smaller, inner knob on the left side of
the audio panel) adjusts the intercom volume in all headphones for pilot, co-
pilot, and passengers. It has no effect on selected radio audio or music levels.
Many general aviation headsets have a built-in volume control, so volume can
also be adjusted locally.
Intercom Squelch
The TMA44 provides a single VOX squelch control for the pilot, co-pilot and
the passengers, although each microphone input has its own squelch circuit.

EN
3
Only the microphones spoken into will be open, thus reducing the amount of
background noise.
With the engine running, set the VOX squelch by slowly rotating the SQ
control knob (the larger, outer knob on left side of unit) clockwise until you no
longer hear the engine noise in the headphones. When the microphone is
positioned properly near the lips, normal speech levels should open the
channel.
When you have stopped talking, there is a delay of about ½ second before the
channel closes. This helps prevent choppy communications.
Intercom Modes
The Intercom (I/C) button is a 3-function mode selector that allows the pilot to
tailor the intercom function to best meet the situation; it cycles through the
following modes, from top to bottom:
PILOT: The pilot is isolated from the intercom and is connected only
to the aircraft radios. Co-pilot and passengers will hear the intercom
and Music 1, but not the aircraft radio receptions or pilot
transmissions.
ALL: All parties will hear the aircraft radios, intercom, and Music 1.
CREW: Pilot and co-pilot are connected on one intercom channel and
have exclusive access to the aircraft radios. They may also listen to
Music 1. Passengers can continue to communicate amongst
themselves without interrupting the crew and may listen to Music 2.
When in Split mode the pilot and co-pilot do not have any intercom function,
the passengers will maintain communications.

EN
4
Intercom Mode Table
Mode Pilot Hears Co-pilot Hears Passengers
Hear
Comments
Pilot Radios
Sidetone
Passengers
Music 1
Co-pilot
Passengers
Music 1
This mode allows the pilot to
communicate with air traffic
control without the co-pilot or
passengers hearing the
conversation. Co-pilot and
passengers can continue to talk
and listen to music.
All Radios
Sidetone
Co-pilot
Passengers
Music 1
Radios
Sidetone
Pilot
Passengers
Music 1
Radios
Sidetone
Pilot
Co-pilot
Passengers
Music 1
This mode allows all on board
to hear radio reception as well
as communicate on the
intercom.
Crew Radios
Sidetone
Co-pilot
Music 1
Radios
Sidetone
Pilot
Music 1
Passengers
Music 2
A second music source is
automatically enabled for the
passengers.
Music Inputs
The audio selector panel has provisions for up to two separate music input
devices. Which device is heard is determined by the intercom mode selected.
It is also possible to use a single input device for both music inputs. A switch
may be installed between the single input device and music input 1; this will
allow the pilot and co-pilot to decide if they hear music devices while in Crew
mode.
Music Muting
The Mute button controls the muting circuits of both music inputs. During
voice communication, the music volume automatically decreases when mute is
active; the music volume increases gradually back to the original level after
communications are complete.

EN
5
Marker Beacon Receiver
The marker beacon receiver uses visual and audio indicators to alert you when
the aircraft passes over a 75 MHz beacon transmitter.
The marker beacon audio can be enabled and disabled by pressing the MKR
button. A green lamp to the right of the button will light when the audio is
enabled.
The blue outer marker lamp has an associated 400 hertz 'dash' tone.
The lamp and tone are keyed at a rate of two per second when the
aircraft is in the range of the outer marker.
The amber middle marker lamp is coupled with a 1300 hertz tone,
keyed alternately with short 'dot' and long 'dash' bursts at 95
combinations per minute.
The white inner marker lamp has a 3000 hertz 'dot' tone. The lamp
and tone are keyed at a rate of six times per second.
The sensitivity (SENS) button can be used to change the marker beacon
receiver sensitivity to high or low. Use HI sensitivity only when navigating
using fan markers on airways. For normal ILS marker beacons the sensitivity
should always be set to LO.
Holding the SENS button for one second illuminates all three lamps
simultaneously to assure the lamps (internal and external) are in working
order. It will also cause the marker audio to mute for that beacon; the next
beacon received will reactivate the audio. Releasing the SENS button restores
the last sensitivity.

DE
6
Bedienelemente
Power und Fail-Safe Modus
Der Strom des Gerätes wird durch Drücken des Lautstärkereglers ein- und
ausgeschaltet (der kleinere, innere Knopf an der linken Seite der Anlage).
Wenn der Strom ausgefallen ist oder sich ausgeschaltet hat, wechselt die
Aufschaltanlage in Fail-Safe Modus.
In diesem Modus ist der Pilot direkt an Com 1 und ungeschalteten Input #1
angeschlossen, welches der Aufschaltanlage ermöglicht - gleich in welchem
Zustand - senden und empfangen zu können.
Senderauswahl
Drücken Sie entweder XMT1 oder XMT2, um ein Funkgerät auszuwählen. Das
grüne Anzeigelämpchen oberhalb der Taste wird aufleuchten, welches Ihnen
anzeigt, auf welchem Funk Sie senden. Das entsprechende Anzeigelämpchen
wird auch aufleuchten – man hört immer das Audio vom Empfänger, der früher
ausgewählt wurde.
Beide Piloten können über das ausgewählte Funkgerät übertragen, aber nur
die Person, die den Push-to-Talk Schalter aktiviert, wird im Flugfunk gehört.
Empfängerauswahl
Beide Funkgeräte können gleichzeitig gehört sein. Drücken Sie entweder Com
1 oder Com 2 nach Bedarf, um das zweite Funk zu aktivieren. Beide Geräte
werden solange gehört bis eins manuell deaktiviert wird.
Navigationsaudio Auswahl
Die Tasten MKR, NAV1, NAV2, DME, ADF und AUX wählen die geschalteten
Navigationsempfänger aus. Drücken Sie einmal, um die entsprechende Quelle
einzuschalten und dann noch einmal, um sie auszuschalten. Ein grünes

DE
7
Anzeigelämpchen oberhalb der Taste wird aufleuchten und anzeigen, welche
Audioquelle ausgewählt ist.
Cockpit Speaker
Wenn aktiv, setzt diese Taste alle geschaltete Audio in den Cockpit Speaker
ein.
Anmerkung: Im Split-Modus (siehe unten) werden nur
ungeschalteten Audioeingäbe über den Lautsprecher abspielen.
Um den Energieverbrauch und Wärmestau in der Instrumententafel zu
verringern, schalten Sie den Lautsprecher aus, wenn unbenutzt.
Swap Modus
Die optionale Taste „Swap“ (normalerweise am Steuerhorn montiert) wechselt
zwischen den COM Transmittern, ohne nach dem Audio Panel greifen zu
müssen. Drücken der Taste „Swap“ hat dieselbe Wirkung wie der Wechsel
zwischen XMT1 und XMT2 auf dem Audio Panel.
Split Modus
Split Modus ist durch gleichzeitiges Drücken von beiden XMT1 und XMT2
Tasten erreicht – alle vier COM und XMT Anzeigelämpchen werden
aufleuchten.
Dies verbindet den Piloten mit Com 1 und den Copiloten mit Com 2 – das
heißt sie können ihre eigenen Funk selbständig verwenden. Passagiere hören
nichts, wenn der Split Modus aktiv ist.
Drücken Sie XMT, um den Split Modus abzuschalten. In diesem Modus ist es
dem Piloten unmöglich, über Com 2 zu übertragen und das Gleiche gilt für
den Copiloten über Com 1. Im Split Modus kann nur der Pilot das ausgewählte
Navigationsaudio hören. Dies könnte wohl vorteilhalt sein, falls der Pilot mit
Flugsicherung sprechen will, während der Copilot mit
Bodenabfertigungsagenten kommuniziert.
Anmerkung: aufgrund der Art der Ultrakurzwellesignale und
Platzerschränkungen in einem allgemeinen Flugzeug, wird es wohl
etwas Übertragungsüberlauf geben im Split Modus, besonders über
Nachbarfrequenzen. Es garantiert sich nicht, dass der Split Modus für
alle Flugbedingungen gilt.
Lautstärkeregler des Intercoms
Drehen des Lautstärkereglerknopfes (des kleineren, inneren Knopfes an der
linken Seite des Gerätes) stellt die Lautstärke des Intercoms in allen
Kopfhörern ein für den Piloten, Copiloten und Passagiere. Das hat keine
Auswirkung weder auf ausgewählten Hörfunk noch auf die Lautstärke der
Musik.

DE
8
Viele Kopfhörer für die allgemeine Luftfahrt haben integrierte
Lautstärkeregler, sodass die Lautstärke auch örtlich eingestellt werden kann.
Intercom Squelch
Die TMA44 hat einen Rauschsperrenregler für den Piloten, Copiloten und die
Passagiere, aber jedes Mikrofon hat eine eigene Schaltung für Squelch.
Diese Schaltungen schalten sich ein, nur wenn man in ein Mikrofon spricht.
Infolgedessen wird das Hintergrundgeräusch verringert.
Bei laufendem Motor stellen Sie das VOX Squelch ein durch Drehen des SQ
Drehknopfes (des größeren an der linken Seite des Gerätes) im Uhrzeigersinn,
bis Sie in den Kopfhörern kein Motorgeräusch mehr hören. Wenn das
Mikrofon richtig neben den Lippen aufgestellt ist, sollten normale
Sprachpegel genügen, um den Kanal zu öffnen.
Wenn Sie aufhören zu sprechen, gibt es eine Pause von einer halben Sekunde,
bevor der Kanal sich schließt. Dies hilft dabei, abegehackte Kommunikation
vorzubeugen.
Modi des Intercoms
Die Taste I/C ist ein Betriebsartenselektor mit 3 Funktionen, der dem Piloten
erlaubt, die Funktion des Intercoms maßzuschneidern. Die drei Fuktionen sind:
PILOT: der Pilot ist vom Intercom isoliert und nur an die Funkgeräte
des Flugzeuges angeschlossen. Der Copilot und die Passagiere hören
das Intercom und Musik jedoch nicht die Funkempfänger des
Flugzeuges oder Sendungen des Piloten.
ALL: alle können die Funkgeräte hören, ebenso Intercom wie auch
Music 1.
CREW: der Pilot und Copilot sind an einen Intercom Kanal
angeschlossen und haben ausschließlichen Zugriff auf die
Funkgeräte. Sie können auch Music 1 hören. Die Passagiere können
weiterhin miteinander sprechen und Music 2 hören, ohne die
Besatzung zu stören.
Im Split Modus haben Pilot und Copilot keine Intercom Funktion und die
Passagiere können weiterhin miteinander reden.

DE
9
Intercom Mode Tabelle
Modus Pilot hört Copilot hört Passagiere
hören
Kommentare
Pilot Funkgeräte
Mithörton
Passagiere
Music 1
Copilot
Passagiere
Music 1
Dieser Modus ermöglicht dem
Piloten mit ATC zu
kommunizieren. Der Copilot
und die Passagiere können
weiter miteinander sprechen
und Musik hören..
Alle Funkgeräte
Mithörton
Copilot
Passagiere
Music 1
Funkgeräte
Mithörton
Pilot
Passagiere
Music 1
Funkgeräte
Mithörton
Pilot
Copilot
Passagiere
Music 1
Dieser Modus ermöglicht allen
an Bord des Flugzeugs sowohl
Funkempfang zu hören, als
auch über das Intercom
miteinander zu
kommunizieren.
Crew Funkgeräte
Mithörton
Copilot
Music 1
Funkgeräte
Mithörton
Pilot
Music 1
Passagiere
Music 2
Eine zweite Musikquelle wird
automatisch für die Passagiere
aktiviert.
Eingänge für Musik
Bis zu zwei verschiedenen Musik-Eingängen können sich an das Gerät
anschließen. Das Gerät, das gehört wird, ist vom ausgewählten Modus des
Intercoms abhängig. Ein einzelnes Eingabegerät darf für beide Eingänge
benutzt werden. Ein Schalter kann zwischen dem einzelnen Eingabegerät und
dem Eingang für Music 1 eingebaut werden – dies ermöglicht dem Piloten und
Copiloten sich dazu zu entscheiden, falls sie Musik hören wollen, während das
Gerät im Crew Modus ist.
Music Muting
Die Taste „Mute“ (d. h. Stummschalttaste) steuert die Stummschaltung beider
Musikeingänge. Bei aktiviertem „Mute“ und bestehendem Funkverkehr wird
die Lautstärke der Musik automatisch verringert; nach Beendigung des
Funkverkehrs erhöht sich die Musiklautstärke langsam wieder auf ihren alten
Wert.
Marker Beacon Empfänger
Der Marker Beacon Empfänger benutzt visuelle und akustische Signale, um Sie
zu alarmieren, wann ein Flugzeug über einen 75MHz Bakensender fliegt.
Das Audio des Funkfeuers kann durch Drücken der Taste „MKR“ aktiviert und
deaktiviert werden. Ein grünes Anzeigelämpchen an der rechten Seite der
Taste wird aufleuchten, wenn das Audio aktiviert wird.
Die blaue, äußere Leuchte hat einen „dash“ Ton von 400 Hertz. Die
Leuchte und Ton sind zu einem Satz von zwei pro Sekunde getastet,
wenn das Flugzeug im Bereich des äußeren Funkfeuers fliegt.

DE
10
Die gelbe, mittlere Leuchte hat einen Ton von 1,300 Hertz, die mit
kleinen „dot“ und langen „dash“ Schüben zu einem Satz von 95
Kombinationen pro Minute getastet ist.
Die weiße, innere Leuchte hat einen „dot“ Ton von 3,000 Hertz. Die
Leuchte und Ton sind zu einem Satz von sechsmal pro Sekunde
getastet.
Die „SENS“ Taste (Empfindlichkeit) kann benutzt werden, um die
Empfindlichkeit des Markierungsfunkfeuers von hoch auf gering zu setzen.
Benutzen Sie „HI“ Empfindlichkeit, nur wenn Sie Marker beim Navigieren auf
Flugstrecken benutzen. Die Empfindlichkeit sollte immer auf „LO“ für normale
ILS Marker eingestellt werden.
Halten der „SENS“ Taste für eine Sekunde gedrückt beleuchtet alle drei
Leuchten gleichzeitig, um sicherzustellen, dass sie alle funktionsfähig sind.
Dabei wird sich das Audio für das Funkfeuer stummschalten, aber wird schon
wieder aktiviert, wenn das nächste Funkfeuer empfangen ist. Loslassen der
„SENS“ Taste stellt die letzte Empfindlichkeitseinstellung wieder her.

FR
11
Panneau de contrôle
Marche, Arrêt, Sécurité
Appuyer sur le bouton rotatif (petit bouton sur la gauche du panneau) permet
la mise en marche ou l’arrêt du panneau de contrôle audio.
Lorsque le panneau audio est éteint ou en cas de panne d’alimentation, le
TMA44 passe en mode sécurité.
A l’arrêt ou en mode sécurité, le pilote est connecté directement à Com 1 et à
l’entrée #1 qui permet de transmettre, recevoir et d’avoir les alertes quel que
soit l’état du panneau de contrôle audio.
Sélection du transmetteur
Pour sélectionner une radio pour transmettre, appuyer sur le bouton XMT1 ou
XMT2, le voyant vert au-dessus du bouton XMT s’allumera indiquant la radio
active.
Le voyant vert COM1 ou COM2 correspondant s’allumera aussi.
Les deux pilotes peuvent transmettre sur la radio sélectionnée mais seul
l’utilisateur appuyant sur le bouton Push-To-Talk sera entendu sur la radio de
l’avion.
Sélection du récepteur
Pour écouter les deux radios, appuyer sur le bouton COM1 ou COM2 (bouton
de la radio inactive) pour activer la deuxième radio. Les deux radios resteront
actives jusqu’à ce que l’une soit manuellement désélectionnée.
Sélection Audio Navigation
Les boutons MKR, NAV1, NAV2, DME, ADF et AUX sélectionnent le récepteur
actif.
Appuyer une fois pour activer le récepteur, appuyer à nouveau pour l’éteindre.

FR
12
Le voyant s’allumera au-dessus du bouton indiquant la source audio active.
Bouton Cockpit Speaker
Ce bouton permet d’entendre l’audio sélectionné sur les hauts parleurs du
cockpit.
À noter: en mode SPLIT (voir ci-dessous), seules les fonctions non
sélectionnées transmettront sur les hauts parleurs.
Afin de réduire la consommation d’énergie et la surchauffe interne des
instruments, éteignez les hauts parleurs si vous ne les utilisez pas.
Bouton SWAP en option
Le bouton SWAP facultatif, généralement situé sur le manche, permet de
changer entre les transmetteurs sans avoir à toucher au panneau de contrôle
audio.
Ceci est similaire à l’utilisation des boutons XMT1 et XMT2 sur le panneau de
contrôle.
Mode SPLIT
Vous activez le mode SPLIT en appuyant simultanément sur les boutons XMT1
and XMT2, les quatre voyants COM et XMT sont allumées.
Le pilote est actif sur Com 1 et le copilote sur Com 2, ils peuvent utiliser leurs
radios respectives indépendamment. Les passagers n’entendront pas les radios
ou l’intercom de l’équipage en SPLIT.
Appuyer sur un des boutons XMT stop le mode SPLIT.
Il n’est pas possible que le pilote soit en COM2 et le copilote en COM1.
En mode SPLIT seul le pilote peut écouter l’audio navigation sélectionnée.
Cette option est utile lorsque le pilote veut parler au trafic aérien et le
copilote est en communication avec les agents au sol..
A noter : en raison de la nature des signaux de communications VHF
et des contraintes de taille des avions de l’aviation générale, il est
possible qu’en mode partagé vous ayez des débordements de
transmission, surtout sur des fréquences adjacentes. Le mode SPLIT
pourrait ne pas convenir à toutes les situations.
Contrôle Volume Intercom
Pour ajuster le volume de l’intercom des casques du pilote, copilote et
passagers, tourner le bouton rotatif (la molette intérieure sur la gauche du
panneau). Cela n’a pas d’effet sur le volume de la radio ou de la musique.
La plupart des casques d’aviations disposent d’un contrôle de volume intégré
permettant l’ajustement du son.

FR
13
Intercom Squelch
Sur le TMA44 le squelch a un réglage unique pour le pilote, copilote et les
passagers, par contre chaque microphone a son propre squelch : seul les
microphones actifs (émettant) seront ouverts afin de réduire les bruits de fond.
Une fois le moteur en marche, régler le squelch en tournant lentement le
bouton rotatif SQ (la molette extérieure sur la gauche du panneau) dans le
sens des aiguilles jusqu’à ce que vous n’entendiez plus le bruit du moteur dans
le casque. Une fois le microphone ajusté à hauteur de la bouche, un niveau
sonore vocal normal devrait ouvrir le canal.
Lorsque vous arrêtez de parler, le canal se ferme après un délai de ½ seconde
pour éviter les communications hachurées.
Modes Intercom
Le bouton Intercom (I/C) a trois modes de fonctionnement, permettant au
pilote de régler l’intercom selon la situation:
PILOT : le pilote est isolé de l’intercom et n’est connecté qu’aux
radios de l’avion. Le copilote et les passagers n’entendront que
l’Intercom et Music 1, pas les communications radio ou les
transmissions du pilote.
ALL : le pilote, copilote et passagers entendent les radios, l’intercom
et Music 1.
CREW : le pilote et copilote sont connectés sur un intercom et
exclusivement aux radios de l’avion. Ils peuvent aussi écouter Music 1.
Les passagers peuvent communiquer entre eux sur un intercom
différent sans interrompre l’équipage et écouter Music 2.
En mode SPLIT, le pilote et copilote n’ont pas accès aux intercoms
contrairement aux passagers.

FR
14
Tableau des fonctions de l’intercom
Mode Pilote Copilote Passagers Notes
Pilot Radios
Sidetone
Passagers
Music 1
Copilote
Passagers
Music 1
Ce mode permet au pilote de
communiquer avec les
contrôleurs ariens sans que le
co-pilote et passagers
entendent la conversation. Le
co-pilote et passagers peuvent
continuer de parler et d’écouter
la musique.
All Radios
Sidetone
Copilote
Passagers
Music 1
Radios
Sidetone
Pilote
Passagers
Music 1
Radios
Sidetone
Pilote
Copilote
Passagers
Music 1
En mode all, tout le mode
entend les receptions radios et
communique sur l’intercom.
Crew Radios
Sidetone
Copilote
Music 1
Radios
Sidetone
Pilote
Music 1
Passagers
Music 2
Une deuxième source musique
est automatiquement active
pour les passagers.
Entrée Musique
Le panneau audio a la possibilité d’avoir deux lecteurs de musique. Le mode
Intercom sélectionné détermine le lecteur entendu / actif.
Il est aussi possible d’utiliser un seul appareil audio sur les deux entrées
musique ; un interrupteur (DPDT) peut être installé entre le lecteur et l’entrée
musique 1 ; cela permet au pilot et copilote de décider s’ils écoutent la
musique en mode Crew.
Bouton Mute
Le bouton MUTE contrôle le circuit silencieux des entrées musique. Pendant la
communication vocale, le volume de la musique baisse lorsque le bouton
MUTE est actif, lorsque que la communication vocale est terminée, le volume
revient graduellement au volume initial.
Marker Beacon Receiver
Le récepteur radio balise (marker beacon receiver) utilise des indicateurs
visuels et audio pour vous informer lorsque l’avion survole un transmetteur
balise 75 MHz (Beacon).
Le signal audio du récepteur radio balise est activé et désactivé en pressant le
bouton MKR. Le voyant proche du bouton s’allume en mode actif.
Voyant Bleu O, Balise extérieur (Outer Marker) (à gauche du bouton
MKR) : tonalité de 400 Hertz. La fréquence du signal sonore et
lumineux est de 2 par seconde lorsque que l’avion est dans le
périmètre du Outer Marker.

FR
15
Voyant Orange M, Balise intermédiaire (Middle Marker) : tonalité
1300 Hertz alternant bips courts et bruits longs cadencés à 95 par
minute.
Voyant Blanc I, Balise intérieur (Inner Marker) : tonalité en point de
3000 Hertz. La fréquence du signal sonore et lumineux est de 6 par
seconde.
Le bouton SENS permet de changer la sensibilité du récepteur Radio Balise en
élevée (High) ou Basse (Low). Utiliser le réglage HI lorsque vous naviguez
utilisant les marqueurs « en route » (airways markers). La sensibilité basse LO
devrait toujours être utilisé avec les marqueurs ILS standard (ILS marker
beacons).
Pour vous assurer que les voyants fonctionnent, tenez le bouton SENS enfoncé
pendant 1 seconde. Cela permet aussi de désactiver le signal sonore pour ce
marqueur, la prochaine émission provenant du marqueur suivant réactivera le
signal sonore. Relâcher le bouton restaure le niveau de sensibilité précèdent.

This page intentionally left blank


Trig Avionics Limited
Heriot Watt Research Park
Riccarton, Edinburgh EH14 4AP, UK
Tel: +44 (0)131 449 8810
Fax: +44 (0)131 449 8811
support@trig-avionics.com
www.trig-avionics.com
Other manuals for TMA44
1
Table of contents
Languages:
Other trig Avionic Display manuals
Popular Avionic Display manuals by other brands

BOMBARDIER
BOMBARDIER Primus 2000XP Pilot training guide

PS Engineering
PS Engineering PMA8000G Pilot's guide and operation manual
uAvionix
uAvionix AV-30-C installation manual

LZ design
LZ design FES LCD Display Flight manual
MGL Avionics
MGL Avionics Blaze ASV-2 operating manual
Garmin
Garmin Cessna Caravan G1000 Maintenance manual

BENDIXKing
BENDIXKing KSN 8 Series installation manual

Aircatglobal
Aircatglobal VirtualFly VF-G1000 user manual
Advanced
Advanced AF-6600 installation manual

Garmin
Garmin GPS 400 Pilot's guide and reference

Garmin
Garmin Cirrus Perspective SR22T reference guide

SANDIA aerospace
SANDIA aerospace SAI-340A pilot's guide
