Trigon Recall II User manual

OPERATING INSTRUCTIONS
FOR CD-PLAYER
Recall II
Recall IIRecall II
Recall II
OPEN << < > >> START STOP
REPEAT
PROGRAM
TIME
Recall II
Version 2, Feb. 2009


CONTENTS
1. Preface
2. General De ice Description
2.1 Safety Notices
2.2 List References
2.3 Guarantees and Service
3. Start-up
3.1 Contro E ements on the Front Side
3.2 Connections on the Back
3.3 Remote Maintenance
4. What to do, if...
4.1... nothing happens?
4.2... one hears nothing?
4.3... it hums?
4.4... there is no reaction to the remote contro ?
5. Technical Data

1. Preface
Dear TRIGON - customer,
Thank you for choosing the CD P ayer RECALL II. This device was manufactured uti izing
the strictest production contro s and the atest precision techno ogy.
Even if you are fami iar with the use of HiFi devices, you shou d study this operation
manua carefu y and confirm your understanding of the instructions, which are contained
therein.
P ease keep this instruction manua , because it can serve as an aid in hand ing your CD
P ayer in the future.
The TRIGON - team wishes you ots of fun with your new CD P ayer.
2. General technical manual
The
Recall II
is a CD-P ayer, where outstanding tona qua ity meets a design and set
of features that conform to high-end demands.
This is exemp ified by a high-qua ity drive – whose oader is guided by side stain ess-stee
push rods – that ensures that there is no oss of (digita ) musica information from the
start of p ayback onward. The digita signa is then passed on to a state-of-the-art 24-Bit
seria converter with a 192-KHz samp ing frequency from Burr Brown, which converts it
into an ana og signa .
The drive osci ator c ocks the entire digita audio, so that c ock-jitter is kept to a minimum.
The steep ro -off s ope of the output fi ter effective y prevents any a iasing of the p ayback
signa .
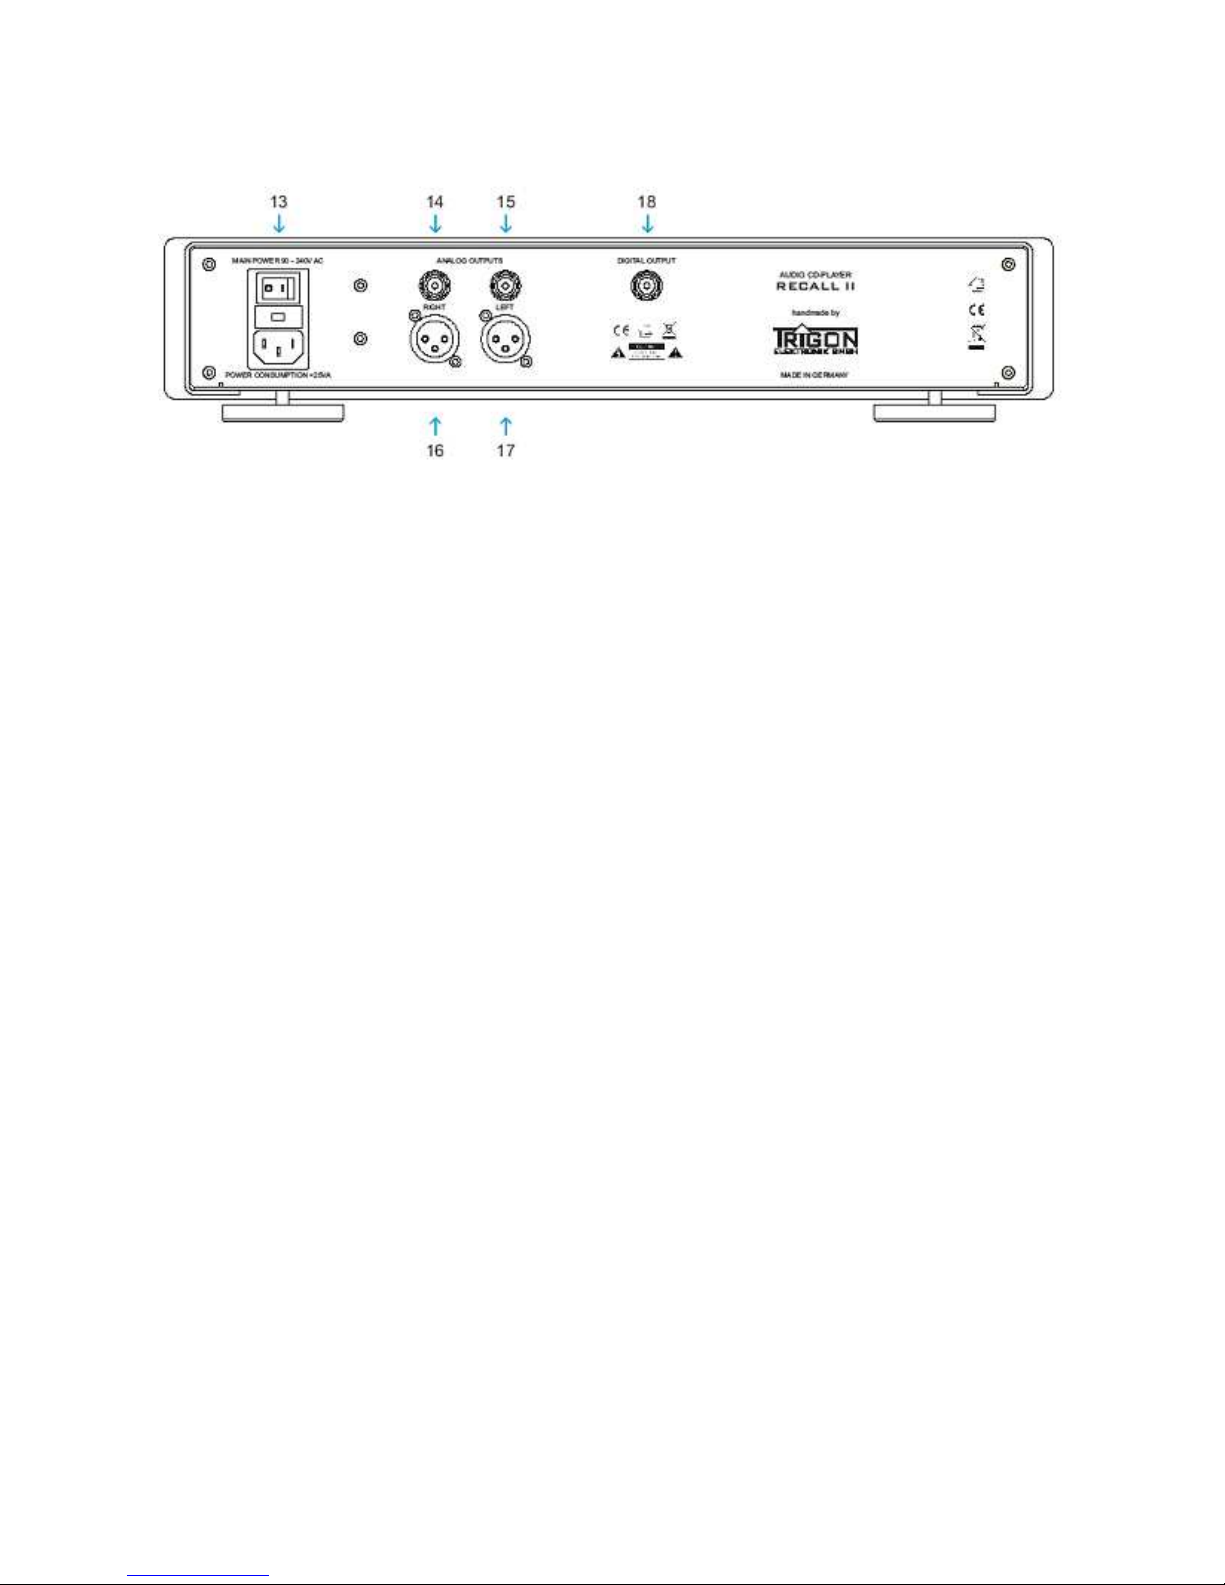
The power is supp ied by a specifica y deve oped switched mode power supp y, which
provides the CD-p ayer with a steady f ow of power – even with arge f uctuations in
vo tage - and e iminates the sound a tering effects of e ectricity.
The 2mm strong stee -sheet casing is ined interna y partia y with absorption mats, so that
microphonic effects are kept from the sensitive e ectronics. The TRIGON suspension
absorber feet - whose princip e of operation corresponds to that of a Be evi e washer –
round off a systematic approach to prevent sound distortions through microphonic effects.
The wide range of media in use today doesn’t pose a prob em for the
Recall II’s
high-qua ity techno ogy and its audio-optimized drive: The
Recall II
is ab e to p ay
CD-Rs and CD-RWs. These shou d be of good qua ity, otherwise “dropouts“ may occur
during p ayback.
The
Recall II
is comp ete y microprocessor contro ed. It is possib e to operate the
p ayer itse f direct y (not a functions) as we as via IR-remote contro
(Trigon
Director)
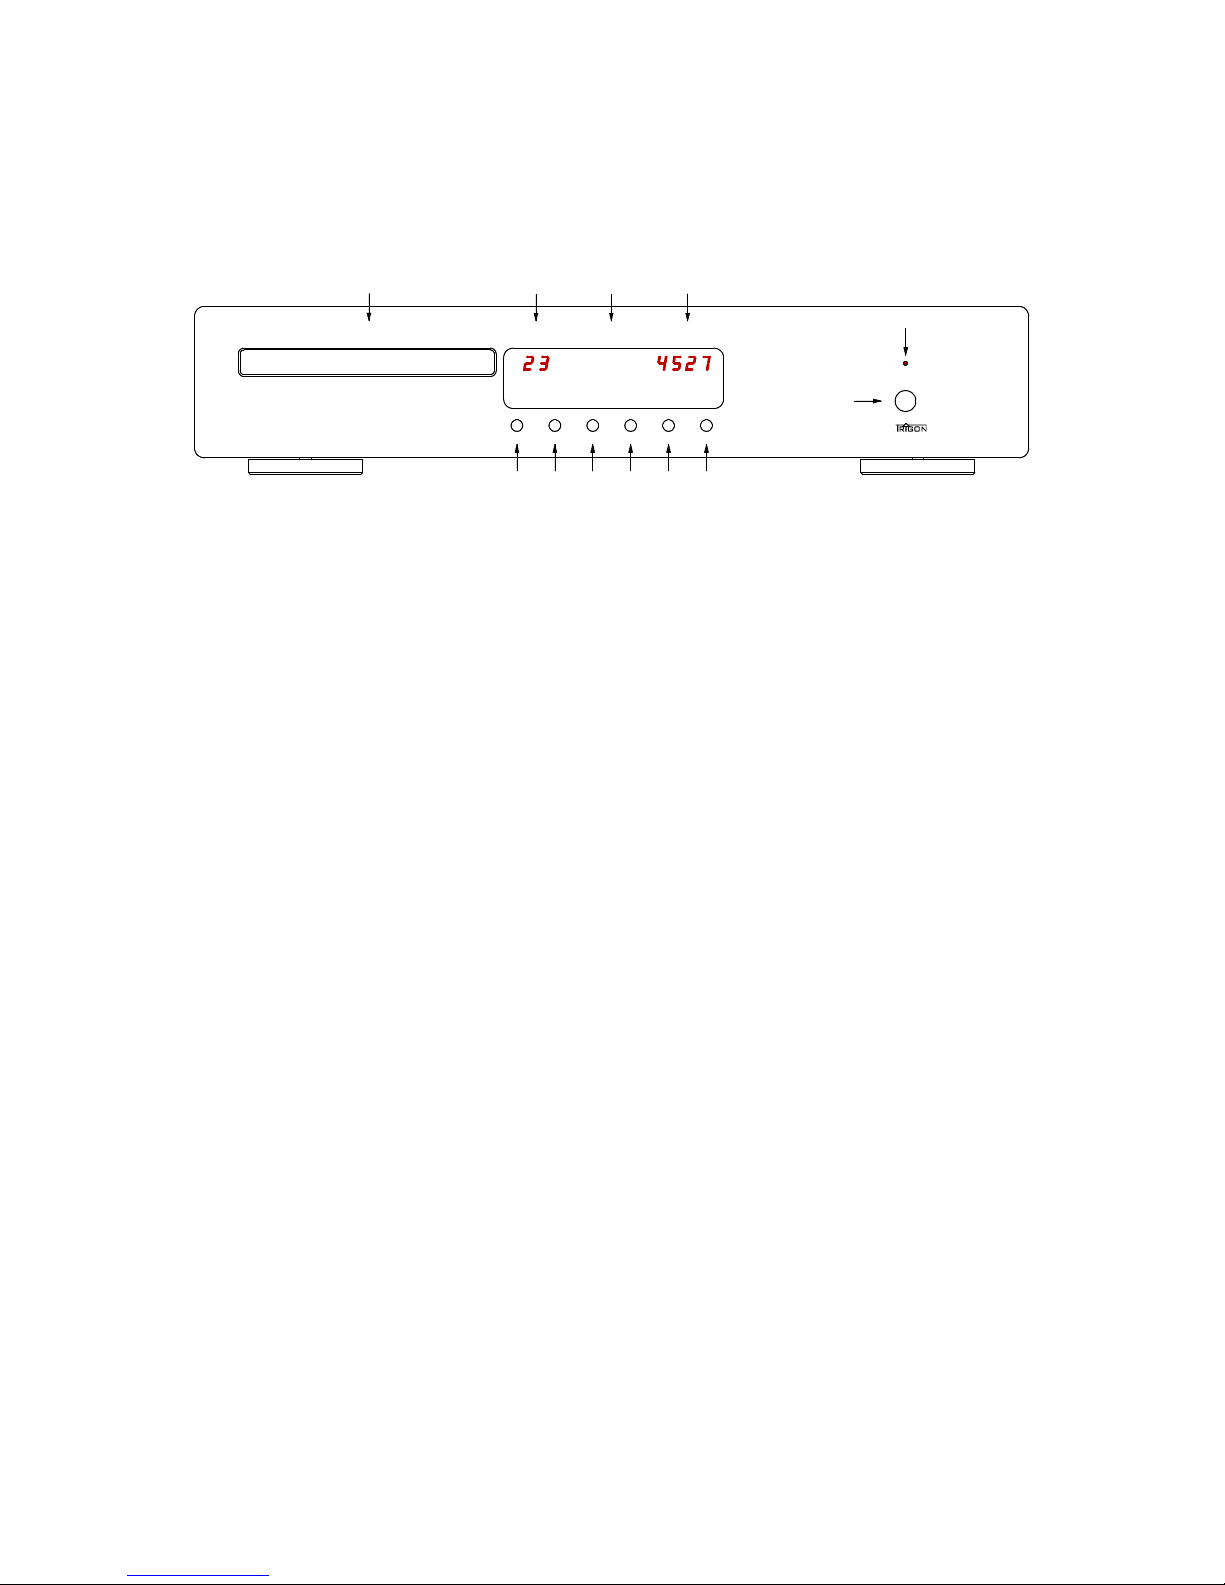
. The c ear y aid out disp ay – which can be dimmed and turned off by the
Director
- shows the current operating state. The
Director
can a so turn the CD-
p ayer on and off.

2.1 Safety notices.
TRIGON ELEKTRONIK
assumes no iabi ity for damage, which resu t from
inappropriate hand ing and/or disregard for the fo owing safety instructions.
The CD-p ayer may not be p aced c ose to strong heat sources such as heating e ements,
furnaces, high-powered amps, open fires, etc.
The CD-p ayer may not be exposed to strong impacts and vibrations.
The CD-p ayer may not be connected to the power out et immediate after being brought
from a co d environment to a warm one. Condensation cou d damage the device. Wait a
few minutes unti the device is warmed up to room temperature.
The CD-p ayer shou d not be exposed to direct sun ight.
P ease ensure that the device gets sufficient venti ation at its insta ation ocation.
Don’t pour f uid on the CD-p ayer; the inside of the device must remain dry.
Ne er acti ate the de ice without ha ing the protecti e casing in place.
Always remo e the power plug from the socket before opening the de ice.
Never bridge the fuse. P ease rep ace a defective fuse on y with an origina fuse of the
same type and rating.
Never attempt repairs on your own. On y authorized, proper y trained technica personne
may undertake any maintenance and/or repair. Any damage that resu ts from improper
hand ing or unauthorized repair attempts wi void any possib e warranty c aim.
P ease a ways turn off your system’s device before changing and/or attaching cab es.
The
RECALL II
can operate at a vo tage between 180V and 250V, 230V is the
average. If another vo tage is required, p ease contact your dea er or
TRIGON
,
so that
the device can be retrofitted.

2.2 Set-up Recommendations
After unpacking the unit, examine the device first for possib e transport damage. If you
shou d determine damage has occurred, then immediate y contact your dea er. Next,
examine the contents of the container to ensure a components are present. You shou d
find, addition to the
RECALL II,
the fo owing:
- Mains cab e
TRIGON VOLT
- IR remote contro
DIRECTOR
- Operating instructions
RECALL II
- Warranty requirement certificate
Set up the device horizonta y in a dry p ace. Ensure good venti ation. Strong magnetic
scattering fie ds, which are caused by output stage transformers and ha ogen ight
transformers, can ead to stray humming effects. Therefore set up the CD P ayer some
distance from such devices. A so, do not ay the cab e connections para e to the ighting
eads.
Stray humming effects are a so produced from f uorescent amps, so keep a minimum
distance of approximate y 1m. Avoid direct sun ight and don’t set up the
RECALL II
c ose to strong heat sources.
2.3 Guarantees and Ser ice
The
RECALL II
is a high-qua ity and sophisticated product. We at
TRIGON
try to
ensure the demands made of a
TRIGON
-product are met via numerous qua ity tests
and strict goods contro . If a prob em shou d however occur, then
TRIGON
ELEKTRONIK Gmb
grants a 3-years warranty. The warranty inc udes the repair
of the defective part as we as any abor charges. This is the imit of iabi ity.
The warranty exc udes any damage which resu ted from inappropriate insta ation,
incorrect operation or repairs through unauthorized specia ist dea ers and private
individua s. Further the warranty is void with disguised seria numbers as we as when
damage occurs as a resu t of accident or transport damages.
3. Start-up
After unpacking the CD P ayers, we recommend you first connect and switch on the device
with e ectricity to the un it on y, without having first connected it to other devices.
After a short switching on phase (the operating disp ay LED [ 5 ] f ashes) you hear a ow
c icking of a re ay. The
RECALL II
is now ready for use. You shou d now make
yourse f somewhat fami iar with the contro s and the fema e connectors.

3.1 The Controls on the Front of the Unit
OPEN << < > >> START STOP
REPEAT
PROGRAM
TIME
1234
5
6 7 8 9
12
10 11
Recall II
[ 1 ] CD Drawer:
Insert the CD here. The CD is to be inserted with the inscription side facing up and the
data side facing downward.
Note: Often we a ready observed that customers “jigg e“ at the opened drawer, in order to derive the qua ity from the drawer fetch.
Notice: A certain fetch must be present, so that the drawer doesn’t b ock itse f between the opening and c osing, i.e. this fetch is
necessary and intended.
[ 2 ] LED Display Title Number
This disp ay indicates the number of tit es detected on the CD. Then the actua tit e
number is indicated. This disp ay expires if tota p ay time and tota remainder p ay time
were shown in the indicator mode.
[ 3 a ] LED Display PROGRAM
This disp ay ights up, if you have switched on the programming mode.
(More on this mode further down)
[ 3 b ] LED Display REPEAT
This disp ay ights up, if the repetition function was switched on with the remote contro .
The entire CD wi be repeated, if the programming mode isn’t programmed different y,
unti the REPEAT-mode is switched off again, the rendition is stopped or the CD drawer is
opened.
[ 4 ] LED Display Title Time
This four-digit disp ay can be adjusted with the remote contro and/or the MODE-key [ 11 ]
to four different time indicator modes.
Mode 1: A ready p ayed tit e time, e.g. 2:45
Mode 2: Tota remainder-rendering time, e.g. –63:37
Mode 3: Tit e remainder-rendering time, e.g. –5:23
Mode 4: A ready p ayed tota rendering time, e.g. 34:52

[ 5 ] Operational status indicator LED
After switching on the CD P ayer this LED f ashes for a few seconds, unti the RECALL
RECALLRECALL
RECALL II
II II
II
stabi ized its interna operating vo tages. As soon as the LED is constant y, the CD P ayer
is ready for use.
[ 6 ] Key OPEN
The CD drawer can be opened and c osed by pressing this key. Every time you press this
key, the OPEN-LED ight brief y shines more bright y.
[ 7 ] Key < < < (title return and fast search return)
This key has two functions. The scanning aser jumps to the tit e beginning of the
momentary shown tit e by brief y pressing the key. The aser wi be brought to the previous
tit e by pressing the key two times. Long pressing of the key arranges the return search
where the signa can be istened to sequentia y.
The LED over the key shines more bright y, as ong as the key is pressed.
[ 8 ] Key > > > (title jump forward and fast search ad ance)
This key has two functions. The scanning aser jumps to the next tit e by brief y pressing
the key. The advance search wi be started by ho ding down the key, where the signa can
be istened to sequentia y.
The LED over the key shines more bright y, as ong as the key is pressed.
[ 9 ] Key START
If there is an audio-CD in the
RECALL II
, the CD p ayer can be started by pressing
this key. Now the START-LED shines more bright y. By pressing the START-Button during
the rendering procedure the Break-Function is switched on. Now the START-LED f ashes.
Pressing again on the start button so ves the break, the starting LED shines again
constant y and the device is again in the run mode.
[ 10 ] Key STOP
If you want to break off the rendering procedure, you can do that by depressing the key
STOP. The LED STOP wi shine more bright y.
[ 11 ] Key MODE
The four different time modes can be se ected with this key. For further information see
number [ 4 ].
[ 12 ] Power switch
The
RECALL II
can be switched on and/or off with this switch. The mains vo tage is
direct y powered, i.e., the
RECALL II
doesn’t use any e ectricity when switched off.

3.2 The Connections on the Back
[ 13 ] Power Connector, Power Switch and Power Protection
The enc osed high-qua ity mains cab e Vo t wi be inserted into the socket. P ease pay
attention to the mark (red point) and insert the p ug into the e ectrica out et of mu tiway
connector so that the red mark ines up with the power phase. You can spot the power
phase with the he p of a simp e mains tester. The red mark shou d square to that contact
of the e ectrica out et, where the mains tester ights up. This kind of “outphasing“ improves
the rendition and shou d be uti ized for a components of a system as we .
The power connection is turned on by the togg e switch. If necessary, rep ace the fuse
on y with a fuse of the same va ue. The mains p ug must be pu ed out, before the fuses
are exchanged.
[ 14 and 15 ] Cinch Exit
This output p ug is connected with the input p ug of the rendition amp ifier. These
entrances are usua y designated at the amp ifier with CD, AUX or LINE INPUT.
(P ease take note of the operating instructions of your amp ifier)
[ 16 and 17 ] Symmetrical Exit
This output p ug is connected with a symmetrica input p ug of the rendition amp ifier.
These entrances are usua y designated at the amp ifier with CD, AUX or LINE INPUT.
(P ease take note of the operating instructions of your amp ifier)
If your amp ifier has a symmetrica input p ug, then this entrance is preferred, because
possib e interspersed externa signa s on the cab e connection extinguish themse ves so
again.
[ 18 ] Digital Output
A separate digita -ana ogue transducer can be attached at this BNC socket. P ease make
sure that you attach and adjust the provided HF-termina resistance to this socket, if you
don’t use this exit. This avoids radiating uncontro ed high frequency signa s with this exit,
such as with a radio station, where it is possib e that sensitive high frequency devices ike
your UKW-Tuner or te evision cou d be disturbed.

3.3 The Remote Control
The IR-remote contro
Director
DirectorDirector
Director
is avai ab e as accessory for CD P ayer RECALL
II
Director
The
Director
is a system remote contro for a
Trigon
HiFi-components, which can be operated by
remote contro .
The picture on the eft shows a keys, which are re evant
for serving
Recall II,
in dark co our. These keys are
avai ab e during se ection type CD-p ayer .
The fo owing functions of
Recall II
can only be
performed with the remote contro :
- DISPLAY
With this key the disp ay can be turned on/off
or dimmed
- + 10
With this key the 10th-keyboard is activated for the
ighting time of the LED.
- REPEAT
With this key the REPEAT-mode can be switched on
and/or off.
- MODE
With this key the program mode can be activated.
- STORE
This key stores the se ected tit e.
- CLEAR
With this key the se ected tit e can be de eted.
Which keys are re evant for these and a other functions,
p ease earn from the manua of the
Director
and the
fo owing graphic.
The
Director
DirectorDirector
Director
is a system remote contro which is a so
compatib e to other
Trigon
TrigonTrigon
Trigon
HiFi devices .
The graphic on the eft shows a keys, with which the
Recall II
Recall IIRecall II
Recall II
can be served, in dark co our. These keys
are avai ab e during se ection type CD P ayer .
The fo owing functions of
Recall II
can only be
performed with the remote contro :
- DISPLAY
With this key the disp ay can be turned on/off
or dimmed
- + 10
With this key the 10th-keyboard is activated for the
ighting time of the LED.
- REPEAT
With this key the REPEAT mode can be switched on
and/or off.
- MODE
With this key the program mode can be activated.
- STORE
This key stores the se ected tit e.
- CLEAR
With this key the se ected tit e can be de eted.
P ease earn from the manua of the
Director
and the
fo owing graphic,
which keys are re evant for these and a
other functions.

3.3.1
Button layout
Director
DirectorDirector
Director
for
Recall II
Recall IIRecall II
Recall II
VOL+
SEARCH+
TITEL+
REPEAT +10TIME
OPENCLEARSTORE
DEVICE
VOL-
SEARCH-START
TITEL-PAUSE
DISPLAY
STOP
=
ON/OFF MODE
Key ON/OFF
To activate the standby mode of the CD P ayer, press the key ON/OFF for a few seconds.
Key DISPLAY
The intensity of the disp ay can be owered by pressing this key s ow y down to 0. To
reactivate the disp ay simp y press the key again.
The disp ay ights up at every operation for 6 seconds and switches off again (see above).
If the key is pressed for ca. 3 seconds, the mode for adjusting the intensity of the disp ay is
activated. It can be adjusted to an intensity between 1 and 99. The arrow keys (TITEL-
und TITEL+) are used for this purpose. The new va ue wi be stored automatica y.
Key MODE
You arrive to programming mode with this key. The LED PROGRAM ights up in the
disp ay in the program mode. Now the desired tit es of the inserted CD can be se ected in
arbitrary order via the arrow keys direct y at the
Recall II
Recall IIRecall II
Recall II
itse f or via
Director
DirectorDirector
Director
.
Each se ected tit e has to be confirmed by pressing the key STORE. The key CLEAR can
de ete the ast input.

If a tit es to be p ayed are entered, press the key START and the rendition begins in the
order, you have pre-programmed.
By pressing the key STOP once program can be stopped. To start over press the key
START. This is a so va id, when the program has been finished.
The comp ete program wi be de eted by pressing the key MODE, pressing the key STOP
twice or by opening the drawer.
Key STORE
The tit e, that has been se ected in the program mode (MODE), is be stored with this key.
Key CLEAR
This key can erase the ast tit e, which was chosen in the program mode (MODE), so the
first se ected choice can be corrected.
Key OPEN
The
Recall II
Recall IIRecall II
Recall II
CD drawer can be opened or c osed by pressing the key OPEN.
Key TIME
The time modes described under number [ 4 ] can be se ected in the order indicated
with the key TIME.
Key REPEAT
The REPEAT mode can be switched on and/or off with this key. See a so number [ 3b ]
Key +10
This key switches on – for a imited time - the 10th-keyboard, which a ows direct se ection
of tit es. If activated, the LED ights up at the
Director
DirectorDirector
Director
and the disp ay of
Recall II
Recall IIRecall II
Recall II
shows two horizonta ines, which ater shows the entered numera s
(numbers of tit es) indicated. The fo owing keys de ineate the numera s in the activated
10th-keyboard, whereby sing e- or doub e pressing the sing e- or doub e-digit number of
the tit e can be entered direct y:
Numera Key Numera Key Numera Key
1 ON/OFF 2 Disp ay 3 Mode
4 STORE 5 CLEAR 6 OPEN
7 TIME 8 REPEAT 9 +10
0 PAUSE
The function starts automatica y after entering the corresponding numera (s).
Keys TITEL – and TITEL+
These keys offer a partia function described under [ 7 ] and [ 8 ] and their functiona ity. If
the key TITEL- is pressed one time, the scanning aser springs back to the beginning of
the most recent y p ayed tit e. By pressing the key two times it springs to the previous tit e.
The next tit e wi be se ected by pressing the key TITEL+.
Keys SEARCH – and SEARCH+
These keys offer a partia function described under [ 7 ] and [ 8 ] and their functiona ity.
Press and ho d the key SEARCH- for a few seconds to search backward; press and ho d
the key SEARCH+ for a few seconds to search forward. The signa can sti be heard in
both cases sequentia y.

Key PAUSE
If the CD-P ayer is in render sty e, the rendition can be stopped by using the function of
break. By using the key START the Pause is cance ed and the rendition can be continued
(A so described under [ 9 ].)
Key START
The rendition can be started with this key.
Key STOP
The rendition is stopped with this key. It is a so used to de ete a program se ected in the
program mode.
Keys VOL – and VOL+
These keys do not contro any functiona ities of
Recall II
Recall IIRecall II
Recall II
. However, they wi contro
the vo ume of a connected
Trigon
TrigonTrigon
Trigon
Amp ifier, without switching the Director to the
Amp ifier device.
4. What to do, if...
In this chapter we want to give you a few hints, which wi he p to reso ve sma er prob ems.
4.1 ... nothing works?
Is the power supp y p ug inserted correct y? - Put the power supp y p ugs firm y into the
p ug socket.
Does the mains vo tage rest against the used main p ug socket, or has the home fuse
maybe reacted? – Examine the home fuse.
Did the interna micro fuse burn through? – Return the device back for service.
4.2 ... one hears nothing?
Is the correct entrance at the amp ifier se ected? - Se ect the correct entrance.
Does the
RECALL II
supp y at a a signa ? – Attach the
RECALL II
to another
entrance and examine if it functions. If this is the case, something is wrong with the other
entrance of the amp ifier. - Examine the entrance of the preamp ifier.
Was a computer data CD inadvertent y inserted? – Insert an audio CD.
Did the
RECALL II
read the CD correct y? – If the p ayer cannot read the CD, it tries
to read the data in anyway. If it isn’t successfu , the message “NO disc or 00 0000”appears
in the disp ay. The CD is either defective or bad y scratched and/or dirty. - Use a new CD.

4.3 ... it hums?
Are the connecting cab es tight and firm y put in? – Examine connection eads.
Sometimes mu tip e groundings can cause so-ca ed humming oops. This prob em
requires an experienced technician. We recommend you to contact your specia ist dea er.
... It hums on y, if the tuner, the video recorder, or the te evision is connected to the
preamp ifier. - A these devices are connected with a grounded antenna. Thus it causes a
humming oop again, which can be simp y e iminated, in this case simp y with a fan-jet
fi ter, which is switched into the antenna in et. Such fan-jet fi ters are avai ab e
inexpensive y in radio and te evision specia ity shops.
4.4 ... the remote control doesn’t operate?
Does the remote contro operate in the preamp ifier mode? – Press the key on the
remote contro . The LED wi shine. The remote contro is activated now for the
RECALL II
.
Are the batteries dead? - Insert new batteries.
Is there too much distance? - Reduce the distance. The IR remote contro has a imited
range. The IR remote contro wi operate at a distance of up to eight metes with fu y
charged batteries, depending upon exposure to sun ight.
If the receiver probe is exposed to bright sun ight, the range decreases. – Avoid direct
sun ight.

5. Technical Data
Frequency response : 20Hz - 20kHz (+ - 1dB)
Distortion factor : < 0.02 %
Cross-ta k attenuation : > 80 dB ( 1kHz )
Distance of weighted noise vo tage : > 100 dBA
Outputs : Audio - 1x Cinch , 1x XLR
: Digita - 1x BNC
Output Impedance : Line Cinch and XLR each 47 Ohm
max. Output vo tage : 2 V eff
Accessories : IR-remote contro
Director
Weight : 8,1 kg
Dimension : 440 x 89 x 320 mm ( BxHxd)
Warranty : 3 years
Subject to change
Production and construction:
Trigon Elektronik Gmb
Trigon Elektronik GmbTrigon Elektronik Gmb
Trigon Elektronik Gmb
Crumbacher Str. 60
D-34277 Fu dabrück-Bergshausen
Te .: +49 (0) 561 – 20753880
FAX:+49 (0) 561 – 20753888
e-mai : trigon@trigon-audio.de
web: www.trigon-audio.de
Kasse , Feb 2009

Table of contents
Other Trigon CD Player manuals