Trinnov Audio ALTITUDE 16 User manual
HIGH•ENDTRINNOV
ALTITUDE16
USER MANUAL
v 1.0


Thank you for choosing Trinnov Audio
ALTITUDE16 USER GUIDE
Software version v4.2 8 2.2
Last update: August, 2018

4
NOTICES
ACKNOWLEDGMENTS
DTS® is a registered trademark of DTS, Inc.
Dolby® is a registered trademark of Dolby Laboratories.
Auro-3D® is a registered trademark of Auro Technologies.
All other trademarks are the properties of their respective owners.
The Altitude16 is manufactured under license from Dolby Laboratories. Dolby, Dolby Atmos, Dolby Surround, and the double-D symbol are trademarks
of Dolby Laboratories.
For DTS patents, see http://patents.dts.com. Manufactured under license from DTS Licensing Limited. DTS, the Symbol, DTS in combination with
the Symbol, DTS:X, and the DTS:X logo are registered trademarks or trademarks of DTS, Inc. in the United States and/or other countries. © DTS,
Inc. All Rights Reserved.
The Altitude16 is manufactured under license from Auro Technologies. Trinnov Audio is certified by Auro Technologies to implement its technolog y
and products. Auro-3D® and the related symbols are registered trademarks of Auro Technologies. All materials contained in this work are protected
by copyright law and may not be reproduced, distributed, transmitted, displayed, published or broadcast without the prior written permission of Auro
Technologies NV or in case of third party materials, the owner of that content. You may not alter or remove any trademark, copyright or other notice from
copies of the content.
©2003-2017 Trinnov Audio. All rights reserved.
Due to constant improvement, all products specifications and design may change without notice.
Photos and illustrations are non-contractual.

5
Altitude16 _ USER MANUAL
To ensure optimal performance, please pay attention to the in-
structions in this Quick Start Guide:
•Read these instructions.
•Keep these instructions.
•Follow all instructions.
•Install the Altitude16 on a solid, flat, level surface that is dry,
well ventilated and out of direct sunlight. Be sure that all four
feet are supported.
•Do not use this apparatus near water.
•Clean only with a dry cloth. Do not use liquid solvent-based
cleaners.
•Protect the detachable power chord from being walked on
or pinched particularly at plugs, convenience receptacles, and
the point where they exit from the apparatus. If the ac cord
becomes damaged, do not use it. Immediately replace it with
a new one of the same or better rating.
•Unplug this apparatus during lightning storms or when
unused for long periods of time.
•Do not open the equipment case or remove any of the cover
panels. There are no user serviceable of this product . Refer all
servicing to qualified service personnel.
•To prevent fire or shock hazard, do not allow liquids to spill
or objects to fall into any openings of the product.
•Use only attachments/accessories specified by the manufac-
turer.
•Do not defeat the safety purpose of the polarized or ground-
ing-type plug. A polarized plug has two blades with one
wider that the other. A grounding-type plug has two blades
and a third grounding prong. The wide blade or the third
prong is provided for your safety. If the provided plug does
not fit into your outlet, consult an electrician for replacement
of the obsolete outlet.
•Before connecting the equipment, check that the main
power supply voltage rating corresponds with the local main
power supply. The rating of the main power supply voltage is
printed on the equipment.
•Please note that the Altitude16 is delivered with 2x 2 fuses
for 110 VAC. If you are located in a country that use 230
VAC please change the fuse before any utilisation of the
Altitude16.
•If replacement of the ac line fuse and/or any internal fuse
becomes necessary, replace only with same value and type of
fuse (110VAC operation: 2xT1A 5x20mm, 230VAC operation:
2x800mA 5x20mm). Never bypass the fuse.
•It is imperative that the Altitude16 be operated in a well
ventilated environment and the immediate external tempera-
ture be maintained as specified. Do not expose the Altitude16
to humidity, steam, smoke or excessive dampness or dust.
Maximum permissible operating conditions: 0°C to 40°C, 20-
65% relative humidity. External cooling fans may be required
in some cases.
•Do not stack any equipment directly above or below the
Altitude16 as to protect it from overheating, as well as the con-
tinued functionality of any equipment near and around it.
•Remote control battery use trademark GP Batteries Inter-
national, Panasonic or Varta, reference RenataCR2032 or
trademark Duracell reference DL2032. *CAUTION: Risk of
Explosion if Battery is replaced by an Incorrect Type. Dispose
of Used Batteries According to the Instructions, including list
of batteries allowed.
•Do not ingest the remote control battery. The remote control
supplied with this product contains a coin battery. If the coin
/ button cell battery is swallowed, it can cause severe internal
burns in just 2 hours and can lead to death. Keep new and
used batteries away from children. If the battery compart-
ment does not close securely, stop using the product and keep
it away from children. If you think batteries might have been
swallowed or placed inside any part of the body, seek imme-
diate medical attention.
•To completely disconnect the aparatus from the AC, com-
pletely remove the power cable from the main outlet.
•Refer all servicing to qualified service personnel. Servic-
ing is required when the apparatus has been damaged in
any way, such as when the power-supply cord or plug in
damaged, liquid has been spilled or object have fallen into
the apparatus, or the apparatus has been exposed to rain or
moisture, does not operate normally or has been dropped.
•Do not expose this apparatus to dripping or splashing and
ensure that no objects filled with liquids, such as vases, are
placed on the apparatus.
•The main plug of the power-supply cord shall remain
readily operable.
•Do not expose batteries to excessive head such as sunshing,
fire or the like.
TO COMPLETELY DISCONNECT THIS APPARATUS FROM
THE AC MAINS, DISCONNECT THE POWER SUPPLY
CORD PLUG FROM THE AC RECEPTACLE.
IMPORTANT
SAFETY INSTRUCTIONS

6
NOTICES 4
IMPORTANT SAFETY INSTRUCTIONS 5
TABLE OF CONTENTS 6
1 INTRODUCTION 10
1.1 ABOUT THIS GUIDE.................................................................12
1.2 PRODUCT INFORMATION.................................................... 14
1.3 SYSTEM INTEGRATION.........................................................15
1.4 TRINNOV CERTIFIED INSTALLERS...................................15
1.5 UNPACKING THE ALTITUDE16 ............................................ 16
1.6 THE HARDWARE...................................................................... 17
1.6.1 Front panel layout.........................................................................................................17
1.6.2 Front panel display.......................................................................................................17
1.6.3 Rear panel layout..........................................................................................................18
1.6.4 IR remote control..........................................................................................................19
1.7 THE SOFTWARE ......................................................................20
1.7.1 Available options to access the graphical user interface............................20
1.7.2 Important note about the web-based interface .............................................20
1.7.3 Using a display, mouse and keyboard connected
to the Altitude
16
...............................................................................................................21
1.7.4 The Top menu bar .......................................................................................................21
1.7.5 The Main user interface.............................................................................................22
1.7.6 The Lateral menu bar .................................................................................................22
1.7.7 Folded lateral menu.....................................................................................................23
1.7.8 Unfolded lateral menu................................................................................................24
1.7.9 The Speakers/Room setup tool ............................................................................25
1.7.10 The Fine Tuning panel................................................................................................25
1.7.11 The Advanced Settings interface..........................................................................26
1.7.12 Product Information....................................................................................................26
1.7.13 Software updates.........................................................................................................27
2 NETWORK SETUP 28
2.1 CONNECTING TO THE ALTITUDE16 ..................................28
2.1.1 Overview of the network connection procedure ............................................28
2.1.2 Step 1: download and install a VNC client on your device ..........................28
2.1.2.1 Using a tablet..................................................................................................................28
2.1.2.2 Using a Mac OS computer...........................................................................................................29
2.1.2.3 Using a Windows computer........................................................................................................29
2.1.3 Step 2: put the Altitude
16
and your device on the same Ethernet network......30
2.1.4 Step 3: connect to the Altitude16 from your device.......................................31
2.1.5 Using a Mac OS X computer with Screen Sharing........................................32
2.1.6 Using a Mac OS X computer with Chicken of the VNC ...............................33
2.1.7 Using a Windows computer with Tight VNC ...................................................33
2.2 CHANGING THE NETWORK SETTINGS
THROUGH THE FRONT PANEL .........................................35
2.2.1 Checking the Ethernet settings..............................................................................35
2.2.2 Using DHCP....................................................................................................................35
2.3 CHANGING THE ETHERNET SETTINGS
THROUGH THE GUI................................................................35
2.3.1 About the Ethernet information..............................................................................35
2.3.2 Checking the Ethernet settings..............................................................................36
2.3.3 Changing the Ethernet Settings.............................................................................36
2.4 ABOUT VNC AND ZERO-CONF NETWORKING.......... 37
2.4.1 About VNC (Virtual Network Computing).........................................................37
2.4.2 About zero-configuration networking ................................................................37
3 NETWORK STREAMING 38
3.1 THE UPNP PROTOCOLE.......................................................39
3.2 UPNP NETWORK ARCHITECTURE........................................
39 3.3 .......................................................RECOMMENDED UPNP
SOFTWARES...........................................................................................39
3.4 USING ROON.............................................................................40
3.4.1 Getting started with Roon ........................................................................................40
3.4.2 Important recommendation ...................................................................................41
3.4.3 Altitude
16
is Roon Ready ............................................................................................42
4 DAILY OPERATIONS 43
4.1 AVAILABLE USER INTERFACES.........................................43
4.2 USING THE FRONT PANEL..................................................43
4.2.1 Power On-Off Sequence...........................................................................................43
4.2.2 Checking the format of incoming audio.............................................................45

7
Altitude16 _ USER MANUAL
4.3 USING THE IR REMOTE CONTROL..................................46
4.3.1 Volume control..............................................................................................................46
4.3.2 Source selection...........................................................................................................46
4.3.3 Listening format Selection .......................................................................................46
4.3.4 Presets selection..........................................................................................................47
4.3.5 Access to the Front Panel menu ...........................................................................47
4.3.6 Ligh Button......................................................................................................................47
4.3.7 Optimizer Bypass.........................................................................................................47
4.4 USING THE GRAPHICAL INTERFACE..............................48
4.4.1 Volume control..............................................................................................................48
4.4.2 Source selection...........................................................................................................48
4.4.3 Preset selection.............................................................................................................49
4.4.4 Checking the format of incoming audio.............................................................49
5 BASIC SETTINGS 50
5.1 NAMING YOUR SOURCES ...................................................50
5.2 CONFIGURING YOUR SOURCES.......................................51
5.3 DEFAULT SOURCE CONFIGURATION .............................53
5.4 OPTIMIZATION OPTIONS.....................................................54
5.5 REMAPPING OPTIONS..........................................................55
5.6 NAMING, SAVING AND LOADING PRESETS................. 55
5.7 DEFAULT PRESET ...................................................................57
5.8 SET A MAXIMUM VOLUME.................................................58
5.9 SET THE DIM LEVEL ..............................................................59
5.10 BACKUP/RESTORE OF PRESETS .....................................60
6 QUICK SETUP 61
6.1 GETTING READY FOR THE CALIBRATION.................... 61
6.1.1 Audio Buffer Size setup .............................................................................................61
6.1.2 Audio clock setup.........................................................................................................62
6.2 STARTING THE WIZARD ......................................................63
6.3 DEFINE YOUR PRESET..........................................................64
6.4 SETUP YOUR ROOM..............................................................65
6.4.1 Introducing the speaker/room setup tool..........................................................65
6.4.2 An example of a specific spealer layout.............................................................67
6.4.3 Available initial layout..................................................................................................68
6.4.4 Select an initial layout .................................................................................................69
6.4.5 Adding regular speakers ...........................................................................................70
6.4.6 Adding Dolby enabled upfiring speakers ...........................................................71
6.4.7 Removing speakers ....................................................................................................71
6.4.8 Configure the settings of each speaker.............................................................72
6.4.9 Configure the crossover settings (optional)......................................................73
6.4.10 Mapping the channels of different formats ......................................................73
6.4.11 Sending pink noise to verify the routing of the speakers............................. 74
6.4.12 Add a para equalizer....................................................................................................74
6.4.12.1 Add a PEQ................................................................................................................................................77
6.4.12.2 Delete a PEQ...........................................................................................................................................77
6.4.12.3 Save a new PEQ group.................................................................................................................... 78
6.4.12.4 Load a PEQ group..............................................................................................................................79
6.4.12.5 Delete a PEQ group............................................................................................................................80
6.4.12.6 Save a PEQ group on an existing one .....................................................................................81
6.4.12.7 Generate pink noise...........................................................................................................................87
6.4.13 Setting up an array of speakers .............................................................................82
6.4.13.1 Example of an array of speakers...............................................................................................83
6.4.13.2 Adjust the gain ......................................................................................................................................83
6.5 BASS MANAGEMENT............................................................84
6.5.1 Overview of the bass management setup procedure .................................85
6.5.2 Bass management mode .......................................................................................86
6.5.3 Quick setup menu .......................................................................................................88
6.5.3.1 Set filters ..................................................................................................................................................89
6.5.3.2 Apply to selected pspeakers .......................................................................................................89
6.5.4 Individual Setup menu ..............................................................................................89
6.5.4.1 Regular bass management ........................................................................................................ 89
6.5.4.2 Intermediate bass management ..............................................................................................91
6.5.5 LFE & Misc.......................................................................................................................92
6.5.5.1 Low frequency effect setup .........................................................................................................92
6.5.5.2 Redirect LFE channel to one more satellite(s) .................................................................. 92
6.5.5.3 Redirect LFE channel to one more satellite(s) ..................................................................93
6.6 USING TRINNOV 3D MICROPHONE ................................94
6.6.1 Theoretically requirements for the measurement environment.............95
6.6.2 Reference measurement point..............................................................................95
6.6.3 Position and orientation of the microphone for the reference point ......95
6.7 SETTING THE VOLUME FOR THE CALIBRATION ...... 96
6.8 SETTING THE CROSSOVER (OPTIONAL)......................98
6.8.1 Overview of the crossover setup procedure.....................................................99
6.8.2 Active filters auto calibration.................................................................................100
6.8.3 Active filters manual calibration (experts only)............................................. 101
6.8.3.1 Setting the crossover......................................................................................................................101
6.8.3.2 Calibrating the crossovers...........................................................................................................102
6.8.4 No calibration..............................................................................................................106
6.9 CALIBRATION..........................................................................106
6.9.1 Single-point calibration........................................................................................... 107
6.9.2 Multi-point calibration ............................................................................................. 107
6.9.3 Common problems during calibration .............................................................110

8
6.9.4 Weighting.......................................................................................................................111
6.10 COMPUTE................................................................................. 112
6.11 ANALYZING THE RESULTS ............................................... 113
6.11.1 Important notes..........................................................................................................114
6.11.2 Graphs display options ............................................................................................114
6.11.3 Choose display options according to your requirements.........................115
6.12 CHECKING THE SPEAKER POSITIONS AFTER CALIBRA-
TION116
7 GOING FURTHER 119
7.1 ESSENTIAL TOOLS AND SETTINGS ............................ 119
7.1.1 Essential tools and settings...................................................................................119
7.1.2 Playing pink noise on the speakers ....................................................................119
7.1.3 Solo/Mute an input or an output .........................................................................121
7.1.4 Input and output volume........................................................................................ 122
7.1.4.1 Input volume ........................................................................................................................................122
7.1.4.2 Output volume....................................................................................................................................122
7.1.5 Equalization.................................................................................................................. 123
7.1.5.1 FIR EQ.......................................................................................................................................................123
7.1.5.2 Band graphic EQs.............................................................................................................................123
7.1.6 Output delay ................................................................................................................ 126
7.1.7 Scwitching optimization ON/OFF...................................................................... 127
7.1.8 Master configuration............................................................................................... 128
7.1.9 Audop clock settings............................................................................................... 130
7.1.9.1 Audio clock status information.................................................................................................130
7.1.9.2 Audio clock setup..............................................................................................................................131
7.2 MAIN OPTIMIZATION SETTINGS ...................................132
7.3 TARGET CURVE .....................................................................133
7.3.1 Overview of this preocedure................................................................................. 133
7.3.2 Setting up one or more target curves............................................................... 134
7.4 LIMITER CURVE .....................................................................134
7.5 ADVANCED OPTIMIZATION SETTINGS ...................................135
7.5.1 Display............................................................................................................................ 136
7.5.2 Front & surround speaker setting....................................................................... 136
7.5.3 Accoustics corection............................................................................................... 136
7.5.4 Calibration settings................................................................................................... 136
7.5.5 Optimize according to L&R speakers settings ............................................. 136
7.5.6 Fir and IIR settings .................................................................................................... 136
7.5.7 Level alignment settings........................................................................................ 137
7.5.8 Subwoofer low-pass filter settings.................................................................... 137
7.5.9 Decimation settings & advanced fir settings................................................ 137
7.5.10 Advanced FIR settings............................................................................................ 137
8 DECODER / UPMIXER SETTINGS 138
8.1 SUPPORTED DECODERS/UPMIXERS ..........................138
8.2 LISTENING FORMATS .........................................................139
8.3 USING THE FRONT PANEL................................................140
8.3.1 Listening format selection.....................................................................................140
8.3.2 Decoders configuration...........................................................................................141
8.4 USING THE GRAPHICAL INTERFACE............................141
8.4.1 Listening format selection......................................................................................141
8.4.2 Decoder configuration.............................................................................................141
8.5 DECODERS SETTINGS........................................................142
8.5.1 General settings..........................................................................................................142
8.5.2 General settings.........................................................................................................143
8.5.3 General settings.........................................................................................................144
8.5.4 General settings.........................................................................................................145
9 MANUAL CALIBRATION 146
9.1 VERY IMPORTANT TIPS.....................................................146
9.2 CHECKLIST BEFORE YOU START...................................146
9.3 IMPORTANT RECOMMENDATIONS
FOR MICROPHONE PLACEMENT...................................146
9.4 CALIBRATE THE ACTIVE CROSSOVERS (IF USED) .147
9.4.1 Overview of the crossover setup procedure ................................................ 147
9.4.2 Configure the advanced settings (optional) ................................................. 147
9.4.3 Adjust the master output level ............................................................................ 150
9.4.4 Calibrate the active crossovers ......................................................................... 150
9.4.5 Verify the sound of the calibrated crossovers................................................152
9.4.5.1 Visualize The Acoustical Graphs For Each Speaker...................................................152
9.4.5.2 Listen To Each Speaker Connected To The Crossover............................................153
9.4.6 Save The Preset.........................................................................................................153
9.5 CALIBRATE THE SPEAKERS IN THE ROOM...............................153
9.5.1 Overview of the calibration procedure ............................................................. 153
9.5.2 Adjust the master output level............................................................................. 153
9.5.3 Normal calibration sequence............................................................................... 154
9.5.4 Common problems during calibration ............................................................ 155
9.5.5 Calibration status ...................................................................................................... 155
9.5.6 Checking the speaker positions during/after calibration ........ 155
9.5.7 Multi-point measurements (optional).............................................................. 155
9.5.8 Compute the optimization filters........................................................................ 156
9.5.9 Save the preset........................................................................................................... 156

9
Altitude16 _ USER MANUAL
10 VERIFY THE SOUND
OF YOUR OPTIMIZED SYSTEM 157
10.1 VISUALIZE THE GRAPHICS...............................................157
10.2 LISTEN TO THE SYSTEM ...................................................157
10.3 SPEAKER SET WINDOW.....................................................157
10.4 BASS MANAGEMENT WINDOW .....................................157
10.5 SAVE PRESET .........................................................................157
11 IN CASE OF EMERGENCY,
BREAK THE GLASS 158
11.1 WHAT YOU WILL NEED.......................................................158
11.2 TRINNOV AUDIO SUPPORT POLICY .............................158
11.2.1 Contact your dealer..................................................................................................158
11.2.2 Send us an email....................................................................................................... 158
11.2.3 Call us............................................................................................................................. 158
12 APPENDIX 160
12.1 INSERT AN EXTERNAL STEREO DAC...........................160
12.2 REMOTE START AND STOP..............................................160
12.3 AUTOMATION .........................................................................160
12.4 SIGNAL FLOW OF THE ALTITUDE16 ...............................160
12.4.1 Signal flow of the altitude
16
.....................................................................................161
12.4.2 Setup process and filters calculation ................................................................161
12.5 3D SPEAKER PLACEMENT RECOMMENDATIONS ........160
12.6 3D MEASUREMENT MICROPHONE ..............................162
12.6.1 Microphone specifications ................................................................................... 162
12.6.2 Power supply .............................................................................................................. 162
12.6.3 Individual compensation file ...............................................................................163

10
INTRODUCTION
Trinnov Audio derives from "Tri-innovation", hence Innovation in 3D Audio. Our company’s constant focus
in this field of research has allowed us to develop the most advanced, innovative, powerful and scalable 3D
AV Preamplifier ever manufactured.
Thanks to a unique hardware platform, Trinnov Audio offers the first implementations of the latest home
theatre audio technologies. The Altitude16 has established a new leadership position within the luxury
home cinema processors category, opening the way for a whole new generation of modern, scalable and
software oriented home cinema processors.

11
Altitude16 _ USER MANUAL

12
!
IMPORTANT NOTE:Please note that the Altitude16 is delivered with a fuse for 110 VAC. If you are located in a country that
use 230 VAC please change the fuse before any utilisation of the Altitude16.
1.1 _ABOUT THIS GUIDE
This guide includes the most important information you need in order to use and setup the Altitude16 in
your home theatre system. From the most frequent daily operations to advanced calibration and optimi-
zation functionality, this document will guide you through every step of the task you wish to accomplish.
This guide is organized in the following parts:
PART I: GETTING STARTED WITH THE ALTITUDE16:
- Introduction: unpacking the Altitude16 and an overview of the hardware and the software.
- Network Setup: setting up a network to start using the software.
PART II: USING THE ALTITUDE16 ON A DAILY BASIS IN YOUR HOME THEATER:
- Daily Operations: Explains how to perform simple operations such as power-on/power-off, volume control, source
selection, preset selection and decoder settings via the front panel, with the IR remote control or through the software
user interface.
- Basic Settings: Explains how to name and configure your sources, how to switch on/off main optimization and remap-
ping options, how to manage presets, and how to backup/restore presets to/from a USB memory stick.
PART III: INTEGRATING THE ALTITUDE16 IN YOUR HOME THEATRE SYSTEM:
Overview of the setup procedure: A summary of the main steps you must follow in order to successfully integrate
the Altitude16.
Essential tools and settings: Provides important information about the software tools and settings you need to
know before starting the setup process.
Specify the Speaker Layout: How to provide the Altitude16 with all the information about your set of speakers.
This information is required for the automatic calibration of the speakers in the room.
Specify an Array of Speakers: Provides information to setup an array of speakers.
Decoder/Upmixer Settings: Provides necessary information on the different decoders supported, their upmixer
and the settings available.
Getting ready for calibration: Provides important tips and recommendations you need to know before running the
calibration procedure, including tips about microphone placement.
Optional: Calibrate the Active Crossovers: Explains the setup procedure for multi-amplified speakers using the
Altitude16’s intelligent crossover calibration tool;
Calibrate the Speakers in the Room: Explains the calibration process for the speaker system and how to compute
the optimization filters.
Setup Bass Management: Explains the advanced bass management options supported by the Altitude16.

13
Altitude16 _ USER MANUAL
Setup the Target Curves: Explains how to use the powerful target curve functionality of the Altitude16 to reach
your required frequency response.
Verify the Sound of your Optimized System: A short chapter to remind you that it is crucially important to verify
the sound of your system after each calibration
PART IV: TUNING THE SOUND OF YOUR HOME THEATRE SYSTEM WITH THE ALTITUDE16:
Tuning the Optimization Settings: Explains how to use the advanced settings of the Altitude16 to make further
improvements to the automatic optimization.
Performing Multi-point Measurements: How to improve the optimization by performing multiple measurements
with different microphone placements.
ADDITIONAL INFORMATION ABOUT THE ALTITUDE16 PREAMPLIFIER:
Appendix: Technical information about automation, the signal flow, the 3D speaker placement recommendations, con-
nector pinouts and the 3D Measurement Microphone.
To improve clarity throughout this document, references to user interface items will be shown in bold letters and illus-
tration’s caption will be shown in italic letters.
This guide also includes information about the latest 3D formats and common practice in terms of speaker placement to
help you understand the new approach of 3D Sound in the best possible and least confusing way.
In addition, important information will be indicated with the following symbols.
!
!
RECORD OF CHANGES:
DATE SOFTWARE VERSION
December 2017 V4.2: Software version 4.2.
!
NOTE: the design and the user experience of the Altitude16’s Graphic User Interface are constantly improved with software
updates.
14
MAIN FEATURES SUPPORTED AUDIO/VIDEO FORMATS
• 16 Channel Digital Audio Processor
• Universal Spatially-Accurate 3D Audio playback
• Fully integrated, best-in-class speaker/Room Optimization
• Superior multi-subwoofer management and active crossovers
calibration
• 4 digital and 2 analog inputs + 16 audio outputs
• 7x HDMI Inputs, 2x HDMI Outputs
• User-friendly, self-explaining user interface
• Builtin Wi-Fi & UPnP/DLNA Compliant Digital Media Renderer
• Wide choice of Remote Options
• 3D Audio Codecs: Auro-3D, Dolby Atmos and DTS:X, including
their respectives upmixers
• HD Audio Codecs: Dolby TrueHD, DTS-HD Master Audio
• HDMI 2.0, HDCP 2.2- compliant digital audio with 4K and 3D
video pass-through
• Roon: FLAC, WAV, DSF, DFF, AIFF, ALAC, AAC; 2.0, 5.1 and 7.1
multichannel audio
• UPnP/DLNA renderer: WAV, AIFF, OGG, FLAC up to 24 bits / 192
kHz
EXCLUSIVE TECHNOLOGIES SUBWOOFER MANAGEMENT
• Trinnov patented 2D/3D spatial remapping
• Trinnov Loudspeaker/Room Optimization
• Next Generation Hardware platform:
• Revolutionary architecture, scalable processing platform
• 64 bits floating point & 24 bits / 96 kHz native processing
• Software-oriented upgrades provided over internet, no DSP
upgrade required
• Robust design, inspired from our professional audio product
lines
• Trinnov high-performance AD/DA converters, used daily by the
most demanding mastering studios
• VNC Remote Control through the network from any
smartphone, tablet or laptop
• Web-based responsive interface
• Automation via IP and RS232 protocols
• Android remote application
• Crestron and Savant modules available
• Built-in Gigabit Ethernet and Wi-Fi
• IR remote control included
• 12V Trigger in/out
• Adjustable High-pass / Low-pass editable by individual
satellite/sub or by group of speakers
• Support from 0 to 16 subwoofers
• Automatic level, delay and phase alignment
PHYSICAL CHARACTERISTICS AUDIO PROCESSING
• Chassis: 3U
• Power supply: 100 - 240VAC - 50-60Hz
• Consumption: 100 W max.
• Fuse: 110 VAC operation: 2xT1A 5x20mm
230 VAC operation: 2xT800mA 5x20mm
• Weight: ~11.3 kg / 24.9 lbs
• Environmental conditions:
- Operating: 0°C-40°C (32°F-104°F)
- Humidity: 20%-80% relative humidity (without condensation)
• Comprehensive Processing latency control
• Automatic Processing:
• Multi-point acoustic measurement (Trinnov 3D measurement
microphone)
• Time/Frequency acoustic analysis based on impulse response
measurement
• Loudspeaker/Room optimization
• Manual Processing: Several layers of 31 bands Graphic EQ, FIR
EQ, Parametric EQ, gains, polarity and delays available for every
channel.
• Total delay given in meters / milliseconds / frames for the
listening point and adjustable global delay for accurate Lip Sync
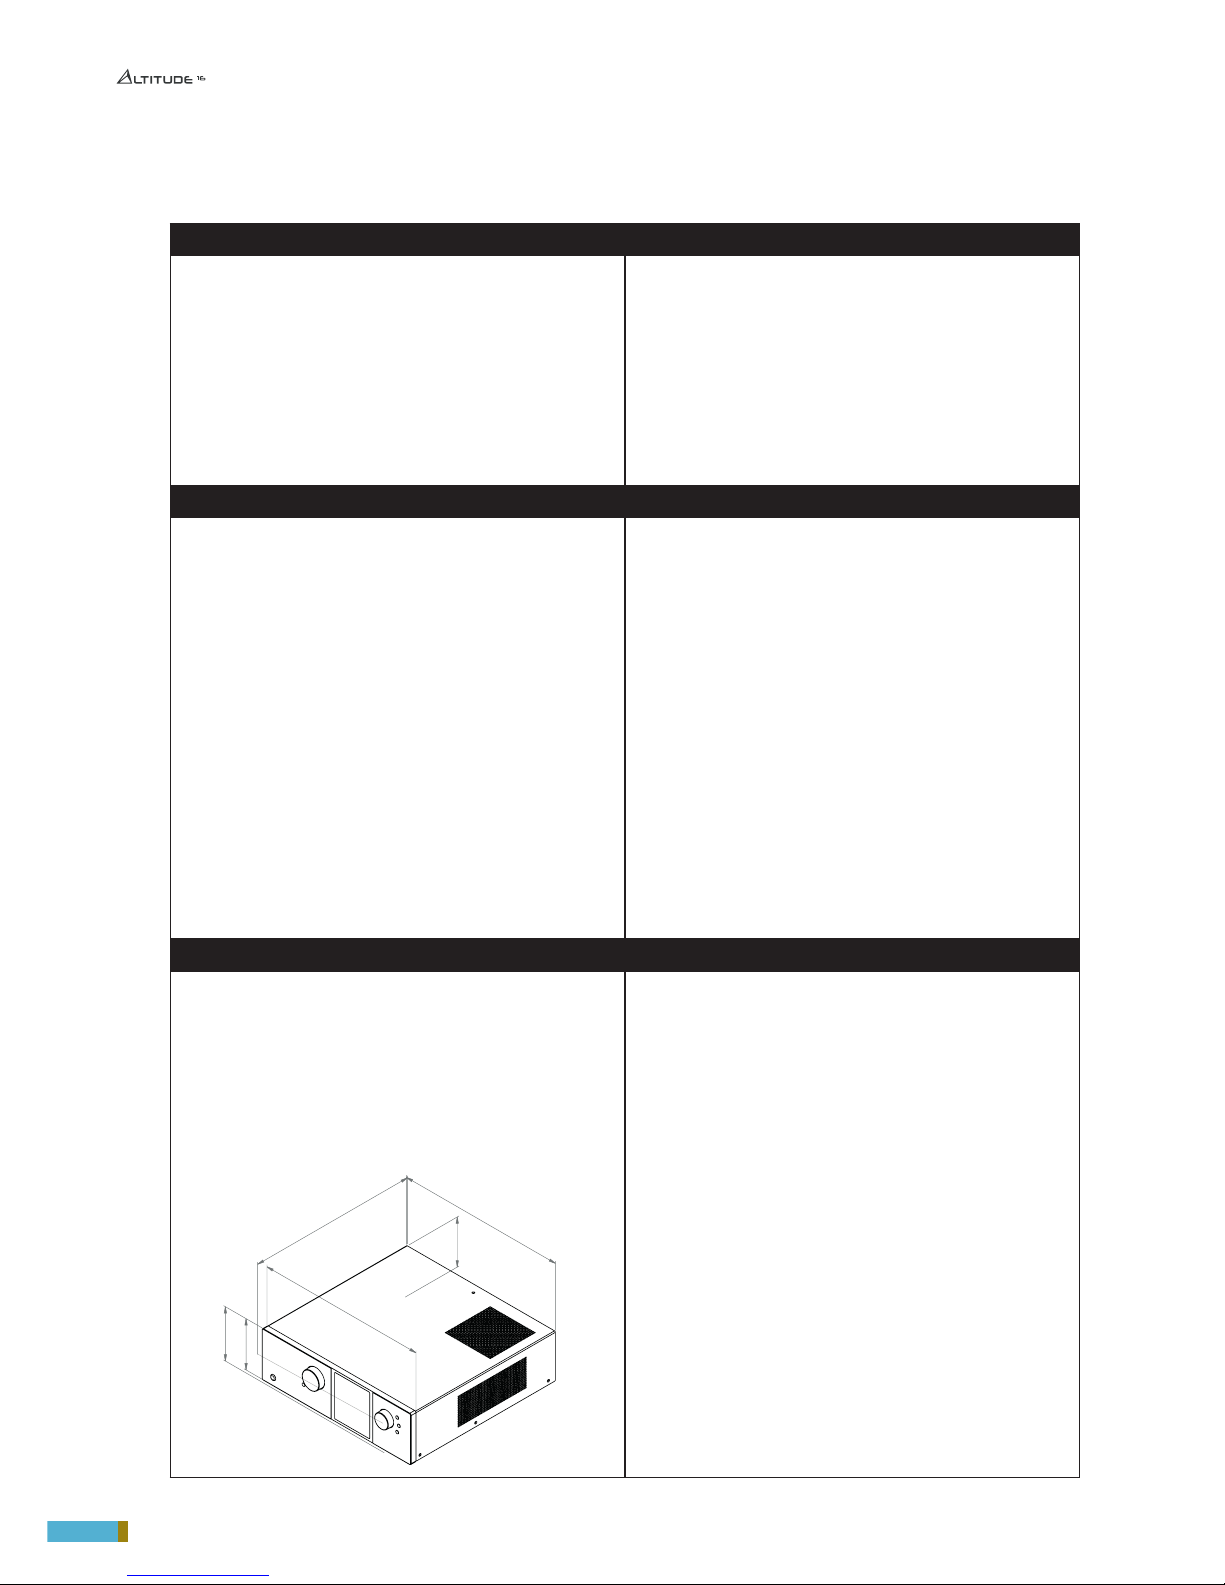
1.2 _PRODUCT INFORMATION
430 mm
138,40 mm
127,60 mm
130,60 mm
438 mm
438 mm
A A
B B
C C
D D
E E
F F
8
8
7
7
6
6
5
5
4
4
3
3
2
2
1
1
AUTEUR
VERIF.
APPR.
FAB.
QUAL.
SAUF INDICATION CONTRAIRE:
LES COTES SONT EN MILLIMETRES
ETAT DE SURFACE:
TOLERANCES:
LINEAIRES:
ANGULAIRES:
FINITION:
CASSER LES
ANGLES VIFS
NOM
SIGNATURE
DATE
MATERIAU:
NE PAS CHANGER L'ECHELLE
REVISION
TITRE:
No. DE PLAN
ECHELLE:1:10
FEUILLE 1 SUR 1
A3
MASSE:
Altitude 16
15
Altitude16 _ USER MANUAL
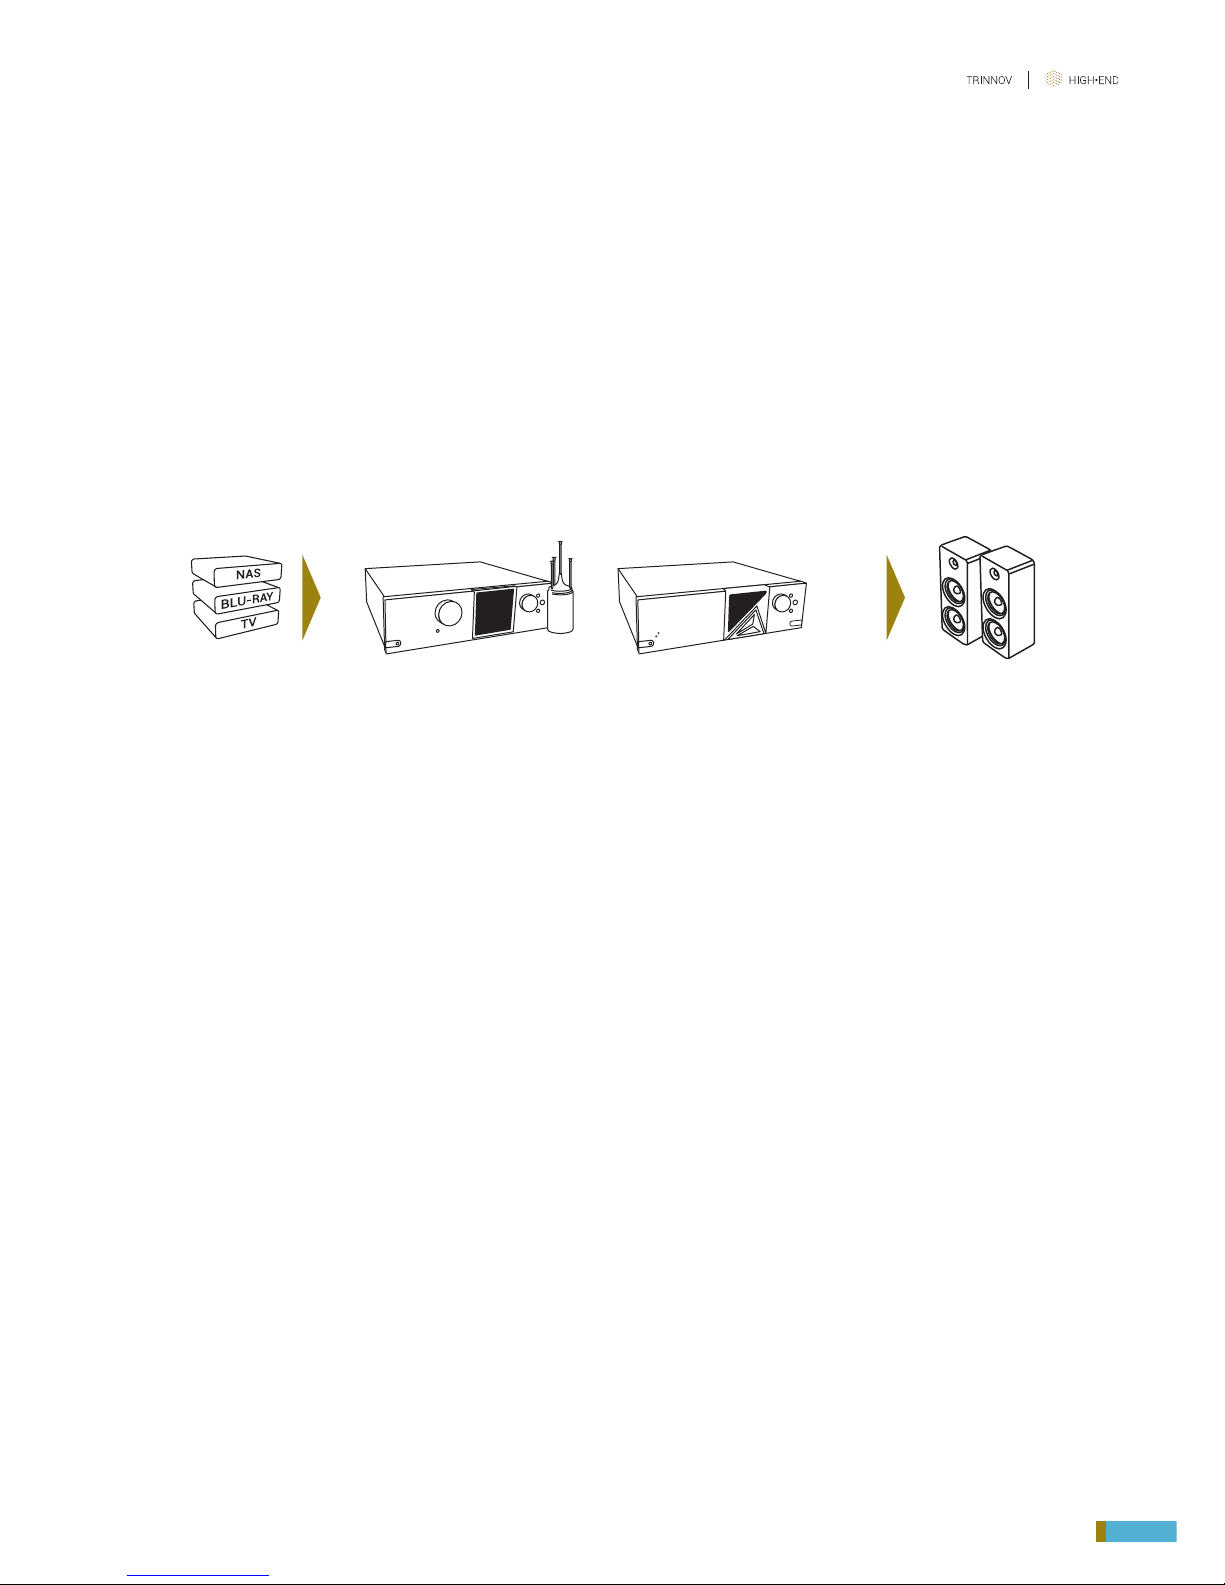
1.3 _SYSTEM INTEGRATION
The Altitude16 is inserted before the amplifier and loudspeakers to correct imperfections of the loudspeak-
ers and the room. During calibration, the speakers are calibrated with a 3D acoustic probe.
Source Altitude16 Amplitude8Speakers
Figure 1: Altitude16 system integration
1.4 _TRINNOV CERTIFIED INSTALLERS
Depending on how far you want to dig into its features, the Optimizer is either a straightforward and easy-
to-use automatic compensation system or an incrediblyflexibleand powerful tool, including numerous
advanced filter parameters,target curves and manual EQ’s, all being re-computable on the fly.
By following an iterative installation procedure, the Optimizer achieves results beyond expectations in record time
but it surely requires a good understanding of the audio and acoustic basics and more especially experience to
clearly identify a problem and therefore use a relevant method to solve it.
Therefore we strongly recommend you request the services of a Certified Trinnov Installer to setup and fine tune
your Altitude16 in your home theater system.
1.2 _PRODUCT INFORMATION

16
1.5 _UNPACKING THE ALTITUDE16
You will find in the Altitude16 packaging:
The Trinnov Altitude16 AV preamplifier
3D Microphone
(Optional)
Remote control
Power Cord
Rack ears
CR2032 Battery

17
Altitude16 _ USER MANUAL
1.6 _THE HARDWARE
1.6.1 _FRONT PANEL LAYOUT
1.6.2 _FRONT PANEL DISPLAY
Back
Button
Select
Button
Menu
Button
Source/Item
Selection Knob
Volume
knob
Mute
button
Power
Switch
Current
Source
Output
Meters
Optmizer
status
Audio
Format
Audio Sync
Status
Output Level

18
1.6.3 _REAR PANEL LAYOUT
1 XLR ANALOG OUTPUTS 1-16
2 7 INPUTS HDMI, 2 OUTPUTS HDMI
• Input #1-3 and output #1 are HDMI1.4
• Input #4-7 and output #2 are HDMI 2.0
3 TRIGGER 12V IN/OUT
• 1x Input trigger
• 4x Output trigger (including 3x progammable)
4ANALOG INPUTS
• 1x XLR Stereo Inputs balanced
• 1x RCA Stereo Input
• 1x 3D Microphone Input on 5-pin XLR
5POWER
• AC Input
• Fuse
• Master Power Switch
• Serial Number
6AUDIO NETWORK
• Dual network audio connector
7 PC CONNECTORS may change following the mother
board reference
•Video output (DVI/HDMI)
•2x USB 2.0 + 2x USB 3.0
•PS/2 Keyboard/Mouse
•RJ45 Gigabit Ethernet
•Audio ports (unused)
8DIGITAL OUTPUTS
•2x S/PDIF Output (1x optical and 1x coaxial)
9DIGITAL INPUTS
• 4x Inputs on S/PDIF (2 optical and 2 coaxial)
1
69 8 4
3
2
5
7

19
Altitude16 _ USER MANUAL
1.6.4 _IR REMOTE CONTROL
1 TO 4
Direct source selection
SOURCE
Source selection
FORMAT
Playback mode selection
OPTIMIZER PRESETS
Preset selection
LIGHT
Switches off the backlight on the front
panel
BYPASS
Optimizer bypass
VOL +/-
Volume control (1dB step)
DIM
Decreases the volume by 20dB (toggle
button)
MUTE
Mutes audio outputs (toggle button)
OK
Press to turn on
20
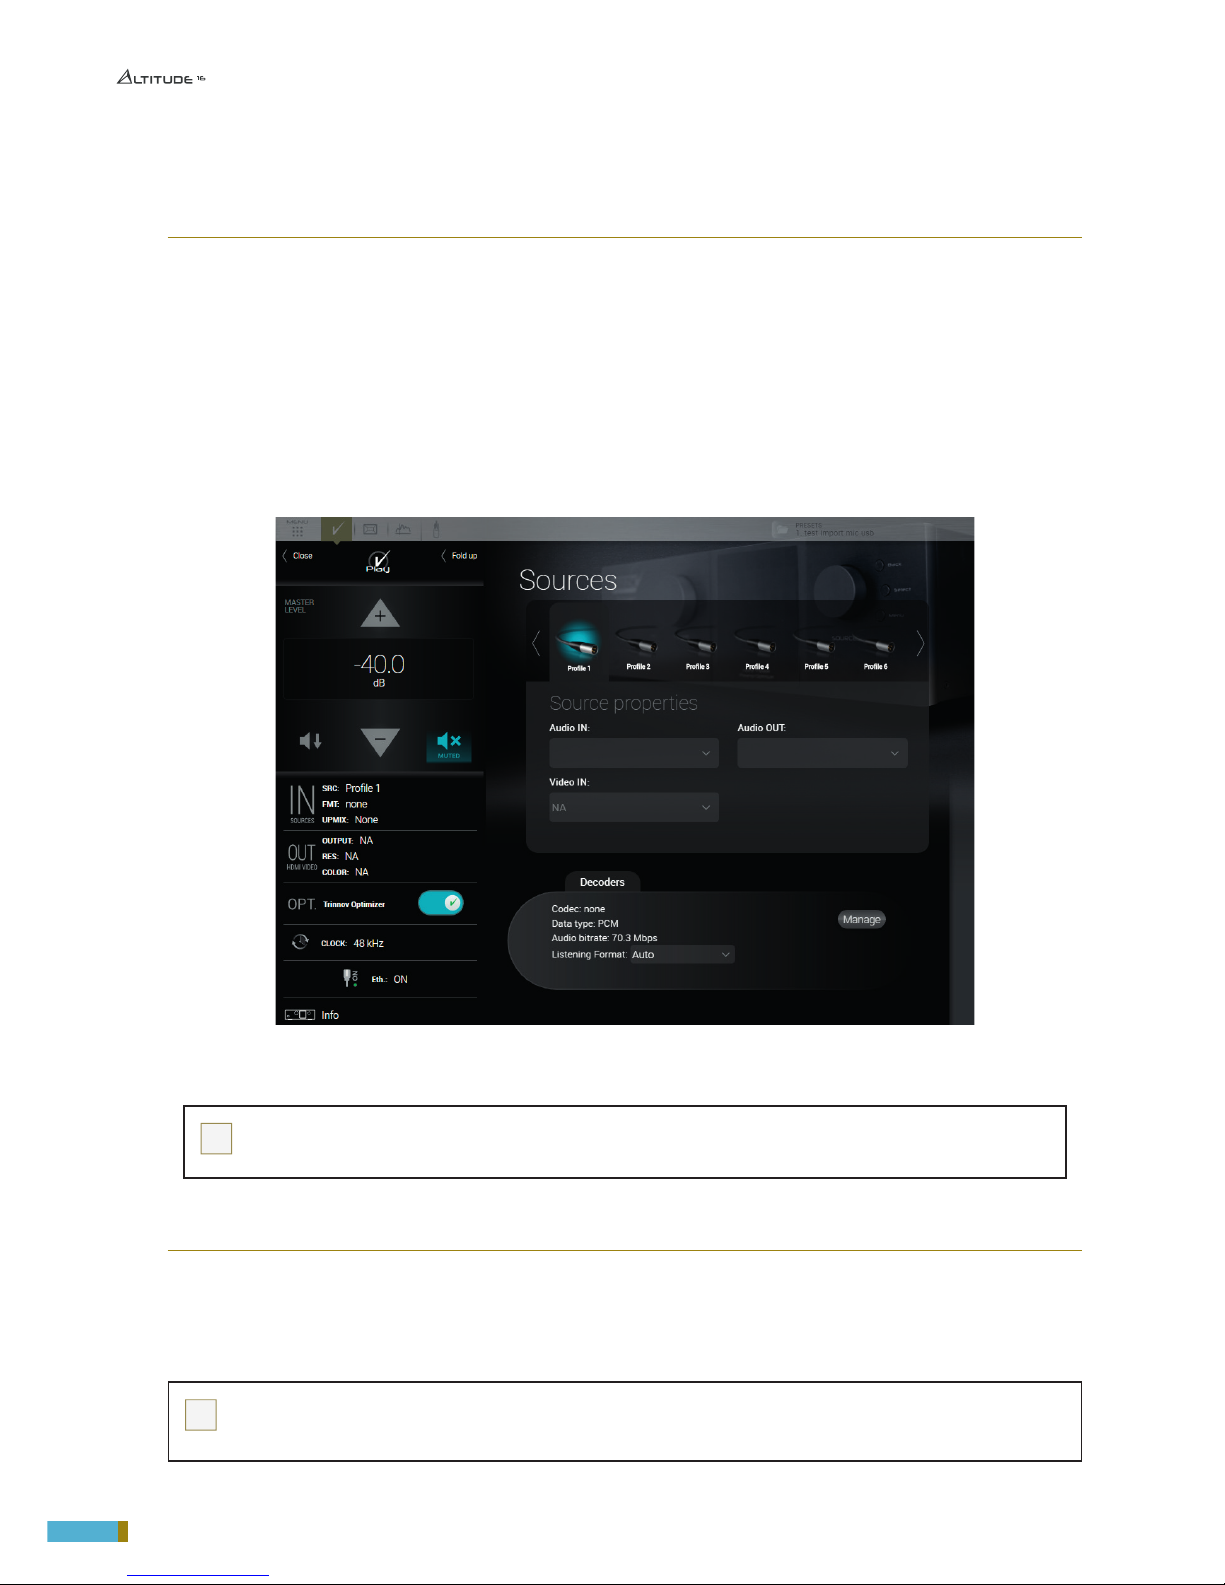
1.7 _THE SOFTWARE
1.7.1 _AVAILABLE OPTIONS TO ACCESS THE GRAPHICAL USER INTERFACE
The Altitude16 offers multiple options to display and control the user interface:
• Directly with a physical display, a mouse and a keyboard connected to the Altitude16.
• Remotely with a VNC Client over the network, from any computer or tablet to access the full user interface in
order to operate and/or setup the Altitude16.
• Remotely with an internet browser, with a limited access to the user interface allowing to operate the Altitude16
but without all the setup menus.
The Graphical User Interface of the Altitude16 is specifically designed for touch screen use
but it is just as easy to use with your laptop’s trackpad or with a mouse.
Figure 2: graphical user interface of the Altitude16
!
NOTE: the design and the user experience of the Altitude16’s Graphic User Interface are constantly improved with
software updates.
1.7.2 _IMPORTANT NOTE ABOUT THE WEB-BASED INTERFACE
The Altitude16‘s full user interface can only be accessed by connecting a display or through a VNC client.
If you’ve already completed the setup of the Altitude16 in your home theatre system and you only need to operate it,
a limited part of the Altitude16‘s user interface is also available from a web browser.
!
NOTE: The web browser can only display the HTML-based pages of the user interface. However, most of the system setup pages of the
Altitude16 are currently Linux-based. Therefore, the web browser can only be used for daily operations of the Altitude16 but cannot be used
to setup, measure and optimize your speaker system.
Table of contents
Other Trinnov Audio Home Theater System manuals


