Trinnov Audio Altitude 32 User manual
1

2
3
ALTITUDE32 USER GUIDE
Software version v4.1
Last update: February 1, 2017

4

5
NOTICES
LIABILITY
The legal guarantees of conformity and latent defects under no circumstances cover any damage arising from accidents,
misuse or an assembly error, negligence or considerable modification of the appearance or functioning of the returned
equipment.
Trinnov Audio reserves the right to refuse any guaranteed return for a damaged product on account of misuse.
TERMS OF GUARANTEE
I. Duration
All the Trinnov products include a guarantee which lasts for two (2) years (extensible to three (3) years) as from the
invoice date.
In the event of a malfunction subsequent to a fault detected in the device, the guarantee is total and no sum may be
claimed from the acquiring party in terms of its replacement or repair, subject to the terms below. Any replaced parts
and the repair of the malfunction are guaranteed for six (6) months.
This guarantee applies to the Trinnov Audio product, provided that it has been purchased in mainland France.
II. Conditions
The guarantee applies only if the product is confirmed as being faulty by the technical services of Trinnov Audio.
This guarantee applies if the faulty product is presented during the guarantee period, accompanied by a copy of the
invoice (which indicates the purchase date, the model of the device and its serial number). Trinnov reserves the right to
refuse the free application of the guarantee if these documents are not submitted or if they are incomplete or illegible.
This guarantee will not apply if the name of the model or the serial number appearing on the product has been modified,
deleted, removed or rendered illegible.
To prevent any damage or loss/deletion of data stored on the device, you must have saved them prior to returning your
device to the services responsible hereunder.
The transport cost to Trinnov is to be met by the customer, including any return in mainland France. The device is
transported at the risks of the customer. In the event of any damage observed upon its return, all the reservations must
be made by the recipient with the carriers.
This guarantee does not cover any of the following points:
●Regular repair and maintenance work or replacements of parts subsequent to normal wear and tear,
●Consumables (elements of limited use, to be replaced on a regular basis)
●Damage or modifications brought about by misuse, including:
Handling which brings about a physical, aesthetic or superficial modification or damage to the
product or damage to the display;
An installation or a use of the product not in keeping with its intended purpose or the instructions of
installation or use of Trinnov Audio;
Maintenance work to the product not in keeping with the instructions of Trinnov Audio;
An installation or a use of the product not in keeping with standards or technical or safety regulations
applicable in the country in which it is installed or used.
●Viral infections or use of the product with software not provided or incorrectly installed,
●The condition or faults of the systems with which the product is used or on which it is integrated, unless
these are other Trinnov Audio products intended for use with the product,
●The use of the product with accessories, peripheral devices and other products whose kind, condition and
standards do not meet with the requirements of Trinnov Audio,
●Any repair work carried out or attempted by any persons other than the repairmen of Trinnov Audio,
●Any modifications or alterations made without the prior written consent of Trinnov, including:

6
The upgrade of the product not in keeping with the specifications or functionalities described in
the user manual,
The replacement of sub-elements in relation to its original configuration, without the prior written
consent of Trinnov Audio,
Any modifications made to the product to bring it into line with technical or safety standards,
whether at a national or local level, applicable in any country other than those for which the product
has been originally designed and manufactured.
Any accidents, fires, liquids, chemical products, other substances, floods, vibrations, excessive
heat, unsuitable air supply, over voltage, an excessive or inadequate power supply, radiation,
electrostatic discharge, including lightning and other forces and external effects,
Unsuitable storage conditions for this kind of product.
This guarantee only covers the hardware components of the product. It does not cover the software (of the Trinnov brand
or other but installed by Trinnov).
A normal repair period of a maximum of 4 weeks (excluding transport time) must be accepted, but if this period is
exceeded, and on demand, equivalent hardware may be loaned which gives entitlement to an extended guarantee of an
equivalent duration. Trinnov Audio reserves the right to replace any parts or products which are deemed to be faulty with
new parts or products reviewed in the factory without any other obligation for us as regards any direct or indirect
consequences of the malfunction of this hardware both in relation to people and the goods. All replaced parts and
products will become the property of Trinnov.
In the event that a latent defect is detected, the Purchaser must immediately notify Trinnov Audio of the same in writing
by a detailed note explaining the circumstances in which he/she became aware of it, not later than eight (8) days from
the time it is discovered, failing which, he/she loses the right to any guarantee.
III.Exclusions and restrictions
Excluding the considerations above, Trinnov Audio offers no guarantee (explicit, implicit, statutory or otherwise) for the
product or the software that it contains or which accompanies it, concerning the quality, functioning, accuracy, reliability,
suitability for a particular purpose or otherwise. If this exclusion is not, or only partially, permitted by applicable
regulations, Trinnov Audio excludes or restricts its guarantees exclusively to the maximum extent permitted by
applicable regulations. Any guarantee which is unable to be fully excluded will be limited (to the extent permitted by
applicable regulations) to the duration hereof.
Under this guarantee, the only obligation for Trinnov Audio is to repair or replace products which meet with the conditions
hereof. Trinnov Audio is in no way liable for any loss or damage related to the products, service, this guarantee or
otherwise, including - financial or intangible losses - the price paid for the product - a loss of profit, income, data,
enjoyment or use of the product or any associated product - an indirect or unforeseen loss or damage. This restriction
is applicable, whether the loss or damage is attributable to:
A malfunction or failure to operate of the product or related products on account of faults or unavailability while
it/they is/are at the premises of Trinnov Audio, thereby resulting in delays, wasted time for the user or a
discontinuation of activity;
An error in the production of the product or related products;
Damage or loss of software or data;
A virus and other causes.
This applies to loss and damage in any legal context, including negligence and other torts, the termination of a contract,
the explicit or implicit guarantee, and the unconditional liability (even when Trinnov Audio has been informed of the
possibility of this damage).
When the applicable regulations forbid or limit these exclusions of liability, Trinnov Audio excludes or limits its liability
only to the extent permitted by the applicable regulations. Some countries forbid, for instance, the exclusion or the
restriction of damage arising from negligence, gross negligence, deliberate breach of contract, deceit and similar acts.
Under this guarantee, the liability of Trinnov Audio will, under no circumstances, surpass the price paid for this product,
but if the applicable regulations allow more significant restrictions of liability, the more significant restrictions will apply.

7
IV. Protection of your legal rights
By virtue of the national regulations in force, the customers enjoy legal (statutory) rights concerning the sale of the
product. This guarantee in no way limits your statutory rights, if applicable, which may not be excluded or restricted, or
your rights vis-à-vis the seller of the product. You are permitted to assert your rights at your sole discretion.
V. Acknowledgments
DTS® is a registered trademark of DTS, Inc.
Dolby® is a registered trademark of Dolby Laboratories.
Auro-3D® is a registered trademark of Auro Technologies.
All other trademarks are the properties of their respective owners.
The Altitude32 is manufactured under license from Dolby Laboratories. Dolby, Dolby Atmos, Dolby Surround, and the
double-D symbol are trademarks of Dolby Laboratories.
For DTS patents, see http://patents.dts.com. Manufactured under license from DTS Licensing Limited. DTS, the Symbol,
DTS in combination with the Symbol, DTS:X, and the DTS:X logo are registered trademarks or trademarks of DTS, Inc. in
the United States and/or other countries. © DTS, Inc. All Rights Reserved.
The Altitude32 is manufactured under license from Auro Technologies. Trinnov Audio is certified by Auro Technologies
to implement its technology and products. Auro-3D® and the related symbols are registered trademarks of Auro
Technologies. All materials contained in this work are protected by copyright law and may not be reproduced, distributed,
transmitted, displayed, published or broadcast without the prior written permission of Auro Technologies NV or in case
of third party materials, the owner of that content. You may not alter or remove any trademark, copyright or other notice
from copies of the content.
©2003-2017 Trinnov Audio. All rights reserved.
Due to constant improvement, all products specifications and design may change without notice.
Photos and illustrations are non-contractual.

8
IMPORTANT SAFETY
INSTRUCTIONS
To ensure optimal performance, please pay attention to the instructions in this Quick Start Guide:
Read these instructions.
Keep these instructions.
Follow all instructions.
Install the Altitude32 on a solid, flat, level surface that is dry, well ventilated and out of direct sunlight. Be sure
that all four feet are supported.
Do not use this apparatus near water.
Clean only with a dry cloth. Do not use liquid solvent-based cleaners.
Protect the detachable power chord from being walked on or pinched particularly at plugs, convenience
receptacles, and the point where they exit from the apparatus. If the ac cord becomes damaged, do not use
it. Immediately replace it with a new one of the same or better rating.
Unplug this apparatus during lightning storms or when unused for long periods of time.
Do not open the equipment case or remove any of the cover panels. There are no user serviceable parts in this
equipment. Refer all servicing to qualified service personnel.
To prevent fire or shock hazard, do not allow liquids to spill or objects to fall into any openings of the product.
Use only attachments/accessories specifies by the manufacturer.
This unit is supplied with a two 3 pin grounded ac plugs. Always insert the ac plug into a grounded outlet. Do
not remove the ground pin or disable the ground for any purpose. The main AC has to be protected by a 20
Ampere circuit breaker.
Do not defeat the safety purpose of the polarized or grounding-type plug. A polarized plug has two blades with
one wider that the other. A grounding-type plug has two blades and a third grounding prong. The wide blade or
the third prong is provided for your safety. If the provided plug does not fit into your outlet, consult an electrician
for replacement of the obsolete outlet.
Before connecting the equipment, check that the main power supply voltage rating corresponds with the local
main power supply. The rating of the main power supply voltage is printed on the equipment.
If replacement of the ac line fuse and/or any internal fuse becomes necessary, replace only with same value
and type of fuse (110V: T1A Schurter FST 5x20; 220V: T800mA Schurter FST 5x20 ). Never bypass the fuse.
It is imperative that the Altitude32 be operated in a well ventilated environment and the immediate external
temperature be maintained as specified. Do not expose the Altitude32 to humidity, steam, smoke or excessive
dampness or dust. Maximum permissible operating conditions: 0°C to 40°C, 20-65% relative humidity. External
cooling fans may be required in some cases.
Do not stack any equipment directly above or below the Altitude32 as to protect it from overheating, as well as
the continued functionality of any equipment near and around it.
Remote control battery use trademark GP Batteries International, Panasonic or Varta, reference CR2032 or
trademark Duracell reference DL2032. *CAUTION : Risk of Explosion if Battery is replaced by an Incorrect Type.
Dispose of Used Batteries According to the Instructions, including list of batteries allowed.
Do no ingest the remote control battery. The remote control supplied with this product contains a coin battery.
If the coin / button cell battery is swallowed, it can cause severe internal burns in just 2 hours and can lead to
death. Keep new and used batteries away from children. If the battery compartment does not close securely,
stop using the product and keep it away from children. If you think batteries might have been swallowed or
placed inside any part of the body, seek immediate medical attention.
To completely disconnect the aparatus from the AC, completely remove the power cable from the main outlet.

9
Refer all servicing to qualified service personnel. Servicing is required when the apparatus has been damaged
in any way, such as when the power-supply cord or plug in damaged, liquid has been spilled or object have
fallen into the apparatus, or the apparatus has been exposed to rain or moisture, does not operate normally or
has been dropped.
Do not expose this apparatus to dripping or splashing and ensure that no objects filled with liquids, such as
vases, are placed on the apparatus.
The main plug of the power-supply cord shall remain readily operable.
Do not expose batteries to excessive head such as sunshing, fire or the like.
TO COMPLETELY DISCONNECT THIS APPARATUS FROM THE AC MAINS, DISCONNECT THE POWER SUPPLY
CORD PLUG FROM THE AC RECEPTACLE.

10
TABLE OF CONTENTS
NOTICES ...................................................................................................................................................5
IMPORTANT SAFETY INSTRUCTIONS .....................................................................................................8
TABLE OF CONTENTS ............................................................................................................................10
1INTRODUCTION .............................................................................................................................15
1.1 ABOUT THIS GUIDE.....................................................................................................................16
1.2 PRODUCT INFORMATION .............................................................................................................18
1.3 SYSTEM INTEGRATION................................................................................................................19
1.4 TRINNOV CERTIFIED INSTALLERS .................................................................................................19
1.5 UNPACKING THE ALTITUDE32.......................................................................................................20
1.6 THE HARDWARE ........................................................................................................................21
Front panel layout ..................................................................................................................................21
Front panel display.................................................................................................................................21
Rear panel layout ...................................................................................................................................22
IR remote control ...................................................................................................................................23
1.7 THE SOFTWARE .........................................................................................................................24
Available options to access the graphical user interface .......................................................................24
Important note about the web-based interface......................................................................................25
Using a display, mouse and keyboard connected to the Altitude32.........................................................25
The Top menu bar ..................................................................................................................................26
The Main user interface .........................................................................................................................27
The Lateral menu bar .............................................................................................................................27
Folded lateral menu................................................................................................................................28
Unfolded lateral menu............................................................................................................................29
The Speakers/Room setup tool..............................................................................................................30
The Fine Tuning panel............................................................................................................................30
The Advanced Settings interface ...........................................................................................................31
Product Information ...............................................................................................................................31
Software updates ...................................................................................................................................32
2NETWORK SETUP ..........................................................................................................................33
2.1 CHOOSING A NETWORK CONFIGURATION........................................................................................33
2.2 CONNECTING TO THE ALTITUDE32 ................................................................................................34
Overview of the network connection procedure .....................................................................................34
Step 1: download and install a VNC client on your device......................................................................35
Step 2: put the Altitude32 and your device on the same network ............................................................36
Step 3: connect to the Altitude32 from your device .................................................................................40
Using a Mac OS X computer with Screen Sharing..................................................................................41
Using a Mac OS X computer with Chicken of the VNC ...........................................................................42
Using a Windows computer with Tight VNC...........................................................................................43
2.3 CHANGING THE NETWORK SETTINGS THROUGH THE FRONT PANEL .....................................................46
Checking the Wi-Fi settings ...................................................................................................................46
Checking the Ethernet settings ..............................................................................................................47
Connecting the Altitude32 to a Wi-Fi network .........................................................................................47
2.4 CHANGING THE WI-FI SETTINGS THROUGH THE GUI .......................................................................48
About the Wi-Fi information...................................................................................................................48
Checking the Wi-Fi settings ...................................................................................................................48
Connecting the Altitude32 to a Wi-Fi network .........................................................................................49
Changing the Wi-Fi Status mode of the Altitude32..................................................................................50
2.5 CHANGING THE ETHERNET SETTINGS THROUGH THE GUI.................................................................51
About the Ethernet information ..............................................................................................................51
Checking the Ethernet settings ..............................................................................................................51
Changing the Ethernet Settings..............................................................................................................52
2.6 ABOUT VNC AND ZERO-CONF NETWORKING ..................................................................................53
About VNC (Virtual Network Computing) ...............................................................................................53
About zero-configuration networking ....................................................................................................53

11
3NETWORK STREAMING .................................................................................................................54
3.1 THE UPNPPROTOCOLE .............................................................................................................54
3.2 UPNPNETWORK ARCHITECTURE.................................................................................................54
3.3 RECOMMENDED UPNPSOFTWARES..............................................................................................55
4DAILY OPERATIONS ......................................................................................................................57
4.1 AVAILABLE USER INTERFACES......................................................................................................57
4.2 USING THE FRONT PANEL............................................................................................................58
Power On-Off Sequence.........................................................................................................................58
Volume control......................................................................................................................................................59
Source selection....................................................................................................................................................59
Preset selection ....................................................................................................................................................59
Checking the format of incoming audio .................................................................................................60
4.3 USING THE IR REMOTE CONTROL..................................................................................................61
Volume control.......................................................................................................................................61
Source selection.....................................................................................................................................61
Listening format Selection .....................................................................................................................61
Presets selection....................................................................................................................................62
Access to the Front Panel menu ............................................................................................................62
Ligh Button.............................................................................................................................................62
Optimizer Bypass ...................................................................................................................................62
4.4 USING THE GRAPHICAL INTERFACE ...............................................................................................63
Volume control.......................................................................................................................................63
Source selection.....................................................................................................................................63
Preset selection .....................................................................................................................................64
Checking the format of incoming audio .................................................................................................64
5BASIC SETTINGS ...........................................................................................................................65
5.1 NAMING YOUR SOURCES .............................................................................................................65
5.2 CONFIGURING YOUR SOURCES .....................................................................................................66
5.3 DEFAULT SOURCE CONFIGURATION...............................................................................................68
5.4 OPTIMIZATION OPTIONS .............................................................................................................69
5.5 REMAPPING OPTIONS.................................................................................................................70
5.6 NAMING,SAVING AND LOADING PRESETS.......................................................................................70
5.7 DEFAULT PRESET.......................................................................................................................72
5.8 SET A MAXIMUM VOLUME ..........................................................................................................72
5.9 SET THE DIM LEVEL ...................................................................................................................73
5.10 BACKUP/RESTORE OF PRESETS ...................................................................................................73
6OVERVIEW OF THE SETUP PROCEDURE.......................................................................................75
7ESSENTIAL TOOLS AND SETTINGS...............................................................................................76
7.1 AUDIO CLOCK SETTINGS .............................................................................................................76
Audio clock status information ..............................................................................................................76
Audio clock setup...................................................................................................................................77
7.2 METERING THE INPUTS AND OUTPUTS ..........................................................................................78
7.3 PLAYING PINK NOISE ON THE SPEAKERS ........................................................................................79
7.4 SOLO/MUTE AN INPUT OR AN OUTPUT..........................................................................................80
7.5 SWITCHING OPTIMIZATION ON/OFF..............................................................................................81
7.6 VIEWING THE ACOUSTICAL GRAPHS ..............................................................................................82
Important notes .....................................................................................................................................83
Graphs display options ..........................................................................................................................83
Chose the display options according to your requirements ...................................................................84
8SPECIFY THE SPEAKER LAYOUT ..................................................................................................86
8.1 OVERVIEW OF THE SPEAKERS SETUP PROCEDURE ............................................................................86
8.2 INTRODUCING THE SPEAKER/ROOM SETUP TOOL............................................................................86
8.3 AN EXAMPLE OF A SPECIFIC SPEAKER LAYOUT ................................................................................88
8.4 AVAILABLE INITIAL LAYOUTS .......................................................................................................89
8.5 SELECT AN INITIAL SPEAKER LAYOUT ............................................................................................90
8.6 ADDING SPEAKERS.....................................................................................................................91
Adding Regular Speakers .......................................................................................................................91
Adding Dolby Enabled Upfiring speakers ...............................................................................................92

12
8.7 REMOVING SPEAKERS.................................................................................................................93
8.8 CONFIGURE THE SETTINGS OF EACH SPEAKER ................................................................................93
8.9 CONFIGURE THE CROSSOVER SETTINGS (OPTIONAL)........................................................................95
8.10 MAPPING THE CHANNELS OF DIFFERENT FORMATS..........................................................................95
8.11 SEND PINK NOISE TO VERIFY THE ROUTING OF THE SPEAKERS ...........................................................97
8.12 ADD A PARAMETRIC EQUALIZER...................................................................................................98
What is a Parametric EQUALIZER? .........................................................................................................98
Open the Parametric Equalizers editor...................................................................................................99
Add a PEQ ............................................................................................................................................100
Delete a PEQ.........................................................................................................................................100
Save a new PEQ group .........................................................................................................................101
Load a PEQ group ................................................................................................................................102
Delete a PEQ group ..............................................................................................................................103
Save a PEQ group on an existing one...................................................................................................105
Generate Pink Noise.............................................................................................................................106
8.13 SAVE THE PRESET....................................................................................................................106
9SPECIFY AN ARRAY OF SPEAKERS.............................................................................................107
9.1 SETTING UP AN ARRAY OF SPEAKERS ..........................................................................................107
9.2 EXAMPLE OF AN ARRAY OF SPEAKERS .........................................................................................108
9.3 ADJUST THE GAIN....................................................................................................................108
9.4 SAVE THE PRESET ...................................................................................................................109
10 DECODER / UPMIXER SETTINGS.................................................................................................110
10.1 SUPPORTED DECODERS/UPMIXERS............................................................................................110
10.2 LISTENING FORMATS ...............................................................................................................111
10.3 USING THE FRONT PANEL..........................................................................................................114
Listening format selection ...................................................................................................................114
Decoders Configuration .......................................................................................................................114
10.4 USING THE GRAPHICAL INTERFACE .............................................................................................115
Listening formats selection..................................................................................................................115
Decoders Configuration .......................................................................................................................115
10.5 DECODERS SETTINGS ...............................................................................................................116
General Settings...................................................................................................................................116
Dolby decoder settings ........................................................................................................................117
DTS decoder Settings...........................................................................................................................118
Auro-3D decoder settings ....................................................................................................................119
11 GETTING READY FOR CALIBRATION...........................................................................................120
11.1 VERY IMPORTANT TIPS........................................................................................................120
11.2 CHECKLIST BEFORE YOU START..................................................................................................120
11.3 IMPORTANT RECOMMENDATIONS FOR MICROPHONE PLACEMENT ....................................................121
Requirements for the measurement environment................................................................................121
Reference measurement point .............................................................................................................121
Position and orientation of the microphone for the reference point.....................................................121
12 CALIBRATE THE ACTIVE CROSSOVERS (OPTIONAL) .................................................................123
12.1 OVERVIEW OF THE CROSSOVER SETUP PROCEDURE........................................................................123
12.2 CONFIGURE THE ADVANCED SETTINGS (OPTIONAL).......................................................................124
12.3 ADJUST THE MASTER OUTPUT LEVEL..........................................................................................126
12.4 CALIBRATE THE ACTIVE CROSSOVERS..........................................................................................127
12.5 VERIFY THE SOUND OF THE CALIBRATED CROSSOVERS ...................................................................128
Visualize the acoustical graphs for each speaker ................................................................................128
Listen to each speaker connected to the crossover.............................................................................130
12.6 SAVE THE PRESET....................................................................................................................130
13 CALIBRATE THE SPEAKERS IN THE ROOM.................................................................................131
13.1 OVERVIEW OF THE CALIBRATION PROCEDURE ...............................................................................131
13.2 ADJUST THE MASTER OUTPUT LEVEL ..........................................................................................131
13.3 NORMAL CALIBRATION SEQUENCE ..............................................................................................132
13.4 COMMON PROBLEMS DURING CALIBRATION .................................................................................133
13.5 CALIBRATION STATUS ..............................................................................................................133
13.6 CHECKING THE SPEAKER POSITIONS DURING/AFTER CALIBRATION ...................................................134

13
13.7 MULTI-POINT MEASUREMENTS (OPTIONAL).................................................................................137
13.8 COMPUTE THE OPTIMIZATION FILTERS ........................................................................................137
13.9 SAVE THE PRESET....................................................................................................................138
14 SETUP BASS MANAGEMENT.......................................................................................................139
14.1 OVERVIEW OF THE BASS MANAGEMENT SETUP PROCEDURE ............................................................139
14.2 FULLY CUSTOMIZABLE BASS MANAGEMENT .................................................................................140
14.3 BASS MANAGEMENT MODE........................................................................................................141
14.4 QUICK SETUP MENU .................................................................................................................142
Set Filters.............................................................................................................................................143
Apply to selected speakers ..................................................................................................................143
14.5 BASS MANAGEMENT SETTINGS FOR INDIVIDUAL SPEAKER...........................................................144
14.6 LFE &MISC ...........................................................................................................................145
Low Frequency Effect Setup.................................................................................................................145
+10 Db on LFE ......................................................................................................................................145
Stacked Sub Correction........................................................................................................................ 146
15 SETUP TARGET CURVES .............................................................................................................147
15.1 OVERVIEW OF THIS PROCEDURE .................................................................................................147
15.2 SETTING UP ONE OR MORE TARGET CURVES .................................................................................147
16 VERIFY THE SOUND OF YOUR OPTIMIZED SPEAKER SYSTEM..................................................149
16.1 VISUALIZE THE ACOUSTICAL GRAPHS FOR ALL SPEAKERS ...............................................................149
16.2 LISTEN TO THE SYSTEM ............................................................................................................149
17 TUNING THE OPTIMIZATION SETTINGS .....................................................................................150
17.1 MAIN OPTIMIZATION SETTINGS..................................................................................................150
17.2 SPEAKER POSITION REMAPPING.................................................................................................152
17.3 TARGET CURVE .......................................................................................................................152
17.4 LIMITER CURVE .......................................................................................................................152
17.5 ADVANCED OPTIMIZATION SETTINGS ..........................................................................................153
Display .................................................................................................................................................153
Front & Surround Speaker settings ......................................................................................................153
Acoustics Correction............................................................................................................................ 154
Calibration settings..............................................................................................................................154
Optimize according to L&R speakers settings......................................................................................154
FIR and IIR settings ..............................................................................................................................154
Level alignment settings ......................................................................................................................155
Subwoofer low-pass filter settings ......................................................................................................155
Decimation settings & Advanced FIR settings......................................................................................155
Advanced FIR settings .........................................................................................................................155
18 PERFORMING MULTI-POINT MEASUREMENTS .........................................................................156
18.1 RELEVANT MEASUREMENT POSITIONS.........................................................................................157
18.2 MULTI-POINT CALIBRATION PROCEDURE .....................................................................................158
18.3 WEIGHTING MULTIPLE MEASUREMENTS ......................................................................................158
19 APPENDIX....................................................................................................................................159
19.1 INSERT AN EXTERNAL STEREO DAC ............................................................................................159
19.2 REMOTE START AND STOP........................................................................................................159
19.3 AUTOMATION..........................................................................................................................160
19.4 SIGNAL FLOW OF THE ALTITUDE32 ..............................................................................................160
Signal flow of the Altitude32..................................................................................................................160
Setup Process and filters calculation...................................................................................................160
19.5 3D SPEAKER PLACEMENT RECOMMENDATIONS ............................................................................161
19.6 DB25 CONNECTOR:ANALOG PINOUT..........................................................................................161
19.7 DB25 CONNECTOR : AES PINOUT .............................................................................................162
19.8 3D MEASUREMENT MICROPHONE ...............................................................................................162
Microphone specifications...................................................................................................................163
Power supply .......................................................................................................................................163
Individual compensation file ................................................................................................................ 163
Connection order..................................................................................................................................165

14

15
1INTRODUCTION
Trinnov stands for 3D innovation and our company’s constant focus in this field of research has
allowed us to develop the most advanced, innovative, powerful and scalable 3D AV Preamplifier ever
manufactured.
Thanks to a unique hardware platform, Trinnov Audio offers the first implementations of the latest
home theatre audio technologies. The Altitude32 has established a new leadership position within the
luxury home cinema processors category, opening the way for a whole new generation of modern,
scalable and software oriented home cinema processors.

16
1.1 ABOUT THIS GUIDE
This guide includes the most important information you need in order to use and setup the Altitude32 in your home theatre
system. From the most frequent daily operations to advanced calibration and optimization functionality, this document
will guide you through every step of the task you wish to accomplish.
This guide is organized in the following parts:
PART I: GETTING STARTED WITH THE ALTITUDE32:
Introduction: unpacking the Altitude32 and an overview of the hardware and the software.
Network Setup: setting up the network to start using the software.
PART II: USING THE ALTITUDE32 ON A DAILY BASIS IN YOUR HOME THEATRE:
Daily Operations: Explains how to perform simple operations such as power-on/power-off, volume control, source
selection, preset selection and decoder settings via the front panel, with the IR remote control or through the software
user interface.
Basic Settings: Explains how to name and configure your sources, how to switch on/off the main optimization and
remapping options, how to manage presets, and how to backup/restore presets to/from a USB memory stick.
PART III: INTEGRATING THE ALTITUDE32 IN YOUR HOME THEATRE SYSTEM:
Overview of the setup procedure: A summary of the main steps you must follow in order to successfully integrate the
Altitude32.
Essential tools and settings: Provides important information about the software tools and settings you need to know
before starting the setup process.
Specify the Speaker Layout: How to provide the Altitude32 with all the information about your set of speakers. This
information is required for the automatic calibration of the speakers in the room.
Specify an Array of Speakers: Provides information to setup an array of speakers.
Decoder/Upmixer Settings: Provides necessary information on the different decoders supported, their upmixer and the
settings available.
Getting ready for calibration: Provides important tips and recommendations you need to know before running the
calibration procedure, including tips about microphone placement.
Optional: Calibrate the Active Crossovers: Explains the setup procedure for multi-amplified speakers using the
Altitude32’s intelligent crossover calibration tool;
Calibrate the Speakers in the Room: Explains the calibration process for the speaker system and how to compute the
optimization filters.
Setup Bass Management: Explains the advanced bass management options supported by the Altitude32.
Setup the Target Curves: Explains how to use the powerful target curve functionality of the Altitude32 to reach your
required frequency response.
Verify the Sound of your Optimized System: A short chapter to remind you that it is crucially important to verify the sound
of your system after each calibration.
PART IV: TUNING THE SOUND OF YOUR HOME THEATRE SYSTEM WITH THE ALTITUDE32:
Tuning the Optimization Settings: Explains how to use the advanced settings of the Altitude32 to make further
improvements to the automatic optimization.
Performing Multi-point Measurements: How to improve the optimization by performing multiple measurements with
different microphone placements.
17
ADDITIONAL INFORMATION ABOUT THE ALTITUDE32 PREAMPLIFIER:
Appendix: Technical information about automation, the signal flow, the 3D speaker placement recommendations,
connector pinouts and the 3D Measurement Microphone.
To improve clarity throughout this document, references to user interface items will be shown in bold letters and
illustration’s caption will be shown in italic bold letters.
This guide also includes information about the latest 3D formats and common practice in terms of speaker placement
to help you understand the new approach of 3D Sound in the best possible and least confusing way.
In addition, important information will be
indicated with the following symbols.
NOTE
IMPORTANT NOTE
Record of Changes:
Date
Software version
April 2015
Software version 4.0 –Pre-release version
May 2015
V4.0: Software version 4.0.0 RC4
July 2015
V4.0: Software version 4.0.0 RC7
October 2015
V4.0: Software version 4.0.0 RC9
February 2016
V4.0: Software version 4.0.9 RC8
June 2016
V4.0: Software version 4.0.10
October 2016
V4.0: Software version 4.0.12
February 2017
V4.1: Software version 4.1.5
IMPORTANT NOTE: The content of this document is subject to change without notice.

18
1.2 PRODUCT INFORMATION
MAIN FEATURES
32 Channel Digital Audio Processor
Universal Spatial-Accurate 3D Audio
playback
Best-in-class Room Optimization fully
integrated
Superior multi-subwoofer management and
active crossovers calibration
118 digital and analog inputs + 80 audio
outputs
8x HDMI Inputs, 2x HDMI Outputs
User-friendly, self-explaining user interface
Builtin Wi-Fi & UPnP/DLNA Compliant Digital
Media Renderer
Wide choice of Remote Options
EXCLUSIVE TECHNOLOGIES
SUPPORTED AUDIO/VIDEO FORMATS
Trinnov patented 2D/3D spatial remapping
Trinnov Loudspeaker/Room Optimization
Next Generation Hardware platform:
Revolutionary architecture, scalable
processing platform
64 bits floating point & 24 bits / 192 kHz
native processing
Future-proof software-oriented upgrades
provided over internet, no DSP upgrade
required
Robust design, inspired from our
professional audio product lines
Trinnov high-performance AD/DA converters,
used daily by the most demanding mastering
studios
LPCM Audio: 16-channels AES input compatible
with Digital Cinema Servers
3D Audio Codecs (optional): Auro-3D, Dolby
Atmos and DTS:X, including their respectives
upmixers
HD Audio Codecs: Dolby TrueHD, DTS-HD Master
Audio
HDMI 1.4b compliant digital audio with 4K and 3D
video pass-through (HDCP 2.2 : HDMI input #1,
HDMI output #2) (HDMI 2.0 upgrade supported)
UPnP/DLNA renderer: WAV, AIFF, OGG, FLAC up
to 24 bits / 192 kHz
SUBWOOFER MANAGEMENT
Adjustable High-pass / Low-pass editable by
individual satellite/sub or by group of speakers
Support from 0 to 32 subwoofers
Automatic level, delay and phase alignment
REMOTE MANAGEMENT
VNC Remote Control through the network
from any smartphone, tablet or laptop
Web-based responsive interface
Automation via Telnet and RS232 protocols
Crestron and Savant modules available
Built-in Gigabit Ethernet and Wi-Fi
IR remote control included
12V Trigger in/out
AUDIO PROCESSING
Comprehensive Processing latency control
Automatic Processing :
Multi-point acoustic measurement
(Trinnov 3D measurement microphone)
Time/Frequency acoustic analysis based
on impulse response measurement
Loudspeaker/Room optimization
Target Curves
Manual Processing
Several layers of 31 bands Graphic EQ, FIR EQ,
gains, polarity and delays available for every
channel.
Total delay given in meters / milliseconds /
frames for the listening point and adjustable
global delay for accurate Lip Sync

19
PHYSICAL CHARACTERISTICS
Chassis: 3.5U
Power supply: 240V AC / 50-60 Hz. Option: 130V AC
Consumption: 90 W max.
Weight: ~14.5kg
Environmental conditions:
- Operating: 0°C-40°C (32°F-104°F)
- Humidity: 20%-80% relative humidity (without
condensation)
1.3 SYSTEM INTEGRATION
The Altitude32 is inserted before loudspeakers to correct imperfections of the loudspeakers and the
room. During calibration, the speakers are calibrated with a 3D acoustic probe.
1.4 TRINNOV CERTIFIED INSTALLERS
Depending on how far you want to dig into its features, the Optimizer is either a straightforward and easy-to-use
automatic compensation system or an incredibly flexible and powerful tool, including numerous advanced filter
parameters, target curves and manual EQ’s, all being re-computable on the fly.
By following an iterative installation procedure, the Optimizer achieves results beyond expectations in record time but it
surely requires a good understanding of the audio and acoustic basics and more especially experience to clearly identify
a problem and therefore use a relevant method to solve it.
Therefore we strongly recommend you request the services of a Certified Trinnov Installer to setup and fine tune your
Altitude32 in your home theater system.
20
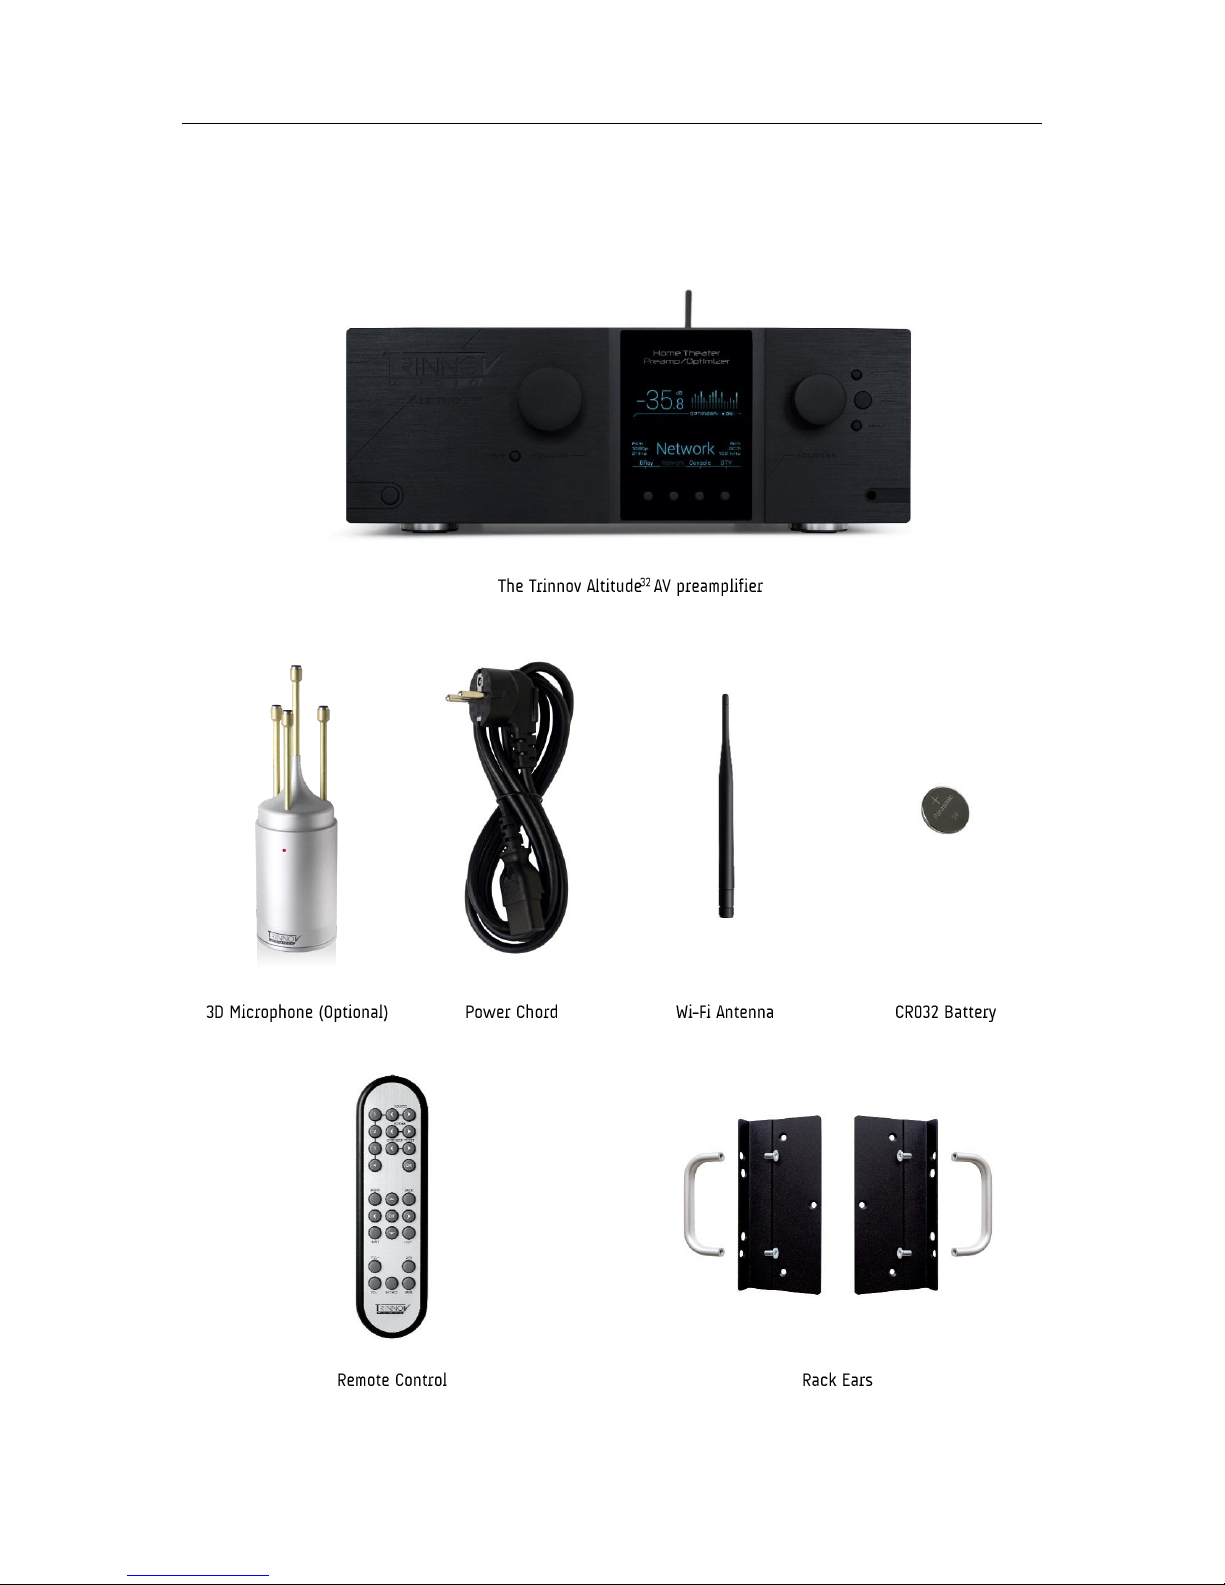
1.5 UNPACKING THE ALTITUDE32
You will find in the Altitude32 packaging:
Table of contents
Other Trinnov Audio Home Theater System manuals


 operating instructions")


