TruTech TDVD6048 User manual

Built-in Dolby Digital decoding for maximum home entertainment enjoyment
Unique laser-head over-current protection system doubles service life
Special DVD deck features fully dustproof and anti shock design as well as augmented
error correction and better stability
Fully functional DVD operating system offers many favorite functions and user-friendly
operation
Integrated DVD and built-in 6-channel Hi-Fi amplifier
TDVD6048
DVD HOME THEATRE SYSTEM
TDVD6048 DVD HOME THEATER
DVD/CD/CD-R/CD-RW/HDCD/MP3/JPEG
DOWN UP
VOLUME
HOW IT WORKS
Customer Service andLimited Product Warrantiesare provided byC.I. LTD.
For all customerservice inquiries pleasecontact our customercare department:
Toll Free Line: 1-800-968-9853
Email: [email protected]

A lightning boltwith an arrowheadsymbol within
an equilateral triangle is intended to alert the
user to the presence of uninsulated "dangerous
voltage" within theproduct's enclosure thatmay
be of sufficientmagnitude to constitutea risk of
electric shock topersons.
The exclamation point within an equilateral
triangle is intended to alert the user to the
presence of important operating and main-
tenance (servicing) instructionsin the literature
accompanying the appliance.
WARNING: TO AVOIDTHE DANGER OFFIRE
OR ELECTRIC SHOCK,DO NOT EXPOSETHIS
APPLIANCE TO RAINOR MOISTURE. NEVER
OPEN THE CABINET, AS DANGEROUS HIGH
VOLTAGES ARE CONTAINED INSIDE. ONLY
A QUALIFIED SERVICETECHNICIAN SHOULD
ATTEMPT TO OPEN THE CABINET.
CAUTION: TO PREVENTELECTRIC SHOCK,
MATCH WIDE BLADE OF PLUG TO WIDE
SLOT, AND FULLYINSERT INTO ELECTRICAL
SOCKET.
CAUTION: This DVD receiver unit employs
a laser system. To prevent direct exposure to
the laser beam, do not open the enclosure.
Visible laser radiation is present when enclo-
sure is open. DO NOT STAREINTO BEAM.
Additionally, the useof controls or adjustments
or performance of procedures other than those
specified herein mayresult in hazardousradia-
tion exposure.
To ensure proper use of this product, please
read this owner's manual carefully and retain
for future reference. Should the unit require
maintenance, contact an authorized service
centre.
PROTECT YOURSELF!
Record the model and serial numbers for this
unit while itis easy to see them. These numbers
are located on the back of the unit's cabinet.
Retain this informationfor future reference.
Model Number TDVD6048
Serial No. _________________________
Retain this informationfor future reference.
CAUTION
RISK OF ELECTRICSHOCK DO NOTOPEN
CAUTION: TO REDUCE THE RISK OF
ELECTRIC SHOCK, DO NOT REMOVE COVER
(OR BACK). THERE IS NO USER SERVICE
ABLE PART INSIDE. REFER SERVICING TO
QUALIFIED SERVICE PERSONNEL.
RISK OF ELECTRICSHOCK
DO NOT OPEN
WARNING
PRECAUTIONS
1 HOW IT WORKS

CAUTION: It isimportant that youread and followall
of the instructions in this bookletand any markedon
the unit itself.Retain this bookletfor future reference.
Accessories--- Never place this product on an un-
stable platform, stand, cart, wall mount, shelf, or
table. The productmay fall, causingserious personal
injury to persons and pets, as well as seriously
damaging the product.Use only witha stable platform,
stand, cart, wallmount, shelf, ortable that has been
recommended by sold with the product. Any
mounting of the product should follow the
manufacturer's instructions, and use a mounting
accessory recommended by the manufacturer.
This unit while positioned on some type of cart must
be moved withcare. Quick stops, excessive force,
and uneven surfaces may cause the product and
cart combination tooverturn.
Attachments---Use only approved attachment as
they may causehazards.
Cleaning--- Always unplug this unit fromthe wall
electrical outlet beforecleaning. Do notuse liquid or
aerosol cleaners; use a dampcloth for cleaning.
Lightning--- For added product protection during
a lightning storm or when it is left unattended and
unused for long periods of time, unplug it from the
wall outlet and/or disconnect the antenna or cable
system. This will prevent damage tothe product due
to lightning andpower-line surges.
Object and Liquid Entry--- Never push objects of
any kind intothis product throughopenings as they
may touch dangerous voltage points or short-out
parts that could result in a fire or electric shock.
Never spill liquidof any kindon or intothe product.
Outdoor Antenna Grounding--- If an outside
antenna or cablesystem is connectedto the product,
be sure theantenna or cablesystem is grounded so
as to provide protection again stvoltage surges and
built-up static charges.
Overloading---Do not overload wall outlets, exten-
sion cords, or integral convenience receptacles, as
this may resultin a fireor electric shock.
Power - Cord Protection - Power - supply cords
should be routed so that they are not likely to be
walked on orpinched by itemsplaced upon oragainst
them, paying particular attention to cords at plugs,
convenience receptacles, and the point where they
exit from theproduct.
Power Lines---An outsideantenna system should
not be locatedin the vicinityof overhead powerlines
or other electriclight or power circuits, or where it
can fall into such power lines or circuits. When
installing an outsideantenna system, extremecare
should be takento keep from touching such power
lines or circuitsas contact with them might befatal.
Power Sources---This productshould be operated
only from thetype of power source indicated on the
marking label. Ifyou are not sure of the type of power
supply to yourhome, consult your product dealer or
local power company. For products intended to
operate from batterypower or other sources, refer to
the operating instructions. This DVD home theater
operates on AC120V~60Hz. Do not turn off unit
immediately after turningon; wait atleast 10 seconds.
Replacement Parts--- If replacement parts are
required, be sure the service technician has used
approved replacement parts or have the same
characteristics as the original part. Unauthorized
substitutions may result in fire, electric shock, or
other hazards.
Safety Check---Upon completion of any service
or repairs tothis product, askthe service technician
to perform safety checks to determine that the
product is inproper operating condition.
Servicing--- Do notattempt to service this product
yourself as openingor removing covers may expose
you to dangerousvoltage or other hazards. Refer all
servicing to qualifiedservice personnel.
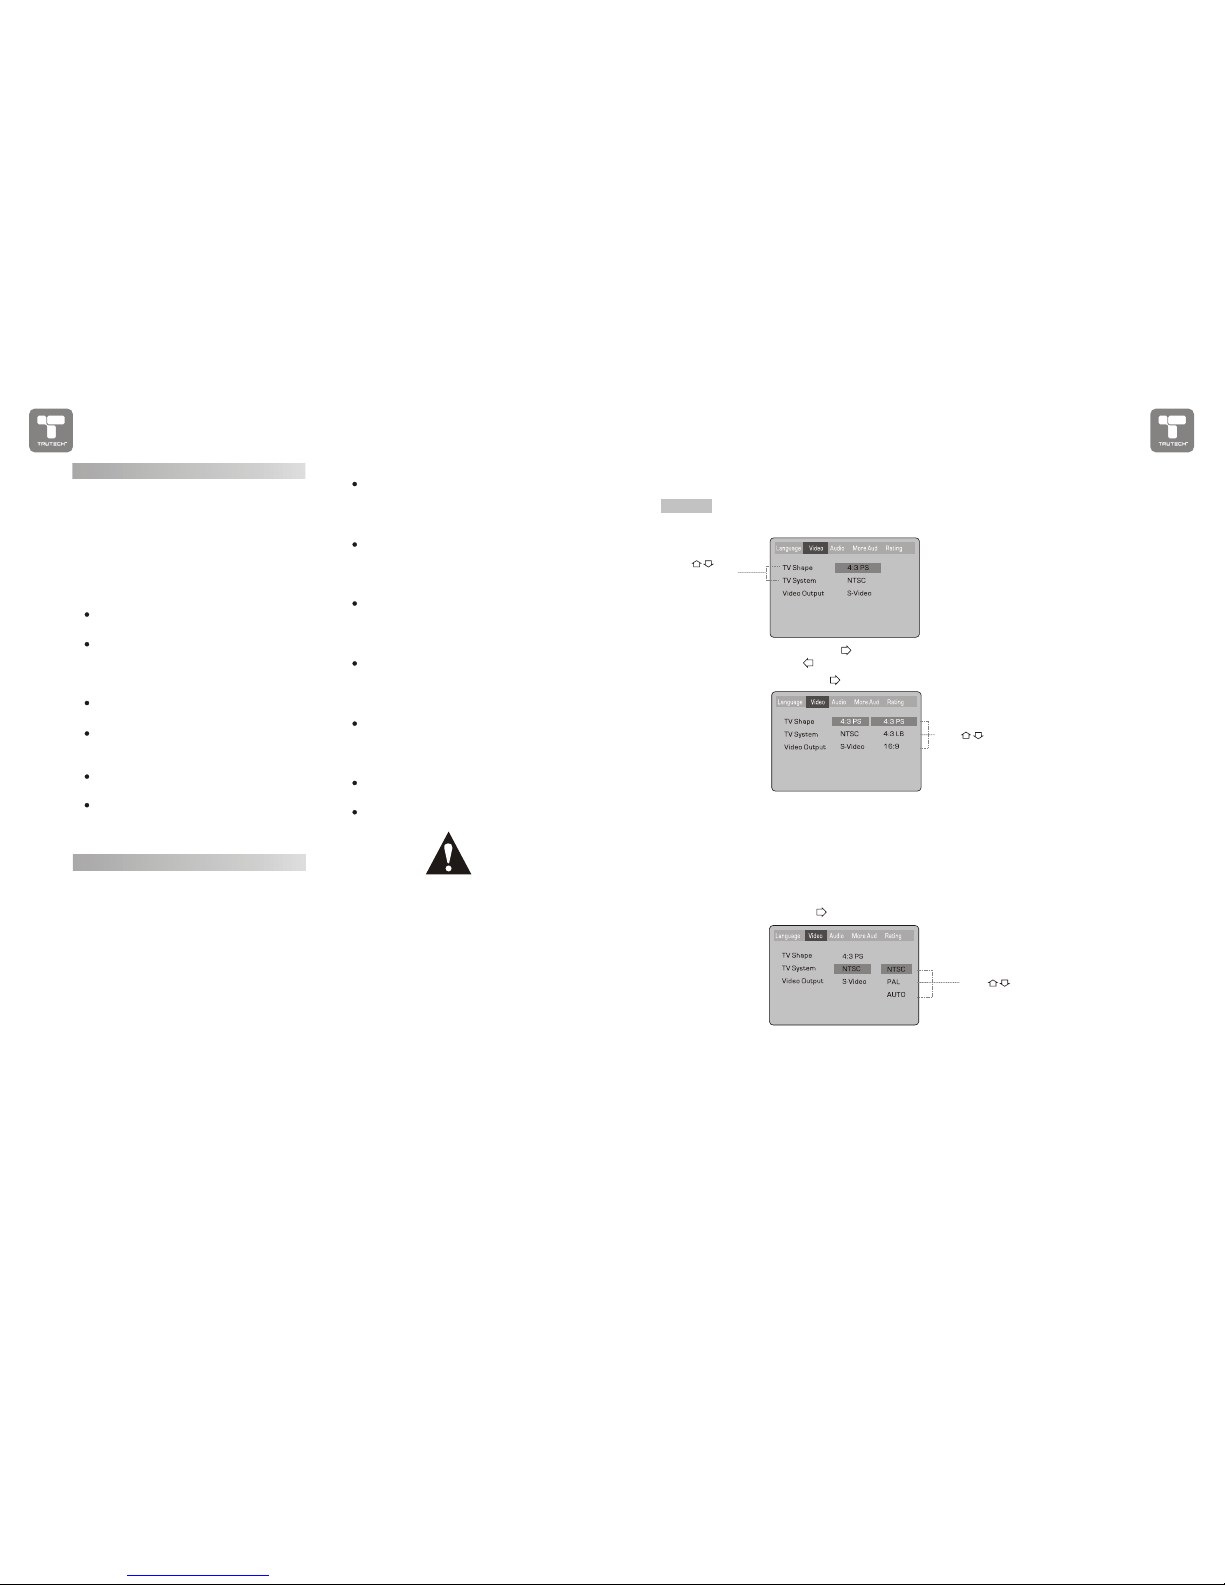
TV System---This unitis compatible with television
sets featuring eitherthe NTSC or PAL color system.
Ventilation---Slots and openings in the cabinet
are provided for ventilation and toensure reliable
operation and protection from overheating. These
openings should never be blocked byplacing the
product on abed, sofa, rug,or other similarsurface.
This product shouldnot be placed in a built-in install-
ation such as a bookcase or rack unless proper
ventilation is provided.Never place this product near
a heat source, such as heat registers, stoves,
radiators, or anyother product that produces heat.
Water and Moisture---Donot use this product near
sources of waterand moisture, such as bath tub, wash
bowl, kitchen sink,or wash machine; in a wet, damp
basement; or near a swimming pool or similar
locations. If moisture condensation occurs, remove
any disc, connectthe unit's power cord to a wall outlet,
turn the uniton, and leaveit on for two to threehours.
By then, the unit will havewarmed up and evaporated
any moisture.
IMPORTANT-- SAFETY INFORMATION
Frequency Response:
Main Speakers 200Hz-20kHz+/- 3dB
Surround Speakers 200Hz-20kHz+/- 3dB
Center Speaker 200Hz-20kHz+/- 3dB
Subwoofer 20Hz-200Hz +/-3dB
S/N Ratio >76dB
Input Sensitivity 350mv,47k
Channel Resolution >30dB (Normal)
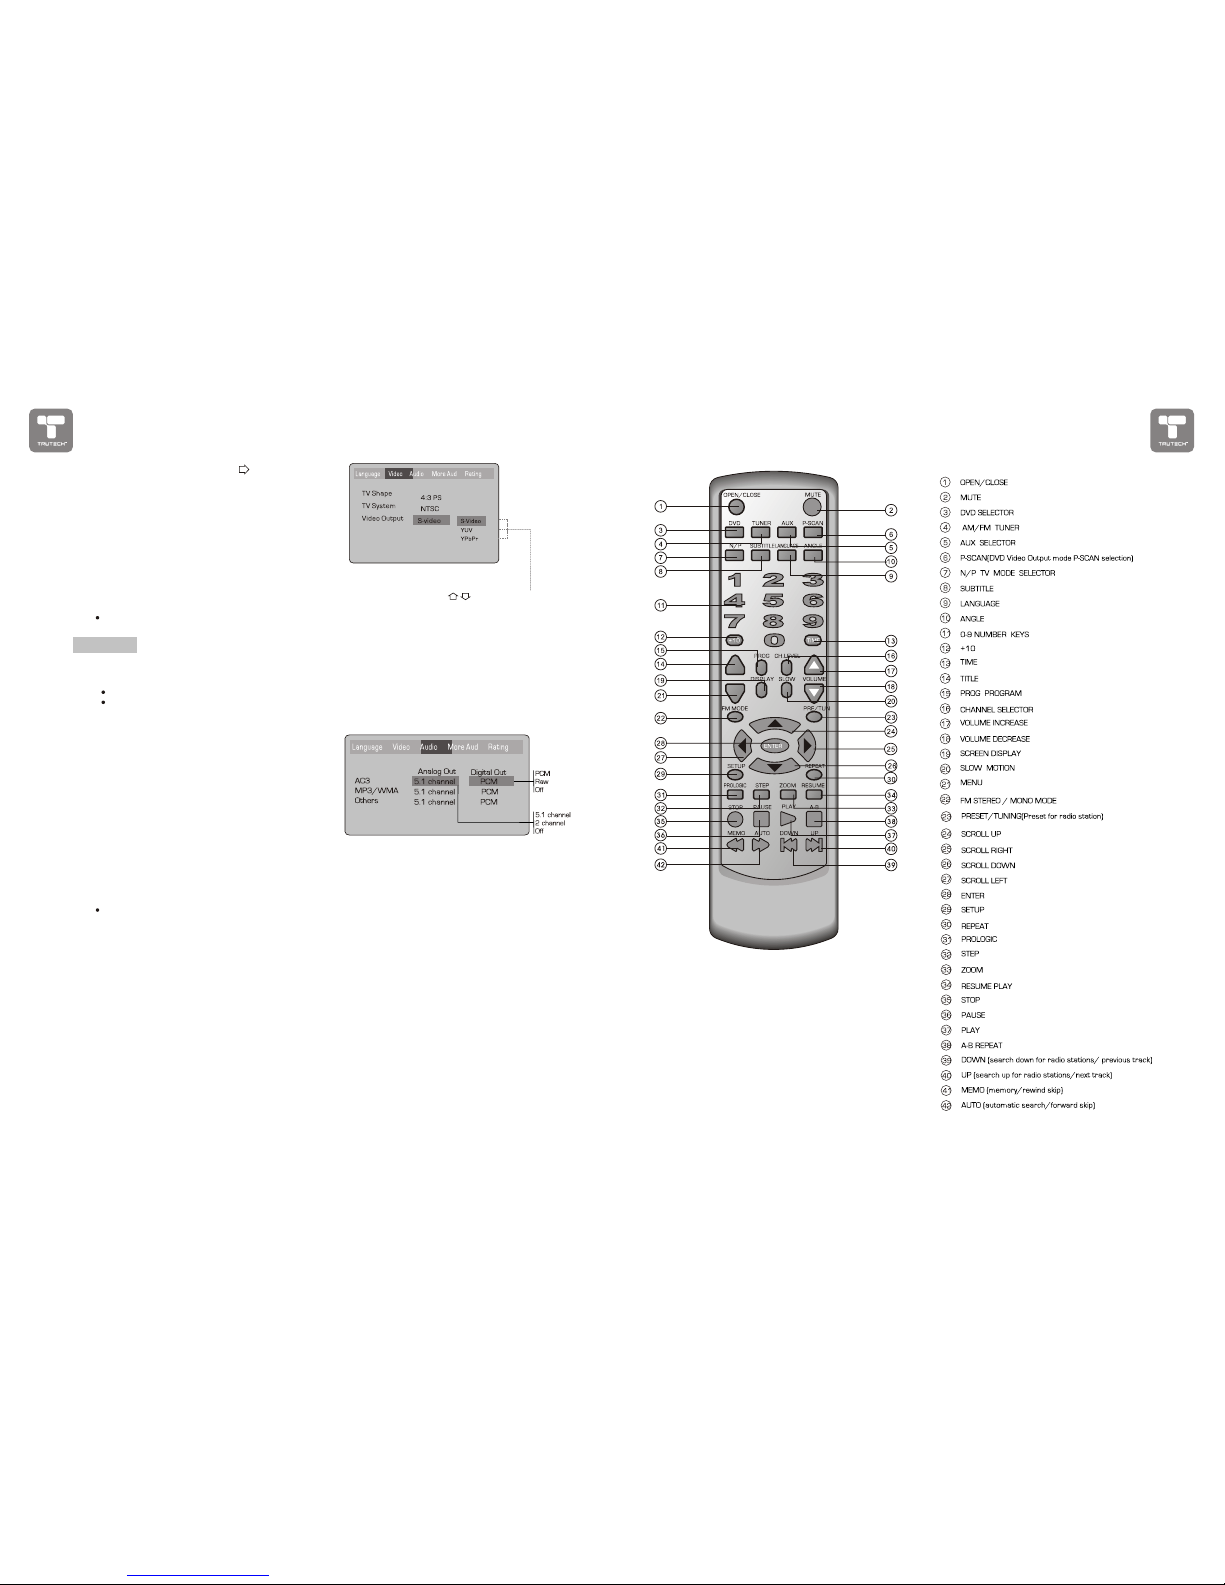
Remote Control
Transmitter Infrared Ray
Signal Range Approximately15'
Power Source 2 AAA Batteries
General
Power Supply AC120V~60Hz
Consumed Power 90W
Accessories:
1, Instruction manual,
2,AM loop antenna,
3,FM wire antenna,
4,AV cable
5,Remote control with2 AAA batteries.
6, 5 satellitespeakers and 1subwoofer
Because its productsare subject to continuous
improvement, we reserves the right tomodify
product design and/or specifications without
notice and withoutincurring any obligations.
""
TECHNICAL SPECIFICATIONS
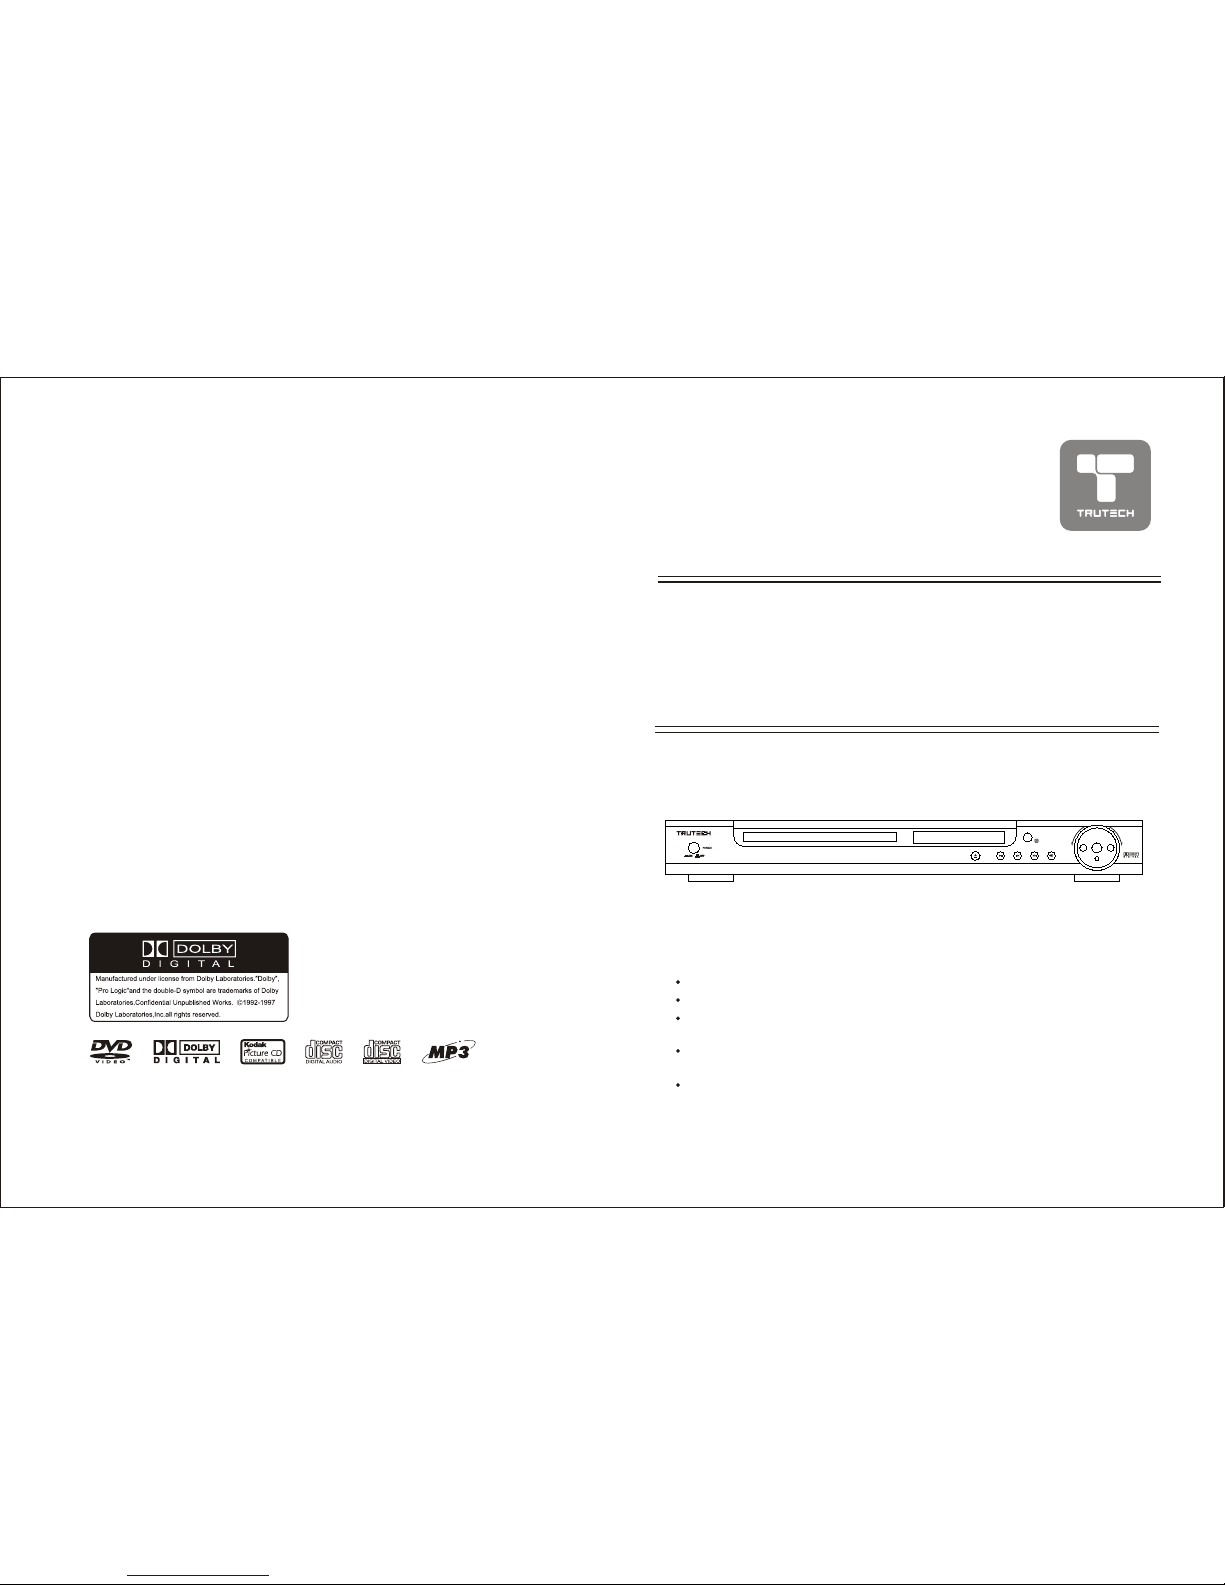
DVD Player
TV System NTSC/PAL
Compatible Discs DVD,CD, MP3,
CD-R, CD-RW
Resolution Ratio GreaterThan 500 lines
Video S/N Ratio 65dB
Frequency Response fs(96KHz/24bit)
4Hz - 44KHz:+/-2dB
Audio S/N Ratio 95dB
Degree of Distortion <0.01%
D/A Converter 192KHz/24bit
Video Out 1Vp-p
S-Video Out Y:1Vp-p(75 )
C: 0.3Vp-p(75 );
Audio Out 2.0V/ V
5.1 Channel,
Digital Audio Output Optical, Coaxial
Connections YUV, CVBS
S-Video, 2 Channel Output
FM Tuner
Tuning Range 87.0-108MHz
S/N Ratio >46dB
Monophonic >46dB
Stereo >50dB (DIN)
Selectance 50dB
THD
Monophonic 2%
Stereo 3%
Frequency Response 30Hz-10kHz+/- 1dB
Stereo Resolution 35dB(1kHz)
30dB (100Hz-10kHz)
AM Tuner
Tuning Range 530-1710KHz
S/N Ratio 35dB
THD 3%
Amplifier
Output Power:
Main Speakers 10W+10W(6 )
Surround Speakers 10W+10W(6 )
Center Speaker 10W (6 )
Subwoofer 20W (8 )
+0
-1
27 HOW IT WORKSHOW IT WORKS 2

TABLE OF CONTENTS
Precaution
Safety Information
Table of Contents
About Your DVDPlayer
Best Location
To Obtain aClear Picture
Playable Discs
Digital Audio Output
Laser-Head Over-Current ProtectionSystem
Use of Disc
Handling
Cleaning
Storing
Front and Back panels
Front Panel
Back Panel
Remote Control
Operating the remotecontrol
Connecting Devices
Speakers
Arrangement of speakers
Connecting speakers
Connecting antenna
Connecting power supply
Playing the radio
Basic DVD operation
Functions
System Setup
Language Setup
Video Setup
Audio Setup
More Audio Setup
Rating Setup
Mp3 function
JPEG files
Trouble shooting
Technical specifications
TROUBLE SHOOTING
This handy trouble-shooting your guide is
provided to save your time in case you
experience any inconvenience with this DVD
player. If the problem is not listed or if the
provided solution does not correct theproblem,
please return topoint of sales within 12 months
of purchase.
Problem Possible Solution
No power
1. Check to ensure that the power plug is
securely in thewall outlet.
No sound
1. Check the connection between the DVD
player and theTV set, amplifier, or any
other unit itis connected to.
2.Check to ensurethe TV andamplifier are
in the correctmode.
No picture
1. Check the connection between the DVD
player and theTV set orany other unit it
is connected to.
2.Check to makesure TV isturned on.
Disc does notplay
1.Check to make sure the disc is loaded
correctly label sidefacing up on disc tray.
2.Check that disc is clean from dirt, dust,
fingerprints, and smudges.
3.Check to ensuredisc is within the guides
on the tray.
4.Check if parentallock function ison.
5.Make sure discis for usein region
Remote does notwork.
1. Check batteries; possibly replace.
2. Check to ensure there isn't any obstacles
between the remotesensor on theunit's
front panel andthe remote control.
3.Be sure theremote is aimedat the remote
sensor.
Divided picture
1.Check that disc is clean and has no
scratches.
2.The unit iscontrolled by amicro computer,
which may need to be reset. Turn off the
unit's power, waitseveral seconds, then
turn back on.
No color picture
1.Check to seeif the Sconnector is damag-
ed (bent pin).
MP3 discs don'tplay
1. Use anothersoftware edition to re burn
disc, as the edition used may not be com-
patible with theplayer.
2. Use neweditions of softwaresuch as Audio
station 4, asy CD Creator , To ast
Titanium, etc.
3. Make sureMP3 file isnot encoded with a
variable bit rate,such as providedby Real
Networks.
"E "
JPEG FILES
JPEG adoptting the most efficient compression is
widely used as picture storage type flattened and
stored format.
Even if pictures are compressed 15-20 times. they
still have good effect. Supported by most picture
processing software, fit for picture storage, it has small
data and easy use .This machine can read. JPEG-fomat-
made picture CD disc.
Press revelant number key to select picture display.
1. Put in disc correctly, the machine begins to
search disc information.
2. Press number key to select picture.
3. It s efficient only in present picture when press
number key.
Select to play by menu
1. Put in disc, machine searches disc information and
main menu displays on screen. press number key
from 1 to select picture. press play key to make sure.
2. Press direction key to select picture then press
play key.
3. In condition of stop. press direction key to select
other pictures.
4. In condition of stop. select the first line file item
on the right. Then press play key, to return to upper
menu.
HOW IT WORKS 26 3 HOW IT WORKS
1
2
3
4
4
4
4
4
4
5
5
5
5
6
6
6
7
8
9
10
10
11
12
13
14
15
16
19
19
21
22
23
24
25
26
26
27

The following willhelp you getthe most enjoymentfrom your DVDreceiver system.
BEST LOCATION
The unit should be placed on a firm, flat surface, away from VCRs, stereos, radios, or large
speakers, as themagnetic flux fromthese devices may cause distortion in the sound and a poor
picture. If placedin a cabinet,be sure thereis at least 1 of free space completely around the unit
for proper ventilation.
TO OBTAIN A CLEAR PICTURE
A DVD receiveris a precisiondevice. If theoptical pick-up lensand disc drive parts become dirty
or worn down,picture quality willbecome poor. StoreDVD player ina clean dustfree environment.
PLAYABLE DISCS
This DVD receiversystem will playthe following types of discs: DVD, MP3, CD, CD-R, and
CD-RW with super-errorcorrection ability. Itis also capable of displayingpicture CDs and digital
photo albums. Itsupports eight languages, up to 32subtitles, and multi-angle viewing. It features
easy setup andoperation with on-screenmenus. It hasfull function CPUup grade able capability.
DIGITAL AUDIO OUTPUT
The unit's coaxialoutput capability enablesyou to connect an external six-channel AV amplifier
and processor withbuilt-in Dolby Digitalcode with just one cord. This enables you to conveniently
enjoy different DVD, CD, and Mp3 discs.
ANALOG AUDIO OUTPUT
Speaker system plug-and-play convenience through the built-in six-channel power amplifier
eliminates the useof an externalpower amplifier.
LASER-HEAD OVER-CURRENT
PROTECTION SYSTEM
To extend the service life of the laserhead, the unit includes a unique laser-head over-current
protection system, ensuringa constant lasercurrent.
""
ABOUT YOUR DVD PLAYER MP3 FUNCTION
Mp3 is an audio compression mode using Level 3 of the international standard MPEG, whereby sound
signal is compressed at a rate of 12:1. A Mp3 disc can record music for playing over 600 minutes or
recording over 170 songs, rivaling CDs in sound quality.
To play a MP3 disc
Files Menu of Mp3 play
When playing a Mp3 disc, 2 files menus can be selected by pressing PROG key: File list, Folder.
1. FILE LIST
It may select the files to be played by pressing UP DOWN, arrow key combining with ENTER key, or
using number keys and ENTER key to select directly. If the number input is out of the music number,
will display on screen.
2. Folder
Display menu first then press UP DOWN, LEFT RIGHT arrow and ENTER key to select subdirectory
and music.
"CURRENT TRACK NUMBER"
OPERATION OF MP3 FUNCTION
HOW IT WORKS 4 25 HOW IT WORKS

This page containsvaluable information regardingthe handling, cleaning, and storage ofdiscs
played in thisunit.
Handling
Do not touchthe playback sideof the disc.
Do not attachpaper or tapeto discs.
Do not stickor write anythingon the surface. Protect against fingerprints.
Always hold adisc by thecenter and edgeportions.
Cleaning
Fingerprints and dirton the discmay cause pictureand/or sound deterioration. Wipe the disc from
the center outwardwith a softcloth. Always keepthe disc clean.
If you cannot wipe thedirt off, lightlyuse a slightlymoistened soft clothand finish witha dry cloth.
Do not useany type ofsolvent such as:Paint thinner, benzene,commercially available cleaners or
anti-static spray forvinyl LPs.
Storing
Do not storediscs in placessubject to directsunlight or nearheat sources.
Do not store discs inplaces subject tomoisture and dust.
Store discs verticallyin a case.Stacking or placingobjects on discsoutside of theircases may
cause warping.
NOTE: We arenot responsible fordamage that mayoccur to anydisc that isoperated in thisunit or
not handled, cleaned, or stored as suggested above.
USE OF DISCSSYSTEM SETUP
Language Video Audio More Aud Rating
Rating Setup
1:Kid Safe
2:G
3:PG
4:PG-13
5:PG-R
6:R
7:NC-17
8:Adult
The Rating menu allows you to block playback
of DVDs based on their ratings.
Setting the Password & Rating Level
The DVD player allows you to block playback
of inappropriate content with a password-
protected Rating system (not all discs are rated).
A. From Stop mode, press SETUP.
B. Select Rating and press ENTER.
C. Select Rating and press ENTER repeatedly to set the rating from 1 (most restrictive)
to 8( least restrictive ).
If a password has already been set, the lock icon will be closed. You will not be
able to select Rating until you SELECT the correct password using the 0-9 keys.
D. Select Password.
E. Use the 0-9 keys to SELECT a 4-digit password and press ENTER. The lock icon will
close to indicate that the rating and password are set.
F. Press SETUP to save and exit.
Not all DVDs are rated.
DVDs that are rated higher than the level you select will not play without SELECTING
the correct password.
If you forget your Rating password, select 0000 to clear the memory. Keep this pass-
word out of reach of children as if will always unlock the Parental Control setting.
Pink Noise Setting
Pink Noise is test tone set to Off and select test
LEFT, CENTER, RIGHT, RIGHT SURROUND and LEFT
SURROUND channle.
A. From Stop mode, press SETUP.
B. Select More Audio and press ENTER.
C. Select Pink Noise and press ENTER.
D. Select the desired Pink Noise setting and press
ENTER.
this function can select test LEFT, CENTER,
RIGHT, RIGHT SURROUND and LEFT
SURROUND channle.
E. Press SETUP to save and exit.
DRC Setting
DRC is Dynamic Range Control.
A. From Stop mode, press SETUP.
B. Select More Audio and press ENTER.
C. Select DRC and press ENTER.
D. Select the desired DRC setting and press ENTER.
Select Off or On state.
E. Press SETUP to save and exit.
LPCM 48k DS Setting
A. From Stop mode, press SETUP.
B. Select More Audio and press ENTER.
C. Select LPCM 48k DS and press ENTER.
D. Select the desired LPCM 48k DS setting and press
ENTER.
Select Off is LPCM 48k.
Select On is LPCM 96k.
E. Press SETUP to save and exit.
5 HOW IT WORKSHOW IT WORKS 24

FRONT AND BACK PANELS
More Audio Setup
The More Audio menu includes Prologic and Subwoofer settings.
Prologic Setting
The DVD player has a built-in Dolby Prologic decoder to provide virtual surround sound for PCM
(stereo) source material from the 5.1 channel analog audio outputs.
A. From Stop mode, press SETUP.
B. Select More Audio and press ENTER.
C. Select Prologic and press ENTER.
D. Select the desired Prologic setting and press
ENTER:
Auto stereo audio soundtracks will be output in
Dolby Prologic mode.
On all audio soundtracks will be output in Dolby
Prologic mode.
Off (default ) Dolby Prologic decoding will always
be inactive.
E. Press SETUP to save and exit.
Subwoofer Setting
You must indicate in the menu system whether or not your audio setup includes a Subwoofer
(the 1in 5.1 sourround sound).
A. From Stop mode, press SETUP.
B. Select More Audio and press ENTER.
C. Select Subwoofer and press ENTER.
D. Select the desired Subwoofer setting and press
ENTER.
On (default) indicates that you are using a Subwoofer
for LFE (low frequency effects) signals.
E. Press SETUP to save and exit.
SYSTEM SETUP
SYSTEM SETUP
Others Setting
Follow these steps to set the outgoing analog and digital audio
format of others tracks:
A. From Stop mode, press SETUP.
B. Select Audio and press ENTER.
C. Select Dolby D and press ENTER.
D. Set Analog out to:
2 Channel (default) to output 2 channel stereo audio from the
stereo audio output; e.g.,to a VCR or TV.
E. Set Digital out (from Optical out) to:
PCM (default) to output 2 channel digital audio from the optical/coaxial digital audio outputs; e.g.,to a Minidisc recorder.
Raw to output the raw 2 channel digital bitstream form th optical/coaxial digital audio outputs; e.g., to an external
amplifier.
Off to disable CD others audio output.
F. Press SETUP to save and exit.
5.1 channel
2 channel
Off
MP3 Setting
Follow these steps to set the outgoing digital audio format of MP3
tracks (Note: The analog format is fixed to 2 channel ):
A. From Audio mode, press SETUP.
B. Select Audio mode, press ENTER.
C. Select MP3 and press ENTER.
D. Set Digital out to:
PCM (default) to output 2 channel digital from the optical/coaxial
digital audio outputs; e.g.,to a Minidisc recorder.
Off to disable MP3 digital output.
E. Press SETUP to save and exit.
Use this buttonto pause playfunction while in
DVD mode.
4. PREV/DOWN
While in the DVD status, you may press this
button for previoustrack.
While in thetuner mode, you may press this bu-
tton for radiodown search.
5. NEXT/UP
While in theDVD status, you may press this
button for next track.
While in thetuner mode, you may press this
button for radioup search.
6. INPUT SIGNALSOURCE
Use this buttonto select theproper input signal
source.(Note:The selected inputwill correspond
to the selectedinput terminal onthe rear panel.)
7. VOLUME
Use this buttonto control theunit's volume.It
controls all sixchannels simultaneously.
Front Panel Functions
124
3576
1. POWER
Before plugging the power cord into the AC
outlet, check tomake sure all of the connections
have been properly completed. When they have
been, carefully plugpower cord intooutlet.
Press the POWER button on the front panel
to power the unit.
When the unitis initially powered, a briefsurge
of electricity may cause interference with other
electronic equipment onthe same circuit.If this
occurs, connect theunit to anoutlet on a
different circuit.
. OPEN/CLOSE/PRE/TUN
Use this buttonto open andclose the disctray
while in DVDmode.
While in thetuner mode, this button is used to
select preseting ortuning mode.
3. PLAY /AUTO/PAUSE
Use this buttonto begin playfunction while in
DVD mode.
When in thetuner mode, youmay press this
button for automaticsearch.
2
Back Panel Functions
1. ANTENNA
Use to connect the provided indoor FM and
AM loop antennas.
2. AUX IN
Use to connectinput for bothauxiliary music
sources.
3. AUDIO OUT
Use to connectboth the rightand left channel
line outputs aswell as subwooferoutput.
4. VIDEO OUTPUT
5. S-VIDEO OUTPUT
6. REAR
Use to connect the four terminals of the left
and right surround sound speakers.
7. FRONT/MAIN
Use to connect the four terminals of the left
and right front or main speakers.
8. CENTER
Use to connect the four terminals of the center
speakers.
9. SUBWOOFER
Use to connectthe four terminals of the subw-
oofer speakers.
10. COAXIAL DIGITAL AUDIO OUTPUT
11.120V~60Hz
This unit comeswith an AC power cord. Be
sure its prongsare dry before plugging it into an
electrical outlet. Takecaution not to overextend
the cord orwalk on it.
12. COMPONENT VIDEO OUTPUT
1
67924510
11
312
8
TDVD6048 DVD HOME THEATER
DVD/CD/CD-R/CD-RW/HDCD/MP3/JPEG
DOWN UP
VOLUME
23 HOW IT WORKSHOW IT WORKS 6
SW
SRSR
SLSL
SPEAKERS IMPEDANCE 6
CENCEN
FRFR
FLFL
120V~60Hz
OUTPUT
LL
SW S-VIDEO
VIDEO
R
YPb
Pr
LINE OUT
AUX IN
R
LL
COAXIAL

MENU
TITLE
Press to change your selection
[S-Video] -Select if you connected the DVD player
to your TV using the composite Video output.
[YUV] -Select if you connected the DVD player to your TV using the YUV output.
[Y Pb Pr] -Select if you connected the DVD player to your TV using progressive scan.
Press P-SCAN bottonon remote control, DVD play Video output S-video ,YUV, Pr Pb Y selection.
REMOTE CONTROLLER
SYSTEM SETUP
A. Press ENTER to confirm
B. Press SETUP to exit the Setup Menu
Select [Video Output], and press ENTER or to display
the [Video Out] submenu:
Note: The Composite video and
S-video output is always available.
Audio Setup
The Audio menu allows you to set the analog and digital audio outputs to correspond with the external components you have
connected to the player. For example, if you connected the player to a TV using the Stereo Audio jacks, you should set Dolby
Digital and others settings to 2 channel to enjoy downmixed stereo audio.
You can set the audio format for each of the following sources: Dolby Digital, MP3, CD and .
DVD playback must be stopped in order to adjust the Audio setup.
Others
AC-3 Setting
Follow these steps to set the analog and digital audio formats of
outgoing Dolby Digital 5.1 soundtracks:
A. From Stop mode, press SETUP.
B. Select Audio and press ENTER.
C. Select Dolby D and press ENTER.
D. Set Analog out to:
6 Channel (default) to output Dolby Digital 5.1 channel
audio from the 5.1 channel analog audio outputs; e.g.,
to a 5.1 channel amplifier.
2 Channel to output downmixed 2 channel stereo from
the stereo audio outputs; e.g., to a VCR or TV.
E. Set Digital out to:
PCM (default) to output 2 channel digital from the optical/coaxial digital audio outputs; e.g., to a Minidisc recorder.
RAW to output the raw 5.1 channel digital bitstream form the optical/coaxial digital audio outputs; e.g., to an
external amplifier with a Dolby Digital decoder.
Off to disable Dolby Digital decoder.
F. Press SETUP to save and exit.
PCM stands for Pulse Code Modulation, and is the standard 2-channel stereo format used for audio Cds.
7 HOW IT WORKSHOW IT WORKS 22

Notes:
Do not direct the remote sensor toward
any light source,such as directsunlight or
a strong fluorescentlight, as itmay cause
the unit tonot operate correctly.
When other remote controls are used
nearby or when the remote is used near
equipment using infrared rays, interference
may occur.
Placing an object on the remote control
may cause it to inadvertently depress a
button, changing afunction and shortening
battery life.
Do not glazethe front ofthe DVD receiver
with colored glass, as it may cause
interference with normaloperation of the
controller.
Make sure thereis no barrier between the
remote control and remote sensor, as it
could prevent theunit from receiving the
signal.
Do not spill water or put wet items on the
remote control.
Never disassemble remotecontrol.
BATTERIES
INCORRECT USE OF BATTERIES MAY
CAUSE THEM TOLEAK, CORRODE OR EXP
LODE.
Battery Installation
1. Push down and out on the battery Compart-
ment cover to remove it.
2. Insert the two AAA batteries into the battery
compartment of the remote control, making
sure the +and - signs on the batteries and
inside the batterycompartment match up.
3. Replace thebattery compartment cover.
Notes:
Do not mix batteries from different manu-
facturers, nor oldones with new.
If the remotecontrol will notbe used foran
extended period of time, remove the
batteries to prevent damage-causing
corrosion.
Remove dead batteries immediately to
prevent damage-causing corrosion.
If battery leakage occurs, wipe the battery
liquid from the battery compartment, then
replace both batteries.
Always replace both batteries at the same
time, using new, fully charged batteries.
Life expectancy of batteries may vary
depending on amountof use.
Using the RemoteControl
Point the remotecontrol at theremote sensor
on the DVD receiver. When the signal is
received from theremote control, theunit will
function accordingly. Theremote will operate to
approximately 16' fromthe remote sensorat an
angle of around30 each direction.
""
OPERATING THE REMOTE CONTROL SYSTEM SETUP
[Video] the [Video] sub :Select in the Setup Menu, and press ENTER to display menu
Video Setup
A. Press ENTER to confirm B. Press SETUP to exit the Setup Menu
Press to change your selection
Press to
select the menu
item
Note: Not all DVDs offer movies in Full Screen format. Ifnot, the disc will override your
TV Display setting and the movie will be displayed in Letterbox format.
A or set. Press ENTER to
B. Press to return to the Setup Menu
[4:3 PS] -Pan and scan refers to pictures where part of pictures is cut
off so it fills the whole screen.
[4:3LB] -Letter Box refers to pictures where black bands appear at the
top and bottom.
[16:9] -The picture fills the screen of a wide-screen (16:9) television.
Select [TV shape], and press ENTER or to display the [TV shape] submenu:
[TV system] the [TV system] sub :Select and press ENTER or to display menu
Press to change your selection
A. Press ENTER to confirm
B. Press SETUP to exit the Setup Menu.
[NTSC] -Select if you are using NTSC signal system to match your TV set.
[PAL] -Select if you are using PAL signal system to match your TV set.
[AUTO]- Select if you are using AUTO signal system to match your TV set.
21 HOW IT WORKSHOW IT WORKS 8

SW
SRSR
SLSL
SPEAKERS IMPEDANCE 6
CENCEN
FRFR
FLFL
120V~60Hz
OUTPUT
LL
SW S-VIDEO
VIDEO
R
YPb
Pr
LINE OUT
AUX IN
R
LL
COAXIAL
A. Press ENTER to confirm
B. Press SETUP to exit the Setup Menu
A. Press ENTER to confirm
B. Press SETUP to exit the Setup Menu
A. Press ENTER to confirm
B. Press SETUP to exit the Setup Menu
Language Setup
Press to change your selection
Note: Subtitle languages vary by disc.
Note: Audio languages vary by disc.
Note: Menu languages vary by disc.
Select [Audio],and press ENTER or to display the [Audio] submenu:
Select [DVD Menu], and press ENTER or to display the [DVD Menu] submenu:
Select [Subtitle], and press ENTER or to display the [Subtitle] submenu:
CONNECTING DEVICESSYSTEM SETUP
RECORDER
CD
Connection terminals for this DVD receiver
are found onthe rear panel. Read carefully
and follow the manufacturers' instructions
of any video and audio device being
connected to thisunit.
Do not connectthe power untilall connections
have been properlycompleted.
Red terminal (markedR) is for connecting the
right channel. The white terminal (marked L)
is for connectingthe left channel. The yellow
terminal is forvideo connection. Make sure
all connections aresecurely made. Improper
connections may cause noise, poor perfor-
mance, or causedamage to theequipment.
Do not tie the AV cord with any other cords,
such as thepower cord orspeaker wires, as
it may result in poor picture and/or sound
quality.
ACTIVE
SUBWOOFER (OPTIONAL)
9 HOW IT WORKSHOW IT WORKS 20

1
2
34
5
8
67
The configuration and arrangement of a
surround sound system's speakers is critical.
For maximum listening enjoyment, refer to the
Arrangement of Speakerssection in thismanual
prior to connectingspeakers.
Surround Sound Speakers
Front or mainright and leftspeakers;
center speaker
These three speakers provide extensive
sound imaging andaugment the dynamic effect
of the audio.A movie's principaldialogue comes
through these speakers.
Rear or surroundsound speakers
These two speakers provide 3-D dynamic
sound effects, and create an enveloping
atmosphere, as theyadd background sounds.
.
Subwoofer speaker
Provides rich and powerful bass, adding a
powerful dimension ofrealism.
Note: Audio recordedfor the centerspeaker and
subwoofer will beassigned to thefront and 3-D
rear speakers to obtain the optimum 3-D
surround sound effect.
The ideal surroundsound speaker configur-
ation may varyaccording to roomsize and wall
material. The figurebelow illustrates a typical
arrangement.
Hints:
Front or mainspeakers and central speaker
should be placedat the samelevel and ina way
that sound isoriented toward thelistener's ears.
3D surround soundor rear speakers should
be placed 3' higher than the height of listener's
ears.
Subwoofer speaker maybe placed anywhere
within the room, as its location produces little
effect on a listener's sensation to sound. To
obtain the optimumbass effect, a subwoofer is
recommended in hometheater systems.
1.TV set or screen
2. Front or main left speaker
3.Subwoofer
4.Center speaker
5.Front or main right speaker
6.3-D surround sound left speaker
7.3-D surround sound right speaker
8.Viewer's location
SPEAKERS ARRANGEMENT OF SPEAKERS SYSTEM SETUP
In stop mode, press SETUP, and the TV screen will display the Setup
Menu as follows:
A. Press ENTER to display each submenu
B. Press SETUP to exit the Setup Menu
Language Setup
Select [Language] in the Setup Menu, and press ENTER to display [Language] submenu:the
Select press ENTER to display submenu[OSD Menu], and or the [OSD Menu] :
Press to change items
Press to
select the menu
item
Press to
select the menu
item
A. Press ENTER to confirm.
B. Press SETUP to exit the Setup Menu.
A or. Press ENTER to set
B. Press to go back one menu
C. Press OR repeatedly toreturn to the Setup Menu
Setup Menu
SETUP
19 HOW IT WORKSHOW IT WORKS 10

SW
SRSR
SLSL
SPEAKERS IMPEDANCE 6
CENCEN
FRFR
FLFL
120V~60Hz
OUTPUT
LL
SW S-VIDEO
VIDEO
R
YPb
Pr
LINE OUT
AUX IN
R
LL
COAXIAL
1 2
3 4
5
This well-designed DVD receiver provides
optimum sound qualitywhen the speakersused
are within therange of theirrated impedance.
Important
The minimum impedanceof the fivespeaker
terminals is 6ohm; for the subwoofer, it is
8 ohm.
If you want to use only one speaker or listen
to monophonic music,do not parallel connect
individual speakers to the left and right
channel terminals. Seethe figure onthe left
below.
Connecting Speaker Cables
1.Peel off approximately1/ 2 of cable
insulation
2.Tighten the wireend (#2 below)
3.Open cable terminalby pressing backon
tab
4.Insert wire endinto terminal
5.Release tab; makesure wire isin terminal
securely
Note: To prevent damage to the circuit, care
should be takento prevent shortcircuiting from
occurring at thepositive and negativepoles of
the speaker cord.
"
CONNECTING SPEAKERSFUNCTIONS
MENU: MENU/PBC
With the PBCfunction on, choosinga song
on a VCDcan only be done when at the main
menu. With thePBC function off,song selections
can be madeby entering the relevant number
keys. The menucontent of thedisc will appear
when the MENUbutton is pressedwhile a DVD
disc is playing.
AUDIO
SUBTITLES
PLAY
2. Press theA-B button againwhile the disc
is playing to set point B, the ending spot. The
section between Aand B willreplay.
3. Press theA-B button athird time tocancel.
A-B Repeat
The A-B repeat function allows you to
re-show sections between two specific points
(A and B)on a disc.
1. Press the A-B button while the disc is
playing to set point A, the beginning spot.
A-B
REPEAT A
Zoom
A picture maybe enlarged up to four times
during either playback or slow motionthrough
the unit's zoomfunction. Press theZOOM key
once and it enlarges the image 2x; press a
second time and the image enlarges 3x; A
third pressing enlarges the image 4x. A forth
pressing the image 1/2x, a five pressing the
image 1/3x, asixth pressing theimage 1/4x .To
return to normal-sizeplayback, press theZOOM
key a seventh time. Enlargement takes place
in the centerof the picture.
CH.LEVEL
When a DVDdisc is played,press this key
and Volume keyto adjust channellevel.
Volume and Mute
The volume on this DVD receiver is easily
controlled with theremote control bypressing
either the VOL key to raise the volume or th e
VOL key to lower it. By pressing the MUTE
key, no audiowill be heard. To rein state the audio,
press the MUTEkey again.
Program
Allows you to program specific tracks in a
desired order ofplay. Press PROGkey program
menu well appear on the screen, set up the
program play innumber key. The scroll to the
START, Press ENTERkey to program play. To
exit the Programmed play mode, press the
PROG button again.
MENU
REPEAT AB
Repeat Play
This DVD receiverallows repeated playback
of specific titles, chapters/tracks, or segment.
It even allowsswitching between twoitems that
are being repeated.
1. Select theitem to repeat.
2. Press theREPEAT key.
REPEAT REPEAT SINGLE
The repeat mode changes each time the
REPEAT key is pressed (i.e., from title repeat to
chapter repeat, all repeat , to repeat off.)
When playing CD or Mp3, press the REPEAT
button to get the following display. Repeat Single,
Repeat ALL and Repeat off.
When playing DVD, press REPEAT button to get
the following player mode: Repeat Chapter,Repeat
Title and Repeat Off.
REPEAT
REPEAT
REPEAT ALL
REPEAT OFF
AMPLIFIER
S-video
VIDEO
AUDIO
Subwoofer speaker
Surround speaker
Surround speaker
Center speaker
Main speaker Main speaker
YUV
11 HOW IT WORKSHOW IT WORKS 18

AM
FM
FM
Outdoor AM antenna
Coaxial cable(75 ohm)
Coaxial cable (75 ohm)
Outdoor FM antenna
Radio signals may be difficult to receive in
some buildings and under certain conditions.
The provided antennaswill help intheir reception.
They are intendedfor indoor useonly.
AM Loop Antenna
The placement ofthe AM loop antenna should
be in a direction that provides the clearest
reception. Keep as far as possible from DVD
receiver, TV set,and speaker andpower cords.
If reception remainspoor, an outdoorantenna
may be necessary.
To connect theAM loop antenna:
1.Hold downhandle
2.Insert wireend into hole
3.Release handle
Position for bestreception
FM Indoor Antenna
The FM antennashould be fullyextended
and in a direction that provides the clearest
signal. Secure theantenna ends in a location
where distortion is a minimum. If reception
remains poor, an outdoor antenna maybe
necessary.
To connect the FM antenna:
1.Open cable terminalby pressing backon tab
2.Insert wire end
3.Release tab;make sure wireis in terminal
securely
2
3
1
CONNECTING ANTENNA
N/P
This DVD receiversupports video output of
various systems, includingauto, NTSC, and PAL.
The picture will blink and become colourless
when the wrongsystem is selected.If this
occurs, press theN/P key onthe remote control,
then select the correct system (NTSC for North
America, PAL forEurope). For moreinformation
on output format, refer to the TV set's manu-
facturer's instructions.
Subtitles
The unit hasthe capability todisplay subtitles
in any of 32 different languages.
1. Press the SUBTITLE key. The subtitle
menu will appear. Select thedesired language
by pressing theSUBTITLE key.
2. To remove the subtitles from view, press
the SUBTITLE key until they disappear.
Note: The disc being played must be multi-
subtitle encoded.
SUBTITLE OFF
SUBTITLE 02/08 ENGLISH
SUBTITLE
Camera Angle
The ability tochange the camera angle allows
viewer to play director andwatch a movie from
different perspectives.
1. Press theANGLE key on the remote control.
With each press, the camera angle changes.
2. The key may be pressed only when the
flashing angle icon appears in the unit's display
panel.
Note: Camera angle may be changed only in
discs with multi-anglecapability encoded
into them.
Language
The unit hasthe capability toshow movies in
one of eight languages.
1. Press the LANGUAGE key. The language
menu will appear. Select the desired language
by pressing theLANGUAGE key.
Note: The discbeing played must be multi-lan-
guage encoded.
1/4
ANGLE
AUDIO 1/8 AC-3 2CH ENGLISH
LANGUAGE
LOCATING A TITLE
DVD discs are normally divided into titles,
which are then sub-divided into chapters. A
specific title canbe easily found with this unit.
Specific titles canbe found using either the title
menu function, ifthe DVD disc contains a title
menu, or throughits unique titlenumber.
Title Menu Function
1. Press theTITLE key. The title menu will
appear on theTV screen.
2. Press theappropriate scroll key to select
the desired title.A title mayalso be located by
pressing its assignednumber with the number
buttons.
3. Press the ENTER key . This will start
playback from chapter1 of the selected title.
Note:
Some discs donot respond to this function. If
different instructions appearon the TV screen,
follow those instructions.The Instructions given
here describe thebasic procedure. Procedures
may vary depending on the content of the DVD
disc. When playinga VCD2.0 disc, TITLE key
can be usedto return tomenu.
FUNCTIONS
Pro Logic selector
When player DVD/ VCD disc,first press STOP
key, than pressPro Logic keyto select ProLogic
ON or OFFchannel output.
When player CDand at tunerstate, press
Pro Logic keyto select stereoor 5.1 channel
output.
17 HOW IT WORKSHOW IT WORKS 12

POWER
BASIC OPERATION
Before plugging the power cord into the AC outlet,check to makesure all ofthe connections
have been properlycompleted. When theyhave been, carefully plug power cord into outlet.
Press the POWERbutton on thefront panel topower the unit.The display panelwill light.
When the unitis initially powered,a brief surgeof electricity maycause interference with other
electronic equipment onthe same circuit.If this occurs,connect the unit to an outleton a different
circuit.
Selecting Sound Source
1. Press anyfunction button (DVD, AM/FM,
AUX) to selectthe desired sound source.
The appropriate symbolwill appear inthe display.
2. When the AM/FM tuner button is pressed,
the last stationlistened to willplay.
Note: The desiredprogram source willnot play
unless it andthe selected signalbutton coincide
with the activeprogram source signalinput.
Volume Control
The volume maybe adjusted byeither turning
the large volumeknob on the front panel or
using the appropriate volume button on the
remote control.
Mute
Pressing the MUTEbutton temporarily mutes
every speaker. Toresume audio, press MUTE
button again.
17
CONNECTING POWER SUPPLYBASIC DVD OPERATION FUNCTIONS
Memory Playback
This unit allowsthe viewer to stop playback,
then later continueplayback from thatexact disc
location. Press theSTOP key to halt playback.
The unit thenwill memorize thelocation where
playback was stopped. To resume watching,
press the RESUMEor PLAY keyand the unitwill
resume playback fromthe exact locationwhere
playback was stopped.(Exclude Mp3 DISC)
Slow Motion
This DVD receiverhas the ability to play
discs in slowmotion in eitherforward or reverse
direction. Each timethe SLOW key is pressed,
the speed willslow from forwardslow speed1/ 2,
to 1/ 4,to 1/ 8,to 1/ 16to normal speed. To
resume normal playback, press the PLAYkey.
MEMO
RESUME
SLOW
AUTO
To activate either function, simply press the
key or key on the remote control. The
speed changes each time the key is pressed.
To resume normalplayback, when pressthe
PLAY key.
RESUME
DISPLAY
2X
2X
Screen Display
While a discis playing, the status ofvarious
functions may bechecked, such asthe tile, track
number, and severaltime categories.
1. Press theDISPLAY key onceand the title
appears along withthe chapter and how much
time has played.
2. Press the DISPLAY key again and the
remaining time forthat particular titleappears
while soundtrack isCD/VCD format.
3. Press theDISPLAY key againand the total
elapsed time forthat particular chapterappears.
while soundtrack isDVD format.
4. Press the DISPLAY key again and the
display turns off.
00:04:08 00:40:52
VCD 2.0
Track 1/15
DVD
Title 1/10 Chapter 2/4 Angle 1/1
Audio 1/3 6CH
Subtitle 1/1
00:01:32 01:44:34
TDVD6048 DVD HOME THEATER
DVD/CD/CD-R/CD-RW/HDCD/MP3/JPEG
DOWN UP
VOLUME
13 HOW IT WORKSHOW IT WORKS 16

MENU
TITLE
Tuner button
Number button
Positioning
1.Press TUNERbutton to selectdesired wave
band (AM orFM).
2.Press UPor DOWN button to find a station.
The frequency willchange with each press.
When a station's signal is received, it will
appear in thedisplay.
3.To lock on to a station quickly, hold the UP
or DOWN buttonfor two seconds. The unit
will start automatictuning. When astation
is found, automatictuning stops.
4.To add astation to memory,press the MEMO
button. The memory storage number will
blink for fourseconds in the display. Press
MEMO again tostore the station.
5. To reduce noisewhen an FM-stereo program
has been received,press the FMbutton. The
word STEREO willdisappear from the display.
The program is now heard in monographic
form, reducing thenoise. To resume stereo
play, press theFM button again.
1.Press the AUTO button. The word AUTO
will appear in the display and the automatic
tuning mode isactivated.
2.Stations willbe stored in ascending order
until 50 stations of that particular wave band
have been saved.When a stationis stored, the
memory storage number,as well asthe station's
frequency, will flash for four seconds in the
display.
3.When the total number of stations reaches
50, in aparticular wave's (AMor FM) memory,
no further stationin that waveband will besaved.
To Play PresetStations
1.Press the TUNER button to select the
desired wave band.
2.Press thePRE/TUN button.
3.Press any of the numbere buttons to
select the desiredstation's memory number.
For example, toplay the stationat memory
#5, simply pressthe 5 button; for memory
#17, press the1 button followed by the 7
button.
4.Stations in thememory function may also
be accessed bypressing the UPor DOWN
button.
PLAYING THE RADIO
Automatic Tuning
This unit willstore up to 50 individual AM or
50 individual FMradio stations inits memory.
Memory number
Wave band Station frequency
BASIC DVD OPERATION
If there is no disc, NO DISC shown on screen:
OPEN/CLOSE
Once the unitis connected to a television
set and any other accessory equipment, you
are ready to enjoy the excitement of DVD videos
or your favoriteCDs and MP3files.
To play a DVD videodisc:
Turn on theTV and selectthe A/V mode.
Turn on amplifier,if connected. Select AC-3 or
DVD mode.
To play an audio disc:
Turn on the audio system and choose the
input source thatis connected tothe DVD player.
Set the SPDIFOUTPUT to SPDIF OFF from the
SETUP MENU display if you don't have the
proper equipment for Dolby Digital surround
sound.
1. Press the POWER key on front panel.
DISC LOADING appearson screen.
2. Press theOPEN/CLOSE key. The disc
tray will open.
3. Place the disc onthe disc tray. Be sure
play side isface down onthe tray.
4. Press OPEN/CLOSEkey to close tray.
The disc tray will close. The disc type will
appear in the upper-left-hand corner of the
screen.
Once it hasread the disc,the unit automati-
cally will beginplayback. When playinga DVD,
the DVD titleor menu willappear. CD tracksare
played in sequence.
Note:
It is possibleto damage a disc if it is not
placed correctly onthe guides in the disc tray.
This may also cause the DVD player to
malfunction. Do not force or place anything
other than a 5 DVD or CD onto the disc tray.
Never move theDVD player during playback,
as this maycause damage tothe disc aswell as
the player. Toopen and closethe disc tray,only
use the OPEN/CLOSE key found on both the
remote control andon the unit'sfront panel.
"
6.Fast Forward/Reverse Playback
The unit featuresboth fast forwardand fast
reverse playback. Either mode will speed up:
2x,4x,8x,16x,32x.
Press PAUSE key:
Press PREV key:
Press NEXT key:
FRONT PANEL
DOWN
PAUSE
FRONT PANEL
REMOTE CONTROL
REMOTE CONTROL
FRONT PANEL
REMOTE CONTROL
5. PREV/NEXT playback
Press key or key , play previous or next
track. To resume normal playback, press PLAY key.
REMOTE CONTROL
PLAY
No Disc
LOADING
OPEN
PLAY
PAUSE
PREV
FRONT PANEL
UP
REMOTE CONTROL
FRONT PANEL
NEXT
TDVD6048 DVD HOME THEATER
DVD/CD/CD-R/CD-RW/HDCD/MP3/JPEG
DOWN UP
VOLUME
15 HOW IT WORKSHOW IT WORKS 14
Table of contents
Popular Home Theater System manuals by other brands

RCA
RCA RTB1023 Software upgrade instructions

Sony
Sony HT-SF1300 Quick setup guide

Sherwood
Sherwood ST-4108 operating instructions

Philips
Philips MCD137/93 quick start guide

Harman
Harman Harman/Kardon RADIANCE 2400 owner's manual

Samsung
Samsung HTQ70 - XM Ready DVD Changer Home Theater... instruction manual