TSIKOLIA GEORGIA User manual


30
10
20
10 1
2
3
4
5
6
7
8
9
15
60
30
45
MO
23
Cal.5040.B Cal.5040.D Cal.5040.E

You have become an owner of the watch made byTSIKOLIA.
in the process of designing we have gone all the way from the firts
sketches to the manufacturing and used highest quality materials.The
case is made of "316L" stainless steel and is water resistant. it protects
the movement from the penetrarion of a dust. Hight precision quartz
movement 5040 is made by Ronda, Switzerladn.The bracelet is metal or
rubber, depending on your choice. In order to enjoy flawless and
precision work of your watch for many years ahead, carefully follow all
the recommendations from manual.
Congratulations
3

Like any other precision mechanical device, your watch needs proper care.
In order to protect your watch and to keep it in good working order, please
note the following: Normal sports activities will not affect the watch’s
integrity. however, any type of violent shock may upset the movement and
the watch’s ability to keep correct time.The watch itself and Metal/rubber
bracelets shoul be cleaned with a soft cloth.
Taking care of your watch
4

30
10
20
10 1
2
3
4
5
6
7
8
9
15
60
30
45
MO
23
Cal.5040.E
5

30
10
20
10 1
2
3
4
5
6
7
8
9
15
60
30
45
MO
23
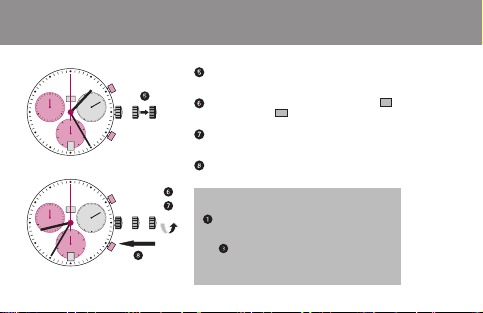
Description of the display and control buttons
Control buttons
Push-button A
Crown
Push-button B
Display elements
Second hand
Minute hand
Weekday
Hour hand
Second counter
Minute counter
1⁄10 second counter
(running for the first 30 sec.)
Hour counter after 30 min.
Date
6

Setting the date, weekday and time
II III
I
10
20
30
10 1
2
3
4
5
6
7
8
9
15
60
30
45
MO
17
IIIIII
10
20
30
10 1
2
3
4
5
6
7
8
9
15
60
30
45
WE
22
Example:
– Date / time on the watch:
17
/ 01:25
/
MO
– Present date / time:
23
/ 20:35
/
TH
Pull out the crown to position III
(the watch stops).
Turn the crown until yesterday’s weekday
WE
appears.
Push the crown to positionII
.
Turn the crown until yesterday’s date
appears
22 .
B
B
A
A
7
Setting the date, weekday and time
III III
10
20
30
10 1
2
3
4
5
6
7
8
9
15
60
30
45
TH
23
III III
10
20
30
10 1
2
3
4
5
6
7
8
9
15
60
30
45
TH
23
* Pull out the crown to position III
(the watch stops).
Turn the crown until the correct date 23
and weekday
TH
appears.
**Continue to turn the crown,until the
correct time 8:35 PM appears.
Push the crown back into position
Always make sure you closed crown!
I.
Please note
** Please observe the AM/PM clock rhythm.
B
B
A
A
*In order to set the time to the exact second,
must be pulled out when the second
hand is in position «60».
Once the hour and minute hands have been
set, must be pushed back into positionI
at the exact second.
8

Chronograph: Basic function
10
20
30
10 1
2
3
4
5
6
7
8
9
15
60
30
45
MO
23
10
20
30
10 1
2
3
4
5
6
7
8
9
15
60
30
45
MO
23
(Start / Stop / Reset)
Example:
Start:Press push-button A
.
Stop:to stop the timing, press
push-button A once more and read
the chronograph counters:
4 min
/
38 sek
/
7
⁄
10
sec
Zero positioning:
Press push-button B.
(The chronograph hands will be reset to
their zero positions.)
B
B
A
A
9

Chronograph: Accumulated timing
10
20
30
10 1
2
3
4
5
6
7
8
9
15
60
30
45
MO
23
10
20
30
10 1
2
3
4
5
6
7
8
9
15
60
30
45
MO
23
Example:
Start:
(start timing)
Stop:
(e.g.15 min
5
sec following
)
Restart:
(timing is resumed)
*
Stop:
(e.g.
5
min
12 sec following
)
=
20 min
17 sec
(The accumulated measured time is shown)
Reset:
The chronograph hands are returned to
their zero positions.
Please note
*
Following , the accumulation of the
timing can be continued by pressing
push-button A
(Restart / Stop, Restart / Stop, …).
B
B
A
A
10

Chronograph: Intermediate or interval timing
10
20
30
10 1
2
3
4
5
6
7
8
9
15
60
30
45
MO
23
10
20
30
10 1
2
3
4
5
6
7
8
9
15
60
30
45
MO
23
Example:
Start:(start timing)
Display interval:
e
.
g
.
20 minutes 17 seconds(timing
continues in the background)
Making up the measured time:
(The chronograph hands are quickly
advanced to the ongoing measured time.)
Stop:(Final time is displayed)
Reset:
The chronograph hands are returned to
their zero position
Please note
*
Following , further intervals or inter
-
mediates can be displayed by pressing
push-button B
(display interval / make up
measured time, ...).
*
B
B
A
A
11

Adjusting the chronograph hands to zero position
10
20
30
10 1
2
3
4
5
6
7
8
9
15
60
30
45
MO
23
III III
10
20
30
10 1
2
3
4
5
6
7
8
9
15
60
30
45
MO
23
III
Example:
One or several chronograph hands are not
in their correct zero positions and have to be
adjusted (e.g. following a battery change).
Pull out the crown to position
III
(all chronograph hands are in their correct
or incorrect zero position).
Keep push-buttons A and B
depressed
simultaneously for at least 2 seconds
(the second counter hand rotates by
360° corrective mode is activated).
B
B
A
A
65,5%=40mmDruchmesser
12

III
III
III
III
III
65,5%=40mmDruchmesser
III
III
Adjusting the second counter hand
Single step
65,5%=40mmDruchmesser
III
A1 x short
Continuous
65,5%=40mmDruchmesser
III
Along
Adjusting the next hand B
III
Adjusting the
1⁄10 second counter hand (position 6h)
Single step
65,5%=40mmDruchmesser
III
A1 x short
Continuous
65,5%=40mmDruchmesser
III
Along
Adjusting the next hand B
65,5%=40mmDruchmesser
III
Adjusting the minute counter hand (position 9h)
Single step
65,5%=40mmDruchmesser
III
A1 x short
Continuous
65,5%=40mmDruchmesser
III
Along
Returning the crown to positionI
Termination of the chronograph hands
adjustment (can be carried out at any time).
A
B
A
B
A
Adjusting the second counter hand
13

14
Cal.5040.B Cal.5040.D

Description of the display and control buttons
15

Setting the date/time
16

Setting the date/time
17

Chronograph: Basic function
18

Chronograph: Accumulated timing
19
Table of contents
Languages:
Popular Watch manuals by other brands

Casio
Casio QW 5513 Operation guide

Piaget
Piaget 560P Instructions for use

Armitron
Armitron pro sport MD0346 instruction manual

West Marine
West Marine BlackTip 13411293 Instruction Booklet and Care Guide

Jaeger-leCoultre
Jaeger-leCoultre HYBRIS MECHANICA CALIBRE 184 manual

FOREVER
FOREVER iGO PRO JW-200 user manual


