Ukoke UTE01 User manual

20V Cordless Grass Trimmer
Model:UTE01
Customer Service
Ukoke Tech
E:Service@ukoke.com Te:
(909)-606-4551
Customer Central: (Items Replacement)
19575 East Walnut Drive South, Units C16& C17,
City of Industry, California 91748.
Te: (909)-734-6812

Contents
General Information ............................................................1
Intended Use........................................................................3
Safety warnings....................................................................3
Product description...............................................................6
Assembly...............................................................................8
Operation ..............................................................................12
Maintenance and Care..........................................................16
Troubleshooting.....................................................................19
Technical Data.......................................................................19

General Information
Reading and storing the instruction manual
This instruction manual accompanies this line trimmer. It contains important information on
setup and handling. Before using the line trimmer, read the instruction manual carefully. This
particularly applies to the safety notes. Failure to follow the contents of this instruction manual
may result in severe injury or damage to the line trimmer. Store the instruction manual for
future use. If you pass the line trimmer on to third parties, please ensure you include this
instruction manual.
Warning symbols on the machine
Symbols are used in this manual to attract your attention to possible risks. The safety
symbols and the explications which accompany them must be perfectly understood. The
warning themselves do not prevent the risks and cannot be a substitute for proper methods of
avoiding accidents.
!
This symbol indicates there is a danger of serious personal injury or death if you do not
observe the warning.
!
Read the instruction manual before use.
!
Wear ear protection
!
Wear eye protection.
!
Wear dust mask.
!
Do not expose to rain.
!
Keep other people out of working area during operation. A distance of at least 15 m must be
observed.
.
1

!
Objects thrown by the product could hit the user or other bystanders. Always ensure that
other people and pets remain at a safe distance from the product when it is in operation. In
general, children must not come near the area where the product is.
!
Guaranteed sound power level.
!
Waste electrical products should not be disposed of with household waste. Please recycle
where facilities exist. Check with your Local Authority or retailer for recycling advice.
Warning symbols on the charger
!
Before use, carefully read through the user manual.
!
The charger is for indoor use only.
!
Protection class II.
!
Pole orientation.
!
Waste electrical products should not be disposed of with household waste. Please recycle
where facilities exist. Check with your Local Authority or retailer for recycling advice.
Warning Symbols on the Battery
!
Do not subject the battery to strong sunlight over long periods and do not leave it on a heater
(max.45℃).
!
Do not dispose of batteries in rivers or immerse in water.
2

!
Do not dispose of batteries in a fire. They will explode and cause injury.
!
Contains Li-ion battery. Battery must be recycles or disposed of properly.
!
Do not dispose of batteries. Return exhausted batteries to your local collection or recycling
point.
INTENDED USE
This Li-ion cordless grass trimmer N0E-22ET-230 is intended for cutting weed, grass or
similar soft vegetation in areas that are hard to reach, e.g. under bushes, on slopes and
edges. It may not be used to work on unusual thick, dry or wet grass, e.g. pasture grass, or to
shred leaves.
For safety reasons it is essential to read the entire instruction manual before first operation
and to observe all the instructions therein.
This product is intended for private domestic use only, not for any commercial trade use. It
must not be used for any purposes other than those described.
SAFETY WARNINGS
WARNING!
This product is not intended for use by persons (including children) with reduced
physical, sensory or mental capabilities, or lack of experience and knowledge, unless
they have been given supervision or instruction concerning use of the product by a
person responsible for their safety.
Children should be supervised to ensure that they do not play with the product.
1. Read the instruction carefully. Be familiar with the controls and the correct use of the
appliance. Read and understand the operator’s manual and observe the warning sand
instruction labels affixed to the appliance.
2. Users. Never allow children or people unfamiliar with these instructions to use the
appliance. Local regulations may restrict the age of operator. Never operate the tool under the
influence of alcohol, medication or drugs.
3. Use appropriate tool. This device is only intended for trimming grass outdoors and only
designated for use on private property. Do not force small tools or attachments to do the job
of a heavy duty tool.
4. Keep work areas clean. Cluttered areas can cause accidents.
5. Consider work area environment. Do not expose the tool to high humidity or rain. Do not
use the tool in damp and wet conditions. Keep the work area well lit. Do not use the tool
where there is a risk of causing fire or explosion, e.g. in the presence of flammable liquids
and gases.
6. Keep all bystanders, children, and pets away. The operator or user is responsible for
accidents or hazards occurring to other people or the property.
7. Dress appropriately. Do not wear loose clothing or jewelry, as these can be caught in
moving parts. Preferably wear non-slip footwear when working outdoors. Wear protective hair
covering to keep long hair out of the way.
8. Head protection. Always use safety glasses and gloves. Use a face or dust mask
whenever the operations may produce dust or flying particles. Wear ear protection whenever
the sound level seems uncomfortable.
9. Do not overreach. Keep proper footing and balance at all times.
3

10. Stay alert, watch what you are doing. Use common sense when operating the
appliance. Do not operate the tool when you are tired.
11. Grip the tool securely. Operator should have one hand on the main handle, the other on
the front handle. Keep finger off trigger until ready to use.
12. Remove adjusting keys and wrenches. Always check that adjusting keys and wrenches
are removed from the tool before operating the tool.
13. Risk of cut. Do not touch or try to stop the nylon line when it is rotating.
14. Disconnect the battery. Disconnect battery from the tool when not in use or when
servicing or cleaning.
15. Check for damaged parts. Before further use, carefully check the tool for damage.
Check for alignment of moving parts, binding of moving parts, breakage of parts, mounting
and any other condition that may affect its operation.
Do not use the tool if any parts are damaged or defective. Have any damaged or defective
parts repaired or replaced by an authorized service agent. Never attempt any repairs yourself.
16. Store idle tools. When not in use, tools should be stored in a dry, locked-up place out of
reach of children.
17. Maintain tools with care. Keep tools clean and in good condition for better and safer
performance. Follow the instructions for maintenance and changing accessories. Keep
handles and switches dry, clean and free from oil and grease.
18. Have your tool repaired by an authorized service agent. This tool is manufactured in
accordance with the relevant safety regulations. To avoid danger, electrical appliances must
only be repaired by qualified technicians.
WARNING!
Do not use any attachments or accessories not recommended by the manufacturer of this
tool. The use of attachments or accessories not recommended can result in serious personal
injury.
ADDITIONAL SAFETY INSTRUCTIONS FOR BATTERIES AND
CHARGERS
Batteries
1. Never attempt to open for any reason.
2. Do not expose to water.
3. Do not incinerate the battery pack even i f it is severely damaged or is completely worn out.
The battery pack can explode in a fire.
4. Do not store in locations where the temperature may exceed 40℃..
5. Do not leave the battery pack in the charger when the charging is finished, otherwise
battery leakage may occur.
6. Charge only at room temperature.
7. Charge only by using the charger provided with the tool (see technical data).
8. Before charging, make sure that the battery is dry and clean.
9. Use only the correct type of battery for the tool (see technical data).
10. When dispose of batteries follow the instructions given in the section "protecting the
environment".
11. Under extreme conditions, battery leakage may occur. When you notice liquid on the
battery, proceed as follows:
---Carefully wipe the liquid off using a cloth.
Avoid skin contact.
---In case of skin or eye contact, follow the instructions below.
---The battery fluid, a 25-30% solution of potassium hydroxide, can be harmful. In case of skin
contact, immediately rinse with water. Neutralize with a mild acid such as lemon juice or
vinegar. In case of eye contact, rinse abundantly with clean water for at least 10minutes.
Consult a physician.
NOTE: The batteries in your battery pack are the Lithium-Ion type. Do not dispose of battery
packs/batteries into household waste, fire or water. Battery packs/batteries should be
collected, recycled or disposed of in an environmental-friendly manner.
Chargers
1. Charger’s plug must match the outlet. Never modify the plug in any way. Unmodified plugs
4

and matching outlets will reduce risk of electric shock.
2. Use your charger only to charge batteries of the type supplied with your tool. Other
batteries could burst, causing personal injury and damage.
3. Only 2 battery packs are allowed to be charged continuously in order to prevent
overheating of charger, necessary rest time is required to let the charger cool down before
further charging.
4. When charging is finished, unplug the charger from mains socket outlet and takeaway the
battery pack from the charger, do not leave the battery pack in the charger.
5. Never carry the charger by its cord or pull it to disconnect from the socket. Keep the cord
away from heat, oil and sharp edges.
6. Never attempt to charge non-rechargeable batteries.
7. The cord of the charger is not changeable, do not continue to use if the cord is damaged.
8. Do not expose to water or rain, do not use in wet condition.
9. Do not open the charger.
10. Do not probe the charger.
11. Intended for indoor use only.
ADDITIONAL SAFETY INSTRUCTIONS FOR LINE TRIMMER
1. Wear safety goggles when operating this tool.
2. Wear gloves when operating this tool.
3. Do not expose the tool to rain or high humidity.
4. Be familiar with the controls and proper use of trimmer.
5. Never allow children or people unfamiliar with the instructions to use the trimmer.
6. Keep children, other people and pets away from the trimmer; the grass which is cut and
dispersed may contain stones and debris. Stop using the trimmer while people, especially
children, or pets are nearby.
7. Do not let other people or animals come within 15 feet of the trimmer when in use.
8. Only use the trimmer in daylight or good artificial light.
9. Before using the trimmer and after any impact, check for signs of wear or damage and
repair as necessary; Do not use the trimmer if the cutting device is not secured properly or is
damaged.
10. Always check the good working order of the trimmer which, if not adequate, could
endanger the user.
11. Never operate the trimmer with damaged guards or without the guards in place.
12. Before starting the trimmer, make sure that the nylon line is not touching stones or debris.
13. Keep hands and feet away from the cutting means at all times and especially when
switching on the motor.
14. Take care against injury from the cutter blade fitted for trimming the filament line length.
After extending new cutter line always return the trimmer to its normal operating position
before switching on.
15. Never fit metal cutting elements.
16. Never use replacement parts or accessories not provided or recommended by the
manufacturer.
17. Remove the battery before checking, cleaning or working on the trimmer and when it is
not in use.
18. Always ensure that ventilation openings are kept clear of debris.
19. To avoid unintentional starting, do not carry the machine with a finger on the on/off switch.
20. Remain in a stable and secure position while operating the trimmer.
21. Keep the area being cut free from wires, stones and debris.
22. Do not cut against hard objects. This could cause injury or damage the trimmer.
23. Warning! Cutting elements continue to rotate after the motor is switched off.
24. Do not try stopping the cutting device (nylon line) with your hands. Always let it come to a
stop by itself.
25. Do not use the trimmer to cut grass which is not in contact with the ground; for example
do not cut grass which is on walls or rocks etc.
26. Do not cross roads or gravel paths with the trimmer still running.
NOTE: Do not switch the line trimmer on and off frequently over a short period of time, and in
particular do not play with the ON/OFF switch
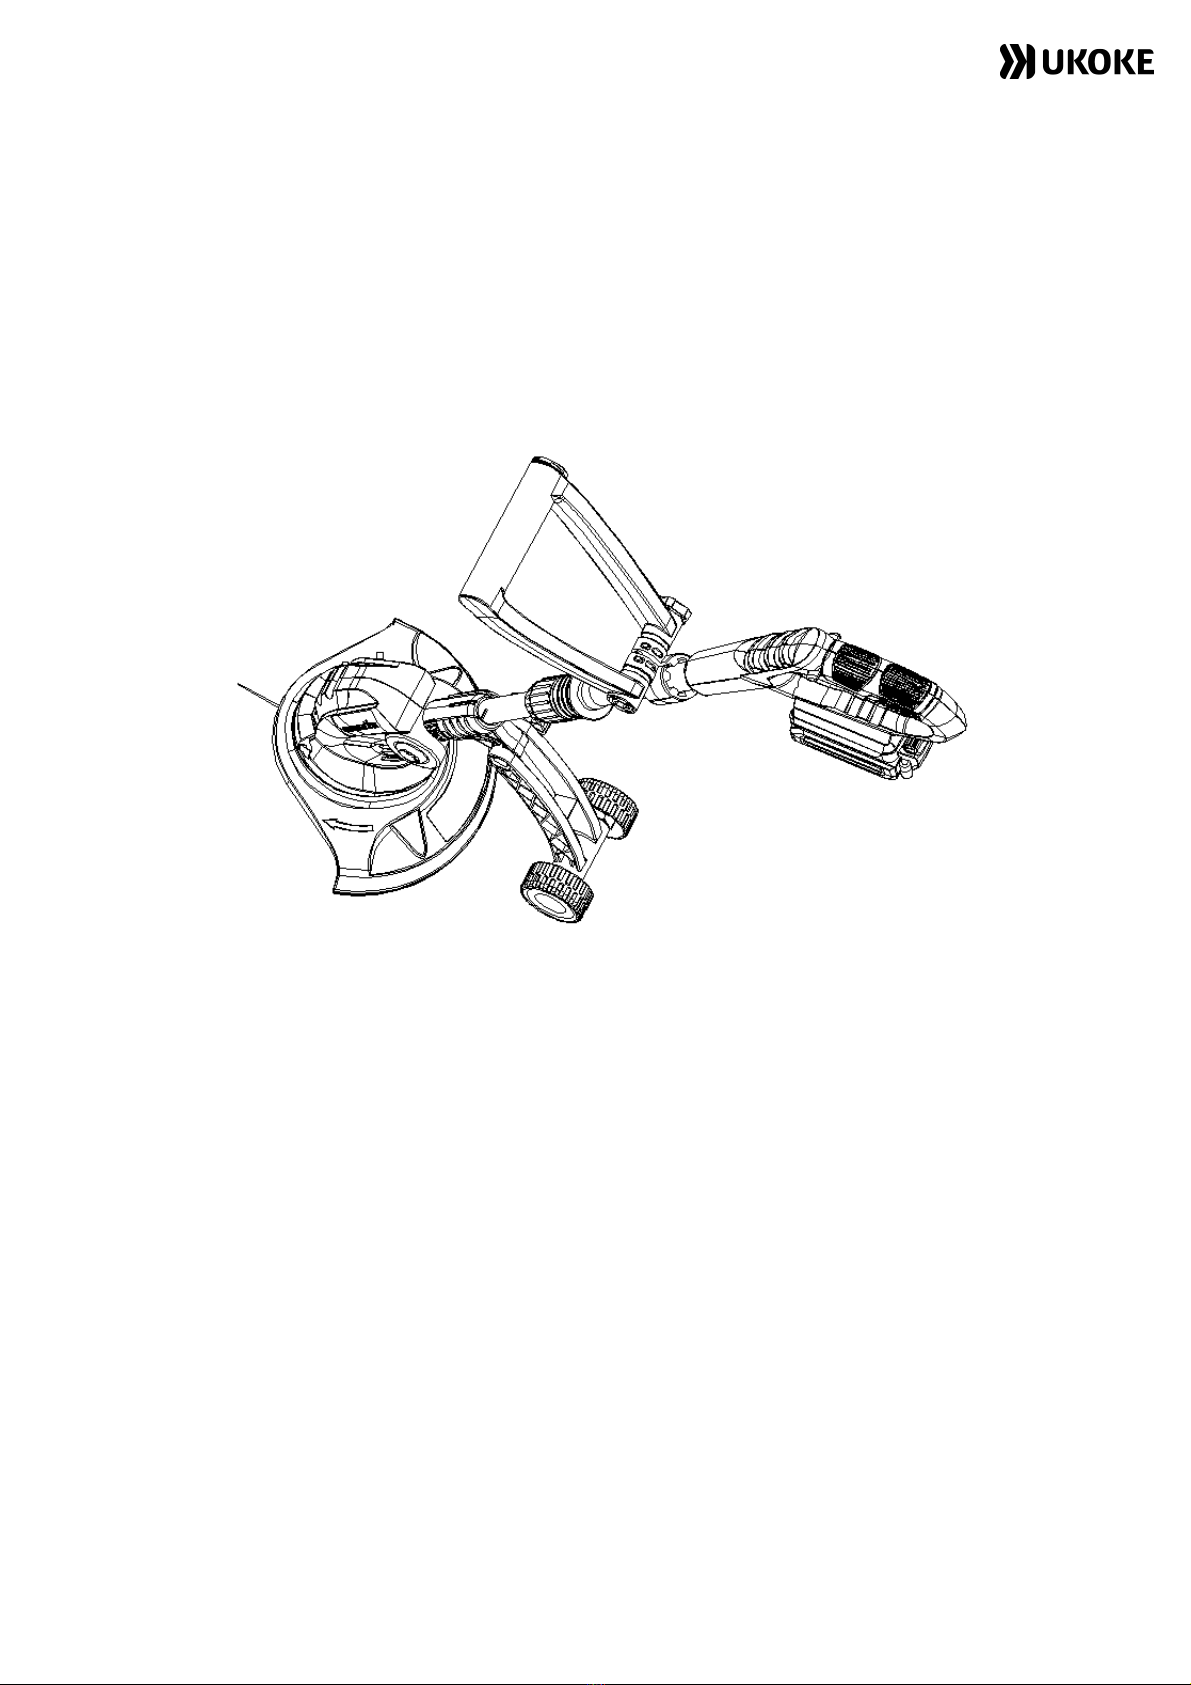
PRODUCT DESCRIPTION
5

!
FIG A
!!
FIG B FIG C
6
18

!
FIG D
1. Lock off button
2. Operating handle
3. On/Off Switch
4. Battery pack
5. Front Handle
6. Locking knob for the front handle
7. Locking Knob for the operating handle
8. Telescopic Knob
9. Locking knob for the support rollers
10. Support rollers
11. Protection Guard
12. Locking button for the support rollers
13. Locking button for the cutting head
14. Cutting head
15. Plant Guard
16. Line Blade
17. Cutting line
18. Line spool
19. Spool button
20. Charger
21, LED (Indicators on Charger)
22. Charger Station
ASSEMBLY
CHARGING THE BATTERY (FIG. D)
WARNING!
The charger and battery pack are specifically designed to work together so do not attempt to
use any other devices. Never insert or allow metallic objects into your charger or battery pack
connections because an electrical failure and hazard will occur.
The battery needs to be charged before first use and whenever it fails to produce sufficient
power on jobs that were easily done before.
The battery may become warm while charging, and this is normal and does not indicate a
problem.
Do not charge the battery at ambient temperature below 10ºc or above 45ºc. Recommend
charging temperature approx. 24ºc.
7

Please refer to FIG D
1. Charging procedure
1). Connect the charger (20) to the charger station(22).
2). Plug the charger into an appropriate AC power outlet. The LED (21) lights green to tell you
that the charger is ready for use.
3) Slide the charger station (22) into the battery pack (4), make sure the charger station is
fully seated in the battery pack. The LED (21) lights red to tell you that the battery pack is on
charge.
Attention! It cannot be charged if battery is immediately after using. The battery pack
should be cooling for a period of time. The LED (21) lights from green to red means it
can be charged.
4).The battery pack will be fully charged in 4hours. And the LED (21) lights green again to tell
you that the battery pack is fully charged.
Important charging notes
Longest life and best performance can be obtained if the battery pack is charged when the air
temperature is between 18-24℃. Do not charge the battery pack in a very low or very high air
temperature. This is important and will prevent serious damage to the battery pack.
1. When using your tool continuously, the batteries in your battery pack will become hot. You
should let a hot battery pack cool down for approximately 30minutes before attempting to
recharge.
2. The charger and battery pack may become warm to touch while charging. This is a normal
condition, and does not indicate a problem.
3. Use the charger in normal room temperatures whenever possible. To prevent overheating,
do not cover the charger and do not charge battery packs in direct sunlight or near heat
sources.
4. If the battery pack does not charge properly –
(1).check current at receptacle by plugging in a lamp or other appliance.
(2)move charger and battery pack to a location where the surrounding air temperature is
approximately 18-24℃.
(3).if charging problems persist, take or send the tool, battery pack and charger to your local
service center.
5. The battery pack should be recharged when it fails to produce sufficient power on jobs
which were easily done previously. DO NOT CONTINUE to use under these conditions.
Follow the charging procedure. You may also charge a partially used pack whenever you
desire with no adverse effect on the battery pack.
6. Under certain conditions, with the charger plugged in to the power supply, the exposed
charging contacts inside the charger can be shorted by foreign material. Foreign materials of
a conductive nature such as, but no limited to, steel wool, aluminum foil, or any buildup of
metallic particles should be kept away from charger cavities. Always unplug the charger from
the power supply when there is no battery pack in the cavity. Unplug charger before
attempting to clean.
7. Do not immerse charger in water or any other liquid.
WARNING!
Don’t allow any liquid to get inside charger. Electric shock may result. To facilitate the cooling
of the battery pack after use, avoid placing the charger or battery pack in a warm environment
such as in a metal shed, or an un-insulated trailer.
CAUTION! Never attempt to open the battery pack for any reason. If the plastic housing of
the battery pack breaks or cracks, return to a service center for recycling; do not put it into
further use
NOTE: When the charging is finished, do not leave your battery on charge continuously; this
may damage the battery cells. If the battery pack is very hot you must allow it to cool first to
ambient temperature and then recharging can be started. If you charge a second battery pack
immediately after the first one, then the charger adapter can be overheated. Always allow at
8

least 15 minutes rest between battery pack charging.
WARNING!
NEVER TO LEAVE THE BATTERY AND CHARGER UNATTENDED WHEN CHARGING THE
BATTERY.
WARNING!
TO AVOID THE SHORT CIRCUIT OF THE BATTERY PACK, DON’T TOUCH THEBATTERY
TERMINALS WITH RINGS AND OTHER METALLIC OBJECTS.
INSTALL THE GUARD (FIG E)
FIG E
1) Remove two screws from the motor housing.
2) Slide guard over motor housing.
3) Re-insert two screws into the guard and tighten.
WARNING!
Take care to have a look at the yellow warning label and rip off before use.
Take great care when doing this as there is a very sharp line blade (16) on the guard. FIG F,
FIG F
MOUNTING THE SUPPORT ROLLERS (FIG.G )
Screw the support rollers(A) with screw(B) to the clamp (C).
9

! !
FIG G
MOUNTING THE FRONT HANDLE (FIG H)
Put the front handle (5) to the clamp (A) and align the mounting holes with holes on the
clamp.
Inset the bolt through the mounting holes and tighten the locking knob (6)
!!
(FIG H)
REMOVE OR INSTALL BATTERY PACK (FIG. I)
!!
FIG I
WARNING!
Always release the On/Off switch before insertion or removal of the battery pack.
1) Remove the battery pack.
Depress the button (A) on end of the battery pack, and then remove the battery pack (4)
10
A
B

from the tool.
2) Install the battery pack.
Align the ribs on both side of the battery pack with the slots in the housing and slip it into
place. Always insert it all the way until it locks in place with a click sound. If not, it may
accidentally fall out of the tool, causing injury to you or someone around you.
OPERATION
SEETING THE CUTTING HEAD ANGLE (FIG J)
The angle of trimmer head can be set to 4 different working positions. Push the Locking
button for the cutting head(13)with one hand and turn round the cutting head to suitable
position. Release the locking button and it can lock the cutting head automatically.
FIG J
SETTING THE LENGTH OF THE UNIT (FIG K)
Turn the Telescopic Knob (8) aligning the “UNLOCK” direction.
Pull the telescopic pole (A) to the desired length.
Turn the Telescopic Knob (8) aligning the “LOCK” direction to lock the telescopic pole (A).
FIG K
SETTING THE ANGLE OF THE OPERATING HANDLE(Edging function) (FIG.L)
Pull back the locking Knob (7)
11

Rotate the operating handle (2) 90°.
Release the locking Knob (7) and it will return to the original position automatically and lock
the operating handle (2).
!
FIG L
SETTING THE ANGLE OF THE SUPPORT ROLLERS (FIG. M )
Open the locking knob (9).
Rotate the support roller to the desired angle.
Re-tighten the locking knob (9).
!
FIG. M
SETTING THE POSITION AND ANGLE OF THE FRONT HANDLE (FIG. N)
Open the locking knob (6).
Move the clamp (A) to the appropriate position.
Rotate the front handle (5) to the desired angle.
Re-tighten the locking knob (6).
12

!
(FIG. N)
STARTING
1. Before starting the grass trimmer for the first time, check that the nylon line touch or pass
over the wire cutting blade. If it is not long enough:
(1). Take off the battery pack from machine.
(2). Press the spool button (19) (FIG B).
(3). Pull more nylon wires to lengthen.
2. Switch the trimmer on. Press and hold the safety lock-off button (1) and then press the
on/off switch (3) on the operating handle.
Release the safety lock-off button (1).
3. The lengthened nylon line will be cut to size automatically by the wire cutting blade once
the grass trimmer is turned on.
4. During use, the nylon line will become shortened or worn. To automatically lengthen or
advance the nylon cutting line, tap the spool button lightly on ground (while the unit is
running).
These operations should be repeated a few times before starting work to make sure that
everything is functioning properly and to familiarize you with the grass trimmer. Start off
slowly, when you have gained experience, you will be able to use the grass trimmer to its full
potential.
SWITCH ON/ OFF
Switching the trimmer on:
1. Press and hold the safety lock-off button (1) and then press the on/off switch (3) on
the operating handle.
2. Release the safety lock-off button (1) again.
Switching the trimmer off:
Release the on/off switch (3) on the handle.
CUTTING GRASS
WARNING!
Always wear eye protection. Never lean over the trimmer head. Rocks or debris can
ricochetor be thrown into eyes and face and cause blindness or other serious injury.
When operating unit, check for the following:
Wear eye protection and heavy clothing.
Hold front handle with one hand and auxiliary handles with the other hand.
Keep unit below waist levels. Work only from your right to your left to ensure debris is thrown
away from you.
Without bending over, keep line near and parallel to the ground (perpendicular when edging).
Do not switch the machine on with the cutting head on or near material to be cut.
Ensure the cutting line is at full speed before contacting grass.
13
6

1. Let the trimmer run for a few seconds to cut the line.
2. Use the trimmer at an angle of approximately15 degree to the working area.
3. Swing the trimmer head from side to side.(See Fig. O)
FIG O
4. If the grass is very long cut in stages rather than trying to cut in one ago. Do not overload
your trimmer, take small cuts this will keep machine operating at high speed and will greatly
improve cutting efficiency. (FIG P)
FIG P
MAINTANENCE
REPLACE THE SPOOL
WARNING!
Before replacing the spool, always switch off the machine and take off the battery pack!
WARNING!
RISK OF INJURY!
Cutting elements continue to rotate after the motor is switched off. Do not try to stop the
cutting device(nylon blade) with your hands. Always let it come to a stop by itself.
1. Remove the spool assembly from the trimmer. To do so, hold the outer ribbed part of the
14
O
P

assembly with one hand, while pushing down and turning the spool head with the other to
unlock it (FIG Q). The spool carrier and spool will now disassemble easily.
Note: There is a spring inside the head that could easily be lost. Ensure that it is put in a safe
place.
FIG Q
2. Choose either OPTION 1 or OPTION 2 below for spool or line replacement.
3. Insert the line through the eyelet in the spool carrier and slide the spool into it. (FIG R)
FIG R
4. Making sure to insert the spring, assemble the spool and spool carrier back onto the
trimmer. To do so, push the head on and turn it clockwise until it locks. (FIG S)
FIG S
5. To test if the line is advancing properly, push the button with your thumbs while pulling the
wire with your fingers. The line should advance freely.
OPTION 1: ACCESSORY REPLACEMENT SPOOL
Use replacement spool
OPTION 2: REWINDING SPOOL USING LINE
Attention! Please use diameter 1.6m line.
Line for your trimmer is available at extra cost from your local dealer. To install line,
follow the steps below:
1. Insert one end of line into the hole in the spool as shown FIG T about 3 mm.
15

FIG T
2. Snugly and evenly wind the line onto the spool in the direction of the arrow on
the spool (FIG T), until the line builds up to the notches in the spool rim. Do
not overfill spool. The spool holds about 6.5 m of line.
CLEAN AND STORAGE
1. After use, remove the battery pack from the trimmer;
2. When not in use store the machine out of the reach of children;
3. Use only manufacturer recommended replacement parts and accessories;
4. To clean the tool, remove battery pack and use only mild soap and a damp cloth to clean
the tool. Do not immerse tool in water or squirt it with a hose. Do not allow any liquid to
get inside it. Do not clean with a pressure washer.
TROUBLESHOOTING
1. Tool runs slowly
- Check that the spool housing can rotate freely. Carefully clean it if necessary.
- Check that the cutting line does not protrude more than 9 cm from the spool housing. If it
does, cut it off so that it just reaches the line trimming blade.
2. If the trimmer is not cutting properly
- Check the condition of the cutting head, if the cutting line is too short or cutting head
damaged.
- Note: Do not use damaged cutting head.
3. If trimmer will not operate
- Check battery pack assembly;
- Charge the battery: operation of the grass trimmer is dependent upon sufficient charge in
the battery pack.
4. If the battery will not charge
- Check to see if the battery is properly inserted into the charger base, and make sure the
indicator light is on. If not, check the power supply to the socket used for charger plug.
5. If a fault is suspected return the trimmer to an authorized dealer for repair.
TECHINICAL DATA
Grass trimmer
UTE01
Voltage
No-load speed
8000 /min
Cutting width
230mm
Line diameter
1.6mm
Battery
ET-D1809
Battery type
Lithium-Ion
Battery voltage
Battery capacity
2.0Ah
20V
20V
16

ENVIRONMENTAL PROTECTION
Waste electrical products should not be disposed of with household waste. Please recycle
where facilities exist.
Check with your Local Authority or retailer for recycling advices.
PARTS AND SERVICE:
◆HOW TO OBTAIN REPLACEMENT PARTS: A replacement parts list is available
online at Ukoke.com/Amazon.com/Walmart.com/newegg.con,. Replacement parts
can be purchased online or by calling Ukoke Customer specialist (909)-606-4551 or
by Email:Service@ukoke.com
◆ HOW TO LOCATE A RETURN CENTER: Return centers can be located at 19575 East
Walnut Drive South, Units C16, City of Industry, California 91748. . Ukoke
Customer specialist (909)-734-6812 or by Email:Service@ukoke.com
Charger
JLH122100400G
Input
100-240VAC 50-60Hz 15W
Output
21VDC 400mA
Protection class
Charging time
Approx 4 Hours
17

LIMITED WARRANTY STATEMENT
UKOKE TECH INC., warrants to the original retail
purchaser that this UKOKE™ brand outdoor product is free
from defect in material and workmanship and agrees to repair
or replace, at UKOKE TECH INC.’s, discretion, any
defective product free of charge within these time periods
from the date of purchase.
n Three years if the product is used for personal, family or
household use;
n 90 days, if used for any other purpose, such as
commercial.
This warranty extends to the original retail purchaser only
and commences on the date of the original retail purchase.
Any part of this product found in the reasonable judgment of
UKOKE TECH INC. to be defective in material or
workmanship will be repaired or replaced without charge for
parts and labor by an authorized service center for UKOKE
™ brand outdoor products.
The product, including any defective part, must be returned
to an authorized UKOKE service center within the warranty
period. The expense of delivering the product to the service
center for warranty work and the expense of returning it back
to the owner after repair or replacement will be paid by the
owner. UKOKE TECH INC.’s, responsibility in respect to
claims is limited to making the required repairs or
replacements and no claim of breach of warranty shall be
cause for cancellation or rescission of the contract of sale of
any UKOKE™ brand outdoor product. Proof of purchase
will be required by the dealer to substantiate any warranty
claim. All warranty work must be performed by an
authorized service dealer.
This warranty is limited to ninety (90) days from the date of
original retail purchase for any UKOKE™ brand outdoor
product that is used for rental or commercial purposes, or any
other income-producing purpose. This warranty does not
cover any product that has been subject to misuse, neglect,
negligence, or accident, or that has been operated in any way
contrary to the operating instructions as specified in this
operator’s manual. This warranty does not apply to any
damage to the product that is the result of improper
maintenance or to any product that has been altered or
modified. The warranty does not extend to repairs made
necessary by normal wear or by the use of parts or
accessories which are either incompatible with the
UKOKE™ brand outdoor product or adversely affect its
operation, performance, or durability. In addition, this
warranty does not cover:
A.Tune-ups – Spark Plugs, Carburetor, Carburetor
Adjustments, Ignition, Filters
B.Wear items – Bump Knobs, Outer Spools, Cutting Lines,
Inner Reels, Starter Pulleys, Starter Ropes, Drive Belts,
Tines, Felt Washers, Hitch Pins, Mulching Blades, Blower
Fans, Blower and Vacuum Tubes, Vacuum Bag and Straps,
Guide Bars, Saw Chains
ALL IMPLIED WARRANTIES ARE LIMITED IN
DURATION TO THE STATED WARRANTY PERIOD.
ACCORDINGLY, ANY SUCH IMPLIED WARRANTIES
INCLUDING MERCHANTABILITY, FITNESS FOR A
PARTICULAR PURPOSE, OR OTHERWISE, ARE
DISCLAIMED IN THEIR ENTIRETY AFTER THE
EXPIRATION OF THE APPROPRIATE THREE-YEAR OR
NINETY-DAY WARRANTY PERIOD. UKOKE TECH
INC.’S, OBLIGATION UNDER THIS WARRANTY IS
STRICTLY AND EXCLUSIVELY LIMITED TO THE
REPAIR OR REPLACEMENT OF DEFECTIVE PARTS
AND UKOKE TECH INC., DOES NOT ASSUME OR
AUTHORIZE ANYONE TO ASSUME FOR THEM ANY
OTHER OBLIGATION. SOME STATES DO NOT ALLOW
LIMITATIONS ON HOW LONG AN IMPLIED
WARRANTY LASTS, SO THE ABOVE LIMITATION
MAY NOT APPLY TO YOU. UKOKE TECH INC.,
ASSUMES NO RESPONSIBILITY FOR INCIDENTAL,
CONSEQUENTIAL, OR OTHER DAMAGES
INCLUDING, BUT NOT LIMITED TO, EXPENSE OF
RETURNING THE PRODUCT TO AN AUTHORIZED
UKOKE SERVICE CENTER AND EXPENSE OF
DELIVERING IT BACK TO THE OWNER, MECHANIC’S
TRAVEL TIME, TELEPHONE OR TELEGRAM
CHARGES, RENTAL OF A LIKE PRODUCT DURING
THE TIME WARRANTY SERVICE IS BEING
PERFORMED, TRAVEL, LOSS OR DAMAGE TO
PERSONAL PROPERTY, LOSS OF REVENUE, LOSS OF
USE OF THE PRODUCT, LOSS OF TIME, OR
INCONVENIENCE. SOME STATES DO NOT ALLOW
THE EXCLUSION OR LIMITATION OF INCIDENTAL
OR CONSEQUENTIAL DAMAGES, SO THE ABOVE
LIMITATION OR EXCLUSION MAY NOT APPLY TO
YOU.
This warranty gives you specific legal rights, and you may
also have other rights which vary from state to state.
This warranty applies to all UKOKE™ brand outdoor
products manufactured by or for UKOKE TECH INC., and
sold in the United States and Canada.#
Table of contents
Other Ukoke Trimmer manuals