unimom FORTE User manual

For a period of 1 year from the date of original purchase, Blue Egg warrants this product
(excluding kit) against defects in material or workmanship. At Blue Egg's option, Blue
Egg may repair or replace that is determined to be defective buy Blue Egg and
determined to be covered by this warranty.
For warranty service, please return the product, along with dated sales receipt or other
proof of the purchase date, to Blue Egg or Local distributor.
This warranty does not cover damage caused by accident, misuse, abuse, improper
maintenance, unauthorized modification, or connection to an improper power supply. A
charge will be made for repair of such damage.
This warranty excludes all incidental or consequential damages and any liability other
than what is stated above. Blue Egg makes no other warranties regarding this product
(including warranties as to merchantability and fitness for a particular purpose) either
express or implied.
LIMITED WARRANTY
Specifications
WARNING Intended use
Overview
Pumping guide
①ALWAYS UNPLUG THIS DEVICE IMMEDIATELY AFTER USING.
②DO NOT USE WHILE BATHING.
③DO NOT PLACE OR STORE THIS DEVICE WHERE IT CAN FALL OR BE PULLED INTO A
TUB OR SINK
④DO NOT PLACE IN OR DROP INTO WATER OR ANY OTHER LIQUID
⑤DO NOT REACH FOR A DEVICE THAT HAS FALLEN INTO WATER UNPLUG THE DEVICE
IMMEDIATELY.
READ ALL INSTRUCTIONS BEFORE USING
When using electrical products, basic safety precautions should always be followed.
DANGER : To reduce the risk of electrocution
1. Relax and stimulate your let-down reflex.
2. Gently massage your breasts or apply warm compresses from the back of the breast
toward the nipple before using.
3. Express milk from each breast for 10 ~ 15 minutes and it is good to alternate breasts.
It is more effective and better for the breasts when you pump frequently than
pumping for a long time. (Every 2 ~3 hours, 8 times a day)
NOTE : EVEN WHEN YOU ARE USING THE BREAST PUMP, BREASTFEED YOUR BABY.
1. Relieving engorgement
2. Expressing breastmilk while away from your baby
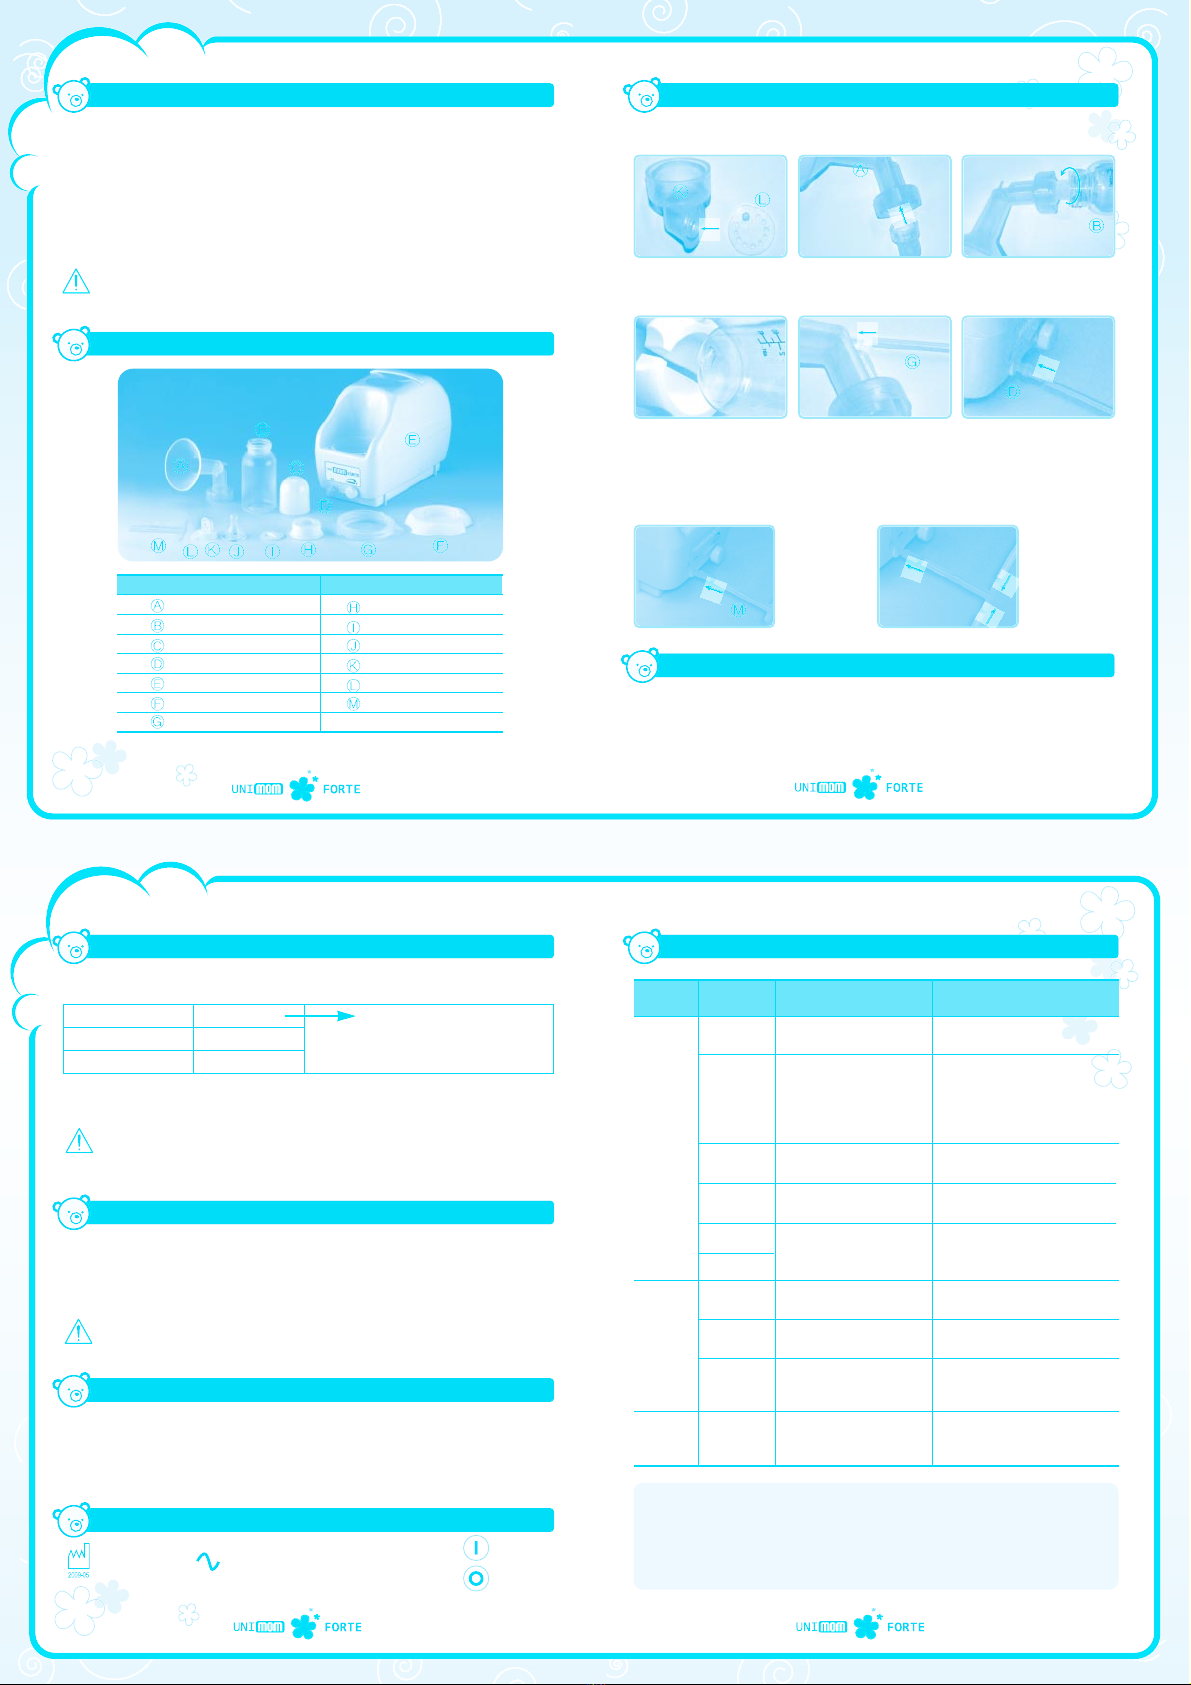
How to use
1. Assemble the kit followed by How to assemble.
2. Start with low vacuum.
3. Set the nipple in the center of the breast shield A and plug into the outlet.
4. Turn the unit on.
5. Adjust the vacuum properly by vacuum control knob.
6. Turn the unit off after use.
NOTE : CLEAN YOUR HANDS AND SANITIZE THE KIT IN BOILING WATER FOR 2-3
MINUTES EXCEPT THE AIR TUBE BEFORE USING THE BREAST PUMP.
WARNING : USE THE BREAST PUMP AFTER CONSULTING A DOCTOR IN CASE
OF HAVING HEART TROUBLE.
①THIS DEVICE SHOULD NEVER BE LEFT UNATTENDED WHEN PLUGGED IN.
②
CLOSE SUPERVISION IN NECESSARY WHEN THIS DEVICE IS USED NEAR INFANTS OR CHILDREN.
③USE UNIMOM ACCESSORIES ONLY.
④USE THIS DEVICE ONLY FOR ITS INTENDED USE AS DESCRIBED IN THIS
INSTRUCTIONS FOR USE.
⑤NEVER OPERATE THIS DEVICE IF IT HAS A DAMAGED CORD OR PLUG, IF IT IS NOT
WORKING PROPERLY, IF IT HAS BEEN DROPPED OR DAMAGED, DROPPED INTO
WATER, OR IF ANY PARTS ARE BROKEN OR MISSING.
⑥KEEP THE DEVICE AWAY FROM HEATED SURFACES.
⑦NEVER USE WHILE SLEEPING OR DROWSY.
⑧
THE POWER CORD SHOULD BE UNPLUGGED FROM THE OUTLET WHEN NOT IN USE.
⑨DO NOT DISASSEMBLE OR REMODEL THE DEVICE.
⑩DO NOT USE WHERE AEROSOL SPARAY PRODUCTS ARE BEING USED OR WHERE
OXYGEN IS BEING ADMINISTERED.
WARNING : To reduce the risk of burns, electrocution, fire, or injury to persons
Manufacturer : Blue Egg Co.
216-5, Yongmoon-Dong, Seo-Ku, Daejon, Korea
Tel : +82-42-532-9226 Fax : +82-42-533-9225
Weight : 1.5kg Fuse : 3.15AL250VP
MADE IN KOREA
①
②
③
④
⑤
⑥
WARNING : DO NOT CURL THE AIR TUBE.
DO NOT OVERFILL THE BOTTLE MORE THAN 4OZ. LEVEL.
21
Voltage
Rated current
Remark
Frequency
100V~
110V~
120V~
220V~
230V~
240V~
50/60Hz
50/60Hz
60Hz
50/60Hz
50/60Hz
50/60Hz
0.9/0.65A
0.5/0.40A
0.63A
0.42/0.33A
0.25/0.20A
0.24/0.18A
: Type B
: Class II Dispose of through separate collection
route for waste electrical equipment
①
Handle
②
Vacuum control knob
③
Single connector
④
Fuse holder
⑤
Power cord
⑥
Switch
:ON :OFF

Cleaning and sterilization
Components
Trouble shooting
How to thaw
How to assemble
How to store breast milk
1. Place frozen milk in the refrigerator for several hours before use.
2. Before feeding, hold milk under warm running water until the milk is room
temperature.
3. Shake it well when the milk fat may separate.
How to transport and store
Clean all parts thoroughly and wipe main body with a clean damp cloth after each use.
NOTE : WHEN UNIT IS NOT TO BE USED FOR AN EXTENDED PERIOD, STORE CAREFULLY
IN A COOL, DRY PLACE.
NOTE : COOL BREAST MILK IN THE REFRIGERATOR FOR TWO HOURS BEFORE
FREEZING.
WARNING : LABEL REFRIGERATED BREAST MILK WITH THE DATE AND TIME
THE MILK WAS EXPRESSED. DO NOT MIX FRESH MILK WITH REFRIGERATED
MILK.
WARNING : DO NOT THAW FROZEN MILK IN MICROWAVE OVEN.
DO NOT REFREEZE MILK ONCE IT HAS BEEN DEFROSTED.
Room temperature
Refrigerator
Freezer
It’s best if you can directly feed your baby, If you can’t, the storage would be better.
Up to 3 hours
Up to 1 day
Up to 3 months
DO NOT
STORE MILK
IN HOT WEATHER.
Condition
Checks Solutions
Possible
Causes
NOTE : WHEN THE MAIN BODY PRODUCES AN ABNOMAL NOISE OR WHEN THE
BREASTMILK IS OVERFLOWN INTO THE MAIN BODY, CONTACT THE
LOCATION WHERE YOU PURCHASED THE PRODUCT OR THE
MANUFACTURER. WHEN THE BREASTMILK IS OVERFLOWN ONLY TO THE
AIR TUBE, REMOVE IT FROM THE MAIN BODY AND CLEAN IT.
Low
suction
Pain
No
suction
Fuse
Switch
Air tube
Valve head
Membrane
Defective
assembly
Breast
shield
Check if the fuse has
become disconnected
Check if the switch is
turned on.
Check if the air tube is
connected to the main body
Check if they are
assembled to the breast
shield properly
Check the connection of
the kit.
Check if there is a problem
with the breast shield.
See how to assemble and
connect the air tube properly
Disassemble and reassemble
them properly.
Disassemble and reassemble
them.
Purchase and replace the
breast shield.
Membrane
Too high
suction
Check if there is space
between valve head and
membrane.
Check the suction level Start with low vacuum
Consult your lactation
consultant or physician.
Remove any foreign
substances
Replace the correct fuse
followed by specification.
Power cord Check if the power cord
is plugged Plug into the outlet
If the pump does not function
when the switch is turned on,
please contact the location
where you purchased the
product or the manufacturer.
1. Single pumping
2. Double pumping
1. Fit the membrane L into the
valve head K.
3. Screw the bottle B into the
breast shield assembly.
2. Push the valve head
assembly into the bottom
of the breast shield A.
4. Hold the bottle assembly
into the bottle stand F.
Follow the above until 5
6. Connect the other end of
the air tube G to the single
connector D
5. Connect one end of the air
tube G to the breast
shield assembly.
1. Remove valve head and membrane from the breast shield.
2. Clean and sterilize it in boiling water for 2~3 minutes.
3. Pull out the air tube carefully and clean it with washing agent.
4. Clean it at least once a week, but when breast milk gets inside, clean immediately.
NOTE : TO ELIMINATE CONDENSATION OR MILK IN THE AIR TUBE, WASH AND DRY IT
IMMEDIATELY. TO CLEAN MAIN BODY, WIPE MAIN BODY WITH A CLEAN
DAMP CLOTH.
WARNING : NEVER IMMERSE MAIN BODY IN WATER.
DO NOT SANITIZE THE KIT IN MICROVAVE OVEN.
6. Connect the
double
connector M to
the single
connector D.
7. Connect the
other end of the
air tube G to the
double
connector M.
3 4
5 6
Breast shield 2EA
Bottle 2EA
Bottle cover 2EA
Single connector 1EA
Main body 1EA
Bottle stand 2EA
Air tube 2EA
Cap 2EA
Disk 2EA
Nipple 2EA
Valve head 2EA
Membrane 2EA
Double connector 1EA
Accessory name Accessory name
Kit : A + B + C + G + H + I + J + K + L
Symbols
: Date of
manufacture
: Serial number
SN
: Alternating
current
: ON
: OFF
Disposal
Use your local collection and return systems for old electronic equipment. If old
electronic equipment is not disposed of correctly, this can have harmful effects on the
environment and on public health.
Other unimom Breast Pump manuals