unni UN0583 User manual

Digital Wireless Weather Station
OPERATING INSTRUCTION
Base unit: UN0583
Wireless sensor: T056I
If you want to know about our features or support solutions, please let us know! We really
hope that owning an Unni Technology product is not only a practical experience, but also a
pleasure.

Catalogue
Package included
.............................................................................................................3
Technical data
...................................................................................................................3
Base unit.....................................................................................................................3
Wireless sensor.......................................................................................................... 3
Switching adapter.......................................................................................................3
Product functions
............................................................................................................. 4
Weather station......................................................................................................... 4
Wireless sensor.......................................................................................................... 4
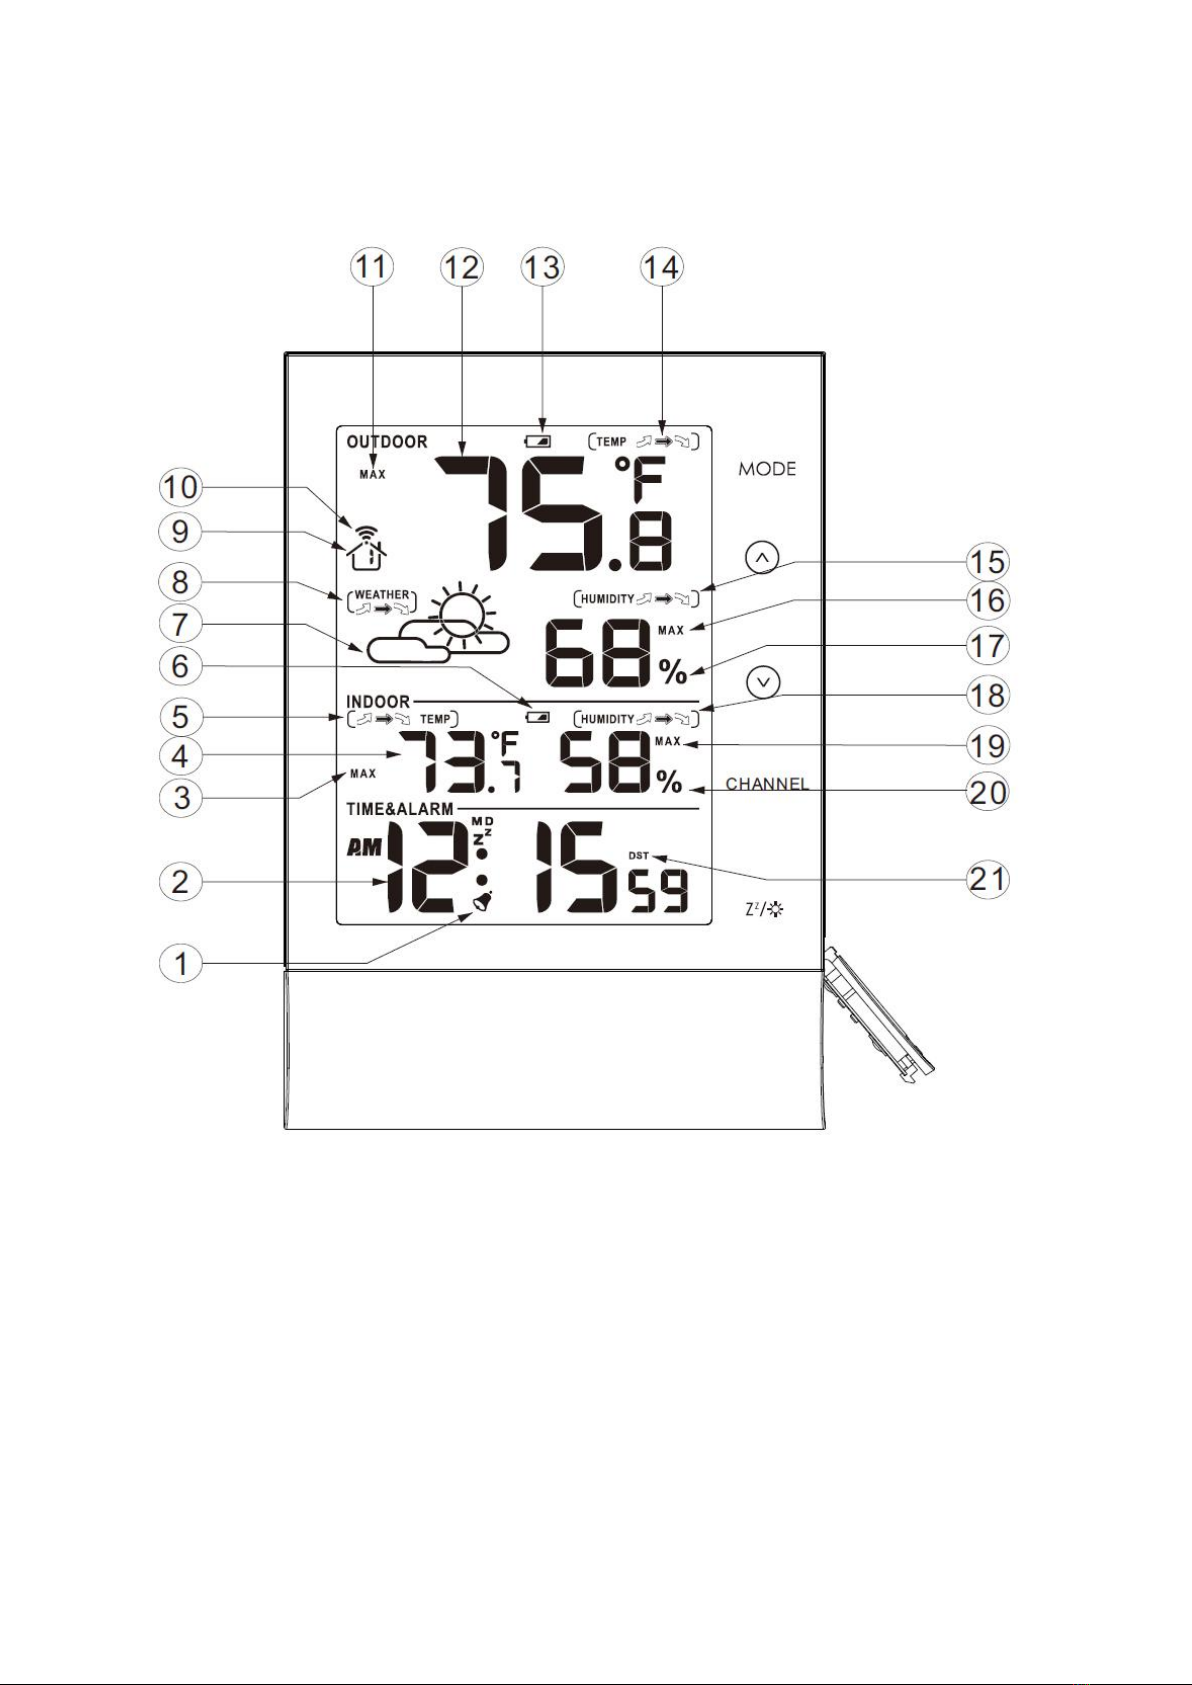
Overview of weather station......................................................................................5
Operating elements and parts of the weather station and wireless sensor............. 6
How to set up
....................................................................................................................7
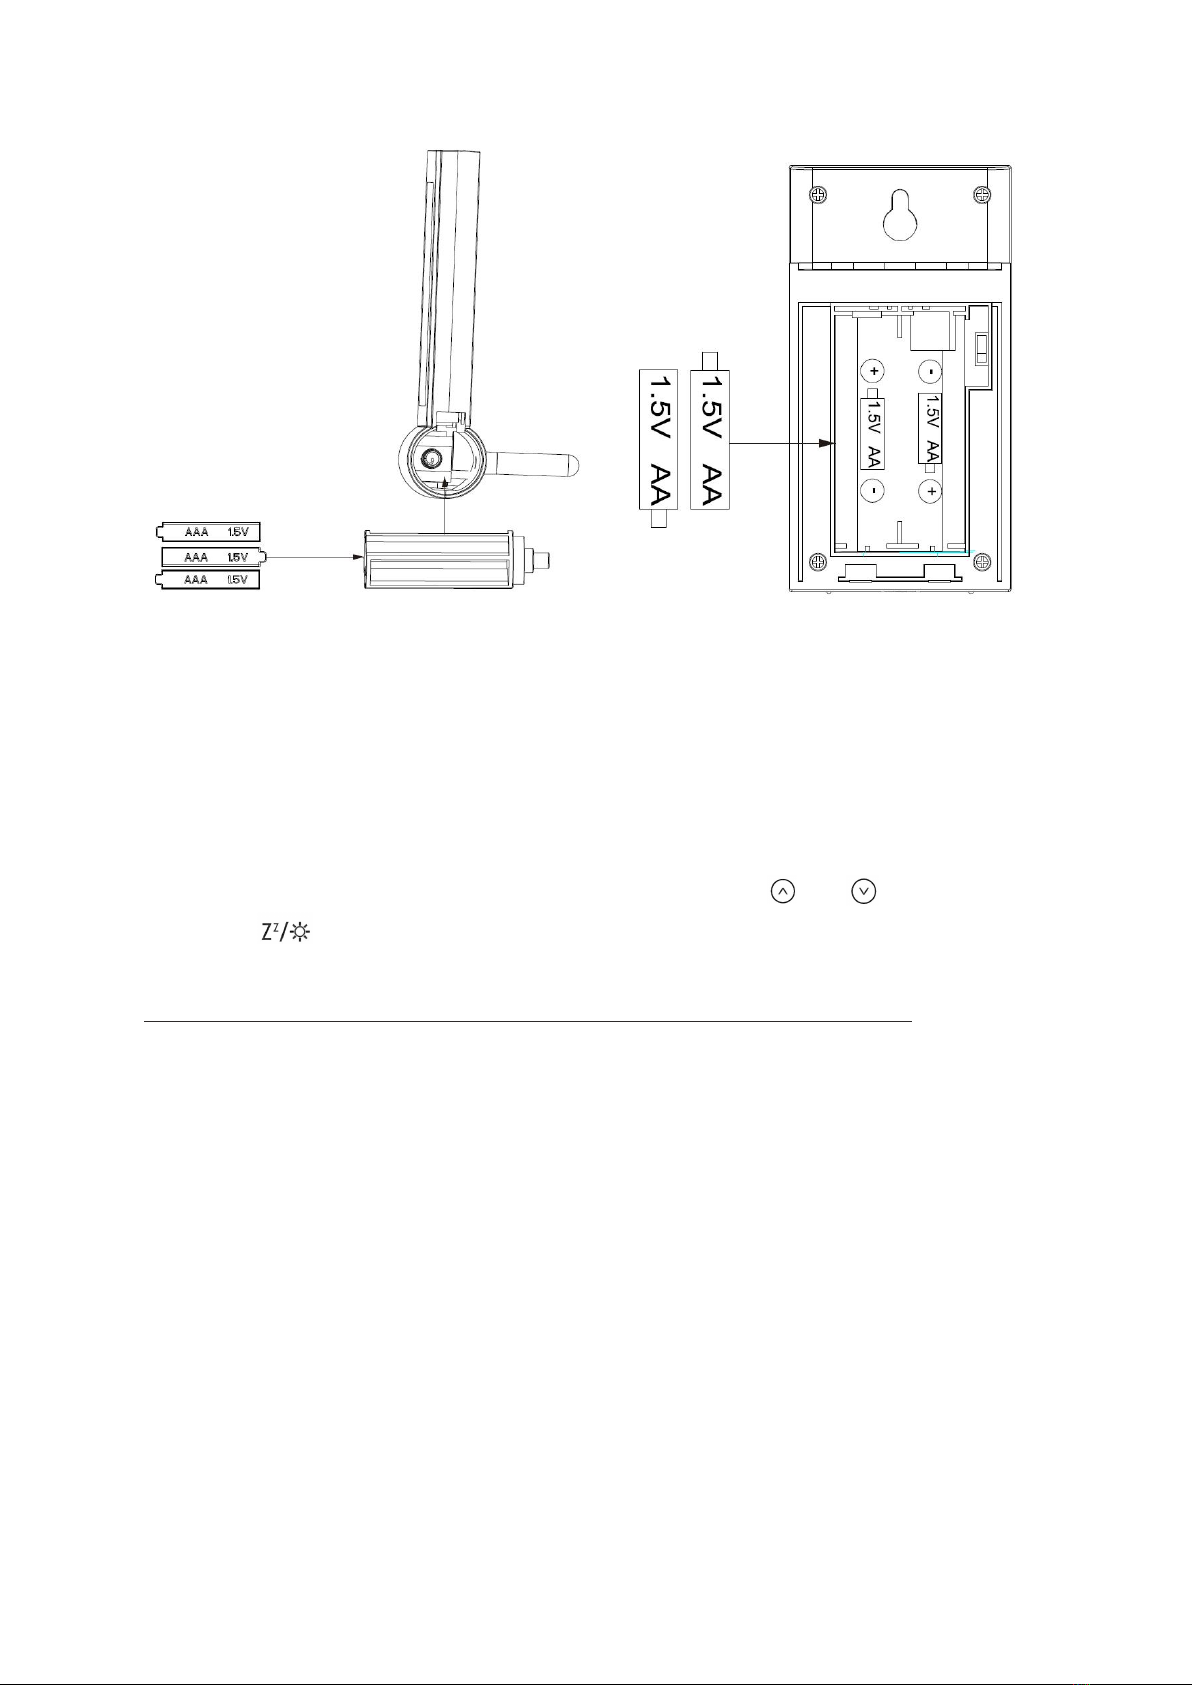
Insert batteries...........................................................................................................
7
Setting the weather symbol
.....................................................................................8
Pairing the outdoor sensor with the weather station..................................................... 8
Setting the basic data................................................................................................. 9
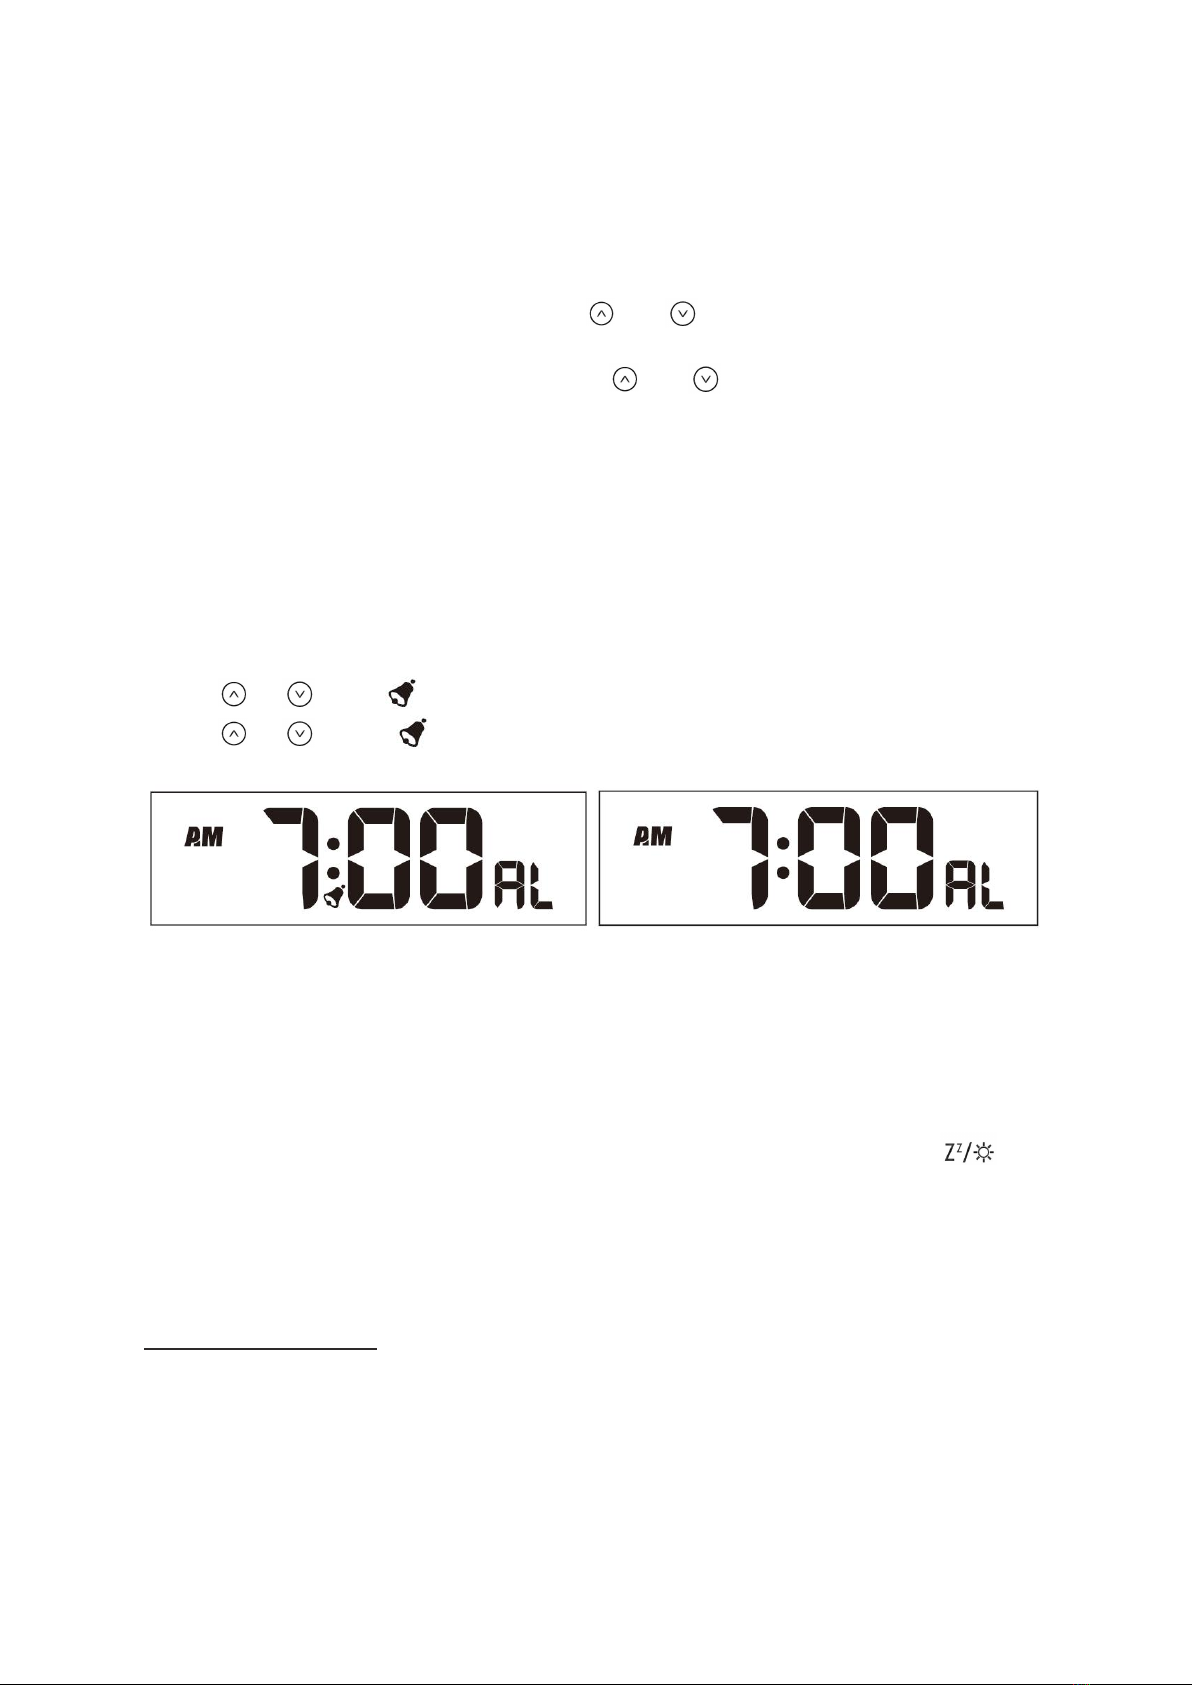
Setting the alarm......................................................................................................10
Deactivate/Activate alarm.......................................................................................
10
Stopping the alarm...................................................................................................10
Other functions................................................................................................................10
Daylight saving time( DST)....................................................................................... 10
Backlight (HI-LOW-OFF)........................................................................................... 11
Low battery Indicator...............................................................................................11
Daily MAX/MIN Data................................................................................................12
Weather trend......................................................................................................... 12
Air pressure trend....................................................................................................
12
Weather forecast icons............................................................................................12
How to add extra sensors............................................................................................... 13
Where the sensor should be placed...............................................................................
14
Where the weather station should be placed................................................................14
Resetting the weather station........................................................................................
14
Care and maintenance.................................................................................................... 14
Safety............................................................................................................................... 15
Danger from electricity(when using the switching adapter.......................................... 15
Unpacking and checking..................................................................................................16
FCC statement................................................................................................................. 16
Disclaimers.......................................................................................................................16
Trouble shooting............................................................................................................. 17
Warranty and support.....................................................................................................17

3
Package included:
•UN0583 weather staon x 1
•T056I wireless sensor x 1
•3 baeries - LR03 type (AAA) / 1.5 V (base unit)
•2 baeries - LR6 type (AA) / 1.5 V (wireless sensor)
•Switching adapter for base unit
•Operang instrucons
Technical data
Base unit
Model: UN0583
Power consumpon: 5.0V 600 mA
Power supply: 3 x LR03 (AAA) / 1.5 V
Temperature measuring range: 14.2°F ~ 122°F
Resoluon: 0.18°F
Temperature measuring accuracy: +/-0.5°F
Humidity measuring range: 1 % to 99 % relave humidity
Humidity measuring accuracy: +/- 2% with a measuring range of 20% to 80%, +/-4% with
measuring range of 1% to 19% and 81% to 99%
Resoluon: 1 %
Temperature and humidity data detecon and sending period: every 30 seconds
Barometric and weather data detecon and sending period: every 1 hour
Wirelesssensor
Model: T056I
Baeries: 2 x LR6 (AA) 1.5 V
Temperature measuring range: - 40°F to 158°F
Protecon type: IPX4: Protecon against splash water from all direcons
Transmission frequency:433 MHz
Range: max. 328 (100 meters) (in open area)
Temperature and humidity data detecon and sending period: every 30 seconds
Switching adapter
Power supply: 100-240V~50/60Hz 0.3A Max
Output: 5.0V 600 mA

4
Note: With the continuous development and improvement of our products, the design and
technology may be changed.
Product functions
Weather station
•High-definition colour display
•12- or 24-hour display
•Alarm with snooze function
•Indoor temperature display in °C/°F
•Indoor and outdoor humidity display
•Outdoor temperature display in °C/°F with up to three wireless sensors at different
measurement sites (delivery includes one wireless sensor)
•Minimum/maximum display for temperature and humidity
•Humidity and temperature trend display
•Weather forecast symbols
•Low battery indicator
•Battery or mains operation
Wireless sensor
•Temperature display in °C/°F
•Humidity display in %
•Range of up to 328 ft (100 meters) (in open area)
•Low battery indicator
•Wall mounting bracket

5
Overview of weather station
1. Alarm symbols
2. Current time
3. Maximum indoor temperature
4. Indoor temperature
5. Indoor temperature trend
6. Low battery indicator for indoor
7. Weather forecast symbol
8. Air pressure trend
9. Current channel of outdoor sensor
10. Outdoor sensor RF signal reception
symbol
11. Maximum outdoor temperature
12. Outdoor temperature
13. Low battery indicator for outdoor
14. Outdoor temperature trend
15. Outdoor humidity trend
16. Maximum outdoor humidity
17. Outdoor humidity
18. Indoor humidity trend
19. Maximum indoor humidity
20. Indoor humidity
21. Daylight saving time (DST) symbol

6
Operating elements and parts of the weather station and wireless sensor
1
Operating buttons
Button MODE
* Display alarm time
* Activate settings mode
* Save changes to settings
Button (Up)
* Set values (increase)
* Display stored MAX and MIN values
Button (Down)
* Set values (decrease)
* Select 12-/24- hour format
Button CHANNEL
* Display weather data from various wireless sensors ( channel 1.2.3)
* Reconnect wireless sensor connection
Button (Snooze/light)
* Illumination backlight
* Active snooze function
* Active setting mode for weather symbol
2
Loop for hanging
3
Adapter port
4
Battery compartment
5
Detachable stand

7
1
Current transmission channel
2
Temperature display
3
Humidity display
4
Red pilot light
5
Symbol for radio frequency connection between base unit and wireless
sensor (display only appears when the transmission is occurring)
6
Loop for hanging
7
Sliding switch 1 2 3: Set sensor number (transmission channel)
8
Battery compartment
Note:
If you are going to use the wireless sensor included in the package, there is no need to
change the transmission channel inside the outdoor sensor.
Changing the transmission channel is only necessary when you are going to add additional
wireless outdoor sensor. See “ How to add extra sensors “ on Page13.
How to set up
Insert batteries
1. Insert 2x AA batteries into your T056I wireless sensor. Pay attention to the correct
polarity. While the sensor is transmitting, the red LED indicator will flash.
2. Use a 5V power cord to plug the weather station into a wall outlet.
(Note: When the weather station only uses batteries, the screen will turn off after 10s and
you will need to touch the button to activate it.)

8
Setting the weather symbol
When the weather station is connected to the adapter or batteries on the first time, it will
enter the weather symbol setting. You can follow below steps.
1.You will see the weather symbol starts flashing, and the default is half sunny. It will
automatically adjust to the correct symbol. However, if you want to shorten the reception
time of the weather station, you can manually adjust it through and button.
2.Press the button to save the setting.
Pairing the outdoor sensor with the weather station
Once the weather station is turned on (plug in or installed batteries), it will start receiving
the pairing RF signals from the outdoor sensor with the same channel for 3 minutes. You can
touch the CHANNEL button on the base unit to match the correct outdoor sensor.
Generally, the outdoor sensor will connect with the base unit automatically. If it doesn’t
connect, please follow below steps to set:
• Ensure that the weather station is in the same channels with the outdoor sensor.
• Long press the CHANNEL button on the base unit to search signal from the outdoor
sensor.
• The sensor receiving icon will flash when searching for the signal.
• After the sensor is connected, the icon will become stable.
• Your weather station will search for the signal each 3 minutes every hour automatically
until it is connected.
Note: After replacing the sensor battery, you need to press and hold the CHANNEL
button of the station to receive again.

9
Setting the basic data
• Press and hold the MODE button for 3 seconds till the DST OFF starts flashing, now you
are in the basic settings.
• To adjust the DST ON/OFF through and button.
• Then press the MODE button to confirm and jump to the next setting.
Below are the setting orders:
1.DST ON/OFF
2.Year
3.Month
4.Date
5.Hour
6.Minutes
7.Temperature: Fahrenheit/Celsius
Note:
All setting can be skipped or ceased if no button is touched or pressed for 20 seconds.
The setting process cannot be interrupted, or you will need to repeat this process to modify
any item.

10
Setting the alarm
There is alarm on the weather station. You can set it through below steps.
1.Long press the MODE button till the time starts flashing.
2.Set the desired hour for the alarm with the and button.
3.Press MODE button to store the setting and enter the minute setting.
4.Set the desired minute for the alarm with the and button.
5.Press MODE button to store the setting. Now the alarm is set and activated.
Note:
The default of the alarm is off.
When the alarm symbol appears in the screen, the alarm is on activated status.
Deactivate/Activate alarm
The alarm clock is off by default and needs to be activated manually.
• press or once: on the display, alarm is activated
• press or twice: disappear, alarm is deactivated
Stopping the alarm
You will be woken by the alarm at the set time, and the sound will become more and more
intense as the alarm continues. You can stop it through below steps:
• Switch off the alarm completely - Press any button on the base unit (apart from
button), to stop the alarm. The alarm will go off again after 24 hours.
• Automatic stop function - If you do not press any buttons, the alarm will automatically
switch off after 2 minutes. The alarm will go off again after 24 hours.
Other functions
Daylight saving time( DST)
The weather station will adapt to winter / summer time automatically when DST is ON.
•Summer time: the second Sunday of March at 1:59 59’changes to 3:00 00’
•Winter time: the first Sunday of November at 1:59 59’changes to 1:00 00’

11
The default of DST is off. If it is on, the DST symbol will appear during the DST period and
display above the "second".
Backlight (HI-LOW-OFF)
•When the base unit is plugged in, the backlight is adjustable: HI-LOW-OFF.
•You can press the button to adjust backlight.
Note: When the base unit is operated by batteries only, the backlight will off after 10s and
you will need to activate it again through pressing the button.
Low battery indicator
•When there is a battery symbol near Outdoor Temperature, you should replace batteries
of the wireless sensor.
•When there is a battery symbol near Indoor Temperature, you should replace batteries of
the weather station.

12
Daily MAX/MIN data
All MAX / MIN temperature/humidity records will reset automatically at 12:00 (midnight).
From normal display, press and release the button to view:
• MAX-- indoor and outdoor temperature/ humidity records.
• MIN-- indoor and outdoor temperature/ humidity records.
Note: Press the button to delete the highest and lowest temperature and humidity
values since midnight.
Weather trend
For the temperature and humidity values measured by the base unit and wireless sensor,
the trend is displayed by an arrow:
Trend rising constant falling
Temperature
Humidity
Air pressure trend
When the air pressure rises again, the symbol will be displayed continuously again.
The arrow shows the weather trend. If it points upwards or downwards, it means that the
weather rises or falls by more than 0.06 inHg (2 hPa) in an hour.
rising air pressure = weather rises
constant air pressure = weather stays the same
falling air pressure = weather falls
Weather forecast icons
• The forecast icons are determined by your station's barometric pressure reading. Please
allow 7-10 days for calibration.
• 7 forecast icons use changing atmospheric pressure to predict weather conditions for the
next 12-hours.
• When Outdoor temperature is below 30.2°F and the forecast shows RAIN or T-STORM, the
station will display SNOW.
Currently displayed symbol means the forecast for the next 12 hours. It may not reflect the
current state of the weather.
The accuracy of the weather forecast is around 75 %.

13
How to add extra sensors
The weather station comes with one wireless sensor. However, you can operate the
weather station with up to three wireless sensors. Additional wireless sensors are available
in our Amazon online shop.
Note:
1. You need to set different channels for the sensor (1-3). You can set it through pull the
stick on near the batteries.
2. Under the corresponding channel displayed on the base unit, press and hold the
CHANNEL button until the signal icon starts to flash to receive the signal from the newly
added sensor.

14
Where the sensor should be placed
1. Sensor can be hung/placed.
2. Better place it under the porch and eaves.
3. The maximum range of the sensor can reach 328ft in an open area.
4. Make sure that the sensor is vertical so that moisture can be drained correctly.
Note:
•Shielding building materials such as reinforced concrete reduce or prevent the radio
reception between the base station and wireless sensor.
•Devices such as televisions, cordless phones, computers and fluorescent tubes can also
interfere with the wireless reception.
•Do not place the base unit and wireless sensors directly on the floor. This restricts the
range.
•In low temperatures in winter the battery performance of the wireless sensors can be
significantly reduced. This reduces the transmitter range.
Where the weather station should be placed
•Pull out the stand and place on a flat surface.
•Or use the hanging holes on the back to mount on a wall.
•Choose a location 6 feet or more away from electronics such as cordless phones, gaming
systems, televisions, microwaves, routers, etc.
•Place within range of the outdoor sensors (330 ft, 100m open air).
•Obstacles such as walls, windows, stucco, concrete, and large metal objects can reduce
the range.
Resetting the weather station
If the base station appears to display incorrect values, you should reset the weather station
to the factory settings.
a. Shut off the main weather station (take out batteries or unplug the power cord).
b. Take the batteries out of the outdoor sensor.
c. Power on the main weather station (put batteries in or plug the power cord).
d. Put batteries back in the outdoor sensor.
e. Put them together within a couple feet for about 20 minutes for a strong connection.
Care and maintenance
•Do not mix old and new batteries.
•Do not mix Alkaline, Standard, Lithium, or Rechargeable Batteries.
•Always purchase the correct size and grade of battery most suitable for intended use.
•Replace all batteries of a set at the same time.

15
•Clean the battery contacts and also those of the device prior to battery installation.
•Ensure the batteries are installed with correct polarity (+ and -).
•Remove batteries from equipment when it is not used for an extended period of time.
•Promptly remove expired batteries.
Safety
Read the following advice carefully and store these operating instructions in case you want
to reread something later. If you give the item to someone else, give them these operating
instructions as well.
•This device may be used by children over 8 years of age and over, as well as by persons
with reduced physical, sensory or mental abilities, or lack of experience and / or knowledge
if they are supervised or instructed regarding the safe use of the equipment and have
understood the resulting hazards.
•Keep the device away from children under the age of 8.
•Cleaning and user maintenance may not be carried out by children unless they are
supervised.
•Children must be supervised to make sure that they do not play with the device.
•The device must not be immersed in water or other liquids. Electric shock hazard! Do not
use the device in areas where it may be wet, such as a sink.
Danger from electricity (when using the switching
adapter)
•Connect the device to a properly installed power socket with a voltage that corresponds to
the Technical Data.
•Ensure that the socket is easily accessible, so that you can quickly remove the switching
adapter if necessary.
•Do not use the wireless weather station if the switching adapter or power cable is
damaged.
•Do not cover the switching adapter with curtains, newspapers, etc. and ensure that it is
sufficiently ventilated. The switching adapter can become hot.
•Uncoil the switching cable fully before connecting. Be careful not to damage the cable
with sharp edges or hot objects.
•Remove the switching adapter from the socket:
- before cleaning the wireless weather station,
- when a fault occurs during operation,
- during thunderstorms,
- always pull the switching adapter, not the cable.
•Do not modify the items or the power cable. Only allow repairs to be carried out by a
specialist workshop as improperly repaired devices endanger the user.

16
Unpacking and checking
1. Remove the device from the packaging, remove all protective films and keep the
packaging materials out of the reach of children.
2. Dispose of the materials separately according to type.
3. Check that all the items that should be included in the delivery are present and whether
the weather station displays any damage.
FCC statement
This device complies with Part 15 of the FCC Rules. Operation is subject to the following two
conditions: (1) This device may not cause harmful interference, and (2) This device must
accept any interference received, including interference that may cause undesired
operation
WARNING: Changes or modifications to this unit not expressly approved by the party
responsible for compliance could void the user’s authority to operate the equipment.
NOTE: This equipment has been tested and found to comply with the limits for a Class B
digital device, pursuant to Part 15 of the FCC Rules. These limits are designed to provide
reasonable protection against harmful interference in a residential installation.
This equipment generates uses and can radiate radio frequency energy and, if not installed
and used in accordance with the instructions, may cause harmful interference to radio
communications. However, there is no guarantee that interference will not occur in a
particular installation. If this equipment does cause harmful interference to radio or
television reception, which can be determined by turning the equipment off and on, the
user is encouraged to try to correct the interference by one or more of the following
measures:
•Reorient or relocate the receiving antenna.
•Increase the separation between the equipment and receiver.
•Connect the equipment into an outlet on a circuit different from that to which the receiver
is connected.
•Consult the dealer or an experienced radio / TV technician for help.
Disclaimers
Manufacturer reserves the right to change specifications of the product.
Manufacturer and supplier are not responsible for malfunction where interference occurs.

17
Trouble shooting
Problem
Possible Solution
Outdoor temperature
is showing dashes
Replace battery
Dashes is generally an indication of wireless interference.
a. Turn off the main weather station (take out batteries or
unplug the power cord)
b. Take the batteries out of the outdoor sensor
c. Turn on the main weather station (put batteries in or plug
the power cord)
d. Put batteries back in the outdoor sensor
e. Let the units sit within a couple feet of each other for about
20 minutes to gain a strong connection.
Display screen not working
Check that the power adapter is plugged into the display and
an electrical outlet.
Accuracy of temperature
and humidity
1. When unpacking for the first time, the weather station and
sensor are sealed for a long time, and it takes 1-2 hours to
balance with the current ambient temperature.
2. Keep away from heat
3. When comparing with other thermometers, it should be
placed in the same position and allowed to stand for 1-2
hours. This is very important.
Inaccurate temperature or
humidity
To ensure accurate temperature measurement, place units
out of direct sunlight and away from any heat sources or
vents.
Warranty and support
Unni Technology, Ltd. provides a 1-year limited time warranty (from date of purchase) on
this product relating to manufacturing defects in materials & workmanship.
Before returning a product, please contact our friendly customer support with questions:
Unni_technology@hotmail.com
This manual suits for next models
1
Table of contents
Other unni Weather Station manuals
Popular Weather Station manuals by other brands

ECG
ECG MS 300 instruction manual

LEGRAND
LEGRAND Netatmo user manual

La Crosse Technology
La Crosse Technology WS-7220U-IT instruction manual

La Crosse Technology
La Crosse Technology WS-7091UD instruction manual

Honeywell
Honeywell TE923WD - Display Unit For Professional Weather Station... user manual

Technoline
Technoline WS 9274 instruction manual