WAREMA EWFS Weather station eco User manual

Operating and installation instructions
EWFS Weather station eco
Keep for future use!
Valid from 01 October 2019
890463_k•en•2019-10-01 We reserve the right to carry out improvements 1
AUTIONC
Never activate buttons on your transmitter
arbitrarily without visual contact to the sun
shading product. Children may not play
with this product - Remote controls or
transmitters may not get into the hands of
children!
OTICEN The receiver (e.g. the radio plug receiver,
radio tubular motor) cannot function in the
event of a power failure. Therefore, raise the
sun shading system early enough in case of
an approaching storm.
The radio control range is limited by legal regulations for
radio systems and by structural factors. Adequate radio
reception must be taken into consideration when planning
the system. This is particularly important when the radio
signal must pass through walls and ceilings. The control
unit should not be installed in the immediate vicinity of
metal components (steel beams, steel-reinforced concrete,
fire door).
Therefore, check that the receiver is functioning
properly before the final installation.
Strong local transmitter systems (e.g. baby monitors or
neighbouring transmitters) can interfere with the reception.
Installation
This device is designed for surface mounting on a building
facade. It can also be mounted on a pole using the
included cable ties.
Included fixing materials:
2 screws 4.5 x 40 mm
2 dowels 6mm
2 spacers for wall and ceiling installation (Fig. 2)
2 steel cable ties 360 mm
Use suitable fixing materials only. Depending on the
substructure (e.g. plastered outer insulation), other screws
and dowels may need to be used.
Important information on the installation location
Attach the device outdoors at a readily accessible but
raised location.
Metal-clad buildings, domestic interference sources
(unshielded household appliances, television sets,
computers), supply lines and metallic objects such
as sheet metal enclosures must have a distance of at
least 0.5 m from the weather station.
Install the device in a position in which the wind
wheel is horizontal (housing inclination of 15°). When
installing the device on sloped surfaces, the sensor
can be positioned horizontally using the joint (Fig. 1).
General information
14
23
5
Fig. 1 EWFS Weather station eco
1 Solar panel
2 Photo diodes (photo sensor)
3 Wind wheel (wind sensor)
4 Joint
5 Mounting plate with cover
A USB connecting cable to the alternative power
supply during commissioning is found under the cover.
The EWFS Weather station eco enables the wireless
control of sun shading drives and is equipped with
sensors for brightness and wind speed. The station is
solar powered. The device sends move commands to
EWFS-compatible receivers.
Intended use
The EWFS Weather station is an electronic device
to control sun shading systems. The approval of the
manufacturer must be obtained for uses outside of the
purposes listed in these instructions.
Safety instructions
ARNINGW
An automatically controlled mechanism
may begin to move unexpectedly!
Therefore, never place any objects in the area of
movement of an automatically controlled mechanism.
Disconnect the power supply of the controlled sun
shading products before maintaining or cleaning the
products.

890463_k•en•2019-10-01
We reserve the right to carry out improvements
2
When selecting the installation location, ensure that the
solar panel is sufficiently supplied with sunlight. For
example, an overhanging roof may shade the panel at
certain times of the day. Also avoid installing it on the
north face of buildings.
Before installing the device, consider that trees, bushes
or parts of the building may shade the photo sensor
during the course of the day. In this case, the sensor
cannot deliver exact values and the results will be
incorrect. Therefore, select the installation location
carefully.
When selecting an installation location, ensure that
the photo sensor is exposed to the same brightness
conditions as the sun shading product being
controlled. This means that you need to position the
photo diodes according to the building facades being
shaded. Ideally, the weather station is oriented in the
same direction as the sun shading product being
controlled.
Mount the device in the vicinity of the sun shading
product although not in places where the sun shading
product affects the wind currents; otherwise, the sensor
will not provide correct wind readings.
Separate spacers are included for wall and ceiling
installation. They prevent cracking and deformation of
the plastic (Fig. 2).
Fig. 2 Clipping the separate spacers into the threaded hole
Additional installation information can be found in the
documentation of your sun shading product.
Mounting plate
4,5
9,0
207,5
4,5
9,0
56
185
Fig. 3 Dimensions
Wall mounting
Fig. 4 Wall mounting
Clip one of the included spacers in the threaded hole
(horizontally or vertically, Fig. 2).
Attach the weather station to a suitable substructure
using the accompanying screws and dowels as shown
(Fig. 4).
The USB line must be correctly positioned in the guide
on the back of the mounting plate to ensure it is not
pinched during installation.
Tighten the screw on the joint.
Ceiling installation
Fig. 5 Ceiling installation
Loosen the screw on the weather station joint.
Swing the mounting plate of the weather station up by
90° (or by the necessary angle).
Tighten the screw on the joint.
Clip one of the included spacers in the threaded hole
(horizontally or vertically, Fig. 2).
Attach the weather station to a suitable substructure
using the included screws and dowels as shown (Fig. 5).
The USB line must be correctly positioned in the guide
on the back of the mounting plate to ensure it is not
pinched during installation.
Pole installation
Fig. 6 Pole installation and steel cable ties locking mechanism

3
890463_k•en•2019-10-01 We reserve the right to carry out improvements
Remove the thin (triangular) pieces at the top and
bottom edge of the mounting plate using a wire cutter
(Fig. 6*).
Pass the included steel cable ties through the
mounting plate openings as shown. The cable tie
closures must face outward.
Attach the weather station to a securely mounted pole.
Ensure that it is oriented correctly and that the cable is
not pinched during installation.
Turn both ends of the cable tie inwards, one at a time,
using needle-nosed pliers. Check that the weather
station cannot be turned.
Tighten the screw on the joint.
Operating elements
6
7
9
8
10
Fig. 7 Operating elements, view from below, factory setting
6 Wind: Wind speed limits can be preselected using
this switch.
7 LED: Flashes green when the L button is
pressed (or red if the battery voltage is low). Flashes
red (three at a time) while a wind alarm is active.
8 Brightness: Brightness limit values can be
preselected using this switch.
9 Learn button: For learning the weather station into
a receiver. This button must be held down until the sun
shading system waves once. If the button is held down
until the sun shading product stops moving, the wind
and brightness evaluation is learned into the receiver
as well.
10 On/off button: To switch the weather station on or
off, press and hold the button for at least 5 seconds
until the status LED lights up once (green = switched
on, red = switched off).
Commissioning
You can find instruction videos on our
YouTube channel at:
http://www.youtube.com/user/SonnenLichtManager/videos
To be able to commission the weather station as early
as 5 minutes later, it can be charged using the USB port
(Fig. 8).
Open the cover of the mounting plate and pull out the
USB cable found inside.
Connect the USB cable to a laptop or to a separately
available USB charger.
Wait approx. 5 minutes for the weather station to
charge fully.
Then press the button for at least 5 seconds.
The status LED lights up green once. The device is
now switched on and ready for operation.
Leave the device connected via USB throughout the
commissioning procedure.
Fig. 8 USB connection of the weather station
As an exception: commission without USB
If the power supply is not possible via USB, you can
also proceed as follows. However, if the product is not
commissioned swiftly, the energy stored in it up to that
point may not be sufficient to complete commissioning.
After installation, the weather station must be exposed
to daylight for at least 30minutes.
Then press the button for at least 5 seconds.
The status LED lights up green once. The device is
now switched on and ready for operation.
Symbols used
When the receiver is delivered, it does not "know" any
transmitters initially and first needs to learn to which
transmitters it should respond. We refer to this process as
"learning".
Power-up: To learn in a receiver, you must
de-energize a receiver or group of receivers,
either at the in-line circuit breaker or at the
associated plug-in connector, and then
switch it back on again after approx. 5
seconds. (Power-up procedure). Always
carry out a power-up procedure when you
see the symbol of the circuit breaker.
The receiver is now in learn mode for
approx. one minute. The training key on the
transmitter must be pushed within this period
or the learning mode is closed. Push the the
training key on your transmitter whenever
you see the symbol of the training key.
Wave: After the learn button on the
transmitter is activated, the connected
sun shading system carries out several
movements. In these instruction, we use the
adjacent symbol for waving. Waving once:
Press the learn button on the transmitter,
wait until the connected sun shading
system moves and then release the button
immediately.

890463_k•en•2019-10-01
We reserve the right to carry out improvements
4
Learning in the weather station
The weather station sends wind- or brightness-related
move commands to an EWFS receiver. It must be learned
into the receiver first.
OTICEN The weather station must be charged before
commissioning to enable fault-free operation
(see Commissioning). The weather station can
only be learned in as an auxiliary channel.
Example: You would like to operate an external venetian
blind with a 1-channel hand-held transmitter (I) and control
it with the weather station based on brightness and wind
values.
1
Ι
= Master channel = Auxiliary channel
Fig. 9 Controlling a external venetian blind with a hand-held
transmitter (I) and a weather station.
Perform the following steps consecutively:
Place receiver1 into learn
mode: Perform the power-
up procedure on external
venetian blind1.
Learn in the hand-held
transmitter (I) as the master
channel: Take the hand-held
transmitter (I), press and hold
the learn button, the external
venetian blind1 waves once,
release the button.
The learn mode is ended
automatically. The hand-held
transmitter (I) is now the
master channel for external
venetian blind1.
External venetian blind1 can now be operated with the
hand-held transmitter (I).
Now learn the weather station into the receiver as an
auxiliary channel:
For this function, the wind
speed limit may not be set to
TEST and the brightness limit
value may not be set to OFF
at the weather station.
Place receiver1 into learn
mode: Take the hand-held
transmitter into which the
master channel was just
learned (I), press and hold
the learn button, external
venetian blind1 waves once,
release the button.
Ι
Ι
Learn in the weather station
as an auxiliary channel:
Press the button on the
weather station and hold it
until the sun shading system
stops moving (the external
venetian blind waves twice).
Release the button. The
weather station is now an
auxiliary channel for external
venetian blind1. The wind
and brightness evaluation
was learned in at the same
time.
End the learn mode: Take
the hand-held transmitter with
the master channel (I) and
press the "Up" or "Down"
button.
External venetian blind1 now can also be controlled
with the weather station.
The weather station evaluates the brightness and
wind speed data and controls the sun shading system
accordingly.
Testing the weather station
Perform the following steps to test the functions of the
weather station.
In the previously described learning procedure, the wind,
precipitation and photo sensors were learned in together.
If you discover during the test that one of the sensors was
not learned in (e.g. due to electromagnetic interference), it
must be learned in again separately.
OTICEN If a sensor that has already been learned in is
learned in again, it is learned out.
Example: During the learning procedure, only
the wind sensor was learned in. If the learning
procedure is repeated, the photo sensor is
learned in but the wind sensors is learned out
at the same time.
1. Test the wind monitoring function
Move the "Wind" switch on the weather station to the
TEST position. Move the sun shading system down
slightly and cause the wind wheel to turn rapidly. The
sun shading system should now move up as a wind
alarm is triggered. The sun shading system now cannot
be operated for the duration of approx. 1minute (wind
alarm).
OTICEN In the TEST position, the duration of the wind
alarm is only approx. one minute, after which
the system can be operated again. For all other
settings (see the adjacent limit value table) a
wind alarm takes approximately 10minutes.
The TEST setting should not remain set during
normal operation since the weather station
otherwise continuously sends a wind alarm
(high power consumption).
Ι

5
890463_k•en•2019-10-01 We reserve the right to carry out improvements
If the sun shading system does not move up, the wind
sensor may not have been learned. To test whether the
wind sensor was correctly learned into the receiver:
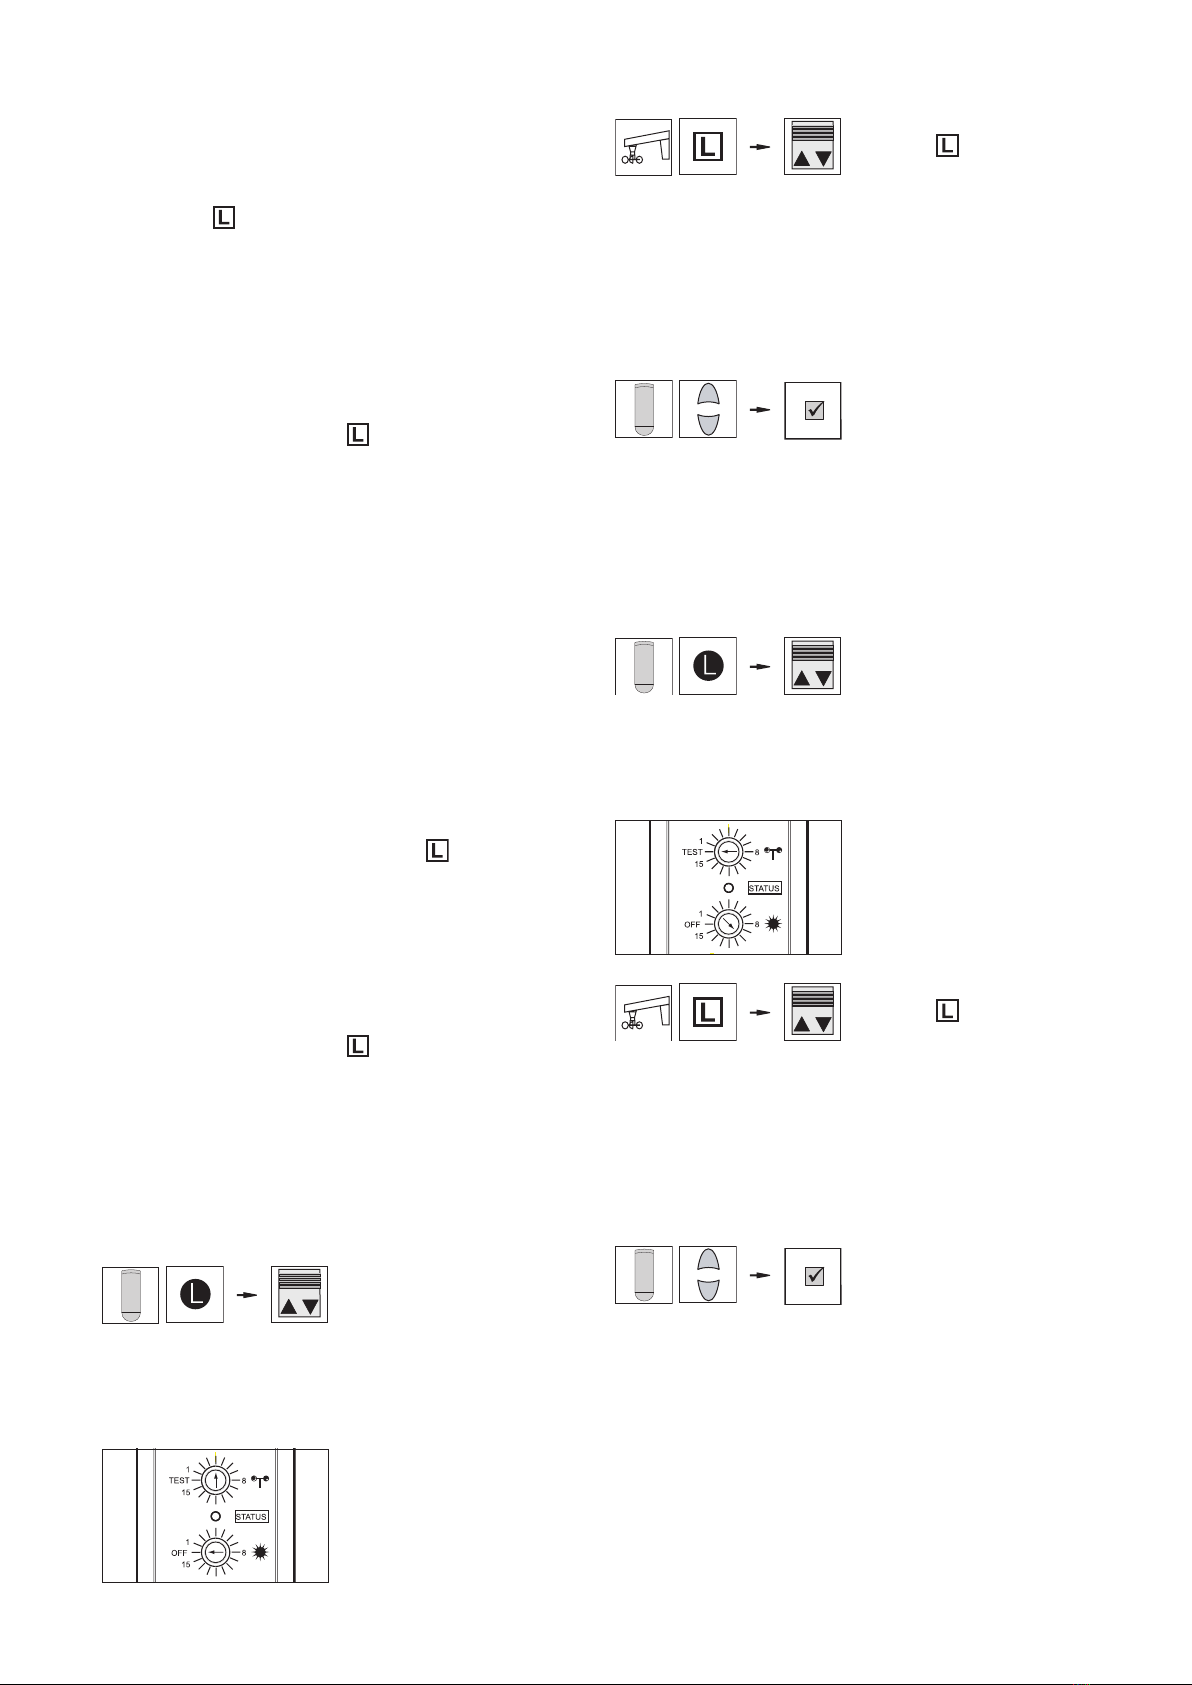
Move the "Wind" switch on the weather station to any
position other than TEST. Move the "Brightness" switch
to OFF. Lower the sun shading system slightly and
press the button on the weather station.
If wind monitoring has been learned in correctly, the
sun shading system moves down for approx. one
second.
If the sun shading system does not move during this
test, wind monitoring was not learned in. Learn in wind
monitoring again separately (see „Learning in functions
individually“).
OTICEN In this test, EWFS tubular motors do not
respond when the button is pressed.
2. Test the sun control
Move the sun shading system manually to its middle
position.
Move the "Wind" switch on the weather station to the
TEST position and the "Brightness" switch to position
"1".
Trigger a wind alarm: Cause the wind wheel to turn
quickly and hold on to the wheel as soon as the sun
shading system moves out.
After 1 or 2 minutes the sun shading system must
move down again.
If the sun shading system does not move down, the photo
sensor may not have been learned. To test whether the
photo sensor was learned into the receiver correctly:
Move the "Brightness" switch on the weather station to
any position other than "OFF". Move the sun shading
system down slightly and press the button on the
weather station.
If the sun control was learned in correctly, the sun
shading system moves down for approx. one second.
If the sun shading system does not move during this test,
the sun control was not learned in. Learn in the sun control
again separately (see „Learning in functions individually“).
OTICEN In this test, EWFS tubular motors do not
respond when the button is pressed.
Learning in functions individually
If problems arose when learning in the weather station of a
sun shading product, the functions can be learned into the
sun shading product separately later on.
Learning the wind monitoring function individually
Perform the following steps consecutively:
Place receiver1 into learn
mode: Take the hand-held
transmitter into which the
master channel was learned
(I), press and hold the learn
button, external roller blind1
waves once, release the
button.
Set the switches on the
weather station: The "WIND"
switch is located in any
position other than "TEST",
and the "Brightness" switch is
in the "OFF" position.
Ι
Learn in wind monitoring:
Press the button on the
weather station and hold it
until the sun shading system
stops moving (the external
venetian blind waves once).
Release the button. The
weather station is now an
auxiliary channel for external
venetian blind1. Wind
monitoring was learned in at
the same time.
End the learn mode: Take
the hand-held transmitter with
the master channel (I) and
press the "Up" or "Down"
button.
Wind monitoring is now learned into the sun shading
product.
Learning in the sun control individually
Perform the following steps consecutively:
Place receiver1 into learn
mode: Take the hand-held
transmitter into which the
master channel was learned
(I), press and hold the learn
button, external roller blind1
waves once, release the
button.
Set the switches on the
weather station: The "WIND"
switch is located in the
"TEST" position and the
"Brightness" switch is in any
position other than the "OFF"
position.
Learn in the sun control:
Press the button on the
weather station and hold it
until the sun shading system
stops moving (the external
venetian blind waves once).
Release the button. The
weather station is now an
auxiliary channel for external
venetian blind1. The sun
control was learned in at the
same time.
End the learn mode: Take
the hand-held transmitter with
the master channel (I) and
press the "Up" or "Down"
button.
The sun control is now learned into the sun shading
product.
Return the wind monitoring setting back to the original
value.
Ι
Ι
Ι

890463_k•en•2019-10-01
We reserve the right to carry out improvements
6
Changing the limit values
AUTIONC
Changing these settings may impair
the safety of the system or reduce its
effectiveness. It is better to consult an expert
if you are not sure about the effect of a
change.
Set the limit values as required for your system (to
the product most sensitive to the wind) based on the
following table.
Wind speed limit Photo limit
"Wind"
switch
position
Wind speed
limit (m/s)
"Brightness"
switch
position
Brightness
limit value
(klx)
TEST Test OFF Off
1 2 1 5
2 3.5 2 15
3 6 3 20
4* 7.5* 4 25
5 9 5 30
6 10.5 6 35
7 12 7 40
8 13.5 8 45
9 15 9 50
10 16.5 10* 55*
11 18 11 60
12 19.5 12 65
13 21 13 70
14 22.5 14 80
15 25 15 >90
*= Factory setting
Operation
Switching the sun control on/off temporarily
("A" button)
To temporarily switch off the sun control for a channel into
which the weather station has been learned in using the A
button:
Press the Abutton and hold until the sun shading
system stops moving. Release the button again.
The sun control is now switched off for 12hours.
After this period, the sun control is reactivated again
automatically.
To reactivate the sun control with the Abutton:
Press and hold the Abutton. Release the button again
when the sun shading system waves.
The sun control is active again.
OTICEN The sun control can be switched off temporarily
with the master channel or with the auxiliary
channels.
Switching the sun control on/off permanently
Set the switch for the sun control on the weather
station to OFF.
The weather station stops sending brightness-related
move commands.
Set the switch for the sun control on the weather
station to the previous value to switch the sun control
back on.
Cleaning
Photo sensors or solar panels must always be clean
to avoid incorrect measuring values and to ensure
operating reliability. The device should occasionally be
checked for soiling (e.g. bird droppings) and cleaned
carefully. Standard household cleaners may be used.
Do not use solvents.
In snowfall, check daily that the solar panel and
photodiodes are free of snow. A snow-covered weather
station may fail to function properly. If the energy in the
buffer is depleted, the weather station fails completely.
It resumes normal operation after it is recharged via
the solar panel.
The weather station may ice over and the wind wheel
may freeze up in extreme weather conditions. To avoid
wind damage, take your sun shading system out of
operation until wind monitoring can be resumed.
Never remove firmly attached layers of ice and snow.
Scratching, heat and chemical antifreeze agents may
damage the weather station.
Maintenance
There are no parts within the device that require
maintenance.
Strong vibrations at the installation location (for example,
from frequent high wind loads) can loosen the fixing
screws. If the joint screw is not properly tightened, the
orientation of the weather station may change as well.
Therefore, check from time to time that the weather
station is still firmly installed and that all screws are
sufficiently tight.
Liability
Failure to comply with the product information in these
instructions and use of the device in a manner that
contravenes its intended use and purpose may result in
the manufacture refusing to honour warranty claims for
product damage. In this case, liability for consequential
harm to persons or damage to property will also be
excluded. Follow also the instructions in the operating
manual of your sun shading system. The automatic or
manual operation of the sun shading system when iced
over as well as using the sun shading system during
severe weather may cause damages and must be
prevented by the user by taking suitable precautions.
OTICEN The device meets the requirements on
interference resistance and interference
emission for use in residential and commercial
areas.
Disposal
After its use, the device must be disposed off according to
legal regulations or returned to your local recycling centre!
Heartbeat function

7
890463_k•en•2019-10-01 We reserve the right to carry out improvements
The weather station cyclically sends a so-called "heartbeat
pulse" to all receivers into which it is learned.
If the receiver does not receive measuring values for 24h,
it is assumed that the weather station has failed (heartbeat
function). The receiver moves the connected product to
a safe position. Depending on the type of sun shading
product, operation is limited or impossible until a new valid
value is received. This is a safety function and not an error.
AUTIONC
If you force the sun shading system to move
down by repeatedly activating the DOWN
button when the weather station has failed,
the safety functions are not active. The sun
shading system may become damaged
(e.g. due to high winds).
Technical data
EWFS Weather station eco
Min. typ. Max. Unit
Supply
Operating duration with full
buffer (in darkness (0 lx) 18 Hr.
Operational at 5 klx after...
(5 klx corresponds roughly
to the brightness in shade)
30 min
Operational when
connection via USB
charger
5 min
RF transmitter
Transmission frequency 433.92 MHz
Transmission power 10 dBm
Range (environment
without interference) 30 m
Wind measurement
Wind speed 2 25 m/s
Locked time in case of
wind alarm 10 min
Brightness measurement
Brightness 5 100 klx
Switch-off delay
(if brightness falls below
60% of the set limit value)
10 min
Enclosure
Dimensions in mm
(L×W×H) 278 × 118 × 207 mm
Degree of protection IP43
Safety class III
Miscellaneous
Conformity
Available at www.warema.de/ce
This device meets the EMC directives for use in
residential and commercial areas.
WAREMA Renkhoff SE declares herewith that this
radio system type [EWFS Weather station eco] is in compliance
with the current guidelines.
Ambient conditions
Operating and storage
temperature -20 60 °C
Humidity
(non-condensing) 10 40 100 %RH
Degree of soiling 2
Article numbers
EWFS Weather station eco 1002 810
USB charger 1002 879
WAREMA Renkhoff SE
Hans-Wilhelm-Renkhoff-Strasse 2
D-97828 Marktheidenfeld
Germany

890463_k•en•2019-10-01
We reserve the right to carry out improvements
8
Troubleshooting
Type of malfunction Possible cause Remedy
The sun shading system does not wave
when the button is pressed (the status
LED flashes green while the button is
pressed)
The receiver is not in learn mode Place the receiver into learn mode
No operating voltage at the receiver Switch on the mains voltage
The sun shading system is driven by the
EWFS tubular motor
For design reasons, EWFS tubular motors
do not respond when the button is
pressed
The sun shading system does not wave
when the button is pressed (the status
LED flashes red while the button is
pressed)
Insufficient sunlight to operate the weather
station
The weather station must be exposed
to daylight for at least 30 minutes after
installation or supplied via the USB port.
Check the installation location if necessary.
When activated with the transmitter, the
sun shading system moves down only
briefly and then back up
A wind alarm was triggered Wait 10 minutes until the wind alarm is
cleared. Then repeat the move command
The sun shading system retracts even in
low winds.
Wind limit value set too low Set the correct wind speed limit after
consulting the specialist dealer.
The wind speed limit depends on the most
wind-sensitive product controlled by the
weather station.
The sun shading system does not retract
in high winds
Wind limit value set too high Lower the wind speed limit
The weather station is installed in an area
protected against the wind
Check mounting position
The sun shading system is not lowered in
sunshine
Brightness limit value set too high Decrease the value incrementally
The sun shading system does not move
up in cloudy weather
Brightness limit value set too low Increase the value incrementally
The sun shading system unexpectedly
moves up for no apparent reason
There is insufficient sunlight to operate
the weather station or the weather station
cannot be received. The sun shading
system is retracted for safety reasons
Wait for sufficient sunlight, clean the
weather station, check the installation
situation
No communication between the weather
station and the sun shading system or
the EWFS Plug receiver (interference from
unrelated transmitters or device faulty)
Switch off unrelated transmitters, check
that the device is operating properly
The sun shading system can only be
lowered in stages and stops after 5
seconds
There is insufficient sunlight to operate the
weather station. The sun shading system
can be operated normally again when it
has sufficient power.
Wait for sufficient sunlight, clean the
weather station, check the installation
situation
Move commands of the weather station
are executed only sporadically
Interference through unrelated transmitters Switch off unrelated transmitters (baby
monitors)
There are reinforced concrete covers or
steel-reinforced concrete walls between the
weather station and receiver
Reduce the distance to the receiver
Table of contents
Other WAREMA Weather Station manuals
Popular Weather Station manuals by other brands

Bresser
Bresser Meteotime instruction manual

Oregon Scientific
Oregon Scientific WMR86 user manual

La Crosse Technology
La Crosse Technology WS-9115 instruction manual

Oregon Scientific
Oregon Scientific RGR202 user manual

ALDI
ALDI Sempre GT-WS-10s operating instructions

Oregon Scientific
Oregon Scientific EB312E instruction manual