US Blaster USB 7363 User manual

Contents
1. Foreword .................................................................................................. 3
2. Safety Instructions ................................................................................... 4
3. Operating controls.................................................................................... 5
4. Assembling the turntable
4.1 Assembling revolving deck.................................................................... 6
4.2 Fastening counterweight ....................................................................... 6
4.3 Setting needle pressure......................................................................... 6
4.4 Setting antiskating compensation ......................................................... 7
5 Assembling dust cap................................................................................. 7
5. Using the turntable
6. Replacing element ................................................................................... 8
7. Technical specifications........................................................................... 9

US Blaster Turntable USB 7363 User Guide 2
1. Foreword
Congratulations with the purchase of the US Blaster DJ Sound Turntable USB 7363. You now have a
high-quality belt-driven turntable.
You must assemble the separate components of the turntable in the correct way. You can read how to
do so, and how you have to set up the turntable components, in this user guide.
US Blaster recommends that you read this manual before you start using the DJ Sound Turntable
USB 7363.
If you have questions, please contact:
Package contents
We recommend that you check all the components are included in the pack before using the turntable.
If anything is missing, we recommend you contact your supplier!
The pack must contain the following components:
•the turntable base;
•dust cap;
•separate counterweight;
•revolving platform;
•magneto-dynamic element;
•45 rpm adapter;
•English user guide.

US Blaster Turntable USB 7363 User Guide 3
2. Safety instructions
Before you start using your DJ Sound Turntable USB 7363 you must be aware of the following safety
instructions!
This equipment contains
components with an
electric power supply.
This current is strong
enough to cause electric
shocks if touched.
WARNING!
Do not open the appliance! You run the risk of
getting an electric shock. The appliance should
only be opened by a qualified professional.
The exclamation mark is
intended to warn the
user of important
maintenance and
operating instructions in
the manual for the
appliance.
1. First read the user guide thoroughly.
You should be aware of the safety instructions and pperating instructions before use.
2. Follow the instructions
Only then can US Blaster guarantee the proper functioning of your DJ Sound Turntable USB 7363.
3. Cleaning
Do not use any cleaning products to clean your DJ Sound Turntable USB 7363.
Use a dry cloth.
4. Moisture and sunlight
Do not use the DJ Sound Turntable USB 7363 in a humid environment, and put it in a place where
there is no direct sunlight.
5. Setting up
Put the DJ Sound Turntable USB 7363 on a level, stable base.
6. Power supply
The DJ Sound Turntable USB 7363 is only suitable for connection to the electricity mains with a
voltage of 220V.
7. Cabling
For you safety, first make sure that the power cable is neatly tucked away along the walls and
similar. No heavy objects should be placed on the mains power cable.
8. Metal and damp
Make sure that no metal objects or moisture can get into your DJ Sound Turntable USB 7363.
If this happens by accident: turn off your DJ Sound Turntable USB 7363 and disconnect it from the
power supply.
Seek advice from a qualified professional.
9. Repair
Do not attempt to repair the DJ Sound Turntable USB 7363 yourself should it become defective.
Always use a qualified service technician.

US Blaster Turntable USB 7363 User Guide 4
3. Operating controls
Top view Rear view
1 ....... 45 rpm adapter. You can use this adapter if you want to play Singles (45 rpm).
2 ....... On/off switch.
3 ....... Revolving deck.
4 ....... Stroboscope light. This shines on the marking on the side of the revolving deck. You can use
the stroboscope light for the precise adjustment of the turning speed.
5 ....... Start/stop switch You use this to start or stop the revolving deck turning.
6 ....... Counterweight.
7 ....... Setting antiskating compensation.
8 ....... Arm lift. You can use this lever to place the needle on the record or lift it off again.
9 ....... Locking pick-up arm. You can use this to temporarily fix the pick-up arm, for example if you are
not using the turntable.
10 ..... Pick-up arm. The pick-up arm contains the MD element-holder (12) and the counterweight (6)
11 ..... Revolution regulator. You can use this slide control to set the turning speed of the revolving
deck.
12 ..... Holder for the cartridge with the pick-up element. The cartridge (‘the needle’) is fixed in the
holder and can be covered with the special protective cap.
13 ..... RPM indicator. Depending on the speed selected with the rpm knobs (14 and 15) the light above
the relevant RPM selection knob lights up the rpm.
14 ..... Switch for 33 rpm (revolutions per minute). This switch is used if a long-play (LP) record is being
played.
15 .... switch for 45 rpm (revolutions per minute). This switch is used if a Single or Maxi Single record
is being played.
16 ..... Dust cap
17 ..... Output connectors. Use these plugs to connect the turntable to an amplifier, receiver or mixer.
18 ......Mains power cable. You can use this cable to connect the turntable to the mains power supply
(220V!).
In the user guide the aforementioned operating controls are indicated using brackets ( ).

US Blaster Turntable USB 7363 User Guide 5
4. Assembling the turntable
Your turntable is supplied partly disassembled. You can read how to assemble the different
components below.
4.1 Assembling revolving deck
Put the revolving deck (3) on the turntable spindle. There are two brad openings in the revolving deck.
Turn one of these openings so that the driving spindle is visible through it. Then connect the driving
belt to the revolving deck so that it covers the driving spindle.
Assembling revolving deck Fastening driving belt
4.2 Fastening counterweight
Screw the separate counterweight (6) on to the
pick-up arm, until it can't be turned any more. Do
not screw the counterweight on to the arm!
Fastening counterweight
4.3 Setting needle pressure
Put the control for the antiskating compensation
(7) in the 0 position. Then remove the protective
cap (12) of the MD element.
Now move the arm carefully to the revolving deck
(not above it!) and lower it with the lever (8).
The needle may not make contact with the
revolving deck!
Turn the counterweight on the end of the pick-up arm so that the arm is completely balanced.
Not correct Arm is balanced Not correct

US Blaster Turntable USB 7363 User Guide 6
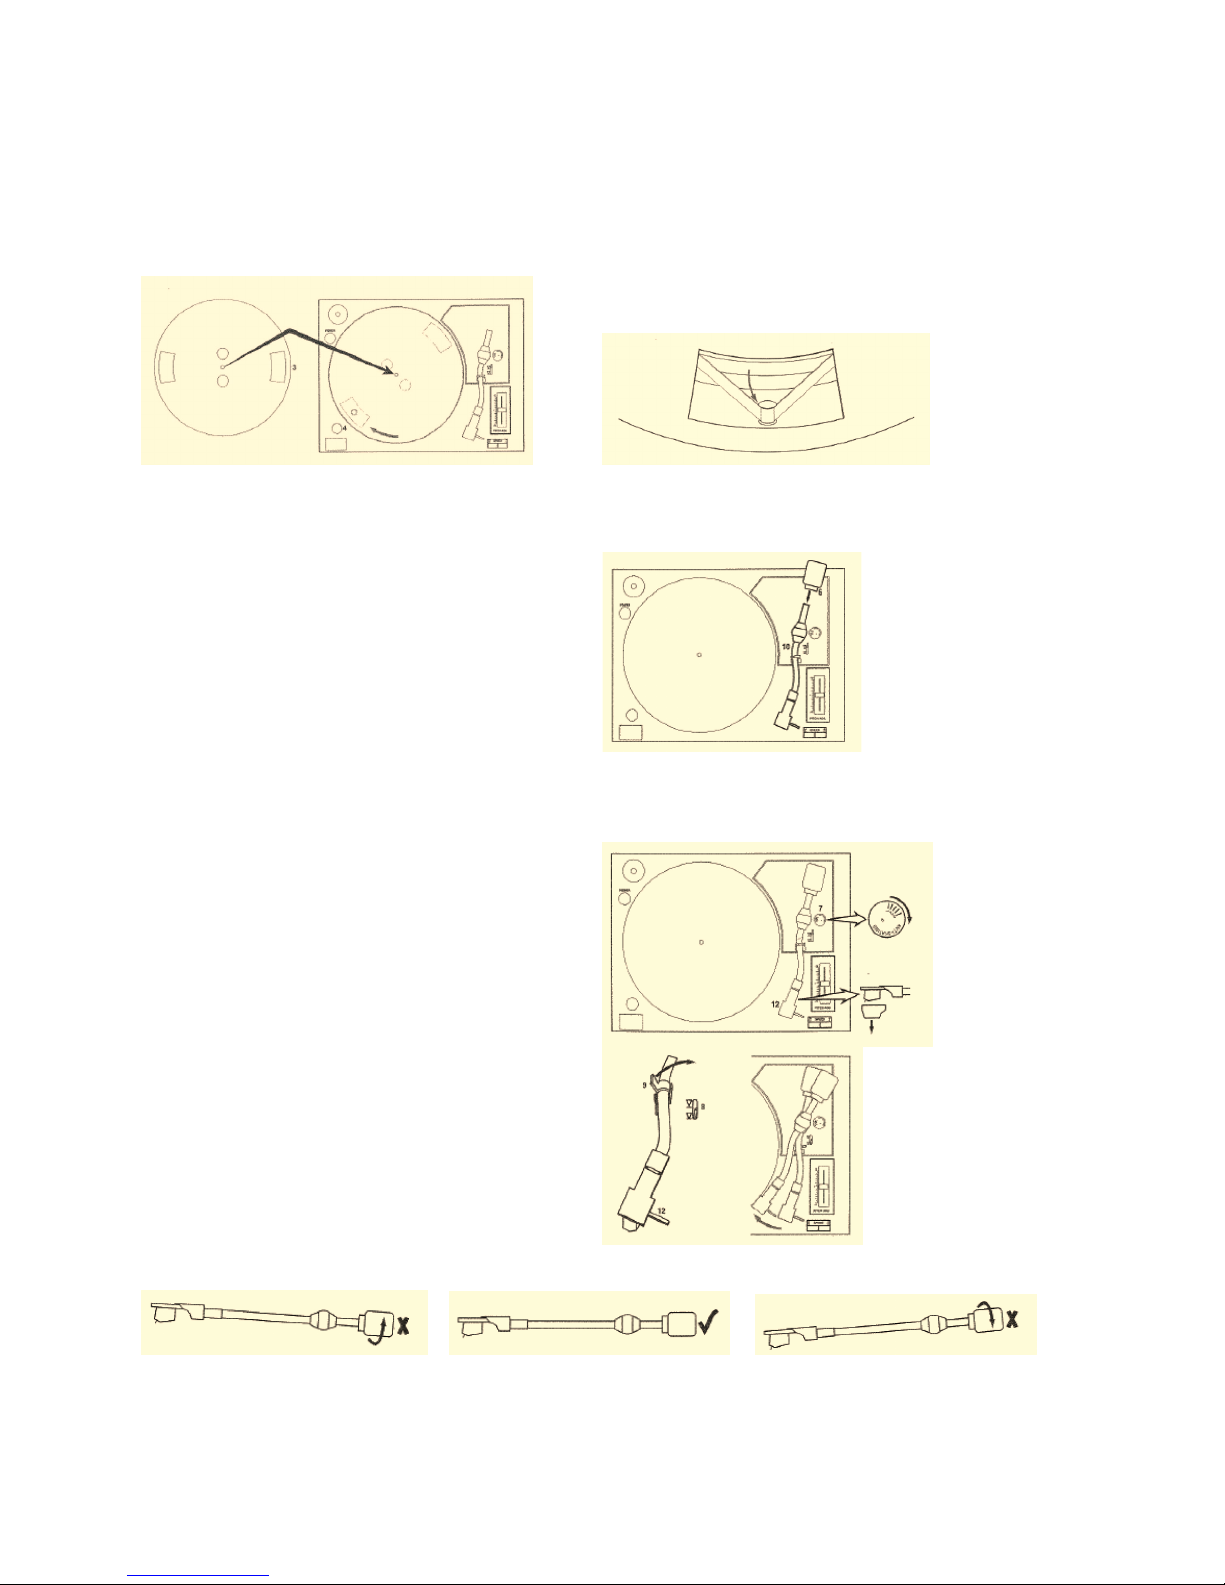
Put the lever (8), with which you have just lowered the arm, back again. Now put the arm carefully
back in the arm holder and lock it. Then also fasten the protective cap back on to the element.
You can now set the numbered ring by the counterweight in such a way that the value 0 is level with
the line on the pick-up arm.
The scale on the ring indicates the weight of the needle pressure in grams. Depending on the element
that you have fitted in your pick-up arm, you can set the correct needle pressure.
You do this by turning the counterweight so that the numbered ring is set to the desired weight.
For the element supplied with the turntable you have to set the needle pressure to 2 (2 grams).
Setting ring in balanced position Setting needle pressure
4.4 Setting antiskating compensation.
The antiskating compensation enables the needle to be set correctly for the record. If this angle is not
correct (the needle does not go into the groove on the record straight) you will not get the optimal
sound from the record, and there is an increased chance of extra wear to the record. The antiskating
compensation prevents this.
The rule of thumb is that the antiskating compensation is more or less the same as the needle
pressure.
Set the control for the antiskating compensation (7) to 2 therefore, if you are using the supplied
element.
Setting antiskating compensation
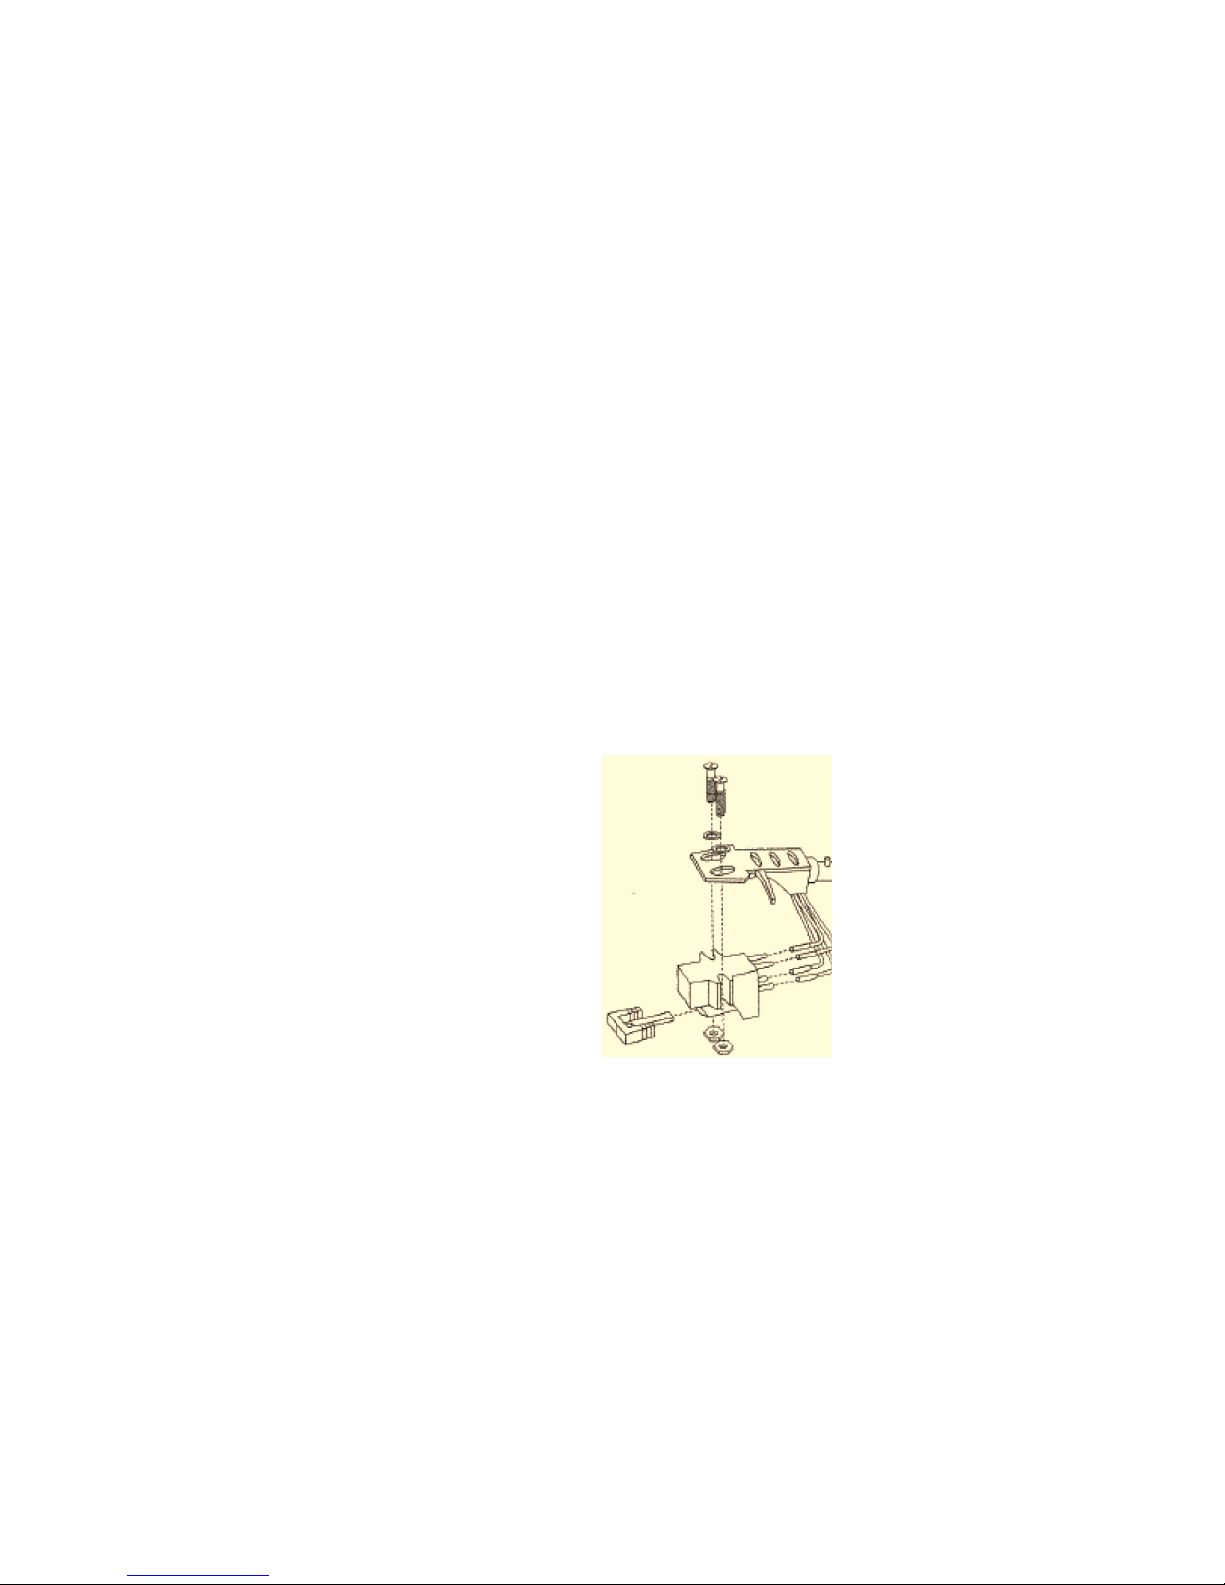
4.5 Assembling dust cap
Now you can set up the turntable, you can fit the
dust cap. You can slide the hinge on the
underside of the dust cap into the intended
grooves. Then you can fit the dust cap on the
turntable.

US Blaster Turntable USB 7363 User Guide 7
5. Using the turntable
If you have carried out all the actions described so far, the appliance is now ready to use.
You can connect the turntable to an amplifier or audio mixing desk using the pre-fitted cinch cables.
Do not forget to attach the extra mass cable to the amplifier or mixing desk. If you don't do this you run
the risk of hearing extra buzz or noise on the loudspeakers.
Using the turntable is relatively simple.
Select the correct rpm using the rpm switch (14/15). Use – if necessary – the separate adapter (1) for
singles.
Position the pick-up arm above the starting groove of the LP record or single and press the start button
(5). Then lower the arm on to the record using the operating lever (8).
If you have listened to (part of) a record you can follow the above process in the reverse order;
Lift the arm off the record with the operating lever (8) and then press the start/stop button (5). After you
have placed the arm back in its intended holder, you can take the record off the revolving deck.
6. Replacing the MD element
Your turntable has a universal element holder. You can replace the supplied element with one from
another manufacturer, as desired.
the fastening for the element – also for other manufacturers –is completely standardised. The
fastening method is shown in the diagram below. It is important, when assembling, that the connecting
cables are properly connected.
White:+ Left channel
Blue: - Left channel
Red: + Right channel
Green: - Right channel
If you do not connect the connections correctly to the element you run the risk that the audio
information from an LP record or single not, or only partially, being audible.

US Blaster Turntable USB 7363 User Guide 8
Technical specifications
Length of pick-up arm ..............................................................................211 mm
Dimensions of revolving deck.....................................................................300 mm
Speeds.........................................................................................................33 1/3, 45 rpm
Speed control (pitch)...................................................................................± 8 %
Start time .....................................................................................................<0.5 sec
Stopping speed ...........................................................................................<1/4 revolution
Rumble ........................................................................................................-55 dB (DIN 45544)
Power...........................................................................................................24 Watt
Dimensions .................................................................................................430 x 120 x 370 mm
Weight..........................................................................................................3.0 kg
Table of contents
Other US Blaster Dj Equipment manuals