Valcourt FM0400 User manual

READ AND KEEP THIS MANUAL FOR REFERENCE
Printed in Canada (07/06/2013)
Installation and operation manual
MASONRY HEATER
www.valcourtinc.com
Stove Builder International Inc.
250, rue Copenhague, Saint-Augustin-de-Desmaures (Quebec) Canada G3A 2H3
Telephone : (418) 878-3040
is manual is available for free download on the manufacturer’s web site. It is a copyrighted document.
Re-sale is strictly prohibited. e manufacturer may update this manual from time to time and cannot be
responsible for problems, injuries, or damages arising out of the use of information contained in any manual
obtained from unauthorized sources.
model FM0400/FM1000/FM1200/FM1500

THANK YOU FOR CHOOSING THIS APPLIANCE
Valcourt is a renowned North American manufacturer of masonry heaters who proudly stands behind the
quality and performance of all its products. We hope you will get the greatest possible satisfaction from using
this product.
In the pages that follow you will nd general advice on wood heating, detailed instructions for safe and eec-
tive installation, and guidance on how to get the best performance from this stove as you build and maintain
res, and maintain your wood heating system.
We recommend that our wood burning hearth products be installed and serviced by professionals who are
certied in the United States by NFI (National Fireplace Institute®) or in Canada by WETT (Wood Energy
Technical Training) or in Quebec by APC (Association des Professionnels du Chauage).
Congratulations for making such a wise purchasing decision. We want to thank you for the condence you
have shown in choosing one of our products. We strive to meet your requirements and needs by oering you
top quality products.
When this stove is not properly installed, a house re may result. To reduce the risk of re, follow the in-
stallation instructions. Contact local building or re ocials about restrictions and installation inspection
requirements in your area.
Please read this entire manual before you install and use your new stove. Failure to follow instructions may
result in property damage, bodily injury, or even death. It is important that you follow the installations
guidelines exactly.
You may need to obtain a building permit for the installation of this stove and the chimney that it is con-
nected to. Consult your municipal building department or re department before installation to determine
the need to obtain one. We recommend that you also inform your home insurance company to nd out if
the installation will aect your policy. Do not install in a mobile home.
REGISTER YOU WARRANTY ONLINE
To receive full warranty coverage, you will need to show evidence of the date you
purchased your unit. Keep your sales invoice. We also recommend that you register
your warranty online at
http://www.valcourtinc.com/warranty-registration.aspx
Registering your warranty online will help us track rapidly the information we
need on your unit.

Heater model installaon and operaon manual
Table of Content
PART A – OPERATION AND MAINTENANCE....................... 4
Safety Information ...................................................... 4
General Information .................................................... 5
Fuel ................................................................. 6
Operating Your Heater .................................................. 10
Maintaining Your Wood Heating System .................................... 12
PARTIE B - INSTALLATION ...................................15
Safety Information ..................................................... 15
Foundation .......................................................... 16
Clearances to Combustible Material........................................ 18
e Venting System .................................................... 22
Appendix 1: Installation of an outside air intake .............................. 27
Appendix 2 : Parts list .................................................. 28
Appendix 3: View of all heater parts ....................................... 29
LIMITED 5-YEARS WARRANTY ...................................30

Heater model installaon and operaon manual
PART A - OPERATION AND MAINTENANCE
Please see Part B for installation instructions.
Safety Information
Summary of Operation and Maintenance Cautions and Warnings
HOT WHILE IN OPERATION, KEEP CHILDREN, CLOTHING AND FURNITURE AWAY. CON-
TACT MAY CAUSE SKIN BURNS. GLOVES MAY BE NEEDED FOR STOVE OPERATION.
USING A STOVE WITH CRACKED OR BROKEN COMPONENTS, SUCH AS GLASS OR FIRE-
BRICKS OR BAFFLES MAY PRODUCE AN UNSAFE CONDITION AND MAY DAMAGE THE
STOVE.
OPEN THE AIR CONTROL FULLY BEFORE OPENING FIRING DOOR.
THIS STOVE IS NOT DESIGNED TO BE USED WITH THE DOOR OPEN. THE DOOR MAY
BE OPEN ONLY DURING LIGHTING PROCEDURES OR RELOADING. DO NOT LEAVE THE
STOVE UNATTENDED WHEN THE DOOR IS SLIGHTLY OPENED DURING IGNITION. AL-
WAYS CLOSE THE DOOR AFTER IGNITION.
NEVER USE GASOLINE, GASOLINE-TYPE LANTERN FUEL (NAPHTHA), FUEL OIL, MOTOR
OIL, KEROSENE, CHARCOAL LIGHTER FLUID, OR SIMILAR LIQUIDS OR AEROSOLS TO
START OR ‘FRESHEN UP’ A FIRE IN THIS STOVE. KEEP ALL SUCH LIQUIDS OR AEROSOLS
WELL AWAY FROM THE STOVE WHILE IT IS IN USE.
DO NOT STORE FUEL WITHIN HEATER MINIMUM INSTALLATION CLEARANCES.
BURN ONLY SEASONED NATURAL FIREWOOD.
DO NOT BURN:
GARBAGE OF ANYKIND;
COAL OR CHARCOAL;
TREATED, PAINTED OR COATED WOOD;
PLYWOOD OR PARTICLE BOARD;
FINE PAPER, COLORED PAPER OR CARDBOARD;
SALT WATER DRIFTWOOD, OR
RAILROAD TIES.
DO NOT ELEVATE THE FIRE BY USING A GRATE IN THIS STOVE.
THIS APPLIANCE SHOULD BE MAINTAINED AND OPERATED AT ALL TIMES IN ACCOR-
DANCE WITH THESE INSTRUCTIONS.
4

Heater model installaon and operaon manual
General Information
Specications
Fuel type Cordwood
Test standards (safety) ULC S627, UL 1482
Zone Heating - How to get the most of it
Your new heater wood stove is a space heater, which means it is intended to heat the area it is installed in, as well as spaces that
connect to that area, although to a lower temperature. is is called zone heating and it is an increasingly popular way to heat
homes or spaces within homes.
Zone heating can be used to supplement another heating system by heating a particular space within a home, such as a basement
family room or an addition that lacks another heat source.
Houses of moderate size and relatively new construction can be heated with a properly sized and located wood stove. Whole house
zone heating works best when the stove is located in the part of the house where the family spends most of its time. is is nor-
mally the main living area where the kitchen, dining and living rooms are located. By locating the stove in this area, you will get
the maximum benet of the heat it produces and will achieve the highest possible heating eciency and comfort. e space where
you spend most of your time will be warmest, while bedrooms and basement (if there is one) will stay cooler. In this way, you will
burn less wood than with other forms of heating.
Although the stove may be able to heat the main living areas of your house to an adequate temperature, we strongly recommend
that you also have a conventional oil, gas or electric heating system to provide backup heating.
Several factors will contribute to make zone heating benecial to you, including the right location and size of the heater, the size,
layout and age of your residence, as well as your climate zone. Second homes used over three seasons annually can generally be
heated with smaller stoves than homes heated throughout the winter.
e Benets of Low Emissions and High Performance
e low smoke emissions produced by the special features inside the heater’s rebox mean that your household will release up to
90 percent less smoke into the outside environment than if you used an older conventional stove. But there is more to the emis-
sion control technologies than protecting the environment.
e smoke released from wood when it is heated contains about half of the energy content of the fuel. By burning the wood com-
pletely, your stove releases all the heat energy from the wood instead of wasting it as smoke up the chimney. Also, the features inside
the rebox allow you to reduce the air supply to control heat output, while maintaining clean and ecient aming combustion,
which boosts the ecient delivery of heat to your home.
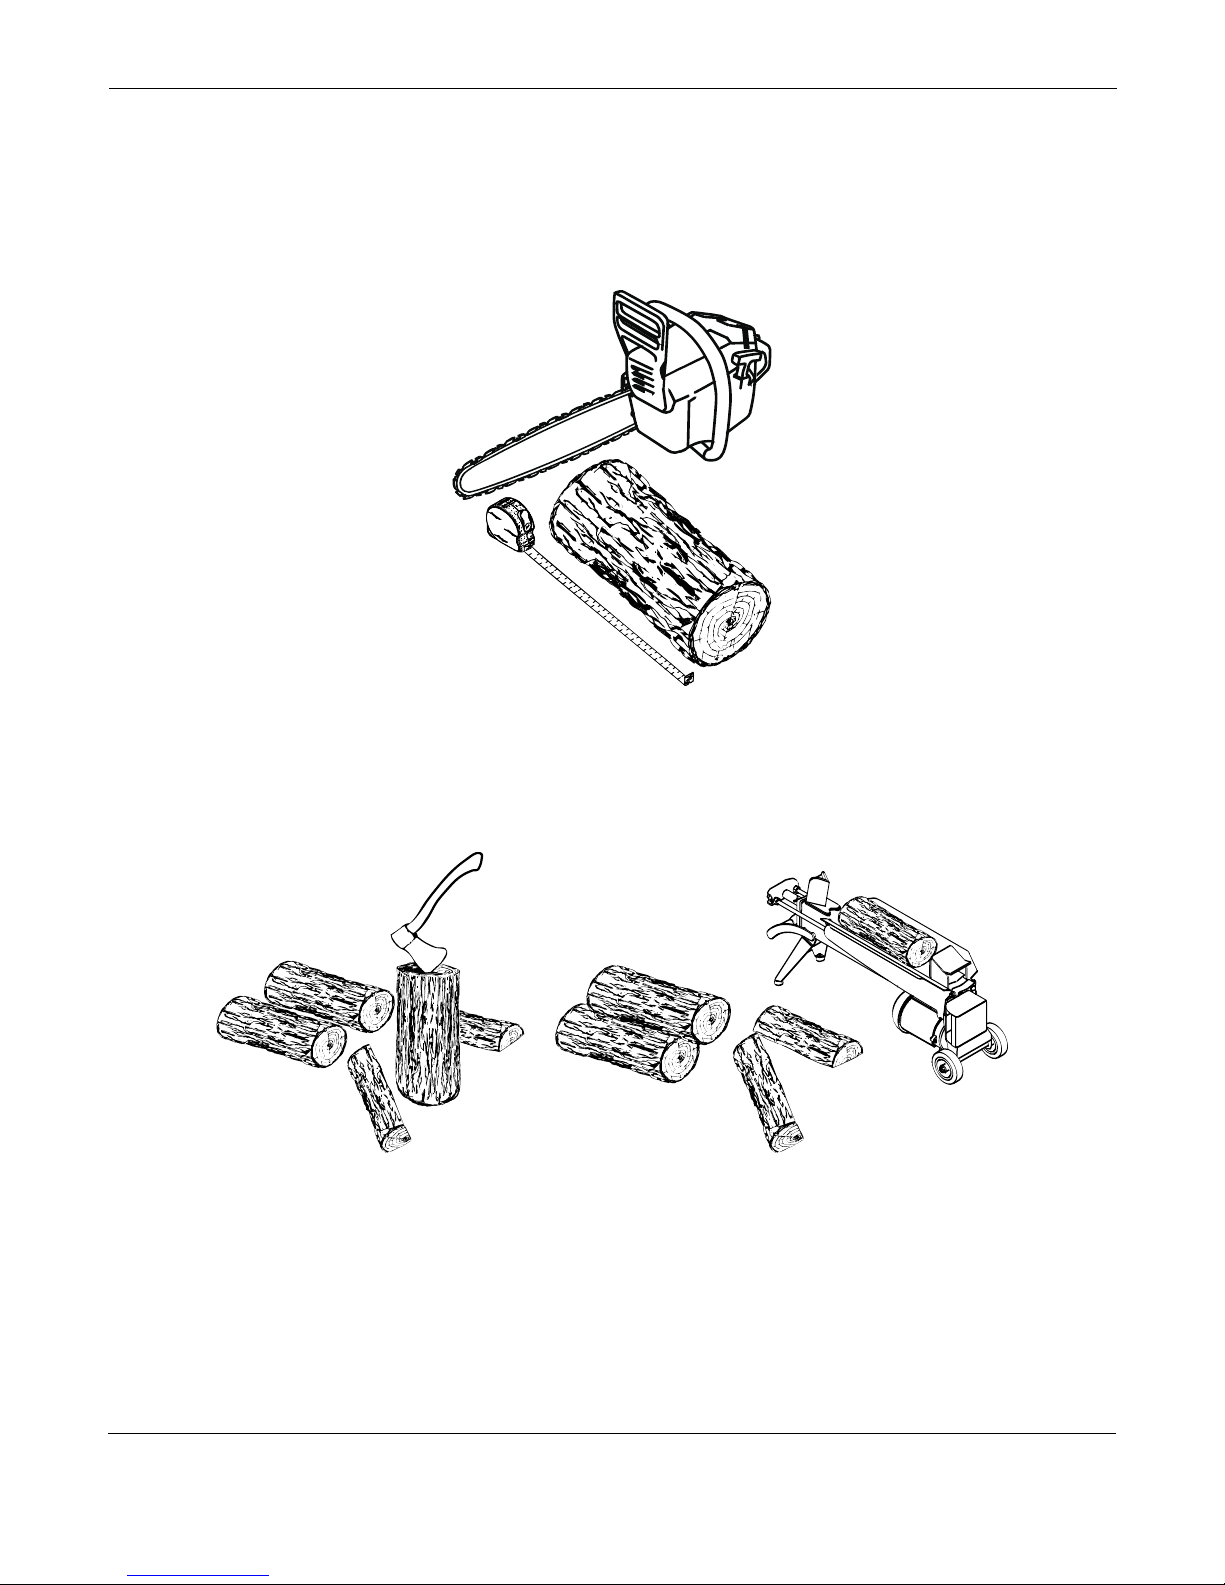
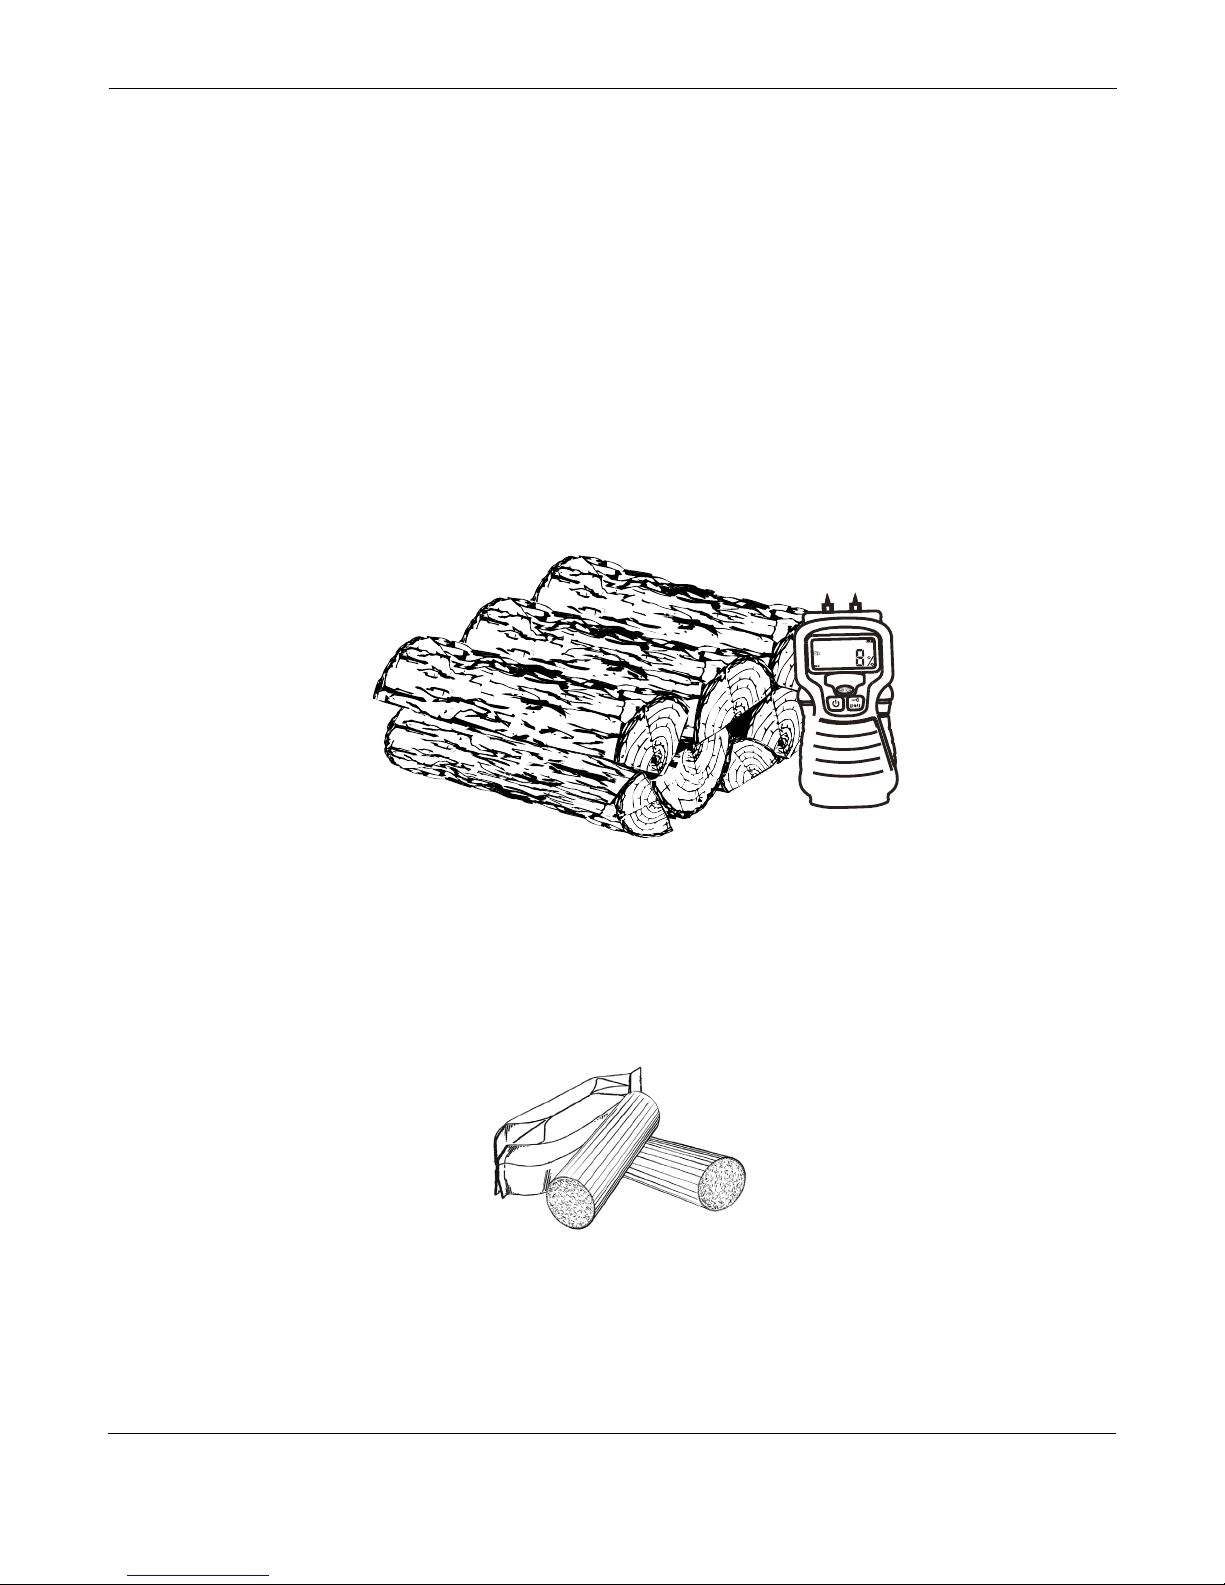
e emission control and advanced combustion features of your stove can only work properly if your fuel has an average moisture
content below 18 percent. See fuel section (page 6) of this manual for suggestions on preparing fuelwood and judging its moisture.
What is Your New Heater Made Of?
Steatite or soapstone is a natural stone quarried in the Province of Quebec in Canada. It contains the right mix of talc and magne-
tite to successfully store heat and withstand very high temperatures. As soapstone is inert, it is not hazardous to human health.
Vermiculite is used as rewall. It’s a mineral extracted from large mines in China, Russia, South Africa and Brazil. Potassium sili-
cate is used as a binder to form a rigid board. Vermiculite can withstand temperatures above 2000°F. It is not considered hazardous
waste. It is recommended to dispose of it in a landll.
e door and glass gaskets are breglass which is spun from melted sand. Black gaskets have been dipped into a solvent-free solu-
tion. Disposal at a landll is recommended.
5

Heater model installaon and operaon manual
e door glass is a 5 mm thick ceramic material that contains no toxic chemicals. It is basically made of raw earth materials such as
sand and quartz that are combined in such a way to form a glass at high temperatures. Ceramic glass will not re-melt in the same
way as normal glass, so it should not be recycled with your regular household products. Disposal at a landll is recommended.
Fuel
Materials at Should Not be Burned
GARBAGE OF ANY KIND;
COAL OR CHARCOAL;
TREATED, PAINTED OR COATED WOOD;
PLYWOOD OR PARTICLE BOARD;
FINE PAPER, COLORED PAPER OR CARDBOARD;
SALT WATER DRIFTWOOD;
MANUFACTURED LOGS CONTAINING WAX OR CHEMICAL ADDITIVES;
RAILROAD TIES;
LIQUIDS SUCH AS KEROSCENE OR DIESEL FUEL TO START A FIRE.
How to Prepare or Buy Good Firewood
What is Good Firewood?
Good rewood has been cut to the correct length for the stove, split to a range of sizes and stacked in the open until its moisture
content is reduced to 15 to 20 per cent.
Tree Species
e tree species the rewood is produced from is less important than its moisture content. e main dierence in rewood from
various tree species is the density of the wood. Hardwoods are denser than softwoods. People who live in the coldest regions of
North America usually have only spruce, birch and poplar, other low-density species to burn and yet they can heat their homes
successfully.
Homeowners with access to both hardwood and softwood fuel sometimes use both types for dierent purposes. For example,
softer woods make good fuel for relatively mild weather in spring and fall because they light quickly and produce less heat Soft-
woods are not as dense as hardwoods so a given volume of wood contains less energy. Using softwoods avoids overheating the
house, which can be a common problem with wood heating in moderate weather. Harder woods are best for colder winter weather
when more heat and longer burn cycles are desirable.
Note that hardwood trees like oak, maple, ash and beech are slower growing and longer lived than softer woods like poplar and
birch. at makes hardwood trees more valuable. e advice that only hardwoods are good to burn is outdated. Old, leaky cast
iron stoves wouldn’t hold a re overnight unless they were fed large pieces of hardwood. at is no longer true. You can success-
fully heat your home by using the less desirable tree species and give the forest a break at the same time.
6

Heater model installaon and operaon manual
Log Length
Logs should be cut about 1” (25 mm) shorter than the rebox so they t in easily. Pieces that are even slightly too long make load-
ing the stove very dicult. e most common standard length of rewood is 16” (400 mm).
e pieces should be a consistent length, with a maximum of 1” (25 mm) variation from piece to piece.
Piece Size
Firewood dries more quickly when it is split. Large unsplit rounds can take years to dry enough to burn. Even when dried, unsplit
logs are dicult to ignite because they don’t have the sharp edges where the ames rst catch. Logs as small as 3” (75 mm) should
be split to encourage drying.
Wood should be split to a range of sizes, from about 3” to 6” (75 mm to 150 mm) in cross section. Having a range of sizes makes
starting and rekindling res much easier. Often, the rewood purchased from commercial suppliers is not split nely enough for
convenient stoking. It is sometimes advisable to resplit the wood before stacking to dry.
7

Heater model installaon and operaon manual
How to Dry Firewood
Firewood that is not dry enough to burn is the cause of most complaints about wood stoves. e complaints
usually involve a lack of heat and dirty door glass.
Here are some things to consider in estimating drying time:
FIREWOOD TAKES A LONG TIME TO DRY;
FIREWOOD BOUGHT FROM A DEALER IS RARELY DRY ENOUGH TO BURN, SO IT IS ADVISABLE TO
BUY THE WOOD IN SPRING AND DRY IT YOURSELF;
DRYING HAPPENS FASTER IN DRY WEATHER THAN IN DAMP, MARITIME CLIMATES;
DRYING HAPPENS FASTER IN WARM SUMMER WEATHER THAN IN WINTER WEATHER;
SMALL PIECES DRY MORE QUICKLY THAN LARGE PIECES;
SPLIT PIECES DRY MORE QUICKLY THAN UNSPLIT ROUNDS;
SOFTWOODS TAKE LESS TIME TO DRY THAN HARDWOODS;
SOFTWOODS LIKE PINE, SPRUCE, AND POPLAR/ASPEN CAN BE DRY ENOUGH TO BURN AFTER BE
ING STACKED IN THE OPEN FOR ONLY THE SUMMER MONTHS;
HARDWOODS LIKE OAK, MAPLE AND ASH CAN TAKE ONE, OR EVEN TWO YEARS TO DRY FULLY,
ESPECIALLY IF THE PIECES ARE BIG;
FIREWOOD DRIES MORE QUICKLY WHEN STACKED IN THE OPEN WHERE IT IS EXPOSED TO SUN
AND WIND; IT TAKES MUCH LONGER TO DRY WHEN STACKED IN A WOOD SHED;
FIREWOOD THAT IS READY TO BURN HAS A MOISTURE CONTENT BETWEEN15 AND 20% BY
WEIGHT AND WILL ALLOW YOUR STOVE TO PRODUCE ITS HIGHEST POSSIBLE EFFICIENCY.
Judging Firewood Moisture Content
8

Heater model installaon and operaon manual
You can nd out if some rewood is dry enough to burn by using these guidelines :
CRACKS FORM AT THE ENDS OF LOGS AS THEY DRY;
AS IT DRIES IN THE SUN, THE WOOD TURNS FROM WHITE OR CREAM COLOURED TO GREY OR
YELLOW;
BANG TWO PIECES OF WOOD TOGETHER; SEASONED WOOD SOUNDS HOLLOW AND WET WOOD
SOUNDS DULL;
DRY WOOD IS MUCH LIGHTER IN WEIGHT THAN WET WOOD;
SPLIT A PIECE, AND IF THE FRESH FACE FEELS WARM AND DRY IT IS DRY ENOUGH TO BURN; IF IT
FEELS DAMP, IT IS TOO WET;
BURN A PIECE; WET WOOD HISSES AND SIZZLES IN THE FIRE AND DRY WOOD DOES NOT.
You could buy a wood moisture meter to test your rewood.
Manufactured Logs
Do not burn manufactured logs made of wax impregnated sawdust or logs with any chemical additives. Manufactured logs made
of 100% compressed sawdust can be burned, but use caution in the number of these logs burned at one time.
9

Heater model installaon and operaon manual
Operating Your Heater
Your First Fires (minimum 3 weeks after installation)
Your new heater contains a lot of moisture. So it is critical that it be thoroughly dried out before being used at full capacity. To do
this, you should heat up your appliance gradually.
Check the tables below for the amount of wood and the number of res required. Gradually increase the intensity of the re and
the wood load with each re. is operation is very important because overly fast evaporation can damage the internal structure of
your appliance. It is also important not to let the heater cool down between res. Some water may ow out of the heater during
the rst re due to internal condensation.
Wood load requires to dry out the heater (pounds)
Heater
weight
(pounds)
re 1 re 2 re 3 re 4 re 5 re 6 re 7 re 8 re 9 re 10
3800 10 12 14 16 18
4500 10 13 16 19 22
5000 10 14 18 22 25
6000 10 15 20 25 30
7000 10 16 22 28 35
8000 10 13 16 19 22 25 28 30 35 40
9000 10 14 18 22 28 32 36 40 44 48
Cold Lighting
If your heater has been out of use for a long time and is at room temperature, it is crucial that you preheat the structure with a
50% load of wood before using a full load. Structural damages can occur if the appliance is heated too quickly (thermal shocks).
You must let heater temperature increase before lighting a second re. It is preferable not to let the heater cool down between res.
Regular Use
Your heater is designed for fast burning, which means that the air vent should be fully open at all times. As it is designed for
regular use, it must reach its cruising temperature and keep it for several weeks; repeated cold lightings will damage the heater and
break up its joints. At the end of the burn cycle, when all embers have burned out, we suggest you close the chimney damper to
keep the heat inside the appliance.
10

Heater model installaon and operaon manual
Wood Load for a Normal Fire (pounds)
Heater weight (pounds) Normal re maximum Normal re minimum Cold lighting
3800 25 8 13
4500 25 8 13
5000 30 10 15
6000 35 12 18
7000 40 13 20
8000 45 15 23
9000 50 17 25
Lighting a Fire
DO NOT LEAVE THE STOVE UNATTENDED WHEN THE DOOR IS SLIGHTLY OPEN DURING IGNITION. AL-
WAYS CLOSE THE DOOR AFTER IGNITION.
11
Top Lighting Procedure
Your heater is designed to be lighted from the top. Pile about
75% of the wood required in criss-crossed layers. Put newspa-
pers on top of the pile, then add the rest of the rewood. Fully
open the air vents, damper and bypass before lighting up the
paper.
It is critical that you wait until the re is going well before clos-
ing the air bypass, otherwise smoke will ow into your home.
Using Fire Starters
Many people like to use commercial re starters instead of
newspaper. Some of these starters are made of sawdust and wax
and others are specialized ammable solid chemicals. Follow the
package directions for use.
Gel starter may be used but only if there are no hot embers pres-
ent. Use only in a cold rebox to start a re.
DO NOT USE FLAMMABLE LIQUIDS SUCH AS GASO-
LINE, NAPHTHA, FUEL OIL, MOTOR OIL, OR AERO-
SOLS TO START OR REKINDLE THE FIRE.

Heater model installaon and operaon manual
Maintaining Wood Fires
General Advice
IF YOU MUST OPEN THE DOOR WHILE THE FUEL IS FLAMING, OPEN THE AIR CONTROL FULLY FOR A FEW
MINUTES, THEN UNLATCH AND OPEN THE DOOR SLOWLY.
Ash Removal
Ash should be removed from the rebox every two or three days of full time heating. Do not let the ash build up in the rebox
because it will interfere with proper re management.
e best time to remove ash is after an overnight re when the stove is relatively cool, but there is still some chimney draft to draw
the ash dust into the stove and prevent it from coming into the room.
After ashes have been removed from the stove and placed in a tightly covered metal container, they should be taken outside imme-
diately. e closed container of ashes should be placed on a non-combustible oor or on the ground well away from all combus-
tible materials pending nal disposal. Ashes normally contain some live charcoal that can stay hot for several days. If the ashes are
disposed of by burial in soil or otherwise locally dispersed, they should be retained in the closed container until all cinders have
thoroughly cooled. Other waste shall not be placed in this container.
NEVER STORE ASHES INDOORS OR IN A NON-METALIC CONTAINER OR ON A WOODEN DECK.
Moving Embers
When the wood is practically all burned, the remaining embers must be moved to the center of the rebox, where the air intake is
located. is helps the embers burn out faster so the re can die out.
Steatite (soapstone) is designed to absorb heat fast and then radiate it slowly. is is why a good re should get going relatively
quickly to store up heat in the appliance as the energy contained in the rewood is at its peak.
Air Intake Control
e heater has an air intake control. is device is used to control the ow of air into the heater. e re needs the right amount
of air to be goingat full capacity. If the air inow is too great, the re loses eciency. If the re does not have enough air, it will
tend to smolder and the wood will burn less eciently. e heater will thus have a poorer performance.
12

Heater model installaon and operaon manual
Maintenance of your Wood-Heating System
Heater Maintenance
Your new stove will give many years of reliable service if you use and maintain it correctly. Some of the internal components of the
rebox, comme les briques de stéatite pourront avoir de légères ssures pouvant survenir mais n’aectent en rien le bon fonction-
nement de l’appareil. Si vous allumez chaque charge à chaud au début d’un cycle comme décrit ci-dessus, cela ne causera pas de
détérioration prématurée du foyer.
Cleaning Door Glass
Under normal conditions, glass doors shoud remain relatively clean. If your rewood is dry and you follow the directions in this
document, a dusty whitish deposit will appear on the inner surface of the glass after using the appliance for about a week. is is
normal, and the deposit can be easily removed when the heater is cold by wiping the glass with a damp cloth or paper towel, and
letting it dry. Never clean the glass when the stove is hot.
If you do get brown stains on the glass you can remove them with special cleaners for wood stove glass doors. Do not use abrasives
to clean your stove’s door glass.
e deposits that form on the glass are the best indication of the quality of your fuel and how well you are doing in operating the
stove. Your goal should be clear glass with no brown stains. If you continue to see brown stains on the glass, something about your
fuel and operating procedure needs to be changed. Stains on the glass indicate incomplete combustion of the wood, which also
means more smoke emissions and faster formation of creosote in the chimney.
If you see brown streaks coming from the edge of the glass, it is time to replace the gasket around the glass. Visit your stove retailer
to get the self-adhesive glass gasket and follow the instructions below for installation.
Replacing the Door Gasket
After a year or more of use, the door gasket will compress and become hard, which may allow air to leak past it. You can test the
condition of the door gasket by closing and latching the door on a strip of paper. Test all around the door. If the paper slips out
easily anywhere, it is time to replace the gasket.
Use the correct replacement gasket that you can purchase from your retailer. e diameter and density of the gasket is important
to getting a good seal.
Place the door face-down on something soft like a cushion of rags or piece of carpet. Remove the old gasket from the door by pull-
ing and prying it out with an old screw driver. en use the screwdriver to scrape the old gasket adhesive from the door. Now run
a 1/4” (6 mm) bead of high temperature silicone in the door gasket groove. Starting from the middle of the hinge side, press the
gasket into the groove. Do not stretch the gasket as you place it. Leave the gasket about 1/2” long when you cut it and press the
end into the groove. Tuck any loose bres under the gasket and into the silicone. Close the door and do not use the stove for 24
hours.
Replacing the Glass Gasket and/or the Glass
It is a good idea to replace the glass gasket when the door gasket is replaced. e gasket is at, adhesive-backed, woven breglass.
Remove the glass retaining screws and clips. Lift out the glass and pull o the old gasket. is is a good time to clean the glass
thoroughly.
13

Heater model installaon and operaon manual
e gasket must be centred on the edge of the glass. To do this easily, peel back a section of the paper covering the adhesive and
place the gasket on a table with the adhesive side up. Stick the end of the gasket to the middle of one edge, then press the edge of
the glass down onto the gasket, taking care that it is perfectly centred on the gasket. Peel o more of the backing and rotate the
glass and press the next section onto the gasket. Do not stretch the gasket as you place it. Continue until you get to the start and
trim the gasket to length. Now pinch the gasket to the glass in a U shape, all around the glass. Reinstall the glass, being careful
to centre the glass carefully in the door. Do not over-tighten the screws. Note that the two main causes of broken door glass are
uneven placement in the door and over-tightening of retaining screws.
Do not abuse the glass door by striking or slamming shut. Do not use the stove if the glass is broken. To change the glass, perform
the same operation described above.
Maintenance of the Chimney and Chimney Connector
Why Chimney Cleaning is Necessary
Wood smoke can condense inside the chimney connector and chimney, forming a combustible deposit called creosote. If creosote
is allowed to build up in the venting system it can ignite when a hot re is burned in the stove and a very hot re can progress to
the top of the chimney. Severe chimney res can damage even the best chimneys. Smouldering, smoky res can quickly cause a
thick layer of creosote to form. When you avoid smouldering so the exhaust from the chimney is mostly clear, creosote builds up
more slowly. Your new stove has the right characteristics to help you to burn clean res with little or no smoke, resulting in less
creosote in the chimney.
How Often Should You Clean the Chimney?
It is not possible to predict how much or how quickly creosote will form in your chimney. It is important, therefore, to check the
build-up in your chimney monthly when getting used to the new stove until you determine the rate of creosote formation. Even if
creosote forms slowly in your system, the chimney should be cleaned and inspected at least once each year.
Contact your local municipal or provincial re authority for information on how to handle a chimney re. Have a clearly under-
stood plan to handle a chimney re.
Cleaning the Chimney
Chimney cleaning can be a dicult and dangerous job. If you don’t have experience cleaning chimneys, you might want to hire
a professional chimney sweep to clean and inspect the system for the rst time. After having seen the cleaning process, you can
decide if it is a job you would like to take on.
e most common equipment used are breglass rods with threaded ttings and sti plastic brushes. e brush is forced up and
down inside the chimney ue to scrub o the creosote.
e chimney connector assembly should always be cleaned at the same time the chimney is cleaned.
14

Heater model installaon and operaon manual
PART B - INSTALLATION
Safety Information
Summary of Installation Cautions and Warnings
THE INFORMATION GIVEN ON THE CERTIFICATION LABEL AFFIXED TO THE APPLIANCE
ALWAYS OVERRIDES THE INFORMATION PUBLISHED, IN ANY OTHER MEDIA (OWNER’S
MANUAL, CATALOGUES, FLYERS, MAGAZINES AND/OR WEB SITES).
MIXING OF APPLIANCE COMPONENTS FROM DIFFERENT SOURCES OR MODIFYING
COMPONENTS MAY RESULT IN HAZARDOUS CONDTIONS. WHERE ANY SUCH CHANGES
ARE PLANNED, STOVE BUILDER INTERNATIONAL INC. SHOULD BE CONTACTED IN AD-
VANCE.
ANY MODIFICATION OF THE APPLIANCE THAT HAS NOT BEEN APPROVED IN WRITING
BY THE TESTING AUTHORITY VIOLATES CSA B365 (CANADA), AND ANSI NFPA 211 (USA).
CONNECT THIS STOVE ONLY TO A LISTED FACTORY-BUILT CHIMNEY FOR USE WITH
SOLID FUEL OR TO A LINED MASONRY CHIMNEY CONFORMING TO NATIONAL AND LO-
CAL BUILDING CODES.
IF REQUIRED, A SUPPLY OF COMBUSTION AIR SHALL BE PROVIDED TO THE ROOM OR
SPACE.
DO NOT CONNECT TO OR USE IN CONJUNCTION WITH ANY AIR DISTRIBUTION DUCT-
WORK UNLESS SPECIFICALLY APPROVED FOR SUCH INSTALLATION.
DO NOT CONNECT THIS UNIT TO A CHIMNEY FLUE SERVING ANOTHER APPLIANCE.
Regulations Covering Stove Installation
In Canada, the CSA B365 Installation Code for Solid Fuel Burning Appliances and Equipment and the CSA
C22.1 Canadian National Electrical Code are to be followed in the absence of local code requirements. In
the USA, the ANSI NFPA 211 Standard for Chimneys, Fireplaces, Vents and Solid Fuel-Burning Appliances
and the ANSI NFPA 70 National Electrical Code are to be followed in the absence of local code require-
ments.
is heater must be connected to a chimney complying with the requirements for Type HT chimneys in the
Standard for Factory-Built Chimneys for Residential Type and Building Heating Appliances, UL 103 and
ULC S629 or to a code-approved masonry chimney with a ue liner.
15

Heater model installaon and operaon manual
Foundation with insulation
Any foundation must be at and level.
16
Insulation must be 2 inch thich
foamglass density of 117kg/m3
or 7.3 lbs/ft3 with a compressive
strenght of 620 kpa or 90 pounds/
inch2.

Heater model installaon and operaon manual
Foundation without insulation
Any foundation must be at and level.
e foundation must be even with the
suboor.
17
Foundation directly on the oor
A small heater may be installed directly
on the oor with a 2-in. insulation and
reinforcements under the oor.
-Concrete on a wood structure does not qualify as a
concrete oor.

Heater model installaon and operaon manual
Clearances to combustible material
1 MINIMUM CLEARANCE MUST BE 14” 350 MM ON THE SIDES OF A FLUE WITH A 3.5”
90 MM THICK OUTER SHELL.
2 MINIMUM CLEARANCE MUST BE 20” 500 MM ON THE SIDES OF A FLUE WITH ONLY
A 2.375” 60 MM THICK OUTER SHELL.
3 MINIMUM CLEARANCE ABOVE THE HEATER MUST BE 10” 250 MM.
4 THE HEATER MUST BE ASSEMBLED ON A 2” 50 MM THICK NONCOMBUSTIBLE SUR
FACE OR FOAMGLASS TYPE INSULATING MATERIAL.
5 WHEN A NONHEATING SHELF OR BENCH 3” 75 MM THICK OR LESS IS ATTACHED
TO THE HEATER, IT CAN BE OVERLOOKED FOR PURPOSES OF CLEARANCES.
6 CLEARANCES FOR KITCHENETTES ARE 20” 500 MM IN ALL DIRECTIONS.
7 7 WHEN THE HEATER IS IN A CUBICLE, SIDE CLEARANCES INCREASE FROM 14” 350
MM TO 20” 500 MM.
e clearances shown in this section have been determined by test according to procedures set out in safety
standards ULC S627 (Canada), UL1482 (U.S.A.) . When the stove is installed so that its surfaces are at or
beyond the minimum clearances specied, combustible surfaces will not overheat under normal and even
abnormal operating conditions.
No part of the stove or ue pipe may be located closer to combustibles than the minimum clearance gures
given.
Location of the Certication Label
Since the information given on the certication label axed to the appliance always overrides the informa-
tion published, in any other media (owner’s manual, catalogues, yers, magazines and/or web sites) it is im-
portant to refer to it in order to have a safe and compliant installation. In addition, you will nd information
about your stove (model, serial number, etc.). You can nd the certication label on the back of the stove.
Clearances to Walls and Ceiling
e clearances to combustible walls may be slightly dierent in Canada and the U.S.A. and may also dier
depending on whether you use single or double wall ue pipe. Please be sure to choose the correct clearance
for your location and type of ue pipe. See gure Clearances to combustible materials and oor protection
to match each letter to a clearance.
18

Heater model installaon and operaon manual
Clearances to combustible materials and oor protection
Clearances to walls Clearances to walls
(Heat shield)
CANADA USA CANADA USA
A 18” (450 mm) 18” (450 mm)
B 18” (450 mm) 18” (450 mm) 18” (450 mm) 18” (450 mm)
C 48” (1200 mm) 48” (1200 mm) 48” (1200 mm) 48” (1200 mm)
GMay vary depending on the type of chimney
See Building Code
H
I 4” (100 mm) 4” (100 mm)
J 6” (150 mm) 6” (150 mm) 6” (150 mm) 6” (150 mm)
Clearances to combustible materials and oor protection
19

Heater model installaon and operaon manual
Floor Protector
Your stove is designed to keep the oor from overheating. It must, however, be placed on a non-ammable surface to
protect the oor from hot ashes that may fall from the stove during loading and maintenance. ere are dierences regard-
ing oor protection between Canada and the U.S., as shown in the table below and the gure Clearances to combustible
materials and oor protection.
Floor protection
CANADA USA
D** 200 200
E** 200 200
F** 450 400
*Steel with a minimum thickness of 0.015’’ (0.38 mm) or ceramic tiles with grout joints. No protection is required if the appliance is
installed on a non-combustible surface (eg.: concrete oor).
** See: Clearances to combustible materials and oor protection
Note 1 : Floor protection is limited to back clearances (A) if it is less than 8 inches (203 mm).
Note 2 : Only required under the connector’s horizontal (Ho) section. Should exceed by at leat 2 inches (51 mm) on either
side of the connector.
20
This manual suits for next models
8
Table of contents
Other Valcourt Heater manuals
Popular Heater manuals by other brands

DeLonghi
DeLonghi BAMBINO instructions

Royal Plaza
Royal Plaza Sorbus SW395080 installation manual

Ducasa
Ducasa Sunrise Eco-Pro SR03D-EP manual

Vortice
Vortice Caldomi Instruction booklet

Lighthouse
Lighthouse ECOHEAT Series instructions

Claudgen
Claudgen ScreenZone CA1309S10 Installation and operating manual