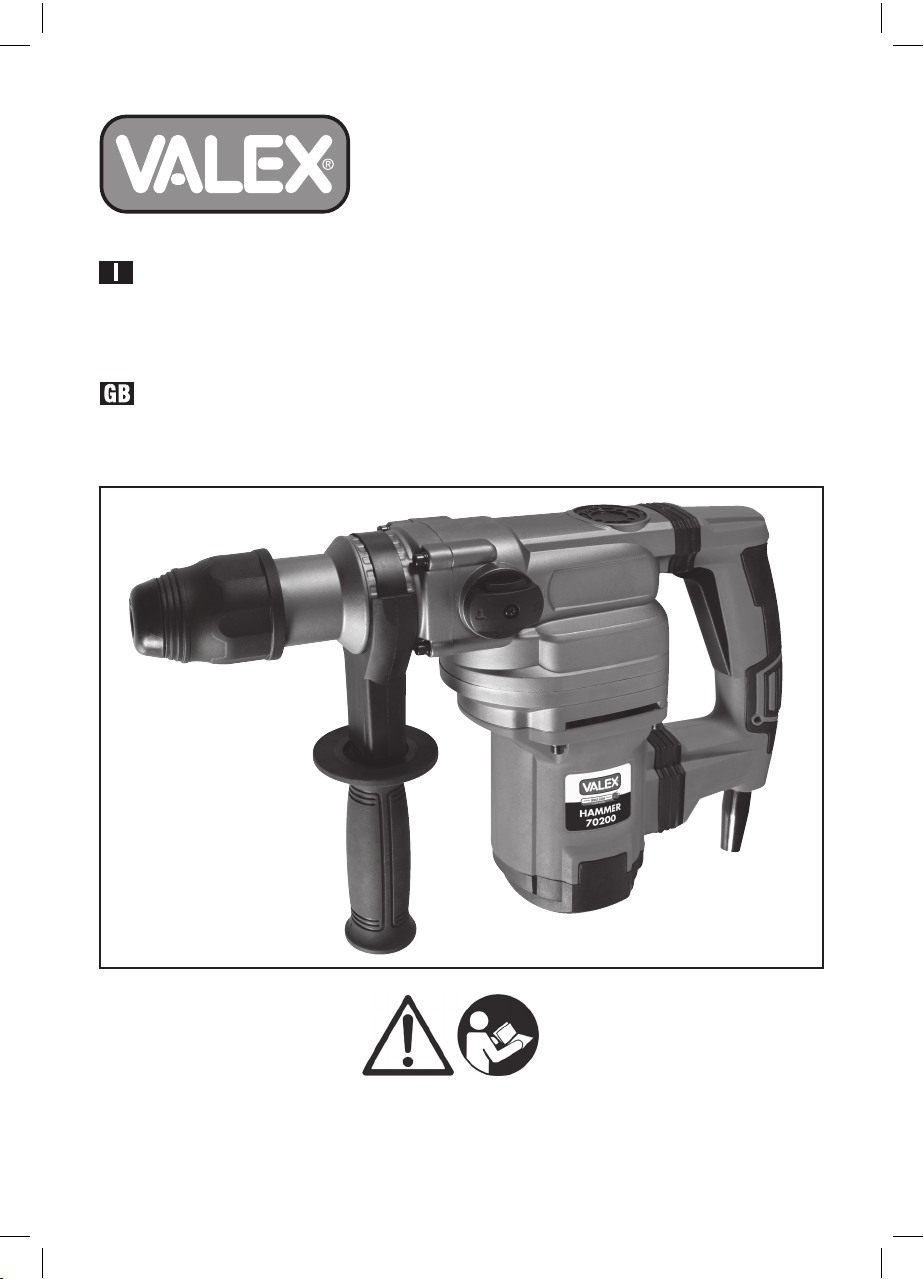
Valex HAMMER 70200 User manual

Final dimension: A5
S421469
14.11.2017
HAMMER 70200
ATTENZIONE! Prima di usare la macchina, leggete e comprendete le istruzioni di sicurezza e le istruzioni d’uso fornite
WARNING! Before using the machine, read and understand the supplied safety instructions and operating instructions
Martello perforatore
ISTRUZIONI D’USO
Istruzioni originali
Hammer drill
OPERATING INSTRUCTIONS
Translation of the original instructions

- 2 -

- 3 -

- 4 -

- 5 -
DICHIARAZIONE DI CONFORMITA’
La ditta indicata in etichetta dichiara sotto la
propria responsabilità che il prodotto ivi citato
è conforme ai requisiti essenziali di sicurezza e
salute contenuti nelle seguenti direttive europee:
2006/42/CE, 2014/30/CE, 2011/65/CE
DECLARATION OF CONFORMITY
The firm indicated on the label declares, under
its own responsibility, that the product cited there
complies with the essential health and safety
requirements contained in the following European
directives:
2006/42/EC, 2014/30/EC, 2011/65/EC
Persona autorizzata a costituire il fascicolo
tecnico presso:
The person authorized to compile the technical
file is in:
Valex SpA
Via Lago Maggiore, 24
36015 Schio (VI) - Italy
Schio, 11.2017
Un procuratore - Attorney
SMIDERLE STEFANO
DATI TECNICI
1. Tensione e frequenza di alimentazione
2. Potenza nominale
3. Velocità a vuoto
4. Percussioni a vuoto
5. Attacco mandrino
6.
Diametro max. foro calcestruzzo/carotatrice
7. Classe isolamento macchina
8. Energia di impatto
9. Peso
10. Livello di pressione acustica misurato LpA
11. Livello di potenza acustica misurato LwA
12. Livello di vibrazioni ah,CHeq - a scalpello
TECHNICAL DATA
1. Supply voltage
2. Absorbed nominal power
3. R.P.M.
4. Strikes per minute
5. Chuck connection
6.
Maximum hole diameter concrete/core drill
7. Machine insulation class
8. Impact energy
9. Weight
10. Measured acoustic pressure level LpA
11. Measured acoustic level LwA
12. Level of vibrations ah,CHeq - chiselling
1 230 V~50 Hz
2 1050 W
3 480 min-1
4 3860 min-1
5 SDS max
6 36mm / 80mm
7 II
8 7,5 J
9 7 kg
10 95,8 dB(A) K=3
11 106,8 dB(A) K=3
12 14,89 m/s2K=1,5

- 6 -
i
ATTENZIONE! Il martello perforatore è
idoneo, con l’utilizzo di specifiche punte, a
forare calcestruzzo e laterizio, inoltre può
essere usato per piccoli lavori di scalpellatura
con sola percussione.
E’ vietato l’utilizzo su materiali pericolosi per
la salute e in ambienti con pericolo di incendio/
esplosione.
Non utilizzare su legno o metallo. Ogni uso
diverso da quello indicato é improprio, peri-
coloso e fa decadere la garanzia.
Questo istruzioni riportano le informazioni e
quanto ritenuto necessario per il buon uso,
la conoscenza e la normale manutenzione
dell’utensile. Esse non riportano le informazioni
sulle tecniche di lavorazione dei vari materiali;
l’utilizzatore troverà maggiori notizie su libri e
pubblicazioni specifiche o partecipando a corsi
di specializzazione.
COMPONENTI
Fare riferimento alla fig. A e seguenti, allegate
alle presenti istruzioni.
1 Protezione antipolvere
2 Mandrino di bloccaggio punta
3 Interruttore di avvio/arresto
4 Impugnatura supplementare
5 Feritoie di ventilazione motore
6 Selettore rotazione inserita/disinserita
7 Impugnatura principale
8 Tappo per ingrassaggio
9 Spina e cavo di alimentazione
10 Cuffia raccoglipolvere
11 Luce led presenza rete
SIMBOLOGIA
Osservate con attenzione la simbologia della
fig.B e memorizzate il rispettivo significato. Una
corretta interpretazione dei simboli consente un
uso più sicuro della macchina.
1 Modello, dati tecnici, numero del lotto di
costruzione.
2 Doppio isolamento elettrico.
3 Marcatura CE di conformità
4 I rifiuti elettrici ed elettronici possono con-
tenere sostanze pericolose per l’ambiente e
per la salute umana; non devono pertanto
essere smaltiti con quelli domestici ma me-
diante una raccolta separata negli appositi
centri di raccolta o riconsegnati al venditore
nel caso di acquisto di una apparecchiatura
nuova analoga. Lo smaltimento abusivo dei
rifiuti comporta l’applicazione di sanzioni.
INSTALLAZIONE
ATTENZIONE! La Ditta costruttrice de-
clina ogni responsabilità per gli eventuali
danni diretti e/o indiretti causati da un errato
allacciamento.
ATTENZIONE! Prima di effettuare le se-
guenti operazioni assicuratevi che la spina
sia scollegata dalla rete elettrica.
TRASPORTO
Per trasportare l’utensile utilizzate sempre il suo
imballo o la sua valigetta (se presente); questo lo
preserverà da urti, polvere e umidità che ne pos-
sono compromettere il regolare funzionamento.
Durante il trasporto togliete la punta dal man-
drino dell’utensile.
MOVIMENTAZIONE
Afferrate saldamente l’impugnatura (pos.7) sen-
za azionare l’interruttore, mantenetelo lontano
dal vostro corpo e dopo l’uso appoggiatelo di
fianco senza battere.
MESSA IN SERVIZIO
Nel luogo che utilizzerete l’utensile elettrico è
opportuno considerare:
- che la zona non sia umida e sia al riparo dagli
agenti atmosferici.
- che attorno sia prevista un’ampia zona opera-
tiva libera da impedimenti.
- che vi sia una buona illuminazione.
- che sia utilizzata in vicinanza dell’interruttore
generale con differenziale.
- che l’impianto di alimentazione sia dotato di
messa a terra conforme alle norme (solo se
l’utensile elettrico è di classe I, cioè dotato di
spina con cavo di terra).
- che la temperatura ambiente sia compresa tra
10° e 35°C.
- che l’ambiente non sia in atmosfera infiamma-
bile/esplosiva.

- 7 -
Estraete l’utensile ed i componenti e verificate
visivamente la loro perfetta integrità; a questo
punto procedete ad una accurata pulizia per
togliere dalle superfici metalliche gli eventuali
oli protettivi utilizzati per il trasporto.
MONTAGGIO IMPUGNATURA SUPPLEMENTARE
(fig.E pos.4)
Infilate l’anello dell’impugnatura supplementare
nella parte anteriore dell’utensile; prestare
attenzione ad eventuali sedi sagomate che de-
vono innestarsi per un corretto accoppiamento.
Prima di fissarla, ruotatela in modo da trovare
la giusta posizione d’uso. Svitate l’impugnatura
in senso antiorario per allentare, in senso orario
per fissare.
MONTAGGIO PUNTA/SCALPELLO (fig.C)
1) Scollegate l’alimentazione elettrica staccan-
do la spina dalla presa elettrica.
2) Verificate che l’attacco della punta sia compa-
tibile con il mandrino dell’utensile osservando i
dati tecnici di entrambi; non è possibile installare
una punta con attacco diverso o con attacco
cilindrico.
3) Pulite accuratamente l’attacco della punta
ed ingrassate leggermente la superficie con
grasso lubrificante (vedi capitolo LUBRIFI-
CAZIONE).
4) Tirate verso di voi il mandrino di bloccaggio
(pos.2); questa operazione aprirà le griffe
interne del mandrino.
5) Inserite la punta, ruotandola leggermente e
spingetela fino al fermo di fondo.
6) Rilasciate il mandrino, la punta rimarrà
bloccata automaticamente.
7) Verificate il bloccaggio della punta tirandola
verso l’esterno.
ESTRAZIONE PUNTA/SCALPELLO (fig.D)
1) Scollegate l’alimentazione elettrica staccan-
do la spina dalla presa elettrica.
2) Tirate verso di voi il mandrino di bloccaggio
(pos.2); questa operazione aprirà le griffe
interne del mandrino.
3) Estraete la punta.
4) Rilasciate il mandrino.
SELEZIONE DELLE FUNZIONI ROTAZIONE-
PERCUSSIONE
Osservate attentamente la fig.H ed operate di
conseguenza.
AVVIAMENTO, ARRESTO E REGOLAZIONE
VELOCITA’
ATTENZIONE! Prima di avviare l’utensile
elettrico è obbligatorio indossare occhiali,
guanti, maschera e cuffie di protezione (non
in dotazione).
ATTENZIONE! Durante l’utilizzo fate in
modo che nessuno si avvicini alla vostra zona
di lavoro.
Avviamento
1) Afferrate saldamente entrambe le impugna-
ture con le mani
2) Per avviare premete l’interruttore (pos.3)
L’interruttore è del tipo ad “azione mantenuta”;
pertanto l’utensile elettrico rimarrà acceso per il
tempo che voi mantenete premuto l’interruttore.
Arresto
Per arrestare rilasciate l’interruttore, mantenendo
ben saldo l’apparecchio.
Vi consigliamo di ripetere queste operazioni
alcune volte prima di iniziare il lavoro in modo
da familiarizzare il più possibile con i comandi.
Se osservate delle anomalie di funzionamento
spegnete l’utensile elettrico e consultate il capi-
tolo “Problemi, cause e rimedi”.
Quando non lavorate spegnete e staccate la
spina dalla presa.
ISTRUZIONI D’USO
Dopo aver letto attentamente i capitoli precedenti,
seguite scrupolosamente queste istruzioni che vi per-
metteranno di ottenere il massimo delle prestazioni.
Procedete con calma in modo da prendere
familiarità con tutti i comandi; solo dopo aver
acquisito una buona esperienza riuscirete a
sfruttarne a fondo tutte le potenzialità.
MONTAGGIO CUFFIA RACCOGLIPOLVERE (fig.F)
Questo accessorio in gomma (pos.14) è utile per
raccogliere la polvere prodotta da una foratura
verticale. Infilare la cuffia nella punta e durante
l’uso non trattenerla con la mano.
INSERIMENTO E DISINSERIMENTO ROTAZIONE
ATTENZIONE! L’operazione di inserimento
rotazione e viceversa, deve essere eseguita
con l’utensile spento ed il mandrino fermo.
Osservate attentamente la fig.H ed operate di
conseguenza.

- 8 -
SOSTITUZIONE PUNTA DA FORARE / SCAL-
PELLO
Vedere capitolo “MESSA IN SERVIZIO”.
PUNTE/SCALPELLI (non inclusi)
Acquistate delle punte/scalpelli di qualità, con
attacco idoneo alle caratteristiche del mandrino
del demolitore e adatte al materiale in lavorazio-
ne. Rivolgetevi al vostro rivenditore di fiducia che
potrà consigliarvi al meglio.
La nostra azienda produce un’ampia gamma
di punte/scalpelli adatti ai più svariati impieghi
(metallo, legno, laterizio ecc.).
USO
Indossate sempre i dispositivi di protezione
individuale elencati nelle istruzioni di sicurezza.
Assicuratevi che il pezzo sia correttamente
bloccato; se il pezzo è piccolo fissatelo con una
morsa o morsetti.
Foratura su laterizio
Non utilizzare la funzione percussione per
piastrelle, intonaci e mattoni leggeri, mentre
innestate la percussione per calcestruzzo e
mattoni resistenti.
Utilizzate punte idonee con inserti al metallo duro
e mantenetele ben affilate.
Per l’esecuzione di fori di diametro elevato,
eseguite dei fori in serie con diametro crescente
per evitare il bloccaggio della punta nel foro e
di sovraccaricare in modo anomalo l’utensile;
utilizzate inoltre delle punte a tazza dette “caro-
tatrici” che tagliano lungo una circonferenza per
eseguire fori di grande diametro (se consentito,
vedi dati tecnici). Attenzione! Rispettare sempre
il diametro massimo consentito per il vostro
apparecchio osservando i dati tecnici delle
istruzioni.
Scalpellatura
Innestate solo la funzione percussione senza
rotazione “ROTOSTOP”.
Utilizzate scalpelli idonei (piatti, a punta ecc.) e
manteneteli ben affilati.
Non applicare forze laterali o torsionali inclinan-
do/ruotando l’utensile. Procedete sfruttando la
percussione senza forzare sull’utensile; non
caricate eccessivamente l’utensile, è sufficiente
applicare una forza pari al peso dello stesso.
DEMOLITORI CON PUNTA FISSA (fig.L)
Per i demolitori con punta fissa (in modalità
scalpellatura/demolitore), è possibile bloccare
lo scalpello nella posizione desiderata.
Per posizionare la punta con l’angolo desiderato:
- Scollegate l’alimentazione elettrica staccando
la spina dalla presa elettrica
- ruotate il selettore (pos.6) nella posizione ‘’a’’
- afferrate lo scalpello con una mano e ruotatelo
nel punto desiderato
- ruotate il selettore (pos.6) nella posizione ‘’b’’.
MANUTENZIONE
ATTENZIONE! Prima di ogni controllo o
regolazione staccate la spina dalla presa di
alimentazione elettrica.
ATTENZIONE! Non manomettete o tentate
di riparare l’utensile elettrico.
ATTENZIONE! Una eventuale revisione in-
terna o la sostituzione delle spazzole in grafite
del motore che si usurano con l’uso, deve
essere effettuata solo da un centro assistenza
autorizzato.
La durata e il costo d’esercizio dipendono anche
da una costante e scrupolosa manutenzione.
Pulite regolarmente ed abbiate cura del vostro
utensile elettrico, vi garantirete una perfetta
efficienza ed una lunga durata dello stesso.
- Rimuovete la polvere e i residui di lavorazione
con un pennello a setole morbide.
- Non spruzzate o bagnate d’acqua l’utensile
elettrico, pericolo di infiltrazioni interne.
- Non usate infiammabili, detergenti o solventi
vari. Le parti in plastica sono aggredibili da
agenti chimici.
- Non utilizzate un getto d’aria compressa per la
pulizia: pericolo lancio materiale!
- Prestate particolare attenzione alla pulizia
dell’interruttore, alle feritoie di ventilazione del
motore, al mandrino.
LUBRIFICAZIONE
Mandrino:
L’assenza della lubrificazione del foro del man-
drino provoca la mancata apertura dello stesso
e il conseguente bloccaggio della punta.
- ogni 3 ore di funzionamento pulite il man-
drino ed inserite un leggero strato di grasso
lubrificante per parti meccaniche nel foro del
mandrino (pos.2).
- il codolo della punta deve essere pulito e leg-
germente lubrificato prima del montaggio nel
mandrino.

- 9 -
Organi meccanici:
Con “organi meccanici” si intendono i com-
ponenti accessibili dal tappo per ingrassaggio
(fig.M pos.8) e che sono a vista dal foro; non
è necessario smontare altre parti dell’utensile e
non è necessario smontare gli organi meccanici.
- ogni 6 ore di funzionamento verificare la
presenza del grasso; se necessario ag-
giungere del grasso lubrificante quantità
min./max 20-25 grammi (tipo per cuscinetti/
giunti/snodi, al litio a bassa viscosità, campo
di utilizzo -30°C/+120°C), da inserire secondo
le istruzioni seguenti:
1Scollegate l’alimentazione elettrica staccan-
do la spina dalla presa elettrica.
2Svitate il tappo (pos.8) con l’apposita chiave
(se inclusa) o con un attrezzo equivalente.
3Verificate visivamente se gli organi meccanici
necessitano di ingrassaggio: la lubrificazione
è corretta quando sono rivestiti di un leggero
strato di grasso. Se non è necessaria alcuna
lubrificazione passate al punto 5.
4Inserite il grasso con un pennellino (non in-
cluso) sugli organi meccanici a vista (biella,
manovella e relativi cuscinetti/perni), in modo
da coprirli con uno leggero strato; insistete
principalmente nelle zone dei cuscinetti/perni
per farlo penetrare. Attenzione! Non è neces-
sario riempire la camera di grasso in quanto
provocherebbe un malfunzionamento dell’e-
lettroutensile (fuoriuscita del grasso, mancato
funzionamento della percussione ecc.). Se il
grasso è attaccato alle pareti della camera,
raccoglietelo con il pennellino e depositatelo
sugli organi meccanici; solo se il grasso è
sporco asportatelo e rimpiazzatelo con del
nuovo.
5Pulire la zona del foro ed avvitate bene il tappo.
6Pulire con uno straccio eventuali tracce di
grasso sull’utensile.
ATTENZIONE!
- Non inserire mai le dita dentro il foro.
- Non inserire il pennellino del grasso troppo
in profondità.
- Non inserire mai il grasso con una spatola o
con le dita.
- Non eccedere con la quantità di grasso; una
quantità eccessiva provoca il malfunziona-
mento dell’utensile.
- Non avviare mai l’utensile se il tappo non è
correttamente avvitato!
IMMAGAZZINAMENTO
Effettuate una accurata pulizia di tutto l’utensile
e sue parti accessorie (vedi paragrafo Manuten-
zione). Proteggete le parti non verniciate con un
olio protettivo ed utilizzate l’imballo originale o la
valigetta (se presente) per proteggerlo.
Riponete l’utensile lontano dalla portata dei bam-
bini, in posizione stabile e sicura. Il luogo dovrà
essere asciutto, privo da polveri, temperato e
protetto dai raggi solari diretti.
Al locale di rimessaggio non devono avere
accesso i bambini e gli estranei.
SMALTIMENTO
Per la salvaguardia ambientale procedete se-
condo le leggi vigenti del Paese in cui vi trovate.
Rivolgetevi alle autorità competenti per maggiori
notizie in merito.
Quando la macchina non è più utilizzabile né
riparabile, consegnatela con l’imballo ad un
punto di raccolta per il riciclaggio.
I rifiuti elettrici ed elettronici possono con-
tenere sostanze pericolose per l’ambiente e
la salute umana; non devono pertanto essere
smaltiti con quelli domestici ma mediante una
raccolta separata negli appositi centri di raccolta
o riconsegnati al venditore nel caso di acquisto di
una apparecchiatura nuova analoga. Lo smalti-
mento abusivo dei rifiuti comporta l’applicazione
di sanzioni amministrative.
GARANZIA
Il prodotto è tutelato a norma di legge contro non
conformità rispetto alle caratteristiche dichiarate
purché sia stato utilizzato esclusivamente nel
modo descritto dalle istruzioni, non sia stato
manomesso in alcun modo, sia stato conser-
vato correttamente, sia stato riparato da tecnici
autorizzati e, ove previsto, siano stati utilizzati
solo ricambi originali.
In caso di utilizzo industriale o professionale
oppure in caso di impiego simile la garanzia ha
validità di 12 mesi.
Per emettere una richiesta di intervento in garan-
zia è necessario presentare la prova di acquisto
al rivenditore o ad centro assistenza autorizzato.

- 10 -
PROBLEMI, CAUSE E RIMEDI
PROBLEMA CAUSE RIMEDI
L’utensile elettri-
co non si avvia
Linea di alimentazione scollegata Verificate la linea di alimentazione elettrica
Spina non inserita Inserire la spina nella presa di alimen-
tazione elettrica e premere il pulsante
di avvio
Guasto elettrico Rivolgetevi ad un centro di assistenza
autorizzato
L’utensile elettri-
co vibra molto
Punta/scalpello danneggiato o
sbilanciato
Sostituire la punta/scalpello
Attacco della punta/scalpello non
idoneo al mandrino dell’utensile
elettrico
Utilizzare solo punte/scalpelli idonei
secondo quanto riportato nei dati tecnici
La punta/scal-
pello non esce
dal mandrino
Punta/scalpello incastrata a cau-
sa dello sporco, dalla mancata
manutenzione e lubrificazione o
dell’attacco non conforme
Spruzzare qualche goccia di lubrificante
all’interno del mandrino e seguire atten-
tamente le istruzioni per estrarre la punta.
Rivolgetevi ad un centro di assistenza
autorizzato. Questo inconveniente non è
coperto dalla garanzia.
La percussione
non funziona
Eccessiva quantità di grasso Rivolgetevi ad un centro assistenza auto-
rizzato per la rimozione/sostituzione del
grasso in eccesso/non idoneo; questo
intervento non è compreso nella garanzia.
Grasso non idoneo
ATTENZIONE! Se dopo aver eseguito gli in-
terventi sopra descritti l’utensile elettrico non
funziona correttamente o in caso di anomalie
diverse da quelle indicate, portatelo presso un
centro di assistenza autorizzato esibendo la
prova di acquisto e richiedendo ricambi origi-
nali. Fate sempre riferimento alle informazioni
riportate sull’etichetta dati tecnici.

- 11 -

- 12 -
g
WARNING! The hammer drill is suitable ,
with the use of specific bits , drilling concrete
and brick, also can be used for small chiselling
with percussion only.
Is forbidden the use of materials hazardous
to health and environment with danger of fire
/ explosion.
Do not use on wood or metal. Any use other
than the one indicated is improper, dangerous
and will invalidate the warranty.
This instruction guide contains information
and as deemed necessary for the proper use,
the knowledge and the normal maintenance of
the tool. They do not report information on the
manufacturing techniques of various materials,
the user will find more news about books and
publications or by attending courses.
COMPONENTS
Refer to fig.A and the following , attached to
these instructions.
1 Dust protection
2 Spindle lock tip
3 Switch on / off
4 Auxiliary handle
5 Louvers engine
6 Reversing switch on / off
7 Main handle
8 Cap for greasing
9 Plug and power cord
10 Dust cap
11 Power presence led light
SYMBOLS
Carefully observe the symbols in fig. B and
memorise their respective meanings. Correct
interpretation of the symbols allows a safer use
of the machine.
1 Model, technical data, manufacturing batch
number.
2 Double electric insulation.
3 CE marking
4 Electric and electronic waste may contain
potentially hazardous substances for the
environment and human health. It should
therefore not be disposed of with domestic
waste, but by means of differentiated
collection at specific centres or returned to
the vendor in the event of purchasing a new
identical appliance. The illegal disposal of
waste will result in sanctions.
INSTALLATION
WARNING! The manufacturer disclaims
any liability for any direct and/or indirect
damages caused by improper connection.
WARNING! Before you perform the fol-
lowing steps, make sure that the plug is
disconnected from the mains.
TRANSPORT
To carry the tool always use his or her briefcase
packaging (if any), and this will preserve it from
bumps, dust and moisture that may affect proper
operation.
During transport, remove the tip from the tool
spindle.
HANDLING
Firmly grasp the handle (pos.7) without acti-
vating the switch, keep it away from your body
after use and place it to the side without blinking .
STARTUP
In the place that you will use the power tool you
should consider:
- That the area is not damp and is sheltered from
the elements.
- Which is provided around a large working area
free from obstructions.
- That there is good lighting.
- Which is used in the vicinity of the main switch
with differential.
- That the fuel system is equipped with a groun-
ding in accordance with the rules (only if the
tool is in class I , that is equipped with a plug
with ground wire).
- That the ambient temperature is between 10°
and 35° C.
- That the environment is not in the atmosphere
of flammable/explosive.
Pull the tool and the components and visually
check their perfect integrity at this point, pro-
ceed to a thorough cleaning to remove from
the metal surfaces of any protective oils used
for the transport.

- 13 -
ADDITIONAL HANDLE ASSEMBLY (fig.E pos.4)
Put the ring on the front of the auxiliary tool,
paying attention to any shaped seats that need
to engage in a proper fit. Before you fix it, rotate
it in order to find the right position for use. Un-
screw the handle counterclockwise to loosen,
clockwise to secure.
ASSEMBLY TIP / CHISEL (fig.C)
1) Disconnect the power supply by disconnec-
ting the plug from the electrical outlet.
2) Verify that the attack of the tip is compatible
with the spindle of the tool by looking at the
technical specifications of both , you can not
install a bit with different attack or with cylin-
drical shank.
3) Clean out the attack of the tip and the sur-
face lightly greased with grease (see chapter
LUBRICATION).
4) Pull toward you chuck (item 2), this will open
the jaws inside the chuck.
5) Insert the tip, turning it slightly and push it
until it stops background .
6) Release the spindle , the tip will be locked
automatically.
7) Check the locking of the tip by pulling it
outwards .
EXTRACTION TIP / CHISEL ( Fig. D )
1 ) Disconnect the power supply by disconnec-
ting the plug from the electrical outlet.
2 ) Pull toward you chuck (item 2), this will open
the jaws inside the chuck.
3 ) Remove the tip .
4) Release the spindle.
SELECTION OF FUNCTIONS - ROTATION HAM-
MER
Look carefully at the fig.H and operate accor-
dingly.
STARTING, STOPPING AND SPEED ADJUSTMENT
WARNING! Before starting the power tool
is required to wear safety glasses, gloves ,
mask and ear protection (not included).
WARNING! When using make sure that no
one comes to your area of work.
Starting
1 ) Grasp both handles firmly with your hands
2 ) To start press the switch (pos.3)
The switch is of the type “Maintained action“ and
therefore the power tool will remain lit for as long
as you hold the switch.
Stopping
To stop, release the switch keeping the unit
securely .
We recommend that you repeat these steps a
few times before starting the work in order to
familiarize yourself with the controls as much
as possible.
If you look malfunctions turn off the power tool
and refer to the chapter “Problems, Causes and
Remedies”.
When you do not work turn off and unplug it
from the outlet.
INSTRUCTIONS FOR USE
After having read the previous chapters , read
carefully the instructions that will enable you to
get the maximum performance.
Take your time to get familiar with all the con-
trols, and only after you have gained a good
experience to be able to exploit fully its potential.
DUST CAP ASSEMBLY (fig.F)
This accessory rubber (pos.14) is useful to
collect dust produced by a vertical drilling. Put
the headset in the tip during use and does not
hold it with your hand.
SNAP OFF AND ROTATION
WARNING! The insertion operation rotation
and vice versa, must be performed with the
tool off and the stationary spindle.
Look carefully at the fig.H and operate accor-
dingly.
REPLACEMENT DRILL DRILL / CHISEL
See the section “ STARTUP “.
TIPS / CHISEL (not included)
Buy the bits / chisels quality, with an attachment
suitable to the characteristics of the spindle of
the breaker and suitable for the material being
processed. Please contact your dealer who will
advise you.
Our company produces a wide range of drills /
chisels suitable for different uses (metal, wood
, brick , etc.).

- 14 -
USE
Always wear the personal protective equipment
listed in the safety instruction manual.
Make sure that the workpiece is properly locked
if the piece is small secure it with a clamp or
clamps.
Drilling on brick
Do not use the percussion tile, plaster and brick
light, while the grafted percussion resistant
concrete and brick.
Use appropriate drills with carbide inserts to
mantenetele and well-sharpened.
For the execution of holes of large diameter,
made of the holes in series with increasing
diameter to avoid clamping of the tip in the hole
and overloading abnormally the tool; used also
of the tips in said cup “ coring “ that cut along
a circumference for drilling large diameter (if
possible, see technical data). Attention! Always
observe the maximum diameter allowed for your
device by observing the technical instructions.
Chiselling
Engage only the percussion function without
rotation “Rotostop“.
Use suitable chisels (flat, pointed, etc.) and keep
them well sharpened.
Do not apply lateral forces or torsional tilting /
rotating the tool. Proceed without taking advan-
tage of the percussion force on the tool, not the
tool loaded excessively, it is sufficient to apply
a force equal to the weight of the same.
DEMOLITION HAMMER WITH LOCKED BIT (fig.L)
With demolition hammers with locked bit (in
chisel/demolition mode), it is possible to lock
the chisel into the desired position.
To position the bit at the desired angle:
- Disconnect the power by removing the plug
from the power supply.
- rotate the selector switch (pos.6) to position ‘’a’’
- grip the chisel with one hand and rotate it to
the desired point.
- rotate the selector switch (pos.6) to position ‘’b’’.
MAINTENANCE
WARNING! Before any control or regulation
unplug it from the power outlet.
WARNING! Do not tamper with or attempt
to repair the power tool.
WARNING! A possible internal audit or the
replacement of graphite brushes of the motor
wear out with use, should only be performed
by an authorized service center.
The duration and the operating cost are also
dependent on a constant and careful maintenan-
ce. Regularly clean and take care of your power
tool, you will guarantee a perfect efficiency and
a long duration.
- Remove dust and machining residues with a
soft bristle brush.
- Do not spray water or wet electric tools, danger
of infiltration inside.
- Do not use flammable cleaning agents or
solvents. The plastic parts are actions brought
by chemicals.
- Do not use a compressed air jet cleaning:
danger launch material!
- Pay particular attention to cleaning the switch,
louvers allow the motor to the spindle.
LUBRICATION
Spindle:
The absence of lubrication of the hole of the
spindle causes the non-opening of the same
and the consequent locking of the tip.
- Every 3 hours of operation clean the spindle
and insert a thin layer of grease for mechanical
parts in the hole of the spindle (pos.2) .
- The shank of the tip should be cleaned and
lightly oiled before assembly into the spindle.
Mechanical:
“mechanical“ means components accessible
from the grease cap (pos.8 fig.M) and which
are visible from the hole; it is not necessary
to remove other parts of the tool and it is not
necessary to remove the mechanical.
- Every 6 hours of operation, check the presence
of fat, if you need to add the lubricating grease
quantity min./max 20-25 grams ( type bearings
/ joints , lithium, low viscosity range of -30°C
/ +120°C), to be inserted in accordance with
the following instructions:
1 Disconnect the electrical supply by discon-
necting the plug from the electrical outlet.
2 Unscrew the cap (pos.8) with the appropriate
key (if included) or an equivalent tool.
3 Check visually if the mechanical parts require
lubrication : lubrication is correct when they are
coated with a thin layer of grease . If you do not
need any lubrication skip to step 5.
4 Insert the grease with a brush (not included)
on the mechanical view (connecting rod,

- 15 -
crank and its bearings / pins), so as to cover
them with a thin layer; insist mainly in the
areas of bearings / pivots to make it penetrate.
Attention! It is not necessary to fill the chamber
of fat as it would cause a malfunction of the
power (leakage of grease, failure of percussion
etc.). If the fat is attached to the walls of the
room, pick it up and deposit it with the brush
on the mechanical and only if the fat is dirty
access cover and replace it with the new one.
5 Clean the area of the hole and screw the cap
on tightly.
6 Wipe any traces of grease on the tool.
WARNING!
- Never put your fingers inside the hole.
- Do not insert the brush fat too deep.
- Never put grease with a spatula or your
fingers.
- Do not exceed the amount of fat, an excessive
amount causes the malfunction of the tool.
- Never start the tool if the cap is not screwed
on properly!
STORAGE
Clean the tool and all its accessories thoroughly
(see Maintenance section). Protect the unpainted
parts with protective oil and use the original
packaging or case (where fitted) to protect it.
Keep the tool out of reach of children, in a stable
and safe position. The place must be dry, free from
dust, temperate and protected from direct sunlight.
Keep children and unauthorised personnel out
of the storage room.
DISPOSAL
In order to protect the environment, proceed
according to the local laws in force. Contact the
relevant authorities for more information.
When the machine is no longer usable or repai-
rable, deliver the machine and packaging to a
recycling centre.
Electric and electronic waste may contain poten-
tially hazardous substances for the environment
and human health. It should therefore not be
disposed of with domestic waste, but by means
of differentiated collection at specific centres or
returned to the vendor in the event of purchasing
new equipment of the same type. The illegal
disposal of waste will result in administrative
sanctions.
WARRANTY
The product is protected by law against non-
compliance with the declared characteristics
provided it is used only in the manner described
in the instructions, it has not been tampered with
in any way, it has been stored properly, has been
repaired by authorized and, where applicable,
have been used only original spare parts.
In the case of industrial or professional use or
when using such a guarantee is valid for 12
months.
To issue a claim under warranty you must
present proof of purchase to your dealer or
authorized service center.

PROBLEMS, CAUSES AND REMEDIES
PROBLEM CAUSE REMEDY
The power tool
does not start
Power Line disconnected Check the electrical supply line
Plug not inserted Insert the plug into the power outlet and press
the start button
Electrical fault Contact an authorized service center
The power tool vi-
brates a lot
damaged or unbalanced
bit/chisel
Change the bit/chisel
Use of bit/chisel not su-
itable
Change the bit/chisel using the ones reported
in the technical data
The bit/chisel tip
does not come
from the spindle
Bit/chisel stuck due to dirt,
lack of maintenance and
lubrication of the attack or
not in accordance
Sprinkle a few drops of lubricant inside the
spindle and carefully follow the instructions
to remove the tip. Contact an authorized
service center. This problem is not covered
by the warranty.
The percussion is
not working
Excessive amounts of gre-
ese
Visit an authorized service center for removal/
replacement of excessive/unfiting greese, this
intervention is not included in the warranty.
Greese is not suitable
IMPORTANT! If the power tool still fails
to operate correctly after you have carried
out the above operations, or in the event of
anomalies other than those described above,
take it to an authorised service centre with
proof of purchase and ask for original spare
parts. Always provide the information shown
on the technical data label.
Table of contents
Languages:
Other Valex Drill manuals