Valley Electronics Lady-Comp User manual

Instructions:
The intelligent fertility computer.

23
Congratulations on choosing Lady-Comp, your
own personal family planning computer. With more
than 25 years of experience in women’s fertility
monitoring, you can rest assured that Lady-Comp
and Lady-Comp baby offer you complete confi-
dence in your family planning goals.
Please read these instructions carefully and follow
the easy steps. You will find everything that you
need to know about your device in the table of
contents or in the alphabetical index.
We wish you a good start.
Lady-Comp
Included
– Fertility computer
– Temperature Sensor
– 2 AAA rechargeable batteries
– Instructions
– USB cable (optional)
– Battery charger (optional)
Display
Control button
Sensor housing
with cable
1. Lady-Comp at a glance
Temperature sensor
Temperature sensor holder

45
Contents
1. Lady-Comp at a glance
Included 03
2. Getting started
Open device 06
Insert batteries 06
Close device 06
Home screen display 07
Control button 07
Main menus 08
3. Time/date
Set the time 09
Set the date 10
4. Alarm
Alarm on / off 11
Set the alarm time 11
5. Menstruation
Activate “M” / Edit “M” 12
Past menstruation data 12
Enter “M” retrospectively 12
6. Take your temperature
Measuring every morning 13
Temperature reading time period 14
Fertility Indicators 16
Past and future fertility display/prediction 16
Fever display 17
When not to take your temperature 17
Cancel temperature measurement 17
7. Fertility calendar
Fertility calendar 18
8. Pregnancy planning
Lady-Comp baby display 19
Enter sexual intercourse 19
Gender prediction 20
Pregnancy display 21
Conception date & birth date 21
Restart after pregnancy 21
9. Fertility & planning statistics
Fertility statistics 22
Planning statistics (only Lady-Comp baby) 23
Temperature curve 24
Personal Notes 26
10. Settings
Body Mass Index 27
Device settings 29
Temperature / time units 30
Enter Personal Notes 30
Gender prediction on /off 31
Deleting data 32
Temperature self-test 33
Device information 33
Brightness 34
Volume 34
Alarm tone 35
Key tone on /off 35
11. Important notes
Analysis of your fertility data – read out 36
Mini USB cable 36
Micro SD card 36
AAA battery Charger 36
Sample values 37
Loss of data 37
After the pill 37
Pearl Index 37
Program 37
Prognosis 37
Travel and time zones 37
Daylight Saving Time 37
Shift work 37
Restart after interruption in use 37
12. Troubleshooting & error messages
Charge batteries 38
Batteries depleted (112-11) 38
Button battery low (112-12) 38
Button battery depleted (112-13) 38
USB: Improper function (117-1) 38
M input: check (111-10) 39
Memory almost full (111-11) 39
Memory full (111-12) 39
Bootloader error (120-1) 39
Maintenance, care and safety 40
Service and support 42
Notes on electromagnetic compatibility 43
Index 48
Contact 52

67
2. Getting started
Insert batteries
Batteries must be inserted before operating the device. 2 AAA rechargeable batteries are included,
but commercial AAA batteries (1.5 V) can also be used. The included 2 batteries (type AAA) must be
recharged for 12 hours before inserting. The serial number of the device is inside the battery box.
1. Remove the temperature sensor
2. Open the device
Open the device by unscrewing the top cover in a
counterclockwise direction.
3. Insert the batteries
Insert the appropriate batteries.
4. Close the device
Align the two notches with each other and screw
the top in a clockwise direction.
Home screen display
The time, date, and year will be set when you receive the fertility computer.
Control button / On switch
Press the control button until the time/date appears in the display. All menus can be reached by tapping
up/ down or right/ left on the control button. Press on the center of the control button “ok”
to select the corresponding menus and to confirm selection.
Back to home screen
Press and hold the “ok” key for 3 seconds to return to the time/date display.
Automatic switch-off
If no button is pressed for 60 seconds, the device will switch off automatically. The display will remain
off until it is activated again or the alarm goes off.
Select menu by using the control
button, left, right, up, down
forward/back
left /right
yes /no
date/time forward /back
up/down
Confirm menu selection
Confirm entry
Hold down for 3 seconds
= Return to home screen
“Return” activated (blue square
highlighted) + “ok” key (confirms entry)
= return to the previous menu level
+
Operating the control button

89
Lady-Comp babyLady-Comp
Set the time
3. Time/Date
“Return” illuminated
Go to minutesPress “ok” Press “ok”
“Return”
Set hour Set minutes
Main menus for the Lady-Comp models
The different menu levels of Lady-Comp and Lady-Comp baby.
Time / Date Alarm
Pregnancy planning
Settings
Temperature
Menstruation
Return Fertility & planning
statistics
Fertility
calendar

10 11
4. Alarm
Prior to the first temperature measurement,
set the alarm time and activate the alarm.
Alarm on/off
“Return” illuminated
Press “ok”
“Confirm”
Press “ok” Press “ok”
“Return”
Alarm on
Alarm off
Set the alarm time
“Return” illuminated
Go to minutes
Press “ok” Press “ok”
“Return”
Set hour Set minutes
Important Note:
If the alarm is on, it is shown on the
home screen.
Set the date
“Return” illuminated
Press “ok” Press “ok” Press “ok”
“Return”
Set day
Important:
If the device has already received one or
more temperature measurements, it is only
possible to change the date setting by one
day. If the date is reversed, no temperature
measurement can be made the following day.
The date cannot be changed accidentally.
The date may also be adjusted when traveling
in different time zones. Do not take your
temperature on the day of travel.

12 13
5. Menstruation
“Return” illuminated
Select date Press “ok”
“Return”
“M” Yes
“M” No
Activate “M” or edit “M”
Past menstruation data
If you have records of past menstruations,
you can enter this data into the device prior
to the first temperature measurement.
Activate “M” as described above.
Enter “M” retrospectively
If you have not taken a temperature for an
extended time and had your period during
that time, you can enter it retrospectively.
Please input carefully, as incorrect entries
Important:
Only the first “M” day has to be activated for
each cycle when entering “M” data retroac-
tively. The device automatically stores three
“M” days. Start with the input of the furthest
menstruation back in time.
Important:
“M” entry after stopping hormonal contra-
ception: The first bleeding after stopping
hormonal contraception is not a men-
struation but a hormone – conditioned
withdrawal bleeding. Do not enter “M” for
this bleeding.
can be corrected only for the previous 3 days.
Start with the first day of menstruation.
Taking your basal body temperature reliably every
morning is one of the key elements of our system.
The basal body temperature is the temperature im-
mediately after waking up, before getting up, before
becoming active in any way. The more regularly you
take your temperature, particularly at the beginning,
the faster the device gets to know your personal cycle.
Place the temperature sensor under your tongue,
right at the back, either to the left or the right and
close your mouth. While taking your temperature,
the temperature sensor should not be moved.
6. Take your Temperature
Press button to
turn the alarm off
Temperature
symbol blinks
Signal tone signifies the
end of the temperature
measurement
Automatically turns off,
or “Return” is illuminated
Temperature symbol illuminated
Alarm goes off
Press button to
start temperature
measurement
Press “ok”
“Return”
Place sensor
under the tongue
Temperature value and
fertility are displayed
Measuring every morning
Temperature unit
Date
Temperature
reading value
Intercourse
“M” Menstruation
Fertility indicators
Thermometer
symbol
Cycle day
Personal Note *
Boy/girl display

14 15
Tips for taking your temperature
Lady-Comp wakes you with the alarm. Press the button to turn the alarm
off. To take your temperature, press the button again. The “thermometer”
symbol is blinking; Lady-Comp is ready to take your temperature.
– Now place the sensor under your tongue and close your mouth.
– It will take 30 to 60 seconds to take your temperature. If no temperature
can be taken after 3 minutes the process is automatically terminated.
– The display will show temperature values between 34.5 to 41.0
degrees Celsius or 94.20 to 105.00 degrees Fahrenheit.
– If your temperature value is above 37.8 °C or 99.9 °F, the
temperature display alternates with the letter “F” for fever.
– When finishing the temperature reading, you hear a signal tone
and the ascertained temperature value appears on the display.
Your fertility is displayed for that day.
Important notes:
Temperature reading time period
The temperature reading time limit is the time during which you can
perform the daily temperature measurement. Lady-Comp monitors
the daily temperature measuring time period. The temperature
measuring time period is generally independent of the alarm and is
calculated from the time you took your temperature previously (+/- 3
hours). The temperature measuring time period comprises 6 hours
and begins and ends three hours before and after the last tempera-
ture measuring time if this is different from the alarm time.
Tips for temperature reading time period:
– You can identify the reading time period from the illuminated thermometer symbol on the home screen.
– During the temperature reading time period pressing any key will start a temperature reading.
– We recommend that you allow Lady-Comp to wake you up.
– If you wake up during the temperature reading time period, i.e. to look after your child, take your
temperature.
– If you wake up after the temperature reading time period, don’t take your temperature.
– You may reset the temperature reading time period at any point by changing the alarm time
(i.e. on weekends or for shift work).
If your temperature is not taken over a three-day period, then the temperature reading time period is cleared, and the temperature can be
taken the next day only by activating the alarm. The temperature measuring time period will then be set by the alarm time (+/- 3 hours).
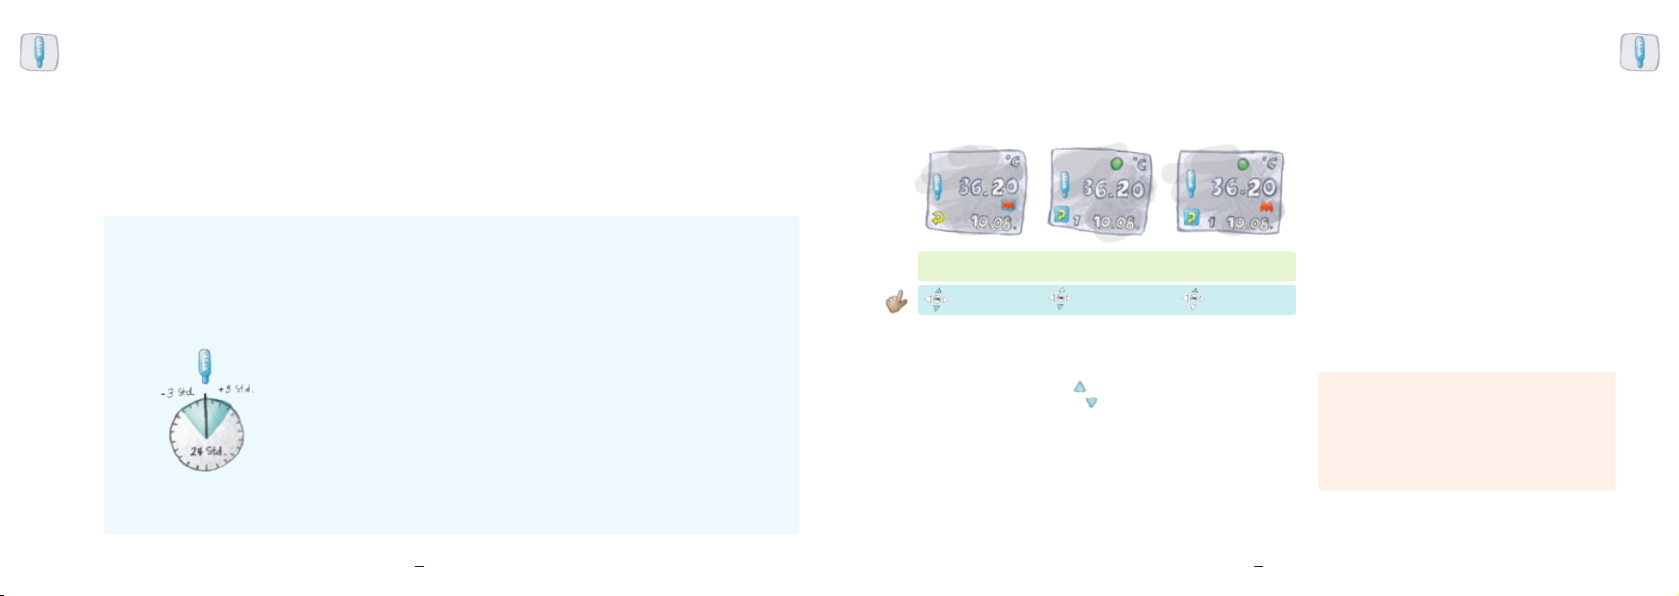
Important:
Please confirm “M” on at least three consecutive days.
If you have “M” without being asked by the device,
activate “M” as described. If you have accidentally
entered “M”, you may return to “M” to edit it for the past
three days.
“Return” illuminated
If “M” is expected,
“M” will blink “Return” illuminated
“M” Display No “M” Display Yes
“M” Yes
“M” No
After taking your temperature, it is possible that the “M” for menstruation
will blink.
– To confirm “M” press the key up for Yes.
– To not confirm “M” press the key down for No.
Once Lady-Comp knows your cycle, the device will ask you about “M” on
the days that menstruation is expected.
– It begins to ask (“M” blinking) two days before menstruation is expected.
– When “M” is done, Lady-Comp will stop asking for “M”.
Activate “M” after temperature measurement

16 17
Fertility indicators
You can view all previous temperatures by repeatedly pressing the key
to the “left” on the temperature display. You can also view a six-day
forecast by repeatedly pressing the “right” key.
Past and future fertility display / prediction
“Return” illuminated
Go back Go forward
= Prediction
Press “ok”
“Return”
When not to take your temperature
Lady-Comp uses its knowledge of your cycle and
available temperature values to calculate the future
cycle course and resulting from this, the fertility.
Increases in temperature due to flu, lack of sleep,
excess alcohol consumption and/or medication
with thermal effects are “abnormal” and will be
recognized by the device as such. Generally, it is
recommended to cancel the daily temperature
measurement in case of a fever, when taking
medication, or after a night of partying, so as not
to enter too many “abnormal” temperatures into
the device.
Fever display
If your temperature value is above 37.8 °C or 99.9 °F, the temperature display alternates with
the letter “F” for fever. Fever is recorded, however, the fever temperature value is not included
in the fertility calculation.
“Fever” display alternating
with temperature value “Return” illuminated
Thermometer
symbol blinks
Temperature symbol
and alarm illuminated
Place temperature
sensor under your
tongue
Pressing the button
switches alarm off
+ starts measurement
Hold button for 3 sec.
after beginning to
stop measurement
Press “ok”
“Return”
Cancel temperature measurement
By pressing the “OK” button for 3 seconds the temperature reading will be canceled and
you return to the home screen. The temperature may be taken again while still within the
temperature measuring time period.
The device displays your temperature and your fertility for the day; this
data is valid for 24 hours, and accurate from the very first day. The num-
ber of “green” days increases cautiously and systematically, while the
“red” days are narrowed down. The Pearl Index is calculated as 0.7
(99.3%) from the first day on. If the device has not received any input for
a long period of time, or receives information that it cannot evaluate, the
number of “yellow” days increases.
“Green” illuminated
= infertile
“Red” illuminated
= fertile
“Red” blinking
= ovulation day
“Yellow” illuminated
= learning phase
“Red” “Yellow”
“Green” blinking =
probable pregnancy
“Red” “Yellow”
“Green” illuminated =
pregnancy confirmed

18 19
7. Fertility calendar
The calendar displays your past and future fertility pattern. You can also view your menstruation
forecast for the next 6 months.
“Return” illuminated
Browse month Press “ok”
“Return”
8. Pregnancy planning
Since the introduction of Baby-Comp in 1986, we have assisted countless
couples in planning a child. Lady-Comp baby shows you the best time to
get pregnant.
“Return” illuminated
Select date YesPress “ok”
If you are planning a pregnancy, tell Lady-Comp
baby when sexual intercourse “SI” took place.
– Enter “SI” the following morning after you
take your temperature.
– It is possible to enter “SI” retrospectively for
up to three previous days.
Enter sexual intercourse (SI)
Press “ok”
“Return”

20 21
Gender prediction
“Return” illuminated
Browse by date Browse by date
Press “ok”
If you wish to conceive a boy, only have intercourse on the two days when only the “boy” symbol is
shown. If you wish to conceive a girl, only have intercourse on the two days when only the “girl” symbol
is shown. The first “boy” symbol lights up two days before the optimum conception day. The “girl”
symbol lights up one day after the optimum conception day. During the optimum conception day, both
“boy” and “girl” are illuminated. This is a calculated prognosis.
Press “ok”
“Return”
Pregnancy display
– As early as 4 to 5 days after fertilization, “red - yellow - green” blink
alternately (if an “SI” entry was made). This early display is especially
valuable to allow you to begin changing your lifestyle to prepare for
baby’s arrival.
– After the 15th day, Lady-Comp baby will display “probable pregnancy.”
The fertility symbol will blink “red – yellow – green”.
– After the 18th day post fertilization, Lady-Comp baby confirms pregnancy.
All three colors will be illuminated.
Important notes:
“Red”, “Yellow”,
“Green” blink alternately
= possible pregnancy
“Red”, “Yellow”,
“Green” blink =
probable pregnancy
“Red”, “Yellow”,
“Green” illuminated
constantly = pregnant
This menu indicates the conception date and
date of birth of your planned baby. Initially it
will be a prediction derived from the expected
ovulation day within your cycle. The predic-
tion will blink beginning on the 4th cycle day.
After ovulation has been confirmed, the calcu-
lated dates of conception and birth will remain
static. If “SI” has been entered, a gender pre-
diction will also appear.
Restart after pregnancy
In the first weeks after birth you will not be
fertile. We recommend resuming your tempera-
ture measurement six weeks after the birth of
your child. At first Lady-Comp baby shows
“yellow”. Slight fluctuations in temperature
indicate that the normal cycle is re-establishing
itself. Once the first ovulation has occurred,
Lady-Comp baby will begin to show the calcu-
lated fertility display.
Conception date and birth date
“Return” illuminated
Press “ok” Press “ok”
“Return”
Important:
Gender prediction must be activated in
the “settings” menu (page 31) in order to
receive the prognosis.

22 23
With the fertility and planning statistics you have the opportunity to
retrieve important information about planning a child successfully. After
three cycles the computer has enough information to assist with your
family planning goals.
9. Fertility and planning statistics
Fertility statistics
4. Length of luteal phase 1. Cycle length 2. Temperature increase 3. Ovulation range
Press “ok” Browse statistics Browse statistics Browse statistics Browse statistics
**
6. CLI*
5. Monophase 7. Planning hits*
“Return” illuminated
Press “ok”
“Return”
1. Average cycle length
The average length of your menstrual
cycle is shown.
2. Average temperature rise
after ovulation
The average temperature rise after
ovulation is shown.
3. Ovulation range in days
The ovulation fluctuation in days is
shown.
4. Length of luteal phase
The average length of the luteal phase
is shown.
5. Number of monophase cycles
The number of monophasic cycles are shown.
If no ovulation takes place during a cycle,
Lady-Comp will indicate this by displaying
the “red” fertility indicator each day.
6. Number of cycles with CLI (CLI =
Corpus Luteum Insufficiency)*
A corpus luteum insufficiency (CLI) will be
detected by Lady-Comp baby. The fertility
computer is able to recognize that the length
of the high level after ovulation is too short
or the temperature increase is low. This
information is important for planning a child.
7. Planning hits *
Lady-Comp baby displays planning hits.
This is the number of times sexual inter-
course has corresponded with ovulation.
The number of hits over the last 20 cycles
is only shown when you activate “SI” Sexual
Intercourse.
*Only for Lady-Comp baby
Browse statistics Browse statistics

24 25
Display: 50 days
Forward/back
+/- 7 days
Press “ok”
Display: 100 days
Temperature curve
You can view your temperature curve here.
Display range of:
25 days / 14 days / 7 days
Time span:
zoom in/out
Show more
Show less Show more Show less
1x = 25 days
Moon phase
Ovulation day
Temperature pattern
Fertility
Last day
Menstruation
Sexual intercourse
First day

26 27
This menu gives you the option of making up to 5 notes. You can enter the texts
yourself under “settings” (page 31) and change them if necessary. These inputs
have no effect on the evaluation of the cycles by the device and can be entered
retroactively for up to three previous days.
“Return” illuminated
Select input
Press “ok”
Select date
Press “ok” Press “ok”
Press “ok”
“Return”
Personal notes
Yes
10. Settings
Body Mass Index (BMI) settings
Body Mass Index: Year of birth, height, and weight.
Lady-Comp calculates your Body Mass Index.
BMI – enter name
“Return” illuminated
Press “ok” Press “ok”Enter text Press “ok” to
confirm each letter
Left arrow deletes
one letter

28 29
BMI – enter birth year
Default = 1980
Confirm year
Press “ok”
Select year of birth Enter year
BMI – enter height
Select weight Select “Return”
Press “ok”
Press “ok” Enter weight
Default = 60kg BMI calculated
Select height Enter height
Press “ok” Confirm height
Default = 170cm Home screen
Fahrenheit
12 hour am/pm | month/day
Home screen
Celsius
24 hour | day/month
Important Note:
Device settings
BMI – enter weight

30 31
Here, you can set your device to Celsius or
Fahrenheit. This will automatically change
the time and date format as follows:
°C: Time in 24-hour format and date with
day / month (i.e. 13:25 and 25.03.).
°F: Time in 12-hour format and date with
month / day (i.e. 01:35 pm and 03/25).
Temperature / time units
Press “ok” Select input field
“Return” illuminated
Enter text Confirm each letter Press “ok”
“Return”
Enter Personal Notes
Press “ok” Select “Return”
Press “ok”
Celsius Fahrenheit
°F = Fahrenheit
°C = Celsius “Return” illuminated
Gender prediction on/off
You can choose to view the boy/girl prognosis with the fertility display. If you want this
display to appear, turn it on here.
Press “ok” Display on
Display off
“Return” illuminated
Confirm Press “ok”
“Return”
Here you can make personal notes on items that might affect your
cycle. For example, if you take medication which you suspect may
affect your cycle, enter this medication here. This menu allows you
to enter up to 5 notes. To avoid changes in the order of the entries,
we recommend that you do not change the text after it has been
saved. The notes may be entered retroactively for up to 3 days. The
entries may be activated under personal notes (page 26).

32 33
Device information includes:
– The device serial number
(13547206).
– The software version
designated by the last two
numbers (-31).
– The battery display.
– Brightness displayed as a
percentage.
If the device has an error or a
warning, this will be displayed.
For a list of possible errors see
page 38.
To delete all your personal data and measurements press the “OK”
button in the delete menu 10x in a row. The indicator bar will decrease
step by step. If you press another key (left, right, up, down), the indicator
bar will revert back to the starting position and you have to press the
“OK” button 10x again in order to do the deletion. After deletion, the
individual displays will only show the sample values like a new device.
After the first new temperature measurement, the sample data will be
automatically deleted.
Cancel
“Return”
Confirm by pressing
“OK” 10 times to
completely delete data.
“Return” illuminated
Press “ok”
“Return”
Deleting data
“Return” illuminated
Signal tone indicates
end of measurement
The thermometer starts
to blink automatically
Press “ok”
“Return”
Please measure
Temperature self test Device information
“Return” illuminated
Press “ok”
“Return”
The temperature self-test can be conducted to see if the temperature
sensor is working properly. The self-test can be canceled by pressing
and holding the “OK” button for 3 seconds.
Important Note:

34 35
Brightness
You can adjust the brightness of the displays.
“Return” illuminated
Press “ok”
“Return”
Move the
brightness control
Volume
You can adjust the volume of the Lady-Comp.
“Return” illuminated
Press “ok”
“Return”
Move the
volume control Press “ok” Choose tone
“Return” illuminated
Press “ok”
“Return”
Alarm tone and key tone
Alarm tone
You can choose an alarm tone or melody.
Key tone on/off
You can turn the key tone on and off.
Press “ok” Key tone on Key tone off
“Return” illuminated
Press “ok”
“Return”
Confirm

36 37
Mini USB cable
The mini USB cable is not included, but it can be
purchased from us. Use the mini USB cable to
upload your data to your PC. You, as well as your
distributor or Valley Electronics GmbH, can ana-
lyze and evaluate your cycle data. This can be
done through our website or per email.
Upgrades: Micro SD card
If you wish to get a software update and/or an
upgrade for more functions at a later date, we will
send you an SD card.
– Open the unit as described on page 6.
– Remove batteries.
– Insert the SD card.
– After successful completion of updates/
upgrades, we recommend that you remove
the SD card again to avoid unnecessary
power consumption.
AAA battery charger
The corresponding battery charger can be ordered
from us. Insert 2 AAA batteries into the charger.
The charging status is displayed on the charger.
Insert SD card
11. Important notes:
Notch to close the device
Mini USB connector
Serial port (for
servicing only)
SD card slot
Temperature sensor
connection port
Battery compartment
and serial number
Sample values
Lady-Comp comes with pre-set example values.
These are automatically deleted once you have
taken your first temperature or entered menstrua-
tion data. The sample values will appear again if
you delete all of your data.
Loss of data
There is no risk of accidentally losing your data,
even if the batteries are depleted.
After the pill
(or hormonal contraception)
Prior to starting with Lady-Comp, you must stop
taking any form of hormonal contraception. The
first bleeding after stopping hormonal contra-
ception is not a menstruation, but a hormone-
conditioned withdrawal bleeding. Do not enter
“M” for this bleeding.
Pearl-Index
The Pearl Index is the value by which the safety
of a contraceptive method is specified in med-
icine. The daily fertility displays of Lady-Comp
have a Pearl Index of 0.7, or in other words,
99.3%.
Example:
If 100 women use contraception for one year and
one of them becomes pregnant, this corresponds
to a Pearl Index of 1.0.
Program
The program is based on all natural family plan-
ning research data. It contains a database of
more then 1 million cycles and uses biomathe-
matical forecasting calculations as well as the
very latest computer techniques. The more regu-
larly you measure, the faster the device gets to
know and interpret your individual cycle. It will
show more and more green days (infertile) and
the red days (fertile days) will decrease as the
device learns your individual rhythm. Depending
on your individual cycle pattern you will have
between 7 and 12 red days per cycle.
Prognosis
Our displays in relation to ovulation and planning
are calculated prognoses. Once a menstrual cycle
is completed and a new one begins with menstru-
ation, Lady-Comp will confirm the day of ovula-
tion retrospectively. The confirmed ovulation day
will be recognized after the 4th cycle day of your
next menstrual cycle.
Travel and time zones
When travelling in different time zones you have
the ability to change the date and time to the
local time. Set and activate the alarm to the
desired new reading time. Lady-Comp will be
ready to take your measurement the next morning.
Repeat the procedure when you return home.
Daylight Saving Time
Set the time forward or backward in the summer
or in winter, as described on page 9.
Shift work
Set and activate the alarm to the desired new
wake up time. Your computer will be ready to
take your measurement the next day. Do the
same at the next shift change.
Restart after interruption in use
The time, date, and year continue to work auto-
matically. The measurement period is disabled
when you don’t take your temperature and needs
to be reset by activating the alarm clock. Set the
alarm for the next morning (before midnight)
and continue as normal.
Analysis of your fertility data / data read out:
Log on to the website: www.raxmedical.com. You will receive your personal access code when
purchasing your cycle computer. Via a mini USB cable you can view your data on your computer.
If you have any questions about your cycle please don't hesitate to contact us.
Please send us an email: [email protected] or call us.

38 39
12. Trouble-shooting and error messages
Charge batteries
If the batteries are low, a warning is displayed
on the home screen.
Batteries depleted (112-11)
When the batteries are completely depleted, reli-
able function of the device is no longer guaran-
teed. Upon this message, no further operation is
possible.
Actions:
– Recharge/change batteries.
– If the message appears again, even though newly
Button battery low (112-12)
The device contains a button battery to ensure
that the clock continues to run even when the
batteries are depleted or not inserted. The capac-
ity is designed so that in normal use this battery
lasts about 7 years. When the voltage gradually
becomes too low toward the end of the battery
life, it displays this warning, but further use is
still possible.
Actions:
– The unit should be sent for service in the near
future, so that the button battery can be replaced.
– This message can also be shown when the
device has been exposed to extremely low tem-
peratures, and therefore the voltage is greatly
Batteries low. Please recharge the
rechargeable batteries or replace
the batteries.
recharged batteries or new batteries are inserted,
the batteries are possibly defective and/or the
batteries are depleted and should be replaced.
The batteries can be easily removed and replaced.
Please note the polarity (see page 6).
reduced. In this case, the device should be
maintained at room temperature for about one
hour. When the message switches off, the device
can be used normally.
Button battery depleted (112-13)
The button battery is fully depleted. No further
use is possible.
USB: improper function (117-1)
The device is connected via USB, but no commu-
nications can be established.
Action:
If you do not need any data transfer via USB, you
can simply unplug the USB cable. If the device
does not automatically restart, please remove the
batteries and reinsert them. If you want to make
a data transfer via USB, check the function of the
connecting cable. USB communication is only
possible with those devices that allow connec-
tion to a USB mass storage device with FAT data
file system, for example PCs running Windows or
Linux, and many other devices.
Memory almost full (111-11)
Action:
The existing data should be backed up via USB
connection or by saving to an SD card. The data
can then be deleted from the device and the
compressed data can be re-entered.
Memory full (111-12)
The memory of the device is sufficient for 20
years of records. If this period is exceeded, this
error message will appear.
Action:
The existing data should be backed up via USB
connection. The data can then be deleted from
the device and the compressed data can be
reentered. Further details can be found on our
website or by calling support.
Error message/bootloader error
(120-1)
If a software update is canceled and the program
has not been fully resaved (i.e. dead battery) this
error message will appear. The number after the
dash will indicate the exact cause of the error.
Error message:
120-2 to 120-7 inclusive, please contact technical
support.
Action:
The bootloader is able to reprogram the device
even without a utilization program. To do this,
insert the micro SD update card and the batter-
ies into the device. The bootloader will erase
the program memory first and then reinstall the
update. You can follow the progress on the indi-
cator bar. Make sure that you use fully charged
batteries for the update so that the process can
be completed.
M input: check (111-10)
If the device has not taken any temperature
measurements or M input for a long period of
time (4 days) and a new cycle start is expected
during this time, it will remind the user to enter
any possibly forgotten data retroactively.
Action:
– Activate M retroactively.
Other manuals for Lady-Comp
8
This manual suits for next models
1
Table of contents
Other Valley Electronics GPS manuals