ValueHD VHD-V61 User manual

VHD-V61
HD Video Conferencing Camera
User Manual
V1.2
(English)
ValueHD Corporation

ValueHD Corporation
1
Preface
Thanks for using this HD Video Conferencing Camera.
This manual introduces the function, installation and operation of the HD camera. Prior to installation and
usage, please read the manual thoroughly.
Precautions
This product can only be used in the specified conditions in order to avoid any damage to the camera:
Don‟t subject the camera to rain or moisture.
Don‟t remove the cover. Otherwise, you may get an electric shock. In case of abnormal operation,
contact the authorized engineer.
Never operating under unspecified temperature , humidity and power supply.
Please use the soft dry cloth to clean the camera. If the camera is very dirty, clean it with diluted neuter
detergent; do not use any type of solvents, which may damages the surface.
Note:
This is class A production. Electromagnetic radiation at the specific frequency may affect the image quality
of TV in home environment

ValueHD Corporation
2
Contents
Note............................................................................................................................................................................3
SuppliedAccessories .................................................................................................................................................4
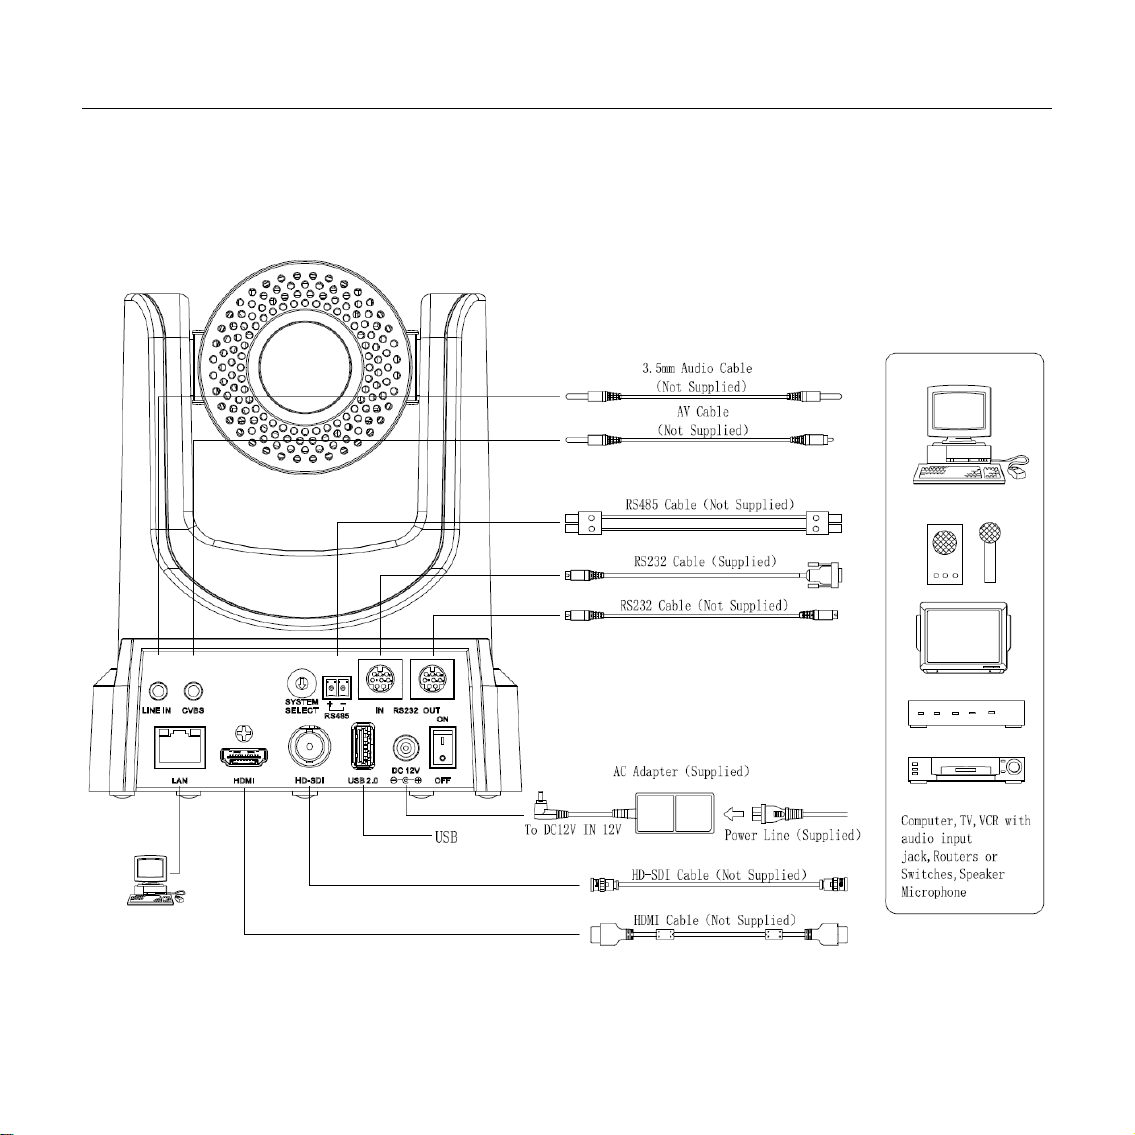
Quick Start.................................................................................................................................................................5
Features......................................................................................................................................................................8
Product Specification.................................................................................................................................................9
Main Unit.................................................................................................................................................................12
Size...........................................................................................................................................................................13
IR Remote Controller Explanation ..........................................................................................................................14
USE IR Remote Controller......................................................................................................................................17
RS-232 Interface......................................................................................................................................................20
VISCA Network Configuration ...............................................................................................................................21
Serial Communication Control ................................................................................................................................22
VISCA Command List.............................................................................................................................................23
Menu Setting............................................................................................................................................................24
Internet connection(Only the network models)........................................................................................................29
Maintenance and Troubleshooting...........................................................................................................................39

ValueHD Corporation
3
Note
Electric Safety
Installation and operation must accord with electric safety standard.
Caution to transport
Avoid stress, vibration and soakage in transport, storage and installation.
Polarity of power supply
The power supply of the product is +12V, the max electrical current is 2A .Polarity of the power supply plug
drawing as follows.
Careful of installation
Do not grasp the camera head when carrying the camera. Don‟t turn camera head by hand. Doing so may
result in mechanical damage.
Don‟t apply in corrosive liquid, gas or solid environment to avoid damaging the cover which is made up of
plastic material.
To make sure no obstacle in rotation range.
Never power on before installation is not completed.
Don’t dismantle the camera
We are not responsible for any unauthorized modification or dismantling.
CAUTION!
The specific frequency of electromagnetic field may affect the image of the camera!

ValueHD Corporation
4
Supplied Accessories
When you unpack, check that all the supplied accessories are included:
Camera ...................................... 1PCS
AC power adaptor ..................... 1PCS
Power cord.................................. 1PCS
RS232 cable................................ 1PCS
Remote controller........................ 1PCS
User manual .............................. 1PCS

ValueHD Corporation
5
Quick Start
Step1. Please check connections are correct before starting

ValueHD Corporation
6
Step2. Setting of the system select switch
The option of video format:
VIDEO SYSTEM
0
1080p60
8
-
1
1080p50
9
-
2
1080i60
A
-
3
1080i50
B
-
4
720p60
C
-
5
720p50
D
576i
6
1080p30
E
480i
7
1080p25
F
-
CAUTION:
a. After changing the switch, you need to restart the camera to take effect.
Step3. Press the Switch ON/OFF button on the rear of the camera, the power lamp light.
Step4. Pan-Tilt will rotate to the maximum position of top right after the camera started, then it return to the center,
the process of initialization is finished. (Note: If the position preset 0 has been stored, the position preset 0 will be
called up after initialization)
Step5. (Optional) If you want to restore the factory default settings, Press [MENU] button to display the OSD
menu. Select the item [MENU] -> [RESTORE DEFAULT] -> [Restore]. Set the value [Yes], press [HOME]
button to restore the factory default settings.

ValueHD Corporation
7
RESTORE DEFAULT
Restore Yes
Change Value
[Home] OK
[Menu] Back

ValueHD Corporation
8
Features
H.265 Support
The first conference video camera which support H.265 encoding in the world, enabling full HD 1080p/60
video stream by ultra-low bandwith.
1080PFull HD
Adopt Panasonic's 1/2.7 inch, 2.07 million pixels high quality HD CMOS sensor, which can achieve
maximum 1920 x 1080 high resolution and quality image with highest output frame rate 60 fps.
Low-light
High SNR of CMOS sensor combined with 2D and 3D noise reduction algorithm, effectively reduce the
noise, even under low illumination conditions, picture can still keep clean and clear.
Abundant & Perfect interface
Support HDMI output, 3G-SDI interface, effective transmission distance up to 100 meters.
72.5°angle of view, 12x Optical + 16x Digital Zoom
Use high quality super wide-angle lens, the max angle of view is 72.5°, support 12x optical zoom, and 16x
digital zoom.
Remote Control
Using RS232/485 interface, all the parameters of the camera can be remote controled by the high-speed
communications.
Network encoded output
Support multi-channel of video streams output..

ValueHD Corporation
9
Product Specification
Model
VHD-V61
Name
HD Video Conferencing Camera
Camera
Video System
HD: 1080p/60, 1080p/50, 1080i/60, 1080i/50, 1080p/30, 1080p/25, 720p/60, 720p/50
SD: NTSC, PAL
Sensor
1/2.7 inch, CMOS, Effective Pixel: 2.07M
Scanning Mode
Progressive
Lens
12x, f3.5mm ~ 42.3mm, F1.8 ~ F2.8
Digital Zoom
16x
Minimal Illumination
0.05 Lux @ (F1.8, AGC ON)
Shutter
1/25s ~ 1/10000s
White Balance
Auto, 3000K/Indoor, 4000K,5000K/Outdoor,6500K-1,6500K-2,6500K-3, One Push, Manual
Backlight Compensation
Support
Digital Noise Reduction
2D&3D Digital Noise Reduction
Video S/N
≥55dB
Horizontal Angle of View
72.5°~ 6.9°
Vertical Angle of View
44.8°~ 3.9°
Horizontal Rotation Range
±170°
Vertical Rotation Range
-30°~ +90°
Pan Speed Range
1.7°~ 100°/s
Tilt Speed Range
1.7°~ 69.9°/s
H & V flip
Support
Number of Preset
255
Preset Accuracy
0.1°
IPC Video Features

ValueHD Corporation
10
Video coding standard
H.265/H.264
Video Stream
Main stream, Sub stream
Main stream resolution
1920x1080, 1280x720
Sub stream resolution
720x480, 320x240
Bit Rate
128K,256K,384K,512K,768K,1024K,1536K,2048K,3072K,4096K,5120K,6144K,8192K
Bit Rate Type
Variable rate, Fixed rate
Maximum Frame
PAL:1-25, NTSC:1-30.
Audio encode standard
AAC
Audio stream rate
96K, 128K, 256K
Support protocols
TCP/IP, HTTP, DDNS, RTSP, RTMP, PPPoE, SMTP, UPnP, SNMP, FTP(Optional)
Input/Output Interface
HD Output
1xHDMI: Version 1.3
1x3D-SDI: BNC type, 800mVp-p, 75Ω, Along to SMPTE 424M standard
SD Output
1xCVBS: RCA jack, 1Vp-p, 75Ω
Network interface
1xRJ45: 10M/100M Adaptive Ethernet ports
Audio Input
1-ch 3.5mm audio interface, Line In
USB
1xUSB2.0: type A jack
Communication interface
1xRS-232 IN: 8pin Min DIN, Max Distance: 30m, Protocol: VISCA/Pelco-D/Pelco-P
1xRS-232 OUT: 8pin Min DIN, Max Distance: 30m, Protocol: VISCA network use only
1xRS-485: 2pin Phoenix Port, Max Distance: 1200m, Protocol: VISCA/Pelco-D/Pelco-P
Power jack
JEITA type (DC IN 12V)
Generic Specification
Input Voltage
DC 12V
Current Consumption
1.0A (Max)
Operating Temperature
-5°C ~ 40°C
Storage Temperature
-20°C ~ 60°C
Power Consumption
12W (Max)

ValueHD Corporation
11
Dimensions
169mm x 142mm x 164mm
Weight
1.5Kg

ValueHD Corporation
12
Main Unit
1. Audio LINE IN Interface 7. Network Interface
2. CVBS Interface 8. HDMI Interface
3. System select switch 9. HD-SDI Interface
4. RS485 interface 10. USB2.0
5. RS232 interface 11. DC 12V jack
6. RS232 OUT interface 12. Power switch

ValueHD Corporation
13
Size

ValueHD Corporation
14
IR Remote Controller Explanation
0. Standby Button
Press this button to enter standby mode. Press it
again to enter normal mode.
(Note: Power consumption in standby mode is
approximately half of the normal mode)
1. Position Buttons
To set preset or call preset
2. * Button
3. Set/Clear Preset Buttons
Set preset: Store a preset position
[SET PRESET] + Numeric button (0-9): Setting a
corresponding numeric key preset position
Clear preset: Erase a preset position
[CLEAR PRESET] + Numeric button (0-9)
Or: [*]+[#]+[CLEAR PRESET]: Erase all the
preset individually
4. BLC (Backlight Compensation) Button
BLC ON/OFF: Press this button to enable the
backlight compensation. Press it again to disable
the backlight compensation.(NOTE: Effective
only in auto exposure mode)
Note: If a light behind the subject, the subject will

ValueHD Corporation
15
become dark. In this case, press the backlight ON / OFF button. To cancel this function, press the backlight ON /
OFF button.
5. Focus Buttons
Used for focus adjustment.
Press [AUTO] adjust the focuses on the center of the object automatically. To adjust the focus manually, press the
[MANUAL] button, and adjust it with [Focus+] (Focus on far object) and [Focus-] (Focus on near object)
6. Camera Select Buttons
Press the button corresponding to the camera you want to operate with the remote controller.
7. # Button
8. Pan/Tilt Control Buttons
Press arrow buttons to perform panning and tilting. Press [HOME] button to face the camera back to front
9. Menu Setting
Menu button: Press this button to enter or exit the OSD menu
10. Zoom Buttons
Zoom : Zoom In
Zoom : Zoom Out
11. Set Camera IR Address Buttons
[*]+[#]+[F1]: Address1
[*]+[#]+[F2]: Address2
[*]+[#]+[F3]: Address3
[*]+[#]+[F4]: Address4

ValueHD Corporation
16
12. Image freezing function
Open the freezing function after press [F4], display "Freeze" on the left upper corner character, after 5 seconds
display disappear automatically. If you want to cancel the freeze, press [F4] key and then can return to normal,
display "Unfreeze" on the left upper corner, after 5 seconds display disappear automatically.

ValueHD Corporation
17
USE IR Remote Controller
When the camera is working, you can use
remote controller to perform panning, tilting,
zooming and focusing, store and call back preset
positions.
Button Instruction:
1. In this instruction, „press the button‟ means
the press and relax the two actions. Such as „press
[HOME] button‟ means to press the [HOME] key
and then relax action, and a special note will be
given if a hold down for more than one second is
required.
2. When a button-combination is required, do it
in sequence. For example, „[*] + [#] + [F1]‟means
press [*] first and then press [#] and press [F1] at
last.
1. Pan/Tilt Control
Move up: Press [ ]
Move down: Press [ ]
Move left: Press [ ]
Move right: Press [ ]
Face the camera back to front: Press [HOME]
Press and hold the up/down/left/right button,
the camera will keep rotating from slow to fast, until
it run to the mechanical limit; the camera stops as
soon as the button is released.
2. Zoom
Zoom Out: press [ZOOM ] button
Zoom In: press [ZOOM ] button
Press and hold the button, the camera will keep
zooming in or zooming out and it stops as soon as
the button is released.

ValueHD Corporation
18
3. Focus Control
Focus Far: Press [FOCUS+] button (NOTE:
Effective only in manual focus mode)
Focus Near: Press [FOCUS-] button (NOTE:
Effective only in manual focus mode)
Press and hold the button, the action of focus
continues and stops as soon as the button is released.
AUTO: Change focus mode to AF, adjusting the
focus automatically.
MANUAL: Change focus mode to MF, adjusting the
focus manually.
4. Backlight Switch
BLC ON/OFF: Press this button to enable the
backlight compensation. Press it again to disable the
backlight compensation. (Note: Backlight is only
effective in full auto exposure mode)
5. Presets Set/Clear
1. To store a preset position: The users should
press the [SET PRESET] button first and then press
the numeric button 0-9.
10 preset positions in total are available.
2. To erase the memory content of a preset
position: The users should press the [CLEAR
PRESET] button first and then press the numeric
button 0-9.
Note:
Press [*]+[#]+[CLEAR PRESET] will erase all
preset individually positions in the memory.

ValueHD Corporation
19
6. Recalling the Preset
Press any of the numeric buttons 0-9 directly to
recall stored preset positions and settings.
Note:
No action is executed if a relative preset
position is not stored.
7. Camera Selection
Press the button corresponding to the camera
you want to operate.
8. Camera IRAddress Set
[*]+[#]+[F1]: Address1
[*]+[#]+[F2]: Address2
[*]+[#]+[F3]: Address3
[*]+[#]+[F4]: Address4
9. Shortcut Set
[*]+[#]+[1]: OSD menu default English
[*]+[#]+[3]: OSD menu default Chinese
[*]+[#]+[4]: Default IP address
[*]+[#]+[5]: Save OSD
[*]+[#]+[6]: Quickly recover the default
[*]+[#]+[8]: Look the camera version
[*]+[#]+[9]: Quickly set up inversion
Table of contents
Popular Camcorder manuals by other brands

Rosco
Rosco Dual-Vision XC4 Installation & operating instructions

Samsung
Samsung SC-D6040 Owner's instruction book

Tiger Electronics
Tiger Electronics VCamNow user guide

Panasonic
Panasonic VDR-D300 (English, Spanish) operating instructions

Choo Choo Vision
Choo Choo Vision CAB-CAM 6 user guide

KJB
KJB XtremeLife WIRELESS PIR QUAD manual