Vibocold TM 500 User manual

DK Brugsanvisning
NO Bruksanvisning
NL Genruiksaanwijzing
UK Instructions for use.
DE Bedienungsanleitung
FR Mode d’emploi

2
GB
In case this appliance contains hydrocar-
bon refrigerant please refer to guidelines
listed below.
As the appliance contains a ammable
refrigerant, it is essential to ensure that the
refrigerant pipes are not damaged.
Standard EN378 species that the room in
which you install your appliance must have
a volume of 1m³ per 8 g of hydrocarbon
refrigerant used in the appliances. This is
to avoid the formation of ammable gas/
air mixtures in the room where the appli-
ance is located in the event of a leak in the
refrigerant circuit. The quantity of the refrig-
erant used in your appliance is indicated on
the rating plate.
WARNING: Keep ventilation openings in
the appliance’s cabinet or in
the built-in structure clear of
obstruction
WARNING: Do not use other mechanical
devices or other means to ac-
celerate the defrosting process
than those recommended by
the manufacturer
WARNING: Do not damage the refrigerant
system
WARNING: Do not use electrical appli-
ances inside the refrigerated
storage compartment, unless
they are of a type recommend-
ed by the manufacturer
WARNING: Do not expose the appliance
to rain
WARNING: This appliance is not intended
for use by young children or
inrm persons unless they have
been adequately supervised by
a responsible person to ensure
that they can use the appliance
safely. Young children should
be supervised to ensure that
they do not play with the appli-
ance
● Always keep the keys in a separate place
and out of reach of children
● Before servicing or cleaning the appli-
ance, unplug the appliance from the
mains or disconnect the electrical power
supply
● If the supply cord is damaged, it must be
replaced by the manufacturer, its service
agent, or similarly qualied persons in
order to avoid a hazard
● Relevant for Australia: Supply cord
tted with a plug complies with AS/NZS
3112.
● Frost formation on the interior evaporator
wall and upper parts is a natural phenom-
enon. Therefore, the appliance should
be defrosted during normal cleaning or
maintenance.
● Please note that changes to the appli-
ance construction will cancel all warranty
and product liability
Warning

3
GB
Warning ..................................................2
Before use ..............................................3
Get to know your chest freezer...............4
Installation and start-up. .........................5
Electrical connection...............................6
Operation and function ...........................7
Use .........................................................8
Defrosting ...............................................9
Cleaning and maintenance ...................10
Fault nding .......................................... 11
Warranty, spare part and service.. ........12
Disposal. ...............................................13
Contents
Before use
Before operating your new appliance,
please read the following instructions care-
fully as they contain important information
on safety, installation, operation and main-
tenance. Keep the instructions for future
reference.
On receipt check to ensure that the appli-
ance has not been damaged. Transport
damage should be reported to the local dis-
tributor before the appliance is put to use.
Remove the packaging. Clean the inside of
the cabinet using warm water with a mild,
perfume-free detergent. Rinse with clean
water and dry thoroughly (see cleaning
instructions). Use a soft cloth.
If the appliance has been stored in cold
surroundings (colder than +5 °C), it must
be allowed to stabilise for at least an hour
before being switched on.
If the appliance has been stood on end dur-
ing transport, it must be allowed to stabilise
in normal position for approx. 12 hours
before being switched on.

4
GB
Get to know your chest freezer
Handle
Lamp
Sealing strip
Nameplate
Partition/defrost
water tray
Basket
Frezing compartment
Ventalation grille
Mechanical control
panel
Defrost water drain
Foot
g. 1
CONTROL
SUPER MAX
MIN

5
GB
Installation and start-up
Placement
For safety and operational reasons, the ap-
pliance must not be installed outdoors.
The appliance should be placed on a
stable, level surface in a dry, well-ventilated
room (max. 75% relative air humidity).
Never place the appliance close to sources
of heat such as cookers or radiators, and
avoid placing it in direct sunlight.
Room temperature
The climate class is stated on the name-
plate (see page 12). This species the
optimum room temperature.
Climate
class
Optimum room
temperature
SN +10 ºC à +32 ºC
N +16 ºC à +32 ºC
ST +18 ºC à +38 ºC
T +18 ºC à +43 ºC
If the room temperature is sub zero, the ap-
pliance will not function correctly.
Ventilation
It is important that the appliance be well
ventilated and that air can circulate unhin-
dered above, below and around it. Figure 2
illustrates how the necessary air circulation
can be ensured.
There must be at least 15 mm clearance
between the base of the appliance and the
oor.
IMPORTANT! There must be free access to
the ventilation grille (g. 3).
100 mm
800 mm
20 mm 100 mm
CONTROL
SUPER MAX
MIN
g. 2
g. 3
g. 2

6
GB
The appliance is intended for connection to
alternating current. The required voltage (V)
and frequency (Hz) are stated on the name-
plate on the rear of the appliance. Power
must be connected via an independent wall
socket outlet.
If the mains lead has been damaged, it
must be replaced with a corresponding
type supplied by the manufacturer or an
approved service centre.
Electrical connection
Technical data
This device complies with relevant EU
directives including Low Voltage Directive
2006/95 EEC. and Electromagnetic Com-
patibility Directive 2004/108/EC
The rating plate provides various techni-
cal information as well as type and serial
number.

7
GB
Operation and function
Mechanical controls
In addition to a thermostat knob, the control
panel contains two control lamps and a but-
ton (g. 4). Control panel design and lamp
position may vary.
The green lamp is lit when power is cor-
rectly supplied.
The yellow lamp is lit when the Super
Freeze button has been pressed (see Super
Freeze).
Starting up
Connect the appliance to the socket outlet.
The green lamp lights up to indicate that
power is supplied. The red lamp on the con-
trol panel will also light up to indicate that
the temperature inside the freezer is not yet
sufciently low.
Temperature setting
The temperature is set by turning the
thermostat knob from MIN to MAX. It is
recommended that a coin be used to turn
the knob. The more the thermostat knob is
turned towards MAX, the lower the tempera-
ture. To test whether the setting is correct,
measure the temperature of the uppermost
item in the centre of the freezer.
It must be no warmer than –18 °C.
Super Freeze
If more than 3 kg of fresh items are to be
frozen, proceed as follows:
1. Press the Super Freeze button (the
yellow lamp lights up). The freezer then
operates at maximum capacity (the com-
pressor runs continuously).
2. Activate Super Freeze 24 hours before
placing fresh items in the freezer.
3. After placing fresh items in the freezer,
leave Super Freeze on for a further 24
hours.
4. Then press the Super Freeze button
again (the yellow lamp goes off).
-18
g. 4

8
GB
Freezer
The appliance is a four-star freezer ap-
proved for freezing and storing frozen items
of food.
Freezing
To keep food at its best, items must be
frozen to –18 °C as quickly as possible.
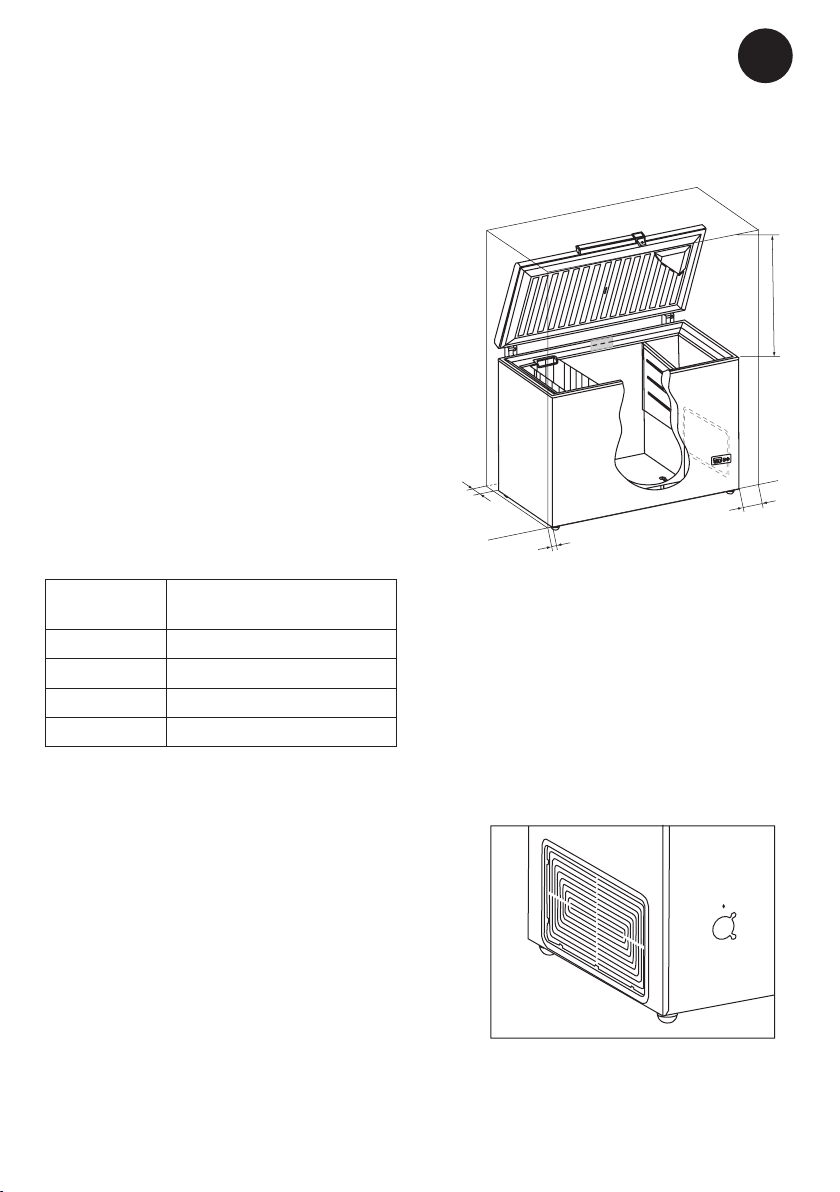
The freezing capacity of the freezer is
stated on the nameplate in kg/24 hours (see
page 12).
Activating the Super Freeze function reduc-
es freezer temperature to –25 °C. If items
weighing 3 kg or more are to be frozen, the
Super Freeze button should be activated
about 24 hours in advance.
To freeze smaller quantities, it is sufcient
to activate Super Freeze just a couple of
hours in advance, or even at the same time
as items are placed in the freezer.
There is no need to use Super Freeze when
pre-frozen items are placed in the freezer or
when small, single items are involved.
Only freeze high-quality fresh products.
Meat, poultry, sh, vegetables, fruit, dairy
products and ready-made meals are suit-
able for freezing. Items with a high water
content, e.g. lettuce, radishes, grapes, ap-
ples, pears and cucumbers, are not suitable
for freezing.
Pack items to be frozen in airtight contain-
ers, freezer bags or similar. Freeze items in
suitable portions. Do not freeze vegetables
or meat in portions larger than 2.5 kg. Keep
packages dry to prevent them from freezing
together. To ensure rapid freezing, make
sure, as far as possible, that items placed
in the freezer are not touching each other.
Ensure that there is as little air in the pack-
Use
ages as possible to prevent the surfaces of
the items from drying out.
Items to be frozen should be placed in the
freezing compartment or evenly distributed
along the inner walls of the freezer.
Always remember to write the date, content
and quantity on the packages before plac-
ing them in the freezer. It is a good idea
to group items within the freezer. Keep
vegetables in one place, meat in another,
and so on.
There must be at least 5 mm clearance
between the lid and items stored in the
freezer.
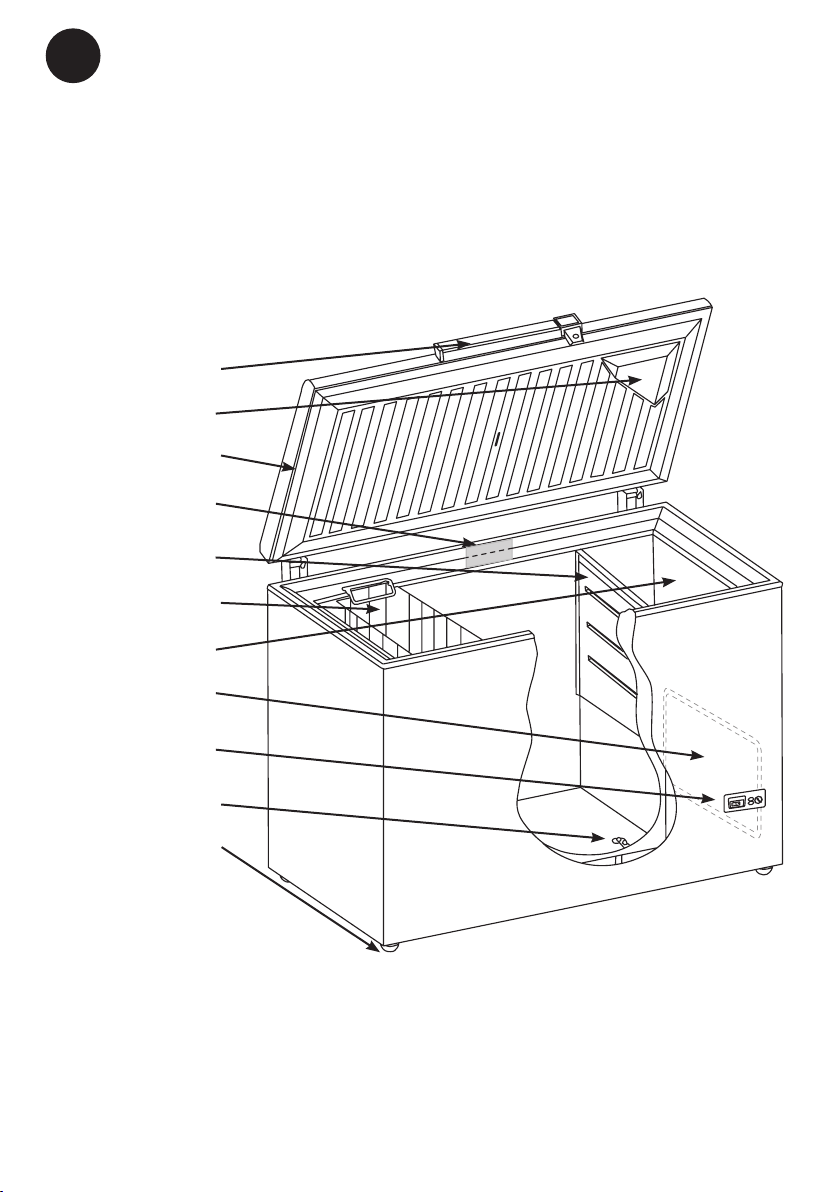
Items stored in the baskets are highly vis-
ible and easily accessible (g. 5).
Thawing
Frozen vegetables and fruit require no
thawing before use and can be immersed in
boiling water directly from the freezer.
To thaw meat, it is advisable to take it out
of the freezer the day before it is to be used
and place it in a refrigerator to defrost. This
ensures the best hygiene and maintains
meat quality as much as possible.
Note:
Glass bottles or cans containing carbon-
ated (zzy) drinks must never be placed
in the freezer as they may explode.
g. 5

9
GB
The items stored and the humidity of the air
gradually cause frost and ice to form in the
freezer. A thin layer of frost or ice does not
affect freezer performance, but the thicker
the layer, the higher the energy consump-
tion. Small amounts of loose frost can be
removed using a plastic scraper.
Never use electrical apparatus or sharp im-
plements as these may damage the inside
of the appliance.
When the layer of frost and ice exceeds
4-5 mm the freezer should be completely
defrosted. It is recommended that defrost-
ing be performed when there are no or only
a few items stored in the freezer.
Proceed as follows:
1. Press the Super Freeze button 4-5
hours before defrosting. This lowers the
temperature of the items stored to ap-
prox. –25 °C, thus prolonging the length
of time they remain frozen after having
been removed from the freezer (see step
3 below).
2. Disconnect the power supply.
3. Remove the items of food. Place them
in a refrigerator or wrap them up to keep
them as cold as possible.
4. Keep the freezer lid open.
5. Position the partition under the defrost
water drain.
6. Place a bowl of hot (but not boiling) water
in the freezer, close the lid and wait ap-
prox. 30 minutes before removing loose
frost with the plastic scraper.
7. To prevent water from damaging the oor
during defrosting, it is advisable to check
the defrost water tray from time to time
and to cover the oor around the defrost
water drain to protect against ice and
Defrosting
splashes. When all the frost and ice have
melted, clean the inside of the cabinet
using water with a mild, perfume-free de-
tergent. Dry the freezer with a soft cloth.
8. Reconnect the power supply. If many
items are to be returned to the freezer,
activate the Super Freeze button.
9. Return items to the freezer approx. 5
minutes after having switched it on.
Remember to reinsert the stopper in the
defrost water drain.
g. 6

10
GB
Cleaning and maintenance
Cleaning
Before cleaning, disconnect the power sup-
ply and remove all loose ttings.
The cabinet is best cleaned using warm
water (max. 65 °C) with a little mild,
perfume-free detergent. Never use cleaning
agents that scour. Use a soft cloth. Rinse
with clean water and dry thoroughly. It is
important to prevent water from entering the
control panel.
The sealing strip around the lid must be
cleaned regularly to prevent discolouration
and prolong service life. Use clean water.
After cleaning the sealing strip, check that it
continues to provide a tight seal.
The ventilation grille must be kept free
of dust and dirt. Clean it with a vacuum
cleaner.
If the appliance is not to be used for any
length of time, switch it off, disconnect the
power supply, empty it, clean the cabinet
and leave the lid open to allow air circula-
tion and prevent smells.
Replacing the bulb
1. Disconnect the power supply by pulling
the plug out of the socket.
2 . Remove the lamp cover by pressing its
upper edge downwards to release it from
the two clips (g. 7).
3. Replace the bulb(s).
4. Ret the cover and reconnect the power
supply.
Save energy
● Cool hot food and beverages before plac-
ing them in the freezer.
● Thaw frozen items in a refrigerator.
● Keep the lid closed as much as possible.
● Check regularly that the lid closes tightly.
● Position the freezer in a cool (min. 5 °C
well-ventilated room.
● Place frozen items in a refrigerator while
defrosting the freezer.
● Defrost the freezer before the layer of ice
becomes excessively thick.
max.
15 W
g. 7

11
GB
Fault nding
Fault Possible cause Remedy
No light in display. There is not enough light for the solar
sensor.
Turn on the light.
No control lamps are
lit.
The appliance is switched off.
Power failure; the fuse is blown; the
appliance is not plugged in correctly.
Check the plug and socket.
Check that power is connected.
Reset the fuse.
Temperature in freezer
too high.
The ventilation grille is blocked.
The lid is not closed properly.
The quantity of fresh items placed
in the freezer is greater than the
capacity of the appliance.
Thick layer of frost and ice.
The thermostat is set too high.
Ensure unhindered air circulation.
Close the lid and wait a few hours.
Wait a few hours.
Defrost the freezer.
Set the thermostat to a lower
temperature.
Temperature in freezer
too low.
Super Freeze is activated.
The thermostat is set too low.
The lid is touching items stored in the
freezer.
Switch Super Freeze off.
Set the thermostat to a higher
temperature.
Reposition items inside the freezer
and check that the lid closes tightly.
The freezer produces
large quantities of frost.
Air humidity in the room is high.
Items placed in the freezer are giving
off moisture.
Ventilate the room more often or
move the freezer to a room with lower
humidity.
Repack items stored in the freezer.
The lid cannot be
opened.
There is underpressure in freezer. Wait 2-3 minutes until the
underpressure has been equalised
and try again.
Vibration and unusual
noise.
The appliance is not on a level
surface.
The appliance is not free standing.
Baskets or partition are loose.
Position the freezer on a at, level
and stable surface.
Move the appliance away from other
appliances or pieces of furniture.
Check movable ttings and reposition
them.

12
GB
Warranty, spare parts and service
Warranty disclaimer
Faults and damage caused directly or
indirectly by incorrect operation, misuse,
insufcient maintenance, incorrect building,
installation or mains connection. Fire, ac-
cident, lightening, voltage variation or other
electrical interference, including defective
fuses or faults in mains installations are not
covered by the warranty.
Repairs performed by others than approved
service centres and any other faults and
damage that the manufacturer can sub-
stantiate are caused by reasons other than
manufacturing or material faults are not
covered by the warranty.
Please note that changes to the construc-
tion of the appliance or changes to the
component equipment of the appliance will
invalidate warranty and product liability, and
the appliance cannot be used lawfully. The
approval stated on rating plate will also be
invalidated.
Transport damage discovered by the buyer
is primarily a matter to be settled between
the buyer and the distributor, i.e. the dis-
tributor must ensure that such complaints
are resolved to the buyer’s satisfaction.
Before calling for technical assistance,
please check whether you are able to rectify
the fault yourself. If your request for assist-
ance is unwarranted, e.g. if the appliance
has failed as a result of a blown fuse or
incorrect operation, you will be charged
the costs incurred by your call for technical
assistance.
Spare parts
When ordering spare parts, please state
the type, serial and product numbers of
your appliance. This information is given on
the rating plate. The rating plate contains
various technical information, including type
and serial numbers.
Product number.

13
GB
Disposal
Information for Users on Collection
and Disposal of Old Equipment and
used Batteries
These symbols on the products,
packaging, and/or accompanying
documents mean that used electri-
cal and electronic products and
batteries should not be mixed with
general household waste. For proper
treatment, recovery and recycling
of old products and used batteries,
please take them to applicable collec-
tion points, in accordance with your
national legislation and the Directives
2002/96/EC and 2006/66/EC.
By disposing of these products and
batteries correctly, you will help to
save valuable resources and prevent
any potential negative effects on
human health and the environment
which could otherwise arise from
inappropriate waste handling.
For more information about collec-
tion and recycling of old products and
batteries, please contact your local
municipality, your waste disposal
service or the point of sale where you
purchased the items.
Penalties may be applicable for incor-
rect disposal of this waste, in accord-
ance with national legislation.
For business users in the Euro-
pean Union.
If you wish to discard electrical and
electronic equipment, please contact
your dealer or supplier for further
information.
[Information on Disposal in other
Countries outside the European
Union]
These symbols are only valid in the
European Union. If you wish to dis-
card this product, please contact your
local authorities or dealer and ask for
the correct method of disposal.
Note for the battery symbol (bot-
tom two symbol examples):
This symbol might be used in combi-
nation with a chemical symbol. In this
case it complies with the requirement
set by the Directive for the chemical
involved.

2
DE
WARNUNG: Das Gerät ist nicht für den
Gebrauch durch kleine Kinder
bestimmt, es sei denn, dass
es ausreichend von einer ver-
antwortlichen Person überprüft
ist, dass sie das Gerät vertret-
bar verwenden können. Kleine
Kinder müssen beaufsichtigt
werden, um sicherzustellen,
dass sie nicht mit dem Gerät
spielen. Der Schlüssel ist an
einer separaten Stelle und
unzugänglich für Kinder aufzu-
bewahren.
● Vor Reparatur oder Reinigung des Gerä-
tes den Netzstecker von der Steckdose
ziehen.
● Wenn die Anschlussleitung beschädigt
ist, muss sie nur vom Hersteller, dem
Serviceagent des Herstellers oder einem
anderen Fachmann ausgewechselt wer-
den, um Gefahr zu vermeiden.
● Bildung von Reif auf der inneren Ver-
dampferplatte und den obersten Teile
ist normal. In Verbindung mit Reinigung
oder Wartung muss das Gerät deshalb
entfrostet werden.
● Beachten Sie bitte, dass Änderungen der
Konstruktion dieses Gerätes zur Folge
haben, dass die Garantie und Produkten-
haftung erlöschen.
Falls dieses Gerät Kohlenwasserstoff-Kälte-
mittel enthält, sehen Sie bitte die untenste-
henden Richtlinien.
Da ein brennbares Gas als Kältemittel in
diesem Gerät dient, ist es wichtig sicher-
zustellen, dass kein Teil des Kühlkreislaufs
oder der Röhren beschädigt ist.
Der Standard EN378 speziziert, dass der
Raum, in dem das Gerät installiert wird,
ein Volumen von 1m³ pro 8 g Kohlenwas-
serstoff-Kältemittel, das im Gerät verwen-
det ist, haben soll. Dies ist zu beachten,
um die Bildung von leicht entzündlichen
Gasgemischen in dem Raum, wo das Gerät
installiert ist, zu vermeiden, falls eine Un-
dichtigkeit des Kuhlkreislaufs entsteht. Die
Menge von Kältemittel im Gerät ist auf dem
Typenschild angegeben.
WARNUNG: Decken Sie die Lüftungs-
öffnungen im Kabinett am
Gerätes oder am Einbaumodul
nicht ab.
WARNUNG: Verwenden Sie keine anderen
mechanischen Geräte oder
Hilfsmittel um den Entfros-
tungsprozess zu beschleuni-
gen, als die Geräte, die vom
Hersteller empfohlen sind.
WARNUNG: Beschädigen Sie nicht den
Kühlkreislauf.
WARNUNG: Verwenden Sie keine elektri-
schen Geräte im Gerät, es sei
denn, dass die Geräte vom
Hersteller empfohlen sind.
WARNUNG: Das Gerät nicht dem Regen
aussetzen.
Warnung

3
DE
Warnung .................................................2
Vor dem Gebrauch .................................3
Lernen Sie Ihr Gefriergerät kennen. .......4
Inbetriebnahme und Installation. ............5
Elektrischer Anschluss ...........................6
Bedienung und Funktion.........................7
Gebrauch ................................................8
Abtauen ..................................................9
Reinigung und Wartung ........................10
Fehlersuche .......................................... 11
Reklamation, Ersatzteile und Service.. .12
Entsorgung. ..........................................13
Inhalt
Vor dem Gebrauch
Vor dem Gebrauch Ihres neuen Geräts soll-
ten Sie diese Bedienungsanleitung gründ-
lich lesen. Sie enthält wichtige Informatio-
nen zu Sicherheit, Installation, Betrieb und
Wartung. Bewahren Sie die Bedienungs-
anleitung auf. Sie könnten Sie zu einem
späteren Zeitpunkt evtl. benötigen.
Kontrollieren Sie das Gerät sofort bei
Lieferung auf eventuelle Beschädigungen.
Transportschäden sind dem Händler zu
melden, bevor das Gerät in Gebrauch
genommen wird.
Verpackung entfernen. Reinigen Sie das
Gerät innen mit warmem Wasser, dem Sie
etwas unparfümiertes Spülmittel zugeben.
Mit klarem Wasser nachwischen und gründ-
lich trocknen (siehe „Reinigung“). Verwen-
den Sie ein weiches Tuch.
Wurde das Gefriergerät bei Temperaturen
unter +5 °C gelagert, muss vor dem ersten
Einschalten mindestens eine Stunde zur
Akklimatisierung vergehen.
Wurde das Gerät hochkant stehend trans-
portiert, muss es vor dem ersten Einschal-
ten etwa 12 Stunden lang in normaler Lage
stehen.

4
DE
Lernen Sie Ihr Gefriergerät kennen
Abb. 1
CONTROL
SUPER MAX
MIN
Handgriff
Beleuchtung
Dichtleiste
Typenschild
Trennwand/Tau-
wasserschale
Korb
Gefrierraum
Ventilationsrost
Mechanisches
Bedienungsfeld
Tauwasserabuss
Fuß

5
DE
Inbetriebnahme und Installation
Aufstellort
Aus Sicherheits- und betriebstechnischen
Gründen darf das Gerät nicht im Freien
aufgestellt werden.
Stellen Sie das Gefriergerät auf einen ebe-
nen, waagerechten und festen Untergrund
in einem trockenen, gut belüfteten Raum
(max. 75% relative Luftfeuchtigkeit).
Stellen Sie die Truhe nicht in unmittelbarer
Nähe von Wärmequellen wie Herden oder
Heizkörpern auf, und vermeiden Sie direkte
Sonneneinstrahlung oder Wärme von ande-
ren Wärmequellen.
Raumtemperatur
Die Klimaklasse nden Sie auf dem Typen-
schild (siehe Seite 12). Sie gibt an, inner-
halb welcher Raumtemperaturbereiche die
Gefriertruhe optimal arbeitet.
Klimaklasse Zulässige
Raumtemperatur
SN +10 ºC à +32 ºC
N +16 ºC à +32 ºC
ST +18 ºC à +38 ºC
T +18 ºC à +43 ºC
Bei Raumtemperaturen unter dem Ge-
frierpunkt arbeitet das Gefriergerät nicht
normal.
Belüftung
Das Gerät muss ausreichend belüftet sein,
und die Luftzirkulation über und unter ihm
sowie seitlich von ihm darf nicht behindert
sein. Abb. 2 zeigt, wie die erforderliche
Luftzirkulation um das Gefriergerät herum
gewährleistet wird.
Zwischen dem Geräteboden und der Unter-
lage muss der Abstand mindestens 15 mm
betragen.
WICHTIG! Der Belüftungsrost muss frei
zugänglich sein (Abb. 3).
100 mm
800 mm
20 mm 100 mm
CONTROL
SUPER MAX
MIN
g. 2
Abb. 3
Abb. 2

6
DE
Das Gefriergerät ist zum Anschluss an das
Wechselstromnetz bestimmt. Die Werte für
Spannung (V) und Frequenz (Hz) sind auf
dem Typenschild an der Geräterückseite
angegeben. Das Gerät ist allein an eine
eigene Steckdose anzuschließen.
Bei Beschädigung des Netzkabels ist es
durch ein gleichwertiges Teil zu erset-
zen, das vom Hersteller
Elektrischer Anschluss
Technische Daten
Dieses Gerät entspricht den einschlägigen
EU-Richtlinien einschließlich:
Niederspannungsrichtinie 2006/95/EEC
Elektromagnetische Kompatibilitätsrichtlinie
2004/108/EC
Das Typenschild, das sich im Gerät be-
ndet, enthält verschiedene technische
Angaben sowie Typen- und Seriennummer.

7
DE
Bedienung und Funktion
Mechanische Steuerung
Die Bedienungselemente bestehen aus
einem Thermostatknopf (Abb. 4), zwei
Kontroll-Leuchten und einem Schalter. In
der Konstruktion der Bedienungselemente
und der Platzierung der Leuchten sind leich-
te Abweichungen möglich.
Die grüne Leuchte zeigt die ordnungsgemä-
ße Versorgungsspannung an.
Die gelbe Leuchte zeigt den Schnellgefrier-
betrieb an (siehe Schnellgefrieren).
Inbetriebnahme
Die Gefriertruhe an die Steckdose anschlie-
ßen. Die grüne Leuchte zeigt an, dass die
Versorgungsspannung anliegt. Die rote
Leuchte auf dem Bedienungsfeld leuchtet,
weil die Temperatur im Gerät noch zu hoch
ist.
Temperatureinstellung
Die Temperatur wird durch Drehen des
Thermostatknopfes von MIN auf MAX
gewählt. Wir empfehlen dazu eine Münze.
Je weiter der Einstellknopf des Thermostats
in Richtung auf MAX gedreht wird, desto
niedriger wird die Temperatur. Zur Kontrolle
der korrekten Einstellung ist die Temperatur
des oberen Gefriergutpäckchens in der
Gerätemitte zu messen.
Sie darf nicht höher sein als -18 °C.
Schnellgefrieren
Beim Einfrieren von mehr als 3 kg ist fol-
gendermaßen zu verfahren:
1. Schnellgefrierknopf drücken (gelbe
Leuchte leuchtet). Das Gefriergerät
arbeitet nun mit höchster Leistung (der
Kompressor läuft ständig).
2. Die Schnellgefrierfunktion bereits 24
Stunden vor dem Einlegen der neuen
Waren einschalten.
3. Das neue Gefriergut in die Truhe legen
und die Schnellgefrierfunktion weitere 24
Stunden lang verwenden.
4. Danach den Knopf heraus drücken (die
gelbe Leuchte erlischt).
-18
Abb. 4

8
DE
Gefriergerät
Die Geriertruhe ist ein 4-Sterne-Gefrierer,
der zum Gefrieren und Tiefkühllagern von
Lebensmitteln zugelassen ist.
Gefrieren
Um die Qualität der Lebensmittel zu erhal-
ten, müssen sie möglichst schnell auf -18
°C tiefgekühlt werden.
Die Leistung des Gefriergeräts ist auf dem
Typenschild in kg/24 Stunden angegeben
(siehe Seite 12)
Mit eingeschalteter Schnellgefrierfunktion
sinkt die Temperatur während des Ge-
friervorgangs auf -25 °C. Sollen mehr als
3 kg Waren eingefroren werden, ist der
Schnellgefrierknopf ca. 24 Stunden vorher
zu aktivieren.
Bei kleineren Mengen genügt es, die
Schnellgefrierfunktion ein paar Stunden
vor oder beim Einlegen der frischen Waren
einzuschalten.
Wenn bereits tiefgekühlte Lebensmittel in
das Gerät gelegt werden, oder wenn es
sich um sehr kleine Portionen frischer Ware
handelt, braucht die Schnellgefrierfunktion
nicht eingesetzt zu werden.
Verwenden Sie nur frische Lebensmittel
guter Qualität. Fleisch, Geügel, Fisch,
Gemüse, Obst, Molkereiprodukte und fertig
zubereitete Mahlzeiten eignen sich zur
Tiefkühllagerung. Lebensmittel mit hohem
Wassergehalt, wie z.B. Salat, Radieschen,
Pampelmusen, ganze Äpfel, Gurken und
Birnen sind nicht zum Gefrieren geeignet.
Verpacken Sie die Waren luftdicht in Behäl-
ter, Gefrierbeutel o.ä. Die Portionen sollten
eine praktische Größe haben. Gefrieren
Sie Gemüse oder Fleisch nicht in Portionen
über 2,5 kg. Halten Sie die Pakete trocken,
Gebrauch
damit sie nicht aneinander festfrieren.
Frische Gefriergutpakete sollten sich mög-
lichst nicht berühren, dann beschleunigt
sich der Gefriervorgang. Drücken Sie die
Luft aus den Paketen, damit die Lebensmit-
teloberäche nicht austrocknet.
Zu gefrierende Ware sollten im Gefrierraum
oder an den Innenwänden der Gefriertruhe,
gleichmäßig verteilt, gelagert werden.
Schreiben Sie stets Inhalt, Menge und Da-
tum auf die Pakete. Es empehlt sich, die
Lebensmittel nach Kategorien zu sortieren.
Das heißt, Gemüse zusammen an einer
Stelle, Fleisch an einer anderen usw.
Lebensmittel dürfen nicht höher als 5
mm unter den Deckel der Truhe gesta-
pelt werden.
In den Körben aufbewahrte Lebensmittel
sind sichtbar und leicht zugänglich (Abb. 5).
Auftauen
Tiefgekühltes Obst und Gemüse sollte vor
dem Verbrauch nicht aufgetaut sondern di-
rekt in kochendes Wasser gegeben werden.
Fleisch sollte einen Tag vor der Zubereitung
zum langsamen Auftauen in den Kühl-
schrank gelegt werden. Das ergibt die beste
Hygiene, und die Fleischqualität bleibt am
besten erhalten.
Anmerkung:
Glasaschen und Dosen mit Flüssig-
keit, die Kohlensäure enthalten, dürfen
nicht tiefgefroren werden, da sie platzen
können.
Abb. 5
This manual suits for next models
3
Table of contents
Languages:
Other Vibocold Freezer manuals