Victure PC320 User manual


Language
1English
22Deutsch
42Français
62Español
82Italiano

Contents
01FOREWORD
02PRODUCT INTRODUCTIONS
03INSTALLATION GUIDE
03About EyeCloud
03Register Account
04
AddDevice
09
EyeCloudOPERATIONINSTRUCTIONS
10
SDCardRecords
10
Settings
13
Full-screenWindow
15ShortcutWindow
15MyPersonalCenter
16Message
18SPECIFICATIONS
19Q&A

1
Foreword
Dear Customer,
We are truly grateful that you have chosen us as your ideal product dealer.
You are one of our most highly-valued customers and it has always been a
sincere pleasure to serve you.
Speaking on behalf of the company, we hope that you have enjoyed the
fantastic quality of our products and service. We will make every effort and
continue to meet your requirements and expectations in the future.
Your suggestion and feedback have helped us shape our business to
perfectly fit your standards. As a token of our appreciation, we are soon to
introduce series of new products for our valued customers like you. Please
share this with all of your friends.
Again, thank you very much for choosing Victure. Please note that items
purchased from Victure are covered by one year warranty. Let us know if
there is anything at least we can do to assist you further.
Contact Us
We look forward to serving you for many years to come.
Kind Regards,
Victure Team
2
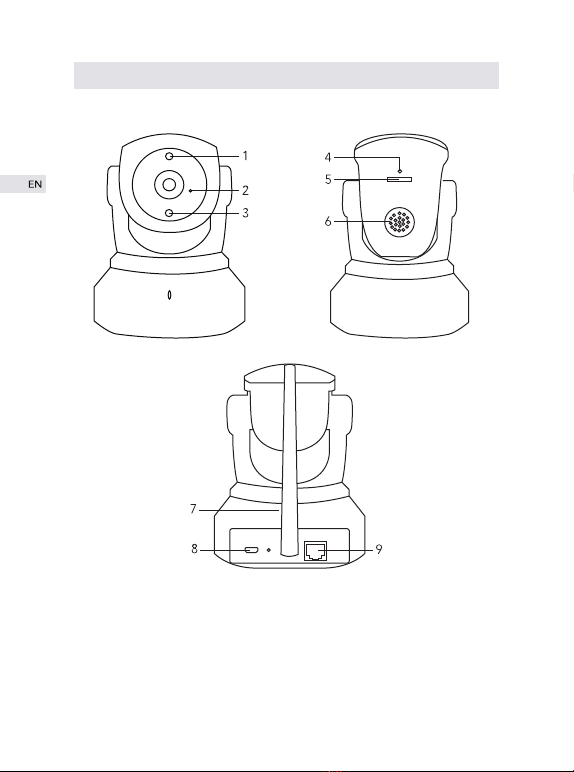
PRODUCT INTRODUCTIONS
1. Photodiode
2. Microphone
3. Working status indicator
4. Reset hole
5. TF card nest
6. Speaker
7. WiFi antenna
8. Power connector
9. RJ45 network port

3
INSTALLATION GUIDE
About EyeCloud
EyeCloud is a camera application software on mobile devices. You can
remotely control camera, watch surveillance video and receive warning
information on mobile devices through this software. Scan the QR code
below or search in application store or browser (particularly recommend-
ed) to download the latest version of EyeCloud. The camera networking
supports two connection modes: wired connection and wireless
connection.
Register Account
① Enter “EyeCloud” and go to register page;
② Input user name and password to finish account registration;
③ For user name, ONLY symbols like “number”, “letter” and “_” are
valid. So email address can not be used as user name. For password, ONLY
combinations of “letter” and “number” are valid. Special symbols like @ $
!are INVALID.

4
Add Device
Method A: wired manual connection (recommended)
① When camera has been connected to power supply, the red indicator
somewhere around infrared lamp will light up and the unit will automatical-
ly rotate 355° laterally and 85° vertically. Please then plug one side of
network cable into camera and the other side into router LAN. Please
make sure that your phone and camera are under the same router.
④ What is highly recommended is to go to “Me”→“Account &Securi-
ty”→“Bind Email” to bind an email address after registration succeeds in
case that you forgot password.

5
② Go to “EyeCloud” and click“+” on upper right of the interface to add
camera.
a. Manually Add (recommended)
Click “manually add” to input camera UID (15-digit number) or scan QR
code on the bottom of the camera.Then inputinitial password “888888”.
Please modify the initial password in a timely manner for the sake of
security.
b. Automatic Search
Click “Search in LAN” and you will find all available cameras which are
under the same router with your phone. “Add Camera” interface will pop
up after few minutes. If there’s still no camera which can be found, please
try again by returning to previous step. Cameras which are already in the
present EyeCloud account are unable to be searched.
ADD Device
Manually add
Name: IP Camera
UID: VSTD094568TXXR
Passeord:
ok
QR Code Scan

6
Method B: wireless/ WiFi connection
① When camera has been connected to power supply, the red indicator
somewhere around infrared lampwill light up and the unit will automatical-
ly rotate 355° laterally and 85° vertically. Please wait for voice prompt
“please use APP for WiFi configuration”. If there is no voice message
coming out, please click “reset” and wait for voice prompt “reset
complete, will restart the device” to restore factory setting.
please use APP for WiFi
configuration
ADD Device
Search in LAN
Table of contents
Languages:
Other Victure Security Camera manuals


