Videotec MAXIMUS MMX User manual

EN
English - Instruction manual
IT
Italiano - Manuale di istruzioni
FR
Français - Manuel d’instructions
DE
Deutsch - Bedienungsanleitung
RU
Русский - Руководство по эксплуатации
PT
Português - Manual de instruções
KO
- 지침 설명서
ENGLISH
MAXIMUS MMX
Ex-proof FULL HD camera in a compact design
Manual B


EN
English - Instruction manual
ENGLISH
MAXIMUS MMX
Ex-proof FULL HD camera in a compact design
Manual B


Instruction manual - English - EN
3MNLCMMXCAM_1905_EN
Contents
ENGLISH 1
1 About this manual ....................................................................................................................5
1.1 Typographical conventions ................................................................................................................................................ 5
2 Notes on copyright and information on trademarks.............................................................5
3 Identification.............................................................................................................................5
3.1 Product marking..................................................................................................................................................................... 5
4 Installation ................................................................................................................................5
4.1 Range of use............................................................................................................................................................................. 5
4.2 Housing board description................................................................................................................................................. 6
4.3 Connecting the power supply........................................................................................................................................... 6
4.3.1 Connecting the power supply (version of the product not cabled) ..................................................................................... 6
4.3.1.1 Connecting the power supply (24Vac/24Vdc) ......................................................................................................................................................6
4.3.1.2 Connecting the power supply (PoE+)......................................................................................................................................................................7
4.3.2 Connecting the power supply (version of the product cabled) ............................................................................................. 7
4.3.2.1 Connecting the power supply (24Vac/24Vdc) ......................................................................................................................................................7
4.3.2.2 Connecting the power supply (PoE+)......................................................................................................................................................................7
4.4 Connection of the Ethernet cable.................................................................................................................................... 8
4.4.1 Connection of the Ethernet cable (version of the product not cabled)............................................................................... 8
4.4.2 Connection of the Ethernet cable (cabled version of the product)....................................................................................... 8
5 Switching on .............................................................................................................................8
6 Configuration............................................................................................................................8
6.1 Default IP address................................................................................................................................................................... 8
6.2 Web interface........................................................................................................................................................................... 9
6.2.1 First access to the web pages.............................................................................................................................................................. 9
6.3 Inserting an SD Card.............................................................................................................................................................. 9
7 Maintenance .............................................................................................................................9
7.1 Factory Default........................................................................................................................................................................ 9
8 Information on disposal and recycling .................................................................................10
9 Troubleshooting .....................................................................................................................10
10 Technical data .......................................................................................................................11
10.1 Cameras.................................................................................................................................................................................11

EN - English - Instruction manual
4 MNLCMMXCAM_1905_EN

Instruction manual - English - EN
5MNLCMMXCAM_1905_EN
1 About this manual
Install the product following all the
operations outlined in the manual below.
The following manual should be consulted
after conducting all the operations
indicated in Manual A.
Read all the documentation supplied carefully before
installing and using this product. Keep the manual in
a convenient place for future reference.
This document has been compiled and published
using product descriptions and specifications
available at the time of publication. The contents
of this document and the specifications of the
products discussed herein are subject to change
without notice. Pelco Inc. reserves the right to make
any such changes without notice. Neither Pelco Inc.
nor any of its affiliated companies: (1) guarantees
the completeness or accuracy of the information
contained in this document; or (2) is responsible for
your use of, or reliance on, the information. Pelco Inc.
shall not be responsible for any losses or damages
(including consequential damages) caused by
reliance on the information presented herein.
1.1 Typographical conventions
DANGER!
High level hazard.
Risk of electric shock. Disconnect the
power supply before proceeding with any
operation, unless indicated otherwise.
DANGER!
Hot surface.
Avoid contact. Surfaces are hot and may
cause personal injury if touched.
CAUTION!
Medium level hazard.
This operation is very important for the
system to function properly. Please read
the procedure described very carefully and
carry it out as instructed.
INFO
Description of system specifications.
We recommend reading this part carefully
in order to understand the subsequent
stages.
2 Notes on copyright and
information on trademarks
The mentioned names of products or companies are
trademarks or registered trademarks.
Pelco, the Pelco logo, and other trademarks
associated with Pelco products referred to in this
publication are trademarks of Pelco, Inc. or its
affiliates.
Other names or logos mentioned herein may be the
trademarks of their respective owners.
The absence of the symbols ™ and ® in proximity to
each trademark in this document or at all is not a
disclaimer of ownership of the related trademark.
ONVIF® is a trademark of Onvif, Inc.
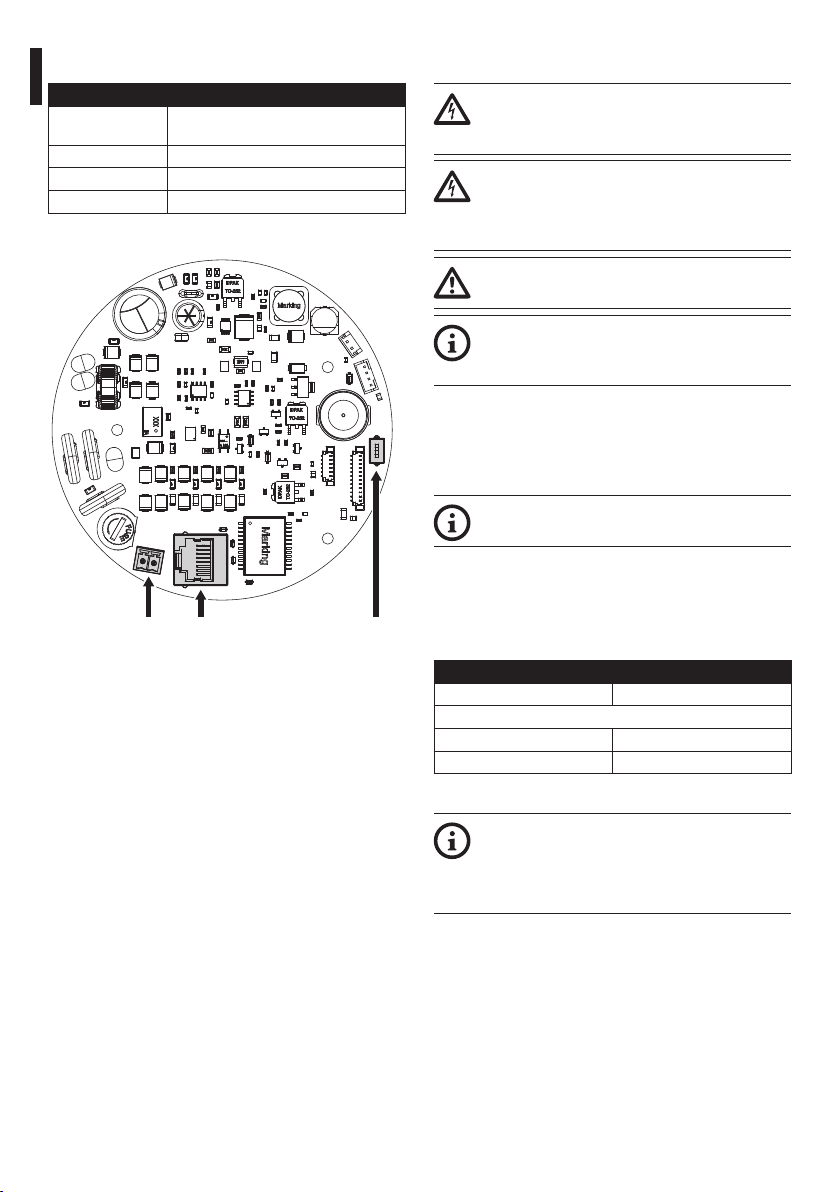
3 Identification
3.1 Product marking
See the label attached to the product.
4 Installation
CAUTION! Device installation and
maintaining must be performed by
specialist technical staff only.
The external multipolar cable shield
(armour), if present, must be earthed.
During installation, remember to comply
with the curvature radius of the multipolar
cable (if present).
Minimum bending radius: 190mm (7.5in).
4.1 Range of use
The installation temperature range is: from -
40°C (-40°F) up to +65°C (149°F) or +70°C (158°F)
(depending on the temperature class of the product).
The device operates within a temperature range of:
from -40°C (-40°F) up to +55°C (+131°F) in enclosed
space; from -40°C (-40°F) up to +60 °C (+140 °F), with
ambient convection.

EN - English - Instruction manual
6 MNLCMMXCAM_1905_EN
4.2 Housing board description
BOARD DESCRIPTION
Connector/
Terminal
Function
J1 Power supply line (24Vac/24Vdc)
J8 Ethernet, PoE+ power supply
SW1 Reset dip-switch
Tab. 1
J8J1 SW1
Fig. 1
4.3 Connecting the power supply
Electrical connections must be performed
with the power supply disconnected and
the circuit-breaker open.
When commencing installation make sure
that the specifications for the power supply
for the installation correspond with those
required by the device.
Check that the power supply is adequately
dimensioned.
The product can be powered in
24Vac/24Vdc or via PoE+ (Power Over
Ethernet).
4.3.1 Connecting the power supply
(version of the product not cabled)
4.3.1.1 Connecting the power supply (24Va
c/24Vdc)
Earthing is not planned since the product
does not require it.
The power supply cables should be connected to the
power supply terminal of the housing board (J1, 4.2
Housing board description, page 6).
Perform the connections following the instructions
reported in the table .
CONNECTING THE POWER SUPPLY
Colour Terminals
Power supply 24Vac/24Vdc
Defined by the installer ~/+
Defined by the installer ~/-
Tab. 2
The power supply terminal can host cables
with the characteristics outlined below.
Nominal section of the cables used: From
0.2mm² (24AWG) up to 1mm² (17AWG).

Instruction manual - English - EN
7MNLCMMXCAM_1905_EN
4.3.1.2 Connecting the power supply (PoE+)
The Ethernet cable shield must always be
earthed via the connector. Always use a
shielded RJ45 connector.
The product can be powered using PoE+ (Power Over
Ethernet) devices in compliance with international
standard for technological information IEEE 802.3at,
with the help of an Ethernet data cable of Category
5E (or higher).
The Ethernet cable should be connected to
connector RJ45 of the housing board (J8, 4.2 Housing
board description, page 6).
Carry out the connections as described in the table
(according to the standard specifications: TIA/EIA-
568-B).
CONNECTION OF THE ETHERNET CABLE
Pin number Cable colour
1 Orange-White
2 Orange
3 Green-White
4 Blue
5 Blue-White
6 Green
7 Brown-White
8 Brown
Tab. 3
4.3.2 Connecting the power supply
(version of the product cabled)
4.3.2.1 Connecting the power supply (24Va
c/24Vdc)
Perform the connections following the instructions
reported in the table .
CONNECTING THE POWER SUPPLY 24VAC/24VDC
Colour Function
Black 1 ~/+
Black 2 ~/-
Tab. 4
4.3.2.2 Connecting the power supply (PoE+)
The product can be directly connected to an
Ethernet switch equipped with a PoE+ (End-Span
configuration) port or a classic Ethernet switch using
a PoE Injector (Mid-Span configuration).

EN - English - Instruction manual
8 MNLCMMXCAM_1905_EN
4.4 Connection of the Ethernet
cable
The Ethernet cable shield must always be
earthed via the connector. Always use a
shielded RJ45 connector.
4.4.1 Connection of the Ethernet cable
(version of the product not cabled)
Use of Ethernet cables with the following
characteristics is highly recommended:
• STP (shielded)
• Category 5E (or higher)
For further information refer to the relative chapter (
4.3.1.2 Connecting the power supply (PoE+), page 7).
4.4.2 Connection of the Ethernet cable
(cabled version of the product)
The product can be directly connected to an Ethernet
switch.
The example below shows a typical installation.
Switch
Personal
Computer
Fig. 2
5 Switching on
Make sure that the unit and other
components of the installation are closed
so that it is impossible to come into contact
with live parts.
Make sure that all parts are fastened down
firmly and safely.
The automatic pre-heating (De-Ice) process
could be started whenever the device is
switched on and the ambient temperature
is below -10°C (+14°F). The procedure is
necessary to guarantee correct operation of
the devices even at low temperatures. Pre-
heating procedure length: 60 minutes.
The unit is switched on by connecting the power
supply.
To switch off the unit disconnect the power.
6 Configuration
6.1 Default IP address
The unit is configured to obtain an IP
address from a DHCP server.
The IP address acquired via DHCP is visible in the
DHCP server log file.
If the DHCP server is not available, the unit
automatically configures itself with a self-generated
IP address in the 169.254.x.x/16 subnet. Configuring
the IP address of the PC as belonging to the same
subnet (example: IP address: 169.254.1.1, subnet
mask: 255.255.0.0).
Use an ONVIF compliant VMS or the Motorola
Solutions Camera Configuration Tool to find the IP
address of the device.

Instruction manual - English - EN
9MNLCMMXCAM_1905_EN
6.2 Web interface
Browsers supported (the latest version):
Microsoft Edge, Google Chrome, Mozilla
Firefox.
6.2.1 First access to the web pages
The first operation in configuring the device consists
in connecting to the web interface.
To access the web interface of the product, simply
use a browser to connect to http://ip_address.
On first access, the Home page will be displayed.
Additional information about setting up and using
the device is available in: www.pelco.com/exsite-
enhanced-2
6.3 Inserting an SD Card
For instruction about opening and closing
the camera, please refer to Manual A.
For onboard video storage capabilities, please insert
an industrial grade microSD card into the slot as show
(Fig. 3, page 9).
Fig. 3
7 Maintenance
Before doing any technical work or
maintenance on the device, make sure that
potentially explosive atmosphere is not
present.
Do not open the device when powered and
in explosive atmosphere.
Read the product Manual A before
performing any operation.
Please provide the device serial number when
requesting any replacement parts.
7.1 Factory Default
It is possible to reset to the factory default settings.
Carry out mechanical operations with reference to
Manual A of the product.
Follow the procedure below:
• Disconnect the power supply to the unit.
• Open the housing and remove the slide.
• Set the reset dip switch to ON (SW1, 4.2 Housing
board description, page 6).
• Re-insert the slide and close the housing.
• Power the unit. Wait for 3 minutes.
• Disconnect the power supply to the unit.
• Open the housing and remove the slide.
• Set the reset dip switch to OFF (SW1, 4.2 Housing
board description, page 6).
• Re-insert the slide and close the housing.
• Power the unit.
Once the factory default procedure has
finished, you need to configure the unit as
described in chapter (6.1 Default IP address,
page 8).

EN - English - Instruction manual
10 MNLCMMXCAM_1905_EN
8 Information on disposal
and recycling
The European Directive 2012/19/EU on Waste
Electrical and Electronic Equipment (WEEE) mandates
that these devices should not be disposed of in the
normal flow of municipal solid waste, but they should
be collected separately in order to optimize the
recovery stream and recycling of the materials that
they contain and to reduce the impact on human
health and the environment due to the presence of
potentially hazardous substances.
The symbol of the crossed out bin is marked
on all products to remember this.
The waste may be delivered to appropriate collection
centers, or may be delivered free of charge to the
distributor where you purchased the equipment at
the time of purchase of a new equivalent or without
obligation to a new purchase for equipment with size
smaller than 25cm (9.8in).
For more information on proper disposal of these
devices, you can contact the responsible public
service.
9 Troubleshooting
Contact an authorized support centre if the
problems listed below persist or you have
any other issues that are not described
here.
Read the product Manual A before
performing any operation.
PROBLEM Video streaming is not visible.
CAUSE Incorrect IP address settings.
SOLUTION Check the device IP address
and the configuration of the
computer network card.
CAUSE Automatic preheating
procedure (De-Ice) in progress.
SOLUTION Wait until the end of the pre-
heating procedure. If the ambient
temperature is too low the unit
will remain blocked.

Instruction manual - English - EN
11MNLCMMXCAM_1905_EN
10 Technical data
10.1 Cameras
Day/Night Full HD 3x
Resolution: 6mp - (16:9) 3200 x 1800 (3:2) 3072 x 2048
Max image rate: 1080p/30fps
Image Sensor: 1/1.8” progressive scan CMOS
WDR Off dynamic range: 85dB
WDR On dynamic range: 120dB
3D noise reduction: Yes
Lens:
• From f= 4.9mm (wide) up to 8.0mm (tele)
• From F1.8
Zoom: 1.6x
Horizontal Angle of View Based on Aspect Ratio:
(16:9) 50°- 91°, *(3:2) 47°- 72°
Vertical Angle of View Based on Aspect Ratio: (16:9)
29°- 51°, *(3:2) 27°- 48°
Electronic Shutter Control: Automatic, Manual
White balance: Automatic, Manual
Iris Control: Automatic, Open, Closed
Camera Tampering Detection: Yes
Day/Night Control: Automatic, Manual
Flicker Control: 60Hz, 50Hz
Backlight Compensation: Adjustable
Privacy Zones: Yes

MNLCMMXCAM_1905_EN
Headquarters Italy Videotec S.p.A.
Via Friuli, 6 - I-36015 Schio (VI) - Italy
Tel. +39 0445 697411 - Fax +39 0445 697414
Email: [email protected]
France Videotec France SARL
Immeuble Le Montreal, 19bis Avenue du Québec, ZA de Courtaboeuf
91140 Villebon sur Yvette - France
Tel. +33 1 60491816 - Fax +33 1 69284736
Email: info.fr@videotec.com
Asia Pacific Videotec (HK) Ltd
Flat 8, 19/F. On Dak Industrial Building, No. 2-6 Wah Sing Street
Kwai Chung, New Territories - Hong Kong
Tel. +852 2333 0601 - Fax +852 2311 0026
Email: info.hk@videotec.com
Americas Videotec Security, Inc.
Gateway Industrial Park, 35 Gateway Drive, Suite 100
Plattsburgh, NY 12901 - U.S.A.
Tel. +1 518 825 0020 - Fax +1 518 825 0022
Email: info.usa@videotec.com
www.videotec.com

IT
Italiano - Manuale di istruzioni
ITALIANO
MAXIMUS MMX
Telecamera FULL HD antideflagrante dal design compatto
Manuale B


Manuale di istruzioni - Italiano - IT
3MNLCMMXCAM_1905_IT
Sommario
ITALIANO 1
1 Informazioni sul presente manuale ........................................................................................5
1.1 Convenzioni tipografiche.................................................................................................................................................... 5
2 Note sul copyright e informazioni sui marchi commerciali...................................................5
3 Identificazione ..........................................................................................................................5
3.1 Marcatura del prodotto........................................................................................................................................................ 5
4 Installazione..............................................................................................................................5
4.1 Campo di utilizzo.................................................................................................................................................................... 5
4.2 Descrizione della scheda della custodia ........................................................................................................................ 6
4.3 Collegamento della linea di alimentazione.................................................................................................................. 6
4.3.1 Collegamento della linea di alimentazione (versione del prodotto non cablata)............................................................ 6
4.3.1.1 Collegamento della linea di alimentazione (24Vac/24Vdc) .............................................................................................................................6
4.3.1.2 Collegamento della linea di alimentazione (PoE+) .............................................................................................................................................7
4.3.2 Collegamento della linea di alimentazione (versione del prodotto cablata)..................................................................... 7
4.3.2.1 Collegamento della linea di alimentazione (24Vac/24Vdc) .............................................................................................................................7
4.3.2.2 Collegamento della linea di alimentazione (PoE+) .............................................................................................................................................7
4.4 Collegamento del cavo di rete Ethernet........................................................................................................................ 8
4.4.1 Collegamento del cavo di rete Ethernet (versione non cablata del prodotto).................................................................. 8
4.4.2 Collegamento del cavo di rete Ethernet (versione cablata del prodotto)........................................................................... 8
5 Accensione ................................................................................................................................8
6 Configurazione .........................................................................................................................8
6.1 Indirizzo IP di default............................................................................................................................................................. 8
6.2 Interfaccia web........................................................................................................................................................................ 9
6.2.1 Primo accesso alle pagine web........................................................................................................................................................... 9
6.3 Inserimento di una scheda SD........................................................................................................................................... 9
7 Manutenzione...........................................................................................................................9
7.1 Factory Default........................................................................................................................................................................ 9
8 Informazioni sullo smaltimento e il riciclo ...........................................................................10
9 Risoluzione dei problemi .......................................................................................................10
10 Dati tecnici ............................................................................................................................11
10.1 Telecamere ...........................................................................................................................................................................11

IT - Italiano - Manuale di istruzioni
4 MNLCMMXCAM_1905_IT

Manuale di istruzioni - Italiano - IT
5MNLCMMXCAM_1905_IT
1
Informazioni sul presente manuale
Effettuare l'installazione del prodotto
eseguendo tutte le operazioni riportate nel
seguente manuale. Il seguente manuale
va consultato dopo aver effettuato tutte le
operazioni indicate nel Manuale A.
Prima di installare e utilizzare questo prodotto, leggere
attentamente tutta la documentazione fornita. Tenere il
manuale a portata di mano per consultazioni successive.
Questo documento è stato compilato e pubblicato
utilizzando descrizioni e specifiche di prodotto disponibili
al momento della pubblicazione. Il contenuto di questo
documento e le specifiche dei prodotti descritti sono
soggetti a modifiche senza preavviso. Pelco Inc. si riserva
il diritto di apportare modifiche senza preavviso. Né Pelco
Inc. né una qualsiasi delle sue società affiliate: (1) garantisce
la completezza o l'accuratezza delle informazioni contenute
nel presente documento; o (2) è responsabile per l'uso di
tali informazioni, o l'affidamento che può farsene. Pelco
Inc. non risponde di alcuna perdita o danno (inclusi i danni
indiretti) causati dall'affidamento sulle informazioni fornite
in questa sede
.
1.1 Convenzioni tipografiche
PERICOLO!
Pericolosità elevata.
Rischio di scosse elettriche. Prima di
eseguire qualsiasi operazione assicurarsi di
togliere tensione al prodotto, salvo diversa
indicazione.
PERICOLO!
Superficie calda.
Evitare il contatto. Le superfici sono calde
e potrebbero causare danni alla persona in
caso di contatto.
ATTENZIONE!
Pericolosità media.
L'operazione è molto importante per il
corretto funzionamento del sistema. Si
prega di leggere attentamente la procedura
indicata e di eseguirla secondo le modalità
previste.
INFO
Descrizione delle caratteristiche del
sistema.
Si consiglia di leggere attentamente per
comprendere le fasi successive.
2 Note sul copyright e
informazioni sui marchi
commerciali
I nomi di prodotto o di aziende citati sono marchi
commerciali o marchi commerciali registrati
appartenenti alle rispettive società.
Pelco, il logo Pelco e altri marchi associati ai prodotti
Pelco a cui si fa riferimento in questa pubblicazione
sono marchi di Pelco, Inc. o dei suoi affiliati.
Altri nomi o loghi qui menzionati potrebbero
essere marchi commerciali di proprietà dei rispettivi
proprietari.
L'assenza dei simboli™ e ® accanto a ciascun marchio
in questo documento o in generale non costituisce
una dichiarazione di non proprietà del relativo
marchio.
ONVIF® è un marchio commerciale di Onvif, Inc.
3 Identificazione
3.1 Marcatura del prodotto
Vedere l’etichetta posta sul prodotto.
4 Installazione
ATTENZIONE! L'installazione e la
manutenzione del dispositivo devono
essere eseguite solo da personale tecnico
specializzato.
La calza esterna del cavo multipolare
(armatura), se presente, deve essere
collegata a terra.
Nell'installazione si raccomanda di
rispettare il raggio di curvatura del cavo
multipolare (se presente).
Raggio di curvatura minimo: 190mm.
4.1 Campo di utilizzo
La temperatura di installazione è compresa tra: da
-40°C (-40°F) fino a +65°C (149°F) oppure +70°C
(158°F) (a seconda della classe di temperatura del
prodotto).
Il dispositivo è operativo in una gamma di
temperatura compresa tra: da -40°C (-40°F) fino a
+55°C (+131°F) in uno spazio chiuso; da -40°C (-40°F)
fino a +60 °C (+140 °F), con convezione ambientale.

IT - Italiano - Manuale di istruzioni
6 MNLCMMXCAM_1905_IT
4.2 Descrizione della scheda della
custodia
DESCRIZIONE DELLA SCHEDA
Connettore/
Morsetto
Funzione
J1 Linea di alimentazione (24Vac/24Vdc)
J8 Ethernet, alimentazione PoE+
SW1 Dip-switch di reset
Tab. 1
J8J1 SW1
Fig. 1
4.3 Collegamento della linea di
alimentazione
Eseguire le connessioni elettriche in
assenza di alimentazione e con dispositivo
di sezionamento aperto.
All’atto dell’installazione controllare che
le caratteristiche di alimentazione fornite
dall’impianto corrispondano a quelle
richieste dal dispositivo.
Verificare che la sorgente di alimentazione
sia adeguatamente dimensionata.
Il prodotto può essere alimentato in
24Vac/24Vdc o tramite PoE+ (Power Over
Ethernet).
4.3.1 Collegamento della linea di
alimentazione (versione del prodotto
non cablata)
4.3.1.1 Collegamento della linea di
alimentazione (24Vac/24Vdc)
Non è prevista la messa a terra in quanto il
prodotto non lo richiede.
I cavi di alimentazione vanno collegati al morsetto
di alimentazione della scheda della custodia (J1, 4.2
Descrizione della scheda della custodia, pagina 6).
Effettuare i collegamenti secondo quanto descritto
nella tabella.
COLLEGAMENTO DELLA LINEA DI ALIMENTAZIONE
Colore Morsetti
Alimentazione 24Vac/24Vdc
Definito dall'installatore ~/+
Definito dall'installatore ~/-
Tab. 2
Il morsetto di alimentazione è in grado di
ospitare cavi con le caratteristiche riportate
di seguito.
Sezione nominale dei cavi utilizzabili: Da
0.2mm² (24AWG) fino a 1mm² (17AWG).
Other manuals for MAXIMUS MMX
4
Table of contents
Languages:
Other Videotec Camcorder manuals