ViewSonic NPi-200 User manual

ViewSonic N210 0
NexTVision N210
Video Process Box
User Guide
Guide de l’utilisateur
Bedienungsanleitung
Guía del usuario
Guida dell’utente
Guia do Usuário
Användarhandbok
Käyttöopas
Airsync N210
Media Station
Stand-alone video process box

ViewSonic N210 1
Contents
Introduction......................................................................................3
Key Features................................................................................................................3
Package Contents ........................................................................................................3
Precautions...................................................................................................................3
Precautions...................................................................................................................4
Start Your Installation......................................................................5
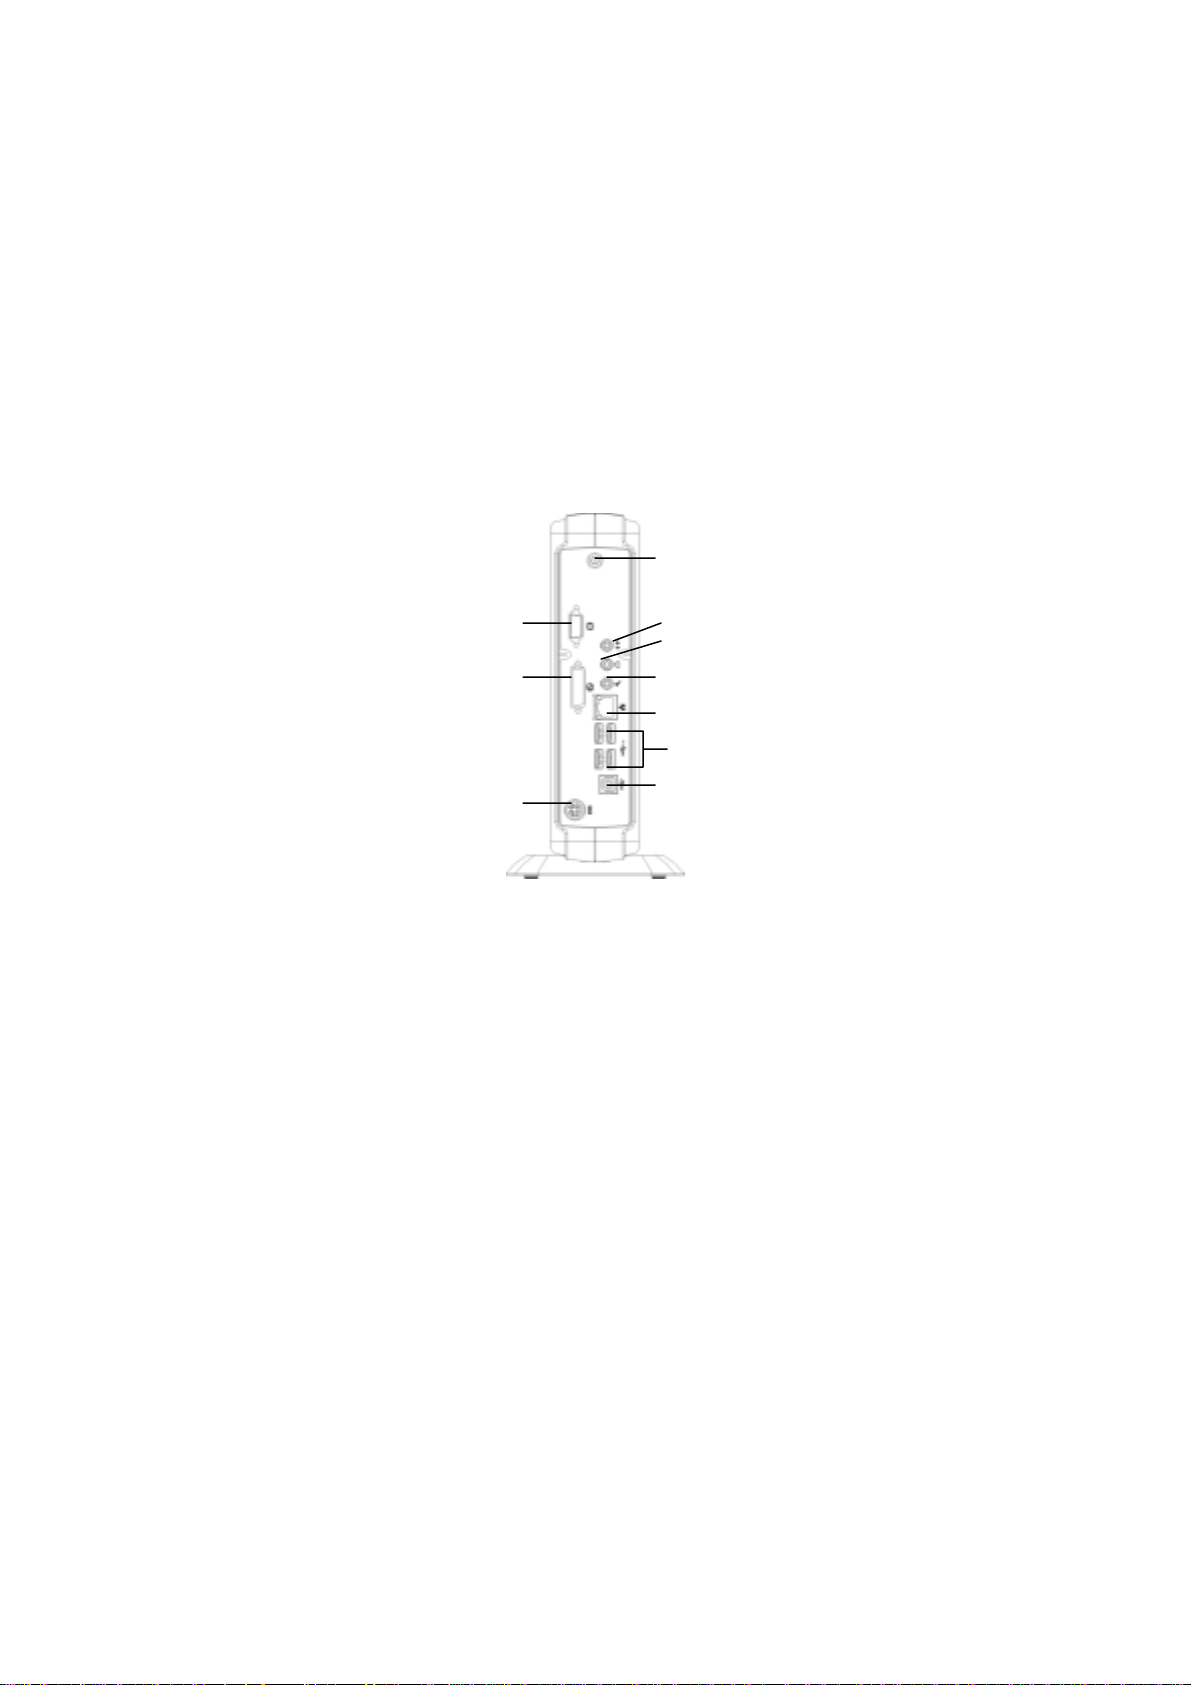
Connecting the NexTVision N210.................................................................................5
Connector Descriptions ................................................................................................5
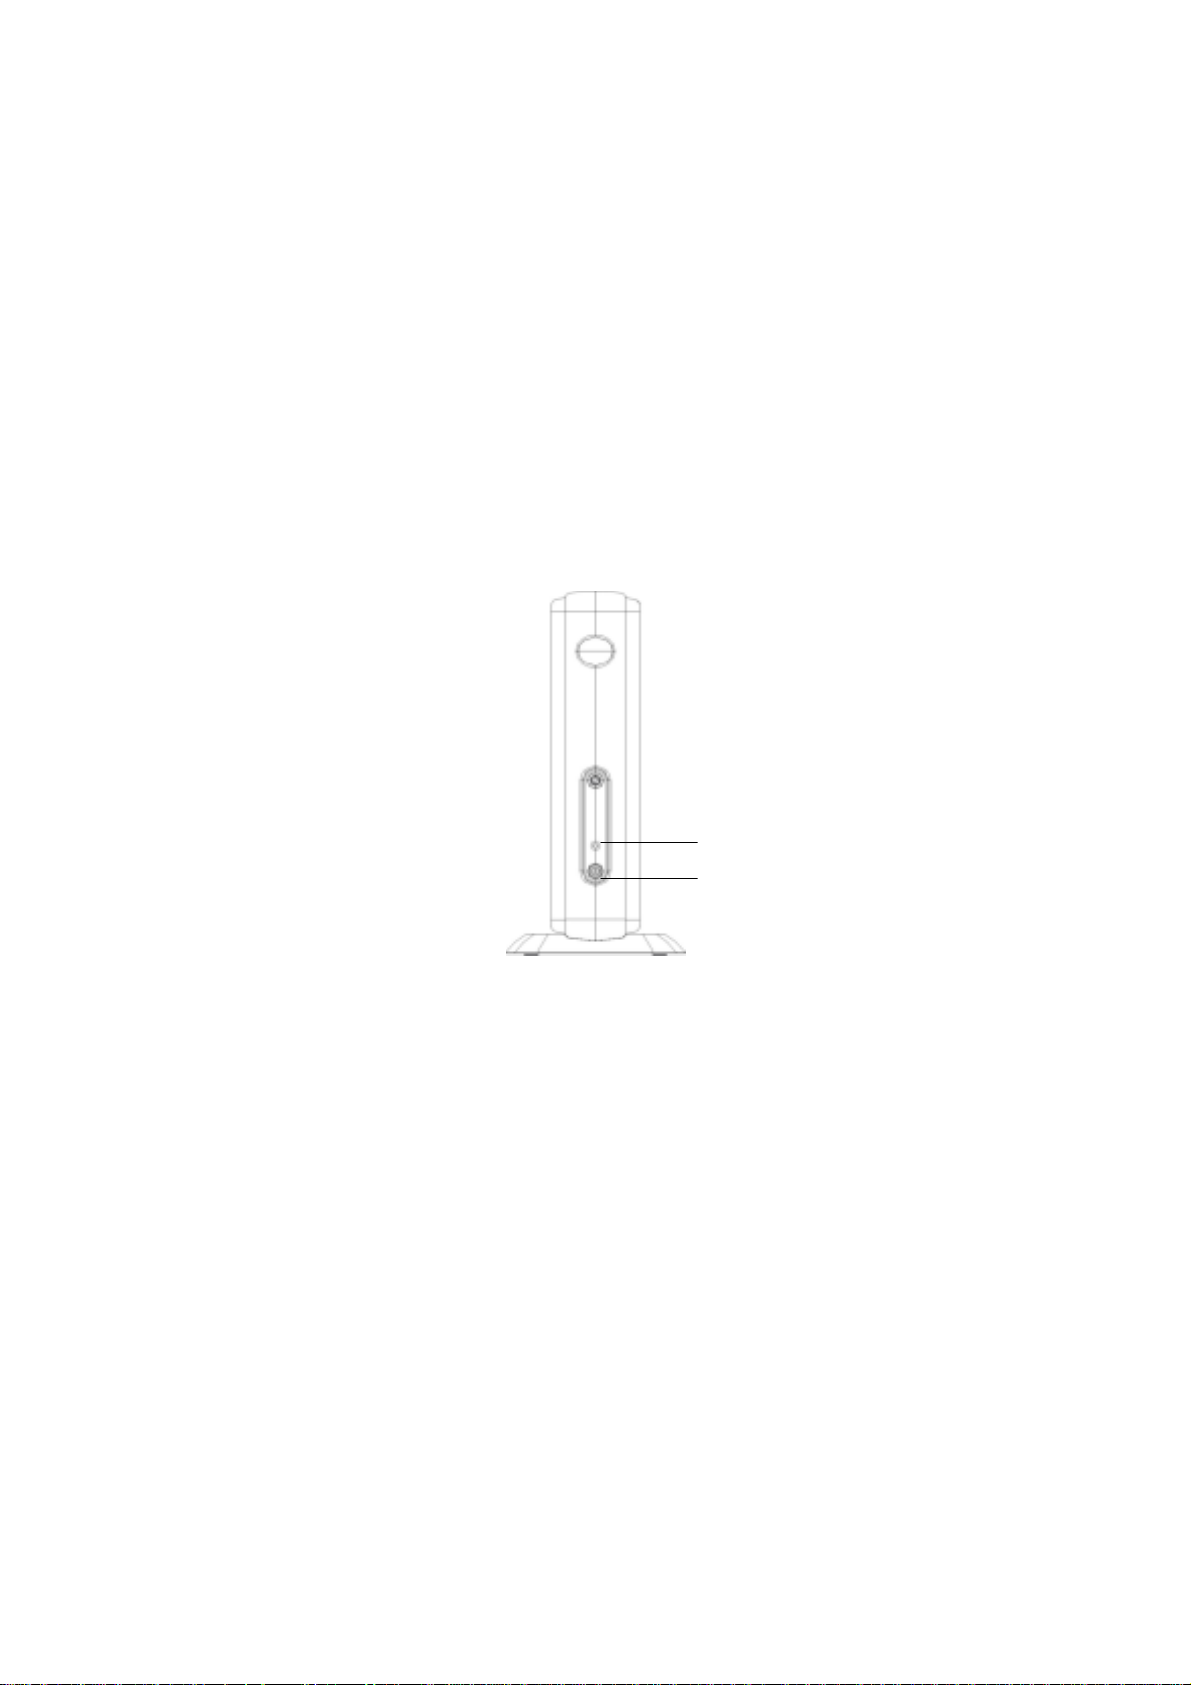
Power On......................................................................................................................6
Control Button Descriptions..........................................................................................6
Getting Started.................................................................................7
Wireless connection .....................................................................................................7
Taskman.......................................................................................................................8
Program........................................................................................................................11
Settings............................................................................................. 14
The Accessibility Control Panel ....................................................................................14
The Certificates Control Panel......................................................................................17
The Date/Time Control Panel .......................................................................................18
The Display Control Panel............................................................................................18
The Internet Options Control Panel..............................................................................19
The Keyboard Control Panel ........................................................................................20
The Mouse Control Panel.............................................................................................21
The JETCET PRINT Pro Control Panel........................................................................21
The Management Tools Control Panel..........................................................................21
The Network and Dial-up Connection Control Panel ....................................................23
The Network Files Settings Control Panel....................................................................23
The Network Printer Properties Control Panel..............................................................24
The Owner Control Panel.............................................................................................25
The Password Control Panel........................................................................................26
The PC Connection Control Panel................................................................................26
The Power Control Panel .............................................................................................27
The Printers Control Panel ...........................................................................................27
The Regional Settings Control Panel............................................................................28
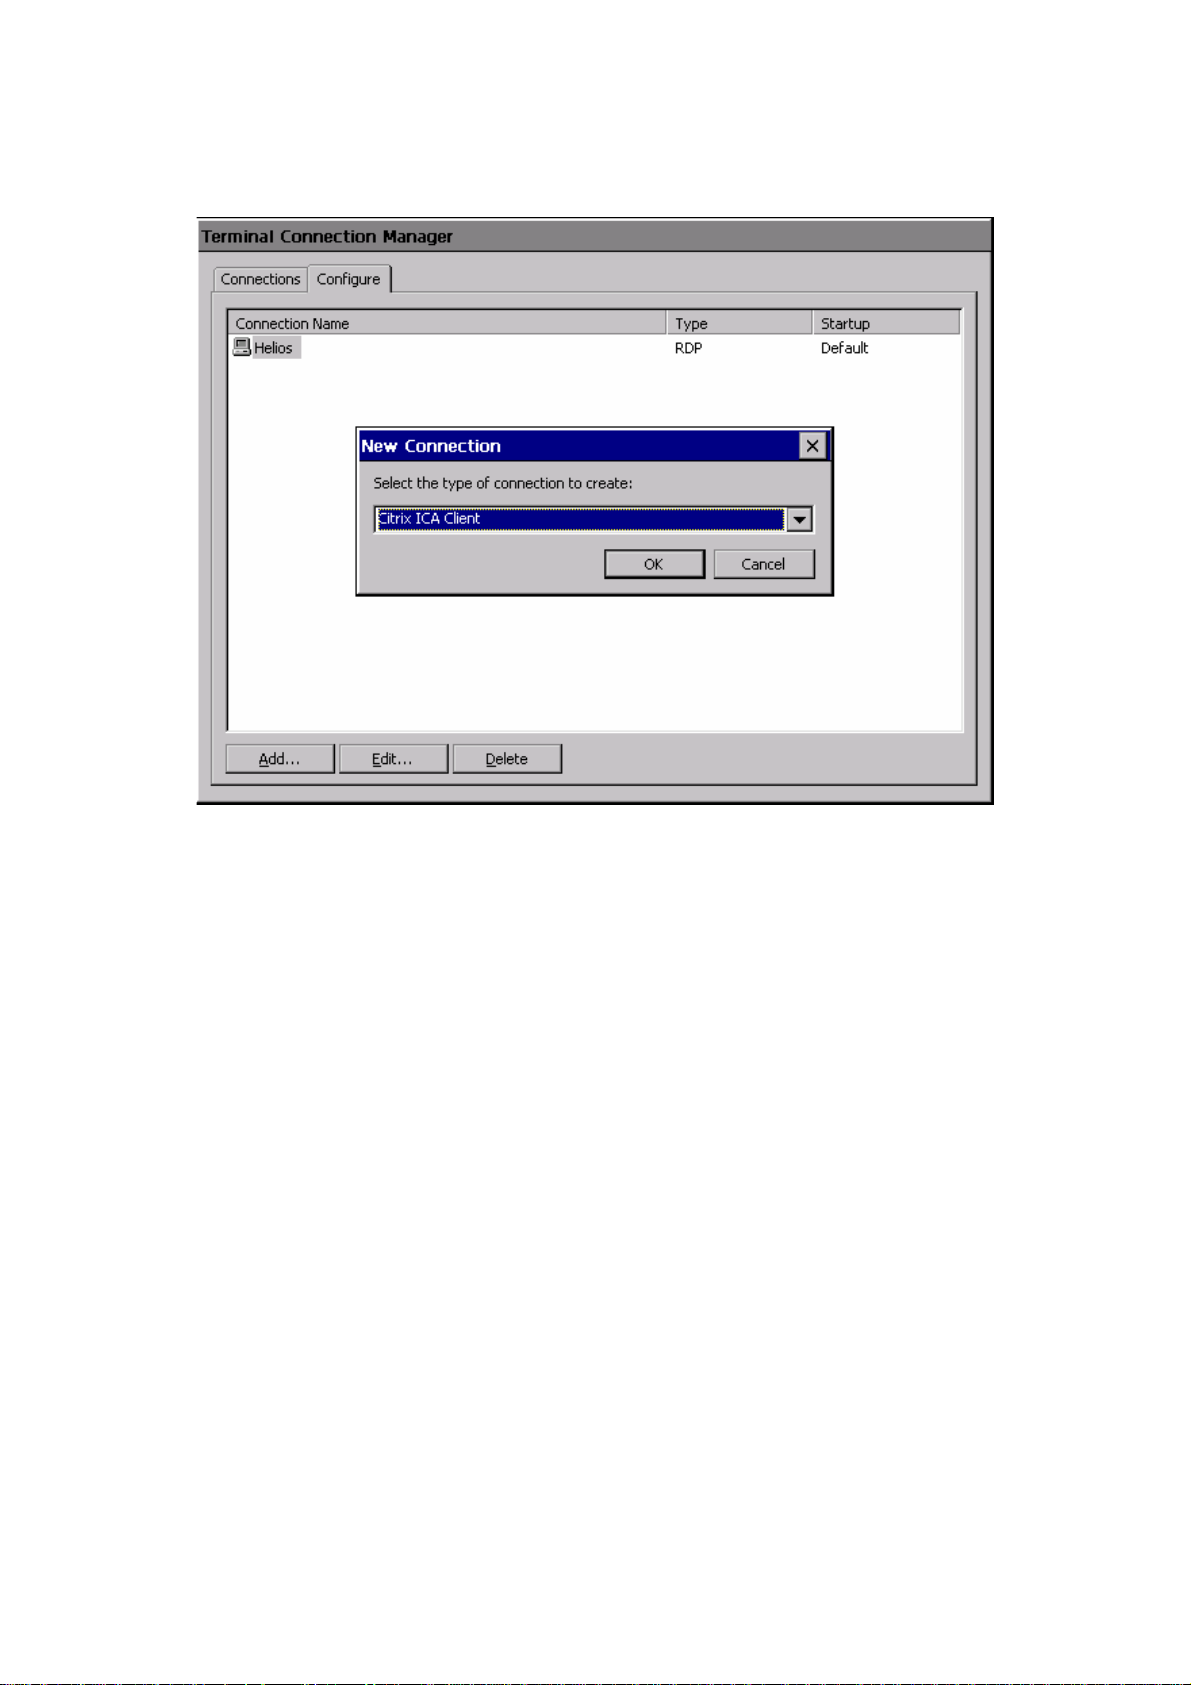
The RDP Connection Control Panel.............................................................................28
The Remove Programs Control Panel..........................................................................29
The System Control Panel............................................................................................30
The TriCEutility Control Panel.......................................................................................30
The Volume & Sounds Control Panel ...........................................................................30
Other Information ............................................................................32
Specifications................................................................................................................32
Troubleshooting............................................................................................................33
Customer Support ........................................................................................................34
Cleaning the Case........................................................................................................35
Limited Warranty...........................................................................................................36
Appendix...........................................................................................37

ViewSonic N210 2
Safety Guidelines .........................................................................................................37
Compliance Information for U.S.A................................................................................37
Federal Communication Commission Interference Statement
This equipment has been tested and found to comply with the limits for a Class B digital device,
pursuant to Part 15 of the FCC Rules. These limits are designed to provide reasonable protection
against harmful interference in a residential installation. This equipment generates, uses and can
radiate radio frequency energy and, if not installed and used in accordance with the instructions,
may cause harmful interference to radio communications. However, there is no guarantee that
interference will not occur in a particular installation. If this equipment does cause harmful
interference to radio or television reception, which can be determined by turning the equipment
off and on, the user is encouraged to try to correct the interference by one of the following
measures:
-Reorient or relocate the receiving antenna.
-Increase the separation between the equipment and receiver.
-Connect the equipment into an outlet on a circuit different from that
to which the receiver is connected.
-Consult the dealer or an experienced radio/TV technician for help.
This device complies with Part 15 of the FCC Rules. Operation is subject to the following two
conditions: (1) This device may not cause harmful interference, and (2) this device must accept
any interference received, including interference that may cause undesired operation.
FCC Caution: Any changes or modifications not expressly approved by the party responsible for
compliance could void the user's authority to operate this equipment.
IMPORTANT NOTE:
FCC Radiation Exposure Statement:
This equipment complies with FCC radiation exposure limits set forth for an uncontrolled
environment. This equipment should be installed and operated with minimum distance 20cm
between the radiator & your body.
This transmitter must not be co-located or operating in conjunction with any other antenna or
transmitter.

ViewSonic N210 3
Introduction
The N210 (NexTVision™N210) is an external “Stand-Alone” video process box that can
communicate over Ethernet 10/100 or over wireless 802.11x infrastructure. There is an option to
attach an external “Patch” antenna that will enhance the wireless signal.
Whenever a monitor is levelesely / Ethernet to the N210 via VGA or DVI/I, it can become a tether
“Mira” device.
Key Features
zWindows CE.Net or XP embedded software image with latest ICA and RDP protocols
zSupport wireless feature that built-in 802.11 Mini-PCI with optional external ViewSonic patch
antenna or Ethernet 10/100
zMPEG 1, 2 and 4 decoding capability for A/V streaming over IP/UDP/RTP/RTCP protocols.
zBuilt-in Microsoft IE Browser and variety of PLUG-IN's
zConfigurable to multiple platforms via an I/O adapter card
zHigh performance 2D/3D graphics controller
zRich Multimedia experience for playing mp3 and Windows Media Player music and various
video files
zSupports 16 bits stereo sound with built-in Microphone-in, Headphone-out, and Audio-out
zA quickly recovery button for software image recovery
Package Contents
This NexTVision comes with the items shown below. Check to be sure your unit is complete.
1.NexTVision N210 main unit
2.Power supply & US power cable
3.Quick start card
4.USB keyboard & mouse
5.Patch antenna bundle optional
Power Adapter
USB Keyboard
Quick Start Card
USB Mouse
Power Cord
NexTVision main unit
Patch antenna

ViewSonic N210 4
Precautions
1) Avoid exposing your N210 to direct sunlight or another heat source. Orient your N210 away
from direct sunlight to reduce glare.
2) Always handle your N210 with care when moving it.
3) Place your N210 in a well-ventilated area. Do not place anything on your N210 that prevents
heat dissipation.
4) Ensure the area around the N210 is clean and free of moisture.
5) Do not place heavy objects on the N210, or power cord.
6) If smoke, abnormal noise, or strange odor is present, immediately switch the N210 off and call
your dealer or ViewSonic. It is dangerous to continue using the N210.

ViewSonic N210 5
Start Your Installation
Connecting the NexTVision N210
Follow these instructions to connect the NexTVision N210 to its peripheral devices:
1. Plug one end of the power cord to an AC outlet and the other end into the power adapter. Then
connect the power adapter to the N210.
2. Connect the monitor to the video connector port?
3. Connect the USB keyboard and USB mouse to the USB type A ports.
4. Connect the ViewSonic patch antenna to the antenna out and screw in the bolt or connect the
10/100-TX network cable to the RJ-45 network connector.
6. Connect the printer or other compatible devices to the USB type A port if necessary.
(see figure below.)
Connector Descriptions
Power Connector
Connects the power adapter with the power cord to the device
RJ-45 Network Connector
Connects the built-in 32-bit 10/100-TX Ethernet network LAN Controller to a host or Hub
LED Lan Link and activity Indicators
Green:Green-on indicates a successfully connected network link.
Amber: Amber-on indicates that network packets are being sent or received through the RJ-45
port
Audio out
Connects line output for Audio
Headphone out
Connects an external speaker or headphone
Microphone In
When the host server supports a record software program and the related protocol as well, the
connects a microphone (when host server supports a program for audio recording and related
protocols)
USB Ports (type A)
Microphone
-
in
Audio-out
Headphone-out
N
et
w
o
rk
VGA
DVI
USB ports (type A)
USB ports (type B)DC
ViewSonic patch antenna-out

ViewSonic N210 6
Connects USB type peripheral such as keyboard and mouse
USB Ports (type B)
Allows image recovery via the USB port (connector-B)
VGA Port
Connects a standard VGA compatible device
DVI
Connects a high quality Digital Video Interface compatible device
Antenna-out
Allows wireless connection, please connect the ViewSonic patch antenna and screwed the bolt
Power On
When you have made all the connections, turn on the NexTVision N210 by pressing the power
switch then turn on the monitor.
Control Button Descriptions
Power Switch
Press this button to turn the device on or off.
Power LED Indicator
Green: indicates the system is powered on.
Amber: indicates the device is in sleeping status.
Green: when blinking indicates the Brightness adjustment value has reach its limitation.
Power LED indicator
Power

ViewSonic N210 7
Getting Started
Push the power-on switch to turn on the device so you can access the Windows CE.Net
operating system (OS).
Wireless connection
You can connect a ViewSonic patch antenna to the NexTVision N210 for wireless connection.
With the NexTVision N210 on, and the wireless connection active, the wireless network properties
will appear on the screen. These include the IP information tab, IPv6 information tab, and
Wireless Information tab.
All available Access Point servers around will have been automatically detected. Please choose
one then press the Connect button to connect the chosen Access Point (AP). Once a wireless
connection is activated, its connection status and signal strength will be displayed showing data
such as “status : good” and “signal strength : high”. IP information is detected automatically as

ViewSonic N210 8
shown below. You can also click the Renew button to set a new IP address.
When you have confirmed that your wireless network connection is active, you can close this
window.
Taskman
The Terminal Connection Manager will help you to manage your network connection. Shown here
is the Terminal Connection Manager dialog box with its Connections properties and Configure
properties tabs.
Connect TAB
Highlight a connection from the Connection Name box then click the Connect button to make
a server connection. You can also just double-click this connection to make a server
connection. The user can define any number of host connections for each client available on

ViewSonic N210 9
a unit.
End
To end the connection, highlight the required connection then click the End button.
Add Button
This function is used for creating a new connection. Select the Configure icon then click this
Add button to create a new connection.
zRDP
This is a terminal service client that allows you to connect to a MicrosoftNT or Windows
2000 terminal server.
You can access a Windows Terminal Server and use all programs installed on the
server via Remote Desktop Connection. For example, you can run the desktop version
of Outlook instead of Inbox.
zICA
The Citrix ICA (Independent Computing Architecture) is also a terminal service client. It
allows you to run Citrix MetaFrame software and connect to the terminal server. When
you access to the server, you can use all the programs installed on the server via the
ICA protocol.
Edit Button
The Edit command button allows the user to edit the properties of an existing connection.
Highlight the connection from the Configure list then click the Edit button. (You can just
double click the Connection from the Configure tab to make changes.)
Net Connection TAB
Use this function to adjust the connection server name and the server address. If you want to
automatically log onto the server, select the Automatic Logon icon. Enter the Username,
Password, and Domain information in these fields.

ViewSonic N210 10
Application TAB
Use this to select the application type you want. Initially, the Windows NT Desktop is selected
by default. You can also select the File name button, enter the name of the application you
need then specify the working directory.
Delete Button
In the menu window, use the Delete button to delete a connection. Choose the Connection
you want to delete, click this Delete button. The Confirm Connection Delete dialog box will
appear. Click Yes to complete the deletion. Click No to cancel the deletion.

ViewSonic N210 11
Program
To open a program that isn't on the desktop, select the Program’s name from Programs on the
Start bar. There are many applications available as shown here.
JETcent Print
Spool documents to be printed, then open the JETCET PRINT Spool from Programs to print
them.
File Viewer
The Microsoft File Viewers provided include the following.
1. Word Viewer: Four files are created from Microsoft Word 97, Word 2000 and Word 2002
including Rich Text Format (.rtf) can be read
2. Excel Viewer: The Excel Viewer displays documents created by Microsoft Excel 97,
Excel 2000 and Excel 2002
3. Image Viewer: Use this application to browse the picture files including bitmap, JPEG,
PNG and GIF files
4. PDF Viewer: Read Portable Document Format (PDF) files that have a .pdf extension
5. PowerPoint Viewer: View your presentations created in Microsoft PowerPoint 97,
PowerPoint 2000 and PowerPoint 2002
Command Prompt
You can execute any command in the command prompt window, please key in command name
after C:>. (Key in “command_name /? “ to find out more details.)
Inbox

ViewSonic N210 12
You can create an e-mail service in the Inbox. You will need to provide settings information such
as POP3 or IMAP4 server name, SMTP host name, user name, password, and domain name.
You can this info from your Internet service provider (ISP) or your Network Administrator.
To setup an e-mail service, open the Inbox application then select Options of Services name,
press the Add button to set the service type, then follow the steps in the Setup Wizard.
IE
You can browse the web page with Internet Explorer after establishing an Internet connection.
As a web page is downloaded, a small hourglass icon will show at the bottom of your screen.
Media Player
Microsoft Media Player provides an audio and video files player for files download, or from an
internet Web-site or FTP-site.
Messenger
The Messenger function allows you to communicate in real-time using text-based messaging,
VoIP, and more. Please follow the on-screen Wizard Guide directions to setup Messenger then
click Next to continue.

ViewSonic N210 13
zSee who's online.
When your colleagues are online, they can see and contact you. You can send and receive
instant messages to them. You can also announce your own presence to a list of watchers that
you define.
zTalk by microphone
Talk with a colleague anywhere in the world using the microphone and speakers on your
device. The Messenger supports high-quality voice calling from your Windows CE device.
zCommunicate using Session Initiation Protocol (SIP) or Hotmail contacts
Windows Messenger supports communication with your colleagues in the enterprise using
SIP-based communications service. You can also talk to your Hotmail contacts using the .NET
Messenger.
WordPad
You can create and edit documents or templates in WordPad. The WordPad look and feel is
similar to the desktop version of Microsoft word.
Help
If you have any problems or need more detailed information, please use online HELP.

ViewSonic N210 14
Settings
System settings information is maintained by the various control panels provided under settings in
the Start Bar. There are a lot of tools that control and maintain mainly system hardware
configuration information in the Control Panel of Setting name from the Start bar.
The settings functions provided include: Accessibility, Certificates, Date/Time, Display,
Internet Options, JETCET PRINT Pro, Keyboard, Mouse, Management Tool, Network and
Dial-up connection, Network Files Settings, Network Printer Properties, Owner, Password,
PC Connection, Power, Printers, RDP connection, Regional Settings, Remove Programs,
System, TriCEUtility and Volume & Sounds. Double-click an icon to open the dialog for that
setting.
The Accessibility Control Panel
The Accessibility options allow a user with physical limitations to more easily use the system.
Double-click the Accessibility Options icon to open the dialog box, it provides five properties in
which you can enable and configure options to improve accessibility.
Keyboard TAB

ViewSonic N210 15
SkickyKeys: Selected the StickyKeys option for simulation the effect of pressing a pair of
keys, such as CTRL-X. Hold down the CTRL, ALT, or SHIFT key first then press another key
so that these keys are pressed together. Press the Settings.. button for advance setting as
shown in the following figure.
Togglekey: Selected the ToggleKey option to generate a tone when pressing the CAPS
LOCK, NUM LOCK and SCROLL LOCK keys. Press the Settings.. button to enable the
shortcut option.
Sound TAB
SoundSentry: Displays a visual indicator when your system makes a sound. The indicator
can be a flashing active window, a flashing active caption bar, or a flashing desktop.
Click the settings.. button to choose the sound type for the visual indicative used.

ViewSonic N210 16
Display TAB
High Contrast: Use high-contrast colors and special fonts to make the screen easy to read
and use.
Click the Setting.. button to set the keyboard shortcut and color scheme.
Mouse TAB
Select the Use Mousekeys option to enable the numeric keypad instead of the mouse for
moving the pointer on the screen.

ViewSonic N210 17
Click the Settings.. button to set the keyboard shortcut and pointer speed.
General TAB
Provides settings for managing the options in the General tab, including when to
automatically turn off the options and whether to give a warning when turning on or off an
option.
The Certificates Control Panel
Certificates Properties dialog box allows you to view your device Certificates information and the
dialog box. You can also press the import button to import the certificates from a file.

ViewSonic N210 18
The Date/Time Control Panel
Date/Time Properties allows you to set the date and time on the device.
Use the calendar to set the date. Select the Time Zone and check the dialog box if daylight
savings time is currently in effect. To manually set the time, enter a time slightly ahead of the
actual time in Current Time text box, and then just as the actual time reaches the set time, click
on the Apply button.
The Display Control Panel
Display Properties allows you to set your Background, Appearance, and Backlight Time Out
settings.
Background TAB
The ViewSonic logo is the default background. You can press the Browse button to change
the background image.
Appearance TAB
Changes the color scheme of the desktop.

ViewSonic N210 19
Backlight TAB
Sets the backlight shut off time for saving battery life. You can also change the time setting.
The Internet Options Control Panel
General TAB
The start page field allows you to set the web browser’s default start up page. You can also
set the search web site for your searching. Web page favorites are stored in the cache
memory. You can set the cache storage size.
Connection TAB
Sets the LAN or Autodial connection and enables the proxy server when you access the
Internet.
Table of contents