VIISAN VF3240 User manual

1
User's Manual
VF3240 / VF3120
A3 High Speed Flatbed Scanner
For Windows®
www.viisan.com
V1.4
Windows is a registered trademark of Microsoft Corporation
in the United States and other countries.

2
Copyright:
• All rights reserved by Beijing VIISAN Technology Co., Ltd. No part of the materials shall be reproduced in any form or by any means
without prior written permission.
Disclaimer:
• The screen shots in this user's manual were made with Windows 10. If you are using others Windows system, your screen will look
somewhat dierent but functions the same.
•Specications are subject to change without notice.
• We shall not be held liable for any damage resulting from electromagnetic interference that occurs from the use of any interface cables
other than those designated by the manufacturer.
Safety Precautions:
•Do not scan originals with glue, grease, correction uid, or wet ink on it which can cause malfunctions.
• When moving the scanner, disconnect the power cord and connection cable.
• When doing maintenance on the scanner, remove the power plug from the outlet.
• Operate the unit on a level, well-grounded work surface, and free of excessive vibration.
• Never store the unit in hot, or very cold, or humid or dusty places.
• Don not open the unit. Risk of electric shock.
• Never spill liquid of any kinds on the scanner during operation. Also do not touch the power adapter with wet hands.
• For an extended storage period, we recommend storing the unit in a cool and dry place.
• If the scanner is left in extreme cold or hot conditions, allow it to adjust to normal room temperatures before use.
•Only use accessories specied by the manufacturer.
• When left unused for a long period of time, remove the power plug from the outlet.
• Always handle the unit with care. Avoid dropping and strong impact.
• Do not leave the Scanner within the reach of children.
Environmental Information:
• Discarded electrical and electronic appliances are recyclable and should separate from the household waste. Please actively support in
conserving resources and protecting the environment by returning this appliance to the collection centers.
Precautions

3
Contents
Precautions ............................................................................. 2
Copyright ................................................................................. 2
Disclaimer ............................................................................... 2
Safety Precautions .................................................................. 2
Environmental Information ...................................................... 2
Package Contents ................................................................... 4
Scanner Parts ......................................................................... 5
System Requirements ............................................................. 6
Driver and Applications ........................................................... 6
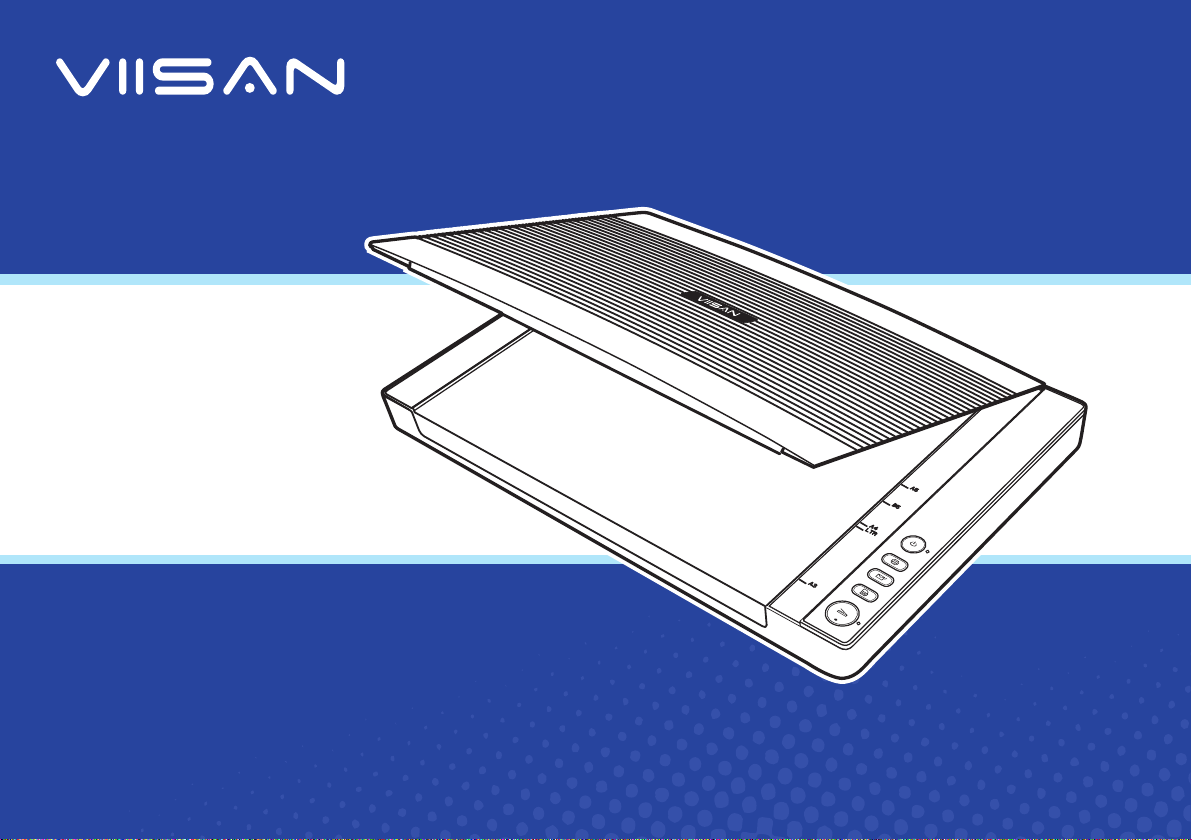
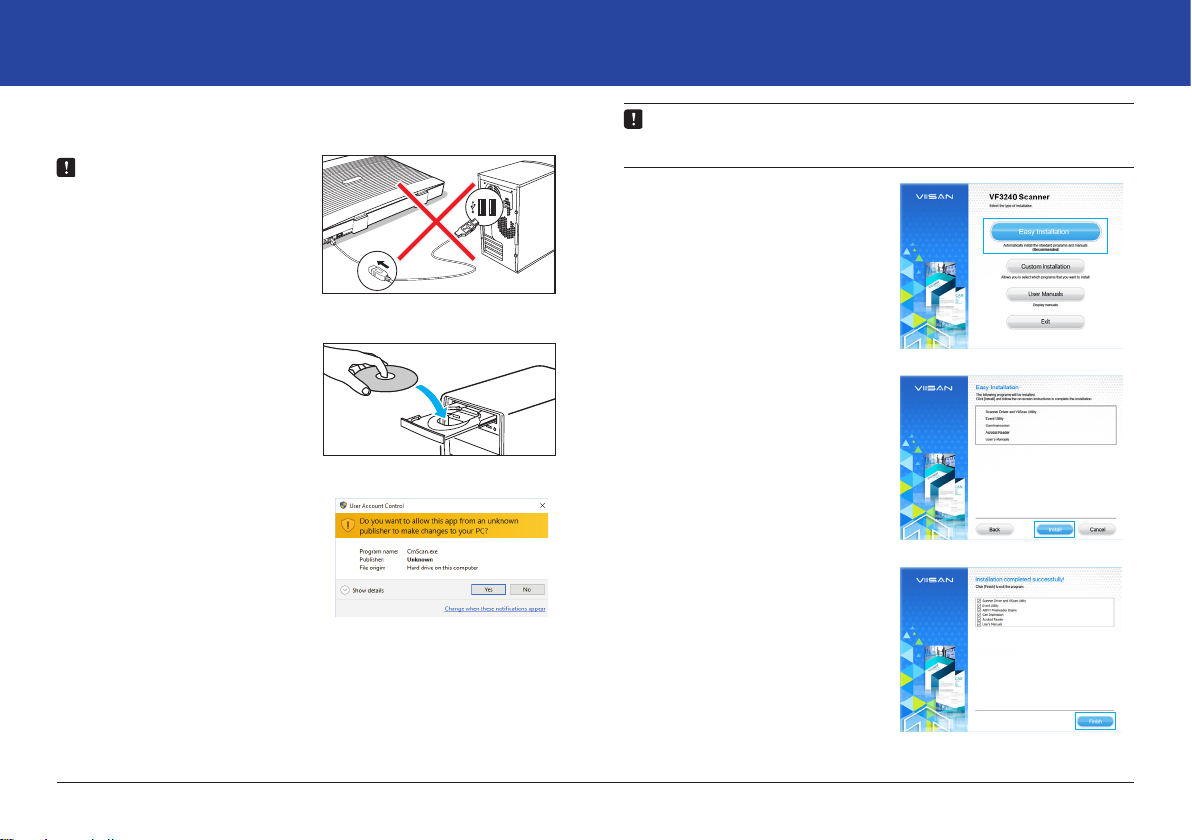
Installation ............................................................................... 7
Installing the software ............................................................. 7
Connecting the Scanner ......................................................... 8
Placing the Originals ............................................................... 9
Scanning Using ViiScan ........................................................ 10
About the ViiScan .................................................................. 10
Launching ViiScan ................................................................ 10
About the ViiScan interface ................................................... 11
Adjusting the Setting Tabs of ViiScan .................................... 11
The Scan Settings Tab .......................................................... 11
The Image Processing Tab ................................................... 15
Preview Window Controls ...................................................... 19
Thumbnail Window Controls .................................................. 20
Using Thumbnail View .......................................................... 20
Continuous Scanning ............................................................ 21
Delete the Backup Files ........................................................ 21
Cancel a Scan ....................................................................... 21
Scanning Using Event Utility ................................................. 23
About the Event Utility ........................................................... 23
Scan-to destinations .............................................................. 23
Launching Event Utility .......................................................... 24
Power Saving ........................................................................ 24
Conguring the Scan To Functions ....................................... 25
Adjusting the Setting Tabs ..................................................... 26
The Destination Tab .............................................................. 26
Scan to Folder ....................................................................... 27
Scan to PDF .......................................................................... 27
Scan to E-Mail ....................................................................... 28
Scan to Print .......................................................................... 28
Scan to OCR ......................................................................... 28
Scan to Application ................................................................ 28
The Scan Settings Tab .......................................................... 29
Adjustments .......................................................................... 31
Image Processing Settings ................................................... 32
The Page Settings Tab .......................................................... 34
Reset to Default .................................................................... 35
Exit Event Utility .................................................................... 35
Preferences ........................................................................... 35
Enable Direct Scan ............................................................... 36
Maintenance .......................................................................... 37
Cleaning the Flatbed Glass ................................................... 37
Specications ........................................................................ 38
Troubleshooting .................................................................... 39
Scanner lights indicate an error ............................................ 39
Problems starting scanning ................................................... 39
Scanned image problems ..................................................... 40
Scanning problems ............................................................... 40
Uninstalling and installing driver or applications ................... 41

4
Package Contents
Make sure following items are included in this package. If any items are missing or damaged, contact the dealer where you purchased
the scanner.
Bundled Driver and Applications:
• Scanner Driver and ViiScan Utility
• Event Utility
• OCR Engine
•Adobe Acrobat Reader
• User’s Manual
Scanner
Quick Start Guide Warranty Card
Power Adapter USB Cable Installation DVD
北京维山科技有限公司
BEIJING VIISAN TECHNOLO GY CO., LT D

5
Scanner Parts
A
I
C
D
E
F
G
B
H
K
M
L
J
Parts Functions
AScanner Lid Opens to reveal the Flatbed Glass.
BPower Button Turns the power on or o.
CPower LED Emits blue light when the Scanner is turn
on.
DPrint Button Scan directly to your printer to make copies
of a scan.
EE-Mail Button Scan directly to E-Mail program.
FPDF Button Scan directly to the PDF le format.
GScan LED Scanning : Emits green light with ashing.
Disconnected : Emits red light.
HScan Button Scan directly to the selected folder.
ICover Sensor Auto scan by detecting the cover sensor.
*See page 36.
JFlatbed Glass Used to scan single pages or book pages.
KLid Hinges Lift the Scanner Lid straight up.
LDC IN Port Connect the Power Adapter.
MUSB Port Connect the USB cable to a computer.

6
System Requirements
Following minimum system requirements are recommended to achieve the best performance from the scanner.
• Intel Core 2 Duo 2.4 GHz Processor or Higher
• DVD-ROM
• USB 2.0 Jack
• At least 2GB RMB (Recommended 4GB)
• 2GB Available HDD Space
• Microsoft® Windows® 10、8.1、8、7、Vista、XP(SP3), 32 Bit or 64 Bit
NOTE: The scanning software performance will be determined by the specifications of your computer. The higher specification
computer will bring better performance.
Driver and Applications:
• Scanner Driver and ViiScan Utility
ViiScan is a driver for controlling your scanner, enabling a variety of scan settings. It also allows you to start either as a standalone
application or by using other third party TWAIN-compliant application. See page 10 for more details.
• Event Utility
This application allows to change your scanner button to other Scan To function and configured with various settings through the
settings dialog, such as scanning to Folder/PDF/Email/Print, creating text OCR or opening scans with a specified application. See
page 23 for more details.
•OCR Engine
This program allows to convert the scanned file into editable text format when using the Scan To OCR (Optical Character
Recognition) function of the Scanner.
• Adobe Acrobat Reader
This application allows to open the scanned data that is converted into PDF format using the Scan to PDF function of the Scanner.
For the detailed information of this application, see the “Help” file integrated within this application.

7
Installation
NOTE: Do NOT connect the
scanner to computer before
installing the software. You
must install the scanner driver
first then connect the scanner
to computer.
1. Insert the Installation disk
into the drive of the computer
then execute [Setup.exe]
from the disk.
2. For Windows 10/8.1/8/7/Vista
If the [User Account Control]
screen appears, click [Yes]
to start installation.
3. Click [Easy Installation].
If you want to reinstall only
specic software that you
have previously uninstalled,
select [Custom Installation]
and specify the software.
4. Click [Install] and follow
the instructions on the screen
to complete installation.
5. Click [Finish] to exit the
program when the installation
completed successfully!
NOTE: Please install all of the applications to ensure all
functions of the Scanner work properly.
Installing the software

8
Installation (Continued)
NOTE: Only use the USB cable and the power adapter
supplied with scanner. Use of other cables may lead to a
malfunction.
Connecting the Scanner:
1. Connect supplied Power Adapter to the scanner’s DC IN port,
and plug the other end to a power outlet.
2. Connect supplied USB Cable to the scanner’s USB Port and
the other end to the computer.
3. Press and hold [POWER] to turn on the scanner until the
Power LED lights up in blue.
4. The [Installing Device] window will appear when the scanner
is turned on for the rst time.
5. Please wait until the driver is nished being congured and
the [Installing Device] window disappears.
NOTE:
•To turn o the power, press and hold [POWER] for a
while until the Power LED turns o.
•The scanner will auto power o after no operation for 15min.

9
Placing the Originals
1. Open the Scanner Lid.
2. Place the original facing down on the Flatbed Glass, and
then align the original at the position Arrow Mark.
3. Close the Scanner lid gently so that your original does not
move.
4. If you are scanning books or other thick documents,
you can lift the scanner lid straight up or remove it.
NOTE: Do not place heavy items on the Scanner Glass or
press on the Scanner Glass with too much force as this will
cause damage to the glass surface.

10
About the ViiScan
ViiScan is a driver for controlling your scanner, enabling a variety of scan
settings. it also allows you to start either as a standalone application or
acquire it by using 3rd-party TWAIN-compliant application like Adobe
Photoshop.
Launching ViiScan
1. Click system Windows icon then [All apps] select [ VIISAN]
folder to open ViiScan program.
2. Select your scanner from the select source list and click [OK] then
the ViiScan interface will be openned immediately.
3. The ViiScan includes a preview window allowing you to preview the
image before scanning the nal image, you can make changes in
the settings as necessary and then click [Preview] to preview the
image before scanning.
4. When the pre-scanned image appears, you can resize the scan
area by dragging the marquee handles around the image to frame
the desired area of the image. The areaoutside of the frame will be
cropped after clicking the [Scan] button.
Scanning Using ViiScan

11
About the ViiScan interface
The TWAIN interface is divided into two sections: the right section where
most of the control settings are located, and the left section, which is the
Preview Area.
NOTE: For the detailed instructions of ViiScan dialog box, Click " "
Help icon on the ViiScan interface to open the Help le.
Adjusting the Setting Tabs of ViiScan
There are three settings dialog in the ViiScan panel includes Scan
Settings, Image Processing, and Page Settings tabs. The following are
the function descriptions and examples of the available settings.
The Scan Settings Tab
Click the Scan Settings tab to bring up the setting page. You can make
change as following:
Preview area
Used for viewing
the prescan image.
Restore to defaults
Save Settings
Exit
MaximizeChange OSD Languages
Minimize
Help
Scan
Preview
Close & Exit
Preview Toolbars
Contain
dierent scan
settings, image
processing,
and page
settings.
1
2
3
4
5
6
7
8
9
12
13
10
11
Scanning Using ViiScan (Continued)

12
1Favorite
Settings
Create new scan proles with your favorite settings
and save them for future use.
2Original Type Specify an original type including "Photograph",
"Text Document & Lineart", "Magazine".
3Scan Source
The Scan Source setting is xed as Flatbed. You
cannot change this setting.
NOTE: The Scan Source may vary depending on
your scanner type.
4Scan Mode Specify a mode to scan your originals
including "Color", "Gray", "B/W", "Multi-Color Output".
5Multi-Color
Output
Tick the checkbox to select the modes including:
“Color”, “Gray”, “B/W”. You can make a single scan
to be saved up to 3 separate images simultaneously.
You can press the “Color”, “Gray”, or “B/W” button to
set dierent settings for each mode.
6Scan Size
Specify a paper size including:
• Flexible
• A3 (297 x 420mm)
• A4 (210 x 297mm)
• B5 (148 x 210mm)
• A6 (105 x 148mm)
• B6 (128 x 182mm)
• Letter (216 x 297mm)
• Legal (216 x 356mm)
7Scan
Resolution
Select the resolution of the image to be
scanned with following choices: "100dpi", "200dpi",
"300dpi", "600dpi", "1200dpi", "2400dpi".
NOTE:The change of Scan Resolution will apply
to the selected cropping frame only.
8Output
Size
Display the width and height of the cropping frame.
You can adjust the output size by dragging the
edges or corners of the cropping frame in the
Preview Window.
9
Color
Droput
This setting removes a single color (Red, Green or
Blue) such as marks, stamps and retains the black
text. If “None” is selected, No color is dropped out.
Example of removing the red stamp:
You can adjust the Filter Threshold slider when the
color selected cannot drop out. Drag the slider toward
“Maximum” to remove more selected color, and toward
“Minimum” to keep more selected color in.
NOTE: Color Dropout can only be specied in
“Gray” and “B/W” mode.
Scanning Using ViiScan (Continued)

13
9
B/W
Threshold
Settings
NOTE: This function is only available when
scanning in B/W, or Multi-color Output (B/W) mode.
You can convert the scanned image in black and white
using following method:
Auto Threshold: It nds an adequate threshold value
automatically to obtain a clear image and remove dark
backgrounds from the image.
Manual Threshold: You may manually adjust the
Filter Threshold value (-100 ~ 100) until you are
satised with the result.
Halftone Pattern: This provide 3 halftone patterns, each
creates a halftone eect using a pattern of black and white
dots that can represent darker or lighter color values. you
can slider the Filter Threshold value (-100~100) if you
want to increase or decrease the edge weight of patterns.
10
Tone
Curve
Settings
In this settings you can adjust the color tone of an
image by selecting the channel of color, You can
Adjust the R.G.B channels as combined or adjust
specied channel.
Channel Options:
RGB: Adjust the Red, Green, and Blue combined.
Red: Adjust the Red channel.
Green: Adjust the Green channel.
Blue: Adjust the Blue channel.
NOTE:
• Only Gray will be displayed in Channel when
Color Mode is selected Gray.
• This function is disabled in B/W mode.
Scanning Using ViiScan (Continued)

14
10
Brightness/
Contrast/
Shadows/
Highlight
Settings
NOTE: This
function is
disabled in
B/W mode.
Brightness:
Move the slider to increase or decrease the value
(-100 ~ 100) to adjust the image brighter or darker.
Darkened Original Brightened
Contrast:
Move the slider to increase or decrease the value
(-100 ~ 100) to adjust the contrast higher or lower.
Decreased contrast Original Increased contrast
Shadows:
Move the slider to adjust the value (0~100%) to bring
out the detail in harsh shadow areas.
Original Brightened Shadow
Highlights:
Move the slider to adjust the value (0~100%) to bring
out the midtones.
Original Highlighted middle tone
11
Color
Adjustment
Hue:
Move the slider to increase or decrease the value
(-100 ~ 100) to adjust the Hue.
Saturation:
Move the slider to increase or decrease the value
(-100 ~ 100) to adjust the saturation.
Saturation decreased Original Saturation increased
Color Balance:
You can adjust the tint when photos are tinted with red and
green due to the weather or the lighting where the photo
was shot.
• Cyan & Red
• Magenta & Green
• Yellow & Blue
Below is an example of an image in which the "Cyan &
Red" pair has been adjusted.
Cyan is increased Red is increased
NOTE: This function is enabled in Color mode only.
Scanning Using ViiScan (Continued)

15
The Image Processing Tab
You can using the features on the Image Processing tab to scan your
originals in ViiScan. The following table gives examples and descriptions
of the Image Processing settings.
NOTE: Some items may not be available depending on scan settings
you made.
4
5
6
8
1
2
3
7
9
10
1Auto Level
Auto Level helps automatically adjusts both the
color and contrast of scanned image, based on the
shadows, midtones, and highlights that it nds.
2Color
Restoration
Color Restoration helps to restore the lost color in
old pictures and makes them to their original colors.
3Descreening
Descreening helps to reduce moire patterns
in magazines or other printed materials. After
descreening, the image may appear blurry.
Original Auto Level Applied
Original
Original
Color Restoration
Applied
Descreening Applied
Scanning Using ViiScan (Continued)

16
5Unsharp
Mask
This function helps to emphasize edges in the image
more clearly for an overall sharper image.
6Dust
Removal
The dust removal function can remove dusts or scratch
marks without aecting the image composition.
7De-noise
De-noise helps to remove small dots or specks appear
in the background of scanned document.
NOTE: De-noise is enabled in “B/W” mode only.
8Text
Enhancement
This function enhances the contrast between the texts
and the background for readability.
9
Punch
Holes
Removal
This function can remove the round-shaped punch holes
around the edges of the documents. The punch holes
around the edges are replaced with the color closest to
the document.
NOTE:
• Punch holes will not be removed if the documents are placed
skewed and without cropping.
• The shape of punch holes that is not round can not be removed.
• Punch holes may not be removed if the holes overlap the text, lines
or graphics.
10
Background
Color
Smoothing
The Background Color Smoothing function allows to
smooth background color or remove it and make white.
Make White
Original
Make Smoothing
Original
Punch Holes Removal
Applied
Scanning Using ViiScan (Continued)

17
11
Edge-
correction
Settings
(Example 1)
This function lls the missing edges with a color which
matches to the image. It also adds white or black edges
onto the borders of the scanned documents.
Example 1:
Automatically to ll the color of missing edges.
11
Edge-
correction
Settings
(Example 2)
Example 2:
Add white or black edge on the border of scanned
document. You can also enter a value (1~20mm).
Add black border
Add white border
Scanning Using ViiScan (Continued)

18
The Page Settings Tab
The "Page Settings" includes Rotation, Mirror, and Invert settings.
You can make changes as following examples:
1
2
3
1Rotation
Select a rotation angle to rotate the image.
Choices: "None", "90° CW", "90° CCW", "180°"
2Mirror
Select a mirror type for your document.
Choices: "None", "Level", "Vertical"
3Invert
This function reverses the colors of the scanned
image to the opposite colors.
F
F
A
A
F
F
Scanning Using ViiScan (Continued)

19
Preview Window Controls
There are several useful tools in the Preview toolbar to assist you to
check the details of the preview image.
2 3 4 5 6 7 8 9 10 11
3
Select scanning area
Your can move the cursor to a corner or an edge of
the crop frame (the cursor will change to ).
Click and drag the cursor to enlarge or shrink the
cropping frame to the desired size.
4Move frame
5Zoom in (Max. 6x)
6Zoom out
7Fit in window
8Rotate the image 90º counterclockwise
9Rotate the image 90º clockwise.
10 Select all cropping frames
11 Delete selected cropping frame
1
1Switch on/o thumbnail view
*. See page 20 for more details.
2Clears preview area
Enlarge/shrink
cursor
Scanning Using ViiScan (Continued)

20
Thumbnail Window Controls
There are several useful tools in the thumbnail toolbar to assist you to
check or uncheck the thumbnail.
Using Thumbnail View
•Cropping frames are specied according to the originals size, and
thumbnails of scanned images are displayed.
• Make sure there is a gap of at least 20 mm (0.8 inch) between the
originals, when placing multiple originals on the scanner glass.
Otherwise they may can not preview in thumbnail correctly.
NOTE:
•When multiple images are previewed, dierent outlines indicate
dierent selection status.
• Selected "Blue outline": The displayed settings will be applied.
• Unselected "Gray outline": The settings will not be applied.
• Only the images with the checkbox selected will be scanned.
1Switch on/off thumbnail view
2Uncheck all of the frames
3Check all of the frames
4Rotate the image 90º counterclockwise
5Rotate the image 90º clockwise.
2 3 4 51
Normal View Thumbnail View
>2cm
Scanning Using ViiScan (Continued)
This manual suits for next models
1
Table of contents
Other VIISAN Scanner manuals