Viking Range CVMOD241 User manual

Use & Care Manual
DrawerMicro™ Oven
VMOD241 / CVMOD241
Control
Lock
Start
Add-A-Minute
Start
Add-A-Minute
Sensor
Cook
Sensor
Cook
ReheatReheat
OPENOPEN
CLOSECLOSE
Power
Level
Power
Level
Timer/
Clock
Timer/
Clock
Stop/
Clear
Stop/
Clear
3 4 5
6 7 8 9 0
Sensor
Reheat
Defrost
Sensor
Popcorn
Setup/
Help
Keep Warm
1 2
On/Off


1E
If service is required:
1. Call your authorized service agency.
2. Have the following information readily available:
a. Model number
b. Serial number
c. Date purchased
d. Name of dealer from whom purchased
3. Clearly describe the problem that you are having.
If you are unable to obtain the name of an authorized service agency, or if
you continue to have a service problem, contact Viking Range, LLC at (888)
845-4641 or write to:
VIKING RANGE, LLC
PREFERRED SERVICE
111 Front Street
Greenwood, Mississippi (MS) 38930 USA
Record the information indicated below. You will need it if service is ever
required. The model and serial number for your oven are located on the left
side of the oven cavity on an identification label
Model Number __________________________ Serial Number _______________________
Date of Purchase ________________________ Date Installed ________________________
Dealer's Name _______________________________________________________________
Address _____________________________________________________________________
______________________________________________________________________________
If service requires installation of parts, use only authorized parts to ensure
protection under the warranty.
PLEASE RETAIN THIS MANUAL FOR FUTURE REFERENCE
SERVICE INFORMATION

2
E
PRECAUTIONS TO AVOID POSSIBLE
EXPOSURE TO EXCESSIVE
MICROWAVE ENERGY
(a) Do not attempt to operate this oven with the door open since open-
door operation can result in harmful exposure to microwave energy.
It is important not to defeat or tamper with the safety interlocks.
(b) Do not place any object between the oven front face and the door
or allow soil or cleaner residue to accumulate on sealing surfaces.
(c) Do not operate the oven if it is damaged. It is particularly important
that the oven door close properly and that there is no damage to
the: (1) door (bent), (2) hinges and latches (broken or loosened),
(3) door seals and sealing surfaces.
(d) The oven should not be adjusted or repaired by anyone except
properly qualified service personnel

3E
1 SERVICE INFORMATION
2 PRECAUTIONS TO AVOID
POSSIBLE EXPOSURE TO
EXCESSIVE MICROWAVE
ENERGY
3 TABLE OF CONTENTS
4-5 IMPORTANT SAFETY
INSTRUCTIONS
6-11 INFORMATION YOU NEED
TO KNOW
6AbOUT UNPACKING
AND Ex AMINING YOUR
DrawerMicro Oven
6-7 ELECTRICAL GROUNDING
INSTRUCTIONS
7 AbOUT YOUR DrawerMicro Oven
7-8 AbOUT MICROWAVE COOKING
8-9 AbOUT UTENSILS AND
COVERINGS
9-10 AbOUT CHILDREN AND THE
MICROWAVE
10 AbOUT SAFETY
11 AbOUT FOOD
12-13 PART NAMES
12 DrawerMicro Oven
13 CONTROL PANEL
14-15 BEFORE OPERATING
14 TO SET THE CLOCK
14 TIMER
14 STOP/CLEAR
15 OPEN OR CLOSE DrawerMicro
Oven
16-23 DrawerMicro Oven COOKING
16 TIME COOKING
16 TO SET POWER LEVEL
17-18 SENSOR SETTINGS
18 SENSOR POPCORN /
SENSOR REHEAT
19-20 SENSOR COOK
21-22 DEFROST
22 MANUAL DEFROST
23 REHEAT
24-27 OTHER FEATURES
24 KEEP WARM
24 MULTIPLE SEq UENCE
COOKING
25 HELP
25 ADD-A-MINUTE
25 MORE OR LESS TIME
ADj USTMENT
25 CONTROL LOCK
26-27 SETUP/HELP
28-29 CLEANING AND CARE
28 Ex TERIOR
28 STAINLESS STEEL SURFACE
28 FRONT SIDE OF THE
DRAWER
28 TOUCH CONTROL PANEL
28 INTERIOR
28 DrawerMicro Oven GUIDES
29 WAVEGUIDE COVER
29 ODOR REMOVAL
30 BEFORE YOU CALL FOR
SERVICE
31 DrawerMicro Oven
WARRANTY
TABLE OF CONTENTS

4
E
When using electrical appliances basic safety precautions should be followed,
including the following:
WARNING - To reduce the risk of burns, electric shock, fi e, injury to persons
or exposure to excessive microwave energy:
1. Read all instructions before using the appliance.
2. Read and follow the specific “PRECAUTIONS TO AVOID POSSIbLE
Ex POSURE TO Ex CESSIVE MICROWAVE ENERGY” on page 2.
3. This appliance must be properly grounded. Connect only to properly
grounded outlet. See Grounding Instructions on page 6.
4. Install or locate this appliance only in accordance with the provided
Installation Manual.
5. Some products such as whole eggs and sealed containers - for example,
closed glass jars—are able to explode and should not be heated in the
appliance.
6. Use this appliance only for its intended use as described in this manual.
Do not use corrosive chemicals or vapors in this appliance. This appliance
is specifically designed to heat, cook or dry food. It is not designed for
industrial or laboratory use.
7. As with any appliance, close supervision is necessary when used by
children.
8. Do not operate this appliance if it has a damaged cord or plug, if it is not
working properly or if it has been damaged or dropped.
9. This appliance should be serviced only by qualified service personnel.
Contact nearest Viking Authorized Servicer for examination, repair or
adjustment.
10. Do not cover or block any openings on the appliance.
11. Do not store or use this appliance outdoors. Do not use this product
near water—for example, near a kitchen sink, in a wet basement, near a
swimming pool or similar locations.
12. Do not immerse cord or plug in water.
13. Keep cord away from heated surfaces.
14. Do not climb or sit on the appliance.
15. Do not let cord hang over edge of table or counter.
16. Do not mount over sink.
17. Do not store anything directly on top of the appliance surface when the
appliance is in operation.
IMPORTANT SAFETY INSTRUCTIONS

5E
18. be sure that fingers or other objects or materials are not around the
appliance opening when the appliance is closed.
19. Do not put fingers or clothes around the drawer guides when the
appliance is opened or closed. They could be caught in the guides when
the appliance is closed.
20. be sure that the food and container are shorter than the drawer before
closing it. You can refer to the height of the side walls of the drawer.
21. When cleaning appliance sealing surfaces that come together on closing
the drawer, use only mild, nonabrasive soaps or detergents applied with
a sponge or soft cloth. See cleaning instructions on page 28.
22. To reduce the risk of fire in the appliance cavity
a. Do not overcook food. Carefully attend appliance when paper, plastic
or other combustible materials are placed inside the appliance to
facilitate cooking.
b. Remove wire twist-ties from paper or plastic bags before placing bag
in appliance.
c. If materials inside the appliance ignite, keep appliance door closed,
turn microwave off and shut off power at the fuse or circuit breaker
panel.
d. Do not use the appliance for storage purposes. Do not leave paper
products, cooking utensils, or food in the appliance when not in use.
23. Liquids, such as water, coffee or tea are able to be overheated beyond
the boiling point without appearing to be boiling due to surface tension
of the liquid. Visible bubbling or boiling when the container is removed
from the appliance is not always present. THIS COULD RESULT IN VERY
HOT LIqUIDS SUDDENLY bOILING OVER WHEN A SPOON OR OTHER
UTENSIL IS INSERTED INTO THE LIqUID.
To reduce the risk of injury to persons:
a. Do not overheat the liquid.
b. Stir the liquid both before and halfway through heating it.
c. Do not use straight-sided containers with narrow necks. Use a wide-
mouthed container.
d. After heating, allow the container to stand in the appliance at least
for 20 seconds before removing the container.
e. Use extreme care when inserting a spoon or other utensil into the
container.
24. If the appliance light fails, consult an AUTHORIZED SERVICER.
SAVE THESE INSTRUCTIONS

6
E
ABOUT UNPACKING AND EXAMINING YOUR
DrawerMicro Oven
1. Remove all packing materials from inside
the DrawerMicro Oven. DO NOT RE-
MOVE THE WAVEGUIDE COVER, which
is located on the top of the DrawerMicro
Oven.
2. Remove the feature sticker, if there is
one. Check the drawer for any damage,
such as misaligned or bent drawer, dam-
aged drawer seals and sealing surfaces,
broken or loose drawer guides and dents
inside the cavity or on the front side of the
drawer. If there is any damage, do not op-
erate the DrawerMicro Oven and contact
your dealer or a VIKING AUTHORIZED
SERVICER.
ELECTRICAL GROUNDING
INSTRUCTIONS
This appliance must be grounded. In the event of an electrical short circuit,
grounding reduces risk of electric shock by providing an escape wire for
the electric current. This oven is equipped with a cord having a grounding
wire with a grounding plug. It must be plugged into a wall receptacle that is
properly installed and grounded in accordance with the National Electrical
Code and local codes and ordinances.
WARNING - Improper use of the grounding plug can result in a risk of
electric shock.
Electrical Requirements
The oven is equipped with a 3-prong grounding plug.
DO NOT UNDER ANY CIRCUMSTANCES CUT OR
REMOVE THE GROUNDING PIN FROM THE PLUG.
DO NOT USE AN ExTENSION CORD. If the power
supply cord is too short, have a qualified electrician
or serviceperson install an outlet near the appliance.
The Power Supply Cord and plug must be connected to a separate 120 Volt
AC, 60 Hz, 15 Amp, or more branch circuit, single grounded receptacle. The
receptacle should be located inside the cabinet directly above the Microwave
Oven mounting location.
INFORMATION YOU NEED TO KNOW
Waveguide
Cover
Sealing
Surface
Oven
Cavity
Sealing
Surface

7E
Note:
1. If you have any questions about the grounding or electrical instructions,
consult a qualified electrician or servic person.
2. Neither Viking Range, LLC nor the dealer can accept any liability for
damage to the oven or personal injury resulting from failure to observe
the correct electri-cal connection procedures.
RADIO OR TV INTERFERENCE
Should there be any interference caused by the DrawerMicro Oven to your
radio or TV, check that the DrawerMicro Oven is on a different electrical
circuit, relocate the radio or TV as far away from the drawer as feasible or
check position and signal of receiving antenna.
ABOUT YOUR DrawerMicro Oven
ALWAYS have food in the DrawerMicro Oven when it is on to absorb the
microwave energy.
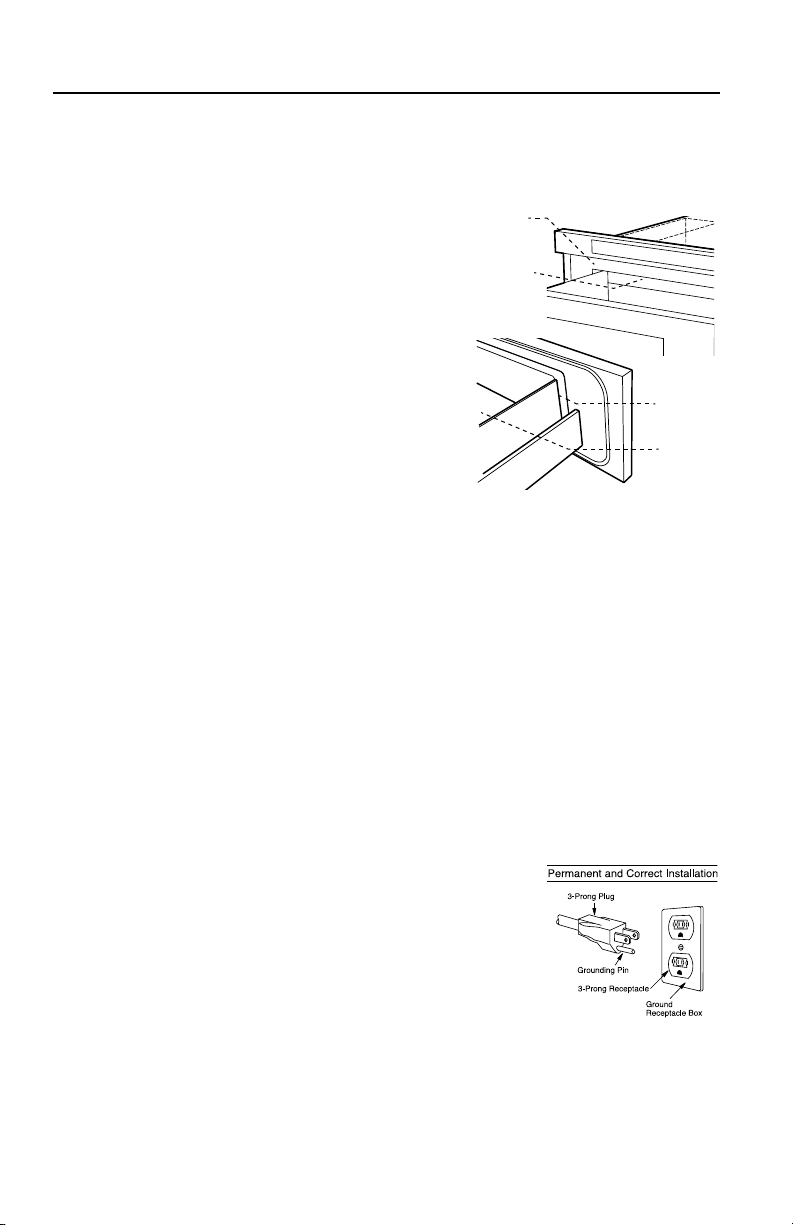
The vent under the DrawerMicro Oven must not be blocked. During micro-
waving, steam may come from the right side of the vent.
When using the DrawerMicro Oven at power levels below 100%, you may
hear the magnetron cycling on and off. It is normal for the exterior of the
DrawerMicro Oven to be warm to the touch when cooking or reheating.
Condensation is a normal part of microwave cooking. Room humidity and
the moisture in food will influence the amount of moisture that condenses
in the DrawerMicro Oven. Generally, covered foods will not cause as much
condensation as uncovered ones.
The DrawerMicro Oven is for food preparation only. It should not be used to
dry clothes or newspapers.
Your DrawerMicro Oven is rated 950 watts by using the IEC Test Procedure.
In using recipes or package directions, check food a minute or two before
the minimum time and add time accordingly.
When opening or closing the DrawerMicro Oven quickly, food in the
DrawerMicro Oven may be spilled. To clean, please refer to the Cleaning
and Care section on page 28.
ABOUT MICROWAVE COOKING
• Arrangefoodcarefully.Placethickestareastowardsoutsideofdish.
• Watchcookingtime.Cookfortheshortestamountoftimeindicatedand
add more as needed. Food severely overcooked can smoke or ignite.
• Coverfoodswhilecooking.Checkrecipeorcookbookforsuggestions:
paper towels, wax paper, microwave plastic wrap or a lid. Covers prevent
spattering and help foods to cook evenly.

8
E
• Shieldwithsmallfla piecesofaluminumfoilanythinareasofmeator
poultry to prevent overcooking before dense, thick areas are cooked
thoroughly.
• Stirfoodsfromoutsidetocenterofdishonceortwiceduringcooking,if
possible.
• Turnfoodsoveronceduringmicrowavingtospeedcookingofsuchfoods
as chicken and hamburgers. Large items like roasts must be turned over
at least once.
• Rearrangefoodssuchasmeatballshalfwaythroughcookingbothfrom
top to bottom and from right to left.
• Addstandingtime.RemovefoodfromDrawerMicro Oven and stir, if
possible. Cover for standing time which allows the food to finish cooking
without overcooking.
• Checkfordoneness.Lookforsignsindicatingthatcookingtemperatures
have been reached.
Doneness signs include:
- Food steams throughout, not just at edge.
- Center bottom of dish is very hot to the touch.
- Poultry thigh joints move easily.
- Meat and poultry show no pinkness.
- Fish is opaque and flakes easily with a fork
ABOUT UTENSILS AND COVERINGS
It is not necessary to buy all new cookware. Many pieces already in your
kitchen can be used successfully in your new DrawerMicro Oven. Make sure
the utensil does not touch the interior walls during cooking.
Use these utensils for safe microwave cooking and reheating:
• glassceramic(Pyroceram®), such as Corningware®.
• heat-resistantglass(Pyrex®)
• microwave-safeplastics
• microwave-safepaperplates
• microwave-safepottery,stonewareandporcelain
• browningdish(Donotexceedrecommendedpreheatingtime.Follow
manufacturer’s directions.)
These items can be used for short time reheating of foods that have little
fat or sugar in them:
• wood,straw,wicker
DO NOT USE
• metalpansandbakeware

9E
• disheswithmetallictrim
• non-heat-resistantglass
• non-microwave-safeplastics(margarinetubs)
• recycledpaperproducts
• brownpaperbags
• foodstoragebags
• metaltwist-ties
Should you wish to check if a dish is safe for microwaving, place the empty
dish in the oven and microwave on HIGH for 30 seconds. A dish which be-
comes very hot should not be used.
The following coverings are ideal:
• Papertowelsaregoodforcoveringfoodsforreheatingandabsorbing
fat while cooking bacon.
• Waxpapercanbeusedforcookingandreheating.
• Plasticwrapthatisspeciallymarkedformicrowaveusecanbeused
for cooking and reheating. DO NOT allow plastic wrap to touch food.
Vent so steam can escape.
• Lidsthataremicrowave-safeareagoodchoicebecauseheatiskept
near the food to hasten cooking.
• Ovencookingbagsaregoodforlargemeatsorfoodsthatneed
tenderizing. DO NOT use metal twist ties. Remember to slit bag so
steam can escape.
How to use aluminum foil in your DrawerMicro Oven:
• Smallfla piecesofaluminumfoilplacedsmoothlyonthefoodcan
be used to shield areas that are either defrosting or cooking too
quickly.
• Foilshouldnotcomecloserthanoneinchtoanysurfaceofthe
DrawerMicro Oven.
Should you have questions about utensils or coverings, check a good micro-
wave cookbook or follow recipe suggestions.
ACCESSORIES There are many microwave accessories available for purchase.
Evaluate carefully before you purchase so that they meet your needs. A mi-
crowave-safe thermometer will assist you in determining correct doneness
and assure you that foods have been cooked to safe temperatures. Viking is
not responsible for any damage to the DrawerMicro Oven when accessories
are used.
ABOUT CHILDREN AND THE MICROWAVE
Children below the age of 7 should use the DrawerMicro Oven with a supervis-
ing person very near to them. between the ages of 7 and 12, the supervising

10
E
person should be in the same room. The child must be able to reach the
DrawerMicro Oven comfortably.
At no time should anyone be allowed to lean or swing on the DrawerMicro
Oven.
Children should be taught all safety precautions: use potholders, remove
coverings carefully, pay special attention to packages that crisp food because
they may be extra hot.
Don't assume that because a child has mastered one cooking skill he/she
can cook everything.
Children need to learn that the DrawerMicro Oven is not a toy. See page 25
for Control Lock feature.
ABOUT SAFETY
• CheckfoodstoseethattheyarecookedtotheUnitedStatesDepartment
of Agriculture's recommended temperatures.
TEMP FOOD
160˚F (71˚C) For fresh pork, ground meat, boneless white poultry, fish
seafood, egg dishes and frozen prepared food.
165˚F (74˚C) For leftover, ready-to-reheat refrigerated, and deli and
carry-out “fresh” food.
170˚F (77˚C) White meat of poultry.
180˚F (82˚C) Dark meat of poultry.
To test for doneness, insert a meat thermometer in a thick or dense area
away from fat or bone. NEVER leave the thermometer in the food during
cooking, unless it is approved for microwave use.
• ALWAYSusepotholderstopreventburnswhenhandlingutensilsthatare
in contact with hot food. Enough heat from the food can transfer through
utensils to cause skin burns.
• Avoidsteamburnsbydirectingsteamawayfromthefaceandhands.Slowly
lift the farthest edge of a dish’s covering and carefully open popcorn and
oven cooking bags away from the face.
• StayneartheDrawerMicro Oven while it’s in use and check cooking prog-
ress frequently so that there is no chance of overcooking food.
• NEVERusetheDrawerMicro Oven for storing cookbooks or other items.
• Select,storeandhandlefoodcarefullytopreserveitshighqualityand
minimize the spread of foodborne bacteria.
• Keepwaveguidecoverclean.Foodresiduecancausearcingand/orfi es.
See page 29.

11 E
ABOUT FOOD
FOOD DO DON'T
Eggs,
sausages,
nuts, seeds,
fruits &
vegetables
• Punctureeggyolksbefore
cooking to prevent “explo-
sion”.
• Pierceskinsofpotatoes,
apples, squash, hot dogs
and sausages so that steam
escapes.
• Cookeggsinshells.
• Reheatwholeeggs.
• Drynutsorseedsin
shells.
Popcorn • Usespeciallybaggedpop-
corn for the microwave.
• Listenwhilepoppingcorn
for the popping to slow to 1
or 2 seconds or use special
Popcorn pad.
• Poppopcorninregular
brown bags or glass
bowls.
• Exceedmaximumtime
on popcorn package.
baby food •
Transfer baby food to small
dish and heat carefully, stir-
ring often. Check tempera-
ture before serving.
• Putnipplesonbottlesafter
heating and shake thor-
oughly. “Wrist” test before
feeding.
• Heatdisposable
bottles.
• Heatbottleswith
nipples on.
• Heatbabyfoodin
original jars.
General • Cutbakedgoodswithfil -
ing after heating to release
steam and avoid burns.
• Stirliquidsbrisklybefore,
during and after heating to
avoid “eruption”.
• Usedeepbowl,whencook-
ing liquids or cereals, to
prevent boilovers.
• Foodshouldbeshorter
than the DrawerMicro Oven.
Please refer to the height of
side walls of the drawer.
• Heatorcookinclosed
glass jars or air tight
containers.
• Caninthemicrowave
as harmful bacteria may
not be destroyed.
• Deepfatfry.
• Drywood,gourds,herbs
or wet papers.

12
E
DrawerMicro Oven
PART NAMES
2
18
5
4
3
7
6
1. Control panel
2. Waveguide cover DO NOT REMOVE
3. Menu Label
4. Drawer sealing surfaces
5. Drawer light
6. DrawerMicro Oven guides
7. Vent
8. Name plate: open the DrawerMicro Oven fully.
The label is slightly beyond the back wall of the
microwave cavity facing up from the flat surface

25 24 21-22 23
26-27 18 18 19-20
15
25
14 14
16
13 E
CONTROL PANEL
Number next to the control panel illustration indicates pages on which there are
feature descriptions and usage information.

14
E
BEFORE OPERATING
before operating your new DrawerMicro Oven make sure you read and un-
derstand this Use and Care Guide completely.
• BeforetheDrawerMicro Oven can be used, follow these steps:
1. Plug in the DrawerMicro Oven. ENJOY YOUR MICRO- WAVE TOUCH
CLEAR AND TOUCH CLOCK will appear.
2. Touch the Stop/Clear pad. :will appear.
3. Set clock.
TO SET THE CLOCK
1. Touch Timer/Clock pad and number 2.
2. Touch number pads for correct time of day and touch Timer/Clock pad
again.
This is a 12 hour clock. If you attempt to enter an incorrect clock time, ERROR
will appear in the display. Touch the Stop/Clear pad and re-enter the time.
• IftheelectricalpowersupplytoyourDrawerMicro Oven should be inter-
rupted, the display will intermittently show ENJOY YOUR MICRO- WAVE
TOUCH CLEAR AND TOUCH CLOCK after the power is reinstated. If
this occurs during cooking, the program will be erased. The time of day
will also be erased. Simply touch Stop/Clear pad and reset the clock for
the correct time of day.
Note:
• TheDrawerMicro Oven can be programmed with the drawer open except
for Start/Add-A-Minute .
TIMER
1. Touch Timer/Clock pad and number 1.
2. Enter time.
3. Touch Timer/Clock pad again.
To cancel timer, touch Stop/Clear.
STOP/CLEAR
Touch the Stop/Clear pad to:
1. Erase if you make a mistake during programming.
2. Cancel timer.
3. Stop the DrawerMicro Oven temporarily during timed cooking.
4. Return the time of day to the display.
5. Cancel a program during cooking, touch twice for timed cooking.

15 E
OPEN OR CLOSE DrawerMicro Oven
Always Touch the OPEN or CLOSE pad on the control panel to open or close
the DrawerMicro Oven.
Do not push or pull the DrawerMicro Oven by hand, except in case of
emergency, such as a power failure. If necessary, push or pull slowly.

16
E
TIME COOKING
Your DrawerMicro Oven can be programmed for 99 minutes 99 seconds
(99.99). Always enter the seconds after the minutes, even if they are both
zeros.
• Supposeyouwanttocookfor5minutesat100%.
1. Enter cooking time 500.
2. To cook at 100% power (High), touch Start/Add-A-Minute pad.
TO SET POWER LEVEL
There are eleven preset power levels.
Using lower power levels increases the cooking time, which is recommended
for foods such as cheese, milk and long slow cooking of meats. Consult a
microwave cookbook or recipes for specific ecommendations.
• Supposeyouwanttodefrostfor5minutesat30%.
1. Enter defrost time 500.
2. Touch Power Level 8 times.
3. Touch Start/Add-A-Minute.
TOUCH POWER LEVEL PAD
NUMBER OF TIMES FOR
DESIRED POWER
APPROXIMATE
PERCENTAGE
OF POWER
COMMON WORDS
FOR
POWER LEVELS
Power Level x 1 100% High
Power Level x 2 90%
Power Level x 3 80%
Power Level x 4 70% Medium High
Power Level x 5 60%
Power Level x 6 50% Medium
Power Level x 7 40%
Power Level x 8 30% Med Low/Defrost
Power Level x 9 20%
Power Level x 10 10% Low
Power Level x 11 0%
DrawerMicro Oven COOKING

17 E
SENSOR SETTINGS
The Sensor is a semi-conductor device that detects the vapor (moisture
and humidity) emitted from the food as it heats. The sensor adjusts the
cooking times and power levels for various foods and quantities.
Using Sensor Settings:
1. After the DrawerMicro Oven is plugged in, wait 2 minutes before using
any sensor setting.
2. be sure the exterior of the cooking container and the interior of the
DrawerMicro Oven are dry. Wipe off any moisture with a dry cloth or paper
towel.
3. The sensor works with foods at normal storage temperature. For example,
popcorn would be at room temperature.
4. Any sensor selection can be programmed with More or Less Time Adjust-
ment. See page 25.
5. More or less food than the quantity listed in the charts should be cooked
following the guidelines in any microwave cookbook.
6. During the first part of sensor use, the food name will appear on the display.
Do not open the DrawerMicro Oven or touch Stop/Clear during this part
of the cycle. The measurement of vapor will be interrupted. If this occurs,
an error message will appear. To continue cooking, touch the Stop/Clear
pad and cook manually.
When the sensor detects the vapor emitted from the food, the remainder
of cooking/reheating time will appear. The DrawerMicro Oven may be
opened when the remaining time appears on the display. At this time,
you may stir or season food, as desired.
7. If the sensor does not detect vapor properly when popping popcorn,
the oven will turn off, and the time of day will be displayed. If the sensor
does not detect vapor properly when cooking other foods, ERROR will
be displayed, and the microwave will turn off.
8. Check food temperature after cooking. If additional time is needed, con-
tinue to cook manually.
9. Each food has a cooking hint. Touch the Setup/Help pad when the HELP
indicator is lighted in the display.
Covering Foods:
Some foods work best when covered. Use the cover recommended in the
charts for these foods. You may refer to the hints by touching the Setup/
Help pad. See page 26.
1. Casserole lid.
2. Plastic wrap: Use plastic wrap recommended for microwave cooking.

18
E
Cover dish loosely; allow approximately 1/2 inch to remain uncovered to
allow steam to escape. Plastic wrap should not touch food.
3. Wax paper: Cover dish completely; fold excess wrap under dish to secure.
If dish is wider than paper, overlap two pieces at least one inch to cover.
be careful when removing any covering to allow steam to escape away from
you.
SENSOR POPCORN / SENSOR REHEAT
You can pop popcorn and reheat many foods and don’t need to calculate
cooking time or power level.
Touch Sensor Reheat or Sensor Popcorn and Start/Add-A-Minute pad.
When the sensor detects the vapor emitted from the food, the remainder of
cooking/reheating time will appear.
Note:
• TheSensorPopcornsettinghas2choices.Followdirectionsinthedisplay
to choose desired option.
SENSOR POPCORN / SENSOR REHEAT CHART
FOOD AMOUNT PROCEDURE
Sensor
Popcorn
Only 1
package
at a time
Use only popcorn packaged for the microwave.
Try several brands to decide which you like. Do
not try to pop unpopped kernels.
2.85 - 3.5 oz.
(Regular/
Regular light)
Touch Sensor Popcorn pad once.
1.2 - 1.75 oz.
(Mini / Snack)
Touch Sensor Popcorn pad twice.
Sensor
Reheat
4 - 36 oz. Place in dish or casserole slightly larger than
amount to be reheated. Flatten, if possible.
Cover with lid, plastic wrap or wax paper. Use
covers such as plastic wrap or lids with larger
quantities of more dense foods such as stews.
After reheating, stir well, if possible. Re-cover
and allow to stand 2 to 3 minutes. Foods should
be very hot. If not, continue to heat with vari-
able power and time.
This manual suits for next models
2
Table of contents
Languages:
Other Viking Range Microwave Oven manuals