Vintage TDM/RTAS User manual


Table of Contents
Contact Details..................................................................................3
Installation and Authorization.........................................................4
System Requirements......................................................................5
Introduction.......................................................................................6
User Interface....................................................................................8
Platform Specific Issues................................................................12
White Amp.......................................................................................13
Brown Amp......................................................................................15
Green Amp.......................................................................................18
Pitfalls and Common Mistakes......................................................21
Buying Recommendations............................................................23
2

Contact Details
Alternatively, you could use the phone or send an old-fashioned mail (do you remember
envelopes, stamps and paper?) to:
Softube AB
S:t Larsgatan 10c
SE-582 24 Linköping
Sweden
Web: www.softube.com
E-mail: [email protected]
Phone: +46 13 21 1623 (9 am – 5 pm CET)
Support
On the Softube website (www.softube.com) you will find answers to common questions
(FAQ) and other topics that might interest you.
Support questions can be posted at http://www.softube.com, where we will help you as fast
as we can!
©2007 SOFTUBE AB, SWEDEN. ALL PRODUCT AND COMPANY NAMES ARE TRADEMARKS OF
THEIR RESPECTIVE OWNERS. AMP ROOM IS A REGISTERED TRADEMARK OF SOFTUBE AB,
SWEDEN. SOFTUBE IS A REGISTERED TRADEMARK OF SOFTUBE AB, SWEDEN. ALL
SPECIFICATIONS SUBJECT TO CHANGE WITHOUT NOTICE. ALL RIGHTS RESERVED.
3

Installation and Authorization
1. Go to http://www.softube.com/register to transfer the license to your iLok
account. You will need the serial number found in the box, your iLok.com
User ID, and your iLok USB dongle. Follow the instructions on the web page.
2. Make sure that you have the latest iLok drivers installed. They can be found at
http://www.ilok.com.
3. Log on to http://www.ilok.com and transfer the newly received license to your
physical iLok dongle.
4. Install the software from the CD, or download the latest version from
http://www.softube.com/installers.
Sometimes the CD contains installers for all Softube products, but you will only be able to
run those that you have acquired licenses for. In some cases, extra demo licenses are
included when you buy a Softube product.
4

System Requirements
All versions
•Mac OS 10.4 (or higher) on a G4 or Intel CPU (or higher)
•Windows XP (or higher) on a PIII CPU (or higher)
•iLok USB key and the latest iLok drivers (download them from http://www.ilok.com)
Pro Tools HD Accel Version (TDM) specific requirements
•Pro Tools | HD Accel with Pro Tools 7.0 or higher
•System must meet requirements for Pro Tools HD from Digidesign
Vintage Amp Room uses less than 62% of an Accel processor.
PowerCore version (VST/AU) specific requirements
•Any VST or AudioUnits compatible host application
•PowerCore software 2.2 (or higher) and compatible hardware
•Vintage Amp Room PowerCore is compatible with PowerCore PCI mkII, Express,
Unplugged, Compact and FireWire. Vintage Amp Room PowerCore is not compatible
with PowerCore Element and PCI.
•System must meet requirements of the host application and PowerCore software
Vintage Amp Room uses less than 76% of a PowerCore processor.
Native version (VST/AU/RTAS) specific requirements
•512 MB RAM
•Any VST, AudioUnits or RTAS compatible host application
5

Introduction
Straightforward and simple, Vintage Amp Room emulates three great guitar amps in a
complete studio set-up with speaker cabinets and fully flexible microphone positioning. It's
easy to use for live performances and recordings, as well as for re-amping and last-minute
tweaking.
Amp Room has none of the added gadgets or weird-sounding presets sometimes found in
simulation software. Focusing on quality and accuracy, it simulates three amps, with
sounds that are timeless and authentically raw. The goal is not to give you a pre-produced,
ultimate guitar sound, but to provide you with the ultimate tool to create your own. Because
after all, only you know exactly what sound you want.
Product Philosophy
Everything about this product is authentic. The raw and dynamic sound is an absolute
replica of what you would get if you had these amps set up in a real studio. What you see
on the screen are photo-realistic 3D-renderings of the complete set-ups, and you get to
move an actual mic around when deciding which position is best, from near field off-axis to
far field and back, continuously, without preset positions.
The idea is that using Amp Room should be like working directly with these amplifiers set
up in a real studio, with a microphone in front of the cabinet, connected to your DAW. And
we kept it simple. Amp Room has no knobs with dubious or unintuitive functionality, and no
added gadgets or ridiculously fake-sounding effects.
The sound of the amps has not been tampered with, because we don't give you a pre-
produced, ultimate guitar sound. We simply provide you with the tools: three great, classic
amplifiers, in digital form. Then it's up to you to add compressors, EQ's, reverb, or any
other effects, to get the sound you want.
6

In short, you need the same skills to master this software as you need when dealing with a
real studio set-up. You can get back to doing what you do best, because music production
is about using your ears, not your computer skills.
Supernormalize
The “supernormalize” feature (from the beginning the internal name of a slightly magic
component of our model building toolbox), makes sure that the output signal from Amp
Room always has a reasonable volume. From a user perspective, this means that the Amp
Room never clips the signal (unwanted digital distortion). Also, the output volume is
normalized, so even with low settings on the Volume knob in Amp Room, the output
volume will be within a reasonable level and ready for digital recordings. Compare this to
the real amp, which easily can have a dynamic range of 100 dB.
From a technical perspective, this means that the signal path within Amp Room always has
the highest dynamic range possible, and you won't lose any bits on the way.
Patents
This Softube product is protected by patent SE525332 and pending patents
US2004-0258250, EP1492081 and JP2004-183976.
7
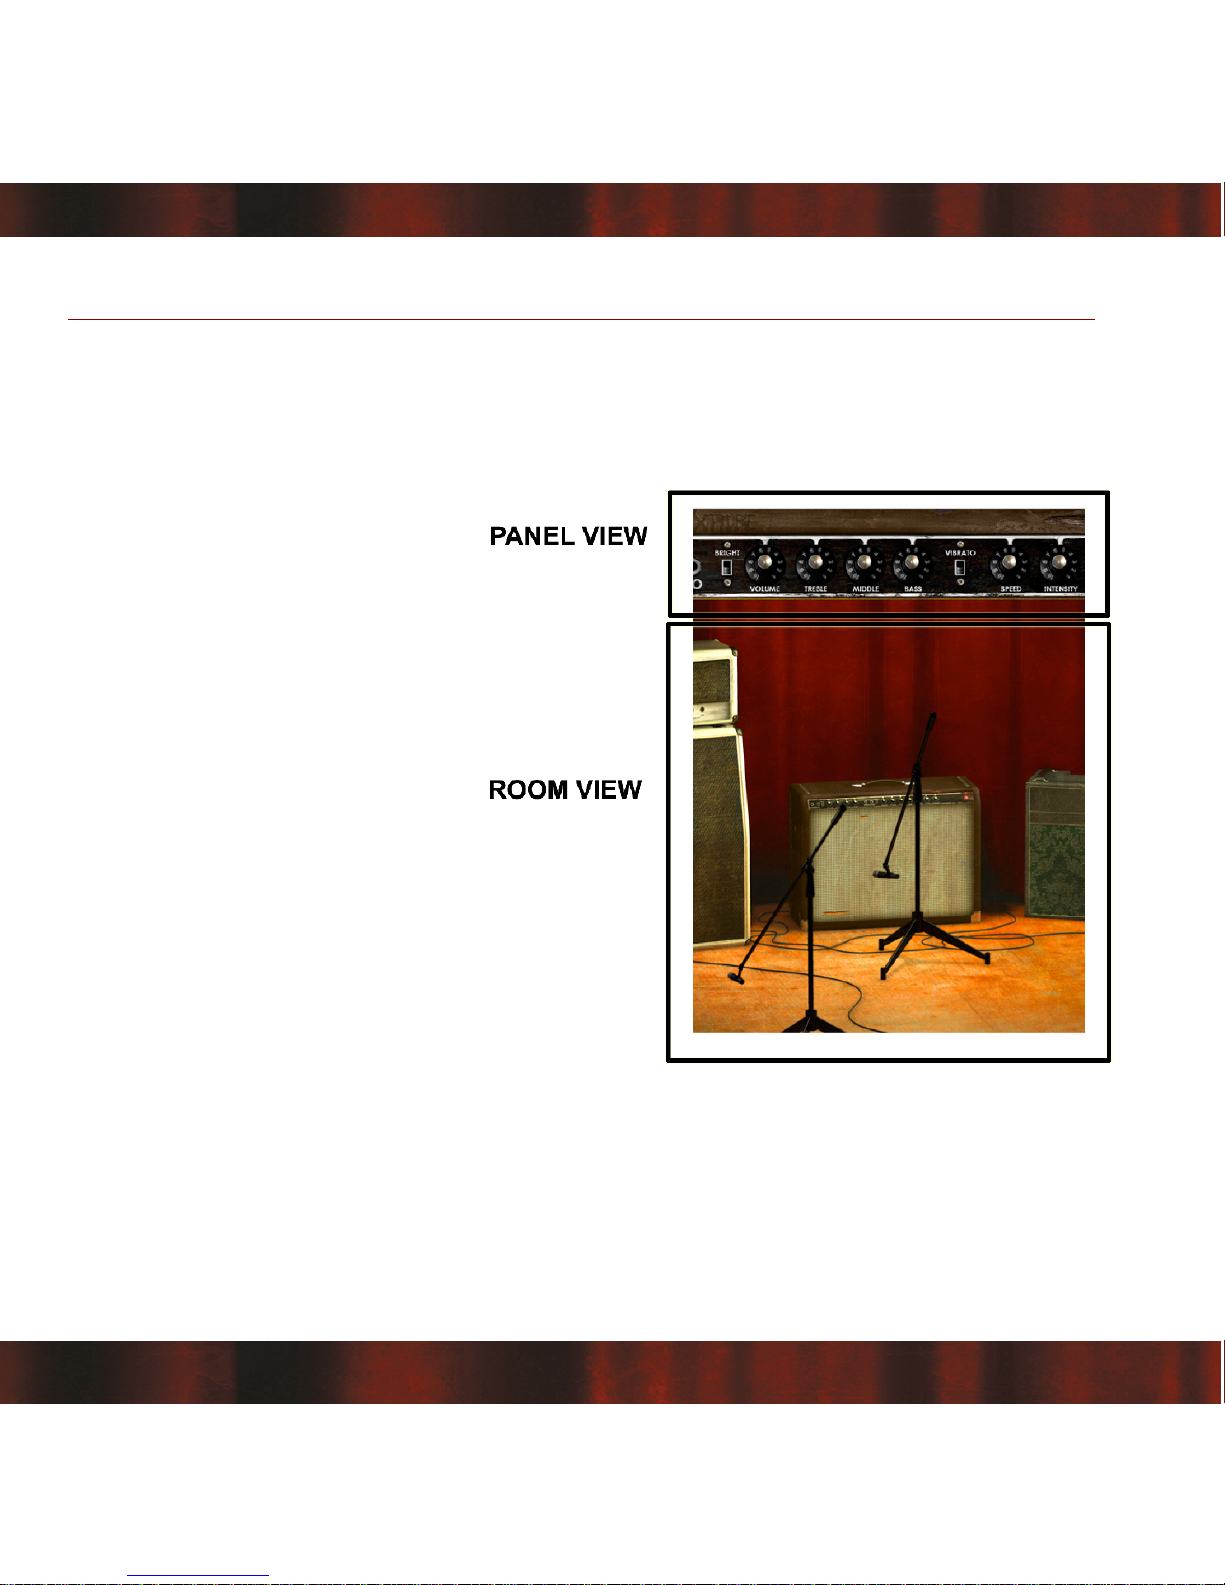
User Interface
Simplicity has been the goal when we developed this product; the amps and mics should
work just as they do in the real studio. Unfortunately, moving a mouse cursor on a 17” LCD
screen isn't exactly like grabbing the real mic stand in a cozy studio. Nevertheless, we have
tried to imitate that feeling
as far as it is possible, and if
you have experience of
working in real studios, you
will notice that Amp Room
handles and sounds the way
you expect it to do.
Panel View (Top Area)
In the Panel View you can
alter the settings of the amp
by clicking the knob and
dragging the mouse up and
down. Switches will be
switched either by clicking
on them, or by click-and-
dragging the mouse up and
down.
You can fine-adjust any
setting by pressing the
Apple-key (the Control-key in Windows) while adjusting the knob.
Knobs and switches can also be reset to their default value by clicking on the knob while
8
Figure 1: Two main views of the graphical user
interface

pressing the Alt-key.
Room View (Bottom Area)
In the Room View you can do two things, select one of the other amps or change the mic
position.
Mic Position
When the mouse is located over the mic stand, the
mouse pointer changes to an “up-down”-arrow. Click-
and-drag the mouse up or down to change the
position of the mic stand. The microphone moves
along a predetermined path (see Figure 2), so you
only need to move the mouse up or down, just as if
you were changing a knob.
9
Figure 2: The mic
moves along this path,
from a close off-axis
position (a) with some
treble roll-off, to the
close on-axis position
(b) with the most un-
colored sound, and
finally the distant far-
field position (c), with
lots of room ambiance.
Figure 3: Click-and-drag up or down
to change microphone position.

Amp Selection
You can change amp by
clicking on the back
ground and dragging
the mouse to the left or
right. The mouse pointer
becomes a “left-right”-
arrow when you are
pointing at the back
ground to indicate that it
is possible to change
amplifier.
Clicking on the background while holding the Shift-key toggles between the
amplifiers without any animations.
10
Figure 4: Click on the background and drag left or right to
change amplifier.
This manual suits for next models
1
Table of contents


