Virtulive VOJAS User manual

VOJAS Installation Manual
Version1.0
September 2019
Virtulive Technologies Pvt Ltd
VOJAS Installation Manual

VOJAS Installation Manual
Contents
1Disclaimers..................................................................................................................................................................... 3
2Introduction..................................................................................................................................................................... 4
3.1
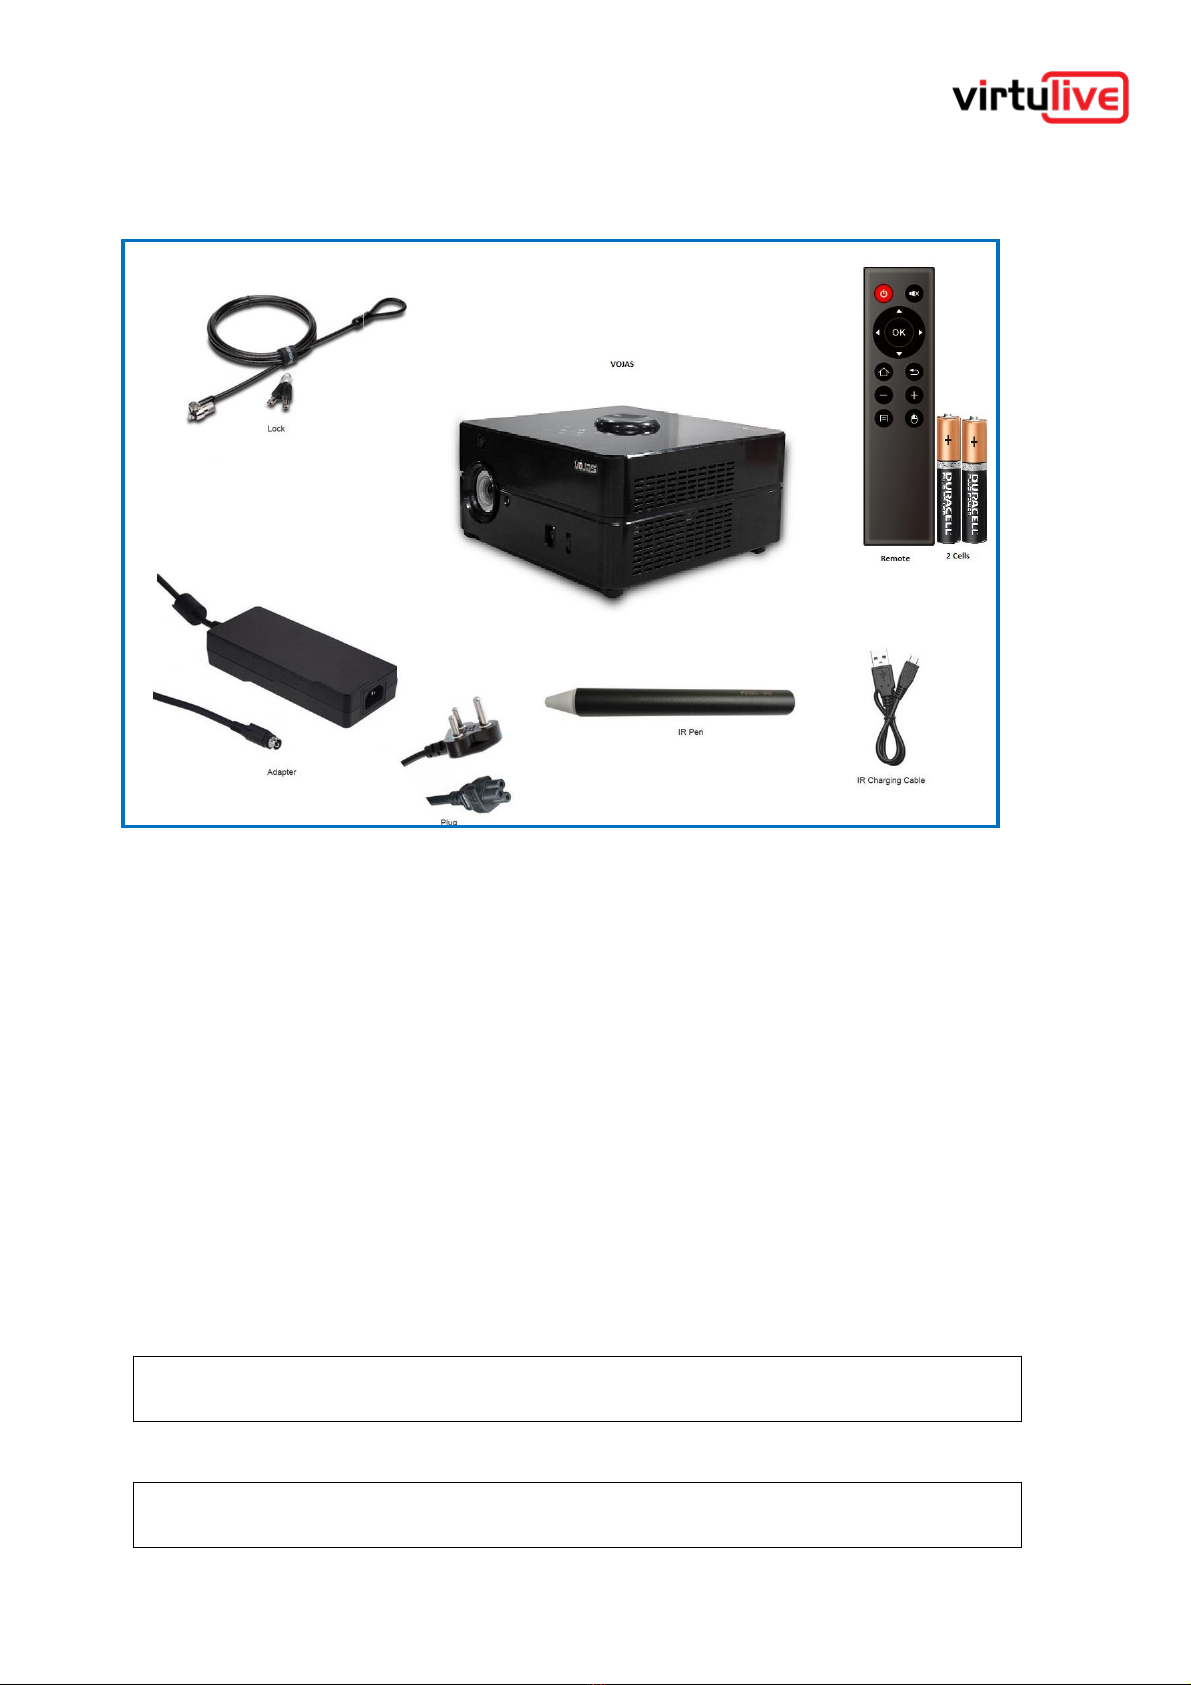
VOJAS Components........................................................................................................................................... 5
3.2
Before You Begin - Pre-Requisites................................................................................................................ 5
3.2.1
Power Supply.................................................................................................................................................... 5
3.2.2
Projection Surface........................................................................................................................................... 6
3.2.3
Internet Connectivity....................................................................................................................................... 6
3.2.4
Operating Environment.................................................................................................................................. 6
3.3 Getting to know your VOJAS........................................................................................................................... 7
3.3.1
Identifying your device................................................................................................................................... 7
3.3.2
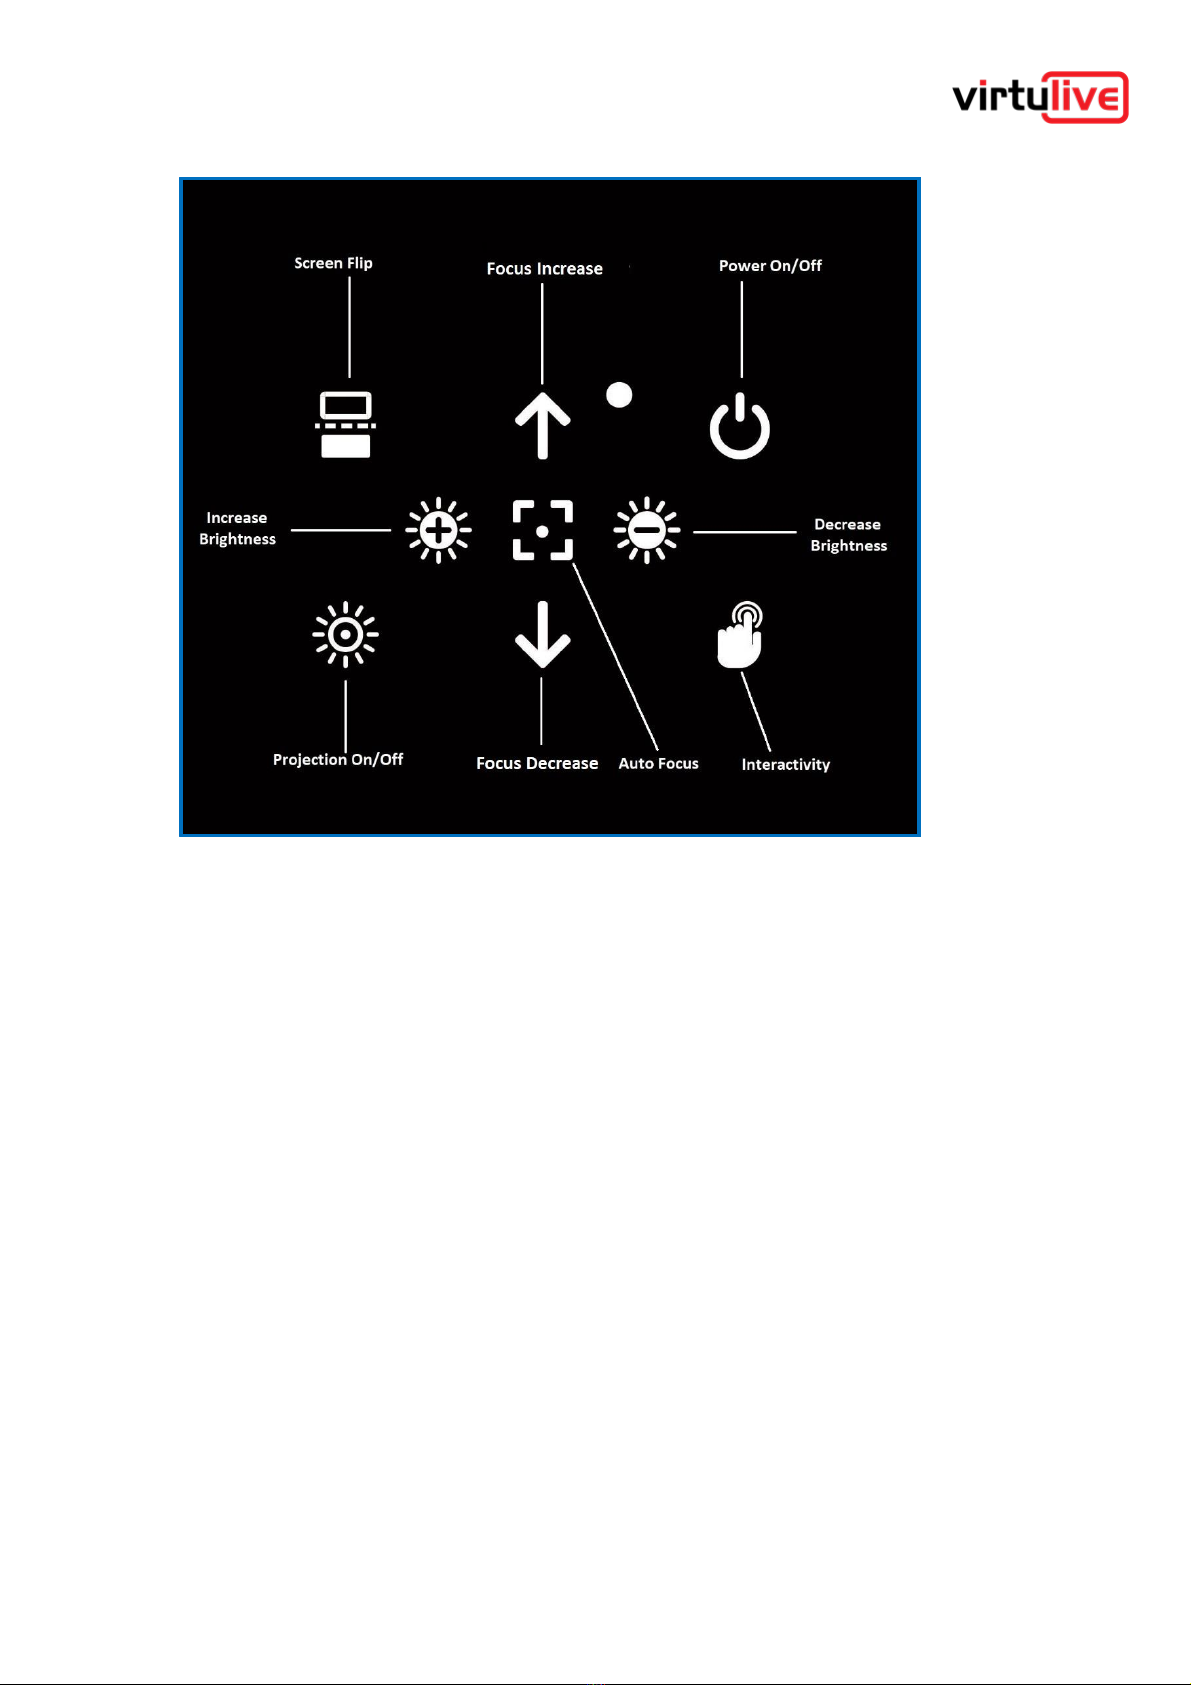
Top Panel & Controls..................................................................................................................................... 8
3.3.3
Front Right View.............................................................................................................................................. 9
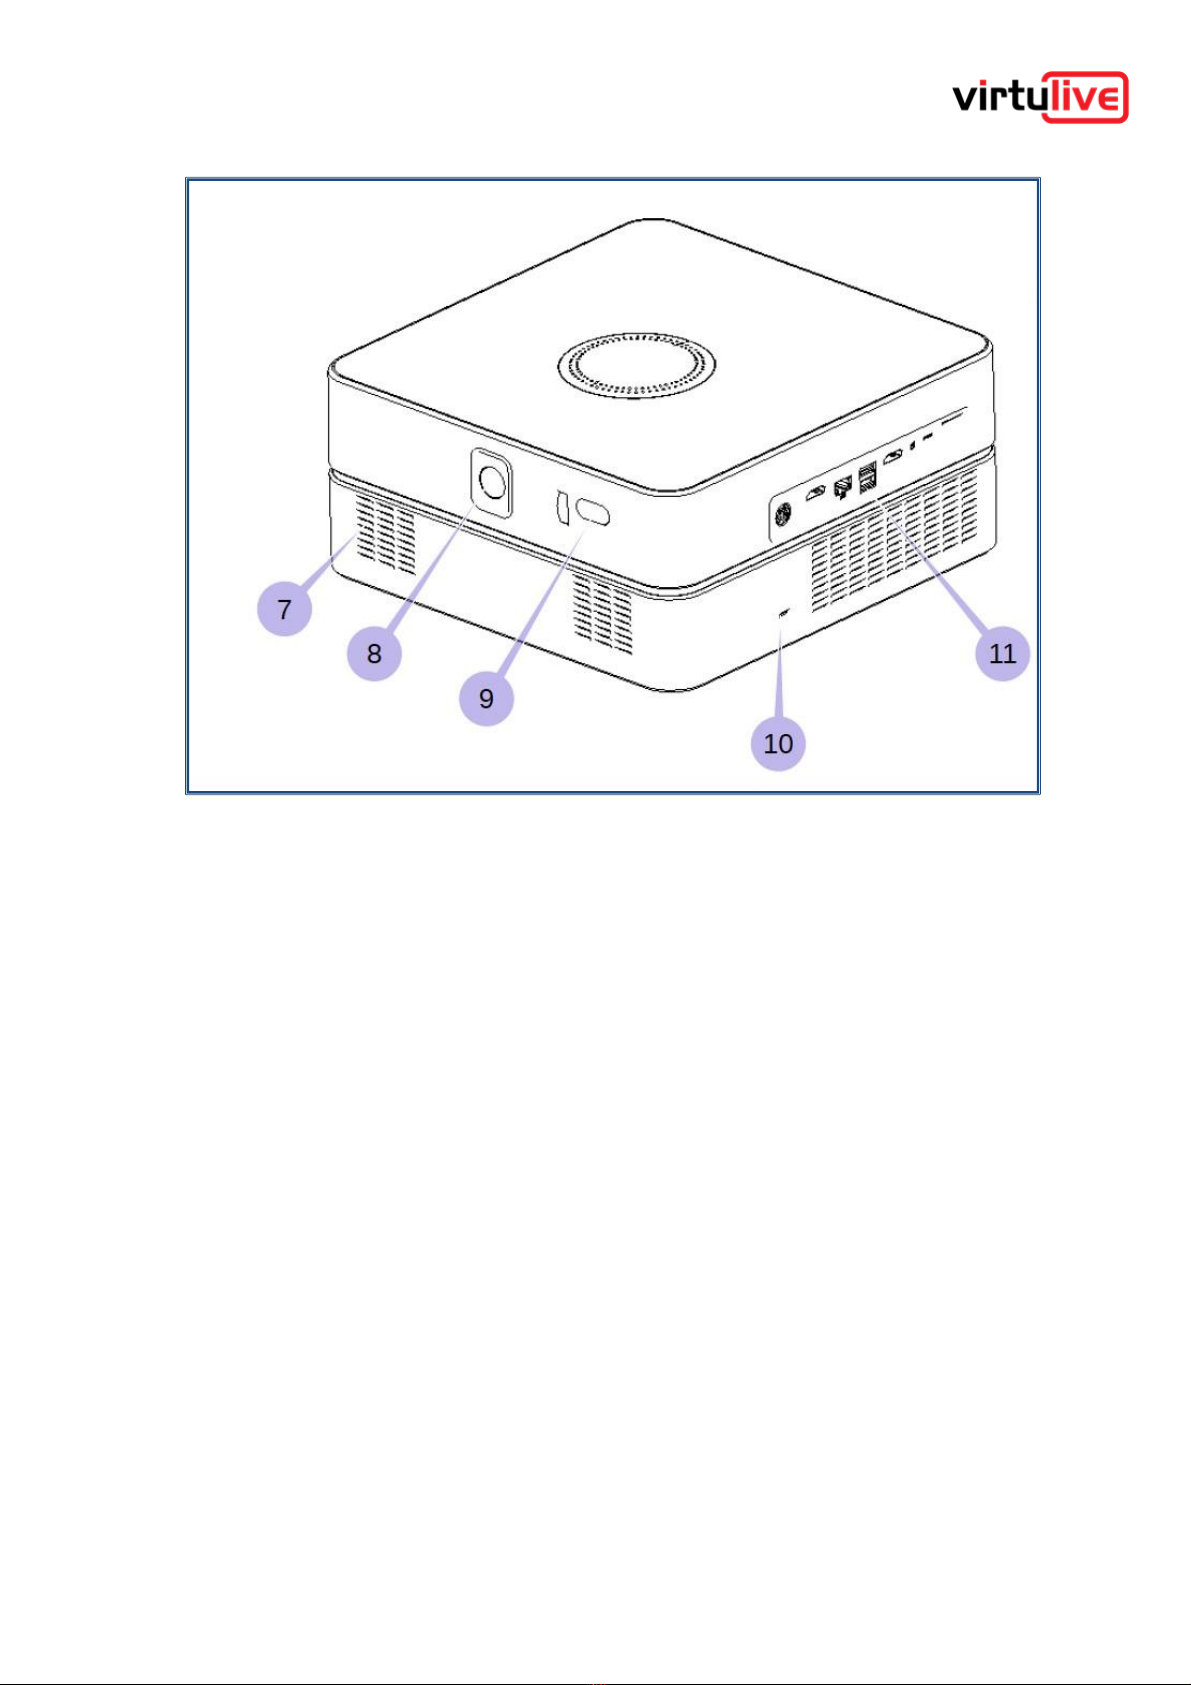
3.3.4
Rear & Left View............................................................................................................................................ 10
3.3.5
Connectivity Panel........................................................................................................................................ 11
3.3.6
Remote Commander.................................................................................................................................... 12
4.1
Ceiling Mount Kit................................................................................................................................................ 13
4.2
Additional Tools and equipment.................................................................................................................... 14
4.3
Placement............................................................................................................................................................ 15
4.6
Mounting the Device......................................................................................................................................... 16
4.7
Connecting the Power...................................................................................................................................... 18
4.8
Other Connections............................................................................................................................................ 19
4.9
Securing the Device.......................................................................................................................................... 19
5Switching On the Device.......................................................................................................................................... 20
5.1
Booting Up........................................................................................................................................................... 20
5.2
Shutting Down .................................................................................................................................................... 20
5.3
Sleep Mode.......................................................................................................................................................... 20
5.4
Log In..................................................................................................................................................................... 20
5.5
Input Devices...................................................................................................................................................... 20
5.6
Top Panel Functions......................................................................................................................................... 21
5.7.1
Auto Focus...................................................................................................................................................... 21
5.7.2
Orientation....................................................................................................................................................... 21
5.7.3
Interactivity Button......................................................................................................................................... 22
5.7.4
Turning the Projection On/Off.................................................................................................................... 22
5.8 Charging the IR Pen......................................................................................................................................... 22
5.9 Calibrating the Interactivity ............................................................................................................................. 22
5.10 Connecting to the Internet............................................................................................................................... 22
6Appendix 1 - Warnings & Cautions....................................................................................................................... 23

VOJAS Installation Manual
1Disclaimers
▪
The specifications and information regarding the products in this manual are subject to
change without notice. All statements, information, and recommendations in this manual are
believed to be accurate but are presented without warranty of any kind, express or implied.
Users must take full responsibility for their application of any products.
▪
The software license and limited warranty for the accompanying product are set forth in the
documentation shipped with the product or published on the website and are incorporated
herein by this reference. If you are unable to locate the software license or limited warranty,
contact your Virtulive representative for a copy.
▪
The Virtulive implementation of TCP header compression is an adaptation of a program
developed by the University of California, Berkeley (UCB) as part of UCB’s public domain
version of the UNIX operating system. All rights reserved. Copyright © 1981, Regents of the
University of California.
▪
Notwithstanding any other warranty herein, all document files and software of these suppliers
are provided “as is” with all faults. Virtulive and the above-named suppliers disclaim all
warranties, expressed or implied, including, without limitation, those of merchantability,
fitness for a particular purpose and noninfringement or arising from a course of dealing,
usage, or trade practice.
▪
In no event shall Virtulive or its suppliers be liable for any indirect, special, consequential, or
incidental damages, including, without limitation, lost profits or loss or damage to data arising
out of the use or inability to use this manual, even if Virtulive or its suppliers have been
advised of the possibility of such damages.
▪
Virtulive and the Virtulive logo are trademarks or registered trademarks of Virtulive and/or its
affiliates in the U.S. and other countries. To view a list of Virtulive trademarks, go to this URL:
www.Virtulive.com/go/trademarks. Third-party trademarks mentioned are the property of
their respective owners. The use of the word partner does not imply a partnership
relationship between Virtulive and any other company.
▪
Any Internet Protocol (IP) addresses and other information used in this document are not
intended to be actual addresses. Any examples, command display output, and figures
included in the document are shown for illustrative purposes only. Any use of actual IP
addresses in illustrative content is unintentional and coincidental.

2Introduction
This document is intended to serve as a guide to professional installers to ceiling mount the VOJAS
using the VOJAS Ceiling Mount Kit.
VOJAS is an integrated, multipurpose collaboration device that brings together all elements of
collaboration into a single portable device. VOJAS is designed ground up around the requirements of
the education sector. It provides a simple and cost-effective way to take the traditional classroom
into the digital domain and reach out to students anywhere in the world.
VOJAS uses the cutting-edge technology, engineering, and innovation to bring together the
features of video conferencing, digital projection, video streaming, two-way audio communication,
audio video recording, and high-speed computing into a single affordable, portable device that
enables real-time collaboration between diverse participants.

VOJAS Installation Manual
the equipment.
Connecting to power supplies outside the operating range can result in damage to
Caution:
Warning: Operating without earthing can result in serious injury to users and damage to
equipment.
3.1
VOJAS Components
VOJAS comes with all the necessary components to instantly convert your space into a virtual and
digital classroom. Your VOJAS should be accompanied by the following:
Figure 1. In The Box
1. VOJAS
2. Power Adapter
3. Power Cord
4. Remote Commander & 2 cells
5. IR Pen & Charging Cable (2 number)
6. Quick Set up guide
7. Kensington Cable Lock & Keys
Note –Please contact Virtulive Customer Service or your sales representative if you find any component missing.
Please visit : http://support.virtulive.com/ Or https://www.virtulive.com/ for support
3.2
Before You Begin - Pre-Requisites
3.2.1
Power Supply
▪
Voltage - VOJAS is designed to be operate on AC voltages between 110V and 240V. It
needs a maximum of 5amps of current to operate.
▪
Earthing - VOJAS requires a grounded or earthed power supply for user safety.

VOJAS Installation Manual
Caution: Sudden power outages can damage the electronics and cause software problems.
covers installed.
Covers are integral part of safety design of the product. Do not operate without the
Warning:
adequate protection can result in equipment failure or even injury to users.
The device is not protected against power spikes. Operating the equipment without
Warning:
permanent damage to the electronics.
Exposing the device to direct sunlight or extreme temperatures can cause
Caution:
damage to the equipment.
Exposing the device to water or excessive humid conditions can cause permanent
Caution:
performance and/or cause permanent damage to the equipment.
Exposing the device to very dusty or smoky environments can reduce the
Caution:
▪
UPS –Uninterruptable Power Supply - VOJAS requires an uninterruptible power supply,
sudden outages of power without following the proper Shut Down procedure can damage
the equipment and the operating system of the device.
▪
Protection - VOJAS needs the power supply to be protected against over voltage and short
circuits, it does not have internal protection against these conditions. It can result in
permanent damage to the device and even injury to users in close proximity.
3.2.2
Projection Surface
VOJAS needs an external projection surface, for permanent installation a fixed or retractable
screen designed for a wide aspect ratio (16:9) projector is recommended.
3.2.3
Internet Connectivity
Though VOJAS can operate as a standalone device it is most effective when connected to the
internet and the SmartSpace. It requires an internet connection with a minimum bandwidth of 1MBPS.
VOJAS offers multiple connectivity options to connect to a network including wired LAN (RJ45), Wi-
Fi, 4G GSM.
3.2.4
Operating Environment
▪
Heat - The VOJAS is designed to be operated across a wide range of temperatures
between 0º C to 40º C and has internal cooling fans to maintain a safe operating temperature.
It is still advised to avoid exposures to very high temperatures or direct sunlight as it might
lead to preventive shutdowns.
▪
Humidity - The VOJAS is designed to operate indoors in a controlled environment.
Excessive humidity in the environment can cause internal short circuiting due to
condensation and damage the electronics.
▪
Dust - Do not expose the VOJAS to very dusty environments. Dust can clog the ventilation
passages and can contaminate the projection optics.
▪
Ventilation - The projector lamp and the electronics generate a lot of heat during normal
operation, the equipment may feel warm to touch when in use. Air is circulated through the
device through the ventilation ducts on either side, these ducts must be kept free from

VOJAS Installation Manual
It may also cause damage to the electronics or the lamp.
Obstructing the ventilation ducts may cause the device to overheat and shutdown.
Caution:
obstruction. Do not place or mount the device so as to obstruct free flow of air to the
ventilation ducts. The Power Adaptor will also generate heat and must be placed in a well-
ventilated area.
▪
Ambient Light - VOJAS is most effective if used in an area with controlled ambient lighting
like most projectors, very bright environments can affect the on-screen visibility.
3.3 Getting to know your VOJAS
3.3.1
Identifying your device
The identification plate is located at the bottom of the device. It will contain details that will help
identify your device and its make.
▪
Product: The model name and version of your hardware device
▪
Serial No: Unique identifier for each device
Figure 2. Identification Plate
These details need to be quoted in all communication with the company regarding service or
warranty.

VOJAS Installation Manual
3.3.2
Top Panel & Controls
Figure 3. Top Panel

VOJAS Installation Manual
3.3.3
Front Right View
Figure 4. Front Right View
The diagram shows a Front Right view of the device:
1. Lens
2. Auto Focus Sensor
3. Front Camera
4. Interactivity Sensor
5. Microphone
6. Cooling Fan Vents

VOJAS Installation Manual
3.3.4
Rear & Left View
Figure 5. Rear Left View
7. Speakers
8. Rear Camera
9. Infrared Sensor
10. Kensington lock slot
11. Connectivity Panel

VOJAS Installation Manual
3.3.5
Connectivity Panel
Figure 6. Connectivity Panel
a) Power receptible
b) HDMI output
c) Ethernet connector RJ45
d) USB connector
e) HDMI input
f) Audio Jack 3.5mm
g) USB OTG
h) 4G SIM Tray

VOJAS Installation Manual
3.3.6
Remote Commander
VOJAS is supplied with a multi-function Remote Commander that can also act as a Keyboard,
Mouse, and a Laser pointer. This unit needs 2nos AA size batteries (not supplied) to operate. Please
install the batteries before installation as you will need the Remote Commander to boot the device.
Figure 7. Remote Commander

VOJAS Installation Manual
4Installation
VOJAS is designed to be used both as a portable tabletop device or permanently ceiling mounted
using the VOJAS Ceiling Mount kit. This document details the procedure to use the Ceiling Mount
Kit to install the VOJAS permanently.
We recommend that the installation is carried out by trained and authorized personnel. However, any
person with a reasonable mechanical ability, aptitude and the required tools will be able to install the
device.
4.1
Ceiling Mount Kit
The VOJAS Ceiling Mount Kit which is supplied to authorized installers is an accessory designed to
allow ceiling mounting of the VOJAS.
Figure 8. Ceiling Mount Kit

VOJAS Installation Manual
4.1.1 Components of the Ceiling Mount Kit
1. Ceiling mount hardware (may be supplied disassembled to facilitate packing and shipping)
2. Eye Bolt
3. M6 X 15mm bolts 4 nos
4. Anchor Bolts 4 nos
5. Hex Key for M6 bolts 1 no
6. Cable Ties 10 nos
4.2
Additional Tools and equipment
You will require additional tools and equipment listed below to install the ceiling mount kit.
1. Powered impact drill
2. Combination Phillips and Flat screwdriver
3. Drill Bit 10mm suitable for the specific surface
4. Hammer
5. Tape measure
6. Marking pencil & Center punch
7. Adjustable spanner and pliers
8. Spirit level

VOJAS Installation Manual
4.3
Placement
VOJAS comes equipped with a short throw 0.8 lens which reduces the throw distance required and
saves space. Please follow the below guidelines to mount the projector:
1. The projector lens is positioned at a level that you wish the top of the projected image to be
at.
2. The projector is placed at the correct distance from your screen and centered. You may need
to adjust the projector based on your screen size.
Figure 10. Projector Placement

VOJAS Installation Manual
Distance
(inches)
Height
(inches)
Width
(inches)
Diagonal
(inches)
40
28
49
55.7
45
30
54.5
62
55
38
68
77.5
60
42
73.5
84.7
65
45
79
91.5
70
48.5
85.5
98.5
Figure 11. Lens Throw Distance Chart
4.4
Assembling the Ceiling Mount Kit
The ceiling mount kit may be shipped in a disassembled condition to facilitate packing. You may need
to assemble it before you can mount it. Use the picture as a guide to assemble the kit.
4.5
Measurement, Marking & Mounting
1. Position the ceiling bracket so that the lens is at the desired distance from the screen as per
the throw distance chart.
2. Use the bracket as a template and mark the anchor bolt drill points
with a marking pencil
3. Use the center punch and hammer to mark the drill points
4. Drill the required holes to accommodate the anchor bolts or screws
depending the ceiling material.
5. Insert the anchor bolts and secure them
6. Install the ceiling bracket and tighten the nuts to lock it in place
7. Attach the down tube to the ceiling bracket
4.6
Mounting the Device
Follow the procedure below to attach the device to the projector
bracket.
1. The projector bracket comes with an adjustable legs,
loosen the adjuster screws to be able to position the
bracket to the device
2. Position the movable legs over the mounting points of the device that are
closer to the lens
3. Secure the clamp to the device with the M6 X 15mm bolts on all the four
arms and fully tighten the M6 bolts with the provided hex key
flammable material can create a fire hazard.
The device generates heat during operation, placing it in close proximity to
Warning:

VOJAS Installation Manual
4. Tighten the adjuster screws with a screw driver to lock the arms in place
5. Secure the tilt adjuster to the projector bracket
6. Mount the up tube to the tilt adjuster

VOJAS Installation Manual
7. Slide the up tube into the down tube and
secure it with the locking bolt at the desired
position
8. Adjust the device to position it parallel to the ground or up to a
downward angle of up to 15 degrees to align it to the screen, use
the spirit level to confirm.
Note: The recommended screen height is that the top of the image should
be at 6’ 6” from ground to enable the educators to use the IR pen to write
on the surface
4.7
Connecting the Power
This section details the procedure to connect the
device to a power source:
1. Connect the Power Adaptor to the Power
Cord
2. Connect the 4-pin connector to the receptible
in the Connectivity Panel on the device
3. Plug in the mains plug (will come with a
suitable plug for your region) into a UPS wall
socket with an earth
4. Place the Power Adaptor in a well-ventilated
area and secure it with cable ties
Note: Please make sure that the power outlet is accessible and switched as it is the only way to
isolate the power supply to the device.
Sudden power outages can damage the electronics and cause software problems.
Caution:
the equipment.
Connecting to power supplies outside the operating range can result in damage to
Operating without earthing can result in serious injury to users and damage to
Warning:
equipment.
Caution:
even injury to users. Please ensure that your power supply has adequate protection.
The device is not protected against power spikes and result in equipment failure or
Warning:

VOJAS Installation Manual
4.8
Other Connections
The device comes multiple wired IO connections to connect external devices or signals, the following
connections can be made. Make the connections as required.
▪
Wired Internet/ LAN through the RJ 45
▪
Monitor for presenter or secondary display through the HDMI output
▪
Memory expansion or other devices through the USB port
▪
Display extension dongle (Screen Cast device) or any other input through the HDMI in port
▪
Connect an external PA system through the audio jack
▪
Insert a SIM card in the SIM tray
Route the connected cables through the up and down tube and secure them in place with cable ties.
4.9
Securing the Device
To secure the device,
1. Loop the cable through the installed eye bolt
2. Pass the locking end through the loop in the cable
3. Insert the lock into the Kensington slot on the computer
and remove the key.

VOJAS Installation Manual
5Switching On the Device
5.1
Booting Up
Press and release the Power button on the Top Panel of the
device to start the bootup sequence. The device runs Windows
10 as the Operating System, at the completion of the bootup a
Windows login screen is displayed.
5.2
Shutting Down
VOJAS is a Windows 10 PC, please follow the Windows 10 shut down procedure to
turn it off.
5.3
Sleep Mode
VOJAS can be put into a sleep mode like any other Windows 10 PC using Start
sleep or through power settings.
Alternately pressing the Power button when the device is running will put it in Sleep
mode
5.4
Log In
Login with the username and password supplied to you by your sales
representative.
5.5
Input Devices
VOJAS is a full-fledged Windows PC and can accommodate input devices. The VOJAS comes with
a Remote Commander with a built-in keyboard, it also comes with an IR pen that can be used as a
mouse. You may also add a Keyboard, Mouse, trackball or other input device through the USB
ports or Bluetooth.
Other manuals for VOJAS
1
Table of contents
Other Virtulive Projector manuals
Popular Projector manuals by other brands

Sharp
Sharp PG-F255W - Notevision WXGA DLP Projector Setup manual

CentoLight
CentoLight SCENIC 100W WW-CW user manual

Barco
Barco F22 Series quick start guide

Panasonic
Panasonic PTL592U - LCD PROJECTOR operating instructions

Projectiondesign
Projectiondesign F2 sx+ supplementary guide

Lenovo
Lenovo ThinkPad Stack user guide