VisionQuest VQF70WD User manual

Operating Instructions
Digital Picture Frame
VQF70WD
TechnicalSpecifications
Input Formats
®®,®
Compact Flash (CF type I&II),Memory Stick Memory Stick PRO ,
Multimedia Card (MMC), Secure Digital (SD),USB Pen Drive.
Supported File
Formats
JPEG, Motion JPEG AVI,Mp3, MPEG1, MPEG2.
Display 7"LCD monitor:480x234 resolution
Power Input 100V-240VAC, 50-60Hz
Power Output 12V DC, 1.5A
Weight 1.3 LBS
Dimensions 9.05"Wx5.9"Hx1.18"D
Image Effects Rotate, zoom, pan,transitions, slide duration
Viewing Modes Full frame 16:9/4:3Standard AspectRatio, slide showor thumbnail
USB Host V1.1
Output
Composite video output
System: PAL/NTSC
Analog 2-channel audioout
Earphone
Stereo Speakers(1Wx2)
19 www.visionquestce.com

1
Tableof Content
Important Safeguards
Frequently Asked Questions
Quick Start Guide
Contents
Connecting to a TV Set
Remote Control
Insert the memory card
Control Functions
System setup
Glossary of Terms
Appendix (Troubleshooting Guide)
Technical Specifications
2
5
6
7
8
9
10
11
15
17
18
19
18
Appendix (Troubleshooting Guide)
Before contacting servicepersonnel, please check possible causes accordingto the following
instructions.
Symptom Possible Cause Remedy
No power
1.Power supply notconnected;
2.Bad contact betweenthe power plug
and the receptacle;
3.The power of thereceptacle is off;
4.Power switch isin the offposition.
1.Incorrect signal connection;
2.The system is inthe mute status.
No sound
No picture
No color
1.Incorrect signal connection;
2.Incorrect TV status;
1.Wrong selection ofTV system;
2.Improper color adjustment;
3.Incorrect video output settings.
1.The remote controlis not directed
at the sensor;
2.Low voltage of theRC batteries;
3.There is anobstacle between the
unit and RC.
Remote
control
malfunction
1.Connect to thepower supply.
2.Plug again orreplace a receptacle.
3.Switch on thereceptacle.
4.Slide the powerswitch to onposition.
1.Connect the signalsproperly.
2.Press the "Mute"button again.
1.Connect the signalsproperly.
2.Adjust the TV/AV status.
1.Se tup theTV system see"system
setup/preference page/TV type"for
reference
2.Readjust the color.
3.Check if the videooutput settings are
correct.
1.Direct the remotecontrol at the
sensor.
2.Change to a newbattery.
3.Remove the obstacle.
No reader
memory card
1.The memory cardis inserted allthe
way into thecard slot andis facing the
wrong direction;
2.The memory card didnot insert
completely.
1.Insert the memorycard with the
correct direction.
2.Insert the memorycard completely.

2
Important Safeguards
IMPORTANT SAFEGUARDS
Signal Word Definitions
DANGER Indicates an imminently hazardous situation, which, if not avoided, will result in death
or serious injury. Usage of this signal word is limited to the most extreme situations.
WARNING Indicates a potentially hazardous situation, which, if not avoided, could result in
death or serious in jury.
CAUTION Indicates a potentially hazardous situation, which, if not avoided may result in
minor/moderate injury or product/property damage. It also alerts against unsafe practices.
WARNING: To reduce the risk of fire or shock hazard, do not expose this product to rain or moisture.
WARNING: To prevent the risk of electric shock, do not remove cover. No user-serviceable parts
inside. Refer servicing to qualified personnel.
WARNING--To reduce the risk of fire, electric shock, or serious personal injury:
• HEED WARNINGS. Adhere to all warnings in the operating instructions and on the Digital Picture
Frame itself.
• WATERAND MOISTURE. Do not use the unit near water or expose to rain or moisture.
• ATTACHMENTS. Use only manufacturer-recommended attachments or accessories.
• ACCESSORIES. Do not place the Digital Picture Frame on unstable cart, stand , tripod, bracket,
or table. The unit may fall, causing injury to you and serious damage to the product.
• VENTILATION. Position the Digital Picture Frame so that its location does not interfere with its
proper ventilation. For example, the unit should not be situated on a bed, sofa, rug or similar
surface that may block the ventilation opening, or placed in a built-in installation, such as a
book-case or cabinet, that may impede the plow of air through the ventilation openings.
• HEAT. Position the Digital Picture Frame away from sources of high heat such as radiators or
stoves.
• POWER SOURCE. Connect the Digital Picture Frame to a power supply only of the type
described in the operating instructions or as marked on the unit.
• GROUNDING OR POLARIZATION. This product may be equipped with a polarized alternating
current line plug (a plug having one blade wider than the other). This plug will fit into the power
outlet only one way. This is a safety feature. If you are unable to insert the plug fully into the outlet,
try reversing the plug. If the plug should still fail to fit, contact your electrician to replace your
obsolete outlet. Do not defeat the safety purpose of the polarized plug.
• POWER CORD PROTECTION.
-Mains plug is used as the disconnect device. It shall remain readily operable and should not be
obstructed during intended use.
-Route power cords so that they are not likely to be walked on or
pinched by items placed on or against them, paying particular attention to the point where the cord
attaches to the Digital Picture Frame.
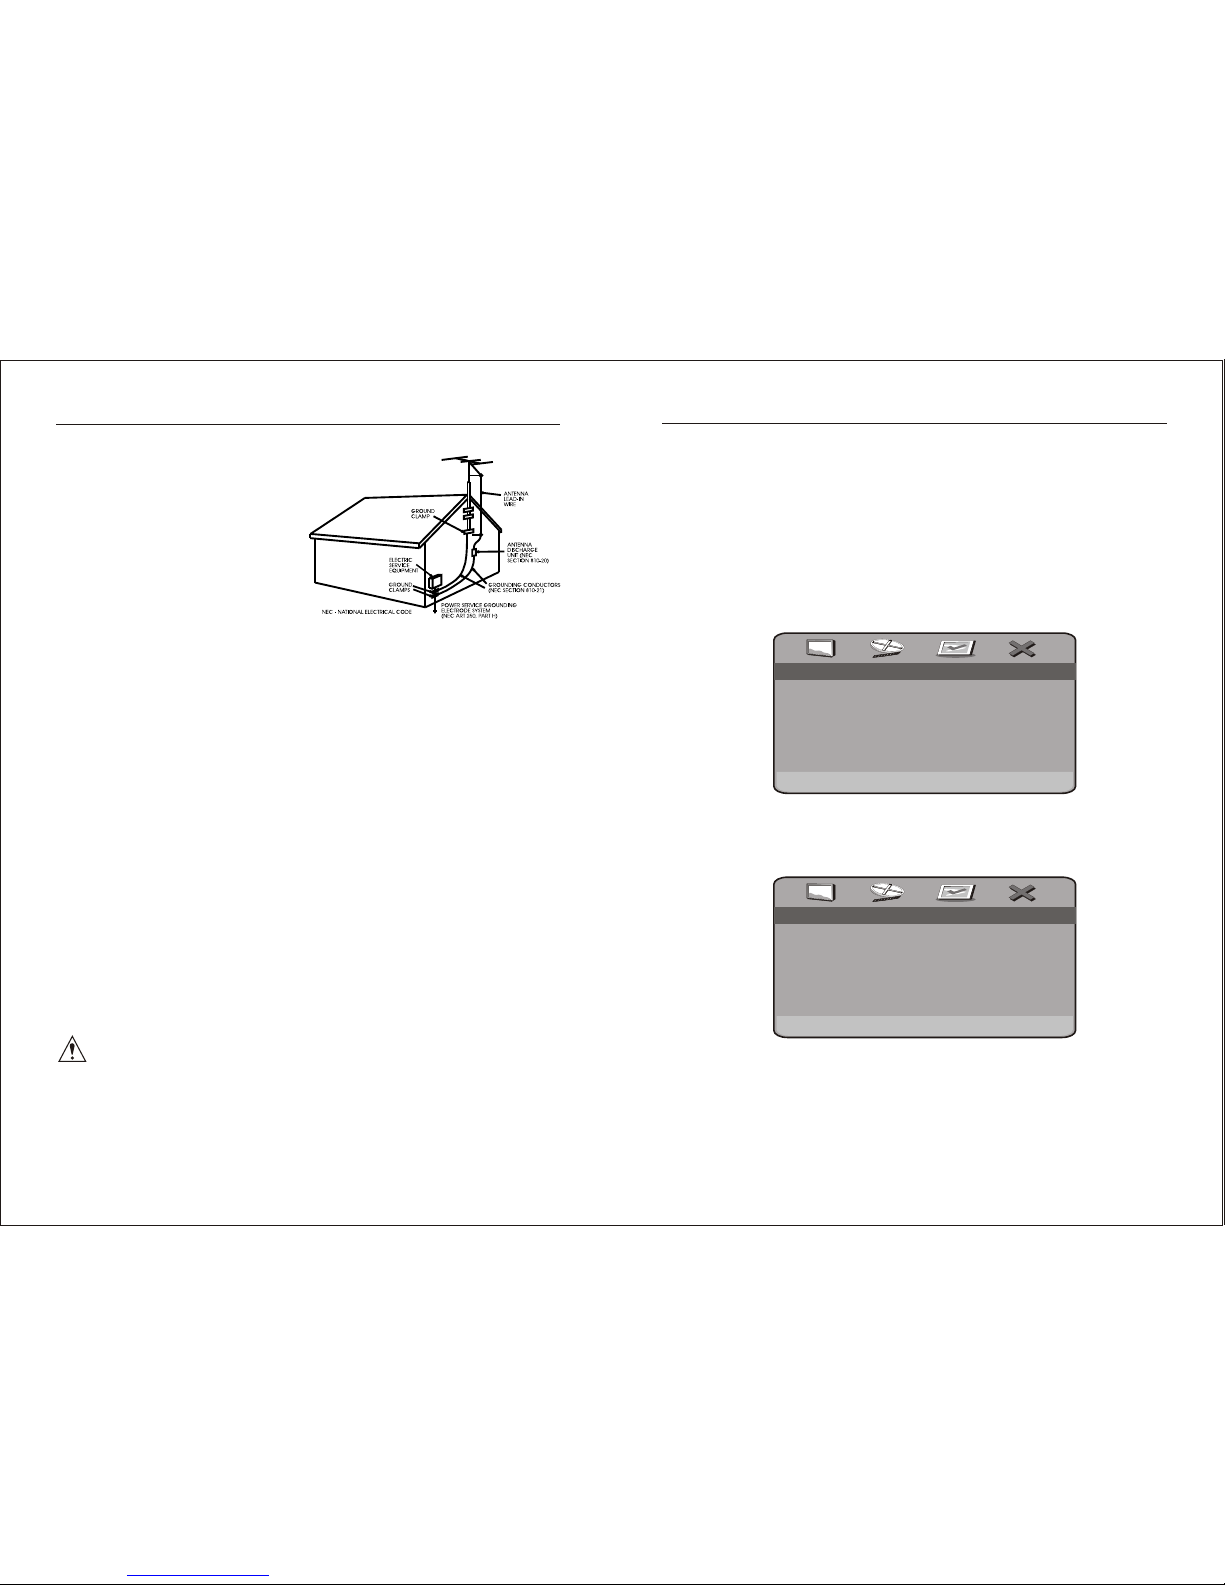
• OUTDOOR ANTENNA GROUNDING .If an outside antenna or cable system is connected to the
product, be sure the antenna or cable system is grounded so as to provide some protection against
voltage surges and built-up static charges. Article 810 of the National Electrical Code, ANSI/NFPA
70, provides information with regard to proper grounding of the mast and supporting structure,
READ ALL INSTRUCTIONS BEFORE USE.
17
Glossary of Terms
Aspect Ratio
The ratio of the length of an image to its width. Most computer s
images that have an aspect ratio of 4:3.35mm film and some digital cameras shoot images
that have aspect ratio of 3:2.
AVI ®
Audio Video interleave; a Microsoft - specified format for saving audio and/ or video clips.
Flash Drive (Pen Drive)
A storage module made of flash memory chips that allow data to be easily transferred from
one device to another.
Flash Memory
A type of non-volatile memory that holds onto is contents even when an electrical charge
is not applied. Flash memory is used in many applications including PDAs, hardware MP3
players, and some digital cameras.
JPEG
Joint Photographic Experts Group; the development group for a compressed 24-bit
color image storage format that also bears its name.
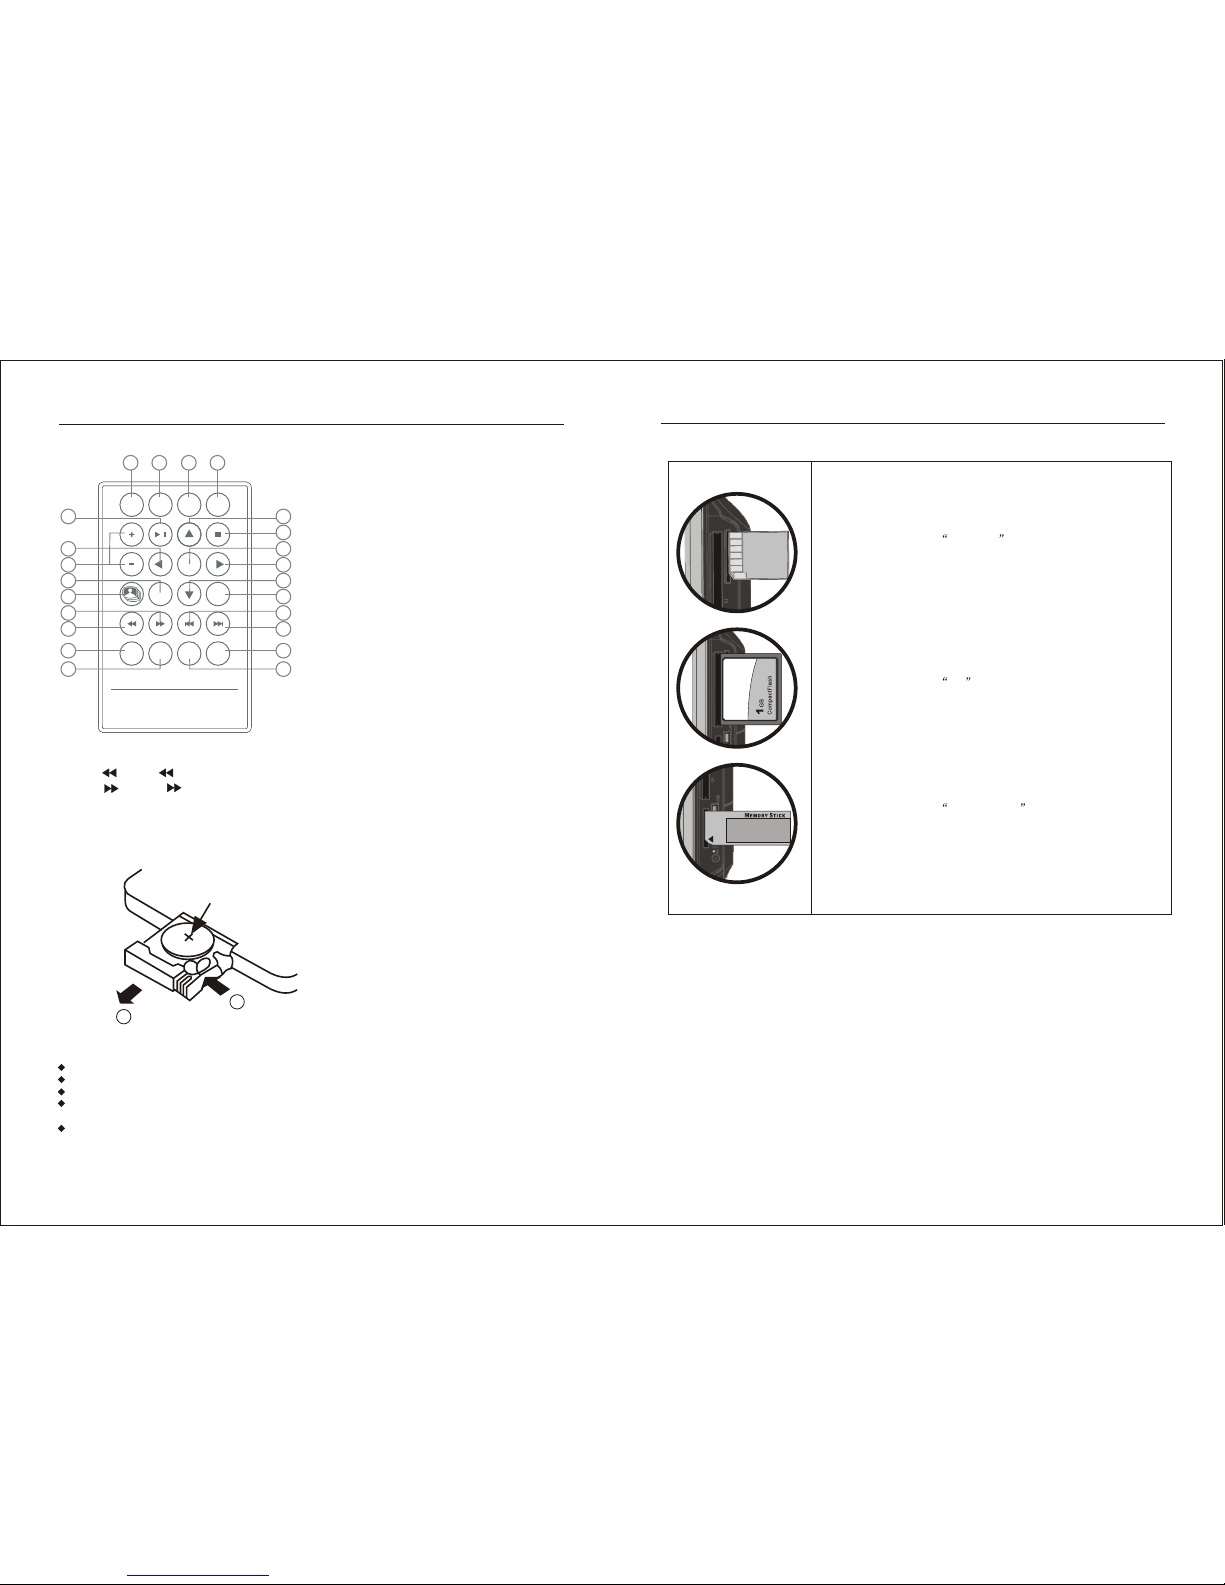
Memory Card
The system used to store images by most digital cameras. Unlike a computer memory card,
this card retains data even without electricity.
Mp3
A compressed digital audio file format. The format enables almost CD quality sound
(depending on the compression ratio) at a fraction of the size of normal audio files.
Mega Pixel
One million pixels. A high mega pixel rating typically equates to a high maximum
performance for graphics, or better quality pictures for digital cameras.
Mp4
A container format allows combining of different multimedia streams into one single file.
Mp4 supports multimedia content such as audio, video, subtitles, and pictures and
advanced content such as animated graphics and DVD-like menus.
Resolution
The amount of pixels that are displayed on a screen measured in pixels horizontal by pixels
vertical, such as 1024x768. The higher the resolution, the more pixels can be displayed
and greater detail is displayed. Lower resolutions are interpreted and may lose detail.
Slideshow
A display of a series of selected images.
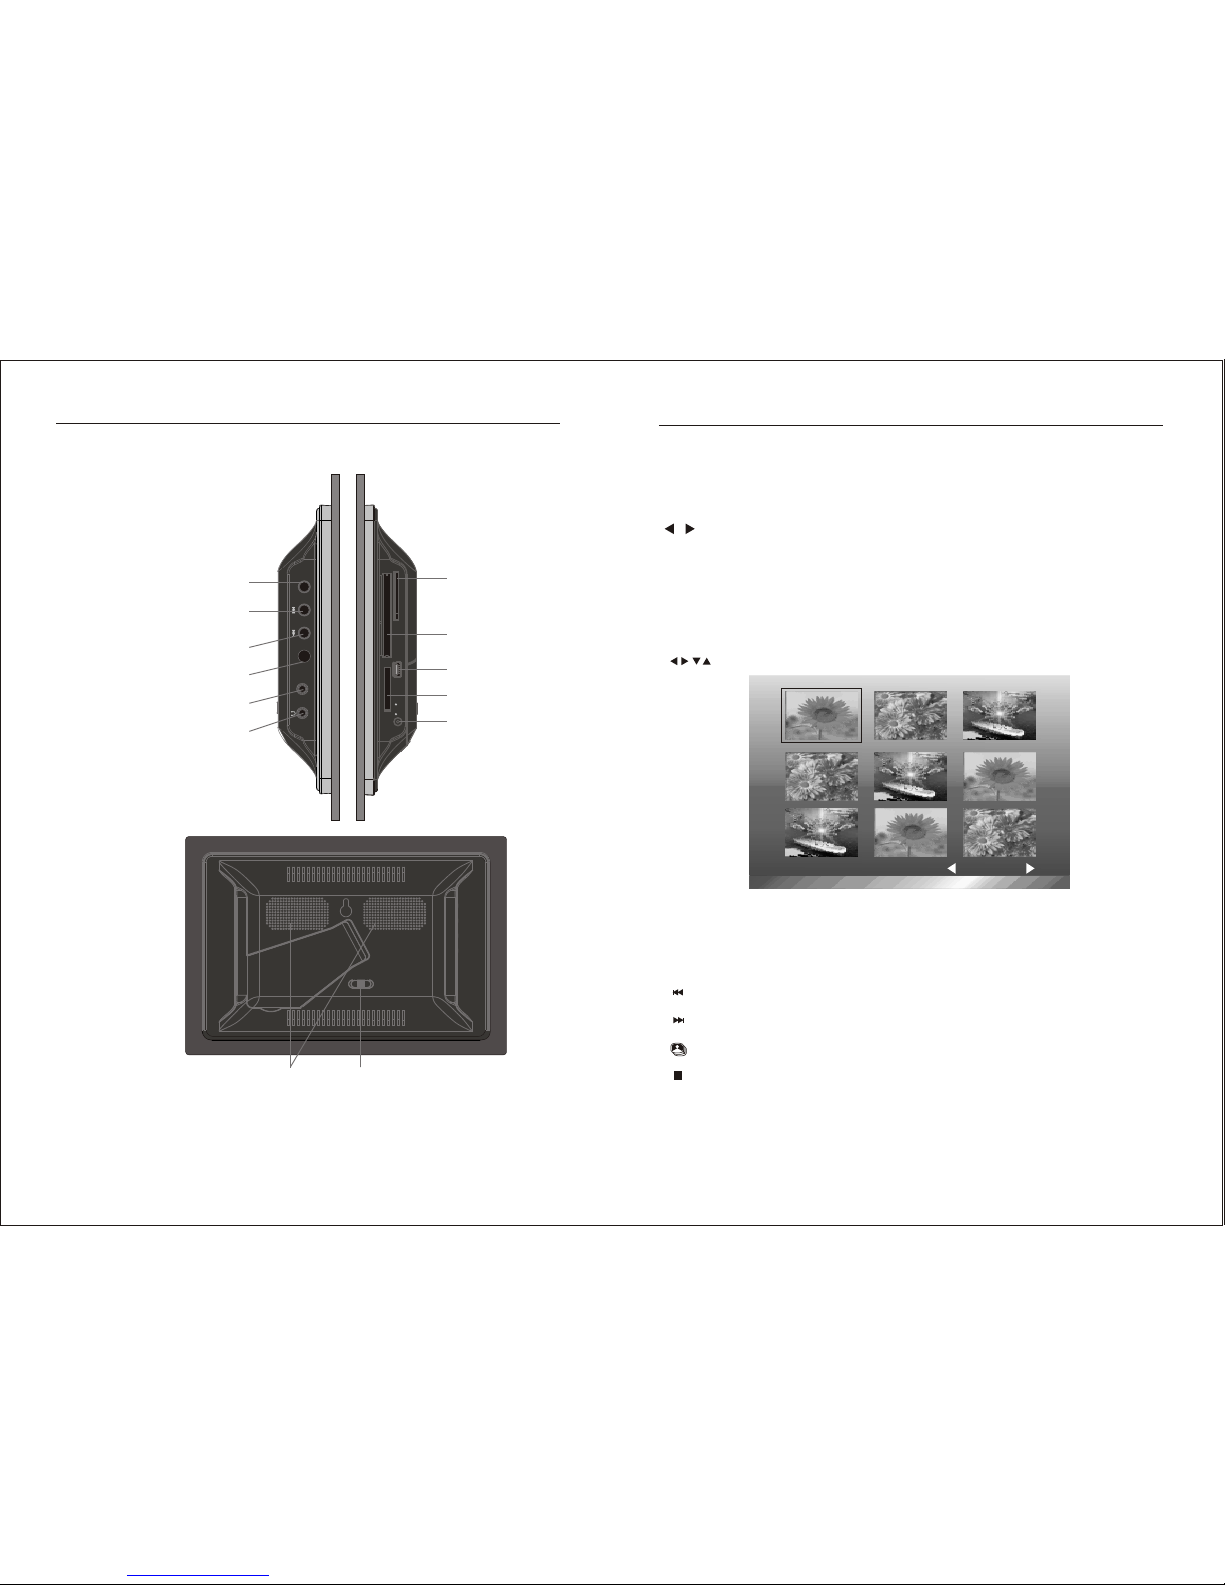
Thumbnail
A small representation of a larger graphic often used to display several graphics at once
and allowing easy sorting through images.
USB (Universal Serial Bus)
A protocol for transferring data to and from digital devices. Many digital cameras and
memory card readers connect to the USB port on a computer.
creens and digitally shot

3
Important Safeguards
grounding of the lead-in wire to an antenna
discharge unit, size of grounding conductors,
location of antenna discharge unit, connection
to grounding electrodes, and requirements
for the grounding electrode. See figure below.
•
•
LIGHTNING. For added protection for this
product during a lightning storm, or when it is
left unattended and unused for long periods of
time, unplug it from the wall outlet and disconnect
the antenna or cable system. This will prevent
damage to the product due to lightning and power
lines surges.
POWER LINES. An outside antenna system should not be located in the vicinity of overhead power
lines or other electric light or power circuits, or where it can fall into such power lines or circuits. When
installing an outside antenna system, extreme care should be taken to keep from touching such power
lines or circuits as contact with them might be fatal.
• NON-USE. Unplug the power from the outlet when the unit is not in use.
• AVOIDING SURGES. For added protection during a lightning storm, unplug the Digital Picture Frame
from the wall outlet to prevent damage to the product due to power line surges.
• OVERLOADING. Do not overload wall out lets or extension cords.
• OBJECT AND LIQUID ENTRY. The apparatus shall not be exposed to dripping or Splashing and that
no objects filled with liquids, such as Vases, shall be placed the apparatus.
• DAMAGE REQUIRING SERVICE. Seek service by qualified service personnel when:
- The power supply has been damaged.
- Liquid has been spilled onto the Digital Picture Frame.
- The unit has been exposed to rain.
- The unit does not operate normally, or exhibits a marked change in performance.
- The unit has been dropped or physically damaged.
•
•
•
• SERVICING. Do not attempt to service the Digital Picture Frame beyond those means described in
these operating instructions. All other servicing should be referred to qualified service personnel.
REPLACEMENT PARTS. When replacement parts are required, be sure the service technician has
used replacement parts specified by the manufacturer or have the same characteristics as the original
part. Unauthorized substitutions may result in fire, electric shock, or other hazards.
SAFETY CHECK. Upon completion of any service or repairs to this product, ask the service
technician to perform safety checks to determine that the product is in proper operating condition.
WALL OR CEILING MOUNTING. The product should be mounted to a wall or ceiling only as
recommended by the manufacturer.
CAUTION-- To reduce the risk of personal injury or product/property damage:
• CLEANING. Clean the outer surface of the Digital Picture Frame (excluding the screen) gently
using a soft cloth dampened with water. Clean the screen only with a specified cleaning solution
for use with products such as laptops and computer monitors. These are available at most retail
consumer electronics stores. Do not clean the inside of the unit.
16
TV TYPE:
Select TV system.Option include PAL and NTSC,and multi.
AUDIO:
Toselect theAudio Language. Option include English, French, Spanish, Chinese,
Japanese, Korean, Russian.
Subtitle:
Select the SubtitleLanguage. Option include English, French, Spanish, Chinese,
Japanese, Korean, Russian.
Default:
Reset all thesetting of DPFto init default state.
Exit setup menu
Preference page
System Setup
.. Preference Page ..
TV Type
Audio
Subtitle
Default
Go To Preference Page
PAI
ENG
Exit Setup Menu
Exit Setup Menu

4
Condensation
If cold water is poured into a glass, water droplets form on the outside of the glass. This is called
condensation. Condensation may occur on internal operating parts of the product. Condensation
occurs:
• When the product is brought from the outdoors into a warm room, or if it is in a cold room which
is heated quickly.
• If the unit is moved suddenly from an air-conditioned room or car to a hot or humid location.
Should condensation occur, the product may not operate properly. WAIT 1-2 hours (to allow the
internal parts to adjust to the surrounding temperature) before using the product.
SAVE THESE INSTRUCTIONS FOR FUTURE REFERENCE
Important Safeguards
This symbol alerts the user of the presence of non-insulated “dangerous voltage”
within the product’s enclosure that may be of sufficient magnitude to constitute a
risk of electric shock to persons.
This symbol alerts the user of the presence of important operating and
maintenance (servicing) instructions in the Digital Picture Frame user guide.
CAUTION
TO REDUCE THE RISK OF
ELECTRIC SHOCK, DO NOT EXPOSE
THIS UNIT TO RAIN OR MOISTURE.
- CAUTION -
TO REDUCE THE RISK OFELECTRIC SHOCK,
DO NOT REMOVECOVER (OR BACK).
NO USER SERVICEABLEPARTS INSIDE.
REFER SERVICING
TO QUALIFIED PERSONNEL.
15
Video Setup:
Quality:
Sharpness:
Select High, Medium,Low
Brightness:
tune the brightnesswith a progressbar by using LEFT/RIGHT.
Contrast:
tune the contrastwith a progressbar by using LEFT/RIGHT.
Hue:
tune the Huewith a progressbar by using LEFT/RIGHT.
Saturation:
tune the Saturationwith a progressbar by using LEFT/RIGHT.
System Setup
3. Slide Show:
Set the display durationfor each image: 1S,3S, 5S.
SETUP: General setup
1.TV DISPLAY
NORMAL: Use thismode for viewing standardpicture in unaltered proportions.
Which is thestandard still image aspectratio from most DigitalCameras.
Black bars willappear on eachside of thescreen.
WIDE: Use thismode to standard picture will stretchto fit the screen.
2.OSD Language
Select the OSD(On Screen Display)language (The languagefor all menusand
on-screen displays). Optioninclude English, French, Spanish, German.
.. General Setup page ..
TV Display
OSD Lang
Slide Show
Wide
ENG
3S
Go To General Setup Page
.. Video Setup Page ..
Sharpness
Brightness
Contrast
Hue
Saturation
Go To Video Setup Page
MID
00
00
00
00

5
Frequently AskedQuestions
Q: How do I set up my Digital Picture Frame?
A: The Digital Picture Frame setup is very easy from “out-of-the-box” to “up-and-running” in a few
short minutes. Just plug the power adapter into the Power In jack on the back of the Digital Picture
Frame and plug the power cord into a standard 100-240 volt AC electrical outlet. Next, insert a
memory card into the appropriate slot on the side and slide the Power Switch to ON.
Q: What memory cards can the Digital Picture Frame read?
A: The Digital Picture Frame can read all popular memory cards in all sizes including the current
large capacity 2 GB cards and above, and card types including:
® ® ®
Compact Flash (CF type I & II), Memory Stick (MS), Memory Stick PRO ,
TM TM
Multimedia Card (MMC), Secure Digital (SD).
Q: What media formats does the Digital Picture Frame support?
A: The Digital Picture Frame supports JPEG picture files, Motion JPEG AVI video files, MPEG1,
MPEG2 and Mp3,WMA audio files.
Q: I set up the Digital Picture Frame; why is it not powered on?
A: The adapter is not securely connected to the picture Frame or the Power Switch is not in the ON
position.
Q: I have a memory card in the Digital Picture Frame; why can’t I view the images?
A: First, make sure that the memory card is one of the card formats listed above and that the files
on the card are in one of the supported formats as listed above. Second, turn the Digital Picture Frame
OFF and make sure that the memory card is inserted all the way into the card slot and is facing the
correct direction. Third, turn the frame ON and from the initial card selection menu make sure that
you can select the card. Finally, make certain you are selecting the correct Mode from the next menu:
Picture for still images, Music for Mp3 music, or Video for AVI videos.
NOTE:
1. Some digital cameras save images in non-standard formats. Please refer to your camera’s
instruction manual for details.
Q: Why is the picture display slower with some pictures and faster with others?
A: Higher resolution pictures load more slowly. Try using lower resolution pictures or down sample
your images. See your camera’s operating manual for details on down sampling images.
Q: Can I insert multiple memory cards?
A: Yes. Turn on the unit after inserting memory cards.The first screen will display which types of
memory cards are in the slots. Use the Remote Control to the desired memory card.
Q: Does the Digital Picture Frame have built-in memory?
A: No, a compatible memory card must be used.
14
Control Functions Continue
[ZOOM]:1.Press 'ZOOM' buttonrepeatedly during playback, then the size of image
will change eachpress in thesequence as: 2X,3X,4X,1/2X,1/3X,1/4X,normal.
2.Use' , , , 'keys tomove the zoomedimageas you like.There is abox on
the button rightof the screento indicate thezoom size andcorresponding position
of the image.
3. To resume normal playback, press 'ZOOM' repeatedly until the image is in
normal size.
[VOLUME +,-]: Press "VOL+,VOL-"keys todecrease/ increase soundvolume.
1.Use left/right keys to highlight "file" icon is in the "select mode" inside. Press
ENTER keys tolist files .
2.Press "PROG" key to make all documents compositor according to the document type.
3.Use UP/DOWN and / keys to highlight desired Audio file, then press ENTER
to start to playback theAudio file, and use "REPEAT" keys to setup repeat mode.
4.Use UP/DOWN and / to highlight image file then. Press ENTER to start to
playback image file, and "slide show" keys to play all image.
Background music play
VIDEO CONTROL
1.Use ' 'Keys to highlight VIDEO icon, Press 'Enter' Button enter VIDEO play
menu.
2.Use / keys to highlight aVIDEO file ,then press PLAY button tostart to play-
back the VIDEOfile.
[PAUSE]: Press ' ' to pause during playback, and pressPause again to resume.
[STOP]: Press ' 'to stop playbackand press ' ' again toreturn to the VIDEO file
browse menu.
[FORWARD /REVERSE] : Press FORWARD/REVERSE to forward /reverse during
playback , and theplayback speed will cycle with each press as: 2x, 4x,8x, 16x,
32x, normal. Press' ' to pauseand press' ' again to resume.
[ / ]: Press' / 'to switch playbackto previous file .next to next file.
[DISPLAY]: Press 'DISPLAY'to choose the "single elapsed", "singleremain"or
"display off"
/
//

6
Quick Start Guide
ON/OFF
13
Normal the aspectratio the screen.
NOTE: For WIDEmode and NORMALmode see' SETUP/TV DISPLAY'
[PAUSE]: Press ' 'to pause duringplayback, and pressPause again toresume.
[STOP]: Press ' ' to stopping playing. Then the timeshowing on thebottom right
will switch to00:00/00:00
[FORWARD /REVERSE] : Press FORWARD/REVERSE to forward /reverse during
playback , and theplayback speed will cycle with each press as: 2x, 4x,8x, 16x,
32x, normal. Press' ' to pauseand press' ' again to resume.
[UP/DOWN]: Use / Keys to highlightan WMAfile when theselected one is
playing by using / keys . Then press ENTER, the highlight WMA will be
played instead ofthe previous one.
[VOLUME +,-]: Press "VOL+,VOL-"keys todecrease/ increase soundvolume.
MUSIC CONTROL
/
1.Use / Keysto highlight MUSICicon, Press 'Enter'Button enter musicplay menu.
2.Use / keys to highlight aWMA file ,then press PLAY button tostart to playback
the WMAfile.
//
Control Functions
16:9
ZOOM Press "ZOOM" button repeatedly during playback, then the size of image will change
each press in the sequence as: 100%, 125%, 150%, 200%,50%, 75%.
After the image is enlarged, use the arrow buttons" , , , " to move the image
so that you can view different of the enlarged image.
Toresume normal playback, press"ZOOM" repeatedly until the image is in normal size.
4:3/16:9 Switch the aspect ratio the screen .
In the WIDEmode , Change view to standard 4:3 aspect ratio. Use this mode for
viewing standard photosin unaltered proportions. Recommend to do not use this
mode is Inthe NORMAL mode.
4:3
4:3 16:9
To begin using the Digital Picture Frame, follow these instructions:
1. Pull the stand to make it better support the frame.
2. Plug one end of the AC Adapter into the Digital Picture Frame
and plug the other end into a standard 100-240 volt AC electrical
outlet.
3. Insert a memory card into the appropriate slot.
NOTE: The card will only fit in one direction; do not force it. The
card should have a firm, snug fit if properly inserted.
4. Slide the Power Switch to the ON position.
5. If not already selected, scroll to the appropriate memory card
type on the first menu screen by using the Arrow Buttons on the
Remote Control.
6. Press the ENTER Button to confirm the selection.
7. On the next menu, scroll using the Arrow buttons to select
PHOTOS.
8. On the next menu, press SLIDESHOW on the Remote Control
to display images. For more details or instructions on using the
MUSIC, MOVIES, or FILES menus, refer to the “Control Functions”
section.

7
Contents
MENU
ENTER AV OUT
USB
CF
MS
SD / MMC
-C +
DC 7-12V
ON/OFF
ENTER
PREV/UP ARROW
/LEFT ARROW
NEXT/DOWN ARROW/
RIGHT ARROW
MENU BUTTON
SD/MMC SLOT
CF SLOT
PUT: FLASH DRIVE USB
AUDIO/VIDEO
OUTPUT
EARPHONE
MS, MS PRO
AC ADAPTER JACK
SPEAKERS POWER SWITCH
12
Control Functions Continue.
Use the Arrow Buttons on the Remote Control Panel to select an image.
ENTER Press the ENTER Button from the Remote Control or the Control Panel to view the
selected image at full screen size.
MENU Press "MENU" button return to main menu.
When viewing an image:
In PHOTO mode, a thumbnail screen will appear to enable easy selection of images. This mode
displays a set of up to 9 thumbnail image on the screen at a time.
Previous: Press the Previous Button on the Remote Control or the Control Panel to return
to the previous image.
NEXT: Press the NEXT Button on the Remote Control or the Control Panel to skip to the
NEXT image.
Slide show: In the press the SLIDE SHOW Button on the Remote Control to begin a
“slide show” style playback of all image on the selected memory card..
STOP: Press the STOP Button on the Remote Control or the Control Panel to stop image
playback and return to the Thumbnail Screen
MENU Press "MENU" button to image file browse menu.
ROTATE When viewing a full screen, Press direction button on the remote: UP(vertically mirror);
DOWN(horizontally mirror),LEFT(90 degree clockwise),RIGHT(90 degree anti-
clockwise)
THUMBNAIL SCREEN
IMAGE CONTROLS
Prev Next
PHOTO: JPEG still image viewingand slide show playback.
MUSIC: MP3/WMA audio playback.
VIDEO: Video file Playback.
FILE: View the filestructure on the memory card.
: Use the Left andRight Arrows onthe Remote Control oron the Control Panelto
select a viewingmode.
MENU: Press"MENU" button returnto main menu.
NOTE: This menu onlyhave to just appearis the memory cardcontain two kind ofabove
the support document.

CARD SELECTION MENU
At startup, a menu screen appears for selection of the memory card:
: Use the Right and Left Arrows on the Remote control or on the control panel to select the
correct memory card type or USB Flash driver.
MODE SELECTION MENU
The next menuallows Selection ofthe playback mode.
NOTE:
1. Some digital cameras save images in non-standard formats. Please refer to your camera’s
instruction manual for details.
2. The SD icon will not be highlighted if no SD inside, The MS/PRO,CF,USB icon is same too.
ENTER: Press the Enter button to confirm.
Control Functions Continue
11
MENU
ENTER AV OUT
8
VIDEO IN
AUDIO IN
WHITERED Yellow
Connecting to aTV Set

Remote Control
DIGITAL PICTURE FRAME
ENTER
SLIDE SHOW
SETUP
MENU
ZOOM
4:3
16:9
AUDIO
SUBTITLE
DISPLAY
PROG REPEAT
MUTE
/
VOL
1 2 3 4
5
6
7
8
9
10
11
12
13
14
16
15
19
18
17
20
21
22
23
1. MENU: Press MENUReturn to theprevious
menu.
2. MUTE: Press MUTE tosound off.
3. Display: Press Displayto choose the"single
elapsed", "single remain" or"displayoff".
4. 4:3/16:9 : Press 4:3/16:9 to adjust aspect
ratio of screendisplay.
5.7.8.9.22:UP/DOWN/LEFT/RIGHT/ENTER:
USE UP/DOWN/LEFT/RIGHT Keysto
navigate all on-screen display, Press ENTER
to confirm selections.
Stop: Press STOPto stop video playback.
SETUP: Press SETUPto access setup menu.
Repeat: Press Repeatto Repeat mode.
6.
10.
11.PREV:Press PREV toprevious image /Mp3/
VIDEO.
12.NEXT:Press NEXTto next image/VIDEO.
13.
14.PROG: Press PROGto show byfile browse.
15.SUBTITLE:Press the SUBTITLEto select the
subtitle language.
9
1
2
CR2025
HOW TO REPLACE THE BATTERY
STEP 1: PUSH THE BUTTON TOWARD LEFT;
STEP 2: PULL THE BATTERY LOADER OUT.
BATTERIES
INCORRECT USE OF BATTERIES MAY CAUSE THEM TO LEAK, CORRODE OR EXPLODE.
Be sure to place the batteries in the correct direction.
It is dangerous to charge/heat/open or short-circuit the batteries.
Do not leave dead or expired batteries or mix old/new batteries.
When not using the remote control for a long duration of time, remove the batteries. When operating
range becomes reduced, replace all batteries with new, fresh ones.
If leakage from the battery occurs, wipe the battery liquid from the battery compartment, then replace.
16.AUDIO: PressAUDIO to selectthe audio language.
17. :Press" " toreverse at differenttimes during.
18. : Press" "to forward atdifferent times during.
19.
20.Zoom: Press Zoomto zoom in/outto magnify orreduce you view.
21.
23.
Slide Show: PressSlide Show tobegin displaying picturein a slideshow
Volume Controls:Adjust volumefor audio andvideo file
Play/Pause: Press Play/Pause onceto Pause video playbackand press Play/Pause
again to resume Playback.
Insert the memorycard
1. Insert the SD/MMC memory card withthe
correct direction.
2. Insert the CF memory card with thecorrect
direction.
3. Insert the MS/MS-PRO memory card with
the correct direction.
10
Table of contents
Other VisionQuest Digital Photo Frame manuals