Vissani HVM1110W User manual

THANK YOU
We appreciate the trust and condence you have placed in Vissani through the purchase of this microwave. We strive
to continually create quality products designed to enhance your home. Visit us online to see our full line of products
available for your home improvement needs. Thank you for choosing Vissani!
USE AND CARE GUIDE
COUNTERTOP MICROWAVE OVEN
Questions, problems, missing parts? Before returning to the store,
Call Vissani Customer Service
Monday - Friday 8 a.m. to 8 p.m., Saturday 8a.m. to 6 p.m.
1-855-847-7264
HOMEDEPOT.COM
Retain this manual for future use.
Item # 1006710527/
Model # HVM1110W/
1006710520
HVM1110B

2
Table of Contents
Table of Contents.......................................................2
Safety Information.....................................................2
Warranty.....................................................................5
Pre-Operation ............................................................6
Product Registration ..............................................6
Installation of your Microwave...............................6
Product Description ...............................................7
Installing the Turntable ..........................................7
Specications ........................................................7
Using the Oven Controls ............................................8
Food Characteristics............................................10
Cooking Guidelines ..............................................10
Using the Microwave...............................................10
Cookware and Dinnerware...................................11
To Test Cookware or Dinnerware for Microwave
Use.......................................................................11
Aluminum Foil and Metal.....................................12
Microwave Cooking Power ..................................12
Cooking Manually ................................................13
Cooking in Stages................................................13
Defrosting ............................................................14
Defrosting by Weight............................................14
Defrosting by Time...............................................14
Using the Memory Feature...................................15
Cooking Popcorn..................................................15
Cooking a Baked Potato.......................................16
Cooking PIzza.......................................................16
Heating a Beverage..............................................16
Heating a Dinner Plate .........................................17
Cooking Frozen Vegetables..................................17
Care and Cleaning ...................................................18
Cleaning the Oven................................................18
Roller Guide Care .................................................18
Glass Tray Care ....................................................18
Troubleshooting .......................................................19
Before you call Service ........................................19
Frequently Asked Questions ................................19
Safety Information
IMPORTANT SAFETY INSTRUCTIONS
When using electrical appliances, basic safety
precautions should be followed, including the
following:
WARNING: To reduce the risk of burns,
electric
shock, re, injury to persons or
exposure to excessive microwave energy:
1. Read all instructions before using the appliance.
2. Read and follow the specic “AVOIDING
POSSIBLE EXPOSURE TO EXCESSIVE MICROWAVE
ENERGY”.
3. This appliance must be grounded. Connect only
to properly grounded outlet. See GROUNDING
INSTRUCTIONS.
4. Install or locate this appliance only in accordance
with the provided installation instructions.
5. Some products such as whole eggs and sealed
containers - for example, closed glass jars are
able to explode and should not be heated in this
oven.
6. Use this appliance only for its intended use as
described in this manual. Do not use corrosive
chemicals or vapors in this appliance. This type
of oven is specically designed to heat, cook,
or dry food. It is not designed for industrial or
laboratory use.
7. As with any appliance, close supervision is
necessary when used by children.
8. Do not operate this appliance if it has a damaged
cord or plug, if it is not working properly, or if it
has been damaged or dropped.
9. This appliance should be serviced only by
qualied service personnel. Contact nearest
authorized service facility for examination, repair
or adjustment.
10. Do not cover or block any openings on the
appliance.
11. Do not store this appliance outdoors. Do not
use this product near water - for example,
near a kitchen sink, in a wet basement, near a
swimming pool, or similar locations.

3
Safety Information (continued)
12. Do not immerse cord or plug in water.
13. Keep cord away from heated surfaces.
14. Do not let cord hang over edge of table or
counter.
15. When cleaning surfaes of door and oven that
comes together on closing the door, use only
mild, non-abrasive soaps or detergents applied
with a sponge or soft cloth.
16. To reduce the risk of re in the oven cavity:
□Do not overcook food. Carefully attend to
appliance when paper, plastic, or other
combustible materials are placed inside the
oven to facilitate cooking.
□Remove wire twist-ties from paper or plastic
bags before placing bag in oven.
□If materials inside the oven ignite, keep oven
door closed, turn oven off, and disconnect the
power cord, or shut off power at the fuse or
circuit breaker panel.
□Do not use the cavity for storage purposes.
Do not leave paper products, cooking utensils,
or food in the cavity when not in use.
17. Liquids, such as water, coffee, or tea are able to
be overheated beyond the boiling point without
appearing to be boiling due to surface tension
of hte liquid. Visible bubbling or boiling when
the container is removed from the microwave
oven is not always present. THIS COULD RESULT
IN VERY HOT LIQUIDS SUDDENLY BOILING OVER
WHEN SPOON OR OTHER UTENSIL IS INSERTED
INTO THE LIQUID. To reduce the risk of injury to
persons:
□Do not overheat the liquid. Stir the liquid both
before and halfway through heating it.
□Do not use straight-sided containers with
narrow necks.
□After heating, allow the container to stand
in the microwave for a short time before
removing the container.
□Use extreme care when inserting a spoon or
other utensil into the container.
18. Do not use this microwave oven to heat corrosive
chemicals (for example, suldes and chlorides).
Vapors from such corrosive chemicals may
interact with the contact and springs of the
safety interlock switches thereby rendering them
inoperable.
19. Keep the waveguide cover clean at all times.
Wipe the oven interior with a soft damp cloth
after each use. If you leave grease or fat
anywhere in the cavity it may overheat, smoke or
even catch re when next using the oven.
20. Never heat oil or fat for deep frying as you
cannot control the temperature. Doing so may
lead to re.
21. Do not operate the oven without the glass tray in
place. Ensure it is properly sitting on the base.
22. Do not attempt to dry clothes, newspapers or
other materials in the oven. They may catch on
re.
23. Do not use recycled paper products as they may
contain impurities which may cause sparks or
res.
24. Never use your microwave oven for home
canning. The oven is not designed for proper
home canning. Improperly canned food may spoil
and be dangerous to consume.
25. Potatoes, apples, egg yolks and sausages are
examples of food with non-porous skins. These
must be pierced before cooking to prevent
bursting.
26. Do not attempt to deep fat fry in your microwave
oven.
ARCING
If you see arcing, touch STOP/CANCEL and correct the
problem. Arcing is a term for sparks in the oven and is
caused by:
□Metal or foil touching the side of the oven or
foil not molded to food (upturned edges act like
antennas).
□Metal, such as twist-ties, poultry pins, or gold
rimmed dishes, in the microwave.
□Recycled paper towels containing small metal
pieces being used in the microwave.
SAVE THESE INSTRUCTIONS
HOMEDEPOT.COM
Please contact 1-855-847-7264 for further assistance.

4
Safety Information (continued)
FEDERAL COMMUNICATIONS COMMISSION
WARNING
This equipment generates and uses ISM frequency energy and if not installed and used properly, that is in strict
accordance with the manufacturer’s instructions, may cause interference to radio and television reception.
It has been type-tested and found to comply with limits for an ISM Equipment pursuant to part 18 of FCC Rules,
which are designed to provide reasonable protection against such interference in a residential installation. However,
there is no guarantee that interference will not occur in a particular installation. If this equipment does cause
interference to radio or television reception,which can be determined by turning the equipment off and on, the user
is encouraged to try to correct the interference by one of more of the following:
□Reorient the receiving antenna or radio or television.
□Relocate the microwave oven with respect to the receiver.
□Move the microwave oven away from the receiver.
□Plug the microwave oven into a different outlet so that microwave oven and receiver are on different branch
circuits.
THE MANUFACTURER is not responsible for any radio or TV interference caused by UNAUTHORIZED MODIFICATION to
this microwave oven. It is the responsibility of the user to correct such interference.
GROUNDING INSTRUCTIONS
This appliance must be grounded. In the event of an electrical short circuit, the grounding plug reduces the risk
of electric shock by providing an escape wire for electric current. This appliance is equipped with a cord having
a grounding wire with a grounding plug. The plug must be plugged into an outlet that is properly installed and
grounded.
WARNING: Improper use of the grounding can result in a risk of electric shock. Consult a qualied electrician or
serviceman if the grounding instructions are not completely understood, or if doubt exists as to whether the appliance
is properly grounded. If it is necessary to use an extension cord, use only a 3-wire extension cord that has a 3-blade
grounding plug, and a 3-slot receptacle that will accept the plug on the appliance. The marked rating of the extension
cord shall be equal to or greater than the electrical rating of the appliance.
WARNING: Do not cut or remove the third (ground) prong from the power cord under any circumstances.
AVOIDING POSSIBLE EXPOSURE TO
Do not attempt to operate this oven with the door open since an open door can result in harmful exposure to
microwave energy. Do not tamper with the safety interlocks.
Do not place any object between the oven front face and the door or allow soil or cleaner residue to accumulate on
sealing surfaces. Do not operate the oven if it is damaged. It is important that the door close properly and that there
is no damage to the door, hinges, latches, door seals, and sealing surfaces.
The door should not be adjusted or repaired by anyone except properly qualied service personnel.
RADIO FREQUENCY INTERFERENCE STATEMENT
EXCESSIVE MICROWAVE ENERGY

5
Warranty
MC Appliance Corporation warrants each new Counvertop Microwave Oven to be free from defects in material and
workmanship, and agrees to remedy any such defect or to furnish a new part(s), at the company’s option, for any
part(s) of the unit that have failed during the warranty period. Parts and labor expenses are covered on this unit for
a period of one year from the date of purchase. A copy of the dated sales receipt or invoice is required to receive
warranty service by an authorized service agent.
In addition, MC Appliance Corporation warrants the magnetron (parts only) to be free from defects in material and
workmanship for a period of eight years. The consumer is responsible for all labor and transportation expenses
related to the diagnosis and replacement of the magnetron after the initial one-year warranty expires. In the event
the unit requires replacement or refund under the terms of this warranty, the consumer is responsible for all
transportation expenses to return the unit to our factory prior to receiving a replacement unit or refund. A copy of
the dated sales receipt/invoice is required to receive warranty service, replacement or refund. This warranty covers
appliances in use within the continental United States, Alaska, Hawaii and Puerto Rico. This warranty does not cover
the following:
Damages due to shipping damage or improper installation.
□Damages due to misuse or abuse.
□Content losses due to failure of the unit.
□Inside components such as turntable, roller guide, light bulbs, etc.
□Repairs performed by unauthorized service agents.
□Service calls that do not involve defects in material and workmanship such as instructions on proper use of
the product or improper installation.
□Replacement or resetting of house fuses or circuit breakers.
□Failure of this product if used for other purposes than its intended purpose.
□Disposal costs for any failed unit not returned to our factory.
□Any delivery/installation costs incurred as the result of a unit that fails to perform as specied.
□Expenses for travel and transportation for product service if your appliance is located in a remote area where
service by an authorized service technician is not available.
□The removal and reinstallation of your appliance if it is installed in an inaccessible location or is not installed
in accordance with published installation instructions.
□Refunds for non repairable products are limited to the price paid for the unit per the sales receipt.
LIMITATIONS OF REMEDIES AND EXCLUSIONS:
Product repair in accordance with the terms herein, is your sole and exclusive remedy under this limited
warranty. Any and all implied warranties including merchantability and tness for a particular purpose are hereby
limited to one year or the shortest period allowed by law. MC Appliance Corporation is not liable for incidental
or consequential damages and no representative or person is authorized to assume for us any other liability in
connection with the sale of this product. Under no circumstances is the consumer permitted to return this unit to
the factory without the prior written consent of MC Appliance Corporation. Some states prohibit the exclusion or
limitation of incidental or consequential damages, or limitations on implied warranties. This warranty gives you
specic legal rights, and you may also have other rights which vary from state to state.
HOMEDEPOT.COM
Please contact 1-855-847-7264 for further assistance.
6
Pre-Operation
PRODUCT REGISTRATION
Thank you for purchasing a Vissani product. The rst step to protect your new product is to complete the product
registration on our website: www.mcappliance.com/register. The benets of registering your product include the
following:
□Registering your product will allow us to contact you regarding a safety notication or product update.
□Registering your product will allow for more efcient warranty service processing when warranty service is
required.
□Registering your product could act as your proof of purchase in the event of insurance loss.
Once again, thank you for purchasing a Vissani product.
INSTALLATION OF YOUR MICROWAVE
When installing your microwave, adhere to the following guidelines:
□Examine the oven after unpacking. Check for damage such as a misaligned door, broken door or dent in the
cavity. If any damage is visible, DO NOT INSTALL, and notify your dealer immediately.
□Install the microwave oven on a level, at surface.
□Do not block air vents. If they are blocked during operation, the oven may overheat and eventually cause a
□Install the microwave away from radio and TV sets. Poor television reception and radio interference may result
if the oven is located close to a TV, radio, antenna, feeder, etc.
□Install the microwave away from heating appliances and water taps. Keep the oven away from heat, steam or
splashing liquids. These things can adversely affect oven wiring and contacts.
□Check your local power source.This microwave oven requires a current of approximately 15 amperes,
120Volts, 60Hz grounded outlet.
- A short power-supply cord is provided to reduce the risks resulting from becoming entangled in or
tripping over a longer cord.
- Longer cord sets or extension cords are available and may be used if care is exercised in their use.
- If a long cord or extension cord is used:
□The marked electrical rating of the cord set or extension cord should be at least as great as the
electrical rating of the appliance.
□The extension cord must be a grounding type 3-wire cord.
□The longer cord should be arranged so that it will not drape over the counter top or tabletop where it
can be pulled on by children or tripped over unintentionally.
□The minimum height of free space necessary above the top surface of the oven is about 4 inches (10.16 cm).
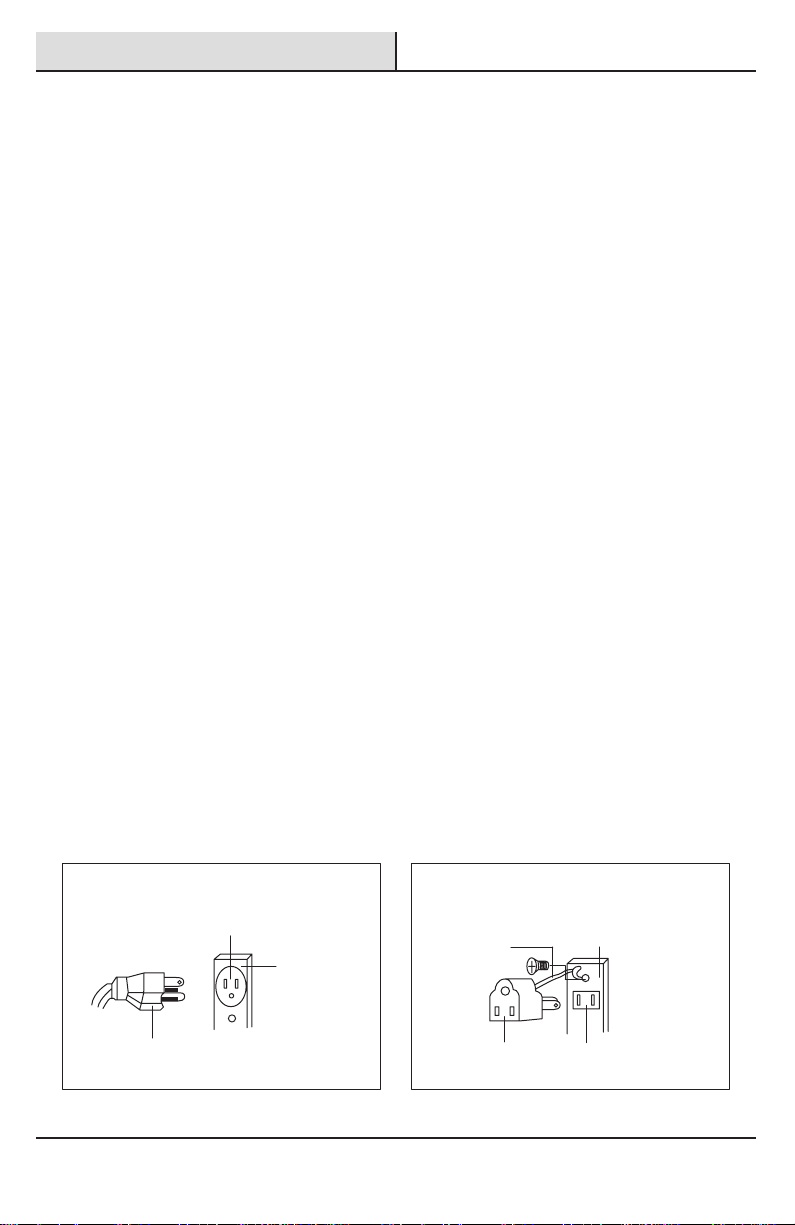
When use 3-pronged plug
3-prong Receptacle
Receptacle
Box cover
3-prong plug
When use grounding adaptor, make sure
the receptacle box is fully grounded.
Receptacle Box Cover
Receptacle
Grounding
Lead
Grounding
Adaptor
THE CANADIAN ELECTRICAL CODE DOES NOT ALLOW THE USE OF THE GROUNDING ADAPTOR
failure. For proper ventilation, Leave a minimum clearance of 12 inches (30cm) above the oven.
a minimum clearance of 3.0 inches (7.5cm) is required between the oven and any
adjacent walls and right side must be open.
7
Pre-Operation (continued)
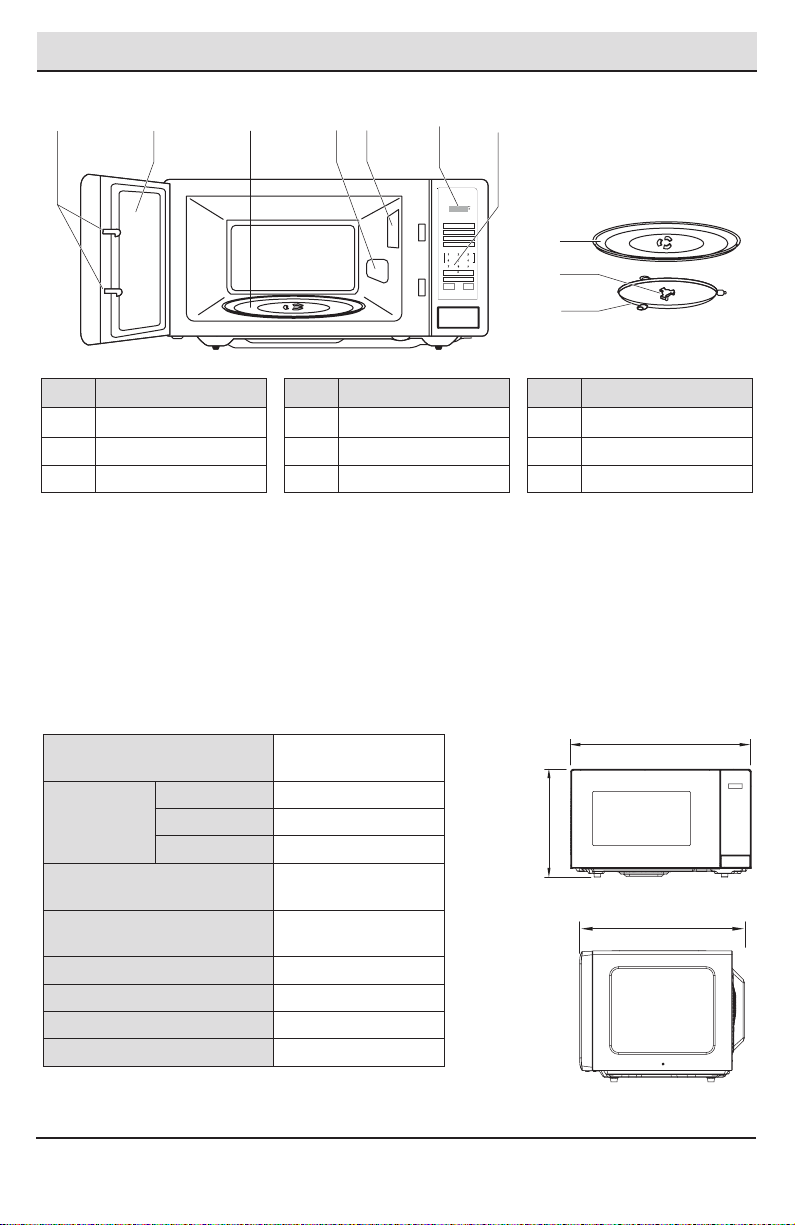
PRODUCT DESCRIPTION
MEMORY
DINNER
PLATE
POPCORN
FROZEN
VEGETABLE
PIZZA
CLOCK
POWER
CANCEL
STOP
+30SEC.
START
TIMER
WEIGHT
DEFROST
EXPRESSCOOK
BAKED
POTATO
TIME
DEFROST
TIME
COOK
BEVERAGE
A
BCDE FG
C
H
I
Part Description Part Description Part Description
A Door lock system D Microwave inlet cover G Control panel
B Metal shielded window E Microwave oven light H Hub
C Glass turntable F Display I Roller Guide
INSTALLING THE TURNTABLE
The turntable can rotate in either direction to help cook food more evenly. For best cooking results, do not operate
the microwave oven without having the turntable in place. To install:
1. Install the hub (H) into the hole in the center of the microwave oven cavity bottom.
2. Place the roller guide (I) on the microwave oven cavity bottom.
3. Place the turntable (C) on the roller guide (I). Fit the raised, curved mounds in the center of the turntable
bottom between the three spokes of the hub.
SPECIFICATIONS
Power Supply 120V AC, 60Hz Single
Phase With Grounding
Microwave Input Power 1600 W
Energy Output 1000 W
Frequency 2,450 MHz
Outside Dimensions (W X H X D) 20.6 x 11.8 x 14.7 in
(523 x 300 x 373 mm)
Cavity Dimensions (W X H X D) 13.9 x 10.0 x 14.1 in
(354 x 253 x 357 mm)
Cavity Volume 1.1 cu.ft
Net Weight Approx. 31.7 lbs.
Timer 99 min. 99 sec.
Power Levels 10 Levels
* Specications are subject to change without notice.
20.6 in (523 mm)
11.8 in
(300 mm)
14.7 in ( mm)373
HOMEDEPOT.COM
Please contact 1-855-847-7264 for further assistance.

8
Using the Oven Controls
1 About the Display
□When power is rst supplied to the microwave
oven, “0:00” will appear in the display. If the
“0:00” appears in the display at any other time,
a power failure has occurred. Reset the clock
if needed.
□When the microwave oven is in use, the
display shows cook time remaining. When
the microwave oven is not in use, the display
shows the time of day (if the clock is set) or
Timer countdown.
2 Using the Start Control
□The START control (START/+30Sec. pad) begins
any function. If cooking is interrupted by
touching STOP/CANCEL or by opening the door,
touching START/+30Sec will resume the cycle.
Adding 30 Seconds to your Cook Time
□The +30SEC control (START/+30Sec.)
automatically starts the microwave oven at
100% power for 30 seconds, and adds 30
seconds of cook time with each additional touch
of the control.
3 Using Express Cook
Each of the EXPRESS COOK controls (number pads 1-6)
automatically starts the microwave oven at 100% power
for 1 minute, 2 minutes, 3 minutes, 4 minutes, 5 minutes
or 6 minutes, depending on which number is touched.
4 Using the Stop/Cancel Control
The STOP/CANCEL control clears any incorrect
command,and pauses and/or cancels any program
during cooking. It will not erase the time of day. A
cooking program may be paused by touching. STOP/
CANCEL once or by opening the door. The cycle may
be resumed by touching START/+30Sec. A cooking
program may be canceled by touching STOP/CANCEL
twice or by opening the door and then touching STOP/
CANCEL.

9
Using the Oven Controls (continued)
5Using the Clock
This is a standard 12-hour clock (1:00-12:59). If the
clock is not set, “0:00” will remain in the display. When
the clock is set, the “:” will ash. During cooking, the
clock may be seen for 3 seconds by touching CLOCK.
□Ensure the microwave is in standby mode.
□Touch CLOCK. “00:00” will appear in the
display, with the rst “0” ashing.
□Use the numbered keypad to enter the time
and press CLOCK again.
6
Using the Kitchen Timer
The Kitchen Timer can be set in minutes and seconds,
up to 99 minutes, 99 seconds, and counts down the
set time. The Kitchen Timer may not be used while any
other function is operating. The Kitchen Timer does not
start or stop the microwave oven.
□Touch TIMER. “00:00” will appear in the
display, with the rst “0” ashing.
□Enter desired time in minutes and seconds,
lling all four digits from left to right. Example:
1-0-0-0 for 10 minutes, or 0-5-0-0 for 5
minutes.
□Touch START/+30Sec. When the set time ends,
end-of-timer tones will sound, and the display
will return to the time of day.
□Touch STOP/CANCEL at any time to cancel the
timer.
7
Using the Control Lock
□The Control Lock shuts down the control panel
pads to avoid unintended use of the microwave
oven. To Lock/Unlock Control: The microwave
oven must be in standby mode. Touch and hold
STOP/CANCEL for 3 seconds until one long
tone sounds and the display clears to show an
outline of the display area.
□Repeat to unlock control, and return the
display to the time of day. If any pad is touched
while the control is locked, there will be no
response from the microwave oven.
8
Listening to Tones
Tones are audible signals that indicate the following:
One tone
□Valid entry (short tone)
□End of stage in multistage cooking
□Control lock activated or deactivated (long
tone)
Five tones
□End of cycle
□End of Kitchen Timer countdown
HOMEDEPOT.COM
Please contact 1-855-847-7264 for further assistance.

10
Using the Microwave
Adhere to these safety guidelines when using the microwave oven:
□To avoid damage to the microwave oven, do not lean on or allow children to swing on the microwave oven
door.
□To avoid damage to the microwave oven, do not operate when it is empty.
□Baby bottles and baby food jars should not be heated in microwave oven.
□Clothes, owers, fruit, herbs, wood, gourds, paper, including brown paper bags and newspaper, should not be
dried in microwave oven.
□Parafn wax will not melt in the microwave oven because it does not absorb microwaves.
□Use oven mitts or pot holders when removing containers from microwave oven.
□Do not overcook potatoes. At the end of the recommended cook time, potatoes should be slightly rm. Let
potatoes stand for 5 minutes. They will nish cooking while standing.
□Do not cook or reheat whole eggs inside the shell. Steam buildup in whole eggs may cause them to burst,
requiring signicant cleanup of microwave oven cavity. Cover poached eggs and allow a standing time.
FOOD CHARACTERISTICS
When microwave cooking, the amount, size and shape, starting temperature, composition and density of the food
affect cooking results.
Amount of Food
The more food heated at once, the longer the cook time needed. Check for doneness and add small increments of
time if necessary.
Size and Shape
Smaller pieces of food will cook more quickly than larger pieces, and uniformly shaped foods cook more evenly
than irregularly shaped food.
Starting Temperature
Room temperature foods will heat faster than refrigerated foods, and refrigerated foods will heat faster than frozen
foods.
Composition and Density
Foods high in fat and sugar will reach a higher temperature, and will heat faster than other foods. Heavy, dense
foods, such as meat and potatoes, require a longer cook time than the same size of a light, porous food, such as
cake.
COOKING GUIDELINES
Covering
Covering food helps retain moisture, shorten cook time and reduce spattering. Use the lid supplied with cookware.
If a lid is not available, wax paper, paper towels or plastic wrap approved for microwave ovens may be used. Plastic
wrap should be turned back at one corner to provide an opening to vent steam. Condensation on the door and cavity
surfaces is normal during heavy cooking.
Stirring and Turning
Stirring and turning redistribute heat evenly to avoid over cooking the outer edges of food. Stir from outside to
center. If possible, turn food over from bottom to top.
Arranging
If heating irregularly shaped or different sized foods, arrange the thinner parts and smaller sized items toward the
center. If cooking several items of the same size and shape, place them in a ring pattern, leaving the center of the
ring empty.
11
Using the Microwave (continued)
Piercing
Before heating, use a fork or small knife to pierce or prick foods that have a skin or membrane, such as potatoes,
egg yolks, chicken livers, hot dogs, and sausage. Prick in several places to allow steam to vent.
Shielding
Use small, at pieces of aluminum foil to shield the thin pieces of irregularly shaped foods, bones and foods such as
chicken wings, leg tips and sh tail. See “Aluminum Foil and Metal” rst.
Standing Time
Food will continue to cook by the natural conduction of heat even after the microwave cooking cycle ends. The
length of standing time depends on the volume and density of the food.
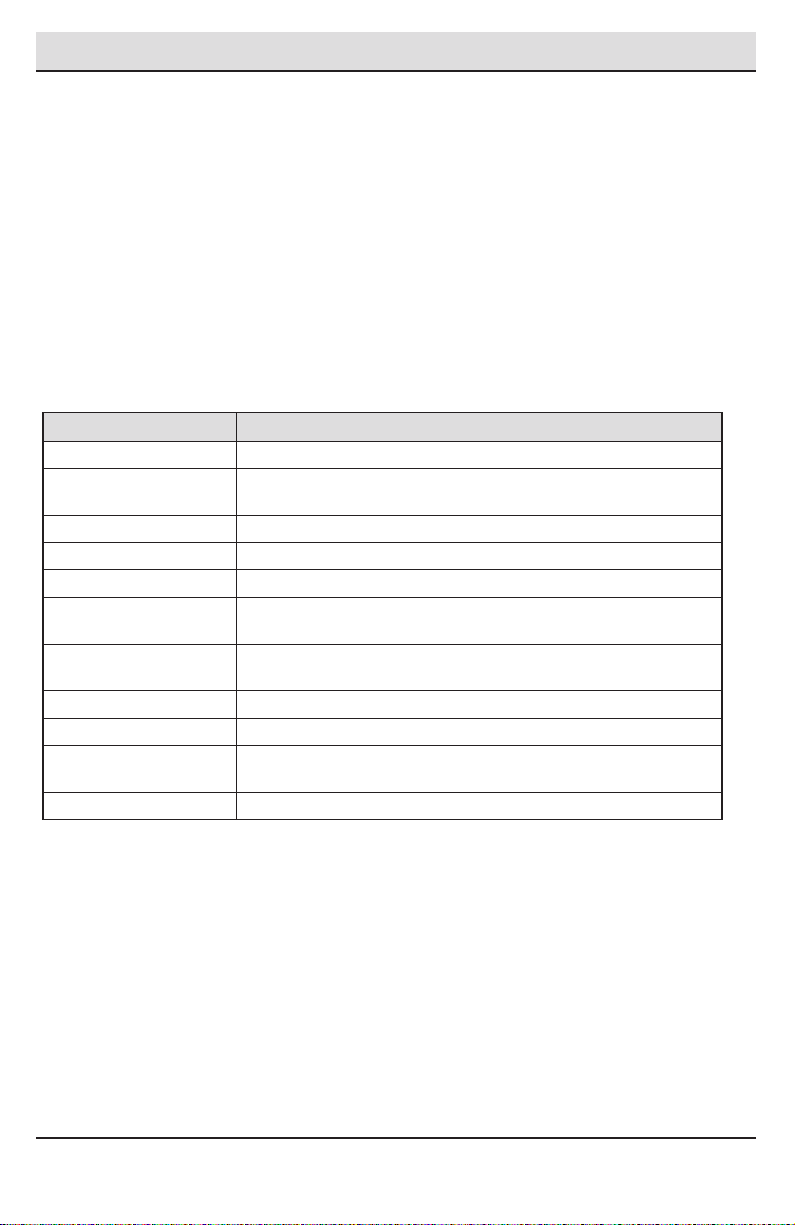
COOKWARE AND DINNERWARE
Cookware and dinnerware must t on the turntable. Always use oven mitts or pot holders when handling because
any dish may become hot from heat transferred from the food. Do not use cookware and dinnerware with gold or
silver trim. Use the following chart as a guide, then test before using.
Material Recommendations
Aluminum Foil, Metal See “Aluminum Foil and Metal” section.
Browning Dish Bottom must be at least 3/16" (5 mm) above the turntable. Follow
manufacturer’s recommendations.
Ceramic Glass, Glass Acceptable for use.
China, Earthenware Follow manufacturer’s recommendations.
Melamine Follow manufacturer’s recommendations.
Paper: Towels, Dinnerware,
Napkins
Use nonrecycled and those approved by the manufacturer for microwave
oven.
Plastic: Wraps, Bags, Covers,
Dinnerware, Containers
Use those approved by the manufacturer for microwave oven use.
Pottery and Clay Follow manufacturer’s recommendations.
Silicone Bakeware Follow manufacturer’s recommendations.
Straw, Wicker, Wooden
Containers
Do not use in microwave oven.
Wax Paper Acceptable for use.
TO TEST COOKWARE OR DINNERWARE FOR MICROWAVE USE
1. Place cookware or dinnerware in microwave oven with 1 cup (250 mL) of water beside it.
2. Cook at 100% cooking power for 1 minute.
Do not use cookware or dinnerware if it becomes hot and the water stays cool.
HOMEDEPOT.COM
Please contact 1-855-847-7264 for further assistance.
12
Using the Microwave (continued)
ALUMINUM FOIL AND METAL
Always use oven mitts or pot holders when removing dishes from the microwave oven.
Aluminum foil and some metal can be used in the microwave oven. If not used properly, arcing (a blue ash of light)
can occur and cause damage to the microwave oven.
OK For Use
Racks and bakeware supplied with the microwave
oven (on some models), aluminum foil for shielding,
and approved meat thermometers may be used
with the following guidelines:
□To avoid damage to the microwave oven, do
not allow aluminum foil or metal to touch the
inside cavity walls, ceiling or oor.
□Always use the turntable.
□To avoid damage to the microwave oven, do
not allow contact with another metal object
during microwave cooking.
Do Not Use
Metal cookware and bakeware, gold, silver, pewter,
non-approved meat thermometers, skewers, twist
ties, foil liners such as sandwich wrappers, staples
and objects with gold or silver trim or a metallic glaze
should not be used in the microwave oven.
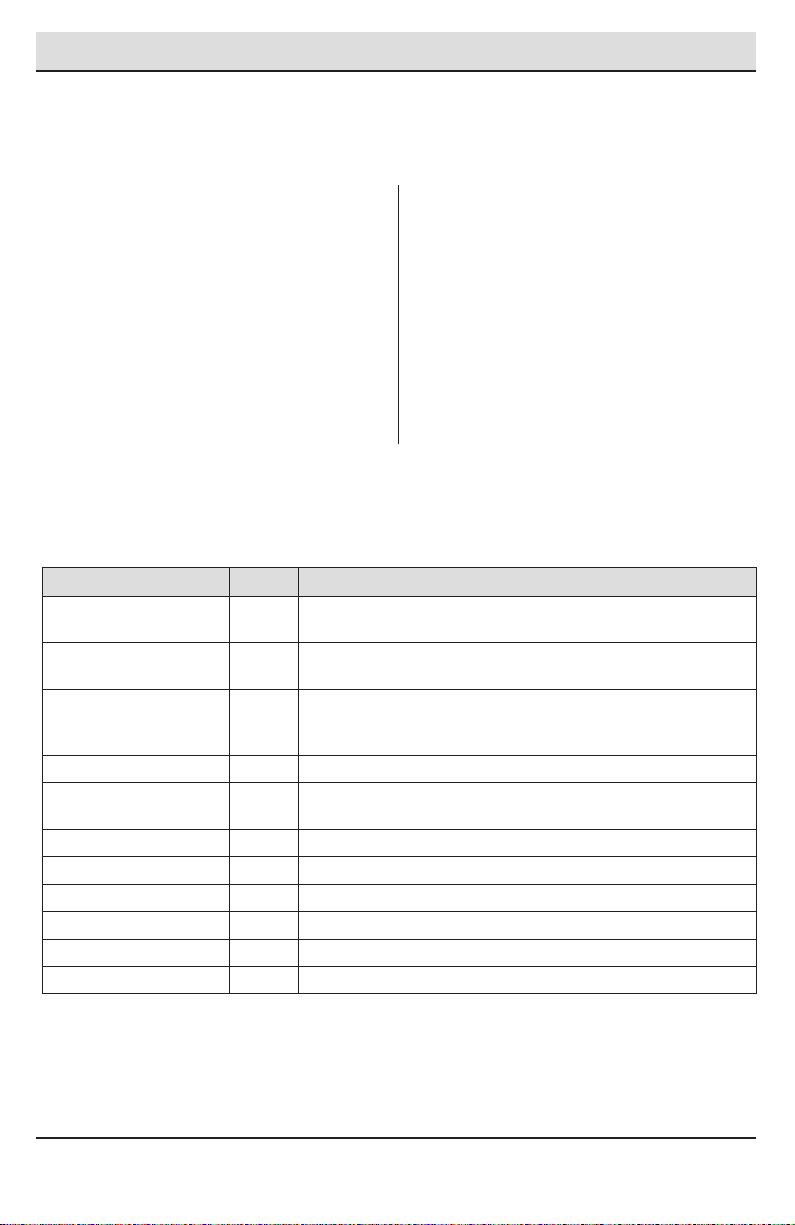
MICROWAVE COOKING POWER
Many recipes for microwave cooking specify which cooking power to use by percent, name or number. For example,
70% = 7= Medium-High. Use the following chart as a general guide for the suggested cooking power of specic
foods.
Percent Number Use
100%, High
(default setting)
10 Quick heating convenience foods and foods with high water content,
such as soups, beverages and most vegetables.
90% 9 Cooking small, tender pieces of meat, ground meat, poultry pieces and
sh llets. Heating cream soups.
80% 8 Heating rice, pasta or stirrable casseroles. Cooking and heating foods
that need a cook power lower than high. For example, whole sh and
meat loaf.
70%, Medium-High 7 Reheating a single serving of food.
60% 6 Cooking sensitive foods such as cheese and egg dishes, pudding and
custards. Cooking non-stirrable casseroles, such as lasagna.
50%, Medium 5 Cooking ham, whole poultry and pot roasts. Simmering stews.
40% 4 Melting chocolate. Heating bread, rolls and pastries.
30%, Medium-Low, Defrost 3 Defrosting bread, sh, meats, poultry and precooked foods.
20% 2 Softening butter, cheese, and ice cream.
10%, Low 1 Taking chill out of fruit.
0% 0 Work with fan for no power.

13
Using the Microwave (continued)
COOKING MANUALLY
1. Place food on the turntable and close the door.
2. Touch TIME COOK.
3. Enter length of time to cook.
4. Touch POWER. “PL10” will appear briey in the display. If cooking with a power other than 100%, touch
number keys to select the power levels from highest to lowest. See “Microwave Cooking Power” chart.
5. Touch START/+30Sec. The display will count down the set cook time. When the cycle ends, the end-of-cycle
tones will soundand the display will return to the time of day.
6. Touch STOP/CANCEL at any time to pause or cancel cooking
COOKING IN STAGES
The microwave oven can be set to cook at different cooking powers for various lengths of time, up to 2 stages. One
of the stages may be an automatic Defrost function, which is the rst stage.
1. Place food on the turntable and close the door.
2. Touch TIME COOK.
3. Enter length of time to cook.
4. Touch POWER. “PL10” will appear briey in the display. If cooking with a power other than 100%, touch
number keys to select the power levels from highest to lowest. See “Microwave Cooking Power” chart.
5. Touch TIME COOK.
6. Enter length of time to cook for second stage.
7. Touch POWER. “PL10” will appear briey in the display. If cooking with a power other than 100%, touch
number keys to select the power levels from highest to lowest.
8. Touch START/+30Sec. The display will count down the set cook time for each stage, and a short tone will
sound at the end of the rst stage. The power level may be seen for 3 seconds by touching POWER during the
cycling stage. When the cycle ends, the end-of-cycle tones will sound, and the display will return to the time
of day.
9. Touch STOP/CANCEL at any time during the countdown to pause or cancel cooking.
Cook time may be added in 30-second increments during the second stage by touching START/+30Sec.
To Use Defrost As First Stage
Touch Weight Defrost, “dEF1” appears in the display. Enter the number of ounces between 4 and 70 ounces (see
“Defrost” section), then follow steps 5-8 above for second stage programming.
HOMEDEPOT.COM
Please contact 1-855-847-7264 for further assistance.

14
Using the Microwave (continued)
DEFROSTING
The Defrost feature has two functions: dEF1, which is an automatic defrost by weight, and dEF2, which is a manual
defrost by time. The default power level is 30%, and can not be adjusted.
1. Unwrap foods and remove lids (for example, from fruit juice containers) before defrosting.
2. Shallow packages will defrost more quickly than deep blocks.
3. Separate food pieces as soon as possible during or at the end of the cycle for more even defrosting.
4. Use small pieces of aluminum foil to shield parts of food such as chicken wings, leg tips and sh tails.
The Defrost feature should not be used for food that has been left outside the freezer for more than 20 minutes, or
for frozen ready-made food. Use the following chart as a guide.
Meat
Beef: ground, steaks, roast, stew □The narrow or fatty areas of irregular shaped cuts should be
shielded with foil before defrosting.
□Do not defrost less than 1/4 lb (113 g) or two 4 oz (113 g) patties.
□Place all meats in microwavesafe baking dish. Do not cover.
Lamb: stew and chops
Pork: chops, ribs, roasts, sausage
Poultry
Chicken: whole and cut up □Place in microwave-safe baking dish, chicken breast.
□Do not cover.
Cornish hens side up
Turkey: breast
Fish
Fillets, Steaks, Whole Shellsh □Place in microwave-safe baking dish.
□Do not cover.
DEFROSTING BY WEIGHT
1. Place food, uncovered, on the turntable and close the door.
2. Touch WEIGHT DEFROST. “dEF1” will appear.
3. Enter the weight in ounces, from 4 to 70. If an invalid value is entered, the microwave oven will not start.
4. Touch START/+30Sec. The display will count down the defrost time. When the cycle ends, the end-of-cycle
tones will sound, and the display will return to the time of day.
5. Touch STOP/CANCEL at any time during the countdown to pause or cancel cooking.
DEFROSTING BY TIME
1. Place food, uncovered, on the turntable and close the door.
2. Touch TIME DEFROST. “dEF2” will appear in the display.
3. Enter the desired time for defrosting.
4. Touch START/+30Sec. The display will count down the defrost time. When the cycle ends, the end-of-cycle
tones will sound, and the display will return to the time of day.
5. Touch STOP/CANCEL at any time during the count down to pause or cancel cooking.

15
Using the Microwave (continued)
USING THE MEMORY FEATURE
The Memory feature can store up to 3 unique cooking programs. The Auto Menu functions cannot be programmed
as a memory function.
To Set Memory:
1. Touch “0” control. “1” will appear in the display for the rst memory program.
2. Set the program, following the instructions in “Manual Cooking” or “Cooking in Stages.”
3. Touch START/+30Sec. . A valid entry tone will sound, indicating that the program has been accepted to
memory or Touch START/+30Sec. again. The program will immediately start, and it will be saved to memory
To Set Second and Third Memory Programs: Touch” 0 “ twice or three times, then follow steps 2 and 3
above.
To use memory:
1. Place food on the turntable and close the door.
2. Touch “0” repeatedly until the desired program number is displayed.
3. Touch START/+30Sec. The display will count down the program cook time. When the cycle ends, the end-of-
cycle tones will sound, and the display will return to the time of day.
4. Touch STOP/CANCEL at any time during the countdown to pause or cancel cooking.
COOKING POPCORN
To cook popcorn, touch POPCORN according to the frequency table below:
Pad Touch Display Serving Size
Popcorn Once 3.2 3.2 oz (91 g)
2 times 3.5 3.5 oz (99 g)
□During cooking, listen for popping to slow to 1 pop every 1 or 2 seconds, then stop the cycle.
□To avoid damage to the microwave oven, do not use regular paper bags or glassware.
□Pop only one package of popcorn at a time.
□Follow manufacturer’s instructions when using a microwave popcorn popper.
□For best cooking results, do not try to pop unpopped kern Use fresh bags of popcor n for optimal results.
□Cooking results may vary by brand and fat content. For bag sizes not listed in this section, follow directions
on the package.
To cook popcorn:
1. Place popcorn bag on the turntable, and close the door.
2. Touch POPCORN to select size (see chart).
3. Touch START/+30Sec. The display will count down the popping time. When the cycle ends, the end-of-cycle
tones will sound, and the display will return to the time of day.
4. Touch STOP/CANCEL at any time to pause or stop popping.
HOMEDEPOT.COM
Please contact 1-855-847-7264 for further assistance.

16
Using the Microwave (continued)
COOKING A BAKED POTATO
Pad Touch Display Serving Size
Baked
Potato
Once 1 1, 8-oz (230 g) potato
2 times 2 2, 16-oz (460 g) potatoes
3 times 3 3, 24-oz (690 g) potatoes
Pierce each potato several times with a fork before baking.
Place a single potato on the turntable, off to the side (not centered). Place 2 or 3 potatoes on the turntable around
the edges, at least 1" (2.5 cm) apart.
Let potato(es) stand for 5 minutes after baking.
To cook a baked potato:
1. Place potato(es) on the turntable and close the door.
2. Touch BAKED POTATO to select number of potatoes (see chart).
3. Touch START/+30Sec. The display will count down the cook time. When the cycle ends, the end-of-cycle tones
will sound, and the display will return to the time of day.
4. Touch STOP/CANCEL at any time to pause or stop cooking.
COOKING PIZZA
Pad Touch Display Serving Size
Pizza Once 4.0 1, 4-oz (113 g) slice
2 times 8.0 2, 8-oz (230 g) slices
3 times 14.0 3, 14-oz (400 g) slices
Place pizza slice(s) on a paper towel or paper plate.
1. Place pizza on the turntable, and close the door.
2. Touch PIZZA to select number of slices (see chart).
3. Touch START/+30Sec. The display will count down the reheat time. When the cycle ends, the end-of-cycle
tones will sound, and the display will return to the time of day.
4. Touch STOP/CANCEL at any time to pause or stop heating.
HEATING A BEVERAGE
Pad Touch Display Serving Size
Beverage Once 1 1, 4-oz (120 mL) cup
2 times 2 2, 8-oz (240 mL) cups
3 times 3 3, 12-oz (360 mL) cups
Do not cover the beverage. The diameter of the cup’s opening will affect how the liquid heats. Beverages in cups
with smaller openings may heat faster.
1. Place cup(s) on the turntable, and close the door.
2. Touch BEVERAGE to select amount (see chart).
3. Touch START/+30Sec. The display will count down the heat time. When the cycle ends, the end-of-cycle tones
will sound, and the display will return to the time of day.
4. Touch STOP/CANCEL at any time to pause or stop heating.

17
Using the Microwave (continued)
HEATING A DINNER PLATE
Pad Touch Display Serving Size
Dinner
Plate
Once 9.0 9.0 oz (255 g)
2 times 12.0 12.0 oz (340 g)
3 times 18.0 18.0 oz (510 g)
1. Place food on plate(s), cover with plastic wrap and vent.
2. Place dinner plate on the turntable and close the door.
3. Touch DINNER PLATE to select size (see chart).
4. Touch START/+30Sec. The display will count down the cook time. When the cycle ends, the end-of-cycle tones
will sound, and the display will return to the time of day.
5. Touch STOP/CANCEL at any time to pause or stop heating.
COOKING FROZEN VEGETABLES
Pad Touch Display Serving Size
Frozen
Vegetable
Once 4.0 4.0 oz (113 g)
2 times 8.0 8.0 oz (230 g)
3 times 16.0 16.0 oz (460g)
1. Remove frozen vegetables from package.
2. Place in microwave-safe container.
3. Add water:
- 2 tbs (30mL) to 4.0 oz (113 g) vegetables
- 4 tbs (60 mL) to 8.0 oz (230 g) vegetables
- 1/3 cup (80 mL) to 16.0 oz (460 g) vegetables
4. Cover with plastic wrap and vent.
5. Stir and let stand 2-3 minutes after cooking.
6. Place food on the turntable and close the door.
7. Touch FROZEN VEGETABLE to select amount (see chart).
8. Touch START/+30Sec. The display will count down the cook time. When the cycle ends, the end-of-cycle tones
will sound, and the display will return to the time of day.
9. Touch STOP/CANCEL at any time to pause or stop heating.
HOMEDEPOT.COM
Please contact 1-855-847-7264 for further assistance.

18
Care and Cleaning
The oven should be cleaned regularly and any food deposits removed. Failure to maintain the oven in a clean
condition could lead to deterioration of the surface that could adversely affect the life of the appliance and possibly
result in a hazardous situation.
CLEANING THE OVEN
□Unplug the power cord before cleaning any part of this oven.
□Keep the inside of the oven clean. When food spatters or spilled liquids adhere to oven walls, wipe with a
damp cloth. Mild detergent may be used if the oven gets very dirty. The use of harsh detergent or abrasives is
not recommended.
□The outside oven surface should be cleaned with soap and water, rinsed and dried with a soft cloth. To prevent
damage to the operating parts inside the oven, water should not be allowed to seep into the ventilation
openings.
□Do not place any object between the oven front face and the door or allow residue to accumulate on sealing
surfaces. Wipe the sealing area frequently with a mild detergent, rinse and dry. Never use abrasive powders
or pads.
□If the Control Panel becomes wet, clean with a soft, dry cloth. Do not use harsh detergents or abrasives on
Control Panel.
□If steam accumulates inside or around the outside of the oven door, wipe with a soft cloth. This may occur
when the microwave oven is operated under high humidity conditions and in no way indicates malfunction of
the unit.
□It is occasionally necessary to remove the glass tray for cleaning. Wash the tray in warm sudsy water or in a
dishwasher.
□The roller guide and oven cavity oor should be cleaned regularly to avoid excessive noise. Simply wipe the
bottom surface of the oven with mild detergent water or window cleaner and dry.
□When opened, the door must not be subjected to strain, for example, a child hanging on an opened door or
any load could cause the oven to fall forward to cause injury and also damage to the door. Do not operate the
oven if it is damaged, until it has been repaired by a competent service technician. It is particularly important
that the oven closes properly and that there is no damage to the door (bent), hinges and hooks (broken or
loosened), or door seals and sealing surfaces.
ROLLER GUIDE CARE
□Clean the roller guide and oven oor frequently to prevent excessive noise.
□Always use the roller guide for cooking together with the glass tray.
GLASS TRAY CARE
□Never operate the oven without the glass tray in place.
□Do not use any other glass tray with this oven.
□If the glass tray is hot, allow it to cool before placing in water or cleaning.
□Do not cook directly on the glass tray.

19 HOMEDEPOT.COM
Please contact 1-855-847-7264 for further assistance.
Troubleshooting
BEFORE YOU CALL SERVICE
Refer to following checklist, you may prevent an unnecessary service call.
The oven doesn’t work:
□Check that the power cord is securely plugged in.
□Check that the door is rmly closed.
□Check that the cooking time is set.
□Check for a blown circuit fuse or tripped main circuit breaker in your house.
Sparking in the cavity:
□Check utensils. Metal containers or dishes with metal trim should not be used.
□Check that metal skewers or foil does not touch the interior walls.
FREQUENTLY ASKED QUESTIONS
Q: Can the oven be used with the glass tray or roller guide removed?
A: No. Both the glass tray and roller guide must always be used in the oven before cooking.
Q: Can I open the door when the oven is operating?
A: The door can be opened anytime during the cooking operation. Then microwave energy will be instantly switched
off and the time setting will maintain until the door is closed.
Q: Why do I have moisture in my microwave oven after cooking?
A: The moisture on the side of your microwave oven is normal and is caused by steam from cooking.
Q: Does microwave energy pass through the viewing screen in the door?
A: No.
Q: Why do eggs sometimes pop?
A: When baking or poaching eggs, the yolk may pop due to steam build-up inside the yolk membrane. To prevent
this, simply pierce the yolk with a toothpick before cooking. Never cook eggs without piercing their shells.
Q: Why this standing time recommended after the cooking operation has been completed?
A: Standing time is very important. Standing Time means that food should be removed from the oven and covered
for additional time to allow it to nish cooking. This frees the oven for other cooking.
Q: Why does my oven not always cook as fast as the microwave cooking guide says?
A: Check your cooking guide again, to make sure you’ve followed directions exactly. Cooking guide times and heat
settings are suggestions, to help prevent over-cooking... the most common problem in getting used to a microwave
oven. Use your own judgement along with the cooking guide suggestions to check whether the food has been
properly cooked just as you would do with a conventional cooker.
Q: Will the microwave oven be damaged if it operates while empty?
A: Yes. Never run it empty.
Q: Can I operate my microwave oven without the turntable or turn the turntable over to hold a
large dish?
A: No. If you remove or turn over the turntable, you will get poor cooking results. Dishes used in your oven must t
on the turntable.

Questions, problems, missing parts? Before returning to the store,
Call Vissani Customer Service
Monday - Friday 8 a.m. to 8 p.m., Saturday 8 a.m. to 6 p.m.
1-855-847-7264
HOMEDEPOT.COM
Retain this manual for future use.
This manual suits for next models
3
Table of contents
Languages:
Other Vissani Microwave Oven manuals


