Vitrifrigo Trivalente 5040DG User manual

GB
9
User, Maintenance and Installation Manual - Trivalenti
Dear Customer:
Wewouldlike tothank youfor choosinga VITRIFRIGOproduct andwe hopeyou remainfully satisfiedwith yourchoice.
We remind you that this manual must be considered as an integral part of the refrigerator, which it must accompany from the
momentof saleto theend userand thatVitrifrigoprohibits thereproduction orcopying ofany partwhatsoever.
Before leaving the factory, every refrigerator is subjected to a series of inspections and tests in order to guarantee its perfect
workingorder andtotal reliabilityof allof itssafety devices.
Forany furtherinformation, pleasecontact VITRIFRIGOdirectly.
Vitri Alceste

10
User, Maintenance and Installation Manual - Trivalenti
1 GENERAL SAFETY REGULATIONS p. 11
2 GENERAL INFORMATION p. 11
Scope of the Manual p. 11
Manufacturer p. 11
3 ABOUT YOUR REFRIGERATOR p. 11
Main Parts p. 12
Controls p. 12
Rating Label p. 12
4 INSTALLATION p. 12
Warning p. 12
Operating Instructions p. 13
Boxing In p. 13
Door Reversal p. 13
Panel Changing p. 13
Electrical Connection p. 13
GAS Connection p. 13
Unit Ventilation p. 14
Disposal of Combustion Fumes p. 14
5 USE p. 14
Switching On p. 14
Mains power p. 14
Battery power p. 14
Gas power p. 14
Refrigerator Operation p. 15
Gas operation p. 15
Main power operation p. 15
Battery peration p. 15
Switching on the fan p. 15
Food Conservation p. 15
Ice-making p. 15
Defrosting p. 15
Winter Operation p. 15
Useful Recommendations p. 15
6 TECHNICAL CHARACTERISTICS AND DIMENSIONS p. 16
7 CLEANING AND MAINTENANCE p. 16
Safety Standards p. 16
Maintenance-Cleaning Schedule p. 16
Standby p. 16
8 TROUBLESHOOTING p. 17
DIAGRAMS p. 57
Figures 1 - 4 p. 57
Figures 5 - 10 p. 61
Figure 11 p. 62
Table 3 p. 63
Contents
11
User, Maintenance and Installation Manual - Trivalenti
11
!
Vitrifrigo s.n.cVitrifrigo s.n.c
via della Produzione, 9via della Produzione, 9
61020 Montecchio di PESARO61020 Montecchio di PESARO
Tel. +39 0721 491080Tel. +39 0721 491080
Fax. +39 0721 497739Fax. +39 0721 497739
Www.vitrifrigo.com
This sign is used in the manual each time
that failure to respect or incorrect
R
R
R
R
R
R
R
R
R
R
R
R
R
R
R
R
Read this manual carefully before using the refrigerator.
Read and observe carefully all of the warnings that are
shown on the adhesive labels applied to the refrigerator.
In the event that this refrigerator is replacing an older
model, we recommend that any locks on the old model
be broken prior to disposal.
Ensure that the packaging is undamaged. In the event of
damaged packaging, please inform the carrier.
Remove the packaging and proceed to the installation of
the product. This must be done with the utmost care
and the use of protective gloves to prevent accidental
injuries to hands, is strongly recommended.
After unpacking the appliance, make sure that it is not
damaged in any way. Any damages must be
communicated to the retailer no later than 24 hours from
the date of purchase.
This appliance is exclusively for conserving food and
beverages.
The refrigerator must be positioned away from heat
sources and making sure that it has adequate ventilation
(see the following indications).
Before connecting the appliance, make sure that the
power supply voltage and/or gas supply pressure from
the pressure limitation valve corresponds to that printed
on the appliance rating plate.
Make sure that the mains power earthing system is in
perfect working order.
After completing the installation processes, make sure
that the appliance is not resting on any power cables.
In the event of operating problems, contact your nearest
authorised technical service engineer. In any case,
always use qualified technicians.
Remove the plug from the power socket before carrying
out any form of maintenance or cleaning.
Do not place any liquids in glass bottles or containers
inside the low-temperature compartment.
Do not discard the appliance packaging. This material
must be sorted and disposed of according to the local
standards in force with regard to waste disposal.
At the end of its useful life, do not abandon the
refrigerator in the environment but contact the local
bodies responsible for waste disposal.
2. GENERAL INFORMATION
1. GENERAL SAFETY REGULATIONS
Scope of the Manual
interpretation of the instructions that follow may
cause damage to persons or to the refrigerator,
whichwouldcompromisesafety.
R
R
R
R
The use of this refrigerator for anything other than that
intended is strictly prohibited.
Make sure that the safety devices are perfectly clean and
in proper working order.
Never remove safeguards (casing) from the refrigerator.
Always read the warnings carefully before carrying out
checks and controls and scheduled maintenance
operations, as described in Chapter 7.
This manual is for refrigerators from the “Trivalente” range and for
models 5040DG, 5060DG, 5070DG, 5075DG, 5080DG,
5090DG, 5105DG, 5140DG and 5150DG. It is intended as a guide
for the correct and safe use of these refrigerators as well as to their
proper maintenance.
To learn in a short space of time how to operate and use your
refrigerator, you must read this use and maintenance manual with
care before using the appliance for the first time.
The correct operation of the refrigerator depends greatly on
effective and efficient maintenance. It is therefore necessary for
you to know which operations to perform. The guidelines for use
indicate all switching on and off and operating procedures.
Your refrigerator has been manufactured in compliance with all
(applicable) safety requirements set forth in the relevant
directives. However, operator safety - and that of other persons –
depends upon the careful reading of this manual and on regular
and attentive cleaning and maintenance.
Some information and/or diagrams in this manual may refer to
details or parts that differ slightly from your refrigerator, although
essential information has not been modified in any way. In the
interests of constant product improvement, your refrigerator may
have variations that have not been included in this manual.
Modifications, if any, will be included as necessary in subsequent
versions of this manual.
This refrigerator was designed and manufactured exclusively by :
Manufacturer
3. ABOUT YOUR REFRIGERATOR
The trivalent refrigerator has been designed for boxed-in
installation and use on vehicles. It is equipped with a front control
panel from which it is possible to select the means of supplying
power and the adjustment of internal temperature. Possible
power supply sources are: the vehicle battery, the local mains

User, Maintenance and Installation Manual - Trivalenti
!
RAlways respect the indications (expiry
date, conservation, etc.) on the pack of
the product to be stored.
Main Parts
A Door Panel
B Door Hinge
C Doorstop
D Control Panel
E Rating Label
F Bottle shelf
G Bottle Divider
H Shelf Guides
I Shelf
L Freezer
M Dissipater
N Drip Troy
O Defrost Water Drain System
P Connection Points
Controls
The controls on the control panel “D” (Fig.1) are described here
below (see Fig.3):
1 - Fan on/off button
2 - Fan status indicator light
3 - Power source selection button
4 - Mains power indicator light
5 - Battery power indicator light
6 - Gas power indicator light
7 - Temperature selection button
8 - Selected temperature indicator
9 - Gas shut-off and adjustment knob + gas safety device
10 - Burner on indicator light
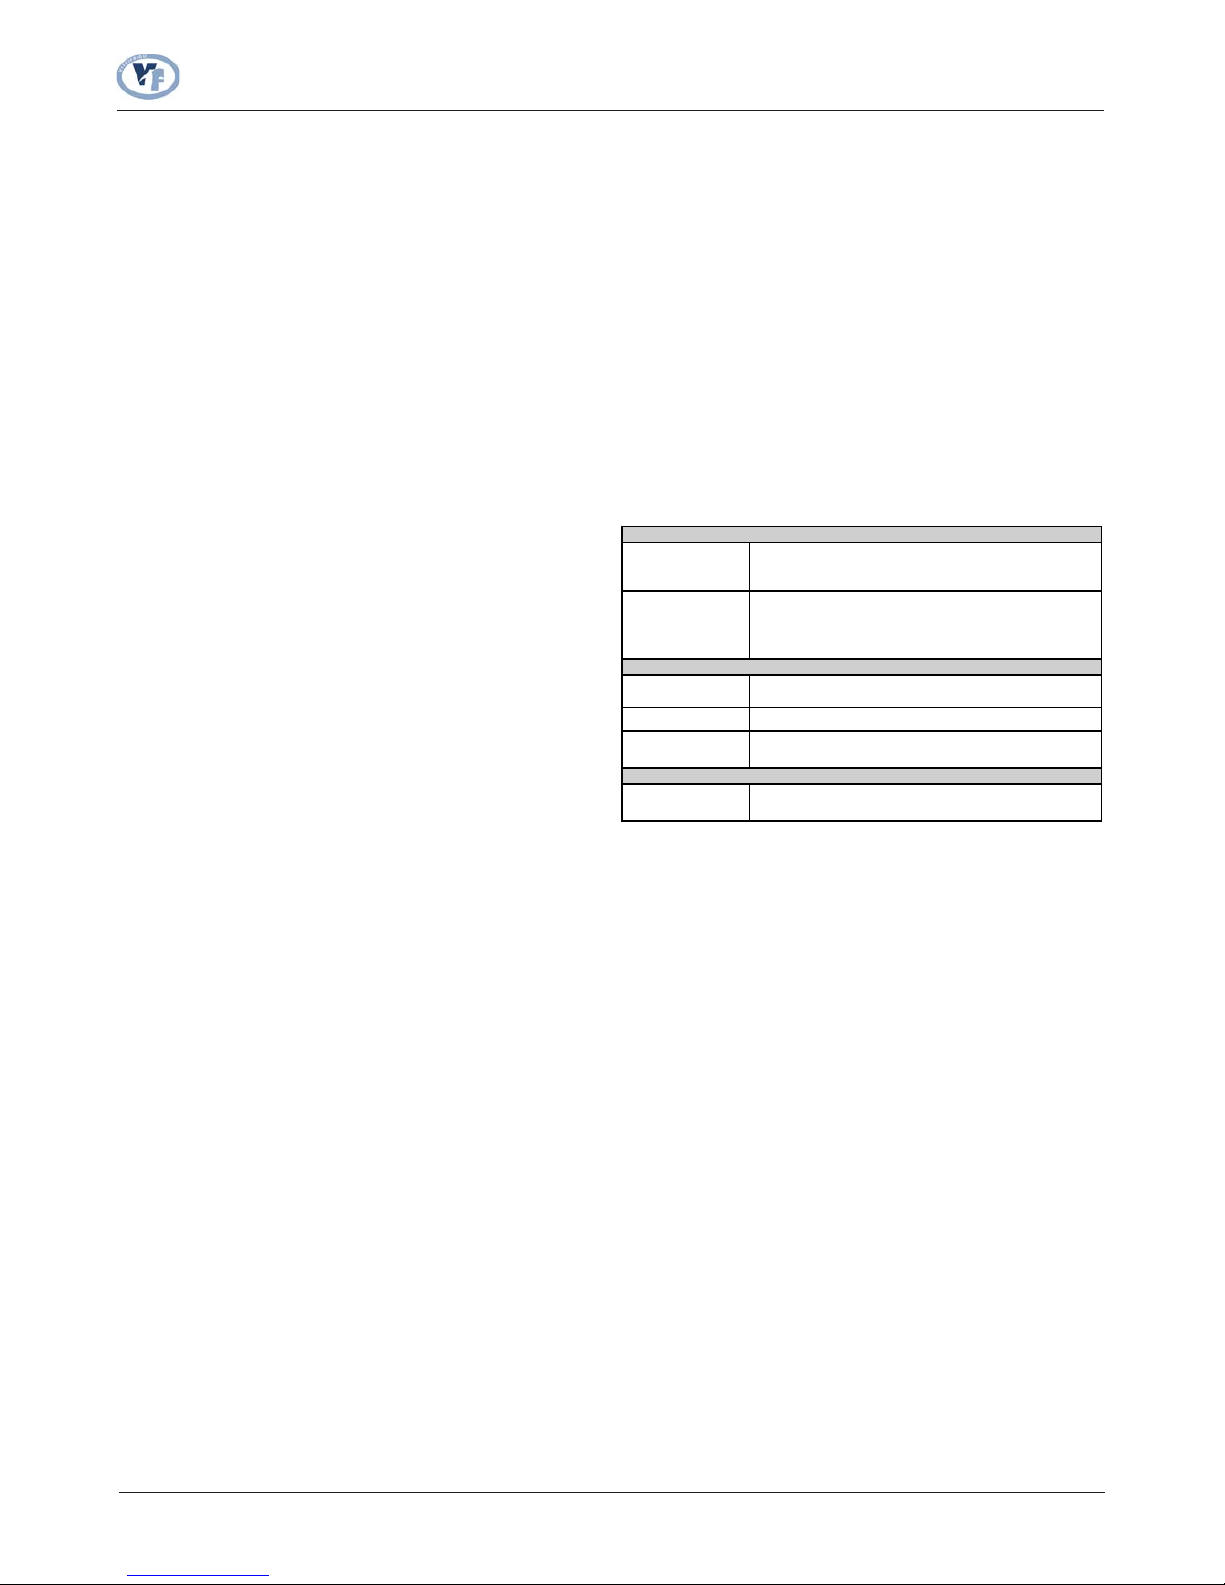
All information necessary for the clear and unequivocal
identification of the manufacturer, serial number, CE marking, and
all technical characteristics can be found on the rating label “E”
(Fig.1) applied to the refrigerator (see Fig.2).
Rating Label
R
R
R
Any use other than those stated above is strictly
prohibited.
The manufacturer refuses to accept any liability deriving
from improper use of the refrigerator.
The manufacturer reserves the right to take legal action
against those who modify the refrigerator without prior
written consent.
The refrigerator is composed as follows (see Fig.1):
4. INSTALLATION
Warning
R
R
R
R
R
R
R
R
R
R
R
R
Ensure that the packaging is undamaged. In the event of
damaged packaging, please inform the carrier.
Remove the packaging and proceed to the installation of
the product. This must be done with the utmost care and
the use of protective gloves to prevent accidental injuries
to hands, is strongly recommended.
After unpacking the appliance, make sure that it is not
damaged in any way. Any damages must be
communicated to the retailer no later than 24 hours from
the date of purchase.
Read this chapter with care before proceeding to install
the refrigerator.
Position the refrigerator on a flat, level surface and make
sure that it is not resting on the power cable (Fig. 4 A).
The refrigerator must be positioned away from heat
sources if not adequately protected (gas rings)(Fig. 4 A).
Leave sufficient space to ventilate the refrigerator (Fig. 4).
Before connecting the refrigerator, ensure that the power
supply voltage and the gas type and working pressure
correspond to the data printed on the appliance rating
plate.
Make sure that the mains power earthing system is in
perfect working order (Fig.8).
Do not discard the appliance packaging. This material
must be sorted and disposed of according to the local
standards in force with regard to waste disposal.
Connect the battery voltage supply cable to the vehicle
system, taking care to respect polarity. Polarity inversion
will cause damage to the electronic control unit.
Do not install the refrigerator where the vehicle door, when
opened, will obstruct the ventilation grid.
12
power supply of the stopping place, and GAS. In any case,
always check that the voltage and type of gas are compatible with
that specified on the rating plate “E” (Fig. 1). The refrigerator has
been designed and manufactured to store food and beverages.
For a more detailed description of component parts, see the
following paragraph.
1Manufacturer
2 Model
3 Serial No.
4 Capacity (litres)
5 Freezer Capacity (litres) Appliance Class
6 Supply Voltage (V) – Electrical Input (W)
7 GAS Type/Pressure (mbar)
8 Rated Thermal Power (W)
GAS Consumption
10 Appliance Class
9

User, Maintenance and Installation Manual - Trivalenti
Operating Instructions
BOXING IN
DOOR REVERSAL
The refrigerator must be inserted into a compartment of
adequate dimensions (see Table 3) – without forgetting that there
must be an all-round gap of no more than 3 mm between the
appliance and the compartment. Ensure that the compartment
is:
perfectly regular and with a flat bottom for problem-free
appliance slotting in or removal;
sufficiently sturdy to sustain the weight of the refrigerator
when full, taking into account the stresses caused by the
vehicle when it is in motion.
Before inserting the refrigerator into the compartment, fix strips to
the sides “A” (as in Fig.4) using an elastic bonding agent.
Insert the appliance into the compartment, ensuring that it is
perfectly aligned and that nothing protrudes. Also make sure that
there is a gap of 10-20 mm between the vehicle wall and the
refrigerator unit in order to permit the correct ventilation of this
latter (see Fig. 4).
Use screws to fix the refrigerator firmly to the sides of the
compartment “A” (as in Fig. 5). The screws should be suited to
withstand strain, not forgetting the stresses caused by the vehicle
in motion and should be inserted in the holes “B” made inside the
unit (as in Fig.5). Use the cap supplied to close the holes “C” (as in
Fig. 5).
To change the direction in which the appliance door opens, from
right to left, it is necessary to adjust the hinges “B” (Fig.1) and the
doorstop “C” (Fig.1) as follows:
Disassemble the doorstop “C” by removing the screw “A” (see
Fig.5),
Loosen the screw pin “D” on the top hinge “B” (see Fig.5),
Move the door upwards until it comes away from the hinge.
Loosen the screw pin “D” on the bottom hinge “B” and screw it
into the bottom hinge on the opposite side,
Reposition the door and screw the screw pin into the top hinge
on the opposite side,
þ
þ
Replace the doorstop “C” and tighten into place with the screw.
To disassemble and/or change the panel “A” (Fig.1), proceed as
follows:
Remove the door, as indicated in the previous section.
Loosen the screws on the lower base section and remove
it.
Slide the panel out downwards.
Insert the new panel in place of the old one, sliding it
upwards until the stop.
Reassemble the lower base section.
Check that the voltage used corresponds to that printed on the
appliance rating label.
The connection between the refrigerator and the battery must be
made directly using a cable with a minimum section of 1.5 mm if
the length of the cable is less than 4 metres; 2.5 mm if the cable
length is between 4 and 9 metres; 4 mm if the cable length is more
than 9 metres.
Insert the power cables into the connector “1” (Fig.10). Use a
cable with a section of at least 1.5 mm Fit a differential
thermomagnetic circuit breaker in compliance with the standard
and regulations in force.
Power supply with double line (direct and switch block) (See
Fig.10-A)
Connect the direct power cable (respecting the polarities) to
the connector “3” and connect the power cable from the
switch block (respecting the polarities and sections as
previously indicated), to the connector “2”
Direct power supply: (see Fig.10-B)
Connect the power cable (respecting the polarities and
sections as indicated previously) to the connector “3”.
Connect the connector “5” to connector “2” creating an
electric jumper, using a conductor that has a section of no less
than 1.5 mm
Connect the fan power cable (respecting polarities) to the
connector “4” (Fig.10) using a cable with an adequate section
for the power of the fan.
This refrigerator is able to operate using gas (propane or butane
LPG). The gas type and operating pressure must be the same as
those indicated in the box “7” (Fig.2) on the rating label “E” (Fig.1)
inside the refrigerator, or on the Conformity Declaration attached
to this manual.
Installation must be carried out in accordance with the various
PANEL CHANGING
ELECTRICAL CONNECTION
Power Supply (MAINS POWER)
Power Supply (BATTERY)
Power Supply for the EXTERNAL FAN (optional)
GAS CONNECTIONS
þ
þ
þ
þ
þ
All cables must be inserted into the connectors “P” (Fig.1) as
shown in Fig.10, making sure that the screws are properly
tightened and ensuring that the connection has been made
perfectly.
WARNING: ALWAYS RESPECT POLARITY (for DC connections).
2
2
2
2.
.
2.
RFollow the instructions below with
great care.
R
R
R
R
It is strictly forbidden to install the refrigerator using
different methods to those described in this manual,
or persons who have not been authorised by
Vitrifrigo snc.
To avoid possible damage, only insert screws in the
relevant holes provided on the refrigerator.
Make sure that electrical cables are adequately
protected - especially the power cables - in order
to avoid them coming into contact with hot or sharp
parts.
Vitrifrigo snc refuses to accept any liability for
installations carried out by personnel who have not
been authorised by the company itself.
!
13

User, Maintenance and Installation Manual - Trivalenti
applicable national regulations and standards in force with regard
to: “Standards for the safe use of combustible gas ”, “Standards
for combustion appliances and ventilation devices on road
vehicles”.
The gas connection to the refrigerator must be made using an
approved flexible pipe for LPG. This hose must be no more than
1.5 m in length and the connections must comply with those of
the destination country. To ensure that the pressure of gas
entering the refrigerator is equal to that shown on the rating label,
it is necessary to connect the other end of the flexible pipe to the
gas cylinder using a pressure reducing valve. The openings
through which the pipe passes must be fitted with abrasion
safeguards and all connections must be made using pipe clamps.
Furthermore, an approved shut-off valve must be fitted (in
accordance with the standards and regulations in force in the
different countries).
Optimum refrigerator operation is guaranteed by adequate
ventilation, which occurs through two openings “B” (Fig.4) to be
made on the upper and lower part of the vehicle. These
openings allow air flow re-circulation: air enters through the
bottom opening and warm air is discharged through the top
opening.
The top opening must be positioned above the condenser and
as high up as possible (as shown in Fig. 4). The bottom grid must
be flush with the base of the refrigerator (Fig. 4). In the event of
wind, the grid “I” must be covered with mosquito netting on the
inside, as well as with the winter shield (not supplied with the
refrigerator) “C”, or the vehicle must be parked with the openings
downwind.
The surfaces that allow air to enter must be at least 250cm and
equipped with the proper grids “I” with sufficient heat resistance
qualities.
During winter periods, it is advisable to fit the protective covers
“C” in order to prevent air that is too cold from entering into the
system. We recommend fitting these covers “C” when the vehicle
is left idle during the winter period.
By insulating the rear part of the refrigerator from the living area,
sealing the strips “A” properly (as shown in Fig. 4), and applying a
sheet of aluminium “D” (as shown in Fig. 4-C) exhaust fumes and
currents of cold air from the outside are prevented from entering
the vehicle and at the same time adequate heat insulation is
guaranteed. In this way it is no longer necessary to use the T-
extension “E” and relevant accessories (as shown in Fig. 4-D) and
it is possible to use the same grid for both the top and bottom
ventilation openings without the housing for the draft tube. If the
rear part of the refrigerator is not insulated or no aluminium sheet
“D” is applied as shown in Fig. 4-C, fit the T-extension “E”, the
extension “F”, cap “G” and cover “H” (as shown in Fig. 4-D) and
use the grid with draft tube housing for the top opening.
UNIT VENTILATION
DISPOSAL OF COMBUSTION FUMES
2
14
The power source is selected by pressing button (3). Selection
occurs in the following sequence:
mains power (4), battery power (5), gas power (6).
(Fig.3)
Press button (3) until the indicator light (4) switches on. To
operate the refrigerator, it is necessary to provide a mains voltage
source. The electronic thermostat is enabled and can be set.
Press button (3) until the indicator light (5) switches on. To
operate the refrigerator, it is necessary to make sure that a battery
is connected to the line input terminals operated by the key. The
electronic thermostat is automatically set to the maximum
temperature and CANNOT be adjusted.
(Fig.3)
Make sure that :
the safety valve on the gas cylinder has been opened and
that the cylinder contains gas;
the central valve on the vehicle (if fitted), is open.
In this position, the electronic card will only supply power to the
spark device that ignites the pilot flame. It is necessary to provide
a source of gas. When the gas operation mode has been
selected, if the indicator light (10) is off, this means that the burner
is operating normally; if the indicator light (10) flashes, this means
that the burner is at the ignition stage.
1 Press button (3) until the indicator light (6) switches on. The
indicator light (10) will start to flash.
2 Press the safety device (9) and turn it to the position marked
by the large flame.
3 Hold down the safety device knob (9).
4 When the indicator light (10) ceases to flash, wait 3-4
seconds and then release the safety device knob (9).
5 If the indicator light (10) continues to flash after 30-40
seconds, release the safety device knob (9) for a few
seconds and then repeat steps 3 and 4.
Mains Power
WARNING: Make sure that the gas safety device (9) is in
the OFF position.
Battery Power
WARNING: Make sure that the gas safety device (9) is in
the OFF position.
Gas power
Gas operation is not possible if there is no direct battery
power supply (service).
R
R
Switching On
5. USE
!
In order to operate, the refrigerator must
be connected to the 12 V DC current
directlyfromabattery (service).

User, Maintenance and Installation Manual - Trivalenti
Refrigerator Operation
R
R
Adhere strictly to the indications given
here below.
For the best performance of the
refrigerator, ensure that it has been
properly levelled.
The refrigerator is equipped with an electric thermostat and
multiposition gas-operated valve for temperature adjustment.
GAS OPERATION
The temperature is set using the safety device (9). To obtain a
cooler temperature, the knob must be set to the large flame, while
for a warmer temperature, it must be set to the small flame.
MAINS POWER OPERATION
The temperature is set using the thermostat (8) in the right-hand
section of the control panel.
The thermostat can be set to any of 7 pre-set temperatures, which
are shown by 4 LEDs.
The first LED on the left represents the highest (warmest)
temperature.
The button (7) is used to vary temperature settings; each time that
it is pressed, the lit LEDs will change and the temperature inside
the refrigerator will change as a result.
Once the lowest (coolest) temperature has been reached (last
LED on the right switched on), when the button (7) is pressed
again, the thermostat will return to the highest (warm)
temperature (last LED on the right lit).
BATTERY OPERATION
When using the refrigerator with battery power, it is not possible
to set the temperature. In this case the thermostat is set to the
lowest (coolest) temperature.
SWITCHING ON THE FAN
The fan is switched on by pressing button (1). When the fan is
working, the indicator light (2) is switched on.
The fan can be operated using any power source, although
operation is only possible if there is a direct power supply from
the service battery (V DC).
(Fig.3)
FOOD CONSERVATION
Most foods carry storage instructions. Always respect these
indications. It is good practice to store foods in closed
containers. Do not place warm food inside the refrigerator; wait
until it has cooled. The low-temperature compartment can be
R
R
During journeys, when the vehicle is moving, GAS
power supply to the refrigerator is prohibited since
there is a risk that the flame may be extinguished.
During storms or in the presence of strong winds, it is
better not to use the GAS power supply to the
refrigerator, since there is a risk that the flame may be
extinguished.
!
15
used to make ice or to store frozen foods, according to the times
and methods indicated on the product. The compartment is not
suitable for freezing foods. By placing drinks in the low-
temperature compartment, the freezing process could cause the
containers to break.
Ice should be made at night when the refrigerating unit is
subjected to a lower workload. Fill the container “A” (Fig. 6) to the
brim with water (if the ice is for human consumption, ONLY use
drinking water) and place in the freezer. If a little water is poured
onto the shelf of the freezer, this will create better contact with the
ice tray and thus speed up ice production.
The refrigerator should be defrosted each time that there is more
than 3 mm of ice. This operation is necessary to guarantee the
correct functioning of the refrigerator and to avoid higher levels of
energy consumption. For full defrosting, press the power
switch(Fig.3), switch off the refrigerator and shut off the gas cock
(Fig.3). Keep the refrigerator door open to speed up the
defrosting time. Do not use sharp, pointed tools or knives to
remove the ice, as these could damage the appliance. When the
refrigerator has been defrosted, switch it on again.
During winter it is advisable to apply protective panels to the
ventilation grids in order to limit the flow of cold air to the
refrigerator. It is possible to order a special protective panel for
the winter for ventilation grids supplied by Vitrifrigo. When the
outside temperature drops to below 0°C, winter protective
panels should be used. When the vehicle is out of use for any
period of time, it is advisable to fit protective panels to the
ventilation grids.
Check regularly that the ventilation grids and the draft tube are not
blocked in any way.
When the vehicle is parked and the engine is switched
off, switch off the battery power supply to the
refrigerator since the charge will finish in a very short
period.
To improve the performance of the refrigerator,
defrost it on a regular basis and never obstruct the
ventilation openings.
All strong-smelling products should be firmly closed
before they are placed inside the refrigerator.
Always use the stop to fix the door firmly into place
before moving the vehicle.
Prepare several containers of ice in advance and keep
in the freezer rather than making ice as required.
ICE-MAKING
DEFROSTING THE APPLIANCE
WINTER OPERATION
USEFUL RECOMMENDATIONS
“9”
R
R
R
R
R
User, Maintenance and Installation Manual - Trivalenti
16
6. TECHNICAL CHARACTERISTICS AND
The rating label shows the main technical data, while the dimensions
of the refrigerator and boxing are shown in Table 3.
OVERALL DIMENSIONS
7. CLEANING AND MAINTENANCE
Safety Standards
Maintenance – Cleaning Schedule
R
R
R
R
R
All cleaning and maintenance must be carried out when
the refrigerator has been disconnected from all power
supplies.
All cleaning and maintenance must always be carried out
by previously trained personnel who have read and
understood all of the prescriptions for safety contained in
this manual and who aware of possible residual risks.
Always adhere to the time periods specified by the
manufacturer.
During all cleaning and maintenance operations, always
use individual protection devices (with CE marking) to
protect against possible injuries to hands
Do not use abrasive products, detergents or soap to
clean the appliance.
R
R
R
Any operations not included in Table 1 are to be
considered as repairs and for this reason, they must only
be carried out by qualified technical personnel.
It is obligatory to contact your retailer or the
manufacturer.
The maintenance operations listed here are to be
carried out periodically. The intervention times listed in
this manual are purely indicative and refer to normal
conditions of use. Take these times into account and if
necessary, carry out the recommended checks on a
more frequent basis.
EXTERNAL Cleaning
Wash the outside of the refrigerator with lukewarm water, wipe over
with cold water and dry with a soft cloth. Do not use abrasive
products.
INTERNAL Cleaning
Remove the grids, containers, and ice trays. Clean the refrigerator with
a little bicarbonate of soda or vinegar diluted in lukewarm water.
Rinse and dry carefully with a soft cloth. Never use abrasive products,
detergents or soap.
CONDENSER Cleaning Clean the condenser with a vacuum cleaner or a dry soft brush (Fig.9).
GAS PIPE Check Check the entire GAS supply pipe for cracks and/or leaks.
FIXING Check Check the integrity of the seal between the refrigerator and the
compartment.
GAS PIPE Replacement Replace the GAS supply pipe before the expiry date printed on the
pipe.
Yearly Maintenance Operations
Maintenance Operations to carry out as required
Montly Maintenance Operations
Standby
At the end of the season and in the event that the refrigerator is to
remain idle for a long period, it is necessary to carry out the
following operations:
Position the switches “1””2” and “6” to the “O” position
and set the GAS knob “9” to the OFF position (Fig.3).
Close the central valve on the vehicle.
Empty the refrigerator completely.
Defrost the refrigerator and carry out general cleaning
operations.
Leave the freezer and refrigerator doors slightly open.
R
R
R
R
R
Tab. 1

User, Maintenance and Installation Manual - Trivalenti
17
Problem Cause Remedy
1) The refrigerator will not operate by
GAS
1.1.1 Make sure that the GAS cylinder is not
empty
1.1.2 Make sure that all valves are open
1.2.1 Bleed the system
1.3.1 See section 3
1.1 No GAS
1.2 Air in the system
1.3 There is no electrical power from
the battery (service)
2.1.1 Check that the electrical system
automatic switch has not been
switched off
2.1.2 Check that the refrigerator is correctly
connected to the power supply
2.1.3 Check that the power cable has not
been interrupted or broken
2.2.1 Cheek that the safety device is
operating and enabled
2.1 There is no electrical power supply
2.2 There has been a current overload
2) The refrigerator will not operate by
mains voltage
3.1.1 Check that the refrigerator has been
correctly connected to the battery
3.1.2 Check that the power cable has not
been interrupted or broken
3.1.3 Check that the battery is working
correctly
3.1.4 Check that there is no oxide on the
battery poles
3.2.1 Check that the line fuse is working
correctly
3.1 There is no electrical power supply
3.2 There has been a current overload
3) The refrigerator will not operate by
battery
4.1.1 Check that the ventilation grids are not
obstructed by any objects that may
block the passage of air
4.2.1 Defrost the refrigerator
4.3.1 Check the position of the temperature
controls
4.4.1 Check the correct setting of the
pressure limitation valve
4.4.2 The GAS cylinder is about to run out
4.5.1 Check that the refrigerator is not close
to heat sources
4.6.1 Remove excess products from the
refrigerator and avoid storing too
many goods inside it
4.6.2 Remove hot foods from the
refrigerator
4.7.1 Make sure that the door closure is
airtight
4.8.1 Use a single power supply source at
any one time and switch off the others
4.1 Insufficient ventilation
4.2 The evaporator is covered in
FROST
4.3 Incorrect thermostat setting
4.4 Incorrect GAS pressure
4.5 High ambient temperature
4.6 The refrigerator is too full
4.7 Air infiltration inside the r
efrigerator
4.8 More than one power supply
function has been enabled at the
same time
4) The refrigerator is not sufficiently cold
This manual suits for next models
8
Table of contents


