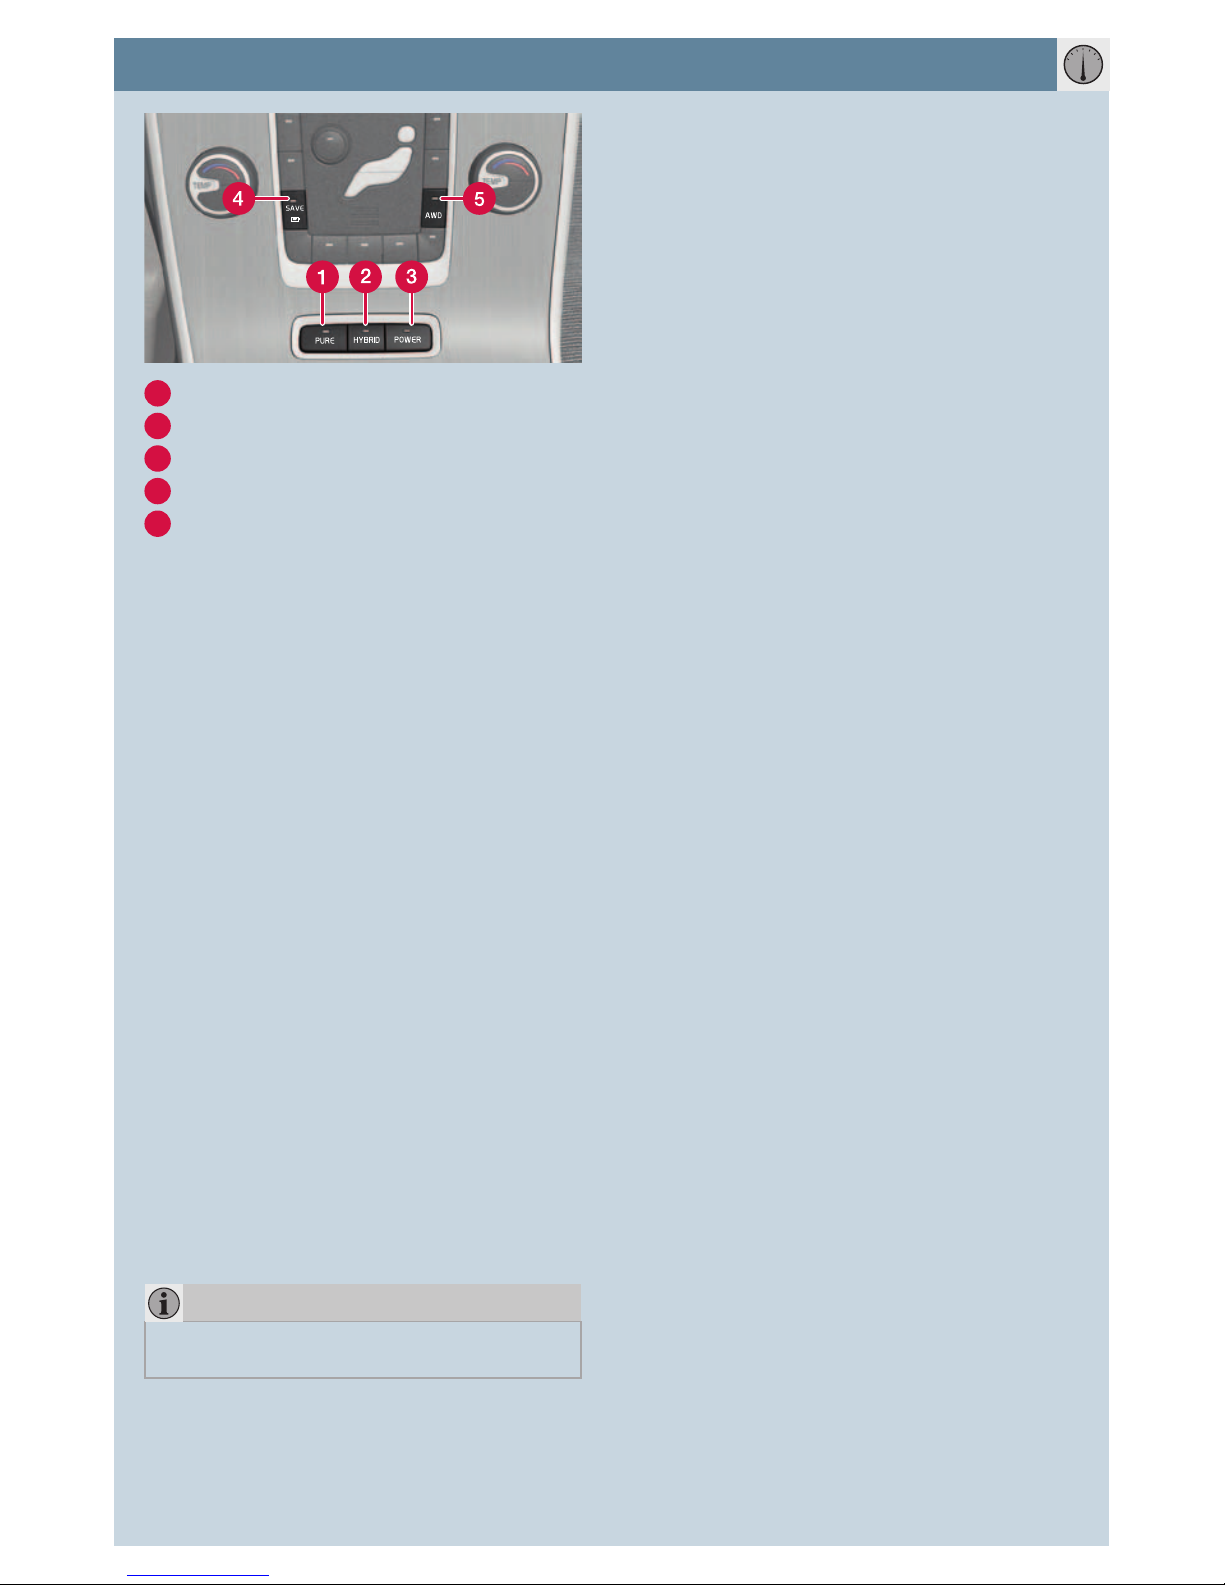
Volvo V60 2012 User manual

V60 Plug-in
hybrid
WELCOME TO YOUR NEW VOLVO!
Getting to know your new car is an exciting experience.
Take a look at this Quick Guide to learn some of the most common
functions quickly and easily.
All warning texts, and other important and detailed information, are
only available in the owner's manual – this folder only contains a small
selection.
In addition, the owner's manual contains the latest and most current
information.
Options are marked with an asterisk (*).
There is further information concerning your car at www.volvocars.com
Quick GUIDE Web edition

PCC*
1Green light: The car is locked.
2Yellow light: The car is unlocked.
3Red light: The alarm has been triggered.
4Flashing alternating red light: The alarm
triggered less than 5 minutes ago. (When
preconditioning is activated the upper lamp
illuminates.)
Locks doors and tailgate and arms the
alarmA. (Long press closes all windows.)
Unlocks doorsBand tailgate and disarms
the alarm. (Long press opens all win-
dows.)
Unlocks the tailgate – this does not
open.C.
Approach light duration. Lights certain
lamps. A long press starts precondition-
ing.
Panic function. Held down for approx.
3 seconds in an emergency in order to
trigger the alarm. Switch off with the
unlock button.
Information can be obtained within a
100 metre range.
– Press the button and wait 7 seconds.
A Personal seat and mirror settings are stored during
locking.
B Automatic relocking takes place if a door/tail-
gate has not been opened within 2 minutes after
unlocking.
C Power tailgate* opens.
REMOTE CONTROL KEY WITH PCC* –
PERSONAL CAR COMMUNICATOR
Ensure that the charging cable has been
removed before starting the car.
Insert the remote control key in the igni-
tion switch and push in the key to its end
position.
Fully depress the brake pedal1.
Briefly press the button to start the
engine. The car is running when the com-
bined instrument panel is illuminated.
NOTE
A started engine is indicated by the figures
in the speedometer or tachometer and side
gauge lighting up.
1A supplementary function check of the brake sys-
tem is performed when the engine is started when
the driver depresses the brake pedal to disengage
the gear selector from the Pposition. During the
function check the pedal travel is longer than dur-
ing normal braking. A brief lowering of the pedal
may be experienced while the check is in progress.
NOTE
When the engine is started under normal con-
ditions the car's electric drive motor is priori-
tised - the diesel engine remains switched off.
However, there are situations where the diesel
engine starts instead, e.g. when the tempera-
ture is too low or if the hybrid battery needs to
be charged.
STARTTHE ENGINE

COMBINED INSTRUMENT PANEL
OK, pressing opens the trip computer's
menus, activates the selected option and
acknowledges messages.
Thumbwheel, turn to see the trip computer's
options.
RESET, undoes or goes back one step.
Long press resets average consumption and
selected speed.
Different themes can be selected in the com-
bined instrument panel: Hybrid (figure above),
Elegance, Eco or Performance.
To change theme – press the left-hand
stalk switch OK button and then select the
Themes menu option by turning the thumb-
wheel. Confirm by pressing the OK button.
1Illuminated for low fuel level. When the lamp
is illuminated, fill with fuel as soon as pos-
sible.
2Fuel gauge.
3Hybrid battery gaugeA. When the electric
motor generates power for the battery, bub-
bles are shown in the gauge.
4Current charge levelA.
5Information on menus, driver support sys-
tems* and warnings.
6SpeedometerA.
7Active drive mode, see description of "Drive
modes".
8The symbol is lit when the diesel engine is
running.
Hybrid guide. Shows the current propulsion
power requested by the driver (large pointer)
and available electric motor output (small
pointer), i.e. the limit for when the diesel
engine starts/stops.
Gear position.
Clock. Adjusted in the menu system
MY CAR.
A Shown with Hybrid theme.

PRECONDITIONING
Engine and passenger compartment heater
There are two types of parking heater in the
car:
• fuel-driven
• electrically-driven.
Preconditioning prepares the car's engine and
passenger compartment before departure so
that both wear and energy needs during the
journey are reduced. By warming up your car
you will also extend the driving distance.
Activate preconditioning
The function can both heat and cool. It is
activated via direct start in the combined
instrument panel (trip computer), the remote
control key or Volvo On Call's mobile app.
What is activated is selected via the combined
instrument panel.
Activate via the combined instrument panel
1. Press OK on the left-hand stalk switch.
2. Turn the thumbwheel to Preconditioning
3. Confirm with OK.
4. Select between Direct start, Timer,
Park. outside or Parking inside. (Can
only be activated if the car is charged
with the charging cable.)
NOTE
For "Park. outside" the fuel-driven auxiliary
heater emits exhaust gases, but not for "Park-
ing inside".
Activating via the remote control key
Activation via the remote control key can
take place via the normal remote control
key as well as the PCC (only the PCC gives
feedback via the lamps.)
-Press the Approach lighting button for
approximately 2 seconds.
If a charging cable is used when Direct
start is selected then the passenger
compartment is preconditioned for approx.
50minutes.
Five short flashes, followed by a sixth longer
flash, confirm that preconditioning is started
in the car.
There is further information about your car at
www.volvocars.com
There are also apps for several Smartphones
on Apple App Store and Google Play
INFORMATION ON THE INTERNET

CHARGING A HYBRID BATTERY
1Lit symbol: Selected 230V charging
current.
2Switch ON/OFF.
3Lit symbol: Cable connected to 230V.
4Increases the charging current.
5Decreases the charging current.
6Lit symbol: Cable connected to the car.
WARNING
Never use an extension cable.
WARNING
Only charge the car from familiar sockets.
The ground fault breaker in the charging
cable's control unit protects the car, but there
is a risk of overloading the 230 V mains power
circuit.
Charging
IMPORTANT
Establish how much current/amperes can be
taken from the 230V socket. Check that the
socket has adequate power supply for charg-
ing electric vehicles.
1. Connect the charging cable to the 230 V
electrical socket.
2. Set the switch (2) to On.
3. Enter the charging current on the control
unit with (4) and (5).
4. Connect the charging cable to the car.
Disconnecting the charging cable
1. Unlock the car.
2. Set the switch (2) to Off.
3. Detach the charging cable from the car.
4. Detach the charging cable from the
230 V electrical socket.
LED lamps in the car's charging input
socket
The charging cable is connected between a
230 V socket and the car. The charging current
is adapted via the charging cable's control unit
to an intensity (between 6–16 A, depending on
market) that is such that the 230 V socket is not
overloaded.
The higher the current the shorter the charging
time
In order to see when the charging is completed
in the combined instrument panel, open the
driver's door, and the instrument is illuminated.
Charging can also be controlled and monitored
via the Volvo On Call mobile app.
White constant LED light
Yellow constant Waiting mode
Green flashing Charging in progressA
Green constant Charging completeB
Blue Timer switched on
Red Error
A Short flash sequence indicates low charge in the battery,
long flash sequence indicates well-charged battery.
B The light is extinguished after a time.

ADJUSTING THE STEERING WHEEL
ADJUSTING THE FRONT SEAT
1Lumbar support.
2Backrest rake.
3Memory buttons for power seat*A.
4Store setting for power seat*A.
5Raise/lower the front of the seat cushion.
6Forwards/backwards.
7Raise/lower seat.
8Lowering the passenger seat backrest.
A The memory function is acknowledged by a signal and mes-
sage in the combined instrument panel.
REMOTE CONTROL KEY AND POWER
DRIVER'S SEAT*
All remote control keys can be used by differ-
ent drivers to store the settings for the driver's
seat.
The function must be activated in the MY CAR
menu system under Settings -> Car settings
-> Car key memory.
Proceed as follows:
1. Adjust the seat as you want it.
2. Lock the car by pressing the lock button
on the remote control key that you nor-
mally use. This stores the seat's position in
the remote control key's memory A.
Unlock the car (by pressing the unlock button
on the same remote control key) and open the
driver's door. The driver's seat will automati-
cally adopt the position stored in the remote
control key's memory (if the seat has been
moved since you locked the car).
AThis setting does not affect settings that have been stored
(see position 4) in the power seat's* memory function*. See
the owner's manual for more information.
WARNING
Adjust the steering wheel before start-
ing to drive – never do this while driving.
Release the catch.
Adjust.
3. Lock the steering wheel.

DRIVE MODES
1PURE
2HYBRID
3POWER
4SAVE
5AWD
There is the option to select different drive
modes during driving. The car calculates an
optimum combination of driveability, driving
experience, environmental load and fuel econ-
omy according to driving options selected.
The drive modes are controlled by a range
of parameters. In certain circumstances the
desired drive mode is not available. See mes-
sage in the car's combined instrument panel.
Selecting drive mode
Go via My Car to read further information
about the different drive modes.
1. MY CAR -> Hybrid -> Drive modes.
2. Then select PURE, HYBRID, POWER,
AWD or SAVE and confirm with OK.
PURE
Focuses on electric operation and low energy
consumption. PURE mode helps the driver to
maximise driving on the hybrid battery. The
electricity mileage depends on the car's total
energy consumption. Deductions are made
for climate and dynamic performance.
The mode can only be selected when the
hybrid battery is sufficiently charged. The air
conditioning is switched off in this mode but
can be started with the AC button.
NOTE
PURE can only be selected when the hybrid
battery has a sufficiently high energy level.
HYBRID
HYBRID mode is the car's preset drive
mode. The control system uses both motors
– individually or in parallel – and calculates
optimum use with regard to performance, fuel
consumption and comfort.
POWER
The car is set in optimum response and per-
formance mode by means of the diesel engine
being activated. The car then has sportier
characteristics as well as faster response for
acceleration. Driving in a lower gear is also
prioritised for active driving, which involves
delayed upshifting.
SAVE
Saves the hybrid battery's charging to a later
time when electrical operation is more advan-
tageous, during urban driving for example.
Select the SAVE mode primarily when the
hybrid battery's charge level is high. If the
energy level is low then the diesel engine
will first charge the hybrid battery to cover
approx. 20 km driving.
AWD
This mode activates all-wheel drive, which
improves the car's road grip and traction. The
capability is limited by the available charge in
the battery. The mode is primarily intended for
low speed on slippery road surfaces.
Geartronic – diesel engine always running
When the lever is set in Geartronic manual
gear position the diesel engine will always be
running. For further information on Geartronic
please refer to the normal owner's manual for
the car.

HEADLAMP CONTROL
A
Main beam flash
B
Main/dipped beam switching and Home
safe light duration
Display and instrument lighting
Rear fog lamp, the light only illuminates
on the driver's side
AutomaticA/deactivated dipped beam.
Main beam flash working but not fixed
main beam
Parking lamps
Dipped beam. Switches off when the
engine is switched off. Main beam can be
activated
Opens petrol tank cap
Manual headlamp levelling (automatic for
Xenon lights*)
Unlocking of tailgate
Warning lamp, switching to dipped
beam, tunnel detection*, full beam
with automatic activation*
A Certain markets.
KEY POSITIONS
In order to reach the following key positions
without the engine starting: Do not depress
the brake pedal.
0Unlock the car.
IWith the remote control key fully inserted
into the ignition switch: Briefly press START/
STOP ENGINE.
II With the remote control key fully inserted
into the ignition switch: Press START/STOP
ENGINE for approx. 2 seconds.
Key position II consumes a lot of current from
the battery and should therefore be avoided!
See also the table in the section "Key posi-
tions" in the normal owner's manual for the
car for information on the functions/systems
that can be used with the engine switched off
in different key positions.
To return to key position 0from position II and I:
Briefly press START/STOP ENGINE.
Briefly press the button
– the engine stops.
Pull the remote control
key out from the igni-
tion switch.
The engine is switched
off when the figures in the
speedometer or tachom-
eter and side gauge
extinguish.
SWITCH OFFTHE ENGINE AND
REMOVETHE KEY

BLIS can help the driver to detect vehicles in
the blind spot.
BLIS warns about detected vehicles with a lit
lamp by each respective door mirror's door
pillar.
See the "BLIS" section in the owner's manual
for more information.
BLIS – BLIND SPOT INFORMATION SYSTEM*
WINDSCREEN WIPERS AND RAIN
SENSOR*
1Rain sensor On/Off, with the lever in posi-
tion 0.
2Regulates the sensor sensitivity or the inter-
mittent delay.
3Wiper, rear window - intermittent/normal.
ASingle sweep
0
Off
BIntermittent wiper, see also (2)
CNormal sweep speed
DHigh sweep speed
EWasher, windscreen and headlamps
FWasher, rear window
Shown in the display when the rain sen-
sor is active
KEYLESS* KEY SYSTEM
The key can remain in a pocket, for example,
the whole time.
LOCK & ARM THE CAR ALARM
– Touch the rear section of one of the outer
door handles (see illustration) or press
lightly on the smaller of the tailgate's two
rubberised buttons (see illustration above).
UNLOCK & DISARM THE ALARM
– Grip a door handle and open the door in
the usual way (a glove may prevent the
function) or press lightly on the larger of
the tailgate's two rubberised buttons.
START THE ENGINE
– Depress the brake pedal and briefly press
START/STOP ENGINE.
SWITCH OFF THE ENGINE
– Briefly press START/STOP ENGINE.

The 12 V sockets in the passenger compartment
work in key position
I
or
II
. The 12 V socket* in
the cargo area is always active.
The car's audio system can playback music
from an MP3 player etc. using the USB*/AUX
socket.
IMPORTANT
Using the 12 V socket in the cargo area when
the engine is switched off could discharge the
battery.
STORAGE SPACES, 12 V-SOCKETS & USB*/AUX
CAR CARE
Handwashing is gentler on the paintwork than
an automatic car wash. The paintwork is also
more sensitive when it is new. For this reason,
handwashing is recommended during the first
few months with a new car.
Use clean water and a washing sponge.
Remember that dirt ad grit can scratch the
paintwork.

EBA – EMERGENCY BRAKE ASSIST
Emergency Brake Assistance helps to
increase brake force and so reduce braking
distance. EBA is activated when the driver
brakes suddenly. When EBA is activated
the brake pedal depresses a little more than
usual.
– Press (hold) down the brake pedal for as
long as necessary – all braking ceases if the
pedal is released.
DRIVER SUPPORT SYSTEM*
City Safety™ and Collision Warning with
Auto-Brake & Pedestrian detection*
These functions help the driver to avoid a col-
lision in situations when changes in the traffic
ahead, combined with a lapse in attention,
could lead to an incident.
The function is active at speeds below
50 km/h and helps the driver by monitoring
the traffic ahead with a laser sensor fitted in
the upper part of the windscreen.
City Safety™ can help avoid a collision if the
speed difference between your car and the
vehicle in front is less than 15 km/h.
Other driver support systems
In order to help the driver to e.g. brake in time,
maintain a safe distance to other vehicles
and to notice vehicles moving in the same
direction as the car, in the so-called blind
spot, or to maintain a suitable position on the
carriageway, the car can be equipped with a
number of systems:
• Adaptive cruise control with Queue Assistant*
• Distance Alert*
• BLIS – (Blind Spot Information System)*
• Driver Alert Control*
• Lane Departure Warning*.
WARNING
The driver is always responsible that the
vehicle is driven in a correct manner and with a
safety distance adapted to the speed.
City Safety™ is a driver tool and can never
replace the driver's attention to the traffic or
the responsibility to drive the vehicle in a safe
manner.
Pedestrian detection (detector for pedestrians
in front of the car) gives no warning or brake
intervention at vehicle speeds above 80 km/h
and the function does not work in the dark and
in tunnels.
The function cannot detect a pedestrian who:
• is partially obscured
• is shorter than 80 cm tall
• is wearing clothing that conceals the con-
tours of the body.
See the owner's manual, section "Driver
support", for more information about the
functions and their limitations.

ELECTRONIC CLIMATE CONTROL – ECC
AUTOMATIC CONTROL
In AUTO mode the ECC system controls all
functions automatically, making driving simpler
with optimum air quality.
1Turn for individual temperature in the left/
right-hand section of the passenger compart-
ment. The display shows the temperature
selected.
8Press for automatic control of selected tem-
perature and other functions.
MANUAL CONTROL
2Heating, left/right-hand seat.
3Max. defroster. Directs all air towards the
windscreen and the side windows, with maxi-
mum air flow – On/Off.
4Turn to change the fan speed.
5Air distribution.
6Electrically heated rear window and door
mirrors – On/Off.
7Recirculation.
9AC – Air conditioning On/Off. Cools the
passenger compartment and demists the
windows.
TP15443 (English) AT 1246. Printed in Sweden, Göteborg 2012, Copyright © 2000-2012 Volvo Car Corporation
Table of contents
Other Volvo Automobile manuals

Volvo
Volvo 262 User manual

Volvo
Volvo V70R User manual

Volvo
Volvo V90 2020 User manual

Volvo
Volvo 2003 S80 User manual

Volvo
Volvo V70 SPORT User manual

Volvo
Volvo XC90 2020 User manual

Volvo
Volvo 2003 C70 User manual

Volvo
Volvo XC60 - ANNEXE 541 User manual

Volvo
Volvo S60 - ANNEXE 931 Quick start guide

Volvo
Volvo XC 60 User manual

Volvo
Volvo V70 SPORT User manual

Volvo
Volvo 2004 XC90 User manual

Volvo
Volvo XC40 RECHARGE User manual

Volvo
Volvo S90 2019 User manual

Volvo
Volvo XC90 - ANNEXE 951 User manual

Volvo
Volvo 164 1969 User manual

Volvo
Volvo V50 User manual

Volvo
Volvo 2003 S60 User manual

Volvo
Volvo V70 SPORT User manual

Volvo
Volvo 2012 S80 User manual